Starway ParKolor 200DW User manual
User Manual
www.star-way.com version 13022023 V1.02

Page 18 Page 19
Table of content
Technical Specications .......................................................................... 19
Dimensions ........................................................................................... 19
Regulation and Safety .............................................................................. 22
Photometry............................................................................................ 23
Installation ............................................................................................. 25
DMX 512 use........................................................................................ 25
Menu Structure...................................................................................... 26
Display .................................................................................................. 27
Menu.................................................................................................... 27
DMX map.............................................................................................. 30
Page 18 Page 19
TECHNICAL SPECIFICATIONS :
• Led COB 200W CW + 200W WW
• Zoom 10 ° - 47 ° beam
• Max ux : 18000 Lm
• Protocols: DMX / RDM
• DMX modes: 1/2/3-CCT/4/4-CCT/5/6/6-CCT/9ch
• Auto / Static / Master-Slave
• DMX Connectors In / Out : 2 x XLR5 IP65
• Power Connectors In / Out : Seetronic IP65
• Removable connector protection cap
• Cooling :
- 1 natural convection mode
- 3 forced ventilation modes
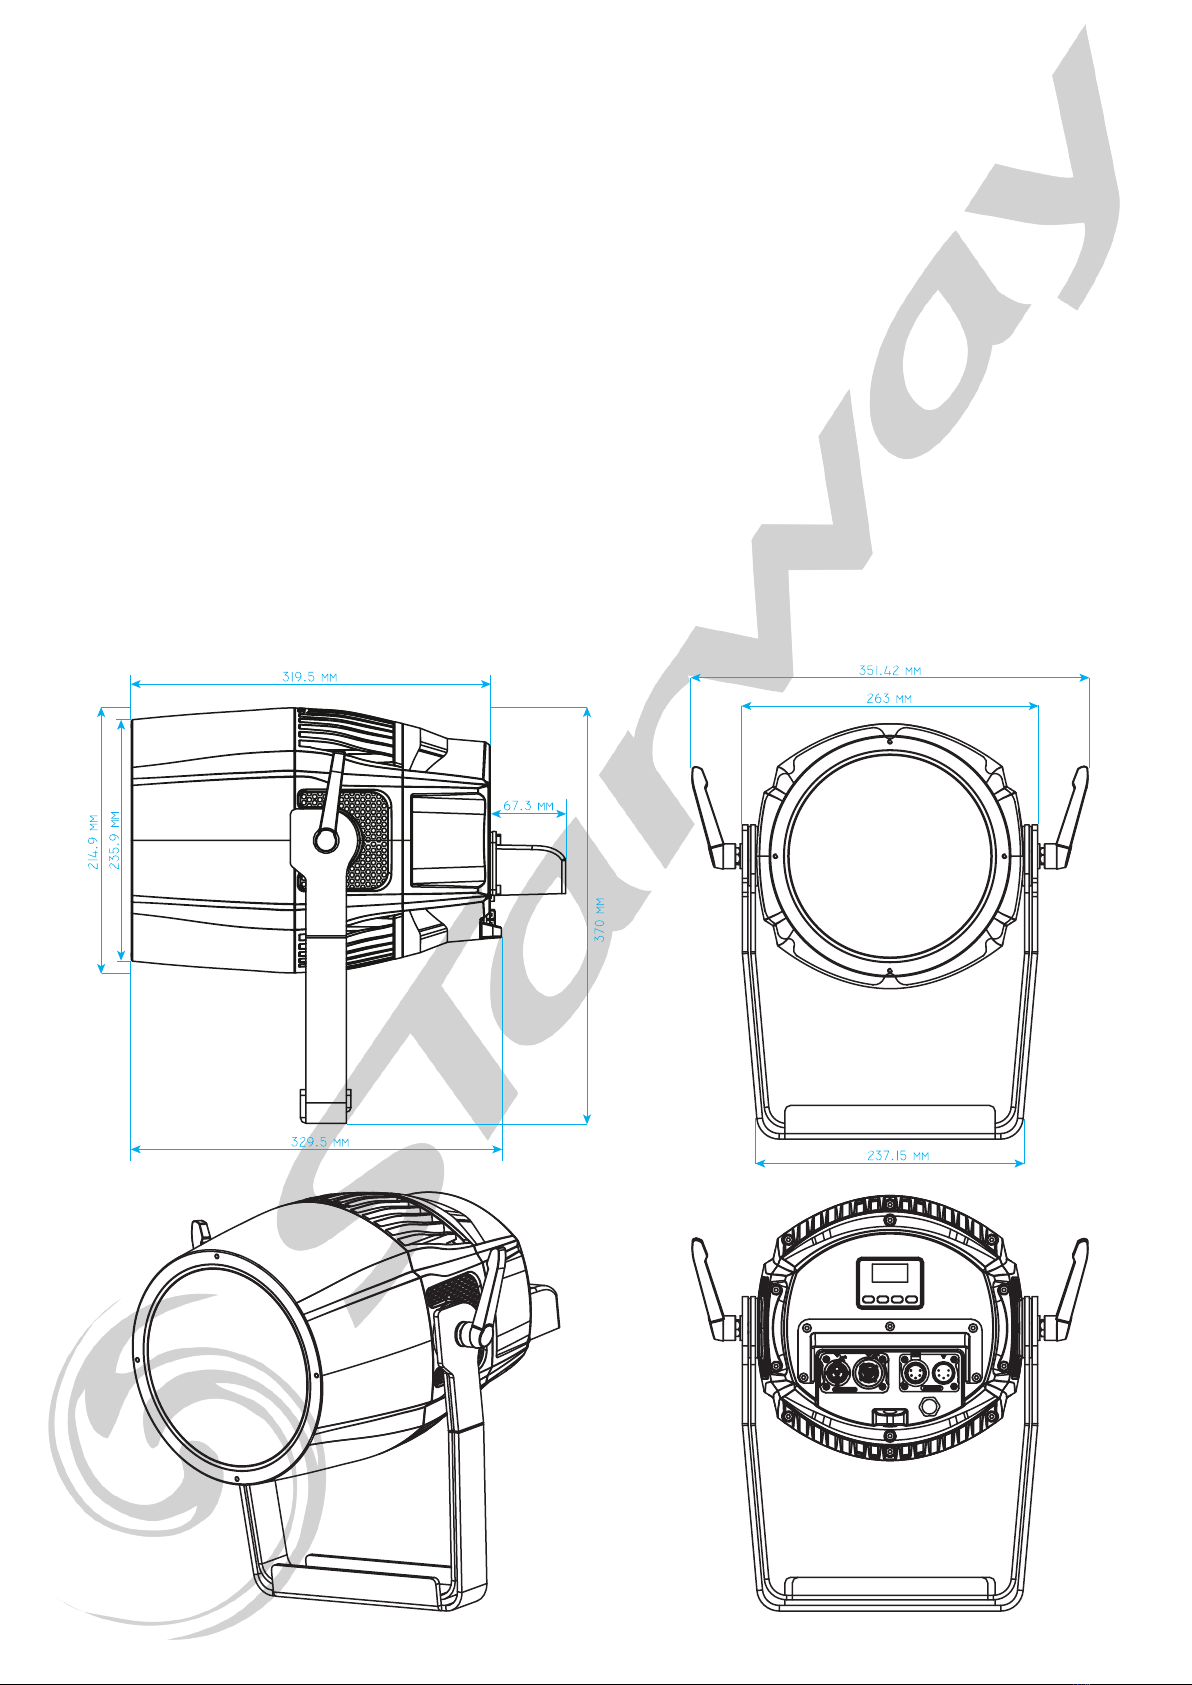
• Dimensions L x P x H: 329.5 x 215 x 370mm
• Weight: 10.3Kg
• Max power: 400W
DIMENSIONS :

Page 20 Page 21
WARNING!
Before carrying out any operations with the unit,
carefully read this instruction manual and keep it with cure
for future reference. It contains important about the installation,
usage and maintenance of the unit.
SAFETY
General InstructIon
• The products referred to in this manual conform to the European Community
Directives and are there-fore marked with CE:.
• The unit is supplied with hazardous network voltage (110/230V~). Leave ser-
vicing to skilled personnel only. Never make any modications on the unit not
described in this instruction manual, otherwise you will risk an electric shock.
• Connection must be made to a power supply system tted with efcient earth-
ing (Class I appliance ac-cording to standard EN 60598-1 ). It is, moreover,
recommended to protect the supply lines of the units from indirect contact
and/or shorting to earth by using appropriately sized residual current devices.
• The connection to the main network of electric distribution must be carried out
by a qualied electrical installer. Check that the main frequency and voltage
correspond to those for which the unit is designed as given on the electrical
data label.
• Never use the xture under the following conditions:
- in places subject to vibrations or bumps;
- in places with an ambient temperature of over 45° C.
• Make certain that no inammable liquids, water or metal objects enter the
xture.
• Do not dismantle or modify the xture.
• All work must always be carried out by qualied technical personnel. Contact
the nearest sales point for an inspection or contact the manufacturer directly.
• If the unit is to be put out of operation denitively, take it to a local recycling
plant for a disposal which is not harmful to the environment.
WarnInGs and InstallatIon precautIons
• Never let the power cord come into contact with other cables! Handle the power
cord and all connections with the mains with particular caution!
• Never modify, bend, mechanically strain, put pressure on, pull or heat up the pow-
er cord.
• Never strain the cable. There must always be sufcient cable going to the device.
Otherwise, the cable will be damaged, which can cause serious damage.
• Never remove warning or informative labels from the unit.
• Never use anything to cover the ground contact.
• Never lift the device holding it by the projector-head, as the mechanics may be
damaged
• Do not shake the device. Avoid brute force when installing or operating the device.
• Only operate the device after having checked if the housing is rmly closed and all
screws are tightly fastened.
• Only operate the device after having familiarized with its functions.
• Avoid ames and do not put close to ammable liquids or gases.
• Always allow a free air space of at least 0.8 m around the unit for ventilation.
• Always disconnect power from the mains, when device is not used or before clean-
ing! Only handle the power cord holding it by the plug. Never pull out the plug by
tugging the power cord.
Page 20 Page 21
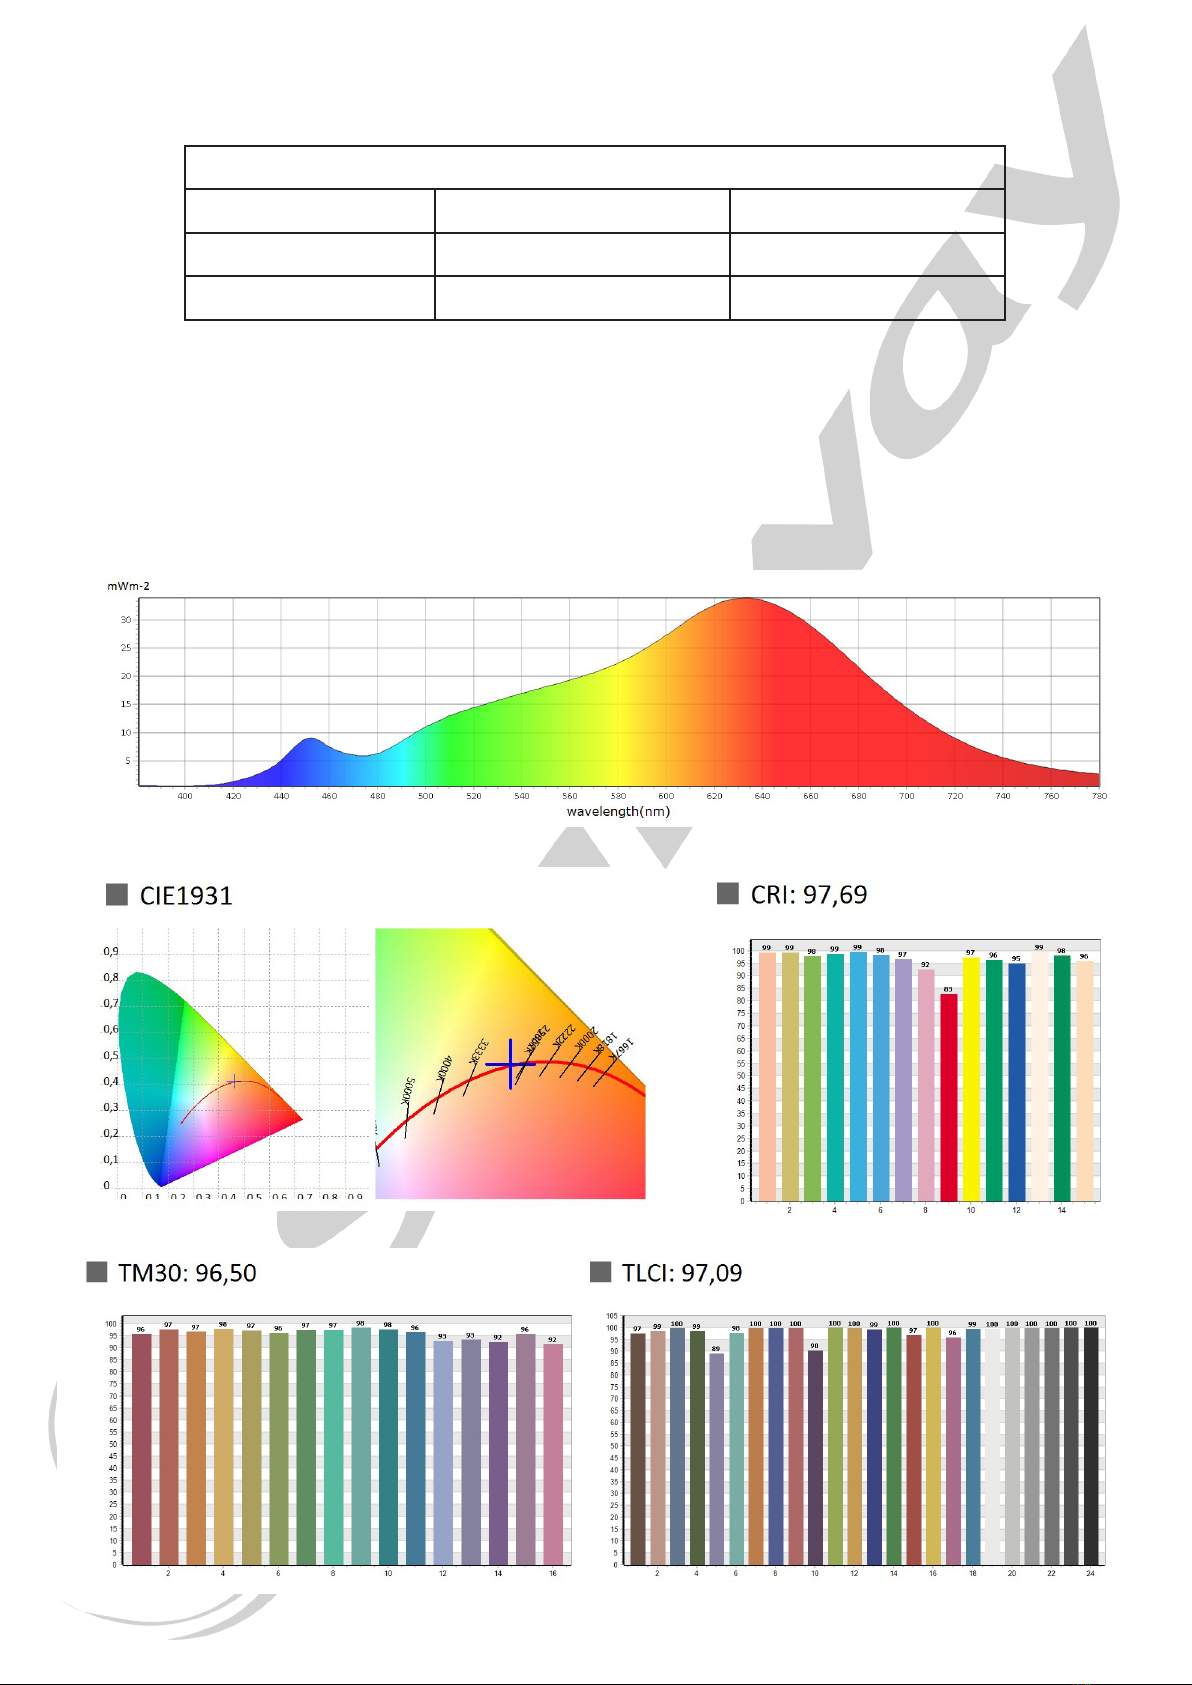
Photometry
Distance 5 meters , Zoom Minimum
LED Color Temperature CRI
Warm White 2700° K 97.7
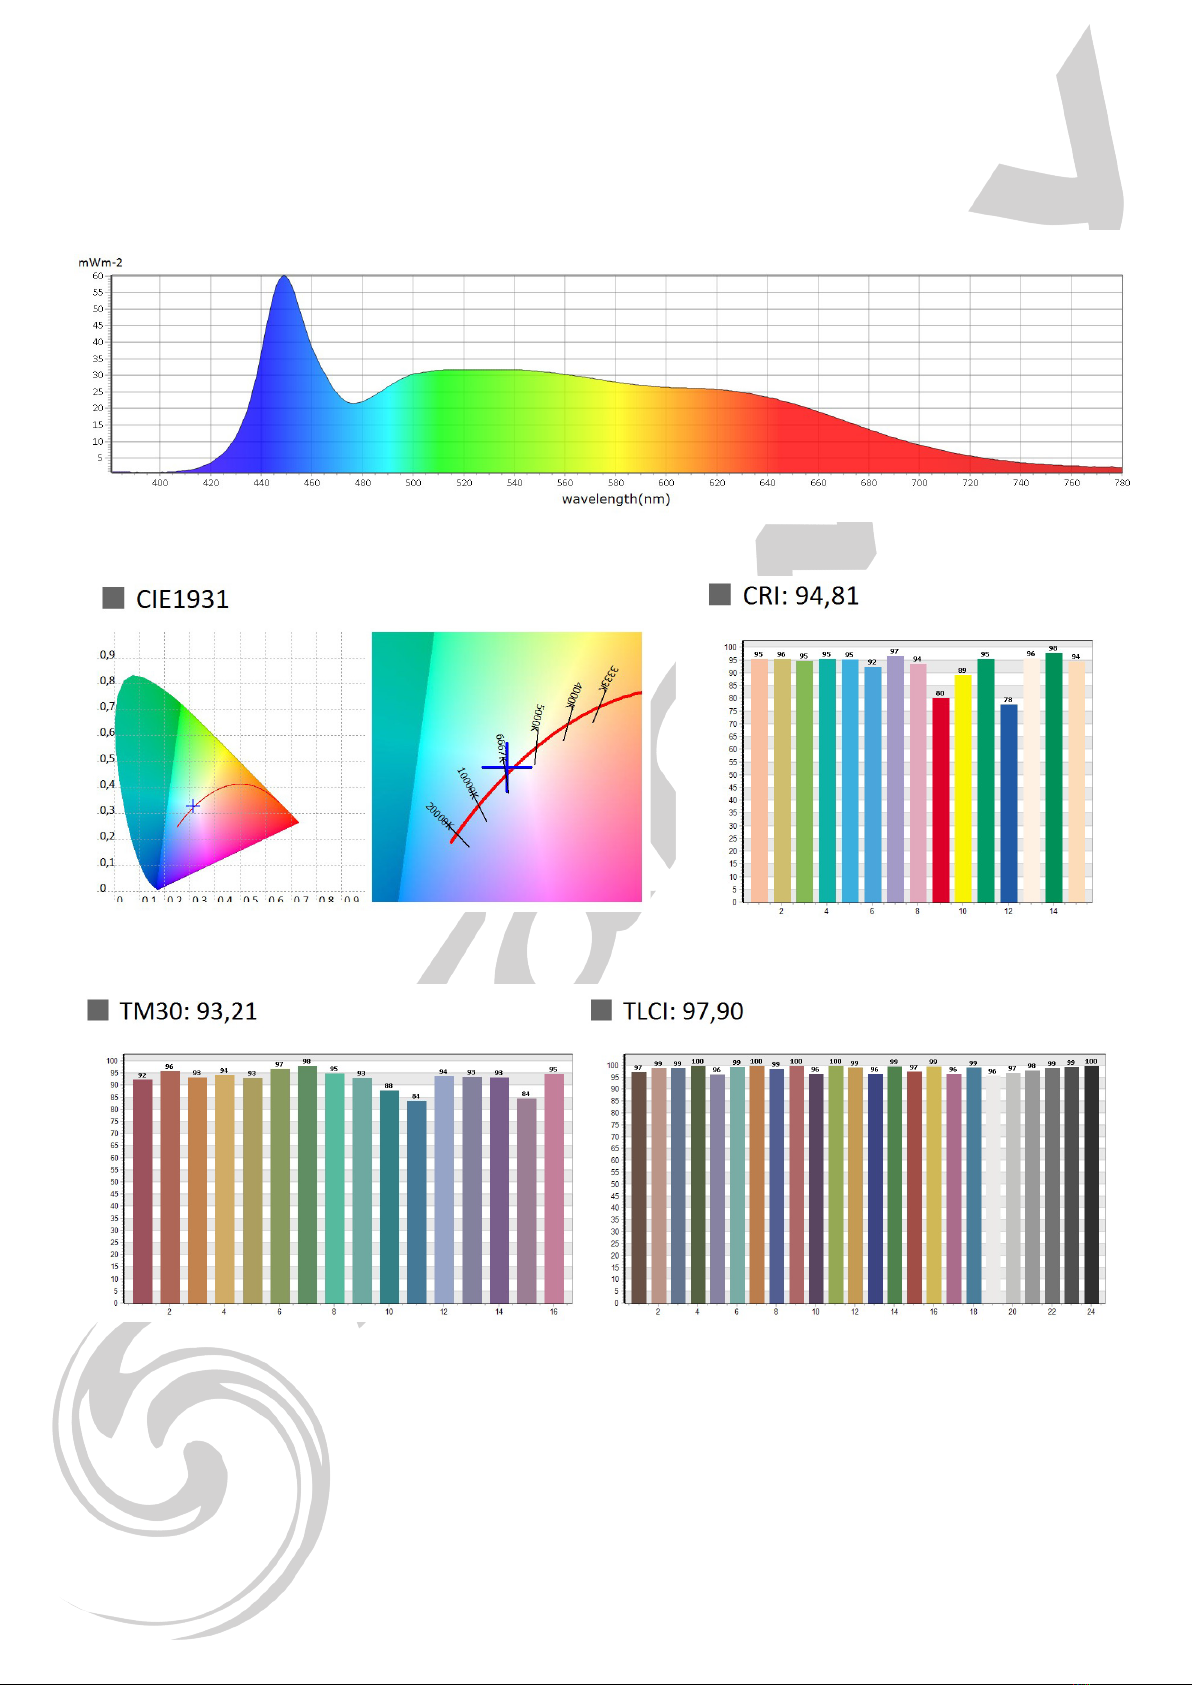
Cold White 6500°K 94.8
Lux Max @ 5m : 9062 Lux @ 10°
Lumen Max @ 5m : 18000 Lm
Warm White
MeasureMents Made with uspectruM MK305s
Page 22 Page 23
Cold White
Page 22 Page 23
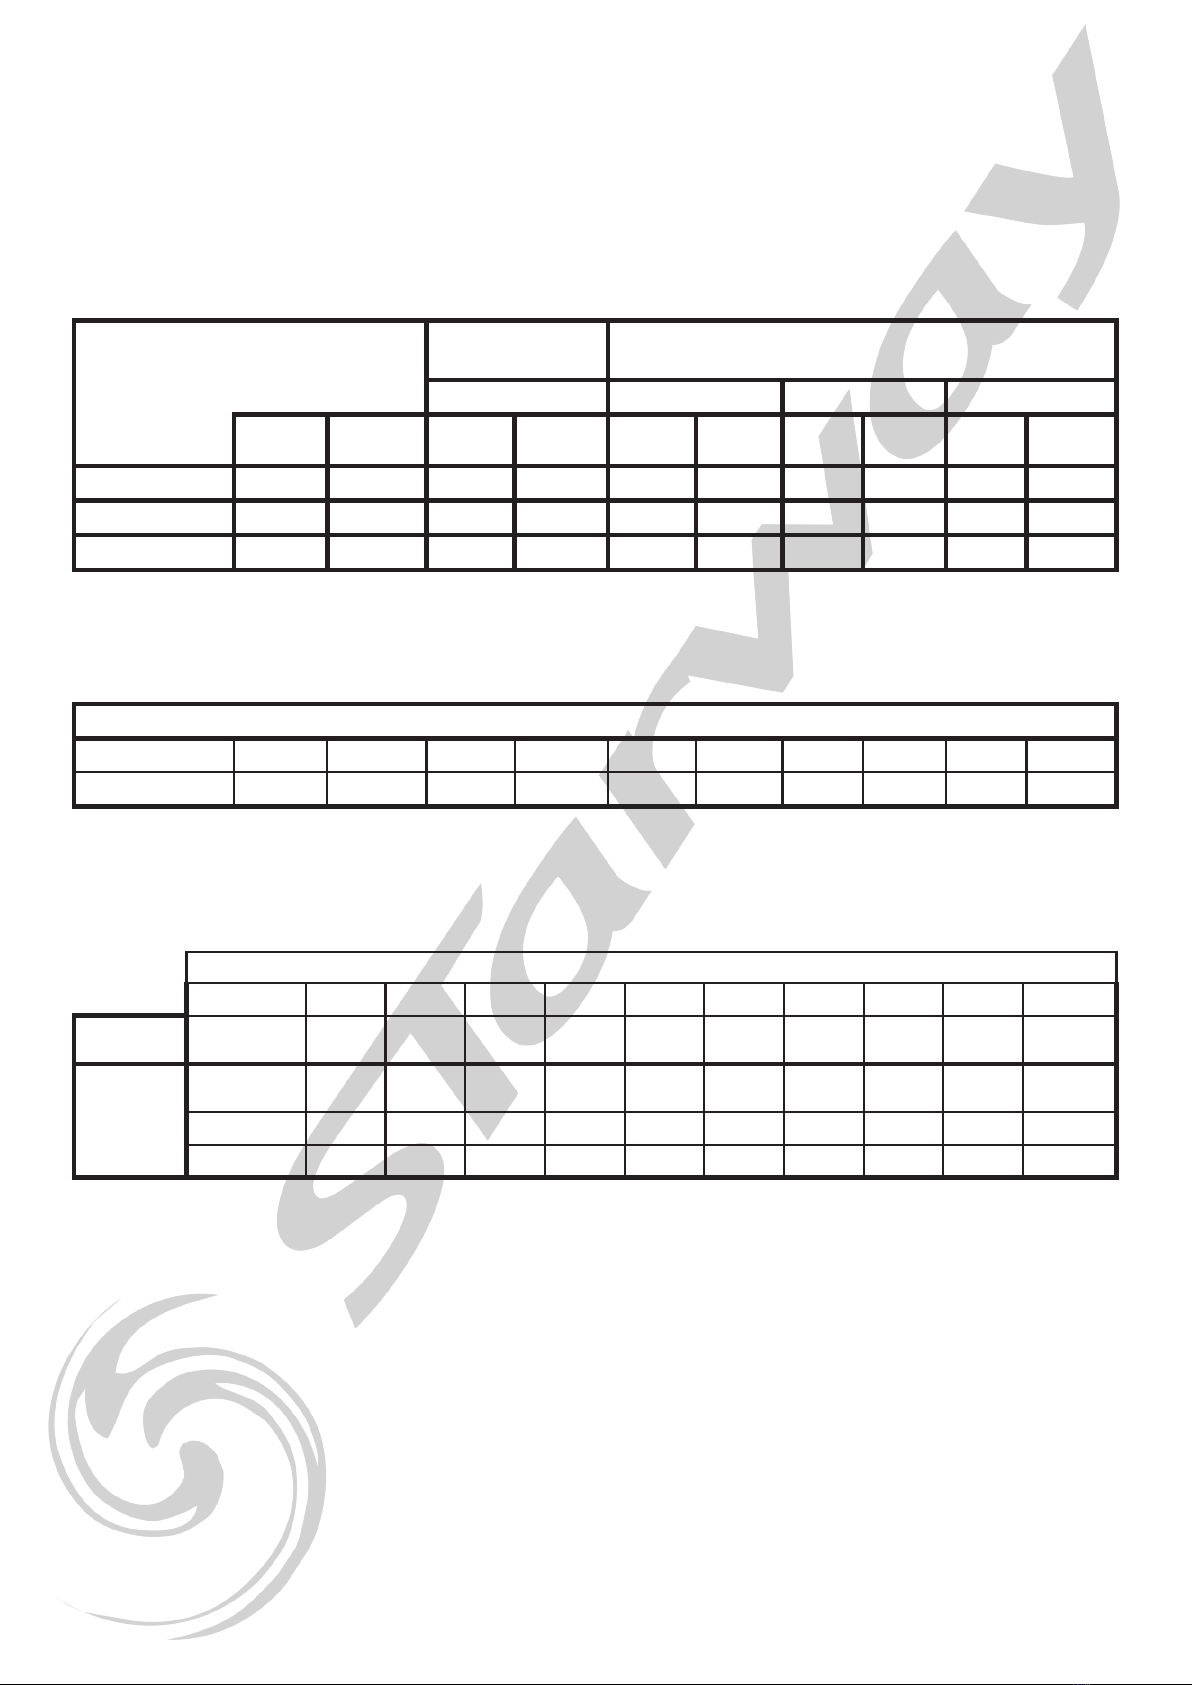
Beam
Angle
Field
Angle
Lux
center
Lumen
Flux
Lux
center
Lumen
Flux
Lux
center
Lumen
Flux
Lux
center
Lumen
Flux
Zoom narrow 10° 18° 9062 7330 5699 5300 5375 4400 3890 3541
Zoom Medium 24° 39° 3210 14000 2072 9345 1941 8600 1404 6100
Zoom Wide 47° 61° 1209 18000 768 11500 729 11000 527 8000
Color Temp 2700K 3000K 3200K 3500K 4000K 4500K 5000K 5600K 6000K 6500K
IRC 97,8 97,5 97,3 97,2 97,2 97,3 96,9 96,9 95,9 94,8
IRC
Mesures photométriques
Regulated power
OFF Regulated power ON
All Fan mode Fan High/Auto Fan Quiet Fan OFF
Color Temp 2700K 3000K 3200K 3500K 4000K 4500K 5000K 5600K 6000K 6500K
Regulated
Power OFF All Fan Mode 206W 236W 258W 300W 390W 331W 243W 234W 214W 202W
Fan
Auto/High
206W 236W 243W 243W 250W 244W 243W 236W 213W 202W
Fan Quiet 204W 232W 232W 232W 235W 233W 232W 232W 214W 202W
Fan OFF 170W 170W 169W 169W 172W 169W 169W 168W 168W 168W
Power measurement according to color temperature
Regulated
Power ON
Page 24 Page 25
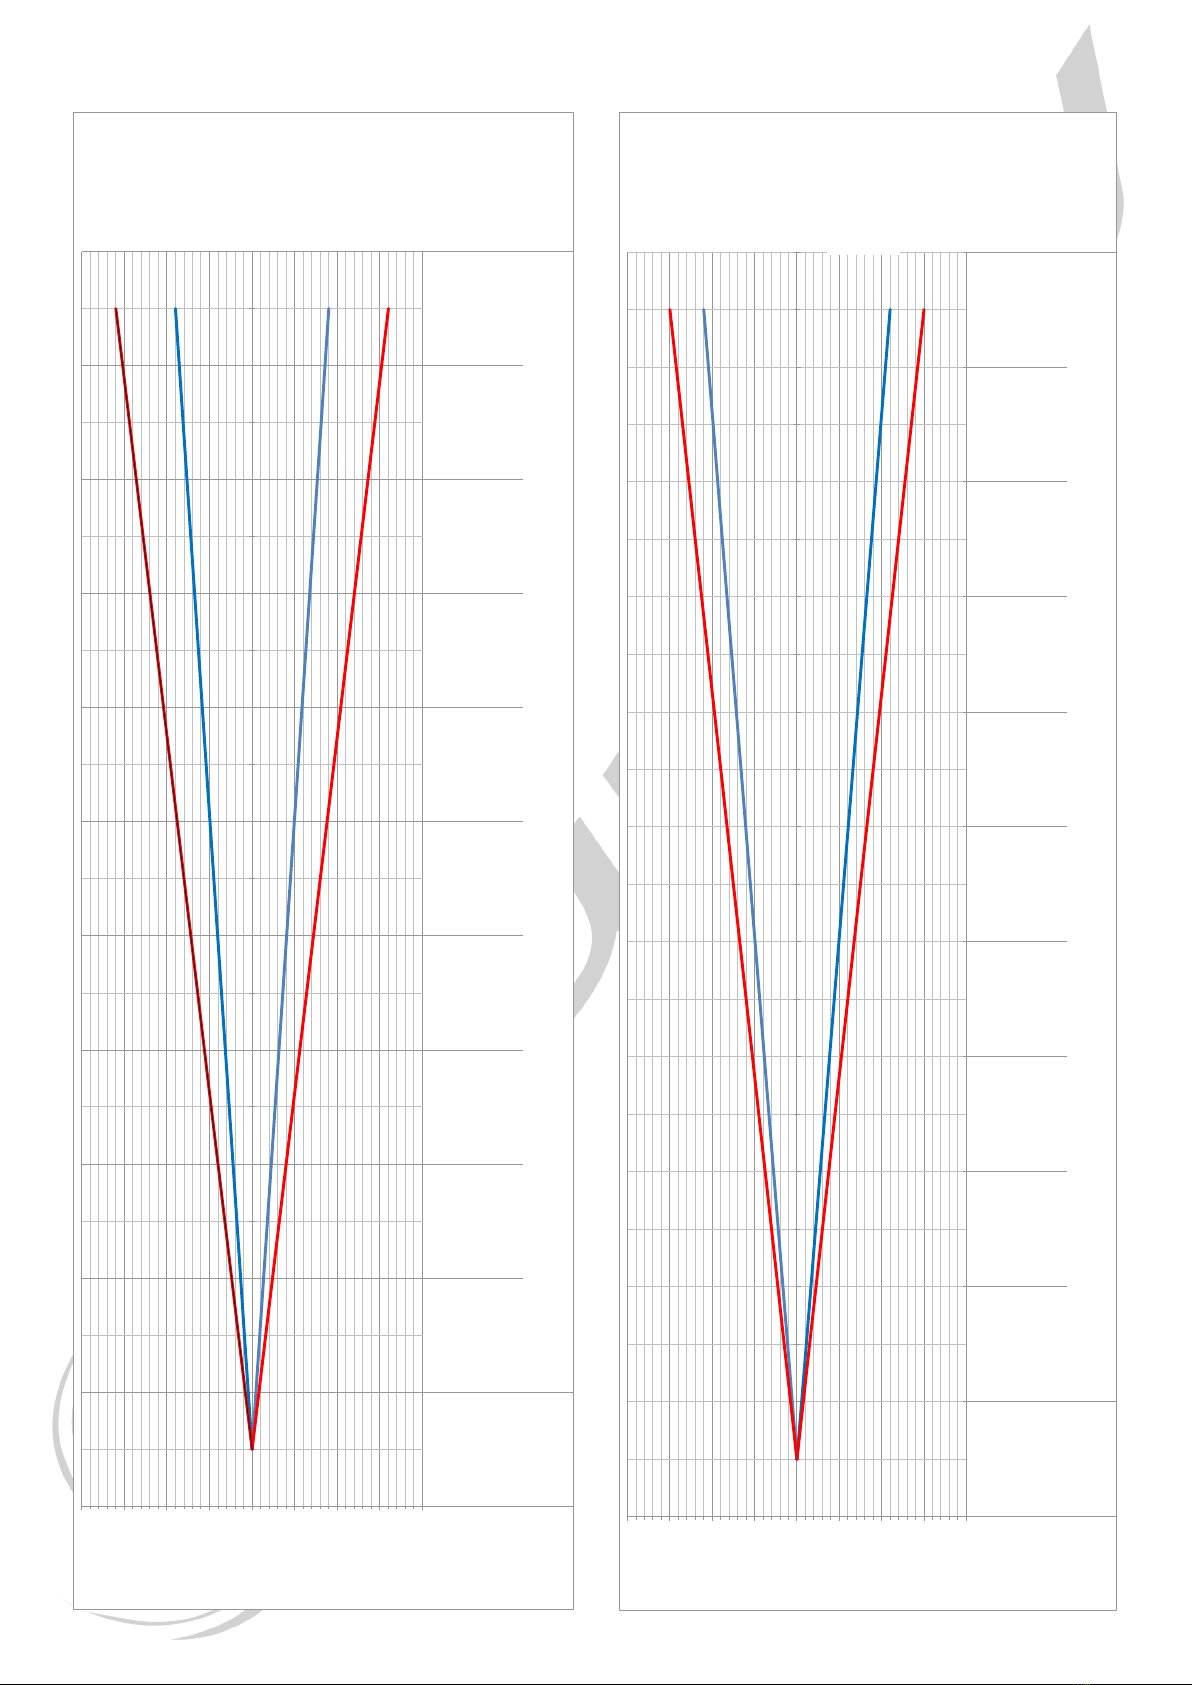
Angle Mini Angle Maxi
° Beam: ####
° Field: ####
Eclairem
###### 56638 25172 14159 9062 6293 4623 3540 2797 2266 1872 1573 1341 1156 1007 885 784 699 628 566
Distance en
12345678910 11 12 13 14 15 16 17 18 19 20
D Bea
0,18 0,36 0,54 0,72 0,9 1,08 1,26 1,44 1,62 1,8 1,98 2,16 2,34 2,52 2,7 2,88 3,06 3,24 3,42 3,6
D Fie
0,32 0,64 0,96 1,28 1,6 1,92 2,24 2,56 2,88 3,2 3,52 3,84 4,16 4,48 4,8 5,12 5,44 5,76 6,08 6,4
00,09 0,18 0,27 0,36 0,45 0,54 0,63 0,72 0,81 0,9 0,99 1,08 1,17 1,26 1,35 1,44 1,53 1,62 1,71 1,8
00,16 0,32 0,48 0,64 0,8 0,96 1,12 1,28 1,44 1,6 1,76 1,92 2,08 2,24 2,4 2,56 2,72 2,88 3,04 3,2
0-0,1 -0,2 -0,3 -0,4 -0,5 -0,5 -0,6 -0,7 -0,8 -0,9 -1 -1,1 -1,2 -1,3 -1,4 -1,4 -1,5 -1,6 -1,7 -1,8
0-0,2 -0,3 -0,5 -0,6 -0,8 -1 -1,1 -1,3 -1,4 -1,6 -1,8 -1,9 -2,1 -2,2 -2,4 -2,6 -2,7 -2,9 -3 -3,2
-2
-1,5
-1
-0,5
0
0,5
1
1,5
2
D Field en metres 0,32 0,64 0,96 1,28 1,6 1,92 2,24 2,56 2,88 3,2
D Beam en metres 0,18 0,36 0,54 0,72 0,9 1,08 1,26 1,44 1,62 1,8
Distance en metres 12345678910
Eclairement Lux 226550 56638 25172 14159 9062 6293 4623 3540 2797 2266
° Field: 18,18
° Beam: 10,29
R
a
y
o
n
e
n
m
e
t
r
e
s
Angle Field
Angle Beam
° Beam: ####
° Field: ####
Eclairem
###### 30231 13436 7558 4837 3359 2468 1889 1493 1209 999 840 716 617 537 472 418 373 335 302
Distance en
0,5 11,5 22,5 33,5 44,5 55,5 66,5 77,5 88,5 99,5 10
D Bea
0,44 0,88 1,32 1,76 2,2 2,64 3,08 3,52 3,96 4,4 4,84 5,28 5,72 6,16 6,6 7,04 7,48 7,92 8,36 8,8
D Fie
0,6 1,2 1,8 2,4 33,6 4,2 4,8 5,4 66,6 7,2 7,8 8,4 99,6 10,2 10,8 11,4 12
00,22 0,44 0,66 0,88 1,1 1,32 1,54 1,76 1,98 2,2 2,42 2,64 2,86 3,08 3,3 3,52 3,74 3,96 4,18 4,4
00,3 0,6 0,9 1,2 1,5 1,8 2,1 2,4 2,7 33,3 3,6 3,9 4,2 4,5 4,8 5,1 5,4 5,7 6
0-0,2 -0,4 -0,7 -0,9 -1,1 -1,3 -1,5 -1,8 -2 -2,2 -2,4 -2,6 -2,9 -3,1 -3,3 -3,5 -3,7 -4 -4,2 -4,4
0-0,3 -0,6 -0,9 -1,2 -1,5 -1,8 -2,1 -2,4 -2,7 -3 -3,3 -3,6 -3,9 -4,2 -4,5 -4,8 -5,1 -5,4 -5,7 -6
-4
-3
-2
-1
0
1
2
3
4
D Field en metres 0,6 1,2 1,8 2,4 33,6 4,2 4,8 5,4 6
D Beam en metres 0,44 0,88 1,32 1,76 2,2 2,64 3,08 3,52 3,96 4,4
Distance en metres 0,5 11,5 22,5 33,5 44,5 5
Eclairement Lux 120925 30231 13436 7558 4837 3359 2468 1889 1493 1209
° Field: 61,93
° Beam: 47,50
R
a
y
o
n
e
n
m
e
t
r
e
s
Angle Field: °
Angle Beam: °
Radius in meters
Field Radius in meters
Beam Radius in meters
Distance in meters
Lux
Radius in meters
Beam Radius in meters
Distance in meters
Lux
Field Radius in meters
Page 24 Page 25
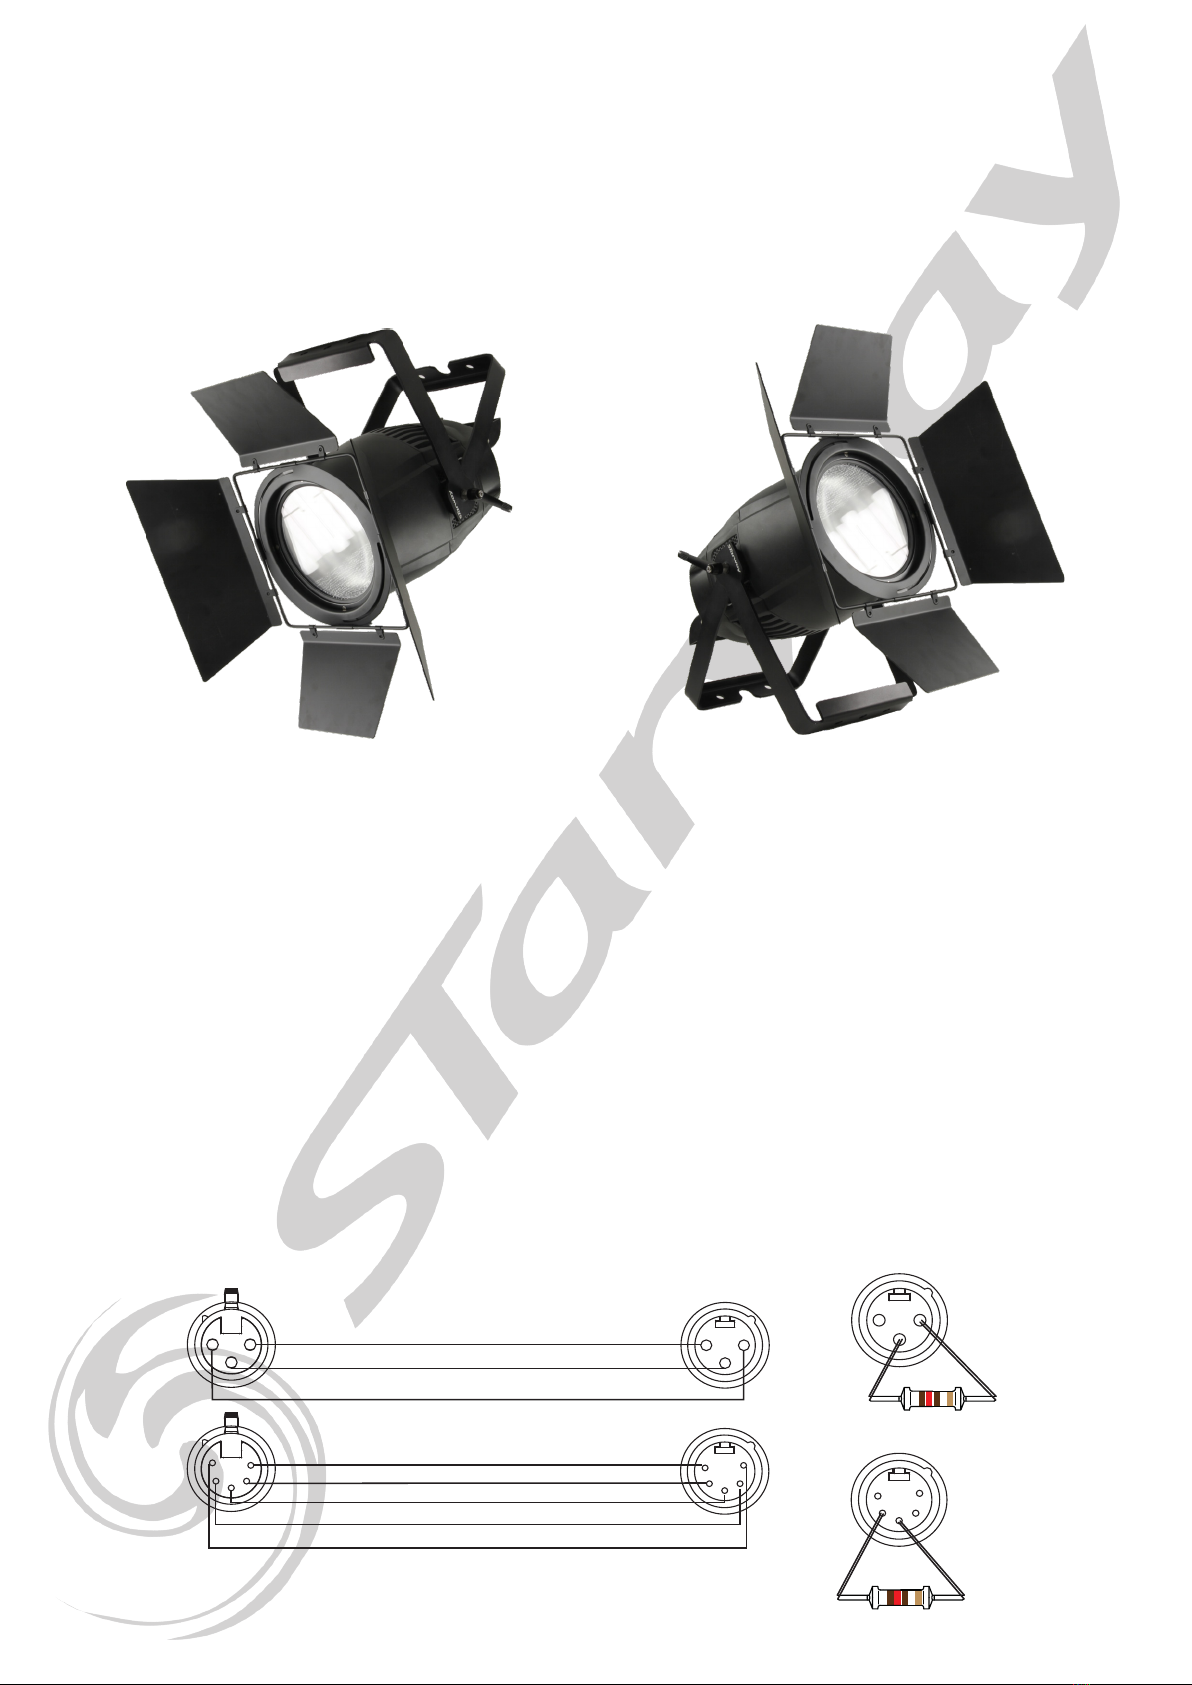
Installation
Setup :
The projector can be mounted in any position and at any angle.
When placed, the surface supporting it must be able to withstand at least 10 times the weight of the projector and must
be stable enough not to cause damage to the projector, people or surrounding objects.
When the projector is hung, systematically and obligatorily remember to secure it with a safety chain.
Electrical connection :
Under 230 VAC, 5 ParKolor 200DW can be connected with the IN and Out connectors.
Under 110 VAC, 2 ParKolor 200DWcan be connected with the IN and Out connectors.
DMX512 use
The use of a DMX amplier is necessary if you use more than 20 interconnected units or a line longer than 60 m.
The use of a real DMX cable (120 ohms) makes it possible to avoid untimely loss of information. The use of a terminal
plug is strongly recommended. In some cases, the absence of this termination is not a problem. On the other hand, its
presence is very strongly recommended in disturbed spaces (Stage, long line length, TV studio, etc.). Its value is usually
120 Ohms. The cap is a male XLR socket in which is soldered, a resistance of 120 Ohms ¼ of W, between the pins
2 and 3 of the XLRs.
The cap prevents the reection of transmitted information when using long cable lengths.
21
3
12
3
3
5
42
1
2
1
3
4
5
GND
DATA -
DATA +
GND
DATA +
DATA -
NON CONNECTE
NON CONNECTE
12
3
2
1
3
4
5
120 Ω
120 Ω
Page 26 Page 27
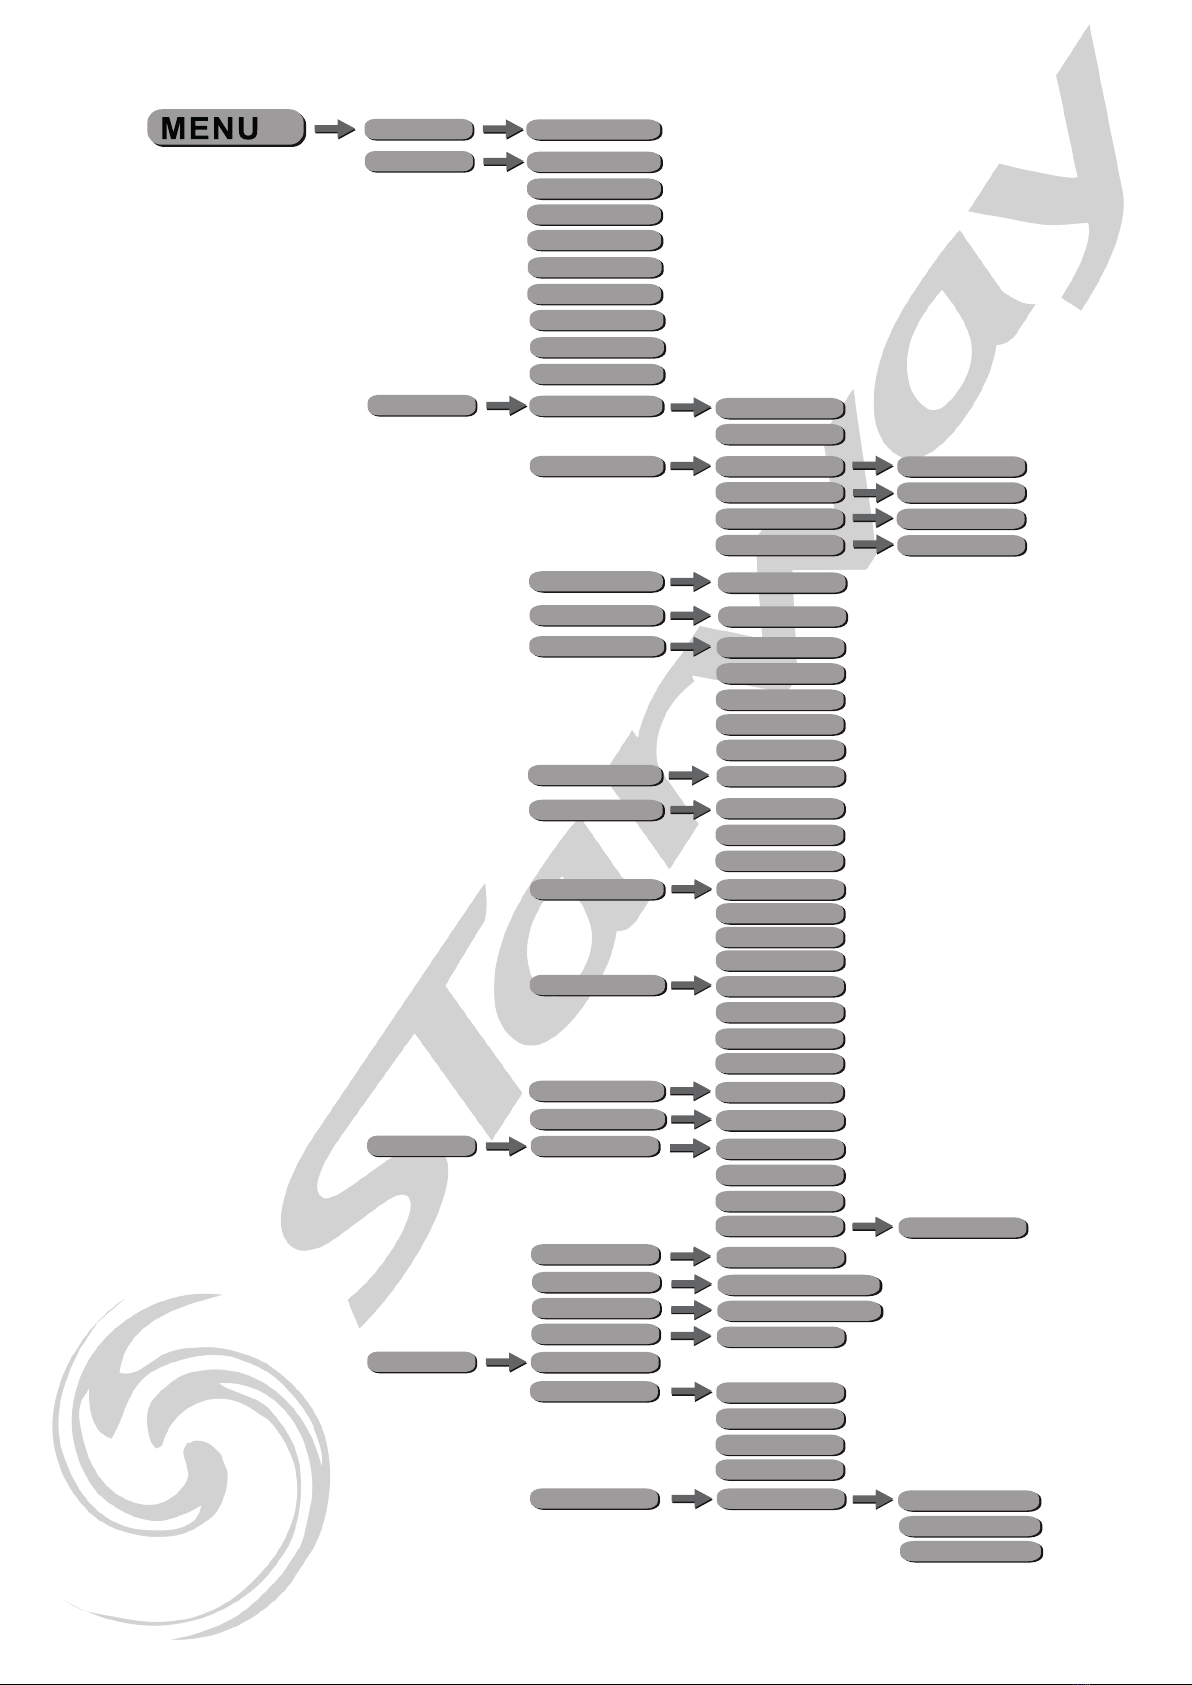
MENU STRUCTURE
The values shown in RED are the default values (reloaded after a DFSE)
001 - 512
ADDRESS
1CH
CH_MODE
DIM4 (1s)
Hold
LOST DMX
Blackout
Display
LCD.Set
Key Lock
Flash
ON / OFF
ON / OFF
°C / °F
DIM0 (instant)
Dim Mode
DIM1 (0,25s)
DIM2 (0,50s)
DIM3 (0,75s)
2CH
6CH
6CH - CCT
9CH
Status
ON / OFF
Invert ON / OFF
Temp
ON / OFF
Fast Dimmer
Disp. CH
DISP.Set
SLAVE
Auto
FAN.Set
High
Quiet
Silent
Linear
Dim Curve
Square
INV-Square
S-Curve
ON/OFF
D.F.S.E.
ON/OFF
Strobe CH
INFO
Time Inf Current
Total
Last
Password Clear
Temp Inf LED Temp
Err. Inf None/Zoom/Temp
Model Inf PARKOLOR
Software Vx.xxx
MANUAL
Reset M.
Manual
Dim: 000-255
Str: 000-255
Zoom: 000-255
CCT: 000-255
Calibration
Password
WWhite: 000-255
CWhite: 000-255
ADDR
Zoom: 000-255
4CH
4CH - CCT
5CH
3CH
ON / OFF
Regulated Power
Page 26 Page 27
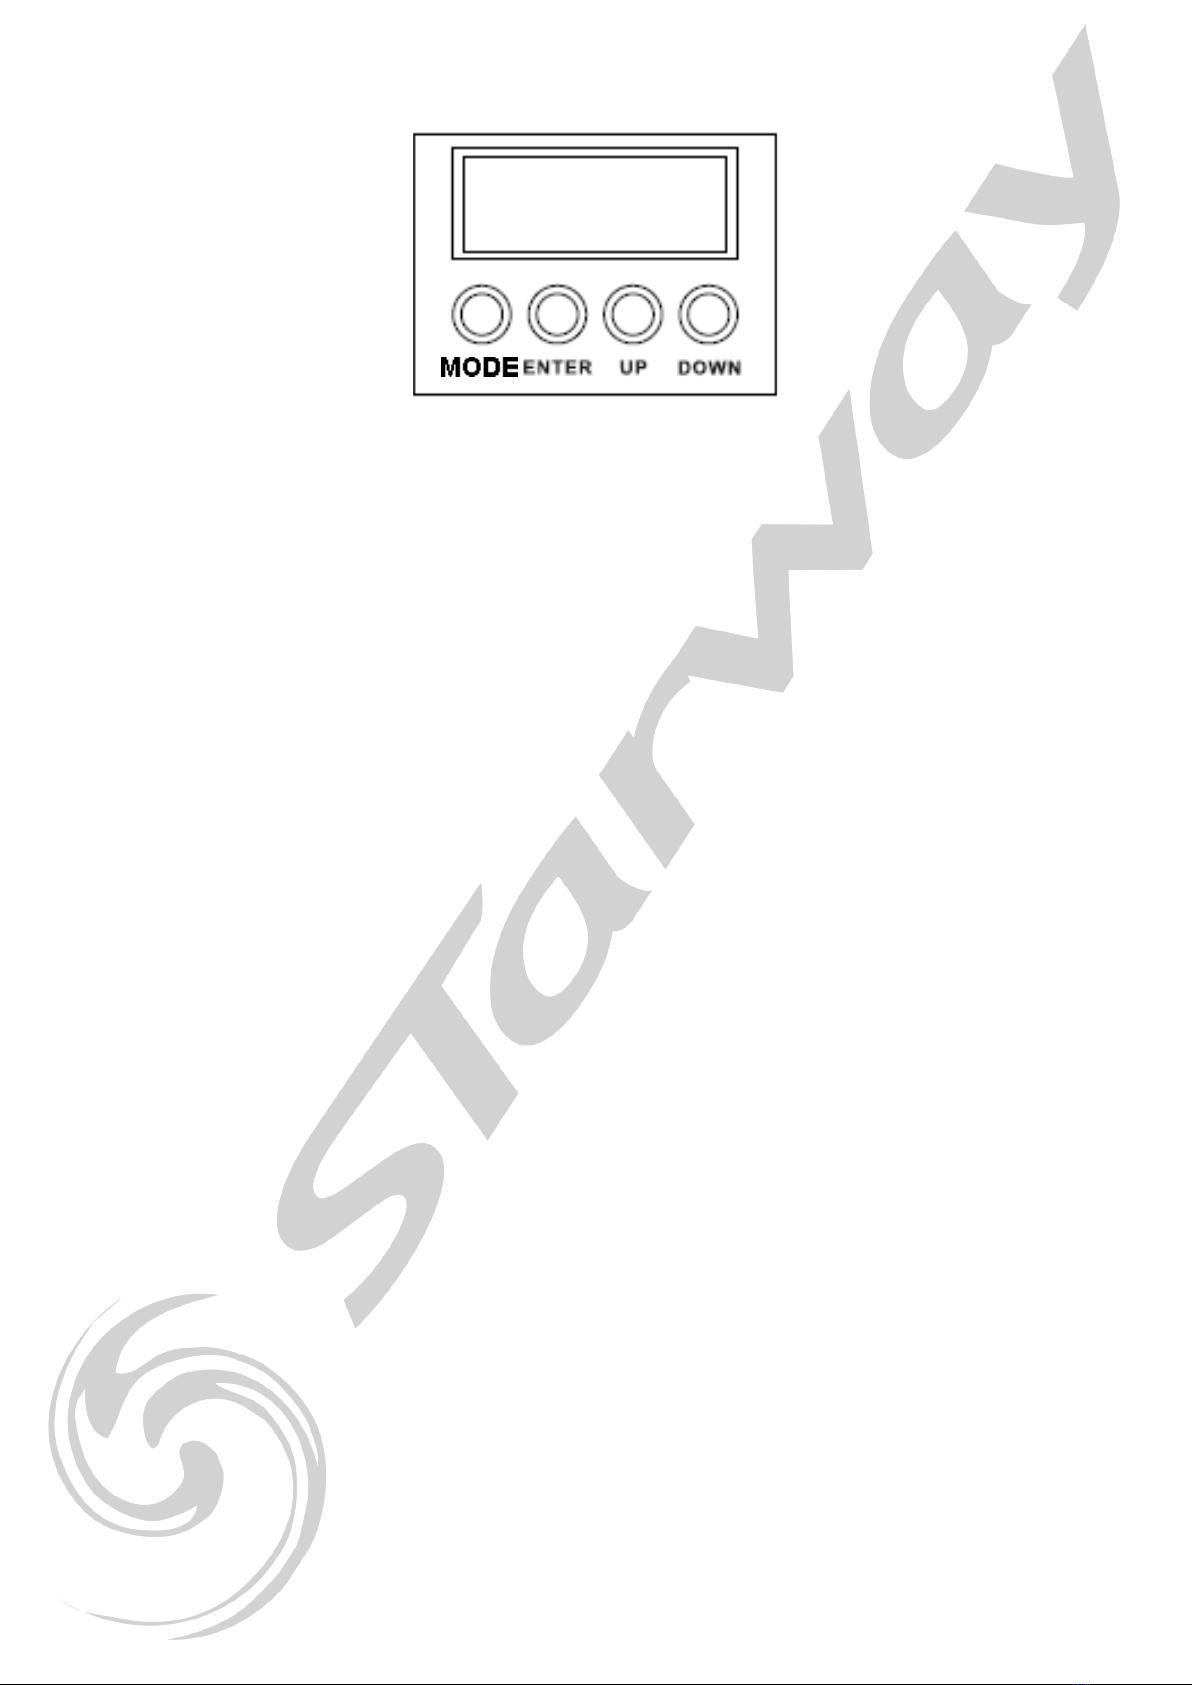
DISPLAY
MODE: Scroll main menu or exit active submenu.
Enter: To enter the menu or conrm the active function or value.
Up: To scroll up in the menu or increase the value of the active function.
Down: To scroll down in the menu or decrease the value of the active function.
To unlock ParKolor 200 HD :
Press MODE for 3/5 seconds
To invert the PARKOLOR 200HD LCD
Press UP while the projector is locked
ADDRESS :
• Enter the DMX address using the [UP] and [DOWN] keys then validate using the [ENTER] key.
CH MODE :
• Choose the DMX mode 1CH, 2 CH, 3 CH, 4 CH, 4 CH CCT, 5 CH, 6 CH, 6 CH CCT, 9 CH.
using the [UP] and [DOWN] keys then validate using the [ENTER] key.
MENU STATUS
LOST DMX :
• Choose one of these two options when losing DMX signal :
• [Hold] : keeps the last value in case of loss of the DMX signal.
• [BLACKOUT] : Blackout when there is no DMX signal.
LCD.SET :
Enter this sub-menu to determine the behavior of the display
• Entrer the [Display] sub-menu, select [ON] or [OFF] to leave the display on or off.
• Entrer the [KEY LOCK] sub-menu, select [ON] or [OFF] to lock the keys
(password : UP, DOWN, UP, DOWN, ENTER).
• Entrer the [FLASH] sub-menu, select [ON] or [OFF] to enable or disable the display ash function when there is
no DMX signal.
• Entrer the [Invert] sub-menu, select [ON] or [OFF] to reverse the display direction.

Page 28 Page 29
TEMP :
• Choose temperature unit [CELSIUS] or [FAHRENHEIT].
FAST DIMMER
Enter this sub-menu to bypass [DIM Mode] in case of rapid channel change from Dimmer to 0.
• Choose [ON] or [OFF] to change dimmer behavior.
DIM MODE
Enter this sub-menu to set the speed of the Dimmer.
• Choisir [DIM0] for instant dimmer, [DIM1] for a 0,25 second dimmer speed,
[DIM2] for a 0,5 second dimmer speed, [DIM3] for a 0,75 second dimmer speed,
or [DIM4] for a 1 second dimmer speed.
REGULATED POWER
Enter this sub-menu to set the power mode:
To limit the power drop due to the rise of temperature, the power is limited as soon as ParKolor 200 DW is switched
on according to the ventilation mode chosen.
Off mode : Max power 400W in all ventilation modes
On Mode:
Fan High > 250W - Fan Auto > 250W - Fan Quiet > 240W - Fan Silent > 170W.
• Choose [ON] ou [OFF] to select Regulated Power mode or not.
DISP.Set :
Enter this sub-menu to dene the display mode
• [ADDR] to display the DMX adress.
• [Disp.CH] to display the DMX values.
• [Slave] to switch the PARKOLOR 200 HD to slave mode.
FAN.Set :
Enter this sub-menu to dene the cooling mode
• [Auto] fans in automatic mode
• [High] fans in forced operation mode at 100%
• [Quiet] fans in silent mode
• [Silent] fans OFF
DIM CURVE
Enter this sub-menu to dene the Dimmer curve.
• [Linear] - The increase in light intensity is linear as the DMX value increases.
• [Square] - Light intensity control is ner at low levels and coarser at high levels.
• [Inv-Square] - Light intensity control is coarser at low levels and ner at high levels.
• [S-Curve] - Light intensity control is ner at low and high levels and coarser at medium levels.
Linear Curve Square Curve Inv-Square Curve S Curve

Page 28 Page 29
DFSE :
• Enter this sub-menu to reset the device to factory default.
(Reload the values shown in red in the menu structure)
STROBE CH :
Enter this sub-menu to select the behavior of the strobe channel:
• [ON] - LEDs are ON when the strobe channel is at 0.
• [OFF] - LEDs are OFF when the strobe channel is at 0.
INFO
[Time.Info] - Usage Time
• [Current] : Display of usage time (in hours) since last power-on.
• [TotalTime] : Display of usage time (in hours).
• [Last] : Display of the time of use (in hours) since the last time reset.
• [PASSWORD] : To access the usage time reset, you must enter a
PIN code: 050 to reset [Last] value.
[Clear] : [ON] to reset [OFF] to cancel
[Temp.Info] - Temperature display
• [LED temp] : xxx F or C - LED temperature display
[Err.Info] - sensor errors
• [None] : No error
• [Zoom] : Zoom Sensor error
• [Temp] : LED temperature sensor error
[ModelInf] - Displaying the projector model [ParKolor 200 DW]
[Software] - Firmware version display [Vx.xxx]
MANUAL :
[Reset.M] - Enter this sub-menu to reset the Zoom.
[ManCtrl] - Manual control
Allows you to create a luminous state. Adjust the following parameters to create a state.
Validate with [Enter] each parameter.
• [Dimmer] : from 000 to 255 adjust overall Intensity.
• [Strobe] : from 000 to 255 adjust the Strobe.
• [Zoom] : from 000 to 255 adjust the Zoom.
• [CCT] : from 000 to 255 adjust Color temperature.
NB : Zoom and CCT settings are also used for 1ch, 2ch, 3ch CCT and 4ch DMX modes.
[Calibrate]
Sub-menu allowing to recalibrate the various parameters of the ParKolor 200 DW.
To access this menu, you must enter the PIN code to unlock this function.
Pin Code : 050
This gives access to the various parameters.
• [Zoom] : de 000 à 255 calibrate the Zoom.
• [CWhite] : de 000 à 255 calibrate Cold White.
• [WWhite] : de 000 à 255 calibrate Warm White.
Page 30
DMX MAP
MODE
FUNCTION
1CH 2CH 4CH 3CH
CCT 5CH 4CH
CCT 6CH 6CH
CCT 9CH
1 1 1 1 1 1 1 1 1 INTENSITY
0-255 0% →100%
2 2 2 INTENSITY FINE
0-255 0% →100%
2 2 2 3 3
SHUTTER
0-5 ON
6-10 OFF
11-90 Regular strobe from slow to fast
91-170 Random strobe from slow to fast
171-255 Synchronized Random strobe from
slow to fast
5 4 3 4 4 ZOOM
0-255 0% →100%
2 3 5 CCT
0-255 WW →CW
2 3 4 5 COLD WHITE
0-255 0% →100%
6COLD WHITE FINE
0-255 0% →100%
3 4 5 7 WARM WHITE
0-255 0% →100%
8WARM WHITE FINE
0-255 0% →100%
4 3 6 6 9
CONTROL
0-10 Idle
11-20 Dim0
21-30 Dim1
31-40 Dim2
41-50 Dim3
51-60 Dim4
61-70 Regulated power On
71-80 Regulated power Off
81-100 Idle
101-110 Fan Silent
111-120 Fan Quiet
121-130 Fan auto
131-140 Fan High
141-150 Fast Dimmer off
151-160 Fast Dimmer on
161-170 Dimmer Curve Linear
171-180 Dimmer Curve Square
181-190 Dimmer Curve Inverse Square
191-200 Dimmer Curve S-Curve
201-255 Zoom Reset
3CH CCT and 4CH mode: The Zoom position is set in the manual mode menu. For this you set directly on the
menu or by RDM the good parameter.
1CH and 2 CH mode: The zoom and CCT value are set in the manual mode. For this you set directly on the
menu or by RDM the good parameter.

In order to improve the products, technical modications can be made without prior information.
This is the reason why the technical characteristics and the physical appearance of the products can change.
To benet from the latest updates to our products, please log on to: www.star-way.com.
NOTES

STARWAY
22 Rue Edouard Buffard
77144 Montevrain
France
Tél. : +33 (0)820 230 007
Fax : +33 (0)1 46 15 47 16
Table of contents
Other Starway Lighting Equipment manuals


