1
OBSERVE THE FOLLOWING STATEMENTS AND WARNINGS TO REDUCE THE LIKELIHOOD OF SERIOUS
OR FATAL INJURY.
SAVE THIS SHEET FOR FUTURE REFERENCE.
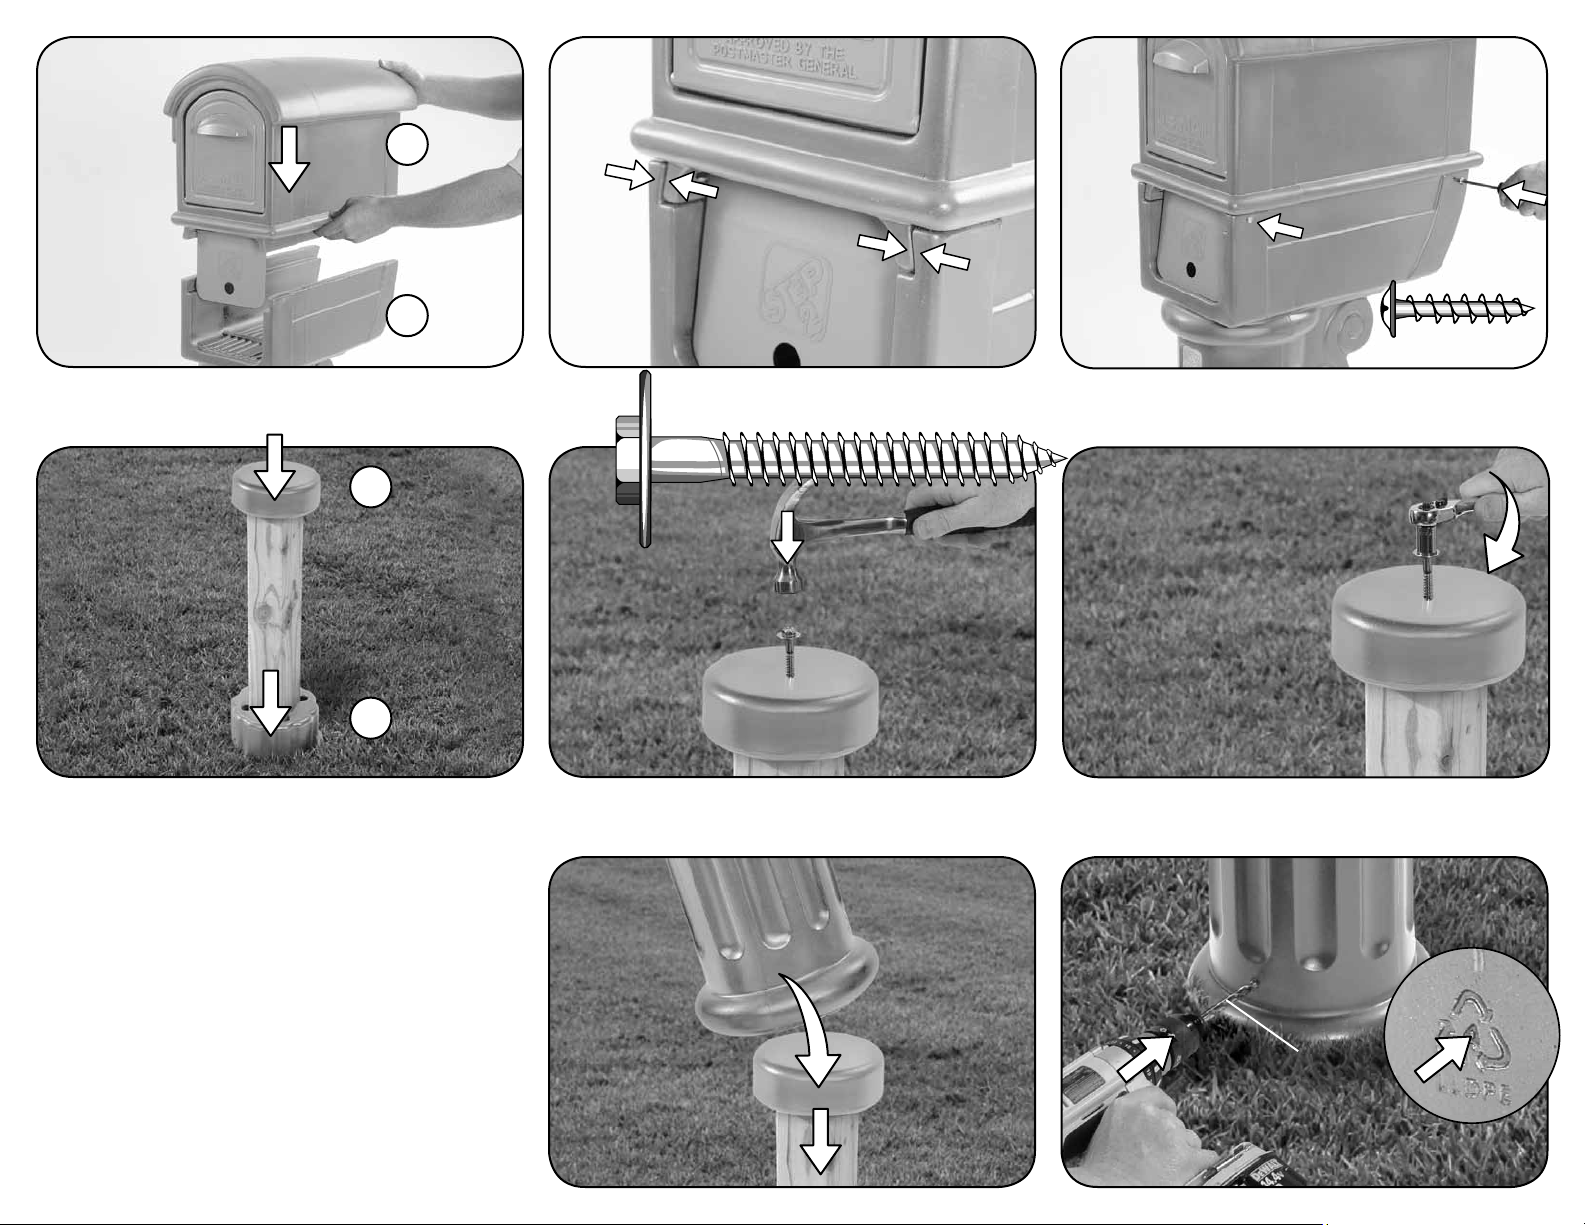
• Rquired for Installation: Standard 4” x 4” post cut to 48-inch length (not included)
• Note: With normal soil conditions and level ground, a standard 4”x4” post cut to 48 inch length is adequate for mount
ing your step 2 mailMaster mailbox with 24 inches in ground and 24 inches above ground.
Inspect this product before each use. Tightly secure connections and replace damaged or worn
components. Contact the Step2 Company for replacement parts.
Cleaning Instructions:
• General Cleaning: Use mild soapy water.
Decal Application:
Clean and dry area thoroughly. Center decal in area. Apply pressure from center to outer edge. (It is recom-
mended that you adhere the numbers when the plastic is at average room temperature.)
Disposal Instructions:
Please recycle when possible. Disposal must be in compliance with all government regulations.
U.S.A Residents Only:
• Customers are requested to contact the local post oce before erecting the box to ensure it’s correct
placement and height at the street.
RESPECTEZ LES ÉNONCÉS ET AVERTISSEMENTS SUIVANTS POUR RÉDUIRE LA PROBABILITÉ DE BLES
SURE GRAVE, VOIRE MORTELLE.
CONSERVEZ CETTE FEUILLE POUR RÉFÉRENCE ULTÉRIEURE.
• Nécessite à l’installation : Un poteau standard de 10 cm x 10 cm d’une longueur de 1,219 m* (non-inclus)
* Notez: Quand les conditions du sol sont normales et que le terrain est nivelé, un poteau standard de
10 cm x 10 cm d’une longueur de 1,219 m est adéquat pour installer votre boîte aux lettres Mailmaster de Step2,
le mettant 0,61 m sous le sol et 0,61 m au-dessus du sol.
Inspectez ce produit avant chaque utilisation. Serrez bien les connexions et remplacez les composants
usés ou endommagés. Contactez la société Step2 pour des pièces de rechange.
Instructions de nettoyage :
• Nettoyage général : Utilisez de l’eau savonneuse douce. 1/13/12
Thank you for purchasing the Step2® MailMaster Classic™. We’d appreciate a few minutes of your time to
complete a brief survey so we can continue providing you with great products.
To participate, please visit our website at:
www.step2.com/survey/?partnumber=5A1000
Thank you for your time,
John Vresics
CEO/President
05/10-5A10
192525
For assistance or replacement
parts please contact :
The Step2 Company, LLC.
10010 Aurora-Hudson Rd.
Streetsboro, OH 44241 USA
1-800-347-8372 USA & Canada Only
(330)656-0440
www.step2.com
Step2 UK LTD
Great Bank Road
Wingates Industrial Estate
BOLTON
BL5 3XU
Uk freephone: 0800 393159
Step2 UK website: www.step2uk.com
MailMaster Classic™
5A10
5A12
Application des décalcomanies :
Nettoyez et séchez soigneusement la zone. Centrez la décalcomanie dans la zone. Appliquez une pression du
centre vers le bord extérieur. (Nous vous recommandons d’appliquer les chires lorsque le plastique est à une
température ambiante.)
Instructions de mise au rebut:
Veuillez recycler dans la mesure du possible. LL’élimination doit être conforme à toutes les lois nationales.
Ne s’applique qu’aux résidents des États-Unis
• Les clients sont priés de bien vouloir contacter la poste locale avant d’installer la boîte pour s’informer de
l’emplacement et de la hauteur corrects par rapport à la rue.
RESPETE LAS SIGUIENTES RECOMENDACIONES Y ADVERTENCIAS PARA DISMINUIR LA PROBABILIDAD
DE SUFRIR LESIONES GRAVES O MORTALES.
CONSERVE ESTA HOJA PARA SU CONSULTA EN EL FUTURO.
• Para la Instalación se requiere: Poste corriente de 4”x 4” cortado a un largo de 48” (no incluído)
* Aviso: Si la condición de la tierra es normal y el terreno está nivelado, es adecuado usarun poste corriente de 4” x 4” enca-
jándolo bajo tierra 24” y manteniéndolo 24”por arriba de la supercie del terreno.
Examine el producto antes de cada utilización. Fije las conexiones y sustituya los componentes que presenten
daños o desgaste. Póngase en contacto con la empresa Step2 para obtener piezas de repuesto.
Instrucciones para la limpieza:
• Limpieza general: utilice una solución de agua y jabón suave.
Colocación de los adhesivos:
Limpie y seque la supercie en profundidad. Sitúe la lámina en la posición correcta. Presione desde el centro
hacia los bordes. (Se recomienda que adhiera los números cuando el plástico está a temperatura ambiente.)
Intrucciones para la eliminación:
Recicle los componentes si tiene la posibilidad. La eliminación de este producto se debe realizar de conformi-
dad con la Normativa Gubernamental.
Para Residentes de Estados Unidos Solamente
• Se pide al consumidor que antes de instalar el buzón obtenga informacíon de la ocina de correos
local acerca de la distancia correcta del buzón a la calle y de la altura apropiada del mismo.
SPANISH
ENGLISH
FRENCH
MISE EN GARDE: DANGER D’ÉTOUFFEMENT - Petite pièces. Points de Sharp.
ADVERTENCIA: RIESGO DE ASFIXIA: Contiene piezas pequeñas. Sharp puntos.
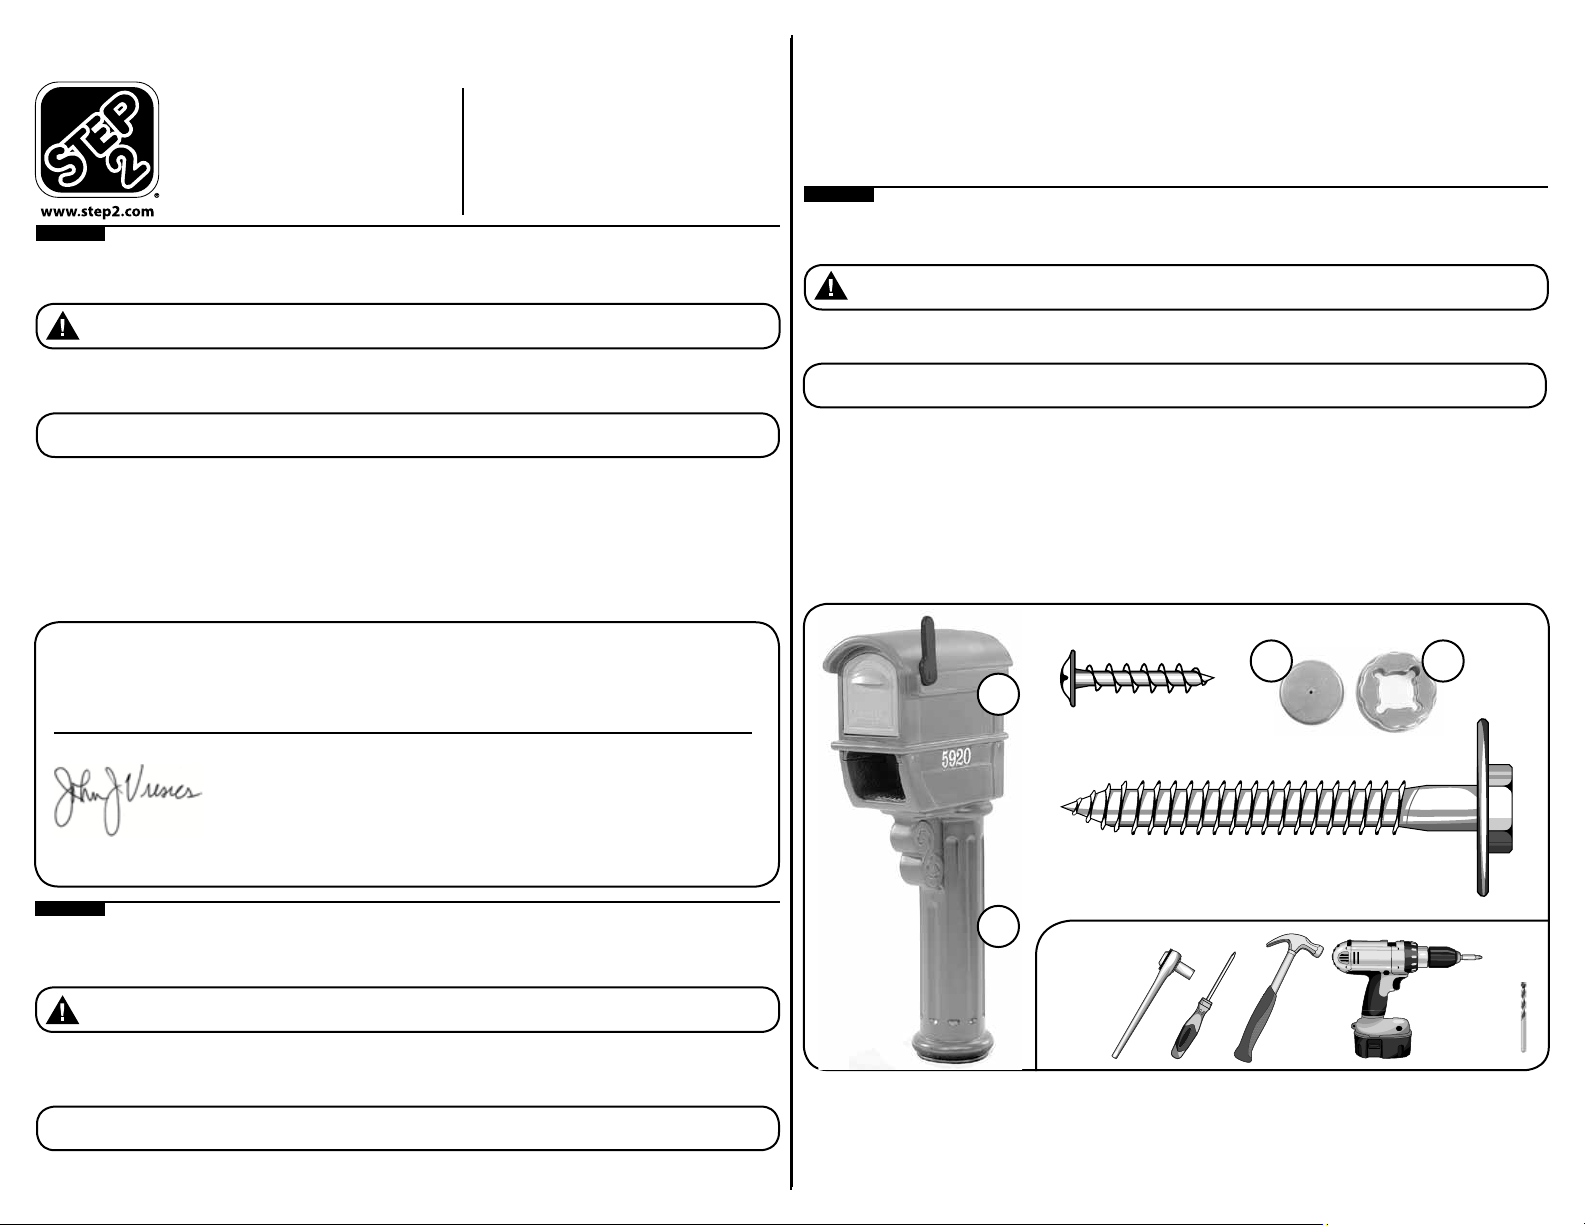
WARNING: CHOKING HAZARD - Small parts. Sharp points. Adult assembly required.
2 x 3” (7,62 cm)
4 x 1” (2,54 cm)
C
B
A
D
1/2” socket
Douille de 1,27
Casquillo de 1,27
1/4” drill bit
Trépan 1,27
Broca de 1,27