Steren COM-437 User manual


Before using your new USB 4-Channel Video Capture,
please read this instruction manual to prevent any damage.
Put it away in a safe place for future references.
Important Considerations Before Using this
Device
It is possible that sometimes when the device is connected to
your computer’s USB port, the computer might not recognize the
device. If this error happens, you should try some of the
following possible solutions:
Disconnect the device, wait a few seconds, and
reconnect the device
Connect the device to another available USB port on
your computer.
Restart your computer after having connected the
device.
Characteristics
Visualization and recording of four video channels
simultaneously and on a single viewable screen
Visualization:
· Supports the following visualization modes: One image,
four images, and sequence mode.
· Supports full screen display
· Display for camera identification, date, and time
· Allows you to change camera names
Recording:
· Instant or programmed recording
· Frames per second settings
· Supports linear or circular modes (when writing)
· Allows for independant recording for multiple cameras
· Audio recording
Playback:
· Allows for search by hour, date, camera ID, etc.
· Video search bar
· Exact duration time
· Playback speed controls
· Take still-frame pictures during playback
•
•
•
ENGLISH
ENGLISH-2
Before usin
g
y
our new USB 4-Channel Video Capture,
p
lease read this instruction manual to prevent an
y
dama
g
e.
P
ut it awa
y
in a safe place for future references
.

Motion Detector:
· Camera selection
· Adjustment of motion detector sensitivity (Low, medium,
high)
· Detection action (Record, alarm)
Minimum System Requirements
Video card (devices with video cards included in the
motherboard are not recommended)
1 available USB 2.0 port
DirectX 9.0 or higher
Intel Pentium 4 at 1 Ghz or better or equivalent AMD
processor
128 MB RAM
Windows 2000 with SP4 or Windows XP with SP1 or better
Contained Within
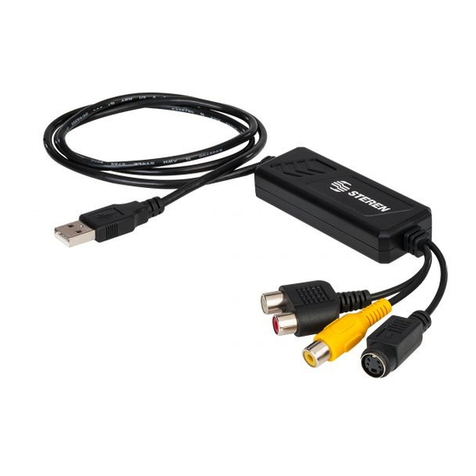
1 Video Capture Device
1 CD with drivers and utilities
1 Instruction Manual
•
•
•
•
•
•
•
•
•
ENGLISH
ENGLISH-3

ENGLISH
ENGLISH-4
Controls
1. Composite Video Input
Allows for the connection of up to four video cameras with RCA
connectors
2. USB jack
Allows you to connect the video capture device to your computer
Make sure that your computer has USB 2.0 ports before
installing this device.
1
2
1
2

Driver Installation
Make sure to install the corresponding drivers before
connecting the video capture device to your computer.
1. Insert the included disc in your computers disc drive.
2. Click the windows start menu and then the RUN option. Type
the following command: XX:\4eyeGrab\Driver\Setup.exe, where
XX is the drive where the disc is located.
3. On the welcome screen that appears, click the NEXT button in
order to continue.
4. The installation process will now begin.
5. In order to conclude the installation, click the FINISH button.
You will now need to restart your computer.
ENGLISH
ENGLISH-5

6. After your computer has been restarted, connect the video
capture device in one of your USB 2.0 ports.
7. Your computer will automatically detect a new device and will
make the necessary updates. After a few seconds, the video
capture device will be completely ready for use.
If you wish to verify that the device has been properly
installed, follow these steps: Open the control panel,
system, hardware, device administrator. Here you should
find the driver USB 2.0 A/V Converter.
ENGLISH
ENGLISH-6
I
f
y
ou wish to verif
y
that the device has been properl
y
i
nstalled, follow these ste
p
s: O
p
en the control
p
anel,
sy
stem, hardware, device administrator. Here
y
ou should
fi
nd the driver USB 2.0 A/V Converter
.

Application Software Installation
1. Insert the included disc in your computers disc drive.
2. Click the windows start menu and then the RUN option. Type
the following command: XX:\4eyeGrab\AP\Software\Setup.exe,
where XX is the drive where the disc is located.
3. On the welcome screen that appears, click the NEXT button in
order to continue.
4. Click the NEXT button in order to select a destination folder.
ENGLISH
ENGLISH-7

5. The installation process will begin.
6. During the process, it will be necessary to install Windows
Media Tools. A new installation window will appear on the
screen. Click YES in order to continue with the installation
process.
7. On the Windows Media Tools start window click NEXT in order
to continue with the installation process.
ENGLISH
ENGLISH-8

8. Select COMPLETE INSTALLATION and click NEXT. It is
possible that a warning window will appear. If this is the case,
simply click OK.
9. On the next window, click FINISH. The installation will begin.
ENGLISH
ENGLISH-9

10. Click OK in order to conclude the installation of Windows
Media Tools.
11. Click FINISH in order to conclude the entire installation
process for the application software.
12. You will find a 4 eyeGrab icon on your Windows desktop.
ENGLISH
ENGLISH-10

Connections
Using your video capture device for the first time
The following screen will be displayed on your monitor
The red colored text indicates a function being executed.
The green colored text indicates a function that can be executed.
The white colored text represents functions that cannot be
executed at this time.
ENGLISH
ENGLISH-11
To USB port
To an external
AV device

If you wish to record, select the camera from which you wish to
record and press the RECORD button. The recording will begin.
The message “Recording” will appear below the name of the
camera being recorded. In order to stop recording, click on the
name of the camera being recorded again.
Functions
Display
Camera I – Camera IV
Press in order to individually view each of the cameras
connected to the video capture device.
Camera All
This option allows you to view all four cameras (if they are all
connected) at the same time.
Sequence
Press in order to view each of the cameras in sequential order
for a predetermined amount of time. (The sequence time can be
programmed in the Camera Settings mode).
ENGLISH
ENGLISH-12

Right mouse button
If you click the right mouse button over one of the images being
viewed, you will get the following options:
Display:
You can select between the visualization of one camera or all of
the cameras at the same time.
Record:
Press in order to begin recording any selected camera or all of
the cameras at the same time.
About:
Displays the current version of the software.
Exit:
Quits the recording program.
Always on top:
Allows you to keep the recording program on top of all other
active programs.
The frames per second being used will diminish when
viewing all four cameras at the same time. If you wish to
record in real time, it is recommended to use only one
camera in the full screen.
ENGLISH
ENGLISH-13
T
he frames per second bein
g
used will diminish when
v
iewin
g
all four cameras at the same time. If
y
ou wish to
recor
d
i
n rea
l
t
i
me,
i
t
i
s recommen
d
e
d
to use on
ly
one
c
amera in the full screen
.

Recorder
Camera I – Camera IV
If you click on one of the camera’s names( 1 – 4), this will
automatically begin the recording from that camera.
Camera All
This option will record the visualized image of the four cameras
simultaneously in four different files.
Sequence
This option will allow you to record from the four cameras onto
one file. You will see four cameras on one image.
The file generated from the recording will be saved as
YYMMDD_hhmmss.avi whereYY is year, MM is month, DD is
day, hh is hour, mm is minute, and ss is second.
Fullscreen
This screen displays the current camera(s) image on the full
screen. Double click the image on the full screen with the left
mouse button in order to return to normal screen view.
ENGLISH
ENGLISH-14
T
he file
g
enerated from the recordin
g
will be saved as
Y
YMMDD_hhmmss.avi whereYY is
y
ear, MM is month, DD is
d
a
y
, hh is hour, mm is minute, and ss is second
.

Snapshot
When you are viewing an image, select one of the active
cameras and click snapshot in order to capture a fixed image.
After you click snapshot, the captured image will be displayed on
a separate window.
Click the right mouse button over the
captured image and you will have available the following options:
Save
Click this in order to save the captured image on the
computer’s hard drive.
Delete
Deletes the captured image
Preview
Displays the image in real size.
Print
Allows you to send the captured image to the printer.
ENGLISH
ENGLISH-15

The captured images are automatically saved with the following
format: YYMMDD-hhmmss.avi, whereYY is year, MM is month,
DD is day, hh is hour, mm is minute, and ss is second
The frames per second being used will diminish when
viewing all four cameras at the same time. If you wish to
record in real time, it is recommended to use only one
camera in the full screen.
Playback
Click playback in order to play the files that have previously been
saved. The following screen will be displayed:
There are different ways to locate a previously saved file:
In the search option, specify the camera from which you
wish to search for files and click FIND. A list of previously
saved files from that specific camera will be displayed on the
screen.
If you know the exact time and date of the desired
recording, you can select the date and/or time options.
If you are not sure of the exact date and time of the
recording, you can indicate a start and end time and/or a
start and end date in order to search for all the files that are
in that range.
•
•
•
ENGLISH
ENGLISH-16
T
he frames per second bein
g
used will diminish when
v
iewin
g
all four cameras at the same time. If
y
ou wish to
recor
d
i
n rea
l
t
i
me,
i
t
i
s recommen
d
e
d
to use on
ly
one
c
amera in the full screen
.

Playback Controls
Play
Click in order to begin the playback of the selected file.
Click twice over the file you wish to play.
Select a file and click OPEN in order to begin playback
Pause
Pauses a video that is in playback
Stop
Stops the current playback
Slow
Diminishes the current playback speed. The speed options are:
1/2x, 1/3x, and 1/4x
Fast
Increases the current playback speed. The speed options are:
2x, 3x, and 4x.
Rewind
Rewinds the current playback at a predetermined speed, which
can be determined each time you click rewind. The speed
options are 1x, 2x, 3x, and 4x.
ENGLISH
ENGLISH-17

Fixed image
Captures the image currently being displayed in the playback
screen.
The captured images are automatically saved with the following
format: YYMMDD-hhmmss.avi, whereYY is year, MM is month,
DD is day, hh is hour, mm is minute, and ss is second
File Information
Displays information about the video that is currently in playback:
recording beginning time, recording ending time, and recording
duration time.
Fast File Search
Allows you to make a fast search for a recorded file in the record
folder. You must specify the date before clicking the search
button.
(Format: Date YYYY/MM/DD Time AM/PM hh/mm)
Click in order to return to the programs main menu.
ENGLISH
ENGLISH-18

Motion Detect
Select this option in order to activate the movement record
function. The camera’s recording will stop after 5 seconds
without any movement.
Camera Setting
With this option you will be able to change the following
parameters:
System:
PAL or NTSC
ENGLISH
ENGLISH-19

B/W / Color
This option allows you to view the images from the cameras in
black & white or in color. (As long as the cameras that are being
used have color capabilities)
Sequence time setting
Allows you to configure the time that passes between the
visualization of one camera and the next in sequence mode.
Camera speed setting
Use this option in order to change the camera’s speed
depending on the speed of your computer and video card.
4 fps: views the image at 4 frames per second
5 fps: views the image at 5 frames per second
6 fps: views the image at 6 frames per second
7 fps: views the image at 7 frames per second
OSD
Use this option in order to change the name of each of the
cameras according to your needs.
Select the camera to be renamed and in the bottom area, input
the desired name.
Color Settings
Allows you to adjust the brightness, contrast, tint, saturation, and
clarity for all the cameras.
If you click default, the modifications that may have been made
will have no effect and the default parameters will be set.
Click OK in order to save the changes.
Click CANCEL in order to exit without saving any changes.
ENGLISH
ENGLISH-20
Other manuals for COM-437
1
Table of contents
Languages:
Other Steren Adapter manuals

Steren
Steren 905-105 User manual

Steren
Steren USB-126 User manual

Steren
Steren COM-205 User manual

Steren
Steren PS2-030 User manual

Steren
Steren 203-815 User manual

Steren
Steren COM-875 User manual

Steren
Steren POD-200 User manual

Steren
Steren COM-260 User manual

Steren
Steren VGA-256 User manual

Steren
Steren ELI-1240 User manual

Steren
Steren COM-475 User manual

Steren
Steren COM-435 User manual

Steren
Steren COM-473 User manual

Steren
Steren 505-490 User manual

Steren
Steren COM-405 User manual

Steren
Steren ELI-1220 User manual

Steren
Steren ELI-820 User manual

Steren
Steren USB-435 User manual

Steren
Steren USB-PAR User manual

Steren
Steren COM-473 User manual