Steren MP4-270 User manual


IMPORTANT
Before using your new MP4 player, please read the
following instructions
Do not use your MP4 player while you are driving or
operating any kind of vehicle.
Keep your MP4 player clean.
Do not place your MP4 player near other hot devices
or in direct sunlight. Do not expose your MP4 player to
dust, humidity, or rain.
If the surface your MP4 player gets dirty, clean it with a
soft dry cloth. Never use alcohol or diluted detergents in
order to clean your device.
Do not use your MP4 player in extremely dry areas in
order to avoid static discharges than can damage the
device.
Make sure not to disconnect your MP4 player while it is
in the process of formatting or loading les. If you do so
you could cause the device to lose the information.
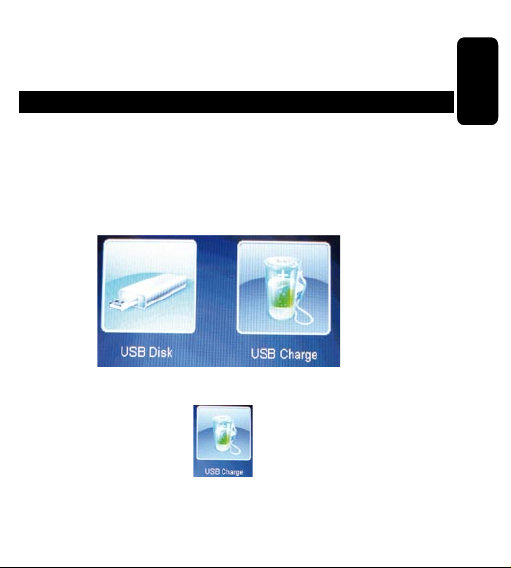
When you are using your MP4 player as a ash drive,
make sure the reading and writing of les is done
correctly. An incorrect data transfer can cause your
MP4 player to lose data.
•
•
•
•
•
•
•
ENGLISH
ENGLISH-02

FEATURES
4 GB capacity.
Mini SD card Slot.
Integrated speaker.
Video Conversion software.
Energy saving mode.
Supports the following music formats: MP3, WMA, WAV.
Supports the following image formats: JPG, BMP, GIF.
Video Format: XVID (through the video conversion
software)
Supports TXT document formats.
Includes three built-in games.
Calculator Function.
Calendar function.
•
•
•
•
•
•
•
•
•
•
•
•
ENGLISH
ENGLISH-03

CONTROLS
1.- ON/OFF SWITCH.
Allows you to power your MP4 player on and off.
2.- OK.
Press Button: Play, pause, and conrm.
Press and hold: Enter sub-menu.
3.- FORWARD
During the playback of a track, skips to the following track.
Selects sub-menu.
ENGLISH
ENGLISH-04
1
710 89
2
3
4
5
6

4.- BACK.
Returns to the following track. Selects sub-menu.
5.- VOL.
Allows you to increase or decrease the volume level.
6.- ESC.
Opens/closes or exits from an application.
7.- MINI USB INPUT JACK.
Allows you to connect a mini-USB cable to the computer.
8.- MINI SD CARD SLOT.
Allows for the reading of data from a mini SD card.
9.- HEADPHONE INPUT JACK.
10.- MIC.
Microphone.
ON/OFF MODE
ON:
Place the ON/OFF switch to the ON position. Wait a few
seconds until the main menu is displayed on the LCD screen.
If the switch is in the ON position and the MP4 player is
powered off, press and hold the ESC button in order to power
it on.
ENGLISH
ENGLISH-05

OFF:
Press and gold the ESC button until the system shuts down.
Place the ON/OFF switch to the OFF position.
BATTERY CHARGE
1.- Make sure that your MP4 player is powered off.
2.- Connect the USB cable to the MP4 player and the other
end to the USB port on your computer.
3.- The screen on your MP4 player will display two options:
USB DISK and USB CHARGE.
4.- With the FORWARD and BACK BUTTONS, select the
USB CHARGE option.
Afterwards, press the OK button.
5.- Set the power switch to the ON position. This is done in
order to guarantee the complete charge of the MP4 player.
ENGLISH
ENGLISH-06

6.- When the battery charging is complete, the computer
screen will display “Charge Finalized” Press the OK button in
order to exit.
If you use the AC power adaptor, the LED light will
switch from illuminating red to illuminating green.
FILE TRANSFER
1.- Make sure that the device is powered off.
2.- Connect the USB cable to the MP4 player and the other
end to the USB port on your computer.
3.- The screen on your MP4 player will display two options:
USB DISK and USB CHARGE
4.- With the FORWARD and BACK BUTTONS, select the
USB DISK option. Afterwards, press the OK button.
ENGLISH
ENGLISH-07

5.- The MP4 player will now be ready to copy les from the
computer to the device. Files such as: music les, video
les, image les, text documents les, etc. You will also be
ready to delete les from the MP4 player.
6.- On the computer, the screen will display a removable
device and the following folders will be available: MUSIC, MY
NOTES, PICTURE, PLAYLIST, RECORD, TXY, and VIDEO
as well as whichever folder you choose to create.
MAIN MENU
When the system starts up, the main menu will be displayed
on the LCD screen. Use the FORWARD and BACK buttons
in order to move around within the different menus. You will
nd the following menus:
A) MY MUSIC
B) MY PICTURE
C) MY VIDEO
D) RECORDER
E) MY EBOOK
F) GAMES AND TOOLS
G) DATA CHANGE
H) SETTING
ENGLISH
ENGLISH-08

Select the desired option by using the FORWARD and
BACK buttons in order to move around within the main
menu. Afterwards, press the OK button in order to enter the
selected sub-menu. Press the ESC button in order to exit the
sub-menu.
A) MY MUSIC
Use the FORWARD and BACK buttons in order to move
within the different sub-menus. Select the MY MUSIC menu.
Press the OK button in order to access this sub-menu. Use
the ESC button in order to exit this sub-menu.
ENGLISH
ENGLISH-09

The different sub-menus are:
NOW PLAYING
ALL MUSIC
ARTIST
ALBUM
GENRE
MY MUSIC LIST
DIR LIST
RECORD LIST
MY MUSIC TAG LIST
Now Playing:
Allows you to play the last song that was played
All Music:
Displays a list of all the songs in your MUSIC folder
Artist:
Allows you to view a list of artists. Select an artist, press the
OK button, and you will be able to view a list of tracks from
the selected artist. Press the ESC button in order to exit the
ARTIST sub-menu.
ENGLISH
ENGLISH-10

Album:
Allows you to view a list of albums. Select an album, press
the OK button, and you will be able to view a list of tracks
from the selected album. Press the ESC button in order to
exit the ALBUM sub-menu.
Genre:
Allows you to view a list of genres or types of music that is
recorded on the MP4 player. Use the FORWARD and BACK
buttons in order to select the desired genre. Use the OK
button in order to access the sub-menu and the ESC button
in order to exit the sub-menu.
My Music List:
Allows you to view ve lists of songs from ve folders (“My
Music”). Select with the FORWARD and BACK buttons and
press the OK button in order to select. Press the ESC button
in order to exit the sub-menu.
Dir List:
Displays two options:
Local memory: These are the tracks that are stored in the
MUSIC folder on your MP4 player.
Card memory: These are the tracks stored on the mini SD
card inserted in the mini SD slot on your MP4 player.
ENGLISH
ENGLISH-11

Recording List:
Allows you to view a list of all the recorded les.
These les are stored in a folder named RECORD
My Music Tag List:
Displays all the selected (checked) tracks
OPERATION OF MUSIC PLAYER
Once you have transferred music les to your MUSIC folder
on the MP4 player, follow these steps for playback:
1.- Power the device ON.
2.- Press the FORWARD and BACK buttons in order to
select the MENU and subsequently the PLAYLIST sub-menu
and press the OK button. This will allow you to enter the
playback application.
3.- Select the desired option from the available sub-menus
(artist, album, genre, etc.) in order to select a type of track.
4.- Select the desired track.
ENGLISH
ENGLISH-12

5.- Press the OK button in order to play the selected track.
This same button can be used in order to play or pause a
track during playback.
6.- Use the FORWARD button in order to skip to the following
track and the BACK button in order to skip to the previous
track.
7.- In order to skip forward within the playback of a track,
press and hold the FORWARD button. In order to skip
backwards within a track, press and hold the BACK button
until you have reached the desired point.
8.- In order to adjust the volume level, during playback mode,
press the VOL button. Press the FORWARD button in order
to increase the volume level. Press the Back button in order
to decrease the volume level. In order to exit the volume
level adjustment, press the VOL button once again.
ENGLISH
ENGLISH-13

9.- During playback, press and hold the OK button in order to
access the following sub-menu options:
REPEAT
EQ
REPLAY TIMES
REPLAY GAP
REPLAY MODE
TEMPO RATE
REMOVE
ADD TO MYLIST
INFORMATION
ADD TAG
FADEIN/FADEOUT
VOLUME
Select the desired option with the FORWARD and BACK
buttons. Afterwards, press the OK button in order to enter.
Press the ESC button in order to exit the sub-menu.
Repeat:
Allows you to repeat one or several tracks. Press the OK
button in order to select one of the following options:
Order: Repeats in order
Repeat one: Repeats one track
Repeat all: Repeats all the selected tracks
ENGLISH
ENGLISH-14

Random: Repeats randomly
Navigate: Allows you to repeat the inserting song
Press the ESC button in order to exit the Repeat mode
sub-menu
EQ:
Allows you to adjust the equalization in several options such
as: natural, rock, pop, classic, soft, jazz, bass, and SRS
WOWHD.
SRS WOWHD
This is a technology that tries to better the audio signal by
simulating a natural 3D acoustic setting.
User Mode
Allows you to adjust the level from 0-10 for:
SRS 3D: Allows you to better the stereo effect by
simulating 3D sound
TruBass: Allows you to accentuate the bass
Focus: Allows you to reposition the sound sources
electronically
You also have the Center, Denition, Speaker size, and
limiter options.
•
•
•
ENGLISH
ENGLISH-15

In order to increase the level, press and hold the FORWARD
button. In order to decrease the level, press and hold the
BACK button.
SRS WOWHD: OPEN allows you to open SRSWOW mode.
CLOSE closes the SRSWOW mode.
Replay Time:
Allows you to repeat on e track from one to ten times.
In order to increase the digit, press and hold the FORWARD
button. In order to decrease the digit, press and hold the
BACK button.
Replay gap:
Allows you to repeat a track for an interval of time, from one
to six seconds. In order to increase the digit, press and hold
the FORWARD button. In order to decrease the digit, press
and hold the BACK button.
Replay mode:
Allows you to change the repeat mode A-B
Tempo ray:
Allows you to increase the speed of the playback of a track.
In order to increase the speed, press and hold the
FORWARD button. In order to decrease the speed, press
and hold the BACK button.
ENGLISH
ENGLISH-16

Remove:
Deletes a track from the MP4 player. Select the option and
press the OK button in order to remove. The LCD screen will
display the message “Sure to delete?” with the following
options: OK or Cancel. Use the FORWARD and BACK
buttons in order to select the desired option.
Add to Mylist:
Adds a track to a folder from the ve playback folders.
Information:
Displays all the tracks information. Such as: Track name,
Album name, Artist name, Genre, Era, File size, Duration
Time, Speed (in bytes), File format, and DRM information.
Add Tag:
Allows you to check a song that will then be saved in the
CHECKED LIST sub-menu in the PLAYLIST menu.
In the playback of this track, the beginning or ending will be
when the track was checked the last time.
ENGLISH
ENGLISH-17

Fadein/Fadeout:
Press and hold the FORWARD button in order to change the
status of the device between OPEN or CLOSED.
Volume: Allows you to increase or decrease the volume level
from 0 to 31.
B) MY PICTURE
Use the FORWARD and BACK buttons in order to move
around the different sub-menus. Select the MY PICTURE
menu.
Press the OK button in order to access the selected option.
Use the ESC button in order exit the selection. The
sub-menus are as follows:
Picture list
Scan mode
Play mode
Slide gap
ENGLISH
ENGLISH-18

Picture List:
Now playing.
Allows you to play the images. All the images will be
displayed. Use the FORWARD and BACK buttons in order to
select the images. Afterwards, press the OK button in order
to display the selected image.
Dir list:
There are two options: main source and card source. In
main source you will see the list of images in your
“PICTURE” folder on your MP4 player. In card source, you
will see the list of images on your mini SD card.
Scan Mode:
Allows you to navigate in two different ways, list mode and
thumbnail mode. List mode will display the images in a list.
Thumbnail mode will display the images in a mosaic where
the images are viewable in a small preview.
Play Mode:
Displays the options for the playback of the images. There
are two different modes: manual mode and slideshow. In
manual mode, the playback of the images will be one by one
switching manually between one image and the next. In
slideshow, all the images will be displayed automatically.
ENGLISH
ENGLISH-19

Slide Gap:
If you wish for the images to be displayed in slideshow mode,
select playback mode and afterwards, select slideshow
mode. Once this has been done, you will be able to select
the time of the interval for each image that will be displayed
(between 1-10 seconds).
In order to change this amount of time, press and hold the
FORWARD button in order to increase it and press and hold
the BACK button in order to decrease it.
OPERATION
Once you have transferred your image les to the PICTURE
folder on your MP4 player, follow these steps in order to view
them:
1.- Power your MP4 player on.
2.- Press the FORWARD and BACK buttons in order to
select the MY PICTURE menu. Afterwards, press the OK
button to enter.
3.- Select the picture list. Afterwards select the source list.
If you wish to open an image from your MP4 player, select
main source. If you wish to view an image from your mini SD
card, select card source.
ENGLISH
ENGLISH-20
Table of contents
Languages:
Other Steren Media Player manuals