Steren NB-600 User manual


Before using your new Uninterruptible Power Supply, please
read this instruction manual to prevent any damage. Put it
away in a safe place for future references.
IMPORTANT
Do not use or store the equipment near wet places. May cause
malfunction or electrical shock.
Do not try to open the equipment, may cause malfunction and
warranty repeal.
Do not expose the equipment to extreme weather.
Battery replacement can only be made by authorized personnel.
Clean only with a soft, dry cloth.
MINIMUM SYSTEM REQUIREMENTS
Available serial port
Pentium processor or higher
Windows 98, 2000, NT, ME, XP
CONTROLS
1.- In-use display
Indicates if the equipment is in use, battery charging or normal
mode
2.- On / Off
Power on / off the equipment
ENGLISH
ENGLISH-2
Before usin
g
y
our new Uninterruptible Power Suppl
y
, please
read this instruction manual to prevent an
y
dama
g
e. Put it
a
wa
y
in a safe place for future references
.
1
2

3.- Communication interface port
Allow one to monitoring the UPS through a PC
4.- Outlets
Allows on to plug up to 4 different appliances
5.- Phone jacks
Allow one to safeguard a phone line
6.- Power cord
Plug the supplied power cord
BATTERY CHARGING
1.- Plug the UPS into an AC household outlet.
2.- To charge the UPS battery at 90% you must leave it for 8
hours approximately.
3.- After that time, you can start to use the equipment.
Do not plug any device during this time.
MESSAGES ON DISPLAY
Normal: Indicates that the equipment is plugged into an AC
outlet, electrical current mode,
Battery: Electrical current fails, UPS is in backup battery mode.
Unusual: Indicates that an overload or a short circuit occurred,
battery back-up time is almost done.
ENGLISH
ENGLISH-3
3
4
56
3
4
56
D
o not plu
g
an
y
device durin
g
this time
.

HOW TO USE THE UPS
1.- Plug the desired equipments into the UPS’ outlets. Do not
overload the equipment capacity. Please refers to technical
specifications.
2.- Connect the UPS into an AC household outlet.
3.- Press and hold the On / Off switch for 5 seconds.
4.- Power on all the plugged devices.
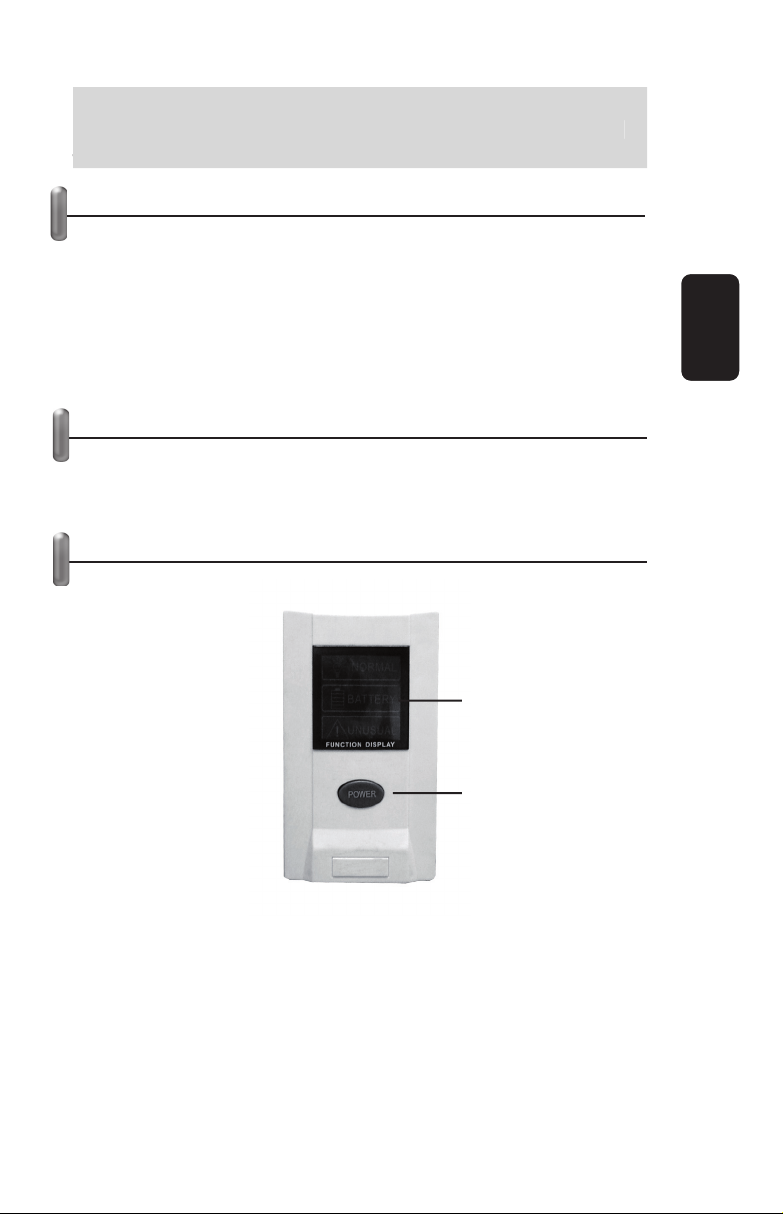
5.- The word Normal displays on screen.
6.- While using the UPS an electrical current fail occurred , the
message Battery displays and you can hear an audible alarm.
You will have up to 20 minutes of battery back-up (NB-600) or up
to 45 minutes (NB-1010). When the electrical current backs to
normality, the message and the alarm will
stop.
7.- The Unusual message display on screen when the UPS’s
battery is near to discharge completely.
During battery mode, if the voltage decrease less than 21V
level, the word UNUSUAL displays and automatically turns
off the equipment.
If an overload or short circuit occurs during battery mode,
the word UNUSUAL displays on screen and you can hear an
audible alarm for 30 seconds. After that time, the equipment
automatically power off. You must restart the UPS.
Place the UPS minimum 10 centimeters between walls and
other objects.
BATTERY STATUS DAILY CHECK-IN
1.- Turn the equipment on.
2.- If the word NORMAL displays on screen, the equipment is in
optimal conditions.
3.- Turns the UPS off.
ENGLISH
ENGLISH-4
D
urin
g
batter
y
mode, if the volta
g
e decrease less than 21V
l
evel, the word UNUSUAL displa
y
s and automaticall
y
turns
o
ff the e
q
ui
p
ment
.
I
f an overload or short circuit occurs durin
g
batter
y
mode,
t
he word UNUSUAL displa
y
s on screen and
y
ou can hear an
a
udible alarm for 30 seconds. After that time, the e
q
ui
p
ment
a
utomaticall
y
power off. You must restart the UPS
.
P
lace the UPS minimum 10 centimeters between walls and
o
t
h
er o
bj
ects
.

MONITOR SOFTWARE INSTALLATION
1.- Place the installation CD into the CD-ROM drive.
2.- A window will pop-up.
3.- Choose Install.
4.- The installation wizard begins, click Next to continue.
5.- Type user name, company and password, then click next to
continue.
6.- Select location destination and click Next.
7.- Choose the installation language. Then click on Next to
continue. The installation process begins.
8.- Once the process concluded, click Finish.
ENGLISH
ENGLISH-5

9.- Click Exit to leave the installation program.
HOW TO USE THE MONITOR SOFTWARE
1.- Plug one end of the serial cable to the UPS. The other end
plug into an available serial port in the computer.
2.- Power the UPS on.
3.- You can start up PowerManager Lite form the PowerManager
Lite Group or Startup Group that lie in the Program Group of the
Start Menu.
4.- In the screen you will see several information about UPS
system.
Select UPS
You can select to monitoring local UPS or remote UPS via
network.
After you have chosen the remote UPS option, the “remote UPS
list window will pop-up. There, you can add or modify remote
UPS.
1.- Click Add to create a Remote UPS.
ENGLISH
ENGLISH-6

2.- Fill the information in every field and click OK.
3.- Select the new Remote UPS, then the software will start to
monitoring.
Shutdown settings
This section allows you to execute and save program and file
before shutdown system and UPS. The delay-time of shutdown
can be set according to the actual condition of the connected
UPS.
Warning message
Use this option to select the type of warning message. This
message will display when the equipment turns off.
Warning sound
This option allows you to activate or deactivate the warning
sound, also you can set the repeating interval, it will sound when
the battery is low or the utility fails.
BIP call
This option allows you to enable or disable the BIP alarm. It will
sound when the utility fails, battery is low, or the utility recover.
ENGLISH
ENGLISH-7

E-Mail
If you activate this option, an warning message will be sent via
e-mail. To configure this option you must enter the SMTP
address, recipient and sender’s address, user and password.
This information must be given by your ISP or e-mail provider.
SMS warning message
This option will send you a SMS message. In order to use this
option, you must use a GSM modem with your computer.
Broadcast
On the page, you can select whether enable NT messenger
broadcast warning function. If you enabled it, the network users
in the LAN will receive NT messenger broadcast warning when
utility fails, battery is low or battery recover.
Once you have made the required changes in the
parameters, you must click on OK to store them in memory.
ENGLISH
ENGLISH-8
O
nce
y
ou have made the required chan
g
es in the
p
arameters,
y
ou must click on OK to store them in memor
y.

TROUBLESHOOTING
ENGLISH
ENGLISH-9
Trouble Solution
The screen displays Battery, even when
the electrical current is normal
Turn off and then turn on the
e
q
ui
p
ment
Re
p
lace the fuse
,
ma
y
be burned
Can't power on the equipment Please, contact an authorized
service centre
When the equipment is in use, the
overload protector turns on and the
equipment is lock
Make sure that the pluffed devices
into the UPS don't overload it
(check the total Watts)
Check for short circuit

SPECIFICATIONS
Product design and specifications are subject to change,
without notice.
NB-600 NB-1010
120V ~ + 15% 120V ~ + 15%
120V ~ + 10% (with
batter
y)
120V ~ + 10% (with
batteries
)
Out
p
ut fre
q
uenc
y
:
Battery type: 12V/7Ah lead-acid (1
batter
y)
12V/7Ah lead-acid (2
batteries
)
Back u
p
time: 20 minutes 45 minutes
Char
g
in
g
time: < 8 hours
(
90%
)
< 8 hours
(
90%
)
Noise fre
q
uenc
y
:<45dB
(
1 metre
)
< 45dB
(
1 metre
)
Dimensions: 3
,
3 x 12
,
9 x 5
,
9in 4
,
7 x 11
,
8 x 7
,
4in
Wei
g
ht: 15lb 28
,
6lb
Input:
Input frequency:
Power:
Output:
Transferring time:
Operating temperature:
Storage temperature:
Humidity:
<10ms < 10ms
120V ~ + 25% (90 –
150V~
)
120V ~ + 25% (90 –
150V~
)
0 – 40°C 0 – 40°C
300W (600VA) 500W (1000VA)
50/60Hz + 5% 50/60Hz + 5%
50Hz + 1% (square
wave
)
50Hz + 1% (square
wave
)
-15 – 45°C
-15 – 45°C
10 – 90% RH 10 – 90% RH
P
roduct desi
g
n and specifications are sub
j
ect to chan
g
e,
w
ithout notice
.
ENGLISH
ENGLISH-10


Antes de utilizar su nuevo No Break lea este instructivo
para evitar cualquier mal funcionamiento. Guárdelo para
futuras referencias.
IMPORTANTE
No use ni almacene este equipo en lugares donde existan
goteras o salpicaduras de agua. Puede causar un mal
funcionamiento o un choque eléctrico.
No intente abrir el equipo, puede ocasionar malfuncionamiento y
anulación de la garantía.
No exponga el equipo a temperaturas extremas.
El reemplazo de batería sólo puede ser realizado por personal
autorizado.
Siempre utilice un paño suave limpio y seco para limpiar el
equipo.
REQUISITOS MÍNIMOS DE SISTEMA
Conector serial disponible
Procesador Pentium o mayor
Windows 98, 2000, NT, ME, XP
CONTROLES
1.- Pantalla indicadora
Indica si el equipo está en uso, carga de batería o modo normal
2.- Encendido / Apagado
Enciende / Apaga el equipo
ESPAÑOL
ESPAÑOL-2
A
ntes
d
e ut
ili
zar su nuevo
N
o
B
rea
k
l
ea este
i
nstruct
i
vo
p
ara evitar cual
q
uier mal funcionamiento. Guárdelo
p
ara
f
uturas referencias
.
1
2

3.- Interfase para computadora
Permite conectar el equipo a una computadora
4.- Contactos
Permite conectar equipos electrónicos
5.- Conectores telefónicos
Permite conectar una línea telefónica
6.- Cable de alimentación
Conecte el cable de alimentación proporcionado
CARGA DE LA BATERÍA
1.- Conecte el cable de alimentación del No-Break en un
tomacorriente casero.
2.- Para realizar un carga al 90% mantenga el equipo conectado
por 8 horas aproximadamente.
3.- Una vez transcurrido este tiempo podrá comenzar a utilizar el
equipo.
No conecte ningún equipo en el UPS durante el tiempo de
carga.
MENSAJES EN EL DISPLAY
Normal: Indica que el equipo está conectado a un tomacorriente,
modo de corriente eléctrica.
ESPAÑOL
ESPAÑOL-3
3
4
56
3
4
56
No conecte nin
g
ún equipo en el UPS durante el tiempo de
c
ar
g
a
.

Battery: La corriente eléctrica falló, el No-Break está en modo de
batería de respaldo.
Unusual: Indica que el equipo ha tenido una sobrecarga, existe
un corto circuito, el tiempo de duración de la batería de respaldo
está a punto de acabarse.
OPERACIÓN DEL NO-BREAK
1.- Conecte los equipos deseados en los contactos del
No-Break. Asegúrese de no sobrecargar la capacidad del
equipo.
2.- Inserte el cable de alimentación del No-Break en un
tomacorriente casero.
3.- Mantenga presionado por 5 segundos el botón de Encendido
del No-Break.
4.- Encienda cada uno de los dispositivos conectados al
No-Break.
5.- El mensaje Normal aparece en pantalla.
6.- Si durante el tiempo que esté utilizando el equipo, ocurre
una falla eléctrica, el mensaje Battery se ilumina y comenzará a
escucharse una alarma audible. Usted tendrá hasta 20 minutos
de respaldo (NB-600) o 45 minutos (NB-1010). El mensaje y la
alarma desaparecerán si la energía
eléctrica vuelve a la normalidad.
7.- El mensaje Unusual aparecerá en pantalla cuando la batería
del No-Break esté próxima a descargarse por completo.
En modo de Batería, cuando el voltaje desciende de los
21V, aparecerá el mensaje UNUSUAL y automáticamente se
apagará.
Si durante el modo de Batería existe un corto circuito o una
sobrecarga, el mensaje UNUSUAL aparecerá en pantalla y
comenzará a emitir una alarma contínua por 30 segundos.
Después de este tiempo, el equipo se apagará
automáticamente. Deberá inicializar el equipo.
Coloque el No-Break a una distancia mínima de 10
centímetros de la pared y otros equipos.
REVISIÓN DIARIA DEL ESTADO DE LA BATERÍA
1.- Encienda el equipo.
2.- Si en pantalla aparece el mensaje NORMAL, el equipo está
en perfectas condiciones de utilizarse.
3.- Apague el No-Break.
ESPAÑOL
ESPAÑOL-4
E
n modo de Batería, cuando el volta
j
e desciende de los
2
1V, aparecerá el mensa
j
e UNUSUAL
y
automáticamente se
a
pa
g
ará
.
S
i durante el modo de Batería existe un corto circuito o una
s
obrecar
g
a, el mensa
j
e UNUSUAL aparecerá en pantalla
y
c
omenzará a emitir una alarma contínua por 30 se
g
undos.
D
espués de este tiempo, el equipo se apa
g
ará
a
utomáticamente. Deberá inicializar el e
q
ui
p
o
.
C
olo
q
ue el No-Break a una distancia mínima de 10
c
entímetros de la pared
y
otros equipos
.

INSTALACIÓN DE SOFTWARE PARA MONITOREO
A TRAVÉS DE UNA PC
1.- Inserte el disco de instalación de software en una unidad de
CD-ROM.
2.- Automáticamente aparece una ventana de instalación.
3.- Seleccione Install.
4.- El asistente de instalación comienza, presione Next para
continuar.
5.-Introduzca un nombre de usuario, la compañía en la que
trabaja y el código suministrado en el empaque del disco de
instalación. Presione Next para continuar.
6.- Seleccione la ubicación de instalación y presione Next para
continuar.
7.- Indique el idioma en el que desee que se instale el
programa. Presione Next para continuar. El proceso de
instalación comienza.
8.- Una vez que el proceso finalizó, presione Finish.
ESPAÑOL
ESPAÑOL-5

9.- Presione Exit para salir del programa de instalación.
COMO UTILIZAR EL SOFTWARE DE MONITOREO
1.- Conecte una terminal del cable serial en el No-Break. La otra
Terminal conéctela a un puerto serial disponible de la
computadora.
2.- Encienda el No-Break.
3.- Ubique la carpeta Power manager Lite en el menú de
Programas de Windows, y seleccione PowerManagerLite.
4.- En la pantalla se mostrará información diversa acerca del
funcionamiento del equipo.
ESPAÑOL
ESPAÑOL-6

Selección de UPS
Mediante esta opción podrá seleccionar el monitoreo de un UPS
local (Local UPS) o vía red de forma remota (Remote UPS).
Si selección la opción Remote UPS, en pantalla aparecerá una
ventana en la que podrá ver y/o agregar UPS remotos.
1.- Presione Adicionar para crear un UPS remoto.
2.- Complete la información de los campos y presione Confirmar.
3.- Seleccione el UPS remoto que desee monitorear.
Ajuste de apagado
Esta sección le permite al usuario ejecutar y guardar de formar
automática programas y archivos específicos antes de que el
sistema se apague. El tiempo de apagado puede ser ajustado
de acuerdo a las condiciones actuales del UPS.
Mensaje de advertencia
Mediante esta opción podrá seleccionar el mensaje de
advertencia que se mostrará cuando el equipo está realice
alguna operación de apagado.
Sonido de advertencia
Utilice esta opción para activar o desactivar el sonido de
advertencia así como ajustar el intervalo de repetición cuando la
batería tenga poca energía o la utilidad falle.
ESPAÑOL
ESPAÑOL-7

Llamada BIP
Permite activar o desactivar la alarma por Bip cuando la utilidad
falla, la batería está baja, la utilidad se reinicia, etc.
Correo electrónico
Activa o desactiva el envío de una alarma por medio de correo
electrónico. Para configurar esta opción deberá introducir datos
como la dirección SMTP, dirección de envío y recepción de
correos electrónicos, usuario y contraseña. Estos datos son
proporcionados por su proveedor de Internet y/o correo
electrónico
Mensaje de advertencia vía SMS
Activa o desactiva la opción de envío de advertencias a través
de mensajes SMS. Para que esta función opere correctamente,
deberá contar con un módem GSM conectado a un puerto
serial.
Radio-difusión
Utilice esta opción para activar o desactivar la función de
advertencia a través de una red de radio-difusión. Si activa esta
opción, los usuarios de la red local (LAN) podrán recibir
advertencias a través del mensajero NT de radio-difusión
cuando la utilidad falla, la batería está baja o la utilidad
se reinició.
Una vez que se han hecho los cambios necesarios, deberá
presionar el botón Reservar para guardarlos en memoria.
ESPAÑOL
ESPAÑOL-8
U
na vez
q
ue se han hecho los cambios necesarios, deberá
p
resionar el botón Reservar para
g
uardarlos en memoria
.

PROBLEMAS Y SOLUCIONES
ESPAÑOL
ESPAÑOL-9
Problema Solución
El indicador del equipo muestra Battery,
aún cuando ya se reestableció la energía
eléctrica
Apague y encienda el equipo
Cambie el fusible, podría estar
q
uemado
El equipo no enciende Acude a un centro autorizado de
servicio
Cuando el equipo está en uso, el protector
de sobrecarga se enciende y bloquea el
equipo
Revise que los equipos
conectados al No-Break no lo
sobrecarguen (revise el total de
Watts
)
Revise que no exista un corto
circuito

ESPECIFICACIONES
El diseño del producto y las especificaciones pueden
cambiar sin previo aviso.
ESPAÑOL
ESPAÑOL-10
NB-600 NB-1010
120V ~ + 15% 120V ~ + 15%
120V ~ + 10% (con
batería
)
120V ~ + 10% (con
baterías
)
Tipo de batería: 12V/7Ah Ácido plomo (1
batería
)
12V/7Ah Ácido plomo (2
baterías
)
Tiem
p
o de res
p
aldo 20 minutos 45 minutos
Tiem
p
o de car
g
a: < 8 horas
(
90%
)
< 8 horas
(
90%
)
Temperatura de
o
p
eración: 0 – 40°C 0 – 40°C
Temperatura de
almacenamiento: -15 – 45°C - 15 – 45°C
Ruido: < 45dB
(
a 1 metro
)
< 45dB
(
a 1 metro
)
Dimensiones: 85 x 330 x 150mm 120 x 300 x 190mm
Peso: 6
,
8k
g
13k
g
Frecuencia de salida:
Tiempo de transferencia
Humedad:
Entrada:
Frecuencia de entrada:
Potencia:
Salida:
10 – 90% RH 10 – 90% RH
50Hz + 1% (onda
cuadrada
)
50Hz + 1% (onda
cuadrada
)
<10ms < 10ms
50/60Hz + 5% 50/60Hz + 5%
300W (600VA) 500W (1000VA)
120V ~ + 25% (90 –
150V~
)
120V ~ + 25% (90 –
150V~
)
E
l diseño del producto
y
las especificaciones pueden
c
ambiar sin
p
revio aviso
.
Other manuals for NB-600
1
This manual suits for next models
1
Table of contents
Languages:
Other Steren Power Supply manuals