STI E5610VC010 User manual

Rear Bumper
① STI Rear Side Under Spoiler
- Install the STI Rear Side Under Spoiler by reading the Installation Manual carefully.
- Handle the STI Rear Side Under Spoiler with care and do not let it fall.
- Do not install or use this product in any way other than described in this manual.
- We do not assume any responsibility for any trouble arising from failure to comply with the
instructions in this manual.
- Double-sided tape is used to attach the STI Rear Side Under Spoiler.
Attach it with care as once it is attached, it is extremely difficult to remove.
-1-
STI Rear Side Under Spoiler
Installation Manual
△00
- This manual describes how to install and handle the STI Rear Side Under Spoiler.
- Read this manual carefully before work and make sure to install it correctly.
!
△
Precautions
Installation Completion Illustration
Genuine part number : E5610VC010/020
Applicable model : WRX(VB),TYPE B~

①
② ③ ④ ⑥
⑤⑦
型紙
LH
RH
BUMPER
BUMPER
REAR SIDE UNDER SPOILER
//////////////////////////
/
/
/
/
/
/
/
/
/
/
/
/
/
/
/
///////////////////////////////////////////////////////////////////////////////////
//////////////////////////
/
/
/
/
/
/
/
/
/
/
/
/
/
/
/
//////////////////////////////////////////////////////////////////////////////////////
REAR SIDE UNDER SPOILER
φ12㎜
φ12㎜
Components
Tools
-2-
Before Work
①
②
RH:1 /LH:1
No. QtyPart Name
STI Rear Side Under Spoiler
2
- Make sure to check the components below before installation.
- When installing this product, park the car on a level ground and apply the parking brake.
- When installing this product, be sure not to damage the car body.
- Before installing this product, wipe off any dirt or oil film from the Rear bumper attachment surface
with a soft waste cloth dampened in a neutral detergent. Then, let it dry completely before work.
- The adhesive strength is weakened significantly when the temperature is 15℃or lower.In this case,
use a dryer to warm the double-sided tape before attachment.
(Do not warm up excessively as doing so may result in deformation.)
- Be extremely careful not to let this product get wet by washing, etc. for 24 hours after attaching it.
Dosing so may cause the product to come off.
- To protect yourself from burns, make sure to stop the engine and let it cool completely before work
- When jacking up the vehicle, be sure to keep the ground level and a hard place where the jack does
not bite, and be sure to support it with a rigid rack before carrying out the work.
③
④
⑤
Clip(Small)
Pattern paper RH/LH (P7)
4
4
φ3mm φ6mm φ9.5mm φ12mm
Clip(Large)
2
⑥
⑦
Washer
Wellnut
Bolt 2
1
8mm

LH
Fr UP
Fr
LH
UP
3mm →6mm→12mm
-3-
LH
Fr UP
Fr
LH
UP
LH
Fr UP
3
2
1
1. Drill holes in the Rear Bumper ( The RH side also performs the same work. )
Masking tape
Rear Bumper
Rear Bumper
Rear Bumper
Rear Bumper
Rear Bumper
Bottom view LH side
Bottom view LH side
LH view
Bottom view LH side
Fender garnish
Remove the
Vehicle clip
Along the bumper shape
Matte range
!
Advice
After drilling, remove the burrs around
the hole.
Make a 12mm hole only in the bumper,
being careful not to penetrate the parts
behind the bumper.
!Advice
(1) Refer to the service manual, remove the
Fender garnish, and remove the Vehicle
screw.
Next, remove the two vehicle clips.
※ Reuse Vehicle screw.
※ Do not reuse Vehicle clip.
(4) Refer to the service manual,restore the
Fender garnish to the Rear Bumper.
(2) As shown in Fig. 2, determine the position
of the pattern according to the P.L.(step)
and fix it with masking tape.
Mark the center of the hole in the ⑦pattern
paper LH with a marking needle.
(3) As shown in Fig.3, spread the rear bumper
outward and insert the waste cloth.
Make pilot holes at the marking positions
in the order of 3 mm and 6 mm, and finally
make a 12 mm hole.
!Advice
Drill
cloth adhesive tape
5mm
During drilling, put a cloth adhesive tape
as a stopper around the drill blade about
5mm from its tip in order to prevent
damages to the Rear Bumper.
Vehicle screw
Vehicle clip
⑦ Pattern paper LH
Fit to P.L.(step)
P.L.(step)
⑦ Pattern paper LH
Spread
the outside
Cover side lower
Cloth, etc.
Spread
the outside

-4-
LH
Fr UP
////////
/////
////////////////
LH
Fr UP
Fr
LH
UP
3mm →6mm→9.5mm
a
////////
LH
Fr UP
4
5
6
( The RH side also performs the same work. )
Rear Bumper
Rear Bumper
Rear Bumper
【Enlarged view a】
The center of the cross mark
in front of the vehicle
Bottom view LH side
Bottom view LH side
LH view
Bottom view LH side
!Advice
Drill
cloth adhesive tape
!Advice
After drilling, remove the burrs around
the hole.
Clean with a waste cloth, etc.
If rainwater is attached, wipe it dry with
a dry cloth.
Insufficient wiping and drying can cause
the product to come off.
!Advice
(5) As shown in Fig.4, mark the center of the
cross mark with a marking needle.
Make pilot holes at the marking positions
in the order of 3 mm and 6 mm, and finally
make a 9.5 mm hole.
(6) Insert the ⑤wellnut into the 9.5 mm hole.
(1) Clean, degreas, and dry the shaded area of
the Rear Bumper with a degreasing agent.
5mm
During drilling, put a cloth adhesive tape
as a stopper around the drill blade about
5mm from its tip in order to prevent
damages to the Rear Bumper.
2. Cleaninng/Degreasing
⑤ Wellnut

-5-
LH
Fr UP
LH
Fr UP
LH
Fr UP
▲
▲
▲
▲
b
b
10
9
8
7
3. Install the STI Rear Side Under Spoiler ( The RH side also performs the same work. )
Masking tape
Bottom view LH side
Phillips screwdriver
!Advice
Do not peel off the double-sided tape
liner more than necessary.
Double-sided tape clings to the bumper,
which hinders positioning.
【 b-b section 】
(1) Part of the double-sided tape liners on the
① STI Rear Side Under Spoiler is peeled
off and fixed with masking tape.
Rear Bumper
② Clip(Small)
③ Clip(Large)
④ Washer
⑥ Bolt
④ Washer
③ Clip(Large)
① STI Rear Side Under Spoiler
(2) Align the ① STI Rear Under Spoiler with
the Rear Bumper and fix it with a
② Clip(Small).
(3) Secure the ① Rear Side Under Spoiler
with ④ Washer and ③ Clip(Large).
(4) Temporarily fix the ① STI Rear Under
Spoiler with ⑥ Bolt.

-6-
c
(1) (2) (3) (4)
△
Newly created document
Revised contents
Details of the work Date
11 / Jun / 2021
00
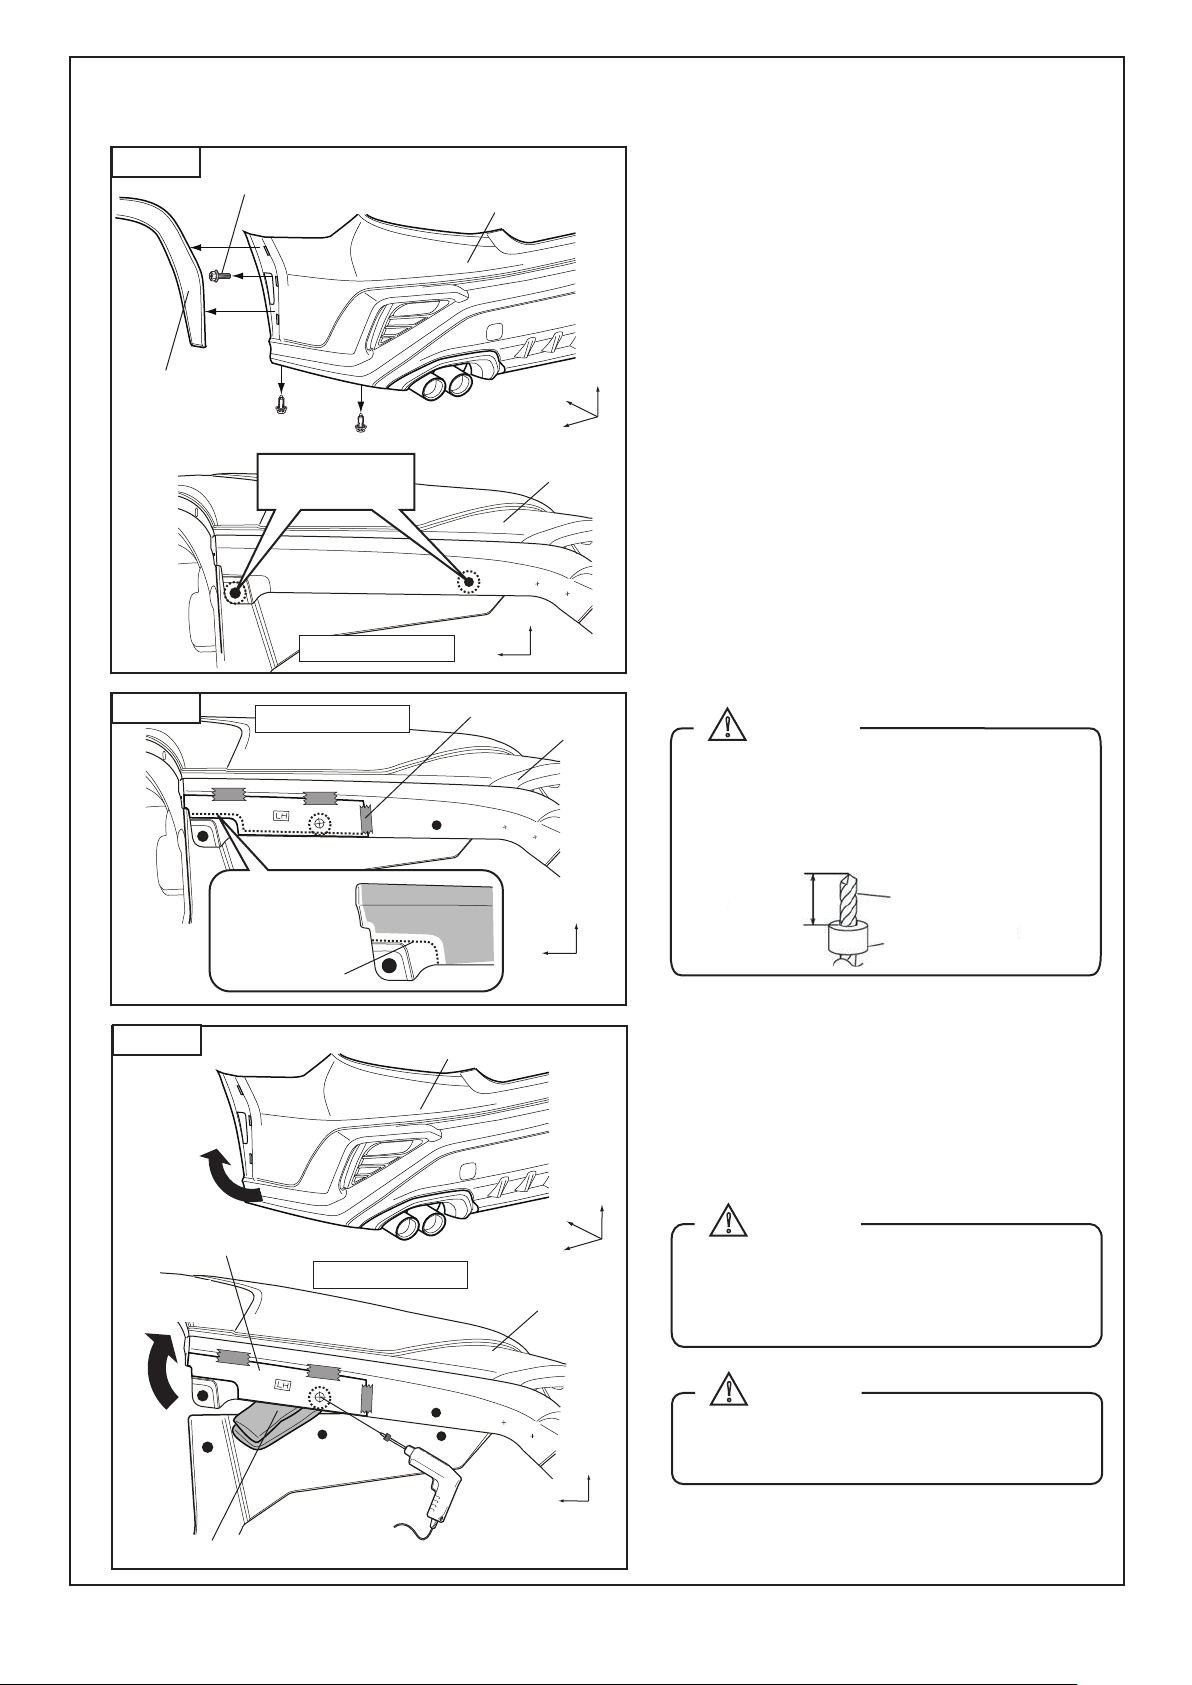
Reference tightening torque 1.0N・m
(0.1kgf・m)
This is the end of the work.
(7) Fully tighten the bottom ⑥bolt with a
ratchet wrench 8 mm.
!Advice
If it is difficult to remove the release paper,
slowly pull it out with needle-nose pliers.
(5) Compare the arrow C and decide the
mounting position so that the left and right
sides look even.
The double-sided tape is crimped while
slowly pulling out the release paper in the
order of (1) to (4).
11
12
・By installing this product, it is up to 32mm lower than the rear bumper.
・Because it is easy to come into contact with curbs, ring clasps, steps, etc.
Be careful not to touch it while driving or parking.
If it comes in contact with it, it may be scratched, deformed, damaged or dropped, and the spoiler
may be damaged accordingly.
・In the case of slight contact, you may not notice the contact, so be sure to perform a pre-operation
inspection and check the area around the mounting part in particular.
・Also, running in snow or ruts may damage the spoiler, deform it, drop it off, or damage the vehicle.
Damage caused by these or equivalent external forces is not covered by the warranty.
To customers
(6) The force that the car shakes with the
double-sided tape adhesive part
Crimping with.
・The back side of this product is not painted. It may vary depending on the product.
・We do not accept warranty repairs such as scratches, discoloration of paint, and peeling that occur
during use.
(8) Finally, check the floating and tilt of the
mounting part, No missing clips or bolts or
forgetting to tighten Please check if it is.

-7-
LH
RH
BUMPER
BUMPER
REAR SIDE UNDER SPOILER
///////////////////////////
/
/
/
/
/
/
/
/
/
/
/
/
/
/
//////////////////////////////////////////////////////////////////////////////////////
///////////////////////////
/
/
/
/
/
/
/
/
/
/
/
/
/
/
//////////////////////////////////////////////////////////////////////////////////////
REAR SIDE UNDER SPOILER
φ12 ㎜
φ12 ㎜
!Advice
・If you print, there is a possibility of scale is not a 1/1.
・Use after copying so that the scale is 1/1.
Cut on the outside of the line.
⑦ Pattern paper
This manual suits for next models
1
Other STI Automobile Accessories manuals