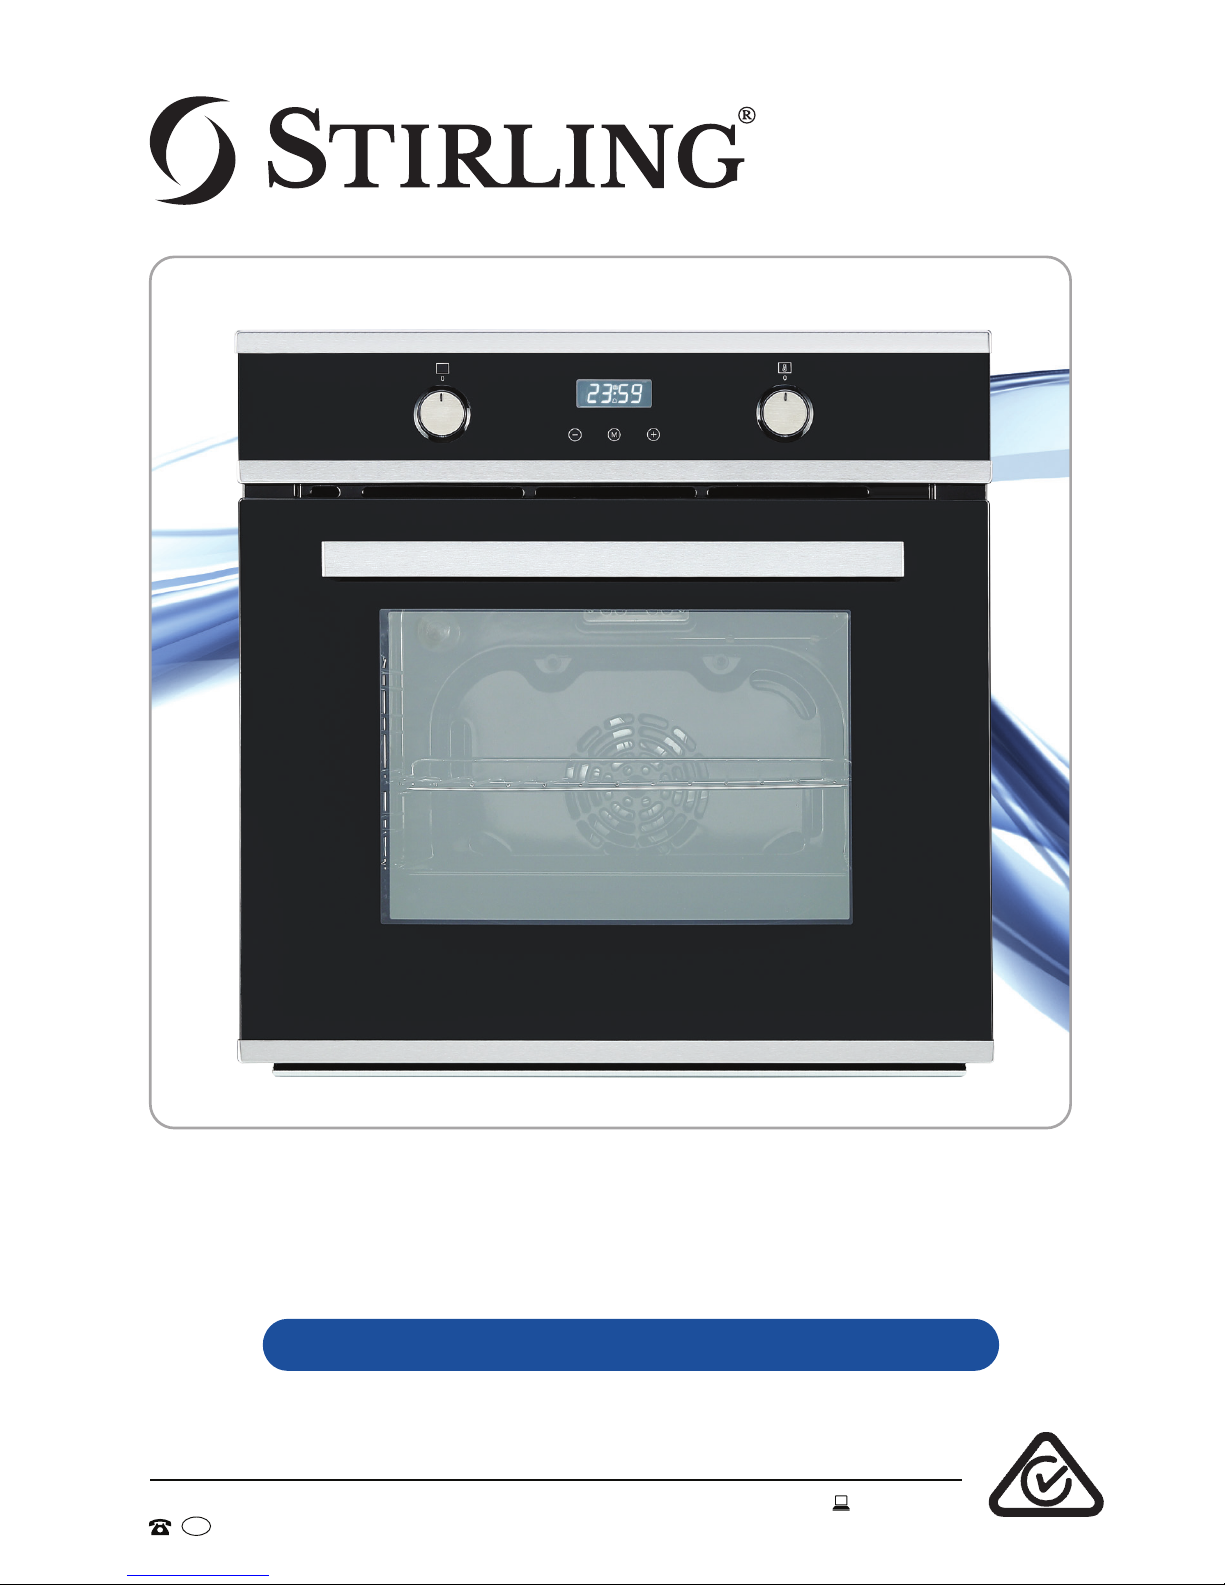
Stirling STR-AEO User manual
N13275
AFTER SALES SUPPORT
1300 886 649
AUS MODEL: STR-AEO PRODUCT CODE: 56595 04/2017
Model Number STR-AEO
Electric Oven
INSTRUCTION MANUAL

2
Welcome
Congratulations on choosing to buy a STIRLING®product.
All products brought to you by STIRLING®are manufactured to the highest
standards of performance and safety and, as part of our philosophy of
customer service and satisfaction, are backed by our comprehensive 3 Year
in Home Warranty. We hope you will enjoy using your purchase for many years
to come.

3
Contents
02 Welcome
04 Warranty Details
05 General Safety Instructions
08 Product Overview
10 Installation
16 Getting Started
17 Instructions
27 Cooking Guidelines
29 FAQs
31 Other Useful Information
39 Repair and Refurbished Goods or Parts Notice

4
Electric Oven
Warranty Details
The product is guaranteed to be free from defects in workmanship and parts
for a period of 36 months from the date of purchase. Defects that occur
within this warranty period, under normal use and care, will be repaired,
replaced or refunded at our discretion, solely at our option with no charge for
parts and labour. The benefits conferred by this warranty are in addition
to all rights and remedies in respect of the product that the consumer
has under the Competition and Consumer Act 2010 and similar state and
territory laws.
Our goods come with guarantees that cannot be excluded under the
Australian Consumer Law. You are entitled to a replacement or refund for
a major failure and to compensation for any other reasonably foreseeable
loss or damage. You are also entitled to have the goods repaired or
replaced if the goods fail to be of acceptable quality and the failure does
not amount to a major failure.
YEAR IN HOME
WARRANTY
3
REGISTER YOUR PURCHASE AT www.aldi.com.au/en/about-aldi/product-registration/ TO KEEP UP-TO-DATE WITH IMPORTANT PRODUCT INFORMATION

5
General Safety Instructions
Important Installation Advice
• This oven must be installed by a licensed electrician.
• Adjacent furniture: When having the oven installed, make sure that
the adjacent furniture or housing, and all installation materials, are able
to withstand a minimum temperature of 85°C above the ambient room
temperature while the oven is in use.
• Certain types of vinyl or laminate kitchen furniture are particularly prone
to heat damage or discolouration at temperatures below the guidelines
given above. We assume no liability for any damage caused by the
appliances being installed in contravention of this temperature limit, or by
placing adjacent cabinet materials closer than 4mm near the appliance.
• Ventilation: Heat, steam and moisture will be created during use of the
oven. Take care to avoid injury and ensure that the room is adequately
ventilated. If the appliance is going to be used for prolonged periods
of time, additional ventilation may be required. If in doubt about your
ventilation requirements, consult your qualied installer.
• Cables: Do not allow electrical ttings or cables to come into contact
with areas on the oven that get hot.
• Curtains: Do not install the oven next to curtains or soft furnishings.
• Damaged cord: If the power cord is damaged, it must be replaced by the
manufacturer or a qualied service engineer in order to avoid a hazard.
IMPORTANT SAFETY INSTRUCTIONS
READ CAREFULLY AND KEEP FOR FUTURE REFERENCE
Read this manual thoroughly before first use, even if you are familiar with
this type of product. The safety precautions enclosed herein reduce the risk
of fire, electric shock and injury when correctly adhered to. Keep the manual
in a safe place for future reference, along with the completed warranty card
and purchase receipt. If applicable, pass these instructions on to the next
owner of the appliance.
Always follow basic safety precautions and accident prevention
measures when using an electrical appliance, including the following:

6
General Safety Instructions (Cont.)
General Usage Conditions and Restrictions
• Domestic use only: This oven is designed for indoor domestic use only. It
can be built into a standard kitchen cabinet or housing unit.
• Intended purpose: Only use this oven for its intended purpose, in its
intended environment and as described in this manual. Any other use may
cause re, electric shock or injury. This oven is not intended for commercial,
industrial or trade use.
• Follow instructions: Make sure to observe all rules and provisions in
this instruction manual. Do not allow anybody who is not familiar with the
contents of this manual to operate the oven.
• Use common sense: These instructions are not intended to cover
every possible condition and situation. As with any electrical household
appliance, common sense and caution are therefore always recommended
when installing, operating and maintaining the oven.
• Usage restriction: This oven is not intended for use by persons (including
children) with reduced physical, sensory or mental capabilities, or lack of ex-
perience and knowledge, unless they have been given supervision or instruc-
tion concerning use of the appliance by a person responsible for their safety.
• Supervise children: Young children do not recognise the risks involved
when using electrical appliances. Make sure children younger than 8 years
of age are kept away from the oven during use. If it is necessary for younger
family members to be in the kitchen, ensure that they are kept under close
supervision at all times.
• Unattended: Never leave the oven unattended during use, as this is a re
risk. Oils and fats in roasting dishes may catch re due to overheating.
• No heater: Do not use the oven for heating a room or drying clothes.
• No timer: The appliance is not intended to be operated by means of an
external timer or separate remote control system.
• After use: Make sure to switch off the oven after use and before cleaning.
• Damage: Do not use the oven if any part has been damaged or does not
work properly. Only have it repaired by an authorised service centre.
Incorrect repair could expose you to the risk of electric shock, re or
injury. Prolonged use of the unit in such conditions could cause re or
electrocution. In case of damage, contact our after sales support centre
using the details at the bottom of this page.
• Liability: We assume no liability for any eventual damages caused by
misuse of the product or noncompliance with these instructions.

7
General Safety Instructions (Cont.)
• Do not use when faulty: Do not use the oven in the event of a technical
fault. Any faults must be xed by an appropriately qualied and authorised
person. Contact our after sales support line for advice.
Oven-Specific Safety Advice
• Oven door: Do not place heavy objects on the oven door. Do not lean on
the oven door when it is open, as this can damage the door hinges.
• Grill: Keep the oven door closed when using the grill function.
• Oven cavity: During cooking, never place pans or cookware directly onto
the bottom of your oven. Always place them on the shelves provided.
• Oven accessories: When removing the baking/drip tray or oven rack
from the hot oven, always use an oven mitt. If a temperature probe is
included in the scope of delivery, only use the supplied probe.
• Aluminium foil: Do not use aluminium foil to cover the grill pan or heat
items wrapped in aluminium foil under the grill. The high reectivity of the
foil could potentially damage the grill element. You should also never line
the base of your oven with aluminium foil.
• Lifting/moving: Do not attempt to lift or move the oven by using the
oven door or handle, as this may cause damage to the appliance or result
in injury to the person lifting the appliance.
• Cleaning: Clean the oven on a regular basis so oils and fats do not
accumulate and cause a re risk. Make sure the oven is switched off
before cleaning. Do not use harsh abrasive cleaners or metal scrapers
to clean the oven door glass as this can scratch the surface, which may
result in the oven glass shattering. Do not use steam cleaning equipment
for cleaning any part of the oven. When cleaning the oven, ensure that no
part is immersed in water or other liquid.
CAUTION: HOT SURFACE!
This symbol indicates that the heating elements and other acces-
sible parts inside the oven cavity become extremely hot during use
and can cause burns on contact. Do not touch hot surfaces! Take
care when handling the food you are cooking to avoid touching hot
parts inadvertently. Keep young children well away during use.
• Opening the door: Be careful when opening the oven door to avoid contact
with hot parts of the oven and steam.
• Danger of fire! Never leave items inside the oven cavity as this can be a re
hazard when the oven is switched on.

8
Product Overview
Oven Cavity
A 1x Oven Rack
B 1x Baking/Drip Tray
C 1x Oven Light
D 2x Side Rack Supports for 4 Shelf Positions:
1 (Lowest)
2 (Medium Low)
3 (Medium High)
4 (Highest)
E Fan Cover
F 4x St4*26 Screws and 4x Plugs for Installation
BA
DD
4
1
4
33
2
1
2
C
E
F
9
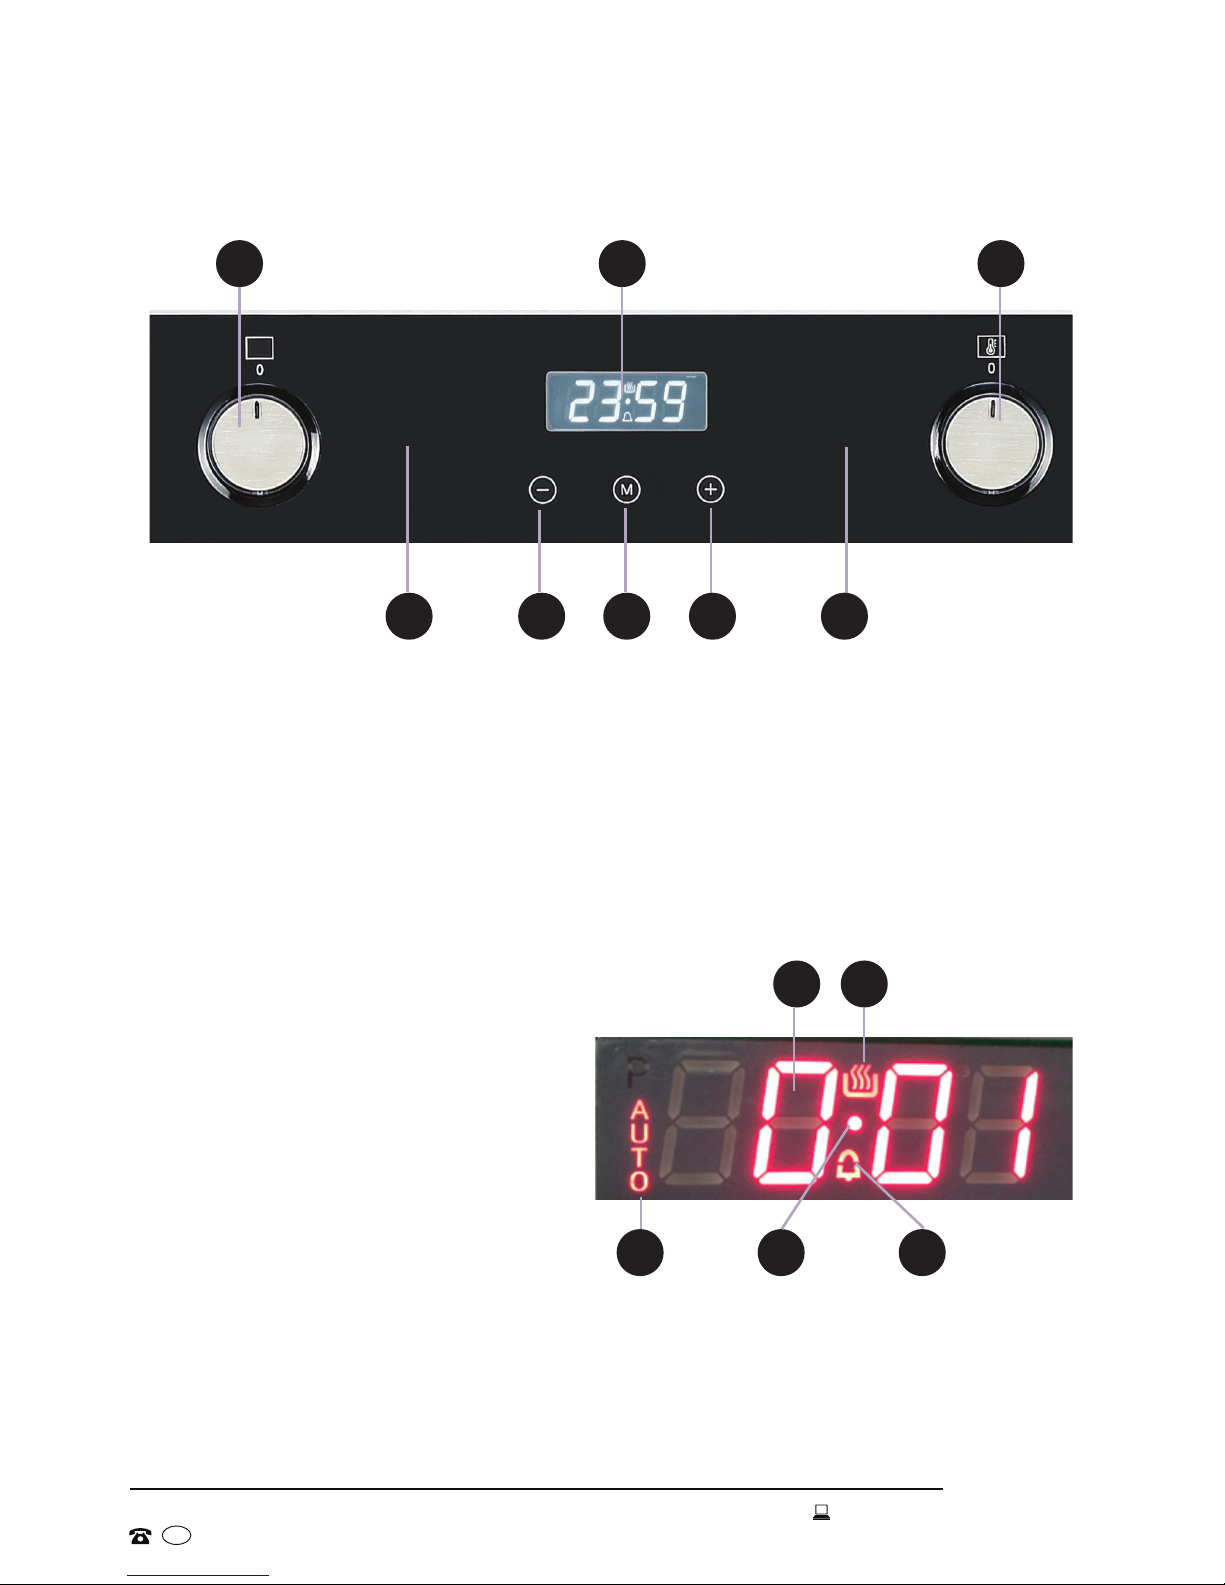
Product Overview (Cont.)
Control Panel
LED Display
1 Function Selector Dial
2 LED Display
3 Thermostat Control Dial
4 Power Indicator Light (will be on when a function is selected)
5 Minus [ - ] Button (for time adjustment)
6 Manual [ M ] Button
7 Plus [ + ] Button (for time adjustment)
8 Heating Indicator Light (will be on when the oven is heating)
9 Time Display (hr:min)
10 Heating Symbol
11 Automatic Mode Symbol
12 Time Adjustment Symbol
13 Minute Minder Symbol
1
4 5
2 3
6 7 8
NOTE:
Due to continued product improvement, images and illustrations in this manual may
vary slightly from the product purchased. All images in this manual are for reference
purposes only. Parts are not necessarily pictured to scale.
109
1211 13
10
Installation
Unpacking the Appliance
• This product has been packaged to protect it against transportation
damage. Unpack the appliance and remove all packaging materials from
around the oven and from inside the oven cavity.
• Keep all packaging materials until you have made sure your new oven is
undamaged and in good working order. The carton is recyclable. Whenever
possible, reuse the carton and recycle it when disposing of the packaging
materials.
• Plastic wrapping can be a suffocation hazard for babies and young
children, so ensure all packaging materials are out of their reach, and
dispose of them safely.
This oven must be correctly installed by an appropriately qualified
electrician in accordance with all applicable rules and regulations and
following the instructions in this manual.
Do not try to install the oven yourself; doing so will expose you to danger and
void the warranty. Improper installation, adjustment, alteration or service can
cause injury or damage. We decline any responsibility for injury or damage,
to persons or property, as a result of improper use or installation.
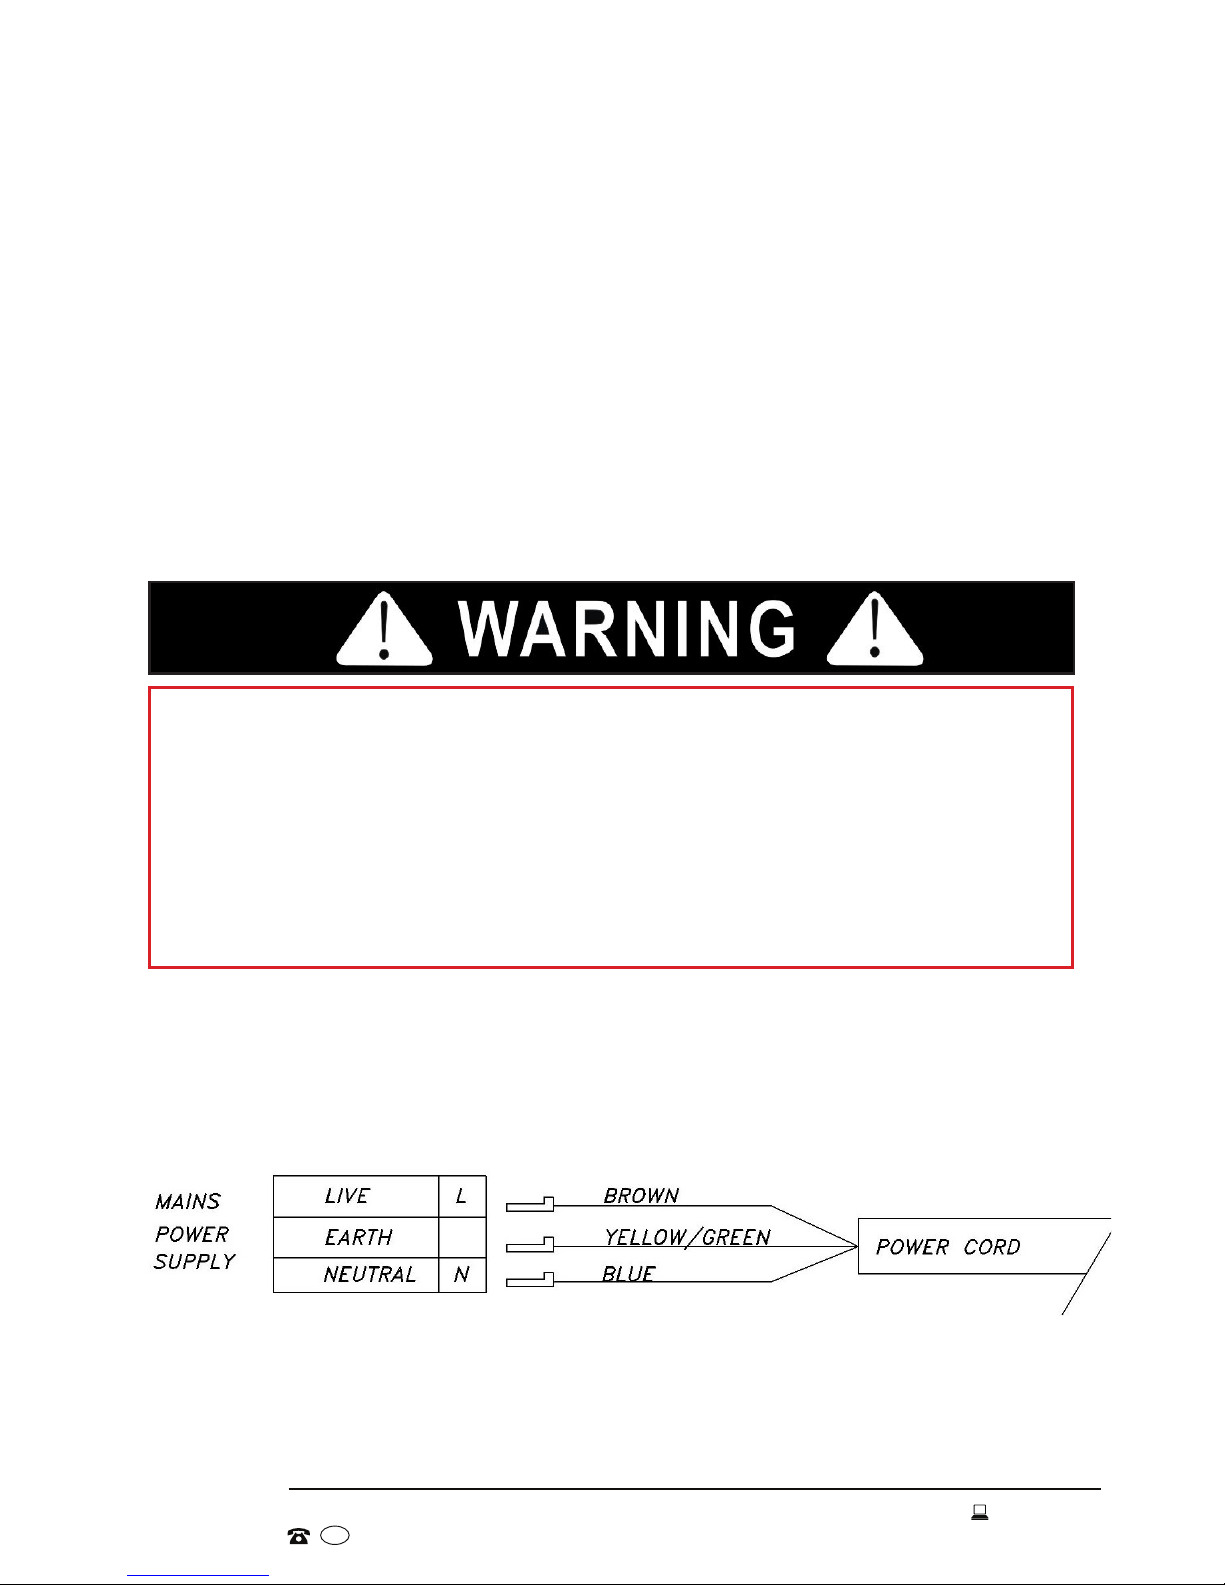
Important Advice for the Installer
• Before connecting the appliance, make sure that the supply voltage
marked on the rating plate corresponds with your mains supply voltage.
• WARNING: This appliance must be earthed.
• Means for disconnection must be incorporated in the fixed wiring in
accordance with the wiring rules.
• The appliance should be connected to a circuit which incorporates an
isolating switch providing full disconnection from the power supply.
11
Installation (Cont.)
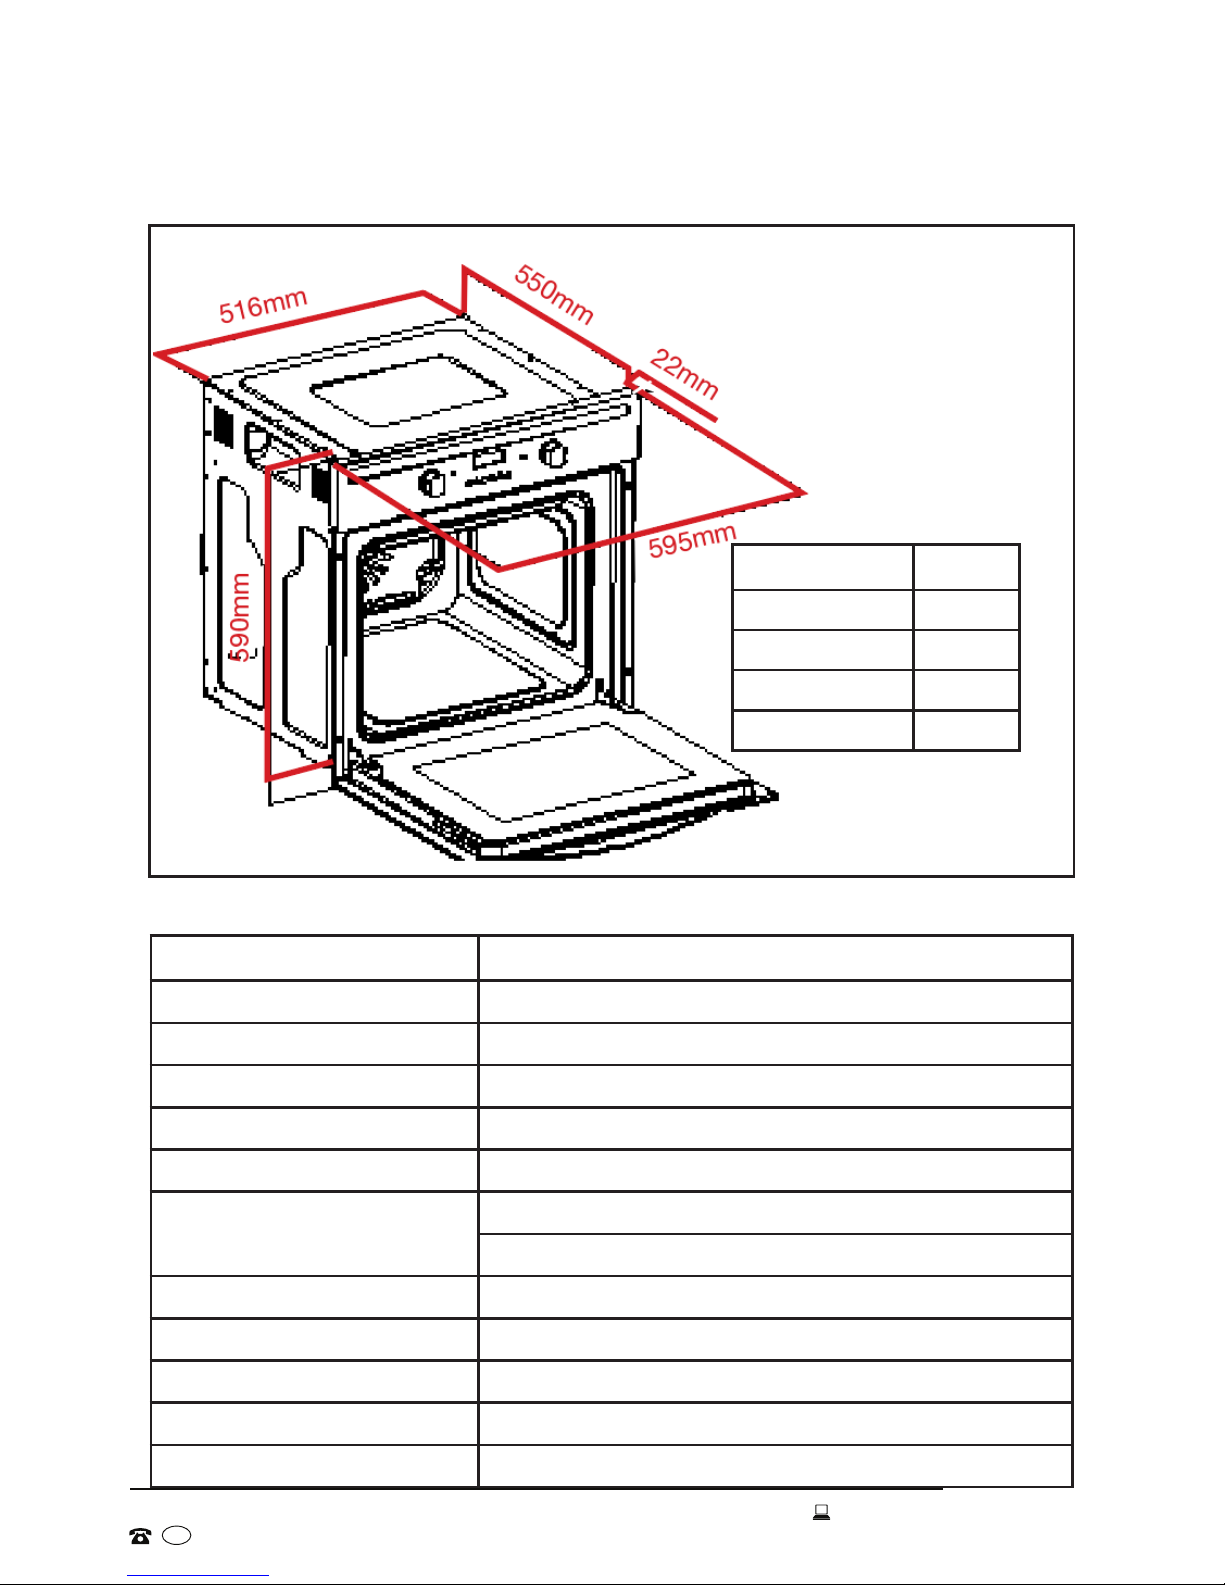
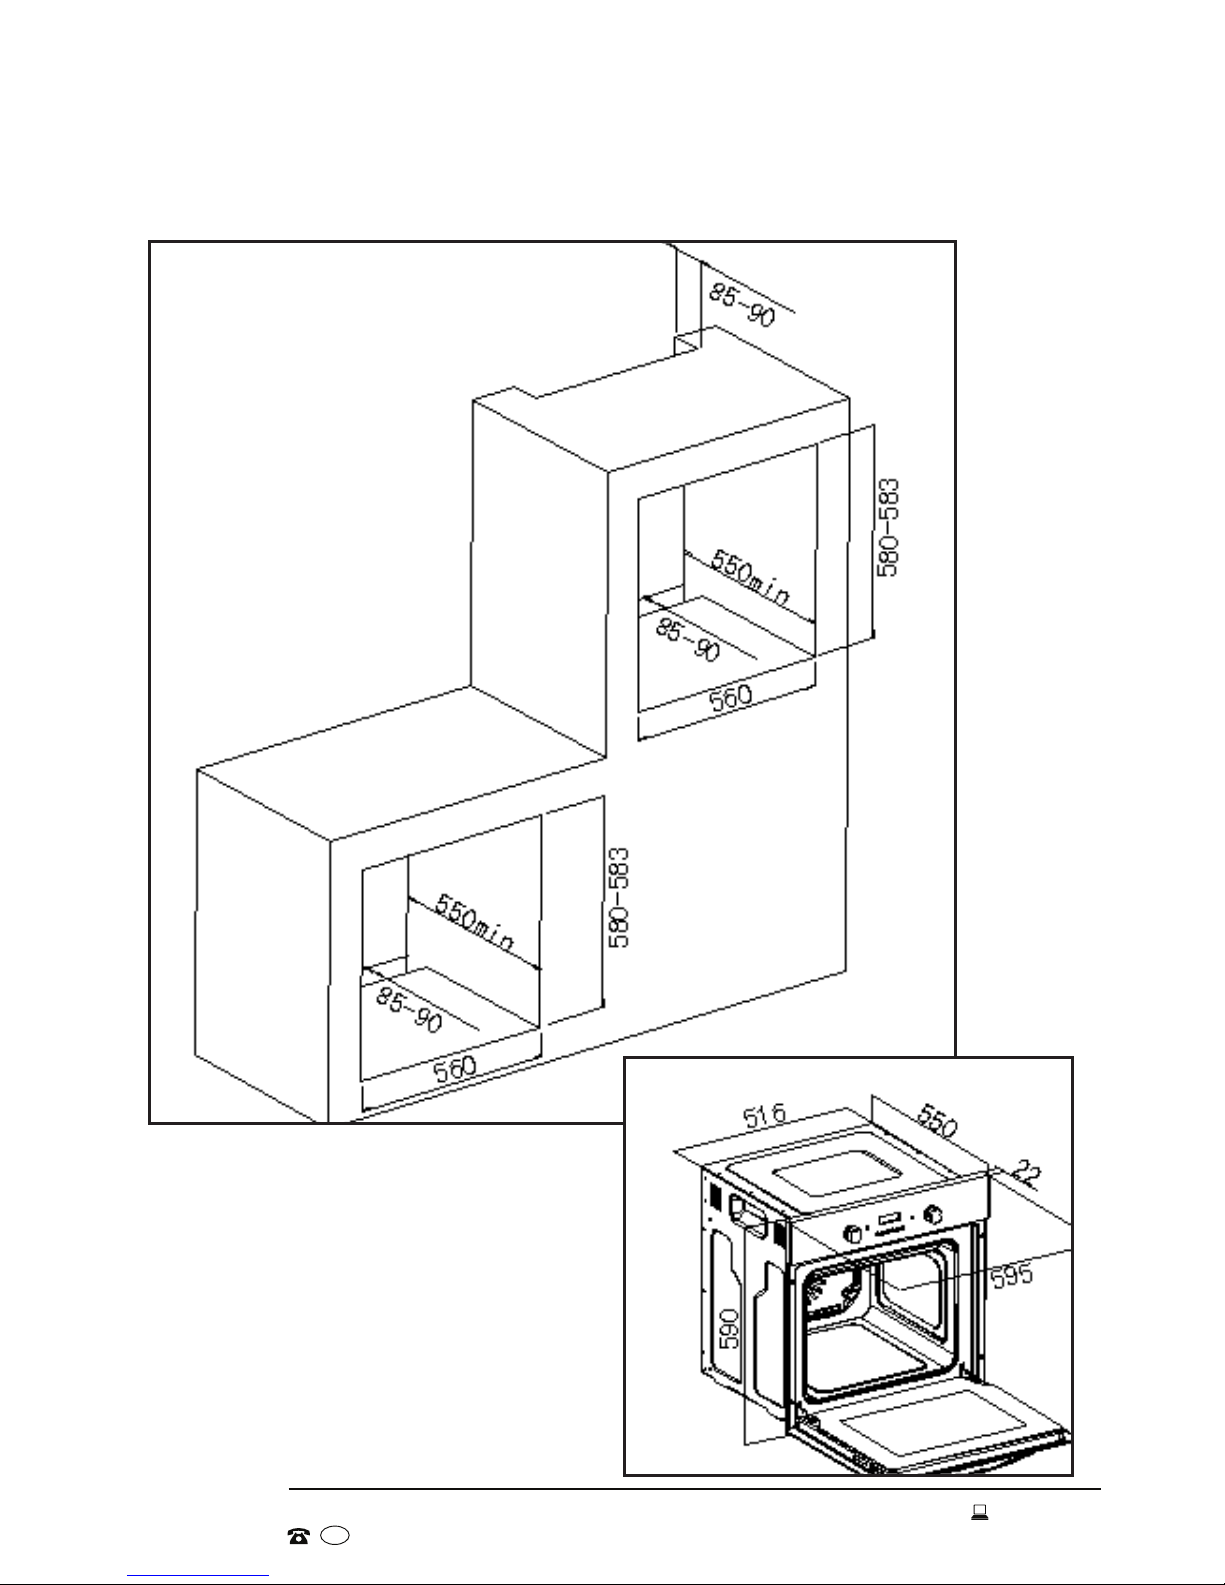
Dimensions
Specifications
Oven chamber capacity 58L
Dimensions See Fig. 1, above
Weight 29kg (33kg with packaging carton)
Shelf positions 4
Oven door Triple glazed, removable
Oven light bulb 25W, 300°C, screw type pigmy
Accessories 1 x Baking/drip tray, 1 x Oven rack
Set of side racks (already assembled)
Oven functions 5
Oven temperature range 50 – 250°C
Timer 24 hour, digital
Rated voltage / frequency 220-240V~ / 50Hz
Total rated mains power 2300W
Height 590mm
Width of Face 595mm
Width of Back 516mm
Depth of Face 22mm
Depth of Back 550mm
Fig. 1
12
Fig. 2
Space requirements
Installation (Cont.)
Installing the Oven into a Kitchen Cabinet
Fig. 3
NOTE: Fig. 3 is printed in more detail
on the previous page as Fig. 1.
13
Installation (Cont.)
Positioning the Appliance
• Ensure that the aperture that you will be fitting the oven into is of the size
given in Fig. 2, opposite.
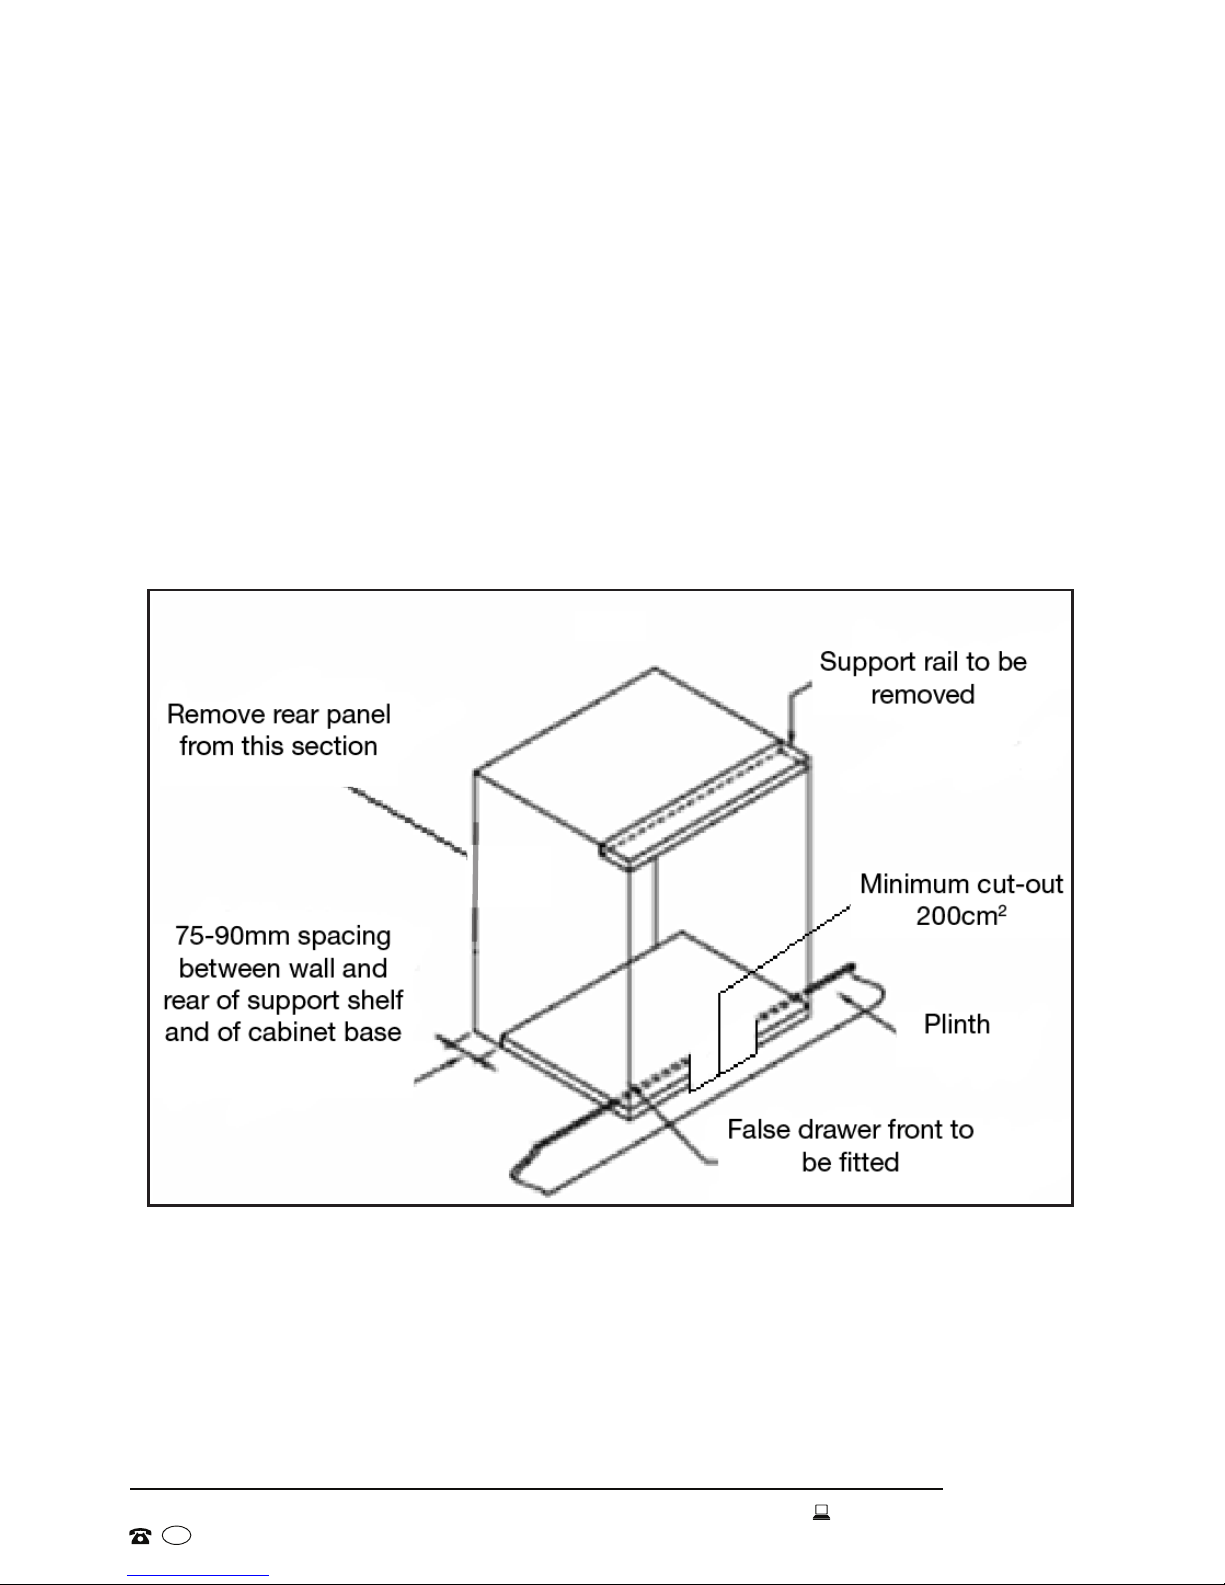
• The oven must be fitted into an oven housing with the ventilation cut-outs
shown in Fig. 4 below.
• Ensure that the rear panel of the furniture housing unit has been removed.
Fig. 4: Ventilation and cut-out requirements for the installation of the
appliance into a standard kitchen unit
Fig. 4
14
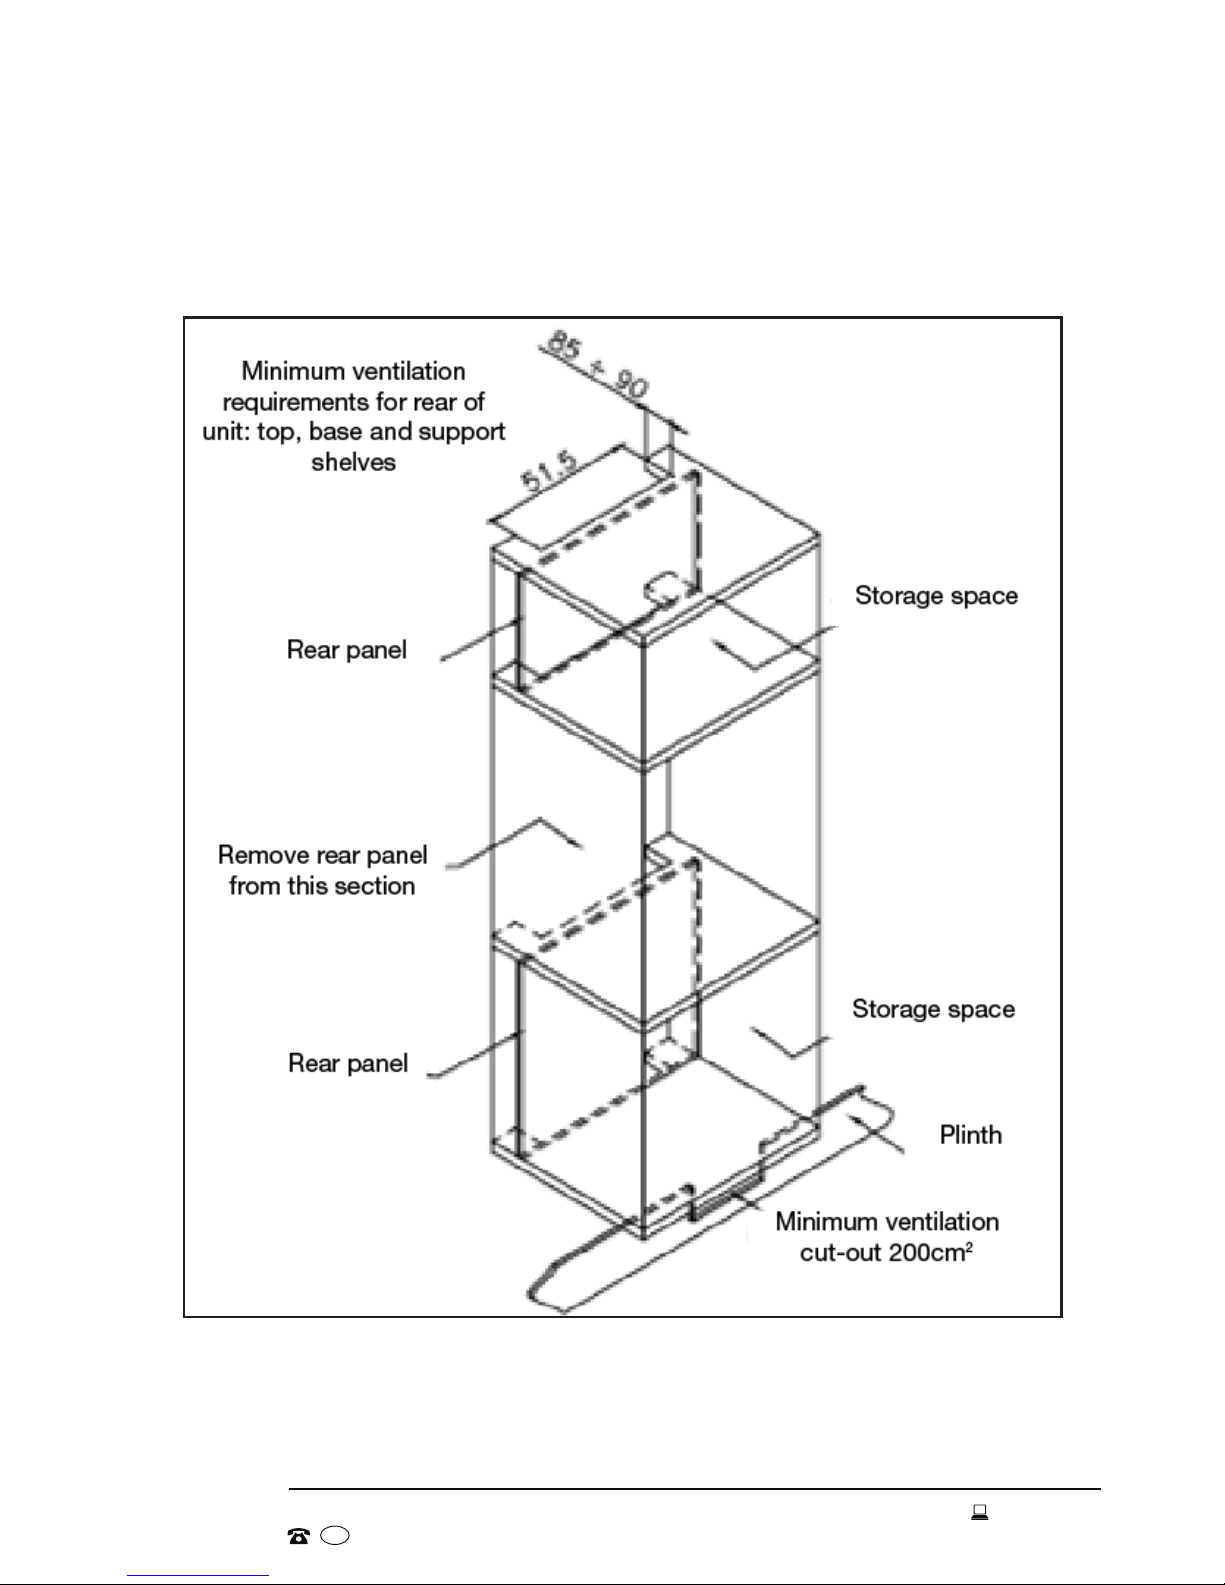
Installation (Cont.)
Fig. 5: Ventilation and cut-out requirements for the installation of the
appliance into a tall housing unit
Fig. 5

15
Installation (Cont.)
Ensure that the oven has been securely fixed into the housing unit. To fix the
oven into the housing unit, attach the four plugs (supplied) through the slots
at the sides of the unit (marked with arrows in Fig. 6 below) and then use the
four screws (supplied) to affix the oven cabinet into the housing unit.
Fig. 6

16
Before First Use
• Read: The best way to familiarise yourself with all the parts and operating
principles of your new electric oven is to read this manual. Pay particular
attention to the safety instructions on pages 5–7. Refer to pages 8–9 for a
picture and list of all parts and buttons.
• Initial use: After the appliance has been properly installed, and before rst
use, you should burn off any dust, oil or other remnants that may have
been left from the manufacturing process or transport.
First set the oven to manual operation mode (see opposite for instructions).
Then set the oven function to the “Intensive Bake” setting (see page 23)
and the thermostat to 250°C. The two control dials just need to be pushed
in slightly, they will then pop out and reveal the available function options or
temperature settings.
Leave the oven on for 30–40 minutes. We recommend you leave the
room during this burning off process. However, any smoke and odour
development during this initial use is normal and completely harmless;
ensure good ventilation.
• Clean: After the oven cavity has cooled, wipe the interior oven surfaces
with a soft cloth dampened with warm water and a little mild detergent. Do
not use abrasive cleaners.
• Wash: Remove and wash the oven rack and baking/drip tray with warm
water and a little washing-up liquid. Dry and return to the oven. Leave the
oven door open until it is completely dry.
CAUTION!
Take care to avoid burns, the oven becomes very hot during use.
Getting Started

17
Using the Oven Programmer/Timer
Timer Operation
Your new electric oven has a digital timer with an easy
to read LED display and 3 control buttons for easy
operation (Fig. 7).
The timer has three different functions. You can use it:
(a) as a minute minder, or
(b) to set the cooking duration, or
(c) to set the cooking end time, or
(d) to set the cooking start time and end time.
Detailed descriptions of all functions are provided on the
following pages.
Manual Operation Mode
When your appliance is connected to the mains supply for the rst time,
the numbers on the timer display will ash. Before you can select a cooking
function or set a temperature, you must set the appliance into manual
operation mode.
• Press and hold the MANUAL [ M ] button for 3 seconds to set the oven
into manual operation (standby) mode.
Setting the Clock
After setting your oven for manual operation, the Time Adjustment symbol will
start ashing on the display, prompting you to set the time of day.
• Use the PLUS [ + ] and MINUS [ - ] buttons to adjust the time that appears
in the display to the current time of day. When the correct time is displayed,
release the PLUS [ +] and MINUS [ - ] buttons and wait for 5 seconds. The
Time Adjustment symbol will then stop ashing and the time is set.
• To readjust the time on the display, press and hold the MANUAL [ M ] button
for 3 seconds to turn off the timer. Then press and hold the MANUAL [ M]
button again to turn on the timer. The Time Adjustment symbol will start
ashing and you can set the time as described above.
Using the Time Adjustment [ + / - ] Buttons
• Press briey for minute-to-minute progression.
• Press and hold to move quickly through the digits.
Instructions
Fig. 7

18
Instructions (Cont.)
(a) Minute Minder Function
You can set a period of time using the minute minder function and an alarm
will sound when that period of time has elapsed. The minute minder can be
set at any time, regardless of whether an oven function has been selected. The
maximum countdown time that can be set is 23 hours and 59 minutes.
• Press the MANUAL [ M ] button once. The Minute Minder symbol will start
ashing and the display will show [ 00·00 ].
• Use the PLUS [ + ] and MINUS [ - ] buttons to set the desired time period.
Once your set countdown time appears on the display, release the PLUS
[+ ] and MINUS [ - ] buttons and wait for 5 seconds. The Minute Minder
symbol will stop ashing and the LED display will show the clock time
again: the timer is now set. An alarm will sound when the countdown time
has elapsed.
• To turn off the alarm, press any button. Or the alarm will be turned off
automatically after 7 minutes, and the Minute Minder symbol will disappear.
• To check how much time is left after the timer is set, press the MANUAL
[ M ] button once: the screen will display the time left.
• To readjust the timer, press the MANUAL [ M ] button once and then
follow the above steps.
• To terminate the timer, press the MANUAL [ M ] button once: the screen
will display the time left. Press the MINUS [ - ] button, repeatedly until
[ 00·00] is shown on the display, then release the button and wait for 5
seconds. The Minute Minder symbol will disappear.
IMPORTANT!
If the oven is in use while you are using the minute minder,
the oven will NOT SWITCH OFF and continue heating once the alarm has been silenced.
To switch off the oven if you have finished cooking, you must turn the oven function
selector and thermostat control dials to their OFF [0] positions.

19
(b) Cooking Duration
This function will allow you to set a countdown time similar to the minute
minder function. However, the oven will no longer continue to heat once the
countdown period has elapsed. The maximum cooking duration time that can
be set is 10 hours. Oven temperature and function must have been set.
• Press the MANUAL [ M ] button twice. The Automatic Mode symbol
[AUTO] will start ashing and the display will show [ 00·00 ].
• Use the PLUS [ + ] and MINUS [ - ] buttons to set the desired cooking time
period. Once your set countdown time appears on the display, release the
PLUS [+] and MINUS [ - ] buttons and wait for 5 seconds. On the display,
[AUTO] will stop ashing and the clock time will be displayed again: the
timer is now set.
• When the countdown time has elapsed, the oven will turn off automati-
cally, and an alarm will sound.
• To turn off the alarm, press any button. Or the alarm will be turned off
automatically after 7 minutes and [AUTO] will disappear.
• If you have nished cooking, turn the oven function selector dial and
thermostat control dial to their OFF [ 0 ] positions.
• To check how much time is left after the timer is set, press the MANUAL
[ M ] button twice: the screen will display the time left.
• To readjust the timer, press the MANUAL [ M ] button twice and then
follow the above steps.
• To terminate the timer, press the MANUAL [ M ] button twice: the screen
will display the time. Press the MINUS [ - ] button, repeatedly until [ 00·00]
is shown on the display, then release the button and wait for 5 seconds.
The Automatic Mode symbol will disappear.
Instructions (Cont.)
IMPORTANT!
Always return the thermostat control and oven function dials to their OFF [ 0]
positions when you have finished cooking.

20
Instructions (Cont.)
(c) Cooking End Time
This function is similar to the Cooking Duration function. However, instead
of setting the period of time that you wish the oven to remain on before
switching off, you select the point of time (the time of day) at which you wish
the oven to switch off automatically. The maximum end time that can be set is
10 hours into the future. Oven temperature and function must have been set.
• Press the MANUAL [ M ] button three times. The Automatic Mode symbol
[AUTO] will start ashing and the display will show the clock time.
• Use the PLUS [ + ] and MINUS [ - ] buttons to set the desired cooking end
time. Once your set time appears on the display, release the PLUS [+ ] and
MINUS [ - ] buttons and wait for 5 seconds. [AUTO] will stop ashing and
the LED display will show the clock time again: the timer is now set.
• When the set cooking end time is reached, the oven will turn off auto-
matically and an alarm will sound.
• To turn off the alarm, press any button. Or the alarm will be turned off
automatically after 7 minutes and [AUTO] will disappear.
• If you have nished cooking, turn the oven function selector dial and
thermostat control dial to their OFF [ 0 ] positions.
• To check the cooking end time after the timer is set, press the MANUAL
[M ] button three times: the screen will display the time left.
• To readjust the timer, press the MANUAL [ M ] button three times and
then follow the above steps.
• To terminate the timer, press the MANUAL [ M ] button three times: the
screen will display the set time. Press the MINUS [ - ] button, repeatedly
until [ 00·00] is shown on the display, then release the button and wait for
5 seconds. The Automatic Mode symbol [AUTO] will disappear.
IMPORTANT!
Always return the thermostat control and oven function dials to their OFF [ 0]
positions when you have finished cooking.
Table of contents
Other Stirling Oven manuals

Stirling
Stirling tp54h4wh User manual

Stirling
Stirling STR-PEO User manual

Stirling
Stirling Black Edition STR-PEO User manual

Stirling
Stirling SORHP1-O User manual

Stirling
Stirling AFD24L User manual

Stirling
Stirling STR-BEO65L User manual

Stirling
Stirling STR-APYRO User manual

Stirling
Stirling SO69S User manual

Stirling
Stirling STR-AEO65L User manual

Stirling
Stirling tp54h4wh User manual


