Stirling VC435 User manual
INSTRUCTION MANUAL
After Sales Support
Telephone: 1300 886 649
Email: [email protected]
Model Number VC435
Complete Care
Bagged Vacuum Cleaner
N13275

Contents
01 Warranty Details
02 Welcome
03 General Safety Instructions
06 Product Overview
08 Getting Started
10 Instructions
13 Other Useful Information

1
Complete Care Bagged Vacuum Cleaner
Warranty Details
The product is guaranteed to be free from defects in workmanship and parts
for a period of 36 months from the date of purchase. Defects that occur
within this warranty period, under normal use and care, will be repaired,
replaced or refunded at our discretion, solely at our option with no charge for
parts and labour. The benefits conferred by this warranty are in addition
to all rights and remedies in respect of the product that the consumer
has under the Competition and Consumer Act 2010 and similar state and
territory laws.
Our goods come with guarantees that cannot be excluded under the
Australian Consumer Law. You are entitled to a replacement or refund for
a major failure and to compensation for any other reasonably foreseeable
loss or damage. You are also entitled to have the goods repaired or
replaced if the goods fail to be of acceptable quality and the failure does
not amount to a major failure.

2
Welcome
Congratulations on choosing to buy a Stirling®product.
All products brought to you by Stirling®are manufactured to the highest
standards of performance and safety and, as part of our philosophy of customer
service and satisfaction, are backed by our comprehensive 3 Year Warranty. We
hope you will enjoy using your purchase for many years to come.

3
General Safety Instructions
Read this manual thoroughly before first use, even if you are familiar with this
type of product. The safety precautions enclosed herein reduce the risk of fire,
electric shock and injury when correctly adhered to. Keep the manual in a safe
place for future reference, along with the completed warranty card, purchase
receipt and carton. If applicable, pass these instructions on to the next owner of
the appliance.
Always follow basic safety precautions and accident prevention measures when
using an electrical appliance, including the following:
Electrical safety and cord handling
• Correct voltage: Make sure your local outlet voltage and circuit frequency
correspond to the voltage indicated on the appliance rating label.
• Safe connection: Insert the plug firmly into a properly earthed mains socket.
Do not alter the plug.
• Protect from moisture: To protect against electric shock, do not immerse the
cord, plug or the appliance itself in water or other liquid. Ensure your hands
are dry before handling the plug or switching on the appliance. Do not use it
outdoors or on wet surfaces.
• Protect the power cord. Do not kink or damage the power cord. Do not wrap
it around the appliance. Do not pull or carry the vacuum cleaner by the cord.
Do not use the cord as a handle, close a door on the cord or pull the cord
around sharp edges or corners. Do not run the vacuum cleaner over the cord.
Keep the cord away from heated surfaces.
• Disconnect after use: Always switch off the appliance first and then unplug
the cord from the outlet when you have finished vacuuming, before connecting
or changing accessories and before changing the dust bag or filters.
• Cord retraction: When unplugging, grip the plug, do not pull the cord. Press
the cord retraction pedal and hold the plug, guiding it back onto the cord reel
to prevent whipping and causing injury or damage.
This vacuum cleaner is equipped with a plug and a power supply cord that
automatically retracts. If anything is damaged, both the plug and the cord
must be repaired by a qualified repairer or electrician.
• Unattended: Do not leave the vacuum cleaner unattended when plugged in.
• RCD: The installation of a residual current device (safety switch) is
recommended to provide additional safety protection when using electrical
appliances. It is advisable that a safety switch with a rated residual operating
current not exceeding 30mA be installed in the electrical circuit supplying the
appliance. See your electrician for professional advice.

4
General Safety Instructions (Cont.)
Usage conditions and restrictions
• Domestic use only: This appliance is intended for indoor household use only.
It is neither suitable for commercial/industrial, nor for outdoor use.
• Intended purpose: Only use the vacuum cleaner on dry indoor surfaces, as
described in this manual and with the original accessories supplied. Do not
use it for any purpose other than described in this manual. Any other use is
not recommended and may cause fire, electric shock or injury, or compromise
the safety of the appliance and void the warranty.
• Handle with caution: These instructions are not intended to cover every
possible condition and situation. As with any electrical household appliance,
common sense and caution are therefore always recommended when
assembling, operating and maintaining the appliance.
• Accessories: Improper assembly or use, and use of accessories from other
brands, may result in the risk of fire, electric shock and/or injury to persons.
• Usage restrictions: This appliance is not intended for use by persons
(including children) with reduced physical, sensory or mental capabilities, or
lack of experience and knowledge unless they have been given supervision or
instructions concerning use of the appliance by a person responsible for their
safety.
• Children: This vacuum cleaner is not a toy. Supervise young children to ensure
they do not play with the appliance. Close supervision is necessary when any
appliance is used by or near children.
• Prevent injury: Keep hair, loose clothing, fingers and all parts of the body
away from openings and moving parts. Keep openings away from moving
parts. Do not point the vacuum cleaner at people or animals when in use.
• Prevent blockage: Do not put any objects into openings. Keep all openings
free of dust, lint, hair or anything that may reduce the airflow. Do not use the
product with any openings blocked or restricted airflow.
IMPORTANT: If the suction opening, hose or telescopic tube is blocked,
switch off the appliance and remove the blockage before restarting.
• Protect the appliance: Keep the vacuum cleaner away from heat sources
(radiator, oven, etc.), direct sunlight, moisture and sharp edges. Do not operate
it too close to a heater.
• Filter installation: Do not use the product without all the filters in place.
• Stairs: Take extra care when vacuuming on stairs.

5
• Do not use the vacuum cleaner to pick up:
• Flammable or combustible fluids (such as fuel or solvent), burning
substances (such as ash, cigarettes or hot coals), or use it in the presence
of explosive liquids or vapours;
• Hard or sharp objects such as shards of glass, nails, coins;
• Harmful or toxic materials (such as chlorine bleach, ammonia, drain
cleaner);
• Any liquids, or vacuum in areas where liquids may be present.
• After use: Put the vacuum cleaner away after every use to prevent anyone
tripping over it.
• Cleaning: Only clean the housing with a soft, dry cloth. Do not use liquid or
aerosol cleaners.
• Repair: Never attempt to open the motor base of the vacuum cleaner
yourself, or to replace the power cord. Only have the appliance repaired by an
authorised technician, or contact the after sales support line for advice.
• Storage: Store the appliance in a cool, dry indoor area, out of reach of young
children.
• Damage: Check the appliance and power cord regularly for visible damage.
Do not use it if the cord or housing is damaged, if it has been dropped,
damaged, left outdoors or dropped into water, or if it appears faulty.
A damaged cord must be replaced by the manufacturer, an authorised service
centre or similarly qualified personnel in order to avoid any hazards.
In case of damage, contact our after sales support line to arrange return
or repair of the damaged product.
• Liability: We accept no liability for any eventual damages or injury caused by
noncompliance with these instructions.
General Safety Instructions (Cont.)

6
Product Overview
1 Suction control
2 Telescopic tube
3 Flexible hose
4 Vacuum cleaner body
5 Carry handle
6 Dual use floor brush
7 Disposable dust bags*
8 Turbo brush
9 Crevice tool
10 Brush tool
11 Dust bag full indicator
12 Cord retraction pedal
13 HEPA filter compartment
14 On/Off pedal
The assembled vacuum cleaner
1
2
3
4
5
6
8
* Replacement dust bags and filters are available
for purchase from our after sales support centre.
Please refer to page 17 for more information.

7
Product Overview (Cont.)
78
910
12 14
11
13
8
Assembling the vacuum cleaner
WARNING: Make sure the vacuum cleaner is unplugged from the power outlet
before assembling the appliance or changing accessories.
Getting Started
Before first use
• Unpack the appliance but keep all packaging materials until you have made
sure your new vacuum cleaner is undamaged and in good working order.
Plastic wrapping can be a suffocation hazard for babies and young children,
so ensure all packaging materials are out of their reach.
• Unwind the cord to its full length and inspect it for damage. Do not use the
appliance if it is damaged. In case of damage, contact our after sales support
line for advice on examination, repair or return of the damaged product.
• Read this manual to familiarise yourself with all the parts and operating
principles of the vacuum cleaner. Pay particular attention to the safety
instructions on the previous pages.
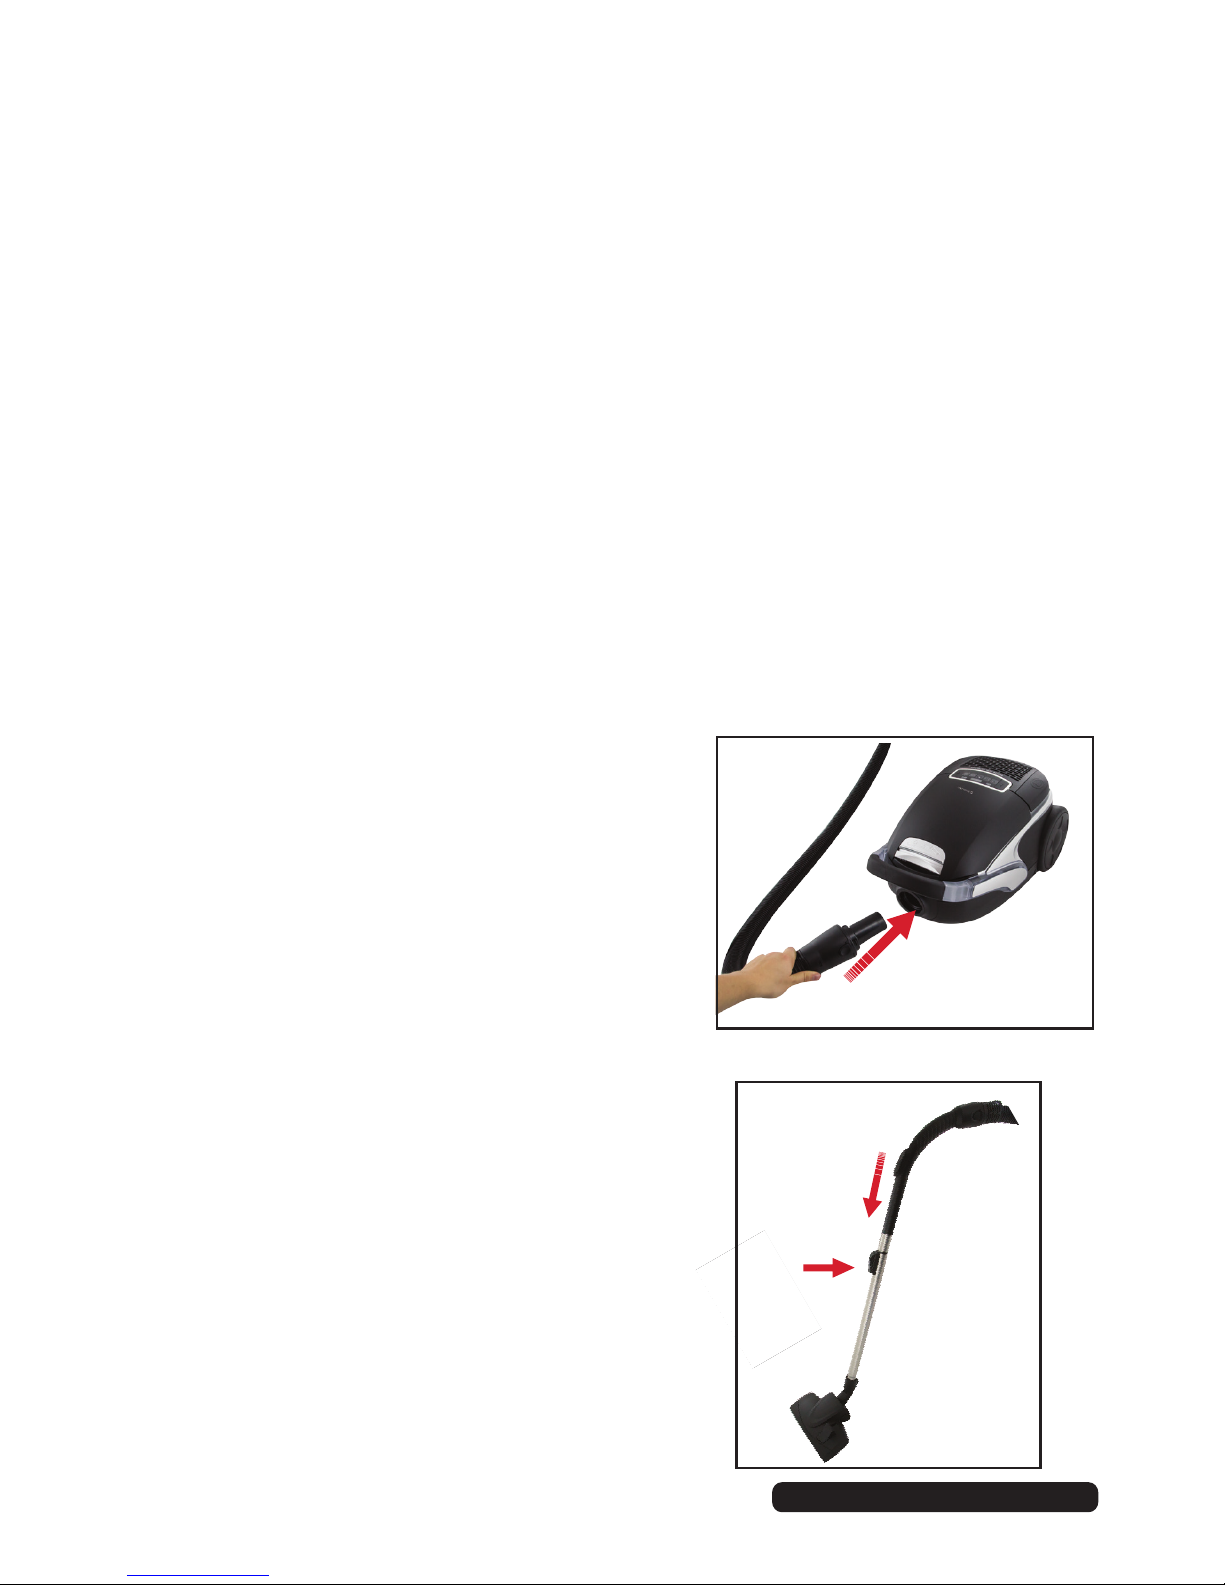
Attaching the hose
• Insert the flexible hose into the hose
connection inlet (Fig. 1). Make sure the
projected parts on the hose are aligned.
Press the hose into the unit until it clicks
into lock position.
• To remove the hose, press the two release
buttons on each side of the hose connector
and pull out the hose.
Adjusting the telescopic tube length
• Push the handle into the upper end of the
telescopic tube (Fig. 2).
• To adjust the length of the tube, press down
the release button on the tube and while
holding it, extend the length as desired.
Let go of the release button and pull until it
locks securely into place.
Fig. 1
Fig. 2

9
Fig. 4
Fig. 5
Fig. 6
Fig. 3
Attaching the floor brush
• Fit the dual use floor brush tightly onto the
end of the extension tube (Fig. 3).
Your vacuum cleaner is now ready for use.
The accessories
Besides the floor brush you just attached,
you may extend the functions of your vacuum
cleaner with the other attachments supplied.
WARNING: Always ensure that the vacuum
cleaner is disconnected from the power
supply before changing accessories.
• The turbo brush (Fig. 4) is suitable for
thorough cleaning of carpeted areas. It
contains a brush that rotates at high speed,
which increases the noise level during use.
• The crevice tool (Fig. 4) is designed for
cleaning in hard to reach places, such as in
between furniture.
• The brush tool (Fig. 4) is suitable for
dusting furniture.
• The crevice tool and brush tool can be
stored in the accessory compartment when
not in use (Fig. 5).
• To open the compartment, push down the
latch labelled "PUSH" on top of the vacuum
cleaner body (Fig. 6).
• To attach an accessory tool, make sure the
vacuum cleaner is unplugged. Push the tool
firmly onto the bottom end of the telescopic
tube, or directly onto the handle.
Getting Started (Cont.)
Turbo brush
Crevice tool
Brush tool
ATTENTION!
Using the vacuum cleaner without a
nozzle attached increases the danger of
accidentally sucking in objects.
10
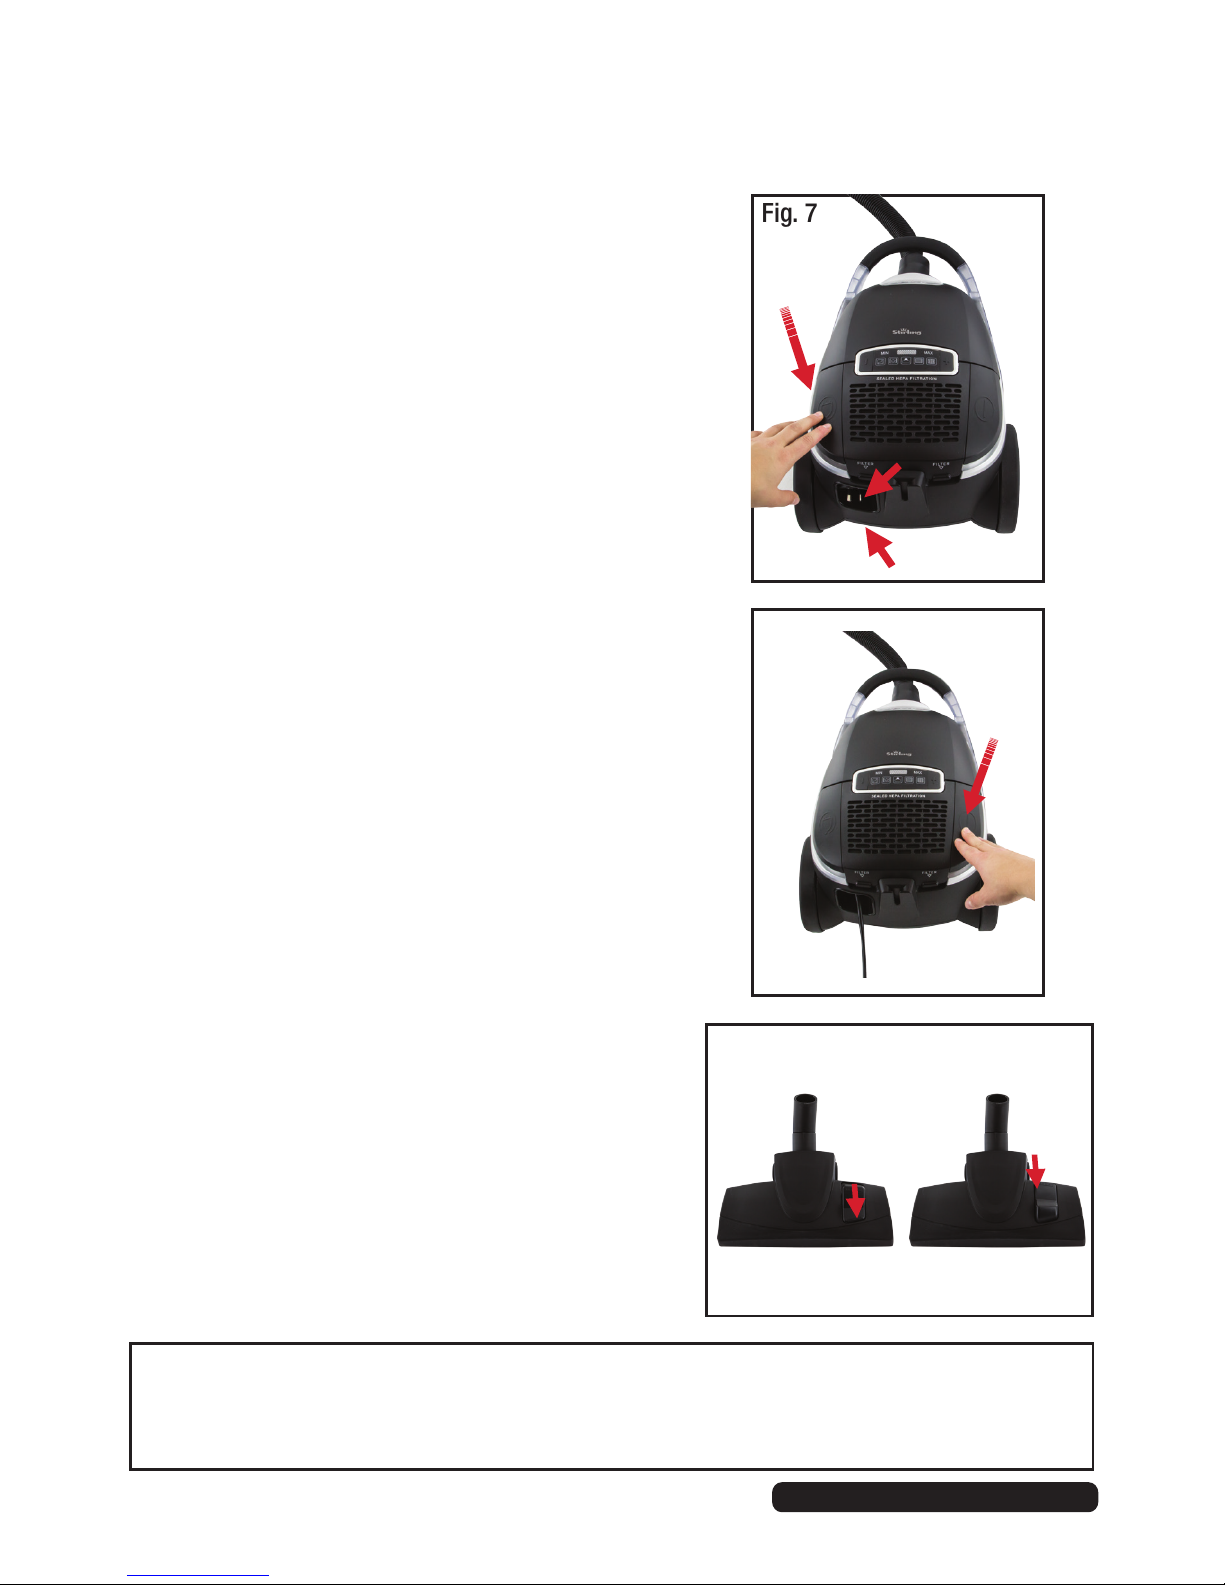
Cord release and rewind
• Holding the power plug firmly, pull it to fully
unwind the cord (Fig. 7). A yellow mark on
the cord indicates the recommended cord
length. Do not pull out the cord past the red
mark. Position the cord so no one is likely
to trip over it.
• To rewind the power cord, press the cord
retraction pedal (Fig. 7).
CAUTION: Take care, the cord retracts very
quickly. Guide it with one hand to prevent
the cord from whipping, which could cause
damage or injury.
Switching on and off
• Insert the plug into a power point and
press down the On/Off pedal to switch the
vacuum cleaner on (Fig. 8).
• Press the pedal again to turn the vacuum
cleaner off.
Carpet and hard floor cleaning
• For carpet and rug cleaning, press the
rocker switch on the dual use floor brush to
raise the bristles (Fig. 9).
• When the bristles are raised, press the
rocker switch to lower the bristles for
vacuuming floor boards, tiles or other hard
floor coverings (Fig. 9).
• Pull the vacuum cleaner behind you on its
wheels. Hold the extension tube by the
handle and gently slide the floor tool over
the surfaces to be vacuumed.
Instructions
Fig. 8
Fig. 7
Fig. 9
WARNING!
Check the vacuum cleaner and power cord before each use.
Do not use the appliance if any part is damaged.

11
Fig. 11
Instructions (Cont.)
Setting the suction power
You can adjust the suction power to suit the type of floor being cleaned. Use
the symbols on the suction power display (Fig. 10) as a guideline.
(A) Upholstery, curtains and other soft furnishings — this is the lowest suction
power setting.
(B) Cushions, rugs and runners.
(C) Daily vacuuming — this is the energy-saving setting.
(D) Lightly soiled rugs, fitted carpets and hard floors.
(E) Heavily soiled rugs, fitted carpets and hard floors, thorough carpet
cleaning — this is the highest suction power setting.
• To select an appropriate power setting, press the [ - ] or [ + ] button
repeatedly until the desired setting lights up on the suction power display.
B C D E
A
Fig. 10
Press to
decrease
the suction
power.
Press to
increase
the suction
power.
• To reduce the suction power quickly during
vacuuming, slide the suction control on top of
the handle upwards. This is useful if less power
is needed for vacuuming certain items, or to
release objects that were accidentally sucked in
(Fig. 11).

12
Instructions (Cont.)
Transport and storage
• To transport the vacuum cleaner from room to
room, you can carry it by the handle if you do not
want to pull it behind you (Fig. 12).
• To store it, or when interrupting your work, hook
the park/storage hook on the back of the dual use
floor brush into the storage bracket at the back of
the vacuum cleaner body (Fig. 13 + 14) .
• Put the vacuum cleaner away after every use
to prevent anyone tripping over it. Make sure to
unplug it from the electrical outlet and rewind the
power cord.
Fig. 12
Fig. 13
ATTENTION!
Your vacuum cleaner is equipped with a safety switch to prevent overheating.
It automatically cuts off the power supply if the motor overheats.
In such a case, switch off the vacuum cleaner and disconnect it from
the power supply. Remove the blockage that may have caused the
overheating and wait for about 45 minutes until the vacuum cleaner
has completely cooled down before reusing it.
Fig. 14
• If you want to store
the appliance for a
prolonged period,
remove the dust bag and
dispose of it properly
(see page 13).
• Always store the
appliance indoors in a
cool, dry area, out of
reach of young children.

13
Changing the dust bag
Change the dust filter bag at the latest
when the electronic dust bag full indicator
(Fig. 15) shows "red", or when the suction
power has noticeably decreased.
• WARNING: Make sure the appliance is
unplugged from the power supply.
• Open the dust compartment cover by
unlatching (Fig. 16) and subsequently
raising it until it locks in the highest
position and remains open by itself.
• Pull the dust bag up and out of the dust
bag holder (Fig. 17).
• Dispose of the full dust bag and replace
it with a new one. Insert the bag into the
holder and gently fit it into the space.
• Close the dust compartment cover,
making sure it clicks into place audibly.
Other Useful Information
Fig. 15
Fig. 16
Fig. 17
ATTENTION!
• Be careful when removing the dust bag so that no dust escapes.
• You can dispose of the dust bag with your regular household rubbish if it
contains no hazardous waste materials.
• Replacement dust bags are available from our after sales support centre.
Contact us on the number listed at the bottom of this page.
• The dust compartment cover can only be closed with a dust bag in place.
14
Other Useful Information (Cont.)
ATTENTION!
• Only use the vacuum cleaner with all filters intact, in dry condition and
correctly installed.
• Replacement filters are available from our after sales support centre. Contact
us on the number listed at the bottom of this page.
• Make sure that the openings of the vacuum cleaner are not clogged or
obstructed. Otherwise the vacuum cleaner might get damaged.
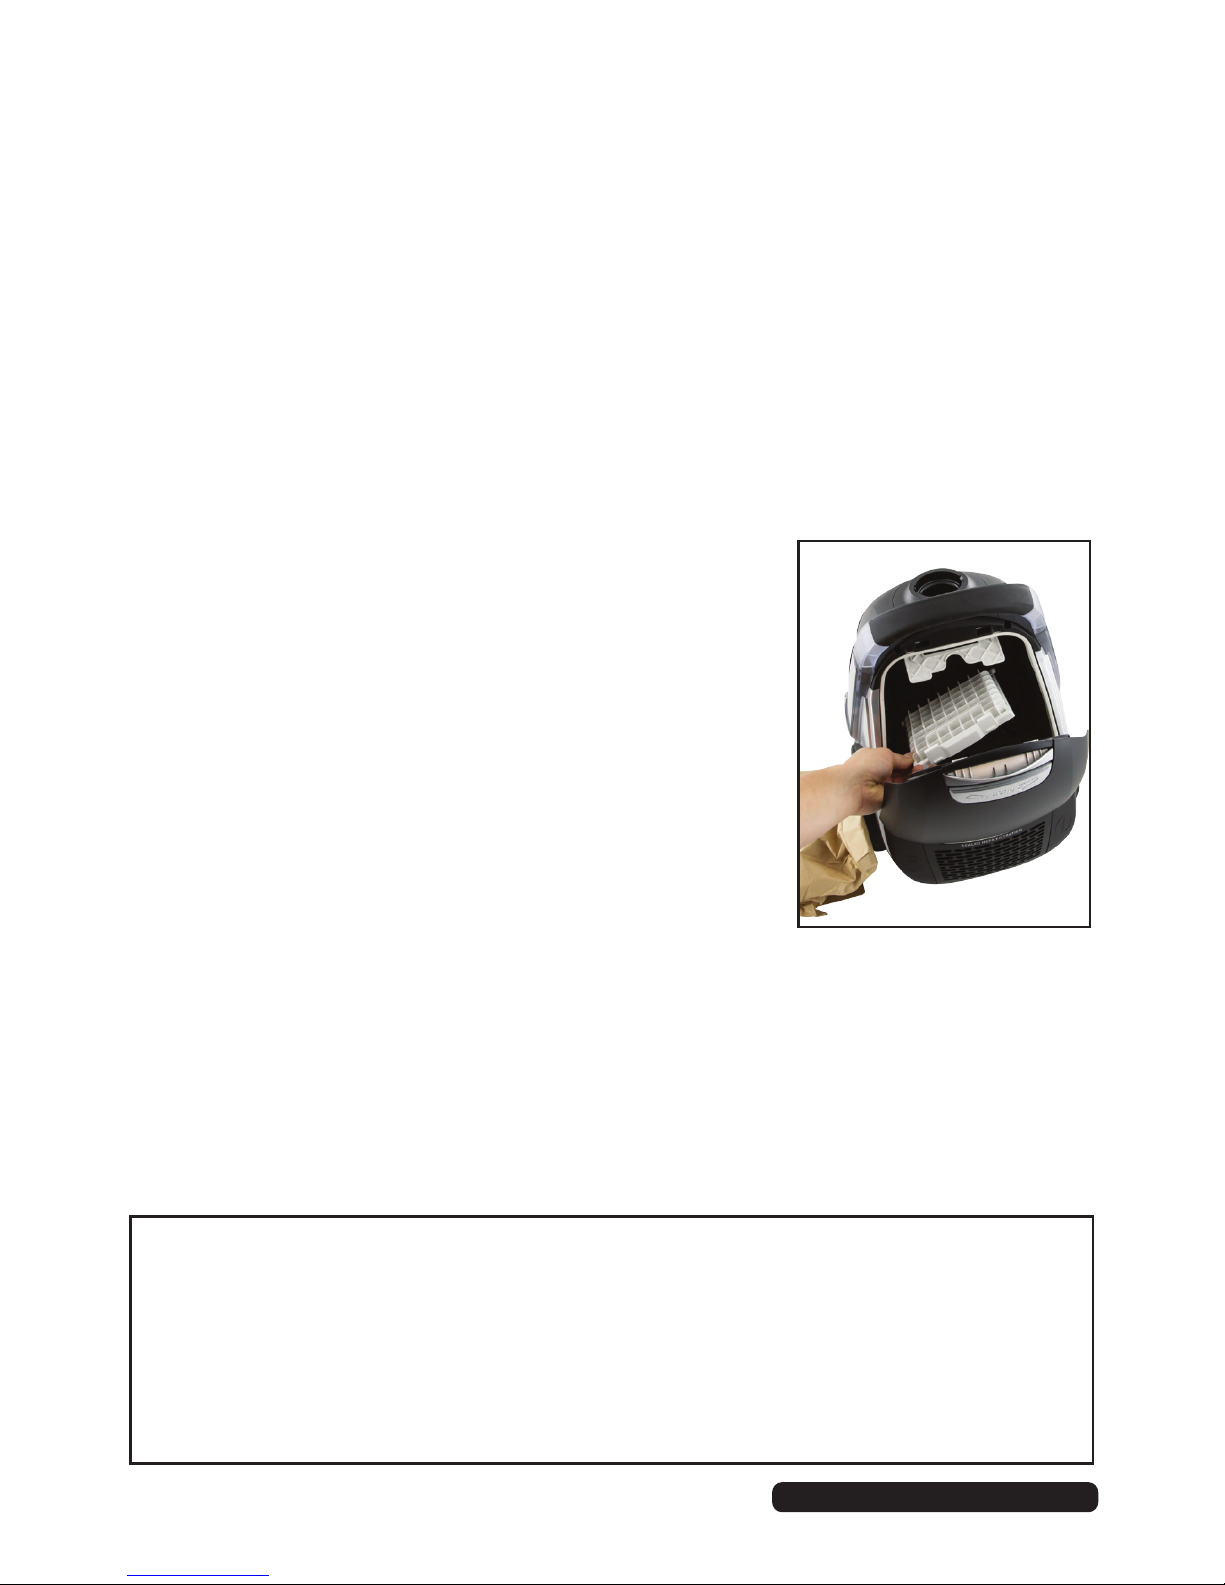
• WARNING: Make sure the appliance is unplugged
from the power supply.
• Open the dust bag compartment and take out the
dust bag (see page 13).
• Remove the filter holder with the motor protection
filter (Fig. 18). First flip the filter holder forwards and
then pull the filter up and out.
• Remove the motor protection filter from the filter
holder and shake or beat out the dust over a dustbin,
if it is only slightly dirty. Replace it if necessary.
• Clean the filter holder.
• If the new motor protection filter is too large, lay the
old filter onto the new filter mat. Mark the contours and cut the new filter down
to size with a pair of scissors.
• Insert the new motor protection filter into the filter holder.
• Insert the filter holder with the new (or cleaned) filter into its bracket from
above and push it down until it audibly locks into place.
• Replace the dust bag and push the dust compartment cover close until it
clicks securely into place.
Fig. 18
Filter maintenance
This vacuum cleaner features a three part filtration system for optimum dust
removal. The motor protection filter is located in the dust compartment, the
HEPA filter and the exhaust filter are located in the HEPA filter compartment.
Cleaning and changing the motor protection filter
The motor protection filter (Fig. 18) prevents larger particles from destroying the
motor in case the dust bag is defective. Clean this filter whenever you change
the dust bag; replace the filter at least every six months, or whenever you open
a new box of dust bags, as they usually contain a new motor protection filter.
15
Other Useful Information (Cont.)
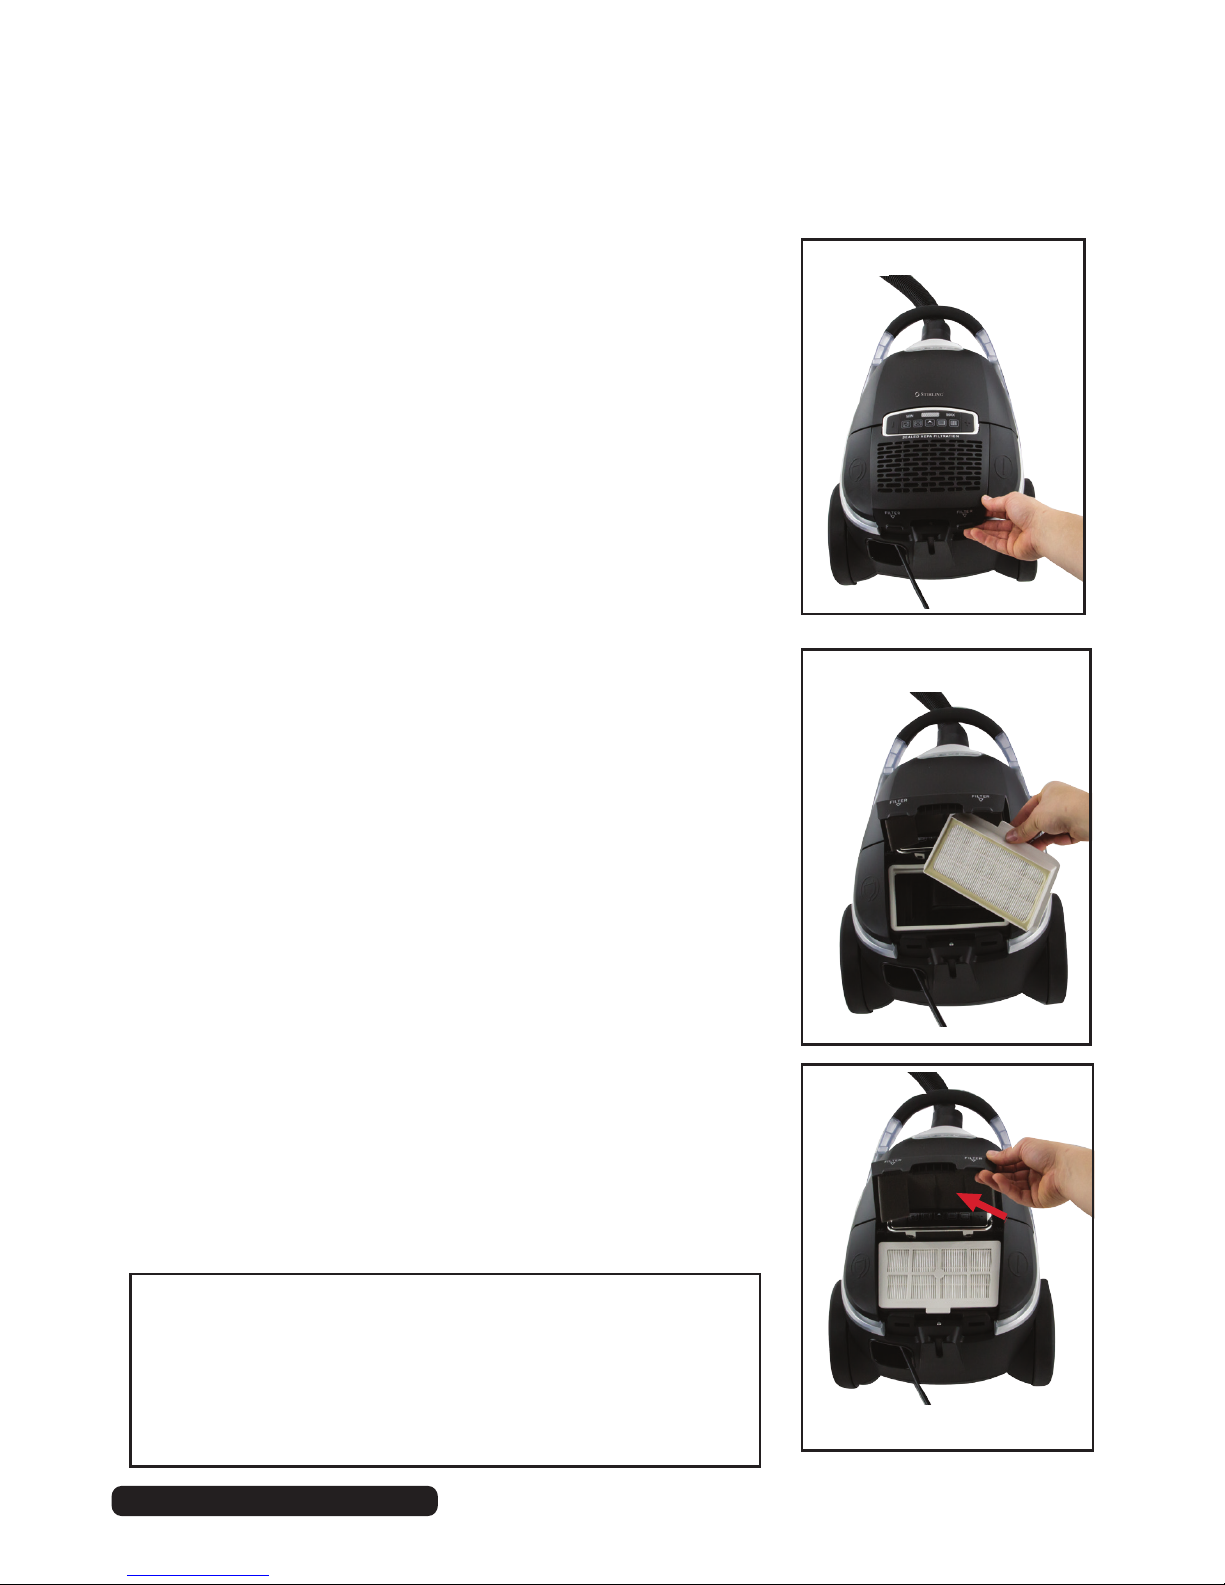
Cleaning and changing the HEPA and exhaust filters
ATTENTION!
• Make sure both exhaust filters are properly in
place before using the vacuum cleaner.
• The HEPA filter is non-washable; replace when
necessary.
Fig. 20
Fig. 19
The post-motor filtration system traps microscopic
dust particles from the exhaust air stream and
ensures that they are they are not dispersed into the
air. It consists of a HEPA filter and an exhaust filter,
which are located in the "Sealed HEPA Filtration"
compartment. Clean the exhaust filter whenever you
change the dust bag, following the instructions below.
• WARNING: Make sure the appliance is unplugged
from the power supply.
• Open the "Sealed HEPA Filtration" compartment
(Fig. 19).
• Remove the HEPA filter (Fig. 20). Grip the latch and
gently lift it out of its place.
• Replace the HEPA filter approximately every
6 months, depending on your usage frequency, or
when it shows any sign of damage. Contact our
after sales support line for a replacement filter.
• Gently pull the foam exhaust filter out from under
the filter compartment cover (Fig. 21). The foam filter
is hand-washable, but make sure it is completely
dry before reinstalling it. Alternatively, or when it
shows some damage, replace the filter. Push it
down slightly until it sits securely in place.
Cleaning the housing
• WARNING: Make sure the appliance is unplugged
from the power supply.
• Clean the outside of the housing using a slightly
damp cloth only. Do not use cleaning or scouring
agents or alcohol, as these might damage the
appliance.
Fig. 21

16
Other Useful Information (Cont.)
Troubleshooting
If you encounter problems with your vacuum cleaner, switch off the appliance
and disconnect it from the power supply before starting troubleshooting. Check
in the table below for solutions to common problems. If none of the solutions
offered help you solve your problem, contact our after sales support line for
advice. Do not use a defective appliance. Do not attempt to repair it yourself.
Problem Possible Cause Solution
The appliance
does not run.
The plug is not connected to
the power supply, or power
to the outlet is not switched
on, or the appliance is not
switched on.
Insert the plug into a wall
socket, switch on power to
the outlet and then switch on
the appliance.
The wall socket does not
carry current.
Test the vacuum cleaner on
another wall socket that you
are sure is working.
The power cord is
damaged.
Call our after sales support
line. Do not use the
appliance.
The cleaning
result is
unsatisfactory.
The dust bag is full or
clogged. Change the dust bag.
The cleaning tool,
telescopic tube or suction
hose are clogged.
Remove the obstacle. If
necessary, use a broomstick
or similar object to do this.
The power setting does not
fit the flooring.
Select the power setting
suggested for the flooring.
The carpet/hard floor rocker
switch is in the wrong
position for the particular
type of floor.
Set the carpet/hard floor
rocker switch to the correct
position for the particular
type of floor.
The attached cleaning tool
does not fit the flooring.
Attach the correct cleaning
tool.
The filter is dirty. Change/clean the respective
filter.
The appliance
makes unusual
noises.
Sucked in objects are
obstructing the air stream.
Remove the objects. If
necessary, use a broomstick
or similar object to do this.

17
Technical specifications
Voltage: 220-240V
Wattage: 1800-2000W (max.)
Dust capacity: 3.5L
Cord length: 8m
Metal telescopic tube length: 84cm
Filters: Motor protection filter
HEPA filter
Exhaust filter
Responsible disposal
At the end of its working life, do not throw this appliance out with your household
rubbish. Electrical and electronic products contain substances that can have
a detrimental effect on the environment and human health if disposed of
inappropriately. Observe any local regulations regarding the disposal of electrical
consumer goods and dispose of it appropriately for recycling. Contact your local
authorities for advice on recycling facilities in your area.
Replacement Dust Bags
• Always empty the bag when indicated on the vacuum cleaner.
• Take care when removing the dust bag so that no dust escapes. Full
bags can be disposed with regular household rubbish unless they contain
hazardous materials.
• Replacement dust bags are available from our after sales support centre.
Contact us on 1300 886 649.
• Before closing the dust compartment cover, make sure a dust bag is properly
in place.
Replacement Filters
• Only use the vacuum cleaner with both filters intact, in dry condition and
correctly installed. Operating the vacuum without filters in place will damage
the unit.
• Replace the filters when necessary. Replacement filters are available from our
after sales support centre. Contact us on 1300 886 649.
Other Useful Information (Cont.)

Complete Care Bagged Vacuum Cleaner
Repair and Refurbished
Goods or Parts Notice
Unfortunately, from time to time, faulty products are manufactured which need to
be returned to the supplier for repair.
Please be aware that if your product is capable of retaining user-generated data
(such as files stored on a computer hard drive, telephone numbers stored on
a mobile telephone, songs stored on a portable media player, games saved on
a games console or files stored on a USB memory stick) during the process of
repair, some or all of your stored data may be lost. We recommend you save this
data elsewhere prior to sending the product for repair.
You should also be aware that rather than repairing goods, we may replace them with
refurbished goods of the same type or use refurbished parts in the repair process.
Please be assured though, refurbished parts or replacements are only used
where they meet ALDI’s stringent quality specifications.
If at any time you feel your repair is being handled unsatisfactorily, you may
escalate your complaint. Please telephone us on 1300 886 649 or write to us at:
Tempo (Aust) Pty Ltd ABN 70 106 100 252
PO BOX 6056 Frenchs Forest, Sydney, Australia NSW 2086
Telephone: 1300 886 649 (Aust) - Fax: (02) 9975 2688
Tempo Help Desk: 1300 886 649 (Aust)
(Operating Hours: Mon-Fri 08:30am to 06:00pm EST)
Email: [email protected]
After Sales Support
Telephone: 1300 886 649
Email: [email protected]
Table of contents
Other Stirling Vacuum Cleaner manuals

Stirling
Stirling VC-460 Specification sheet

Stirling
Stirling VC-001 User manual

Stirling
Stirling SVS-268 User manual

Stirling
Stirling KB-8005 User manual

Stirling
Stirling IA0978 User manual

Stirling
Stirling IA0850 User manual

Stirling
Stirling EE-9248 User manual

Stirling
Stirling HS-2H1-001 User manual

Stirling
Stirling A320 User manual

Stirling
Stirling EE-9248 User manual


