StormRed PREDATOR User manual

PREDATOR
User Manual –Uživatelský manuál -
Užívateľský manuál - Használati utasítás

2
English
3 –16
Czech
17 –30
Slovak
31 –44
Magyar
45 –58

3
The product user manual contains the product functions, instructions for use and
operating procedure. Read the user manual carefully to get the best experience and
avoid unnecessary damage. Keep this manual for future reference. If you have any
questions or comments about the equipment, please contact the customer service line.
✉www.alza.cz/kontakt
✆+420 225 340 111
Importer Alza.cz a.s. , Jankovcova 1522/53, Holešovice, 170 00 Prague 7, www.alza.cz

4
Important - Please read these instructions carefully before installation or use. The
instructions contain important information to help you get the most out of your
equipment and ensure safe and proper use and maintenance.
Package contents
In the package you should find the following parts for your indoor rowing machine. If
any parts are missing, please contact your machine dealer through the contacts listed
on the previous page.
5
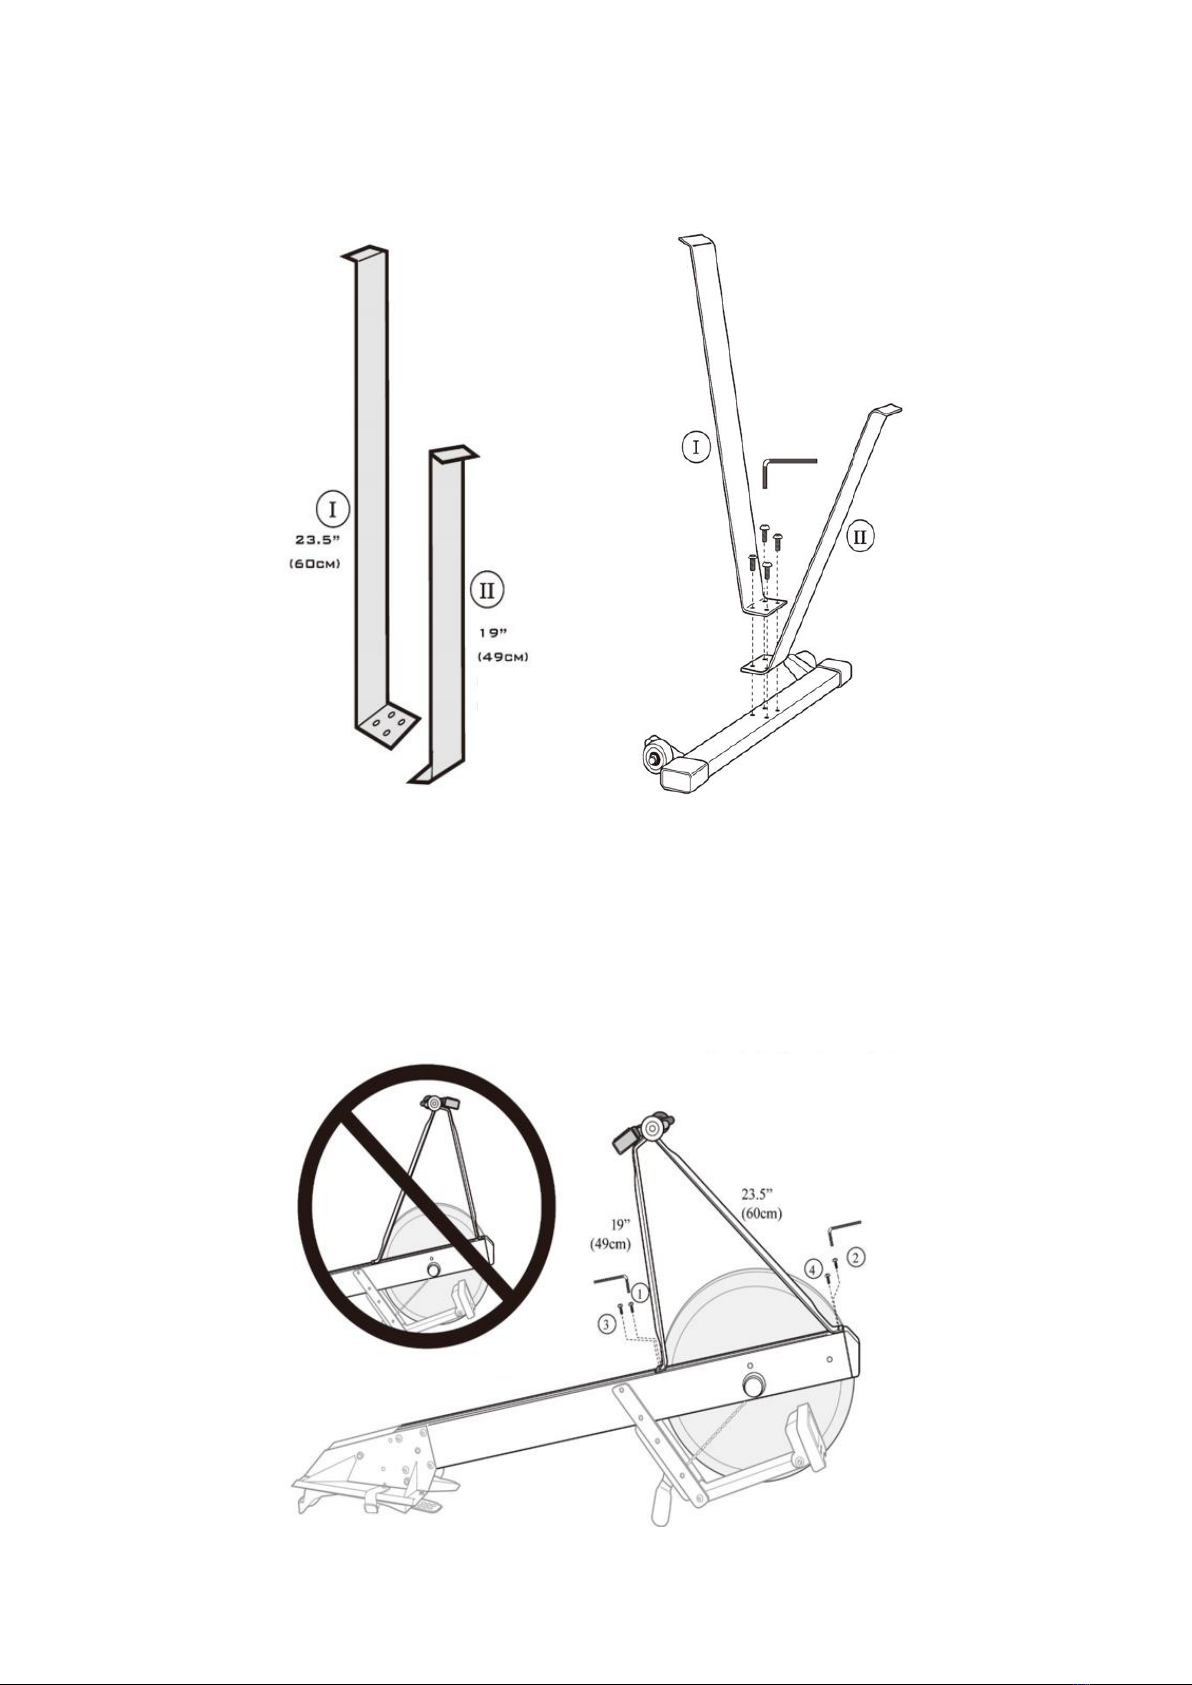
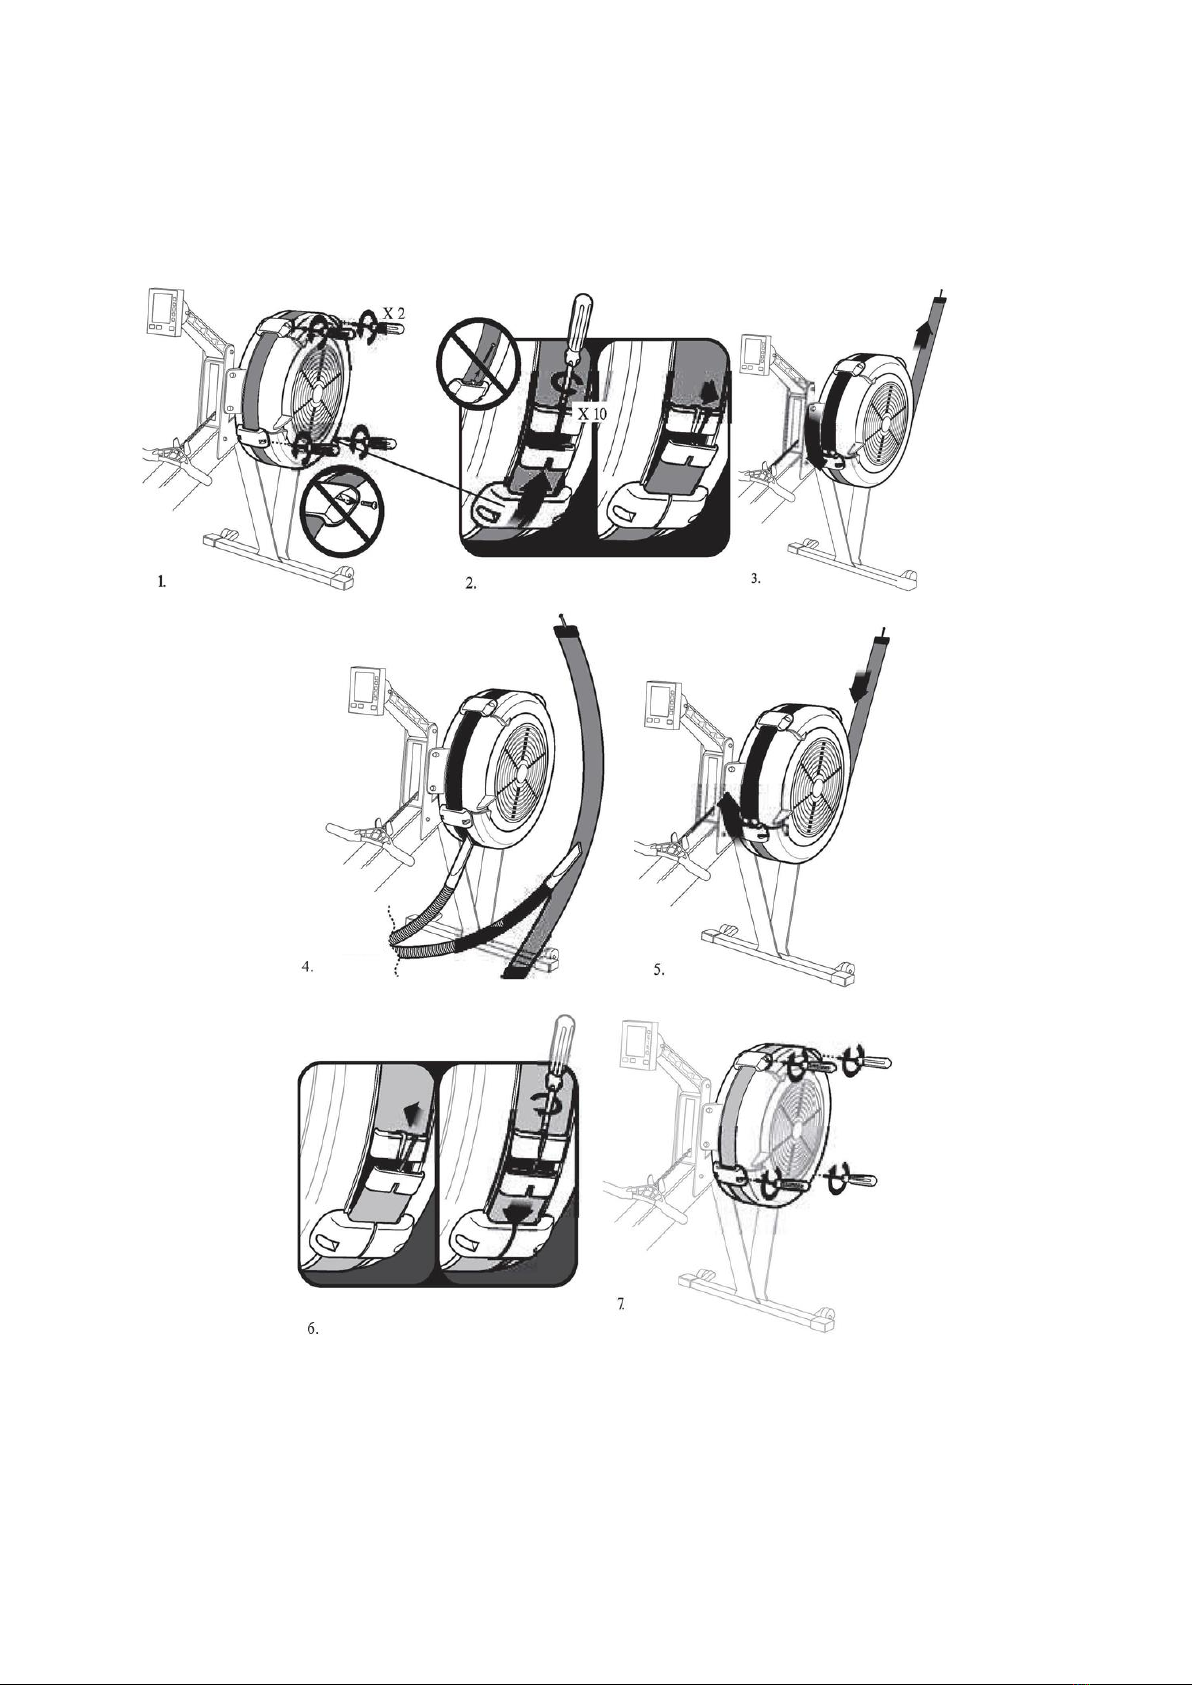
Assembling the front rack
You need: 4× screws (3/4"), Allen wrench.
Note that the longer leg (I) attaches to the side where the wheels are.
Attaching the front rack to the frame
You need: 4× screws (3/4"), Allen wrench.
Attach the front leg as shown.

6
Attaching the seat post
Raise the front of the frame by the back
of the treadmill so that the wheels are on
the ground. At the same time, lift the seat
post to the same height behind the front
of the treadmill, as shown in the picture.
Join the two parts so that they fit
together. You must insert the saddle part
between the foot pegs.
Make sure that the joint is correctly
attached.
Lower the two parts to the ground and
push downwards so that the two parts fit
together properly. Make sure that the
joint is properly secured.
Storage
For more compact storage, both parts can
be placed vertically as shown in the
picture.
Extra caution must be taken when setting
the flywheel section, as it may cause a
sudden shift in the balance.
It is recommended to separate the seat
post and frame when storing.
7
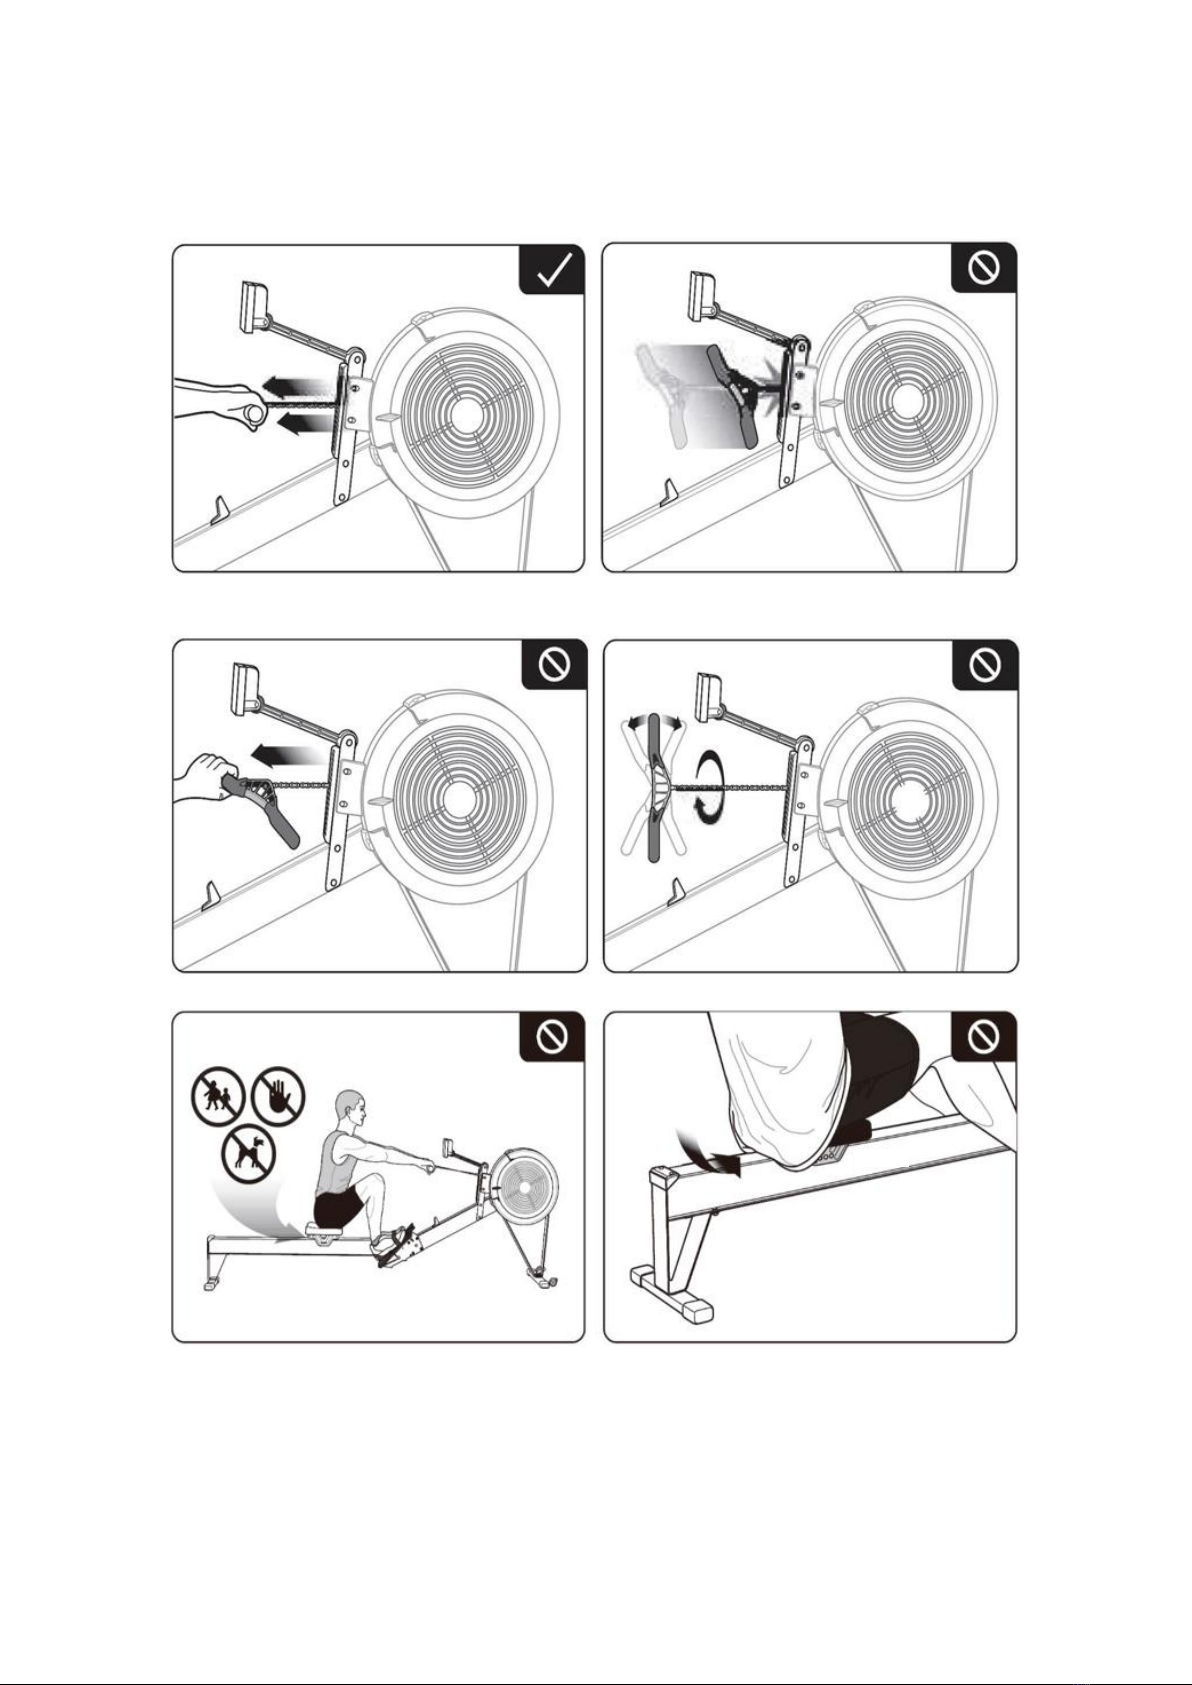
Note
When rowing, use both hands at the
same time.
Never let go of the handle from a
distance.
Do not use only one hand.
Do not twist the handle.
When exercising, make sure there is no
child or pet around to prevent injury.
Never place your fingers on the seat post.
Be careful not to get part of your clothing
between the saddle and the seat post
when exercising.
8
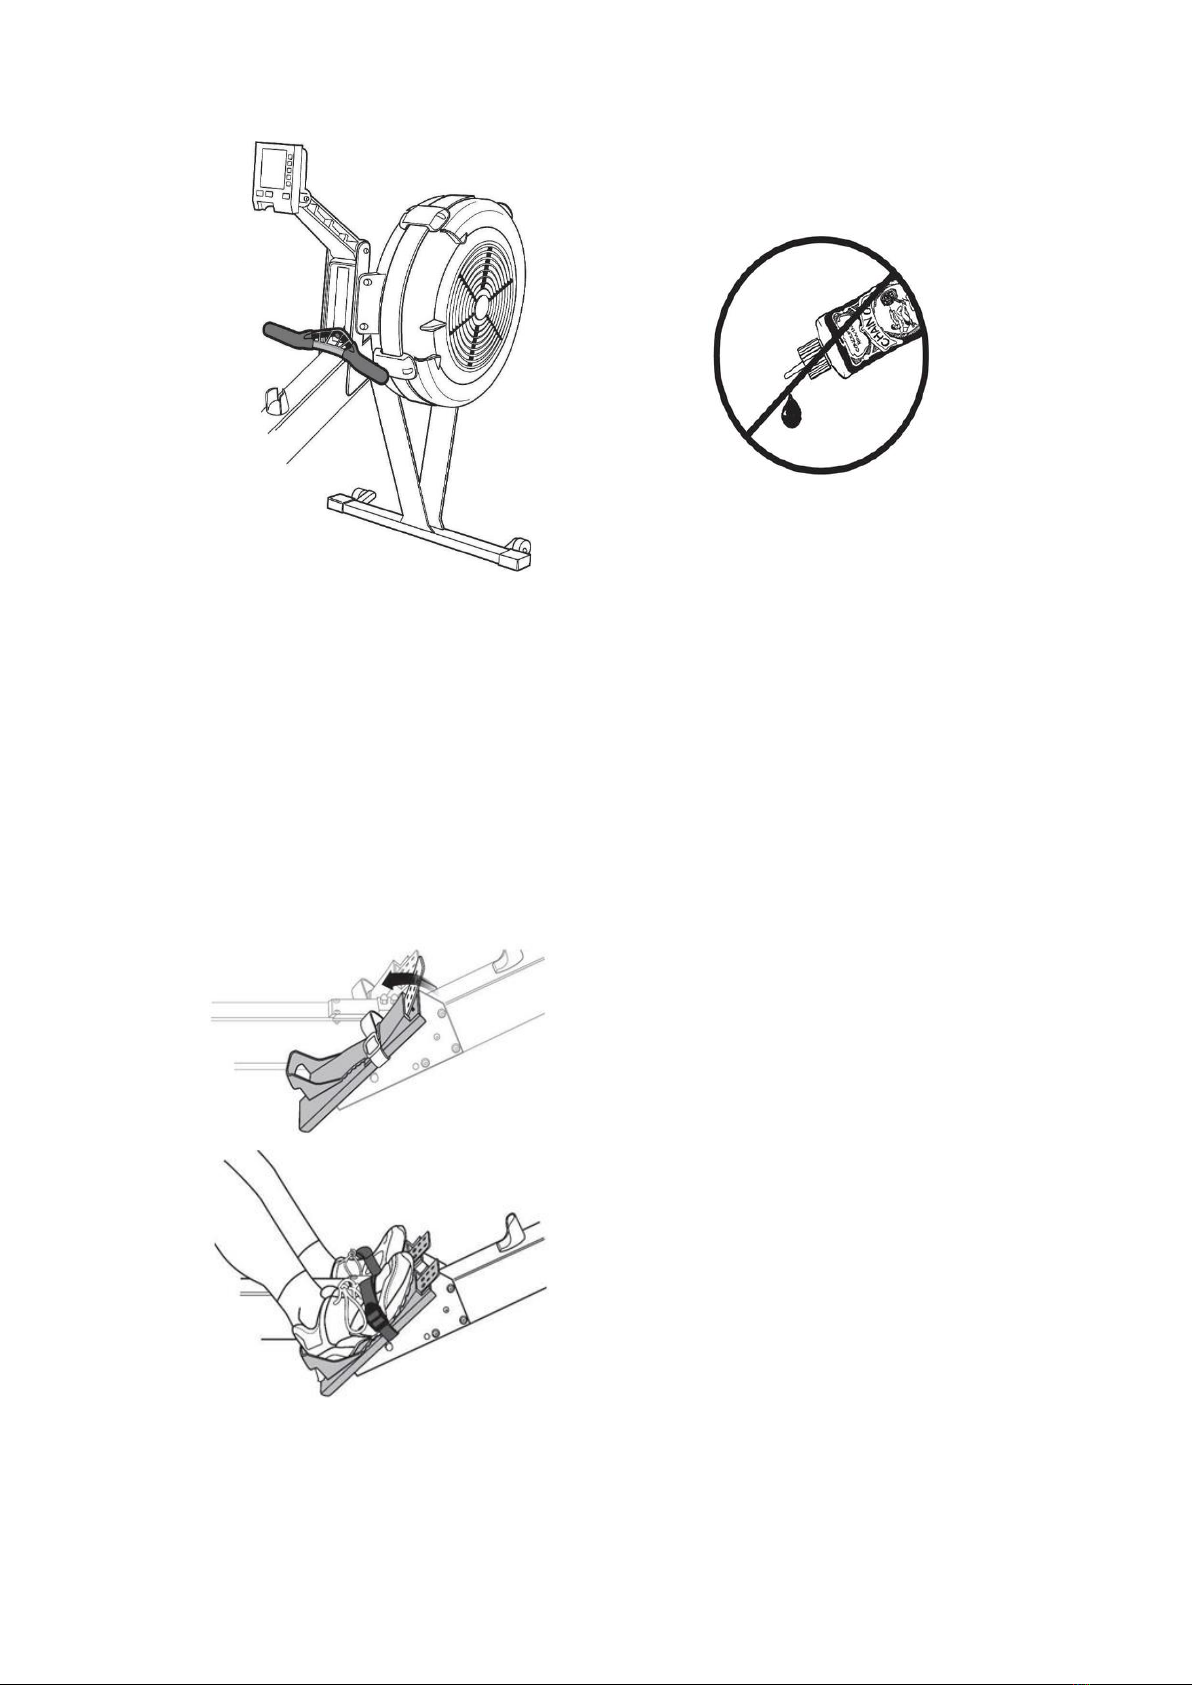
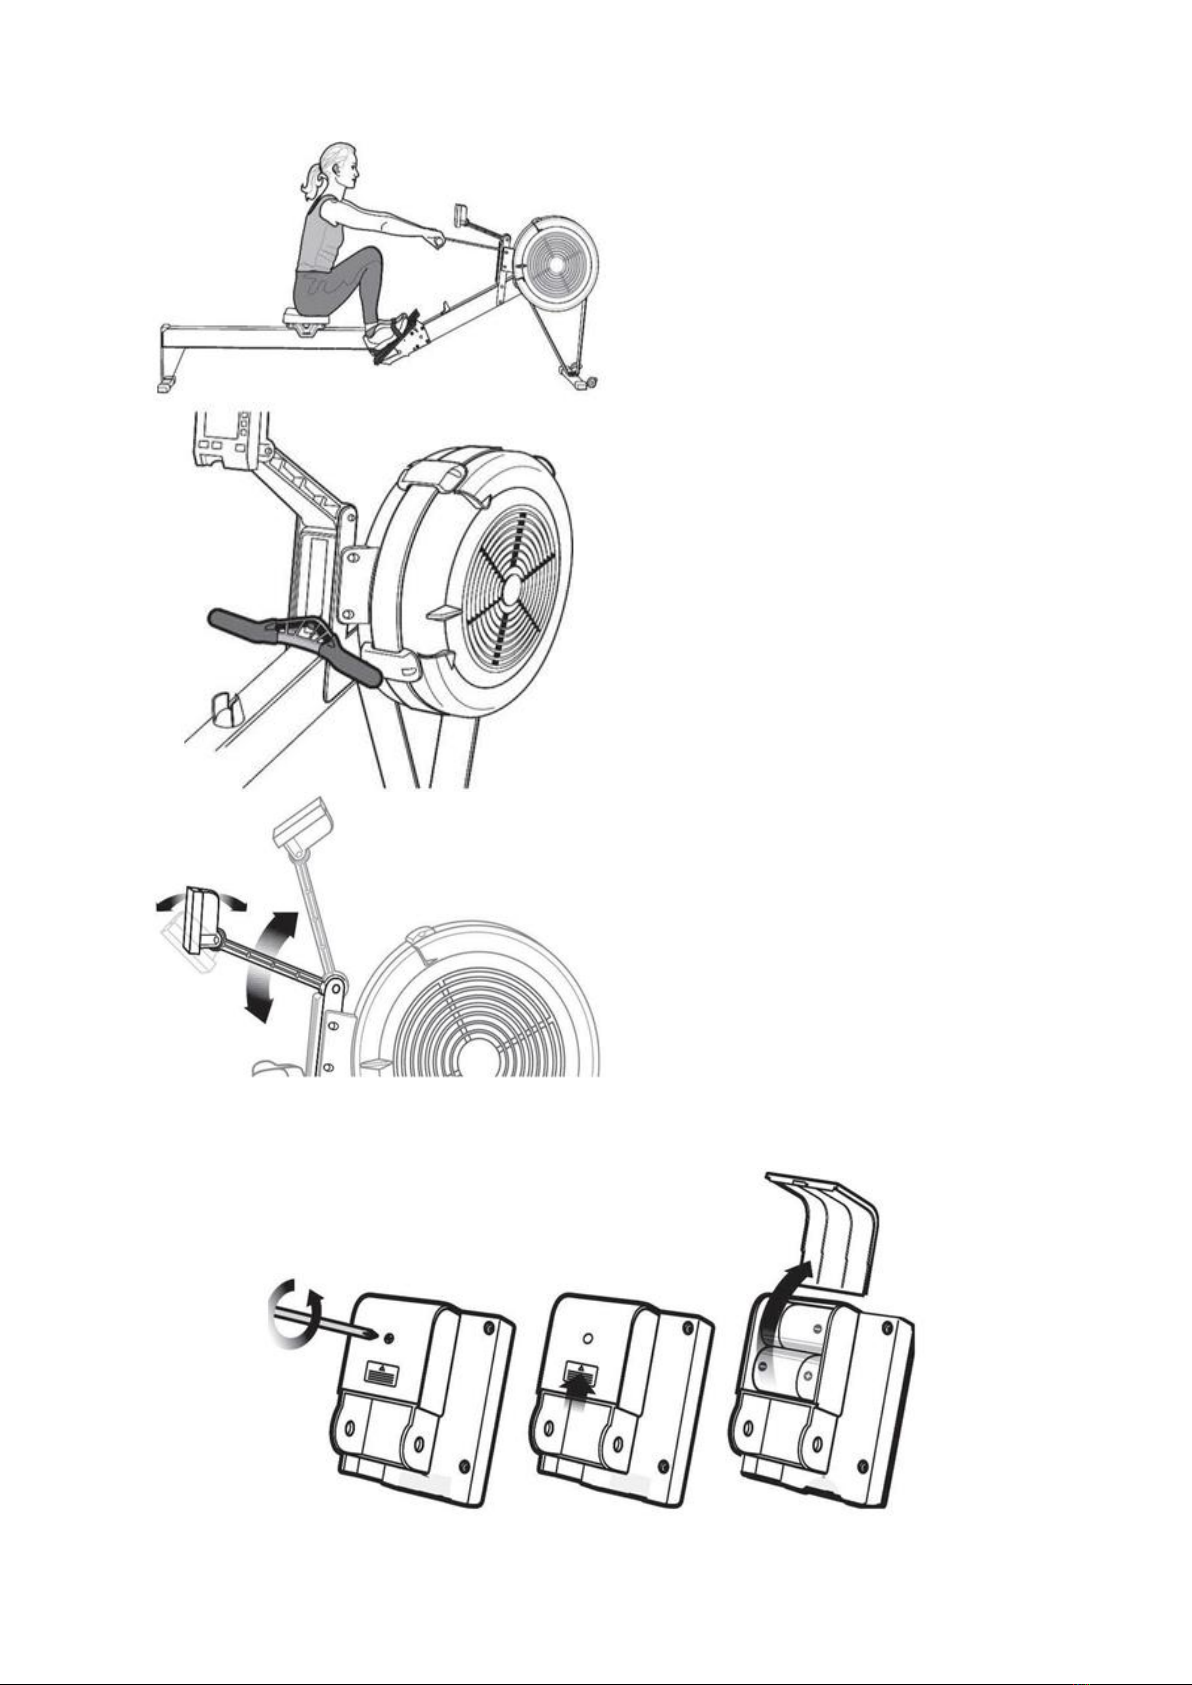
At the end of the exercise, insert the
handle into the handle holder.
The chain does not require oiling before
first use. Perform proper maintenance as
described in the Maintenance section.
Do not use the machine with worn parts such as chain, sprocket, swivel connector,
handle clutch, or cable. If the parts are not in good condition, then do not use the
machine. If in doubt about the condition of a part, we recommend replacing it with an
original part.
Be careful when assembling the machine. When the machine is not in use, move the
saddle forward to the footrests.
You can adjust the pedals.
Adjust the pedal bands to your foot
size.
Handle holder
Handle
9
When you finish the exercise, insert the
handle into the handle holder.
Adjust the monitor so that you can see
the readings.
Replacing batteries

10
Maintenance
Cleaning the machine
Clean regularly after each use. Use a
luring cloth and soapy water or glass
cleaner. Do not use bleach or other
abrasive cleaners.
Chain lubrication
Every 50 hours of use.
Before lubricating, clean the chain
thoroughly, then apply oil along the
entire length of the chain using a cloth.
Checking the tightening of the front
stabiliser
Every 250 hours of use.
Chain and handle connection check
Every 250 hours of use.
If the joint is deformed or weakened,
we recommend replacing it.
11
Load wheel check
Every 250 hours of use.
Vacuum

12
Product scheme
Instructions for using the computer
Functions
#
Position
Display range
Setting range
Memory
RZ
Description
1
TIME
0:00~99:99
±1 minute
Yes
Yes
1.If there is no setting, time
will accumulate in the cycle.
2.If the user has a pre-set
value, it will be subtracted
from the pre-set value to
zero. (with 4 BIBI sounds)
3. If there is no signal on
the input for 4 minutes, the
console will go into standby
mode.
2
DISTANCE
0~9999
0~9990
±10K
±10M
Yes
Yes
1. If there is no setting, time
will accumulate in the cycle.
2.If the user has a pre-set
value, it will be subtracted
from the pre-set value to
zero. (with 4 BIBI sounds)
3. If there is no signal on
the input for 4 minutes, the
console will go into standby
mode.
3
CALORIES
0~9999 cal
0~9990
(±10)
Yes
Yes
1. If there is no setting, time
will accumulate in the cycle.
2.If the user has a preset
value, it will be subtracted
from the preset value to
zero.
Mono rail
Fly wheel

13
3. If there is no signal on
the input for 4 minutes, the
console will go into standby
mode.
4
SPM
0~999
NO
NO
Yes
In START state:
If the signal from the
sensor is on the input for 3
seconds, the value is
displayed.
If there is no sensor signal
at the input for 4 seconds,
the value returns to zero
after 6 seconds.
SPM shares the same
window with WATT and the
display switches every 5
seconds.
5
STROKES
0~9999
0~9990
(±10)
Yes
Yes
The number of strokes and
the total number of strokes
share the same window.
They switch every 5
seconds.
6
TOTAL
ATTACKS
(TOTAL
STROKES)
0~9999
NO
Yes
NO
Total number of strokes.
7
WATT
0~999
NO
NO
NO
If the signal from the
sensor is on the input for 3
seconds, the value is
displayed.
If there is no sensor signal
at the input for 4 seconds,
the value returns to zero
after 6 seconds.
WATT shares the same
window with WATT and the
display switches every 5
seconds.
8
PULSE
Inappropriate
9
MANUAL
If the monitor has not
entered any mode and has
detected the speed sensor,
the computer performs a
QUICK START.
10
INTERVAL
20-10
INTERVAL exercise mode.
Exercise 20s, rest 10s.
11
INTERVAL
10-20
INTERVAL exercise mode.
Exercise 10s, rest 20s.

14
12
OWN
INTERVAL
INTERVAL exercise mode.
Exercise time and rest time
are set by the user.
13
TARGET TIME
The exercise time is set by
the user.
14
TARGET
DISTANCE
The distance of the
exercise is set by the user.
15
TARGET
CALORIES
Calories are set by the user.
16
TARGET
STROKES
Strokes are set by the user.
17
TARGET
PULSE
Inappropriate
18
BLUETOOTH
ON/
OFF
The user can turn
Bluetooth on or off. If the
user has turned Bluetooth
on, the Bluetooth icon will
appear on the display. If
the user has turned
Bluetooth off, the display
will appear normal, but
Bluetooth cannot be used.
Turning the power on and off
When the power is turned on, everything on the display lights up for two seconds, then
goes into standby mode. If the computer receives no signal for four minutes, it will go
into sleep mode. When any button is pressed, it wakes up again.
Controls
Standby mode
The display will sequentially show the following screens: MANUAL, INTERVAL, TARGET,
TIME, DISTANCE, CALORIE, PULSE, SPM, WATT, TOTAL STROKES, STROKES.
MANUAL
If the console receives a signal, it will automatically perform a quick start. In manual
mode, all values will be displayed, with SPM and WATT values alternating every five
seconds. Press the MODE button to change between the SPT and WATT displays.

15
INTERVAL
In standby mode, to enter INTERVAL function, press the MODE button and the up button
until INTERVAL is displayed.
TARGET
In standby mode, to enter the TARGET function, press the MODE button and the up
button until TARGET is displayed. In TARGET mode, you can set a goal in the following
values: time, distance, calories, number of strokes.
Functions of the buttons
Up button
•One press to increase the value by one. Hold to accelerate the increase.
•In standby mode, by pressing the up button and the MODE button, you can
switch between meter and mile displays.
MODE (mode button)
•From the feature selection screen, press this button to confirm your selection.
•From the settings screen, press this button to save the selected settings.
•During the exercise, use this button to pause/stop the exercise.
RESET
•On the function selection screen, use this button to return to the previous
function.
•On the setup screen, this button resets the value to the default state.
BLUETOOTH
•Press this button to turn the Bluetooth app on or off. If the user turns Bluetooth
on, the computer displays the Bluetooth icon. If the user turns Bluetooth off, the
display will appear normally, but the Bluetooth function cannot be used.
•Recommended application: FITSHOW.
TOTAL RESET button
•Pressing this button completely resets the instrument (just as you would when
removing and inserting the batteries).

16
Warranty conditions
A new product purchased from Alza.cz is covered by a 2-year warranty. In case of need
for repair or other service within the warranty period, please contact the seller of the
product directly, it is necessary to present the original proof of purchase with the date of
purchase.
The following shall be deemed to be a breach of warranty for which the claim
cannot be accepted:
•Using the product for a purpose other than that for which the product is intended or
failing to follow the instructions for maintenance, operation and servicing of the
product.
•Damage to the product due to natural disaster, unauthorized person or mechanical
fault of the buyer (e.g. during transportation, cleaning by improper means, etc.).
•natural wear and aging of consumables or components during use (e.g. batteries,
etc.).
•The action of adverse external influences such as solar and other radiation or
electromagnetic fields, liquid ingress, object ingress, mains surges, electrostatic
discharge (including lightning), faulty supply or input voltage and the improper
polarity of this voltage, chemical processes, e.g. used power supplies, etc.
•If anyone has made alterations, modifications, design changes or adaptations to
change or extend the product's functions from the design purchased or use non-
original parts.

17
Uživatelská příručka k výrobku obsahuje funkce výrobku, návod k použití a postup
obsluhy. Přečtěte si pozorně uživatelskou příručku, abyste získali co nejlepší zkušenosti a
předešli zbytečným škodám. Tuto příručku si uschovejte pro budoucí použití. Máte-li
jakékoli dotazy nebo připomínky k zařízení, obraťte se na zákaznickou linku.
✉www.alza.cz/kontakt
✆+420 225 340 111
Dovozce Alza.cz a.s. , Jankovcova 1522/53, Holešovice, 170 00 Praha 7, www.alza.cz

18
Důležité –Před montáží nebo použitím si prosím pečlivě přečtěte tyto pokyny. Pokyny
obsahují důležité informace, které vám pomohou získat ze svého zařízení maximum a
zajistit bezpečné a správné použití a údržbu.
Obsah balení
V balení byste měli najít následující díly pro váš indoorový veslařský trenažér. Pokud
některé součásti chybí, kontaktujte prodejce stroje skrze kontakty uvedené na předchozí
stránce.

19
Sestavení přední stojky
Potřebujete: 4× šrouby (3/4“), imbusový klíč.
Pamatujte, že delší noha (I) se připevňuje na stranu, kde jsou kolečka.
Připojení přední stojky k rámu
Potřebujete: 4× šrouby (3/4“), imbusový klíč.
Připevněte přední nohu podle
obrázku.

20
Připojení sedlovky
Zdvihněte přední část rámu trenažeru za
jeho zadní část se stupátky do výšky tak,
aby kolečka stály na zemi. Zároveň
zdvihněte sedlovku do stejné výšky za její
přední část, jako na obrázku.
Spojte obě části dohromady, tak aby do
sebe zapadly. Sedlovkovou část musíte
vsunout mezi stupadla.
Přesvědčte se, zdali je spoj správně
připevněn.
Spusťte obě části na zem a zatlačte
směrem dolů, aby obě části do sebe
řádně zapadly. Přesvědčte se, zdali je spoj
správně připevněn.
Skladování
Pro kompaktnější skladování lze oba díly
umístit ve svislé poloze, jak je znázorněno
na obrázku.
Při stavění setrvačníkové části je třeba
dbát zvýšené opatrnosti, protože může
dojít k náhlému posunu vyvážení.
Při skladování se doporučuje část
sedlovky a rám od sebe oddělit.
Table of contents
Languages:
Other StormRed Fitness Equipment manuals

StormRed
StormRed DEVIL User manual

StormRed
StormRed RANGER User manual

StormRed
StormRed FLYER User manual

StormRed
StormRed Slackline User manual

StormRed
StormRed SEAHAWK User manual

StormRed
StormRed GIANT User manual

StormRed
StormRed HURRICANE User manual

StormRed
StormRed KING User manual

StormRed
StormRed KNIGHT User manual
Popular Fitness Equipment manuals by other brands


G-FITNESS
G-FITNESS AIR ROWER user manual

CAPITAL SPORTS
CAPITAL SPORTS Dominate Edition 10028796 manual

Martin System
Martin System TT4FK user guide

CIRCLE FITNESS
CIRCLE FITNESS E7 owner's manual

G-FITNESS
G-FITNESS TZ-6017 user manual

Accelerated Care Plus
Accelerated Care Plus OMNISTIM FX2 CYCLE/WALK user manual


