Stratasys WaveWash 55 User manual

209297-0002
User Guide
Guide de l’utilisateur
Benutzerhandbuch
Guida dell'utente
Manual de usuario
ユーザーガイド
用户指南

Legal Notice
The only warranties for Stratasys products and
services are set forth in the express warranty
statement accompanying such products and
services. Nothing herein should be construed
as constituting an additional warranty.
Stratasys shall not be liable for technical or
editorial errors or omissions contained herein.
© 2013 Stratasys Inc. All rights reserved.
uPrint, Dimension, Dimension BST, Dimension
SST, WaveWash, Catalyst, and Ecoworks are
registered trademarks of Stratasys Inc. Mojo,
uPrint Plus, uPrint SE, uPrint SE Plus, Print Pack,
ABSplus, Catalyst EX, FDM, Fused Deposition
Modeling, and QuickPack are trademarks of
Stratasys, Inc. All other trademarks are the
property of their respective owners, and
Stratasys assumes no responsibility with regard
to the selection, performance, or use of these
non-Stratasys products. Product specifications
are subject to change without notice.

1
Table of Contents
1 Introduction...............................................................................................................................2
How to use this guide ..............................................................................................2
Learn More!............................................................................................................2
Safety precautions ...................................................................................................3
2 Overview..................................................................................................................................4
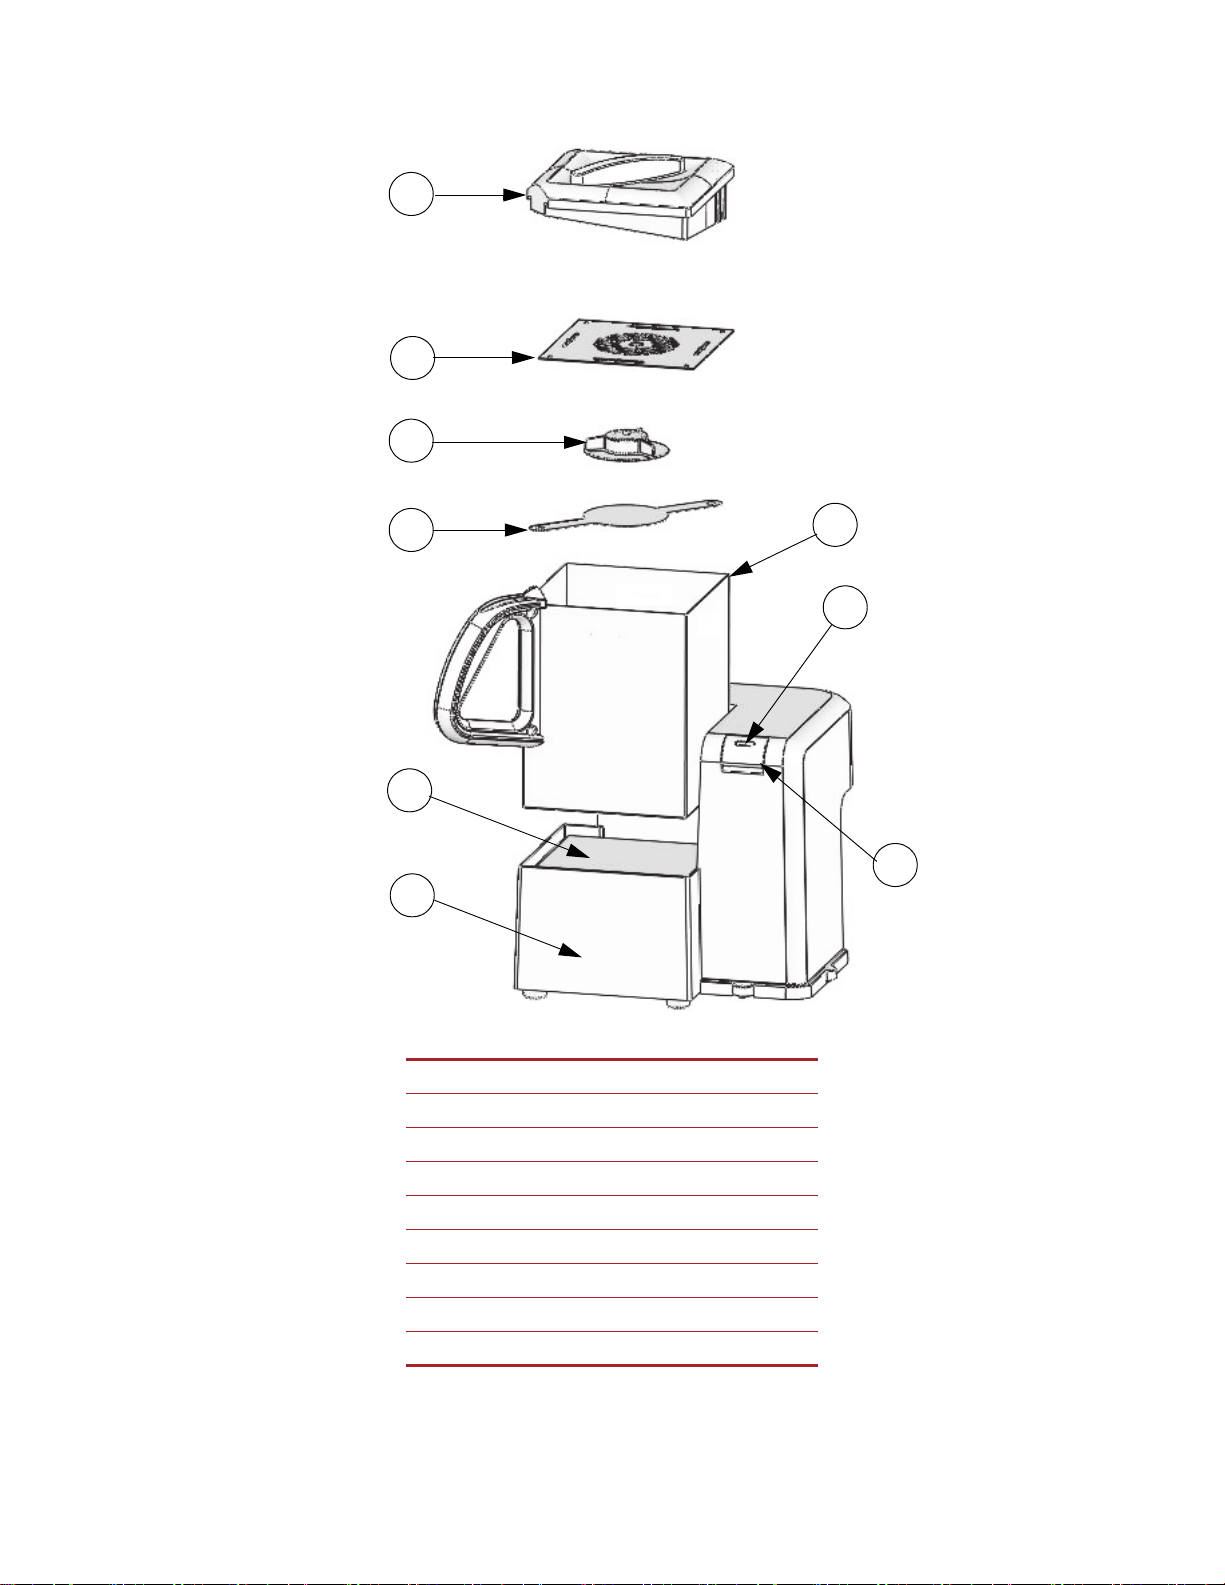
How it works ..........................................................................................................4
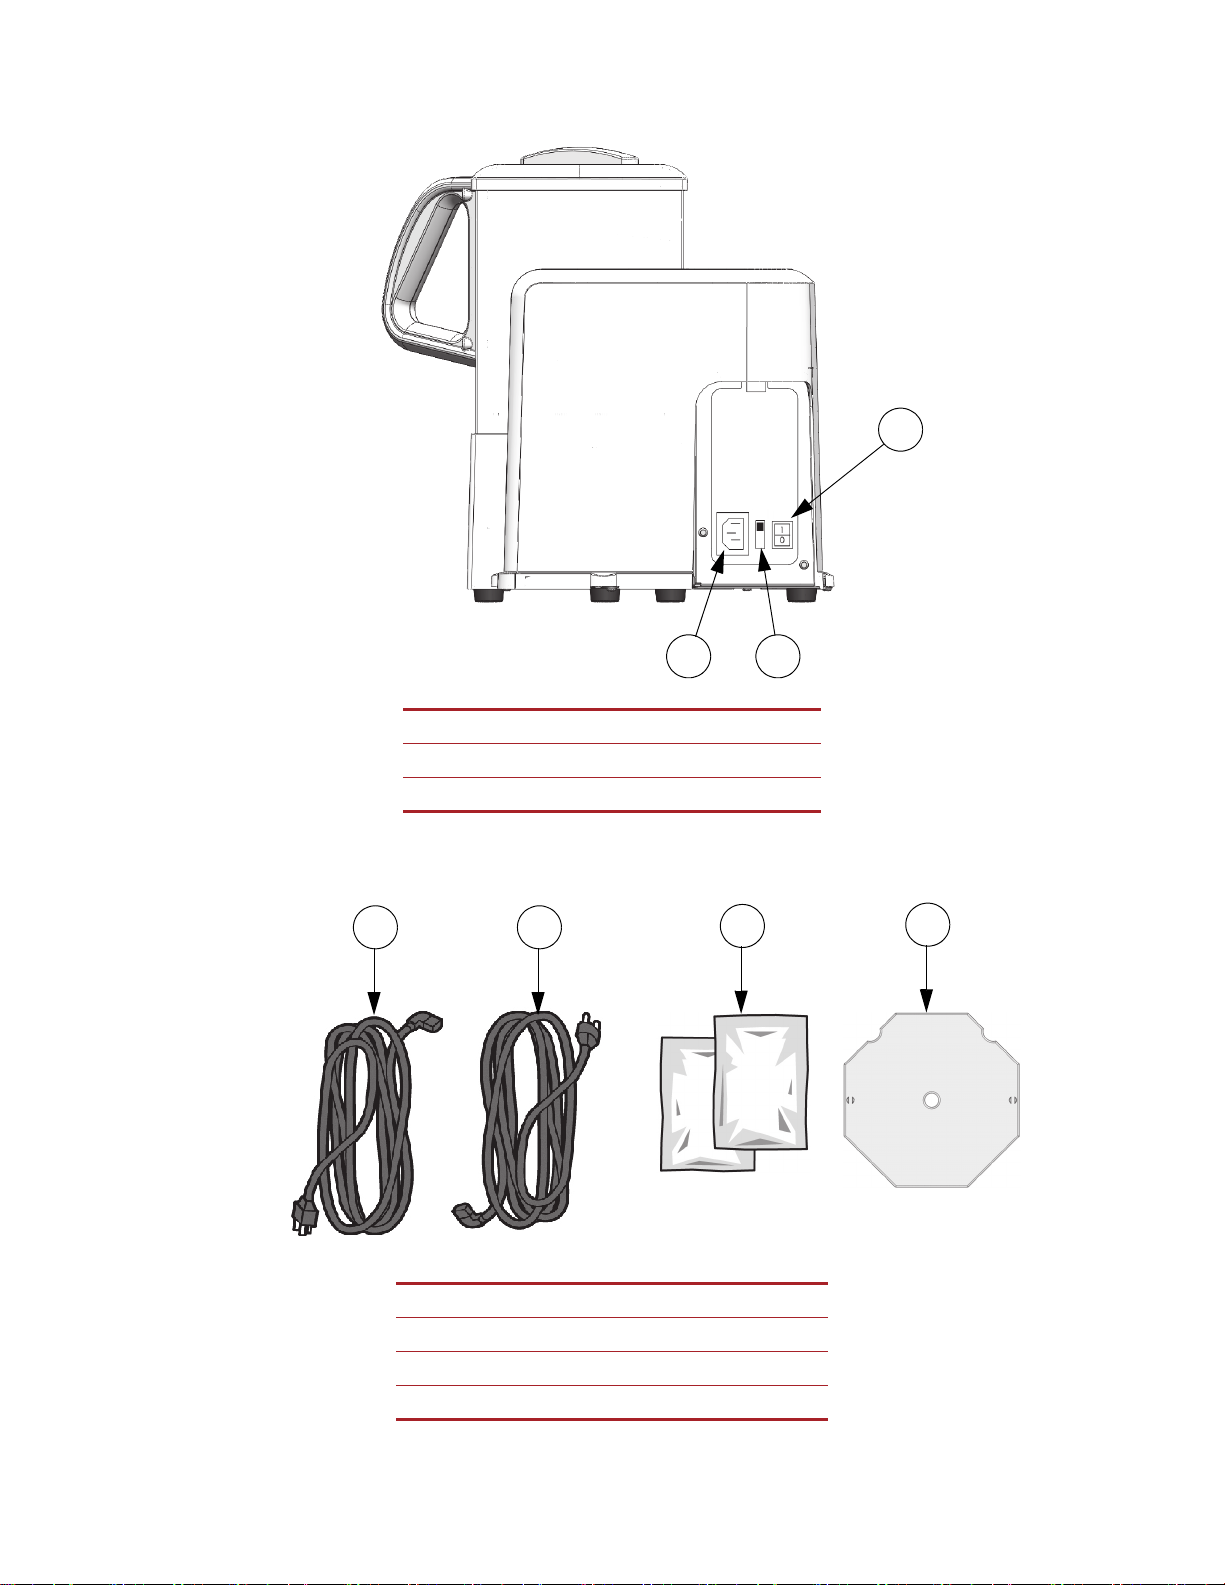
3 Setup........................................................................................................................................7
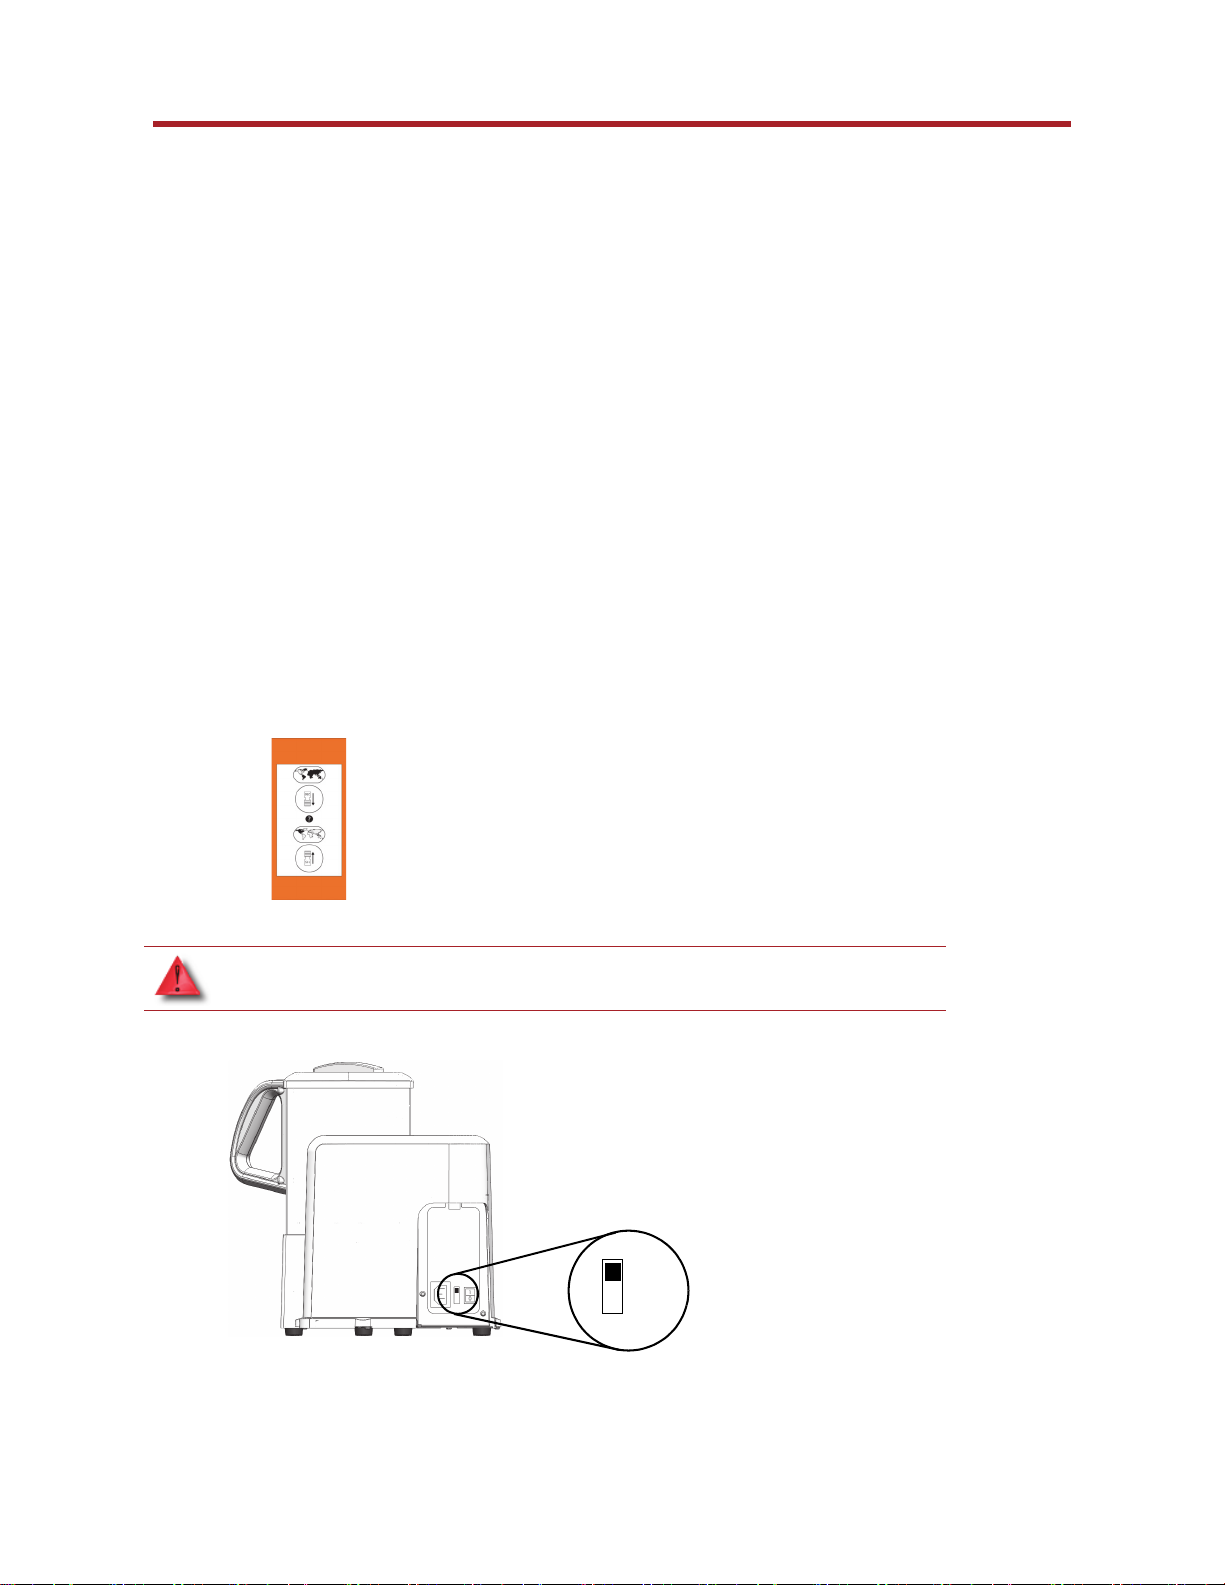
Connecting the system .............................................................................................7
4 Operation .................................................................................................................................8
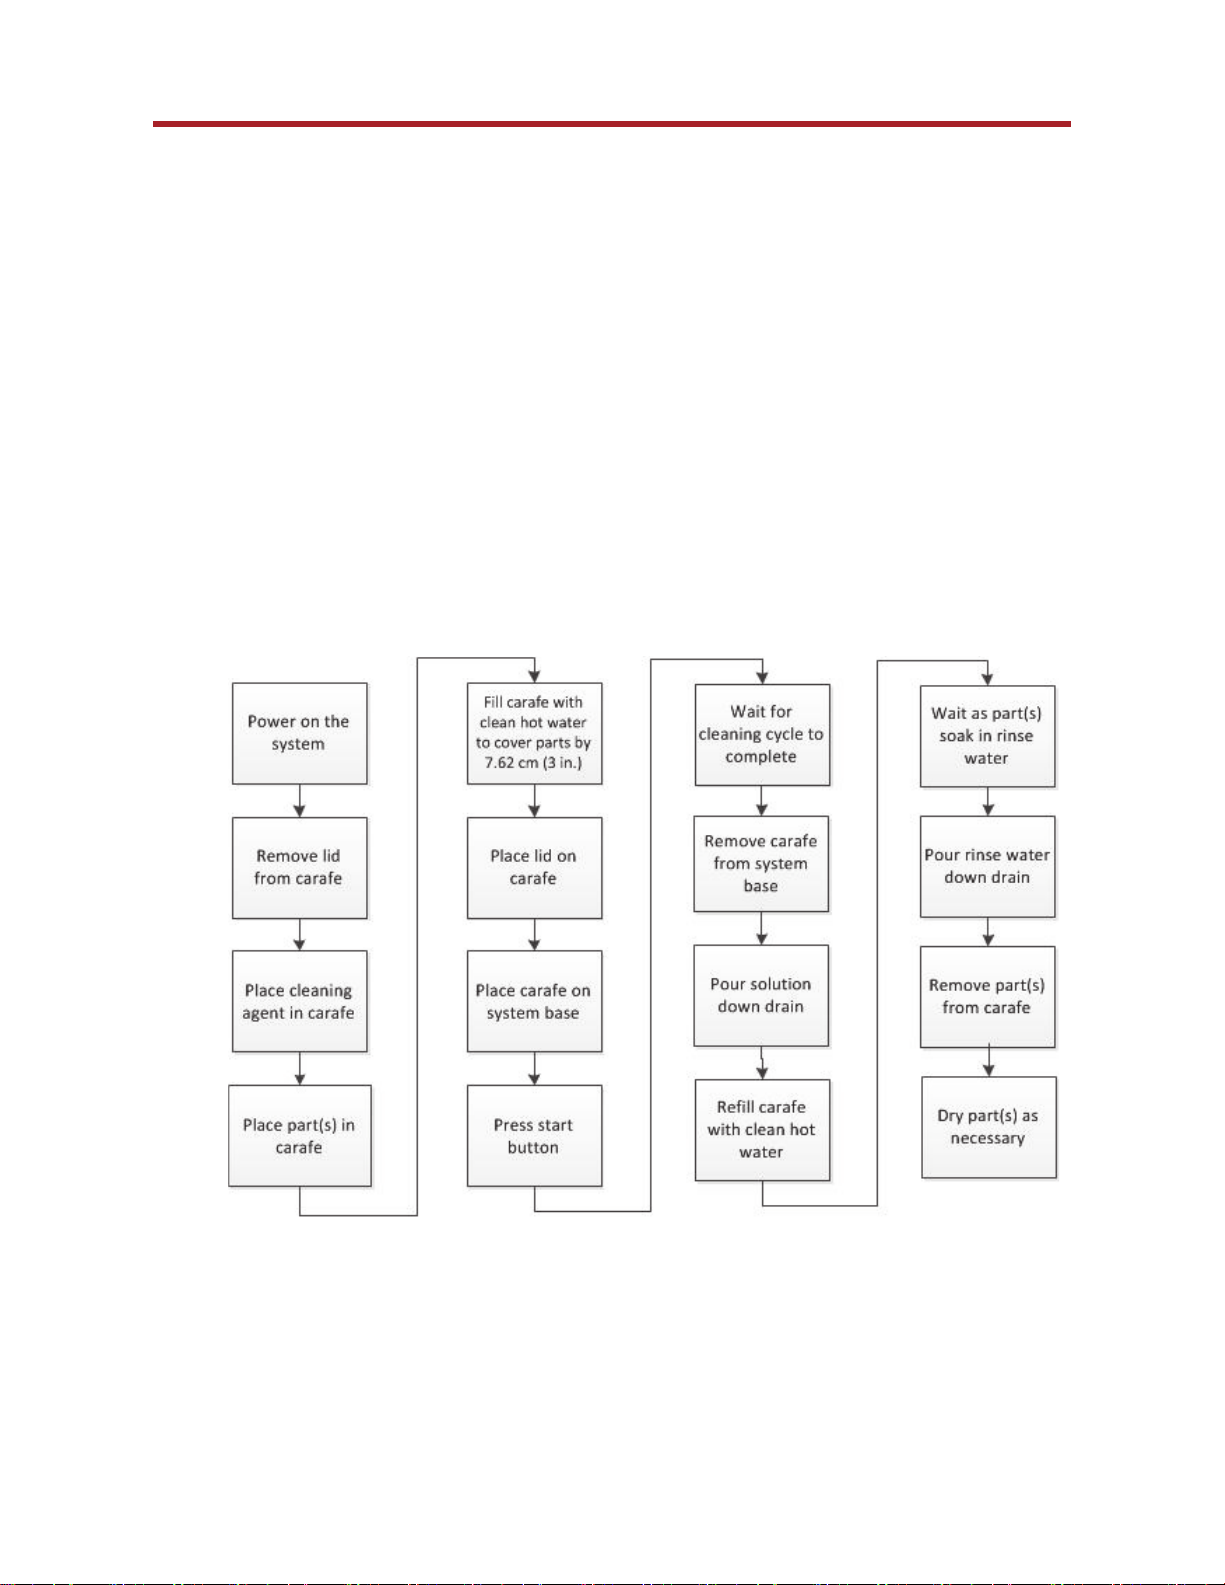
Cleaning parts ........................................................................................................8
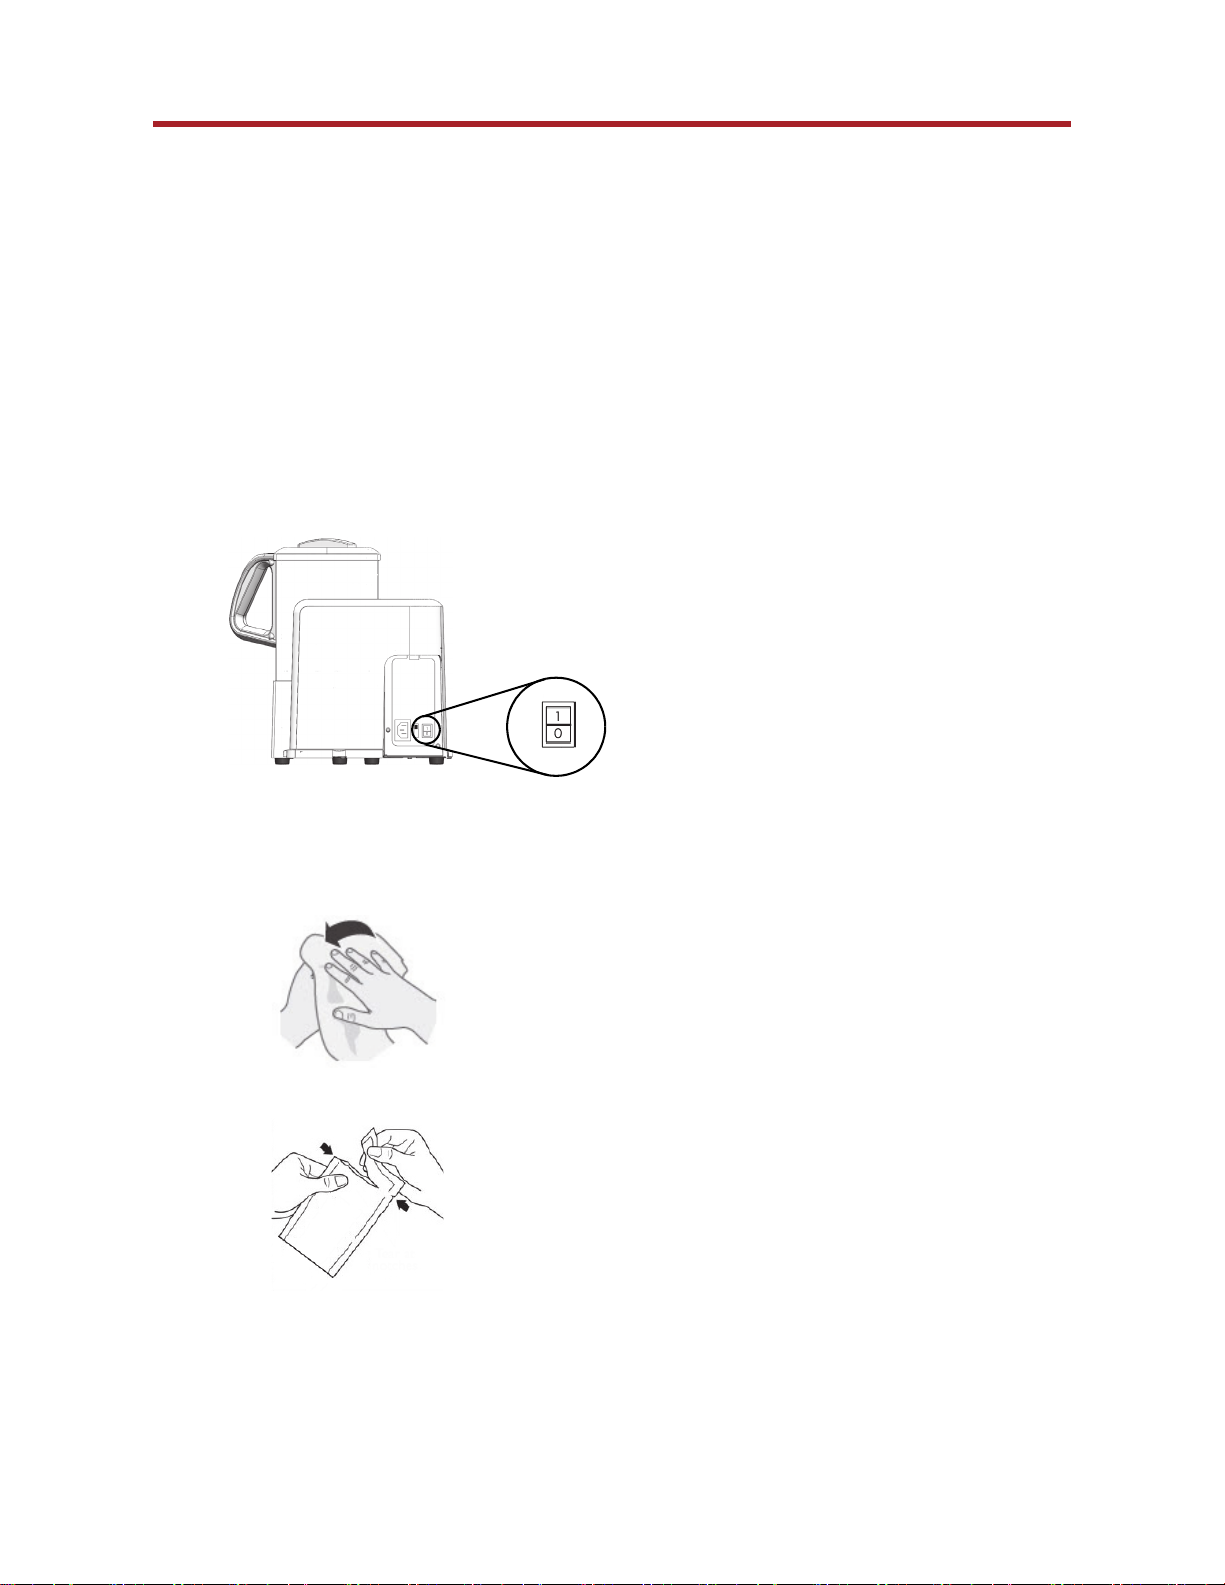
Powering off .........................................................................................................11
5 Maintenance ...........................................................................................................................12
Every cleaning cycle ..............................................................................................12
As needed............................................................................................................12
Yearly..................................................................................................................12
6 Troubleshooting ......................................................................................................................13
Troubleshooting ....................................................................................................13
7 Support...................................................................................................................................14
Registration ..........................................................................................................14
Customer Support..................................................................................................14
8 Recycling ................................................................................................................................15
9 System specifications...............................................................................................................16
Physical specifications............................................................................................16
Facility specifications .............................................................................................16
Power specifications ..............................................................................................16
Environmental specifications ...................................................................................16
Acoustic specifications ...........................................................................................16
10 Supplemental Information........................................................................................................17
Stratasys Limited Warranty Statement ......................................................................17
Declaration of Conformity ......................................................................................19
Regulatory and environmental information................................................................20
11 Glossary .................................................................................................................................22

2
1 Introduction
WaveWash 55 Support Cleaning System is designed to remove SR-30 soluble supports from
ABSplus parts using Ecoworks tablets. The system is environmentally friendly, allowing for municipal
sewage disposal of used solution. WaveWash 55 Support Cleaning System can clean a single part
as large as 127 x 127 x 127 mm (5 x 5 x 5 in.).
Your part is left with a smooth and clean finish with the fine details intact. The majority of the soluble
support material can be removed by hand with relative ease, but is designed to be dissolved from
your parts for hands free finishing.
How to use this guide
This User Guide is laid out in easy to follow sections which cover Setup, Operation, Maintenance,
and Troubleshooting. Read each section carefully so that you will get the best performance from
your cleaning system.
Learn More!
An electronic User Guide is available at: http://www.stratasys.com/login. This guide provides
information on the following topics:
• Troubleshooting information
• Important safety notices and regulatory information
• Detailed user instructions
You can also find more information at: http://www.Mojo3Dprinting.com.

3
Safety precautions
The following precautions ensure proper use of the system and prevent system damage. Follow these
precautions at all times.
• Make sure the appropriate voltage range for your region has been selected. Avoid
overloading the electrical outlet with multiple devices.
• Ensure the system is well-grounded. Failure to ground the system may result in electrical shock,
fire and susceptibility to electromagnetic interference.
• Before disassembling or repairing the system yourself, contact your local Service
Representative. See the Support section in the User Guide.
• Use only the power cord supplied. Do not damage, cut or repair the power cord. A damaged
power cord has risk of fire and electric shock. Replace a damaged power cord with an
approved power cord.
• Do not allow metal or liquids to touch the internal parts. Doing so may cause damage, fire,
electric shock or other serious hazards.
• Power off the system and disconnect the power cord from the power outlet in any of the
following cases:
• If there is smoke or an unusual smell coming from the cleaning system.
• If the cleaning system is making an unusual noise not heard during normal operation.
• A piece of metal or a liquid touches the internal parts of the cleaning system.
• During an electrical (thunder/lightning) storm.
• During a power failure.
The following classifications are used throughout this guide.
CAUTION: Indicates a potentially hazardous situation which, if not avoided,
may result in minor or moderate injury.
WARNING: Indicates a potentially hazardous situation which, if not avoided,
could result in serious injury.
Hot Surface: The hot surface sign indicates the presence of devices with high
temperatures. Always use extra care, and wear safety gloves, when working
around heated components.
Recycle: Use proper recycling techniques for materials and packaging.

4
2Overview
The WaveWash 55 Support Cleaning System was specifically developed to provide efficient
removal of soluble support material from parts built using the FDM process.
How it works
The system removes support material by immersing parts in a bath of water with a specific amount
of Ecoworks tablets. The system heats and circulates solution around the parts in the carafe. The
solution dissolves the support material without harming the underlying part material. Cleaned parts
should be air dried before using.
Figure 1 Sequence of operation

5
Figure 2 Major cleaning system components
1Lid
2Grate
3 Agitator assembly
4 Bushing
5Heatersurface
6Base
7 Start/stop button
8LEDindicator
9Carafe
7
8
6
5
2
4
1
3
9

6
Figure 3 Back view of cleaning system
Figure 4 Startup kit contents
1 AC power cord connector
2ACpowerselection(115 V o r 23 0 V )
3 Power ON/OFF switch
1Powercord(Euro)
2Powercord(US)
3 Ecoworks tablets (2)
4Baffle
3
1 2
1 2 34

7
3Setup
Connecting the system
Make sure the following preparations of the physical site are met:
• The system must be placed on a flat and stable surface able to support 9.1 kg (20 lbs.) to avoid
the risk of falling.
• The grounded electrical outlet (100–120/220-240VAC, 7/4A 60/50Hz) must connect a
power cord for your region and must be located within 2 m (5 ft.) of the system. Do not use an
extension cord or a power strip. Using these can possibly cause intermittent power issues.
• The AC voltage selection (115V or 230V) switch must be set for the proper power input.
Select AC power
1. Remove the AC power selection sticker.
2. Set the AC power selection (115V or 230V) switch to the voltage used in your region.
Figure 5 AC Power Selection
Connect the power cord
Securely plug one end of the appropriate power cord into the receptacle at the side of the system
and the other end of the power cord into a grounded receptacle.
WARNING: If the proper input voltage is not selected, the cleaning system will be
damaged.
115 V
230V

8
4Operation
Cleaning parts
Power on the system
Power on the system using the On/Off switch.
Add cleaning agent
Follow the instructions below for adding the contents of the cleaning agent bag into the carafe.
1. Dry hands before opening the cleaning agent bag.
2. Open the cleaning agent bag as shown.

9
3. Empty all the contents of the cleaning agent bag into the carafe.
After adding all the contents of the cleaning agent bag, properly dispose of the bag.
Adding parts
Place part(s) with soluble supports in the bottom of the carafe. All parts must be free to agitate in the
cleaning solution. Do not overload the carafe with parts.
Adding delicate parts
Delicate parts can be protected by first placing the baffle in the bottom of the carafe and locking it
in place. The baffle is designed to lessen agitation and prevent delicate parts from being damaged
during the cleaning cycle.
• Delicate parts have features with a cross sectional areas under 19 sq. mm (0.03 sq. in.).
Installing/removing the baffle (optional)
Use the following steps to install the baffle at the bottom of the carafe.
1. Align the locking tabs of the baffle to the slots on the carafe grate. Make sure the baffle is
firmly installed.
2. Move the baffle to the “locked” position.

10
To remove the baffle from the bottom of the carafe, use the following steps.
1. Using the unlock finger holes, lift up and move the baffle to the unlocked position.
2. Use the unlock finger holes to lift up and remove the baffle.
Filling the carafe
Manually fill the carafe with hot water. Fill the carafe so the water level is at least 7.62 cm (3 in.)
above the part(s) or to a maximum of 2.54 cm (1 inch) from the top of the carafe, whichever is less.
Part(s) must be fully submerged during the cleaning process. Use hot water when filling the carafe.
This will help dissolve the support structures more quickly. Place the lid on the carafe and set the
carafe on the base.
Starting the cleaning cycle
Start the cleaning cycle by pressing the start/stop button. The LED indicator will turn green and the
system will start an 8 hour cycle. The cleaning cycle can be stopped at any time by pressing the
start/stop button again.
Completed cleaning cycle
After an 8 hour cycle, the system will automatically turn off and the LED indicator will turn dark. The
cleaning cycle can be cancelled at any time by pressing the start/stop button. If the cleaning cycle
is restarted, the timer will revert to the 8 hour cycle. The size of the part and the amount of support
structure will determine the length of time necessary to completely remove support material.

11
Rinsing parts
After completing a cleaning cycle, the part(s) must be rinsed clean.
1. Lift the lid slightly while draining the cleaning solution into a drain.
2. Remove the lid and manually fill the carafe with hot water to cover the part(s) and rinse away
any residue.
3. Replace the lid and let parts soak in clean water for a approximately 5 minutes.
4. Lift the lid slightly while draining the rinse water.
Remove parts
1. Remove the lid completely and remove the part(s) from the carafe.
2. Let the water drain off the part(s) for a few minutes and if necessary, wash away any
remaining residue under running warm water.
3. Dry the part(s) with a clean cloth or paper towel.
Powering off
To power off the cleaning system, turn the power switch to the OFF position. No other steps are
necessary. If this is done while the system is cleaning a part, the current cycle will stop and parts
may not be completely clean.
Note: Always observe your local city ordinances concerning the disposal of
wastewater.

12
5 Maintenance
Preventive Maintenance
Every cleaning cycle
• Rinse out carafe and keep the inside free of debris.
• Wipe up any spills or debris from all surfaces.
• Clean any residue or spills from the heater surface using a damp cloth.
As needed
• Wipe down the exterior of unit with a damp cloth to remove any residue.
Yearly
Bushing and agitator inspection
1. Remove the carafe from the base.
2. Remove the lid from the carafe.
3. Remove four screws that attach the carafe grate to the bottom of the carafe and remove the
grate.
• Check the grate for damage or distortion.
4. Lift the agitator assembly out of the carafe.
5. Inspect the agitator for wear. Replace if the bottom is worn through to the magnets.
6. Inspect the bushing for wear. Replace if it is worn through in any location or if any of the
blades are broken.
7. Inspect the inside of the carafe for any residue build up.
• Remove any residue using a damp cloth.
Hot Surface: The heater surface may be hot.
Note: The agitator assembly is magnetic. Make sure the assembly does not
get placed near any loose metal debris.

13
6 Troubleshooting
Troubleshooting
Problem Recommendation
No power 1. Verify power cord is securely plugged in.
2. Verify that the power switch (at the back of the cleaning system) is in the ON
position.
3. Verify AC power is present at the wall outlet.
Parts not cleaning 1. Verify machine is powered on.
2. Verify the start/stop button was pushed (green LED on).
3. Verify that clean water and a new Ecoworks tablet is used for each cleaning
cycle.
4. Verify the part(s) were covered by at least 3-inches of water.
5. Allow more time to clean.
6. Verify that solution is agitating.
7. Verify agitator assembly moves freely.
8. Check the agitator and bushing for wear (see “Yearly” on page 12).
9. Verify the cleaning solution is heating.
Solution not hot 1. Fill the carafe with hot water.
2. Verify carafe is sitting flat on the heater surface.
Red LED errors The red LED indicates a heater surface temperature error. Follow the following
steps to resolve:
1. Verify the carafe is sitting flat on the heater surface.
2. Contact your Service Provider.
Yellow LED error The yellow LED indicates the motor has lost coupling with the agitator. To
resolve:
1. Verify the carafe is sitting flat on the heater surface.
2. Verify the agitator is positioned correctly in the carafe.
3. Verify the agitator is free to rotate.
4. Press the start button to restart the wash cycle.

14
7Support
Registration
To register your WaveWash 55 Support Cleaning System, visit:
http://www.mojo3dprinting.com/help/register‐printer.aspx.
Customer Support
Visit: http://www.stratasys.com/login for the following:
• Material specifications, MSDS, and environmental documentation.
• Product specifications and guides.
• Applications.
• Best practices.
When contacting technical support please provide the following:
By phone:
• System model.
• System serial number.
• Detailed description of the problem you are experiencing.
• Please try to be near the cleaning system for troubleshooting, if possible.
By email:
• System model.
• System serial number.
• Your name.
• Your telephone number.
• Detailed description of the problem you are experiencing.

15
8Recycling
Recycle all materials per your local recycling guidelines.
Figure 6 Recycling Codes
System Component Materials Recycling Code
Baffle ABS
Bushing PTFE
All packaging materials can be recycled per your local
recycling guidlines.

16
9 System specifications
The information in this section is applicable to the WaveWash 55 Support Cleaning System.
Physical specifications
Facility specifications
Power specifications
Environmental specifications
Acoustic specifications
Height 33.5cm (13.2 in.)
Width 33.5cm (13.2 in.)
Depth 33.5cm (13.2 in.)
Weight (empty) 5.4 kg (12 lbs.)
Weight (full) 9.1 kg (20 lbs.)
Installation location Stable flat surface capable of holding 9.1kg (20 lbs), with a height clearance of
47.8 cm (19.2 in.).
Power Requirements A grounded electrical outlet (100–120/220-240VAC, 7/4A 60/50Hz 600W)
located within 2 m (80 in.)
Do not use an extension cord or a power strip, using these can possibly
cause intermittent power issues.)
Air Circulation 10.2 cm (4 in.) minimum space behind and around the cleaning system for air circu-
lation.
System 100–120/220-240VAC, 7/4A 60/50Hz 200W
Do not use an extension cord or a power strip, using these can possibly
cause intermittent power issues.
Temperature range .15 ◦C to 30◦C (59◦F to 86◦F)
Relative humidity range 30 to 70 percent, non condensing
Heat emission 580 BTU during heat up
Operating sound pressure at bystander 46 dBA

17
10 Supplemental Information
Stratasys Limited Warranty Statement
Stratasys, Inc. ("Stratasys") warrants its' systems and associated peripheral devices and replacement
parts (collectively, the "Product") purchased from Stratasys or an Authorized Stratasys Reseller to be
free from defects in material and workmanship according to the terms and conditions stated below:
Warranties extend only to the original purchaser of the Product. The warranty on the original
Product, as delivered, extends for one year starting on the date of delivery. Your sole remedy as
purchaser under this Limited Warranty shall be repair or replacement as provided herein.
To preserve your warranty rights, Products must be installed in accordance with the then-current User
Guide available at www.stratasys.com. During the Limited Warranty period, Stratasys or its'
designated representative will, at their option, repair or replace a defective Product as set forth
below. Service Parts and replacement Products will be furnished on an exchange basis, and will be
either new or refurbished. All replaced parts or replaced Products become the property of Stratasys,
and you will be invoiced for replacement parts if defective parts are not returned as directed by
Stratasys under this Limited Warranty.
Stratasys will bear the cost of returned parts, as well as for shipping new or rebuilt replacement
parts to you, provided that you report the warranty claim within the Limited Warranty period and
obtain return instructions from Stratasys prior to return. Replacement parts independently carry a 90-
day warranty from date of shipment from Stratasys or designated representative location.
Consumable parts are not covered by this Limited Warranty. Warranty services may be provided by
Stratasys, an Authorized Reseller, or a third party service provider designated by Stratasys.
No coverage or benefits under this Limited Warranty will exist if any of the following conditions
apply:
(a) The Product has been subjected to abnormal use, improper or inadequate maintenance,
unauthorized modifications, unauthorized repair, misuse, abuse, exposure to moisture, flooding, fire,
electrical problems associated with incoming power, or other acts which are not the fault of
Stratasys, Inc.
(b) Stratasys' Customer Service Department was not notified of the defect or malfunction of the
system prior to expiration of the one year warranty period.
(c) Parts or consumables were installed and used that were not certified or approved by
Stratasys.
Stratasys will also not be liable under any circumstances for Product replacement or associated
labor, loss of use, loss of profits, or for any other indirect, incidental, collateral, exemplary, punitive,
consequential or special damages, or losses arising out of the purchase of the Product and/or out of
this limited warranty, even if Stratasys or its' designated representative have been advised of the
possibility of such damages or claims. To the extent such claims are not excludable as adjudged by
a court of competent jurisdiction, you agree to accept as sole and exclusive remedy, a payment
equal to the original purchase price for the product adjudged to be defective.

18
SOME COUNTRIES, REGIONS, STATES OR PROVINCES DO NOT ALLOW THE EXCLUSION OR
LIMITATION OF REMEDIES OR OF INCIDENTAL, PUNITIVE, OR CONSEQUENTIAL DAMAGES,
OR THE APPLICABLE TIME PERIODS, SO THE ABOVE LIMITATIONS OR EXCLUSIONS MAY NOT
APPLY TO YOU. EXCEPT TO THE EXTENT LAWFULLY PERMITTED, THIS LIMITED WARRANTY DOES
NOT EXCLUDE, RESTRICT OR MODIFY, AND IS IN ADDITION TO THE STATUTORY RIGHTS
APPLICABLE TO THE SALE OF THIS PRODUCT TO YOU.
This warranty gives you specific legal rights and you might also have other rights that vary from
country/region to country/region, state to state, or province to province.
EXCEPT FOR THIS LIMITED WARRANTY, AND TO THE FULLEST EXTENT ALLOWED BY LAW,
NEITHER STRATASYS NOR ANY AUTHORIZED RESELLER MAKES ANY OTHER WARRANTY OF
ANY KIND, EXPRESS OR IMPLIED, INCLUDING ANY IMPLIED WARRANTY OF MERCHANTABILITY
OR FITNESS FOR A PARTICULAR PURPOSE. STRATASYS DOES NOT OFFER, ASSUME OR
AUTHORIZE THE OFFER OR ASSUMPTION OF LIABILITY FOR IT OR FOR ANY OTHER
WARRANTY, EITHER EXPRESS OR IMPLIED BY ANY AUTHORIZED RESELLER OR OTHER
INDEPENDENT THIRD PARTY.
Table of contents
Other Stratasys Cleaning Equipment manuals
Popular Cleaning Equipment manuals by other brands

Kärcher
Kärcher T 250 manual

Graymills
Graymills BTU Series Operator and maintenance manual

Lincoln Electric
Lincoln Electric WELDLINE OPTICLEAN II Use and maintenance instructions

Getinge
Getinge Castle 7900 installation instructions

nanoskin
nanoskin Evergreen EG-1004 instruction manual

Sprintus
Sprintus CRAFTIX M Original user manual