manuals.online logo
Brands
  1. Home
  2. •
  3. Brands
  4. •
  5. Sumitomo
  6. •
  7. Cables And Connectors
  8. •
  9. Sumitomo Lynx-CustomFit LYNX2-SC User manual

Sumitomo Lynx-CustomFit LYNX2-SC User manual

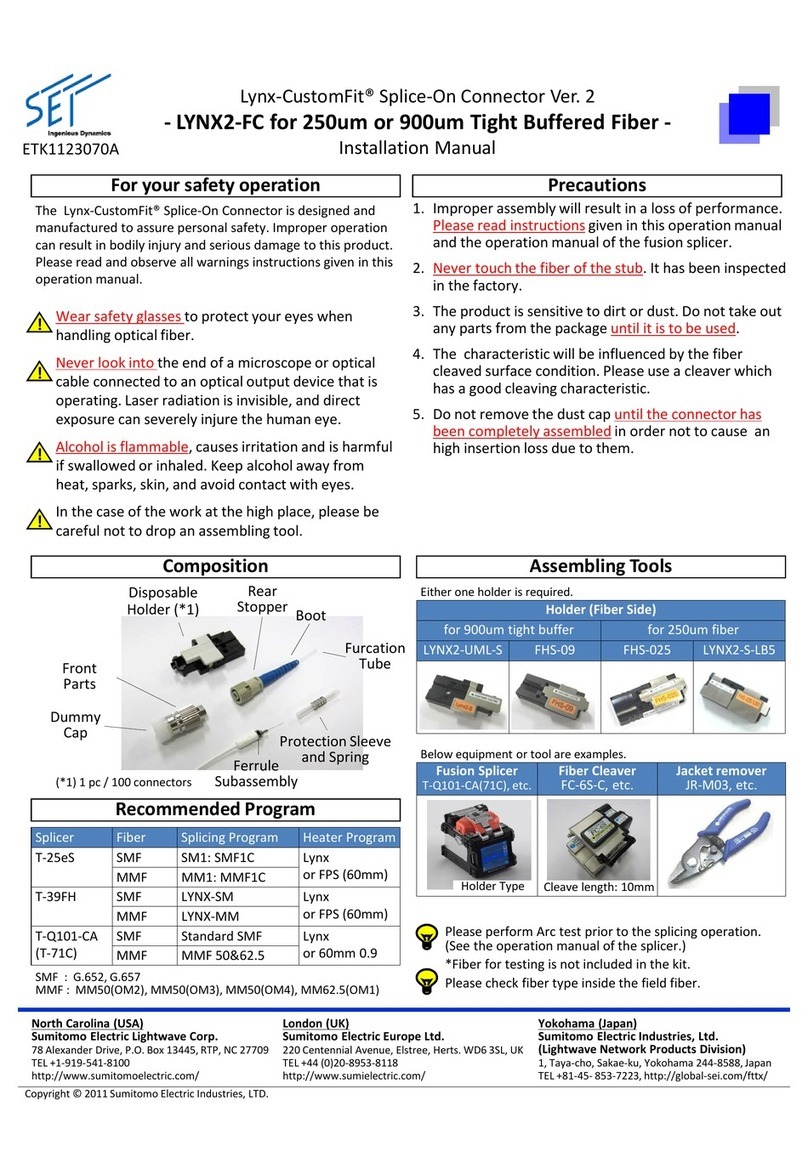
Foryoursafetyoperation Precautions
ETK1123085B
Lynx‐CustomFit® Splice‐On Connector Ver.2
‐LYNX2‐SC for Optical Cord with Tight Buffered Fiber ‐
Installation Manual
TheLynx‐CustomFit® Splice‐On Connectoris designedand
manufacturedtoassurepersonalsafety.Improperoperation
canresultinbodilyinjuryandseriousdamagetothisproduct.
Pleasereadandobserveallwarningsinstructionsgiveninthis
operationmanual.
Wearsafetyglassestoprotectyoureyeswhen
hdli ti l fib
!
1. Improperassemblywillresultinalossofperformance.
Pleasereadinstructions giveninthisoperationmanual
and the operation manual of the fusion splicer.
2. Never touch the fiber of the stub. It has been inspected
in the factory.
3. Theproductissensitivetodirtordust.Donottakeout
any
parts from the package
until it is to be used
h
an
dli
ngop
ti
ca
l

fib
er.
Neverlookintotheendofamicroscopeoroptical
cableconnectedtoanopticaloutputdevicethatis
operating.Laserradiationisinvisible,anddirect
exposurecanseverelyinjurethehumaneye.
Alcoholisflammable,causesirritationandisharmful
!
!
any
parts

from

the

package

until

it

is

to

be

used
.
4. Thecharacteristicwillbeinfluencedbythefiber
cleavedsurfacecondition.Pleaseuseacleaverwhich
hasagoodcleavingcharacteristic.
5. Donotremovethedustcapuntiltheconnectorhas
beencompletelyassembled inordernottocausean
highinsertionlossduetothem.
ifswallowedorinhaled.Keepalcoholawayfrom
heat,sparks,skin,andavoidcontactwitheyes.
Inthecaseoftheworkatthehighplace,pleasebe
carefulnottodropanassemblingtool.
!
!
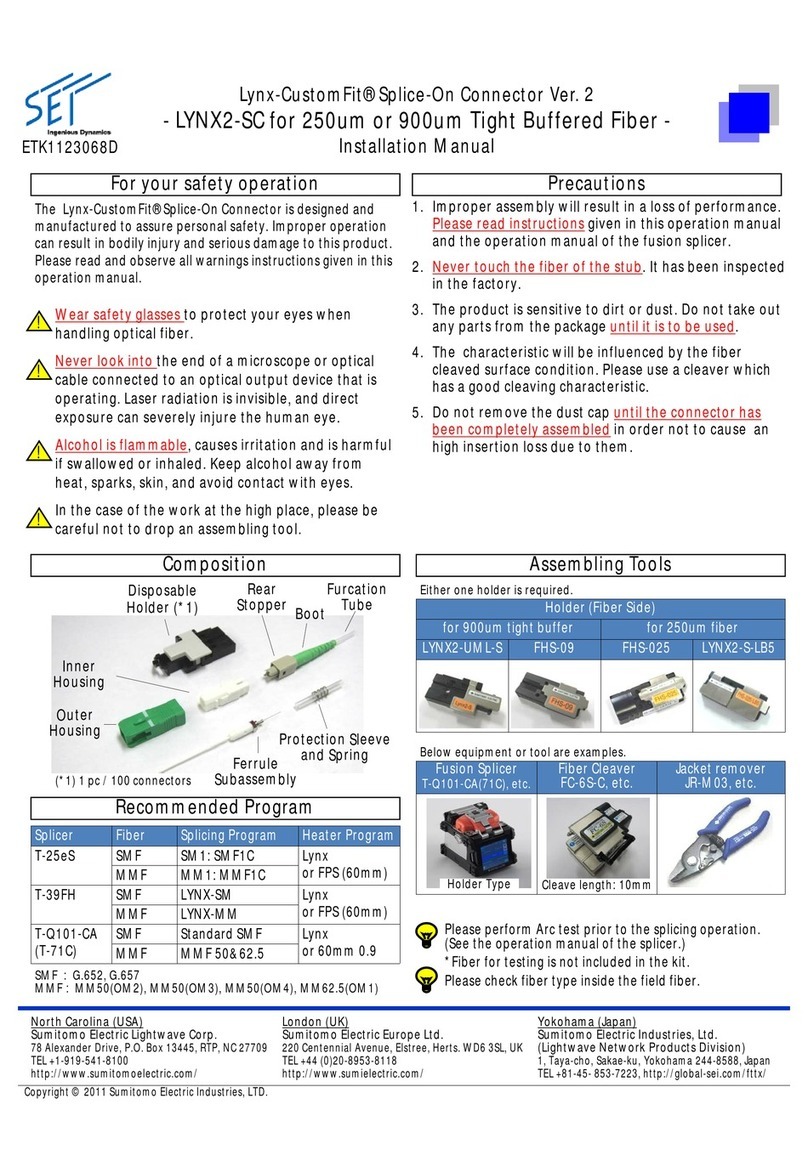
Composition Assembling Tools
Di bl
Rear
Furcation
Bl
l
id
Di
sposa
bl
e
Holder(*1)
Outer
Inner
Housing
Rear

Stopper Boot
Furcation

Tube
PiSl
Fiber Holder
LYNX2‐UML‐S
Cord Tool
LYNX2‐CORDTOOL
B
e
l
ow too
l
s are requ
i
re
d
.
FusionSplicer
T‐Q101‐CA, etc.
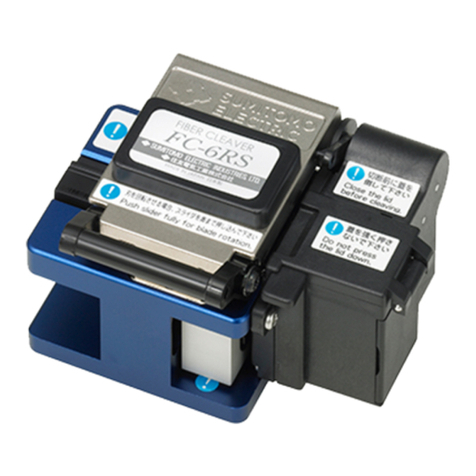
FiberCleaver
FC‐6S‐C, etc.
Jacketremover
JR‐M03, etc. KevlarCutter
Recommended Program
Splicer Fiber SplicingProgram HeaterProgram
Below equipments or tools are examples.
Outer

Housing
Ferrule
Subassembly
P
rotect
i
on
Sl
eeve
and Spring
(*1) 1 pc / 100 connectors
SMF G 652 G657
T‐25eS SMF SM1: SMF1C Lynx
or FPS (60mm)
MMF MM1: MMF1C
T‐39FH SMF LYNX‐SM Lynx
or FPS (60mm)
MMF LYNX‐MM
T‐Q101‐CA
(T‐71C)
SMF Standard SMF Lynx
or 60mm 0.9
MMF MMF 50&62.5
PleaseperformArctestpriortothesplicingoperation.
(Seethe operation manual of the splicer.)
*Fiberfortestingisnotincludedinthekit.
HolderType Cleave length:
10mm
Copyright©2011SumitomoElectricIndustries,LTD.
SMF
:
G
.
652
,
G
.
657
MMF:MM50(OM2),MM50(OM3),MM50(OM4),MM62.5(OM1) Pleasecheckfibertypeinsidethefieldfiber.
North Carolina (USA)
SumitomoElectricLightwaveCorp.
78 Alexander Drive, P.O. Box 13445, RTP, NC 27709
TEL+1‐919‐541‐8100
http://www.sumitomoelectric.com/
Yokohama (Japan)
SumitomoElectricIndustries,Ltd.
(LightwaveNetworkProductsDivision)
1, Taya‐cho, Sakae‐ku, Yokohama 244‐8588, Japan
TEL+81‐45‐853‐7223, http://global‐sei.com/fttx/
London (UK)
SumitomoElectricEuropeLtd.
220 Centennial Avenue, Elstree, Herts. WD6 3SL, UK
TEL+44 (0)20‐8953‐8118
http://www.sumielectric.com/
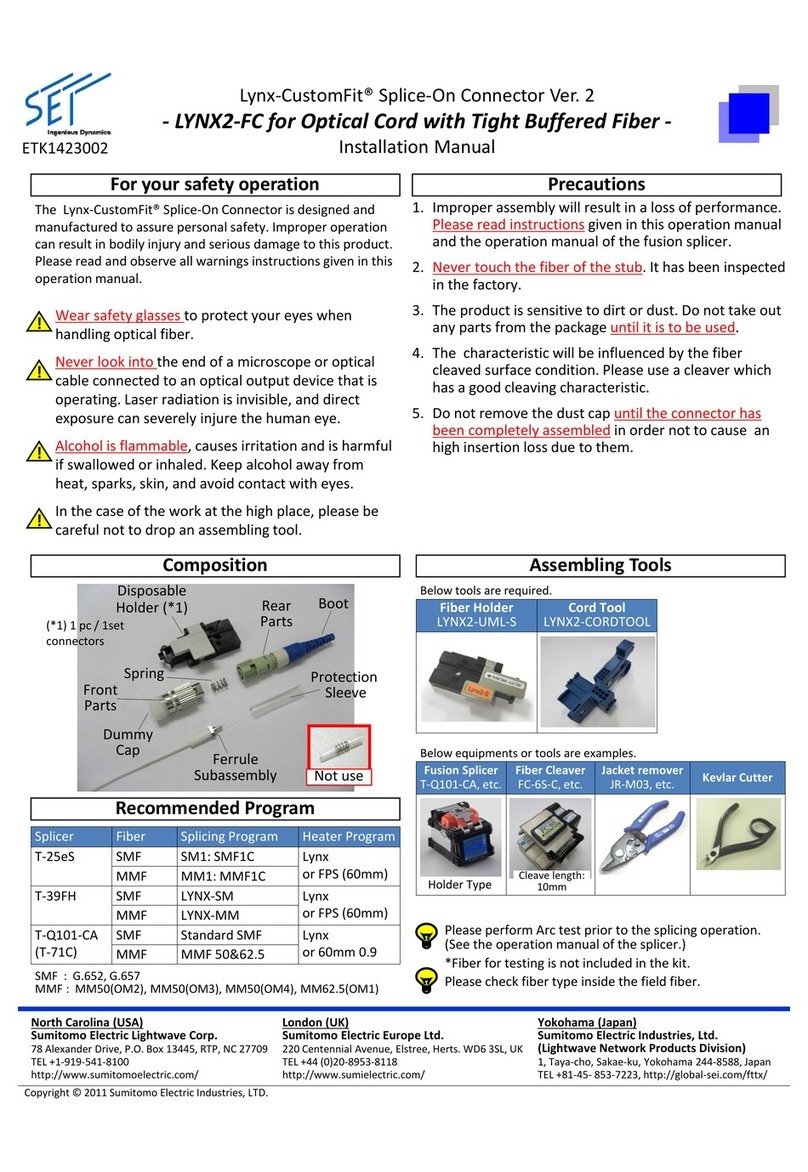
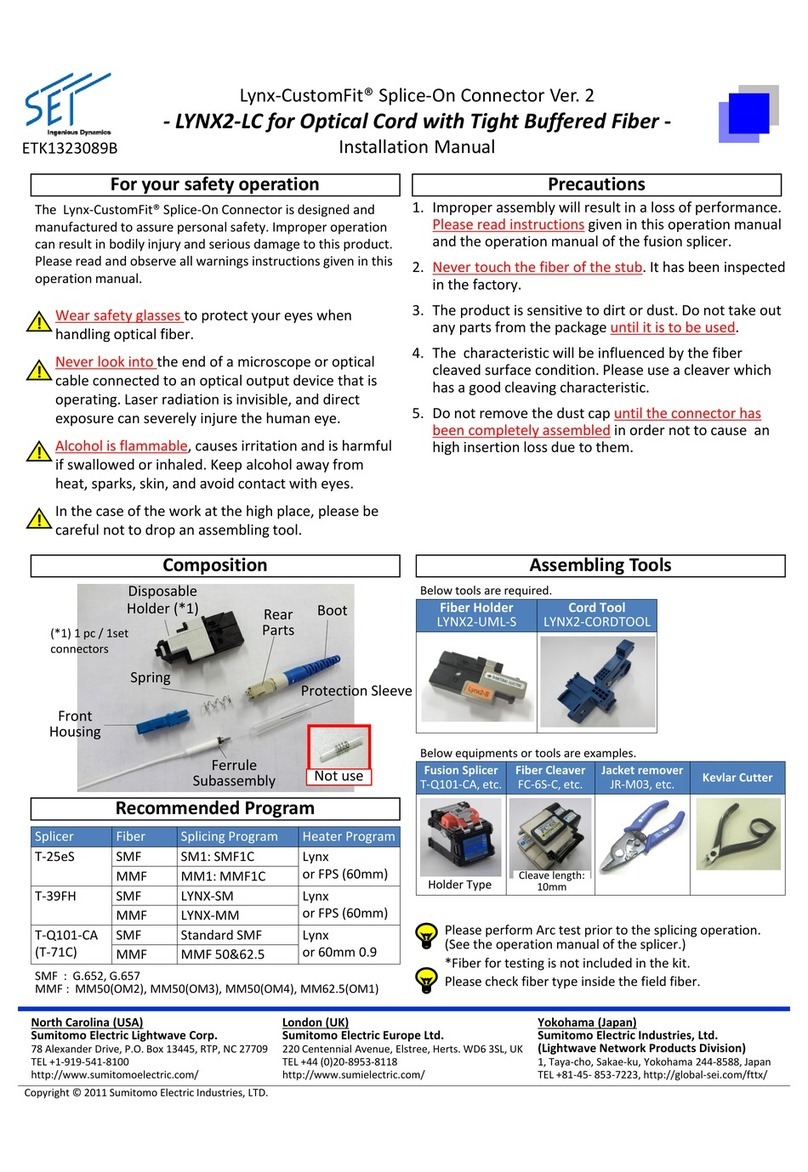
LYNX2‐SCforOpticalCordwith Tight Buffered Fiber
Assembly Procedure ETK1123085B
(A) Set Fusion Condition (B) Perform Arc Test
Then perform the arc test
according to the
instruction.
(1) Slide Rear Parts onto
the cord.
(2) Open Cord Tool and set the cord on the proper groove.
Rotate the cord, then remove the outer sheath.
Contact
the
top
(3) Open Cord Tool again and set the cord on the proper groove.
Mark on the 900um fiber.
900um
Push “power
key” for more
than 1 sec.
“Main Menu”
Select Fiber Type Select “FiberType”, then “Return”. Select “Arc Test”
*Fiberfortestingisnot
includedinthekit.
Pleasecheckfibertype
insidethefieldfiber.
“Main Manu”
Select Sleeve Type
Select Sleeve Type
Then “Return”
Seetheoperationmanualofeachsplicer.ThesearetheexampleofT‐Q101‐CA(T‐71C).
Contact
the
top
to the wall
Cord
Fiber
MarkHere
Rotate
the cord
Remove
the sheath
(4)
Grip
Cord
Tool
and
pull
the
cord.
Then
the
(5)
Slide
Protection
Sleeve
(6)
Remove
the
fiber
coating
from
(7)
Clean
the
fiber
with
Grip Here
(4)
Grip
Cord
Tool
and
pull
the
cord.
Then
the
outer sheath is separated into two pieces.
Pull
the
cord
(5)
Slide
Protection
Sleeve
onto the fiber.
Insertfiberinto
this hole
(6)
Remove
the
fiber
coating
from
the marking point. (JR‐M03)
0.9to0.25mm
0.25to0.125mm
(7)
Clean
the
fiber
with
lint‐free cleaning wipe.
Moistened
withalcohol
Markpoint
Pull
the
cord
this

hole
(8) Set the fiber on theholder. Confirmtheposition
Good
No Good
Donottouch
barefiber 1. Place
(10) Cleave the fiber (FC‐6S)
Nogap
2. Close
(9) Set the sleeve on theholder.
Donottouch
barefiber
No Good
3. Slide
Cleanrubberclamp
andbladeregularly
(11) Setfiberholderonthesplicer
(leftside). (12) Pick up the stub and set the stub on the plastic holder.
Push to
close
(13) Setstubholderonthesplicer
(rightside).
Placefiberon
V‐groovegently
Grasphereto
pick up
Donottouch
barefiber Placefiberon
V‐groovegently
(14) Fusion Splice. (15) Open the stub and fiber holders.
Left side first Then right side
(16) Pick up the spliced fiber.
Copyright©2011SumitomoElectricIndustries,LTD.
If the position of the fiber is wrong,
set the fiber or stub again.
Buttonto
startsplicing
Lightlyholdingassemblytopreventbending
Lightlymaintainingtensionto
preventbending
LYNX2‐SCforOpticalCordwith Tight Buffered Fiber
Assembly Procedure ETK1123085B
Notwisting
(17) Slide Protection untilitcoverstheprojectionof
theflange.
(18) Set Sleeve into the heater.
Right side first
Then left side
(19) Confirm the position before
heating. Sleeveatcenter
fht
Buttonto
(20) Heat Protection Sleeve. (21) Pick up Sleeve. (22) Slide Rear Parts.
Notwisting Notwisting
Lightlymaintaining
tensiononfiber
Notwisting
o
f

h
ea
t
er
Nogap
startheating
Lynxheaterprogram runsafanto
coolthesleeveafterheating
Becareful for hot sleeve,
spring and flange even after
the cooling by fan.
!Rear Parts
(23)
Disassemble
Boot
/
Kevlar
(24)
Remove
Orange
Tape
then
(25)
Pull
out
Outer
Sheath
from
Rear
(26)
Pull
out
Kevlar
from
Rear
Stopper.
(23)
Disassemble
Boot
/
Kevlar
Stopper and Rear Stopper.
(24)
Remove
Orange
Tape
,
then
disassemble Jacket Stopper.
(25)
Pull
out
Outer
Sheath
from
Rear
Stopper.
(26)
Pull
out
Kevlar
from
Rear
Stopper.
Kevlar
Rear
Stopper
Rear
Stopper
Sheath
Jacket
Stopper
Boot Rear
Stopper
Kevlar
Stopper Rotatecounter‐clockwise.
(29) Insert the split sheath into Jacket
Stopper and hold them on Rear Stopper.
Jacket
Stopper Rear
Stopper
APC‐ Reddot
PC/UPC‐ Blackdot Red
Triangle
Make sure
protrusion of cap.
(28) Push ferrule to the end. Then assemble the housing.
(27) Key Alignment.
1direction
onl
y
Flange
Design
NeverTwistSheath
Neverrollupfiber
Aligneachtriangle.
(30) Hold the split sheath by Jacket Stopper. (31) Slide the furcation tube to the rear stopper.
Furcation
Tube
Rotateclockwise.
(32) Secure Kevlar by Screw with holding Kevlar.
y
Ke
y
(33) Trim Excess Kevlar by Kevlar Cutter
andcutthetether. (34) Put Outer Housing. Key
Kevlar should be kept inside the sheath.
Neverrollupfiber
Hold Kevlar Tightly,
otherwise the fiber is danger to be twisted or rolled up.
Copyright©2011SumitomoElectricIndustries,LTD.
y
CutTether
Complete

Other Sumitomo Cables And Connectors manuals

Sumitomo TYPE-Q102-CA+ User manual

Sumitomo

Sumitomo TYPE-Q102-CA+ User manual

Sumitomo T-400S User manual

Sumitomo

Sumitomo T-400S User manual

Sumitomo Lynx-CustomFit LYNX2-ST User manual

Sumitomo

Sumitomo Lynx-CustomFit LYNX2-ST User manual

Sumitomo Lynx-CustomFit LYNX2-ST User manual

Sumitomo

Sumitomo Lynx-CustomFit LYNX2-ST User manual

Sumitomo FC-6R User manual

Sumitomo

Sumitomo FC-6R User manual

Sumitomo Lynx-CustomFit LYNX2-FC User manual

Sumitomo

Sumitomo Lynx-CustomFit LYNX2-FC User manual

Sumitomo Lynx-CustomFit LYNX2-FC User manual

Sumitomo

Sumitomo Lynx-CustomFit LYNX2-FC User manual

Sumitomo Lynx-CustomFit LYNX2-LC User manual

Sumitomo

Sumitomo Lynx-CustomFit LYNX2-LC User manual

Sumitomo Lynx-Custom Fit Splice-On Connector User manual

Sumitomo

Sumitomo Lynx-Custom Fit Splice-On Connector User manual

Sumitomo ETK1423090 User manual

Sumitomo

Sumitomo ETK1423090 User manual

Sumitomo Lynx-CustomFit LYNX2-MPO User manual

Sumitomo

Sumitomo Lynx-CustomFit LYNX2-MPO User manual

Sumitomo Lynx-CustomFit LYNX2 User manual

Sumitomo

Sumitomo Lynx-CustomFit LYNX2 User manual

Sumitomo Lynx-CustomFit LYNX2-SC User manual

Sumitomo

Sumitomo Lynx-CustomFit LYNX2-SC User manual

Popular Cables And Connectors manuals by other brands

Gomax SP-5004IZM user manual

Gomax

Gomax SP-5004IZM user manual

Lincoln 83753 Installation and maintenance guide

Lincoln

Lincoln 83753 Installation and maintenance guide

Chicago Electric 93633 operating instructions

Chicago Electric

Chicago Electric 93633 operating instructions

Siemon 10G 6 Specification sheet

Siemon

Siemon 10G 6 Specification sheet

OUNEVA VC02-0003 installation guide

OUNEVA

OUNEVA VC02-0003 installation guide

Cobra mini manual

Cobra

Cobra mini manual

Staubli PV-KST4 UR Series Assembly instructions

Staubli

Staubli PV-KST4 UR Series Assembly instructions

Hubbell Gleason Reel P28 Replacement parts list

Hubbell

Hubbell Gleason Reel P28 Replacement parts list

Kramer LPE Installation, start-up and maintenance instructions

Kramer

Kramer LPE Installation, start-up and maintenance instructions

Equip 332714v2 user manual

Equip

Equip 332714v2 user manual

National Instruments NI 9924 USER GUIDE AND SPECIFICATIONS

National Instruments

National Instruments NI 9924 USER GUIDE AND SPECIFICATIONS

HARTING Han 1A manual

HARTING

HARTING Han 1A manual

Lindy 38409 user manual

Lindy

Lindy 38409 user manual

Aukey CB-CMD26 user manual

Aukey

Aukey CB-CMD26 user manual

CommScope PICABOND 60944-6 instruction sheet

CommScope

CommScope PICABOND 60944-6 instruction sheet

Vibe Critical Link RAPAWK2.5M installation instructions

Vibe

Vibe Critical Link RAPAWK2.5M installation instructions

Manhattan 177337 instructions

Manhattan

Manhattan 177337 instructions

NEUTRIK NL4FX Assembly instructions/use and care manual

NEUTRIK

NEUTRIK NL4FX Assembly instructions/use and care manual

manuals.online logo
manuals.online logoBrands
  • About & Mission
  • Contact us
  • Privacy Policy
  • Terms and Conditions

Copyright 2025 Manuals.Online. All Rights Reserved.