Sundstrom SR 580 User manual

Drawn up by:
2009-02-16 / RK
OI06H-8018 SR 580
Revision:
03
Reviewed:
2014-10-06/PA
Page:
1 of 18
Operating instruction
SR 580 Helmet with visor

Drawn up by:
2009-02-16 / RK
OI06H-8018 SR 580
Revision:
03
Reviewed:
2014-10-06/PA
Page:
2 of 18
General information
SR 580 together with the fan unit SR 500/SR 500 EX/SR 700 and
approved filters are included in the Sundström fan-assisted
respiratory protective device system conforming to EN 12941/EN
12942:1998 class TH3.
Combination of SR 580-SR 500 EX is especially designed for use
in potentially explosive and fire hazardous environments.
See user instructions or label on fan unit for classification.
The SR 580 together with compressed air attachment SR 507 and
compressed air supply tube SR 358/SR 359/SR 360 are included in
the Sundström compressed air-fed respiratory device system
conforming to EN 14594:2005 class 3A/3B.
This combination gives you a continuous flow compressed air-line
breathing apparatus.
When selecting the equipment there are some factors that should
be taken into account:
•Potentially explosive atmosphere
•Type of pollutants
•Concentrations
•Work intensity
•Protection requirements in addition to respiratory protective device.
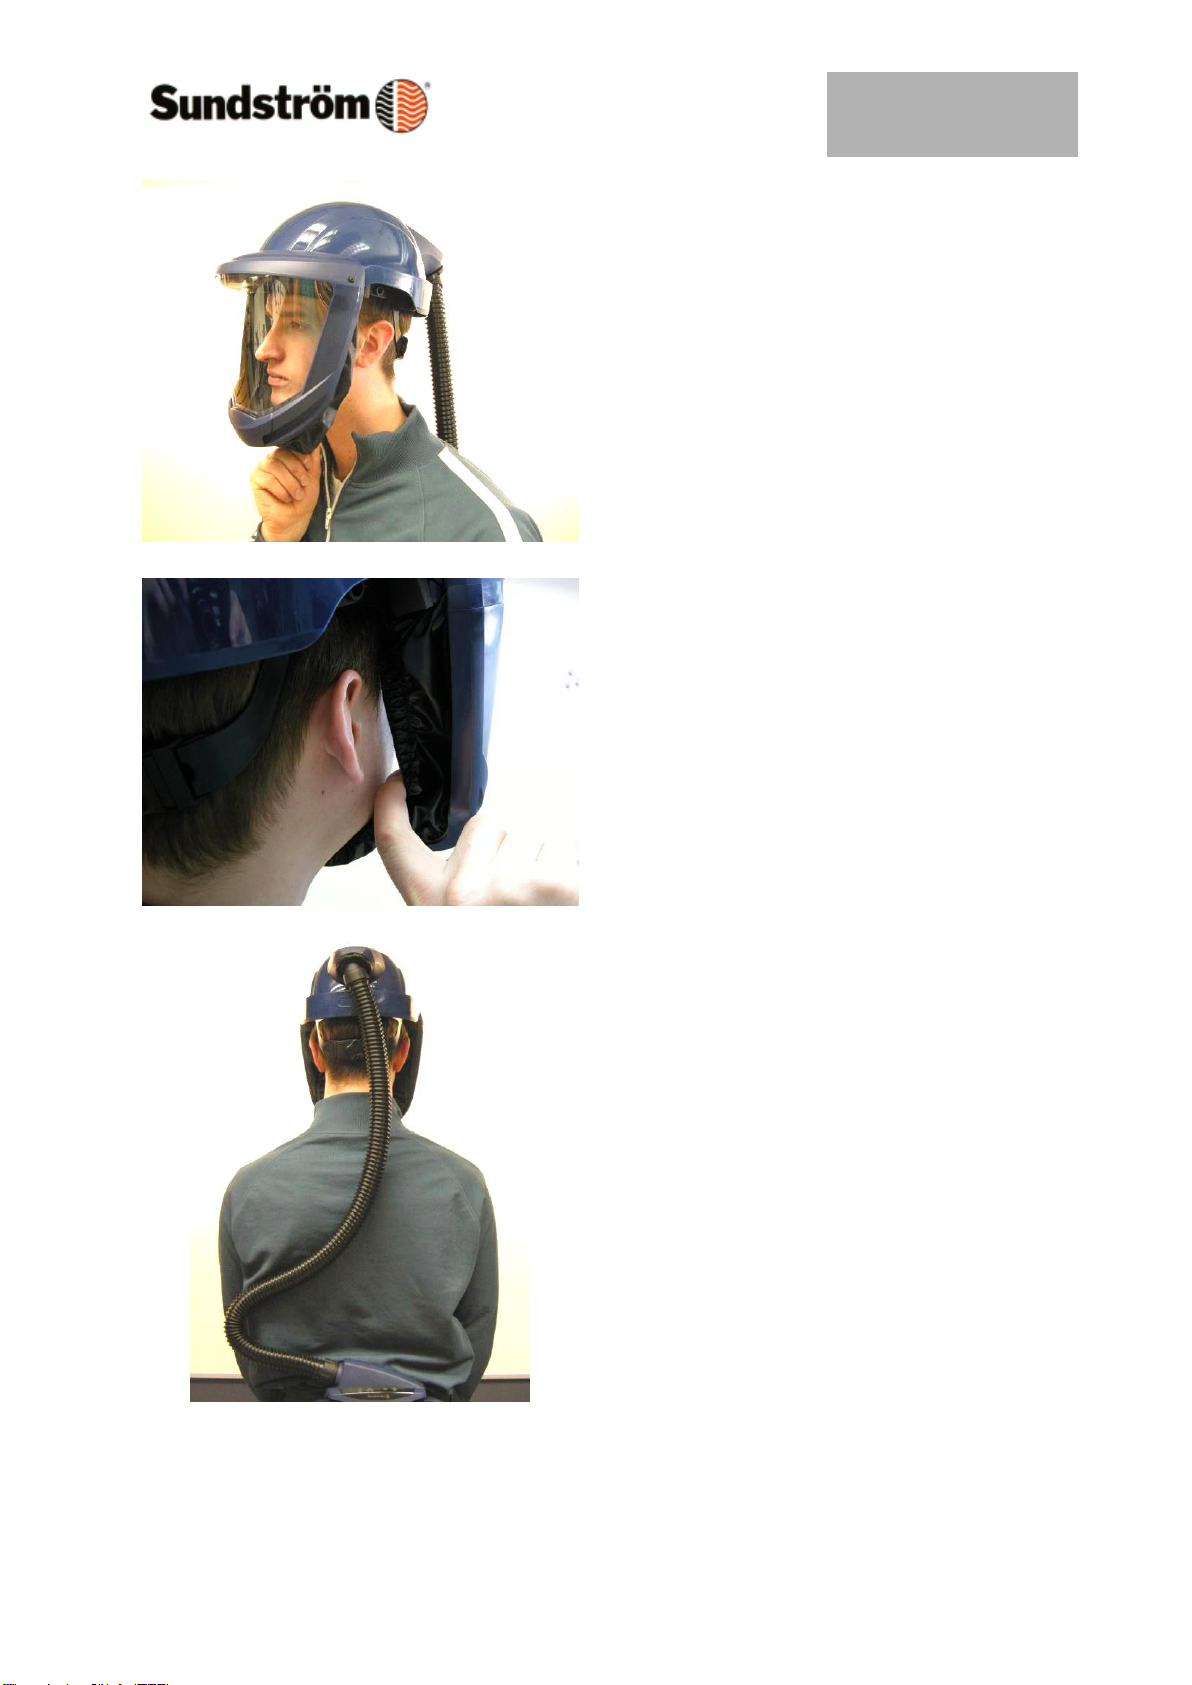
The helmet must only be used when carrying out work it is intended
for. It provides limited protection by reducing the force of falling
objects that strike or penetrate the top of the helmet shell. The risk
analysis should be carried by a person who has suitable training
and experience in the area.
Risk analysis should be carried out by a person who has suitable
training and experience in the area.
Limitations
When working in explosive environments all parts of the equipment
have to be EX-approved. When changing spare parts and
accessories you must check that these are EX approved for work in
potentially explosive environments.
Instructions for use for SR 580 should be read before use.

Drawn up by:
2009-02-16 / RK
OI06H-8018 SR 580
Revision:
03
Reviewed:
2014-10-06/PA
Page:
3 of 18
2.1 Unpacking SR 580
2.2 Packing list
Check that the equipment is complete
as shown on the packing
list and that it have not been damaged
during transit.
Packing list
• Helmet
• Lower visor frame
• Visor
• Face seal
• Breathing hose
• User instructions
• Cleaning tissue
2.3 Assembly
Face seal and visor
Assembly of the face seal and visor
does not require any tools.
Do the following:
Fit the face seal on the inner flange in
the lower visor frame Start at one side,
push the pin upwards and control that
the lip is fastened in the lower visor
frame.
Push along the face seal frame so it is
securely fastened on the lower visor
frame. Control that the pin and lip is
fastened on both sides
Remove the protective foil covering the
visor.
Fit the visor into the lower visor frame.
Applying a little water to the seal will
make fitting easier

Drawn up by:
2009-02-16 / RK
OI06H-8018 SR 580
Revision:
03
Reviewed:
2014-10-06/PA
Page:
4 of 18
Fit the lower visor frame to the helmet
by sliding it into position.
A ‘click’ indicates that the frame is
locked in position
Check that the visor has achieved a full
seal around the entire visor frame.
Attach the hooks in the head harness.

Drawn up by:
2009-02-16 / RK
OI06H-8018 SR 580
Revision:
03
Reviewed:
2014-10-06/PA
Page:
5 of 18
One end of the hose has an ø42 mm
thread (fig. 1b/2b), whilst the other is
fitted with an O-ring (fig. 1c/2c).
Check that the thread is ok.
The threaded end is to be connected to
the helmet.
Putting the helmet on 2.4
Check that the 6-point harness is
secured correctly

Drawn up by:
2009-02-16 / RK
OI06H-8018 SR 580
Revision:
03
Reviewed:
2014-10-06/PA
Page:
6 of 18
Raise the visor and put on the helmet
If necessary, adjust the width of the
helmet using the knob
located at the rear of the harness
To adjust the height of the helmet
interior, move the pins between
positions a and b.
If the interior is attached to pin a, the
helmet will sit lower, and on pin b the
helmet will be higher.
To achieve the best fit, this adjustment
can be made at both the front and back
of the helmet.

Drawn up by:
2009-02-16 / RK
OI06H-8018 SR 580
Revision:
03
Reviewed:
2014-10-06/PA
Page:
7 of 18
Lower the visor by pulling the face seal
down below your chin. A ‘click’
indicates that the visor is fully lowered
Insert a finger inside the face seal and
move it along the length of the contact
surface to check the fit.
Make sure that the breathing hose runs
down your back
and is not twisted.
You can adjust the angle of the helmet
connection as required

Drawn up by:
2009-02-16 / RK
OI06H-8018 SR 580
Revision:
03
Reviewed:
2014-10-06/PA
Page:
8 of 18
Cleaning/disinfecting
Sundström cleaning tissues SR 5226
that clean and disinfect
are recommended for daily care.
If the equipment is more heavily fouled,
use a soft brush or sponge moistened
with a solution of water and washing
detergent or the like.
Rinse the equipment and leave it to dry.
N.B. Never use a solvent for cleaning.
4.2 Storage
After cleaning, store the equipment, dry
and clean, at room temperature. The
SR 580 should be stored with the visor
either fully raised or fully lowered. Keep
out of direct sunlight.
Maintenance schedule
The following schedule shows the
minimum maintenance procedures
required in order to ensure that the
equipment is always in functional
condition.

Drawn up by:
2009-02-16 / RK
OI06H-8018 SR 580
Revision:
03
Reviewed:
2014-10-06/PA
Page:
9 of 18
At the first signs of wear, impact marks,
damage or aging of the material, the
helmet shell or harness must be
replaced in order to ensure the
protective ability of the helmet is
maintained. This must be checked on a
regular basis.
A helmet that shows signs of damage,
e.g. cracks or scratches that may
reduce its protective ability must be
discarded. The helmet must also be
discarded if it has been exposed to
stresses during an accident or near
accident, even if there is no visible
damage.
4.4.1 Replacement of exhalation membrane
The exhalation membrane is fitted on a
pin inside the valve cover. The cover
must be replaced at the same time as
the membrane. Do the following:
Remove the valve cover from the valve
seat
Pull out the membrane.

Drawn up by:
2009-02-16 / RK
OI06H-8018 SR 580
Revision:
03
Reviewed:
2014-10-06/PA
Page:
10 of 18
Check and, if necessary, clean the seal
groove in the valve seat.
Press the new membrane securely on
the pin. Carefully check that the
membrane is fully in contact with the
valve seat.
Press the valve cover firmly back into
position. A ‘snap’ indicates that it is
locked in position.

Drawn up by:
2009-02-16 / RK
OI06H-8018 SR 580
Revision:
03
Reviewed:
2014-10-06/PA
Page:
11 of 18
Replacement of visor
No tools are required to replace the
visor. Do the following:
Unhook the face seal from the harness
Remove the lower visor frame
Remove the visor.

Drawn up by:
2009-02-16 / RK
OI06H-8018 SR 580
Revision:
03
Reviewed:
2014-10-06/PA
Page:
12 of 18
Remove the protective foils from the
new visor.
Fit the visor into the lower visor frame.
Applying a little water to the seal will
make fitting easier
Fit the lower visor frame to the helmet
by sliding it into position. A ‘click’
indicates that is locked in position

Drawn up by:
2009-02-16 / RK
OI06H-8018 SR 580
Revision:
03
Reviewed:
2014-10-06/PA
Page:
13 of 18
Check that the visor has achieved a full
seal around the entire visor frame.
Attach the hooks in the harness
4.4.3 Replacement of face seal
The face seal plastic frame has a
groove in which a flange on the lower
visor frame fits. The frame locks into
position using two pins –one at either
end - , which fit into a hole in the visor.
The face seal covering has hooks at
either end that attach to the head
harness.
Do the following:
Unhook the face seal from the head
harness

Drawn up by:
2009-02-16 / RK
OI06H-8018 SR 580
Revision:
03
Reviewed:
2014-10-06/PA
Page:
14 of 18
Remove the lower visor frame
Unfasten the face seal by pulling its
frame until the pins release from the
holes in the visor.
Remove the face seal.
Fit the new face seal in the inner visor
flange with the centre markings aligned.
Press the face seal frame down so that
the pins lock into the holes in the visor.
A ‘click’ indicates that they have locked
in position.

Drawn up by:
2009-02-16 / RK
OI06H-8018 SR 580
Revision:
03
Reviewed:
2014-10-06/PA
Page:
15 of 18
Fit the lower visor frame to the helmet
by sliding it into position. A ‘click’
indicates that it is locked in position.
Attach the hooks in the head harness

Drawn up by:
2009-02-16 / RK
OI06H-8018 SR 580
Revision:
03
Reviewed:
2014-10-06/PA
Page:
16 of 18
Replacement of sweatband
The sweatband is attached to the
forehead strap by a Velcro tape.
Do the following:
Unhook the face seal from the head
harness
Remove the sweatband.
Fit the Velcro tape with the rough side
towards the forehead strap and the
groove facing upwards.

Drawn up by:
2009-02-16 / RK
OI06H-8018 SR 580
Revision:
03
Reviewed:
2014-10-06/PA
Page:
17 of 18
Attach the face seal hooks in the head
harness
Replacement of gasket
The gasket is located inside the helmet
Do the following:
Unscrew the hose from the helmet.
Remove the gasket from the flange.

Drawn up by:
2009-02-16 / RK
OI06H-8018 SR 580
Revision:
03
Reviewed:
2014-10-06/PA
Page:
18 of 18
Fit the new gasket.
Other manuals for SR 580
7
Table of contents
Other Sundstrom Motorcycle Accessories manuals

Sundstrom
Sundstrom SR 580 User manual

Sundstrom
Sundstrom SR 580 User manual

Sundstrom
Sundstrom SR 591 User manual

Sundstrom
Sundstrom SR 580 Installation and user guide

Sundstrom
Sundstrom SR 592 User manual

Sundstrom
Sundstrom SR 574 Installation instructions

Sundstrom
Sundstrom SR 580 User manual

Sundstrom
Sundstrom SR 580 User manual

Sundstrom
Sundstrom SR 580 Installation and user guide

Sundstrom
Sundstrom SR 574 Installation instructions