SunSetter EasyShade Vertical Roll up User manual

EasyShade™ Vertical Roll up
Manual Solar Shade Screen Kits
Tools Needed:
Electric Drill
1/8" Drill Bit
Pencil
Phillips Screwdriver
Tape Measure
Level
Parts Supplied:
Shade Assembly
Mounting Brackets - (2) for 4', 6' and 8' Models and (3) for the 10' Model
Crank Wand
(2) Bungee Cords
(4) Bungee Brackets
Crank Loop and Screw (4mm x 20mm Machine Screw)
(4) #8 x 1-1/2" Flat-Head Phillips Screws
(4 or 6) #8 x 1-1/2" Round-Head Phillips Screws - (4) for 4', 6' and 8'
Models and (6) for the 10' Models,
1/8" Allen Wrench - for securing mounting bracket set screws.
WARNING: FAILURE TO FOLLOW THESE INSTRUCTIONS CAN RESULT IN PERSONAL
INJURY! PLEASE READ THESE INSTRUCTIONS IN ITS ENTIRETY BEFORE ATTEMPTING TO
COMPLETE THIS PROCESS.
PLEASE NOTE THAT LEFT AND RIGHT REFERENCES ARE AS YOU FACE YOUR MOUNTING
LOCATION.
The SunSetter EasyShade can be installed with the mounting brackets on a wall (vertical surface) see
Figure 1a or on the underside of a structure (horizontal surface) see Figure 1b. For the 4’, 6’ and 8’
models, each of the brackets should be installed so that it is no more than 10" from the end of the
shade assembly. When mounting a 10’ Model, a mounting bracket should be installed at each end of
the shade assembly so that it is no more than 10" from the end of the shade. The third mounting
bracket should be installed at the mid point between the two end brackets.
STEP 1. Determine the desired location for the mounting brackets, making sure that they are plumb
and level. Using a pencil, mark the 2 hole locations in the bracket. Using a 1/8" bit, drill holes
approximately 1-1/2" deep at both hole locations. Repeat for the mounting bracket on the other
side, and the center mounting location on 10’ models.
STEP 2A. For mounting on a wall (vertical surface), secure each bracket with two #8 x 1-1/2"
round-head screws. Note the orientation of the bracket, the end with the set screw should
be at the bottom. See Figure 1a.
STEP 2B. For mounting on an underside structure (horizontal surface), secure each bracket
with two #8 x 1-1/2" round-head screws. Note the orientation of the bracket, the end with the
set screw should face toward you as you face your mounting location. See Figure 1b.
STEP 3. Secure the crank loop onto the gear shaft using the provided attachment screw.
STEP 4. Orient the shade assembly so that the crank loop is on your right as you face the installed
brackets.
STEP 5. With your helper, lift the shade assembly up to the installed mounting brackets and insert
the top groove of the shade assembly onto the protruding tab on the mounting brackets (See Figure
1a). While maintaining upward pressure to keep the top groove of the shade assembly on the tab of
the mounting brackets, press the shade assembly toward the mounting bracket and tighten the set
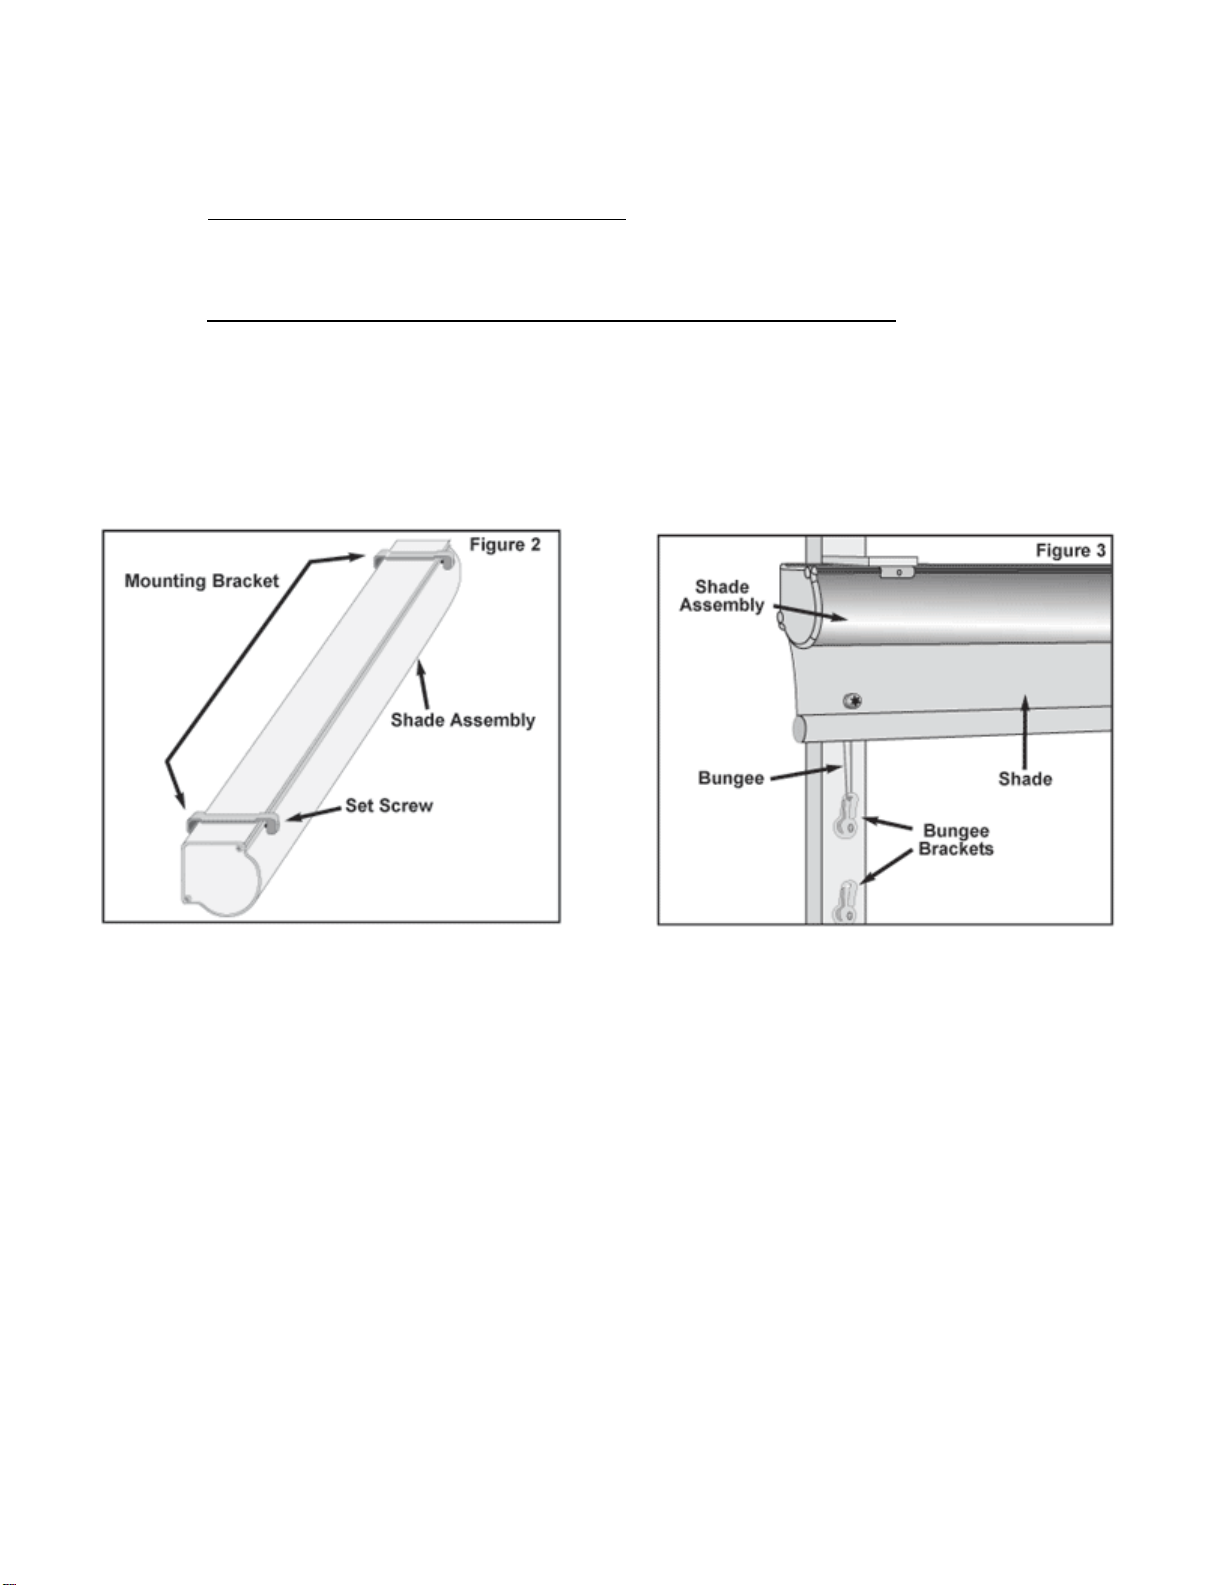
screw in each of the mounting brackets until the shade assembly is secure. See figure 2. Your
installation is complete.
The SunSetter EasyShade extends down 6-1/2 feet to provide a wide range of flexible shade. You
may also choose to use the provided bungees and bungee brackets so that the extended shade can
be secured.
•Mount the bungee brackets at the desired height(s) using the screws provided.
•Insert the bungee cord through the grommet at each corner of the shade.
•Place the bungee cord over the hook on the bracket.
NOTE: WE HAVE PROVIDED 2 SETS OF BUNGEE BRACKETS, WHICH GIVES YOU THE
FLEXIBILITY TO HAVE PAR- TIAL AND FULLY EXTENDED FASTENING POINTS. SEE FIGURE
3.
CAUTION: YOU SHOULD ROLL YOUR EASYSHADE UP WHEN THERE IS SEVERE WEATHER
FORCASTED FOR YOUR AREA.
Table of contents
Popular Window Blind manuals by other brands


Current
Current E-WAND Installation manual and user's guide

weinor
weinor VertiTex ZipR Maintenance Instructions and Directions for use for the end user

Roto
Roto ZAR M R4/R7 Mounting instructions

SOMFY
SOMFY Movelite WT Series instructions

Acmeda
Acmeda RF400 Series instructions

Motura
Motura Pli_353/3 manual