You should have:
• 1 Radiator
• 4 Wall brackets (3 wall brac. for single 2 elements)
• 4 Wall Plugs (3 wall plugs for single 2 elements)
• 4 Screws (3 wall screws single 2 elements)
• 4 Wall sleeves (3 wall sleeves for single 2 elements)
• 1 Airvent
• 1 Blanking Plug
You will need:
• Tape measure
• Electric drill and bits
• Spirit level
2. Contents
Beaufort Slim single radiators use clamp style brackets
that can be positioned on the collector to suit the
installation, although we recommend that they are fitted
in the locations suggested in the technical drawings in
section 5. Fit Brackets & Hang.
The brackets on double radiators use welded lugs in fixed
positions on the cross tubes.
Attach brackets and bracket sleeves to the radiator
as shown in Diagrams 1 (single) and 2 (double), place
radiator against the wall and mark bracket positions.
Detach the bracket sleeve from the bracket and using a
suitable drill bit and fixings secure in position, checking
they are level and square.
PLEASE NOTE :
It is essential that all brackets are level to ensure a vertical
alignment for connecting the pipework.
3. Mark Bracket Positions
All products must be inspected once removed from the
packaging and your point of purchase notified within 28 days
of delivery of any scratches, blemishes or other damage. Your
point of purchase will then agree appropriate action.
Imperfect radiators should therefore not be fitted and we
will not accept responsibility for replacement of scratched or
damaged radiators once they have been fitted. This includes
any consequential loss or cost of fitting.
If we are not notified within 28 days of the date on the
signed delivery note then it will be deemed that we have
fully complied with our obligations and claims will not be
considered.
Failure to comply with any of the above may invalidate any
claims. We recommend that after you check the product on
delivery that it is stored in its packaging to prevent damage
prior to installation, we cannot accept responsibility for items
damaged after delivery.
For full details of our Terms and Conditions please visit
supplies4heat.co.uk or call us on 01342 306880.
Terms & Conditions
This product is guaranteed for 10 years.The guarantees in all cases are subject to the
products being installed in accordance with British and or European standards as well
as these fitting instructions. The guarantees in all cases are restricted to the free of
charge replacement or repair of the failed product only. Our liability will under no
circumstances extend beyond the repair or replacement of the product supplied by
us. Claims for either labour in replacement or damage to property are not admissible.
Any goods that are returned, in the event of a problem, will belong to us.
Guarantees & Liabilities
5. Fit Brackets & Hang
Technical Specifications
Materials Steel.
Connections ½” flow and return.
Test pressure 5.2 Bar
Maximum operating pressure 4 Bar
Maximum working temperature As to EN442 ∆t 50ºC
Packaging Wrapped in polythene & boxed
supplies4heat.co.uk 01342 306880
PLEASE NOTE:Systemsusing micro bore pipework must have adequate pressure
and flow rates for the number and style ofradiators on the system.
Unpack & Inspect
1
You should have:
• 1 Radiator
• 4 Wall brackets (3 wall brac. for single 2 elements)
• 4 Wall Plugs (3 wall plugs for single 2 elements)
• 4 Screws (3 wall screws single 2 elements)
• 4 Wall sleeves (3 wall sleeves for single 2 elements)
• 1 Airvent
• 1 Blanking Plug
You will need:
• Tape measure
• Electric drill and bits
• Spirit level
Contents
Mark and Fix Brackets
3
Diagrams of Water Lily
The Radiator Company prides itself on selecting products from
manufacturers who exercise tight quality control measures. We only
select models with excellent standards of welding and brazing, as
well as high quality nishes. All of our products are well packaged
and should reach you in perfect condition. Just in case however, we
offer a minimum 10 year no quibble guarantee
for all radiators and towel rails.
Please carefully unpack and inspect this radiator
and all ttings. The Radiator Company must be
notied of any shortages or damage within 28
days of delivery. For further information please
see terms and conditions on back page.
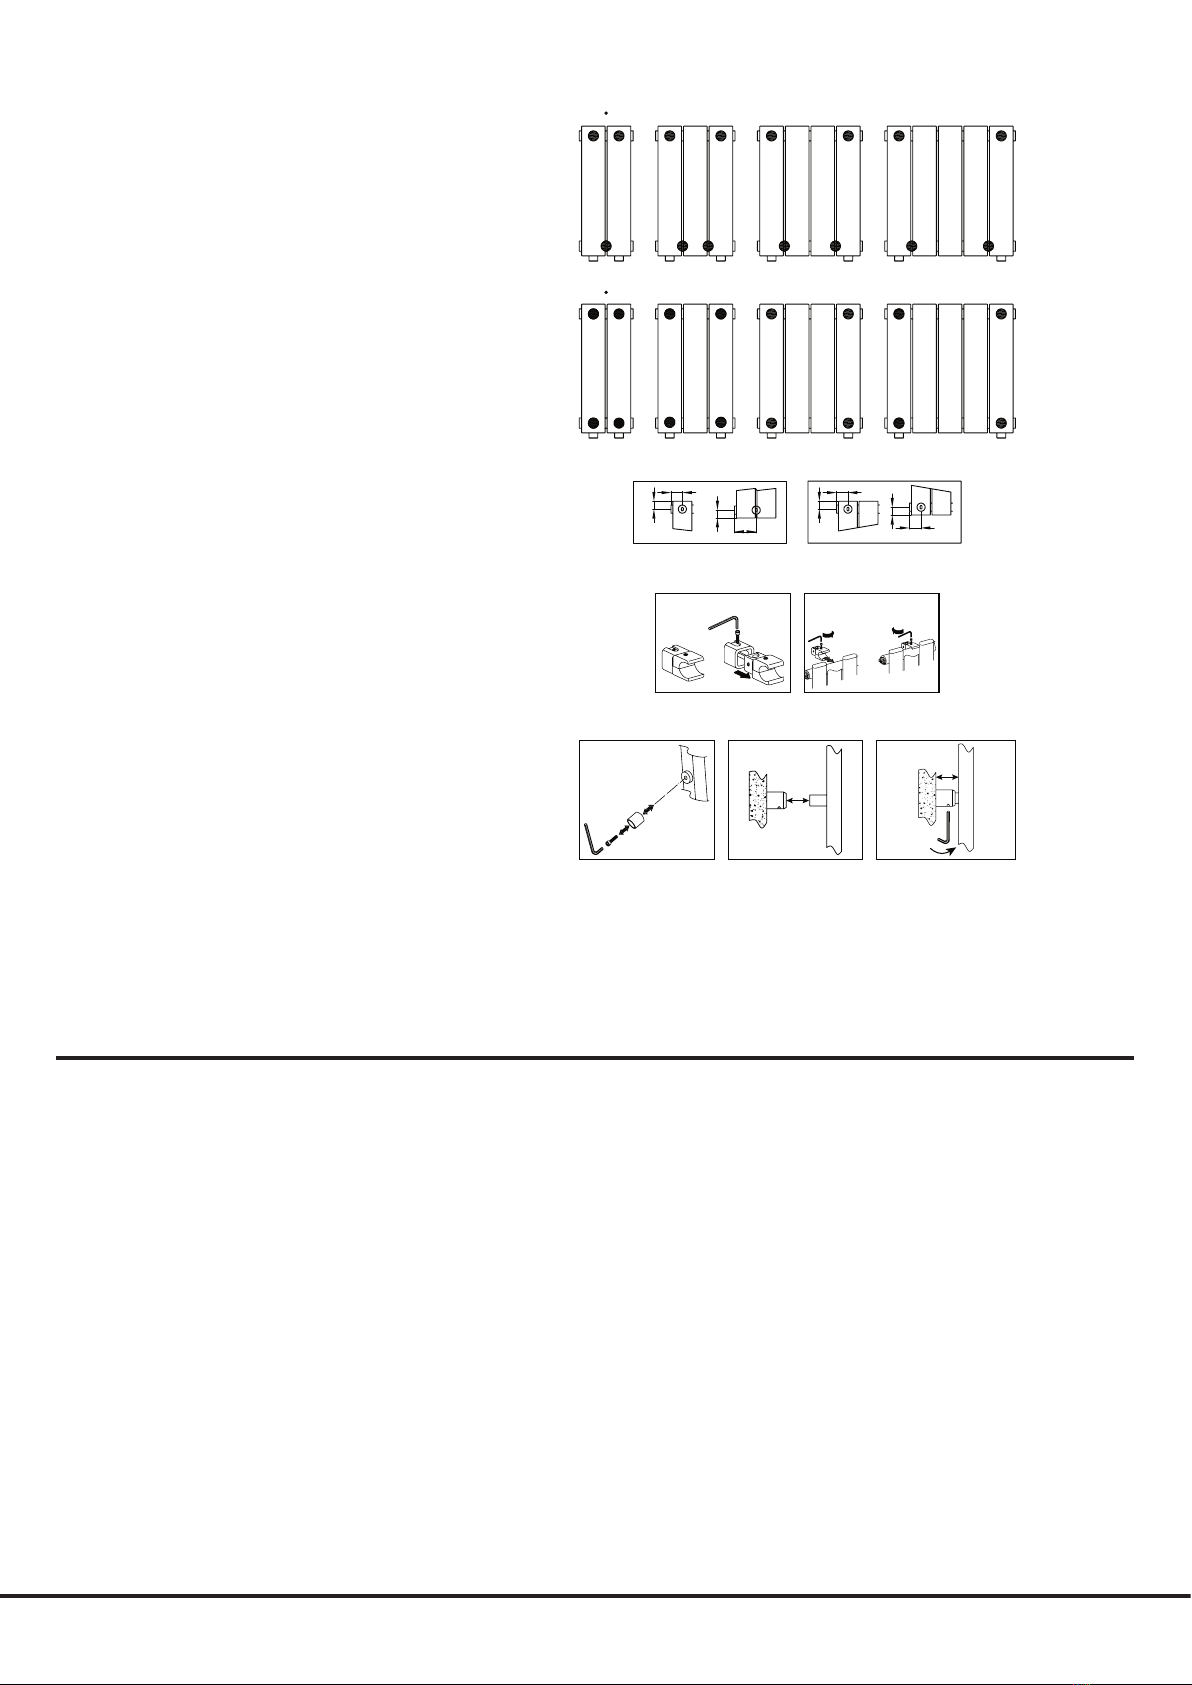
Water Lily single radiators use clamp style brackets that can be
positioned on the collector to suit the installation, although we
recommend that they are tted in the locations suggested in the
technical drawings in section 5. The brackets on double radiators use
welded lugs in xed positions on the cross tubes.
Attach brackets and bracket sleeves to the radiator as shown in
Diagrams 1 (single) and 2 (double), place radiator against the wall
and mark bracket positions.
Detach the bracket sleeve from the bracket and using a suitable drill
bit and xings secure in position, checking they are level and square.
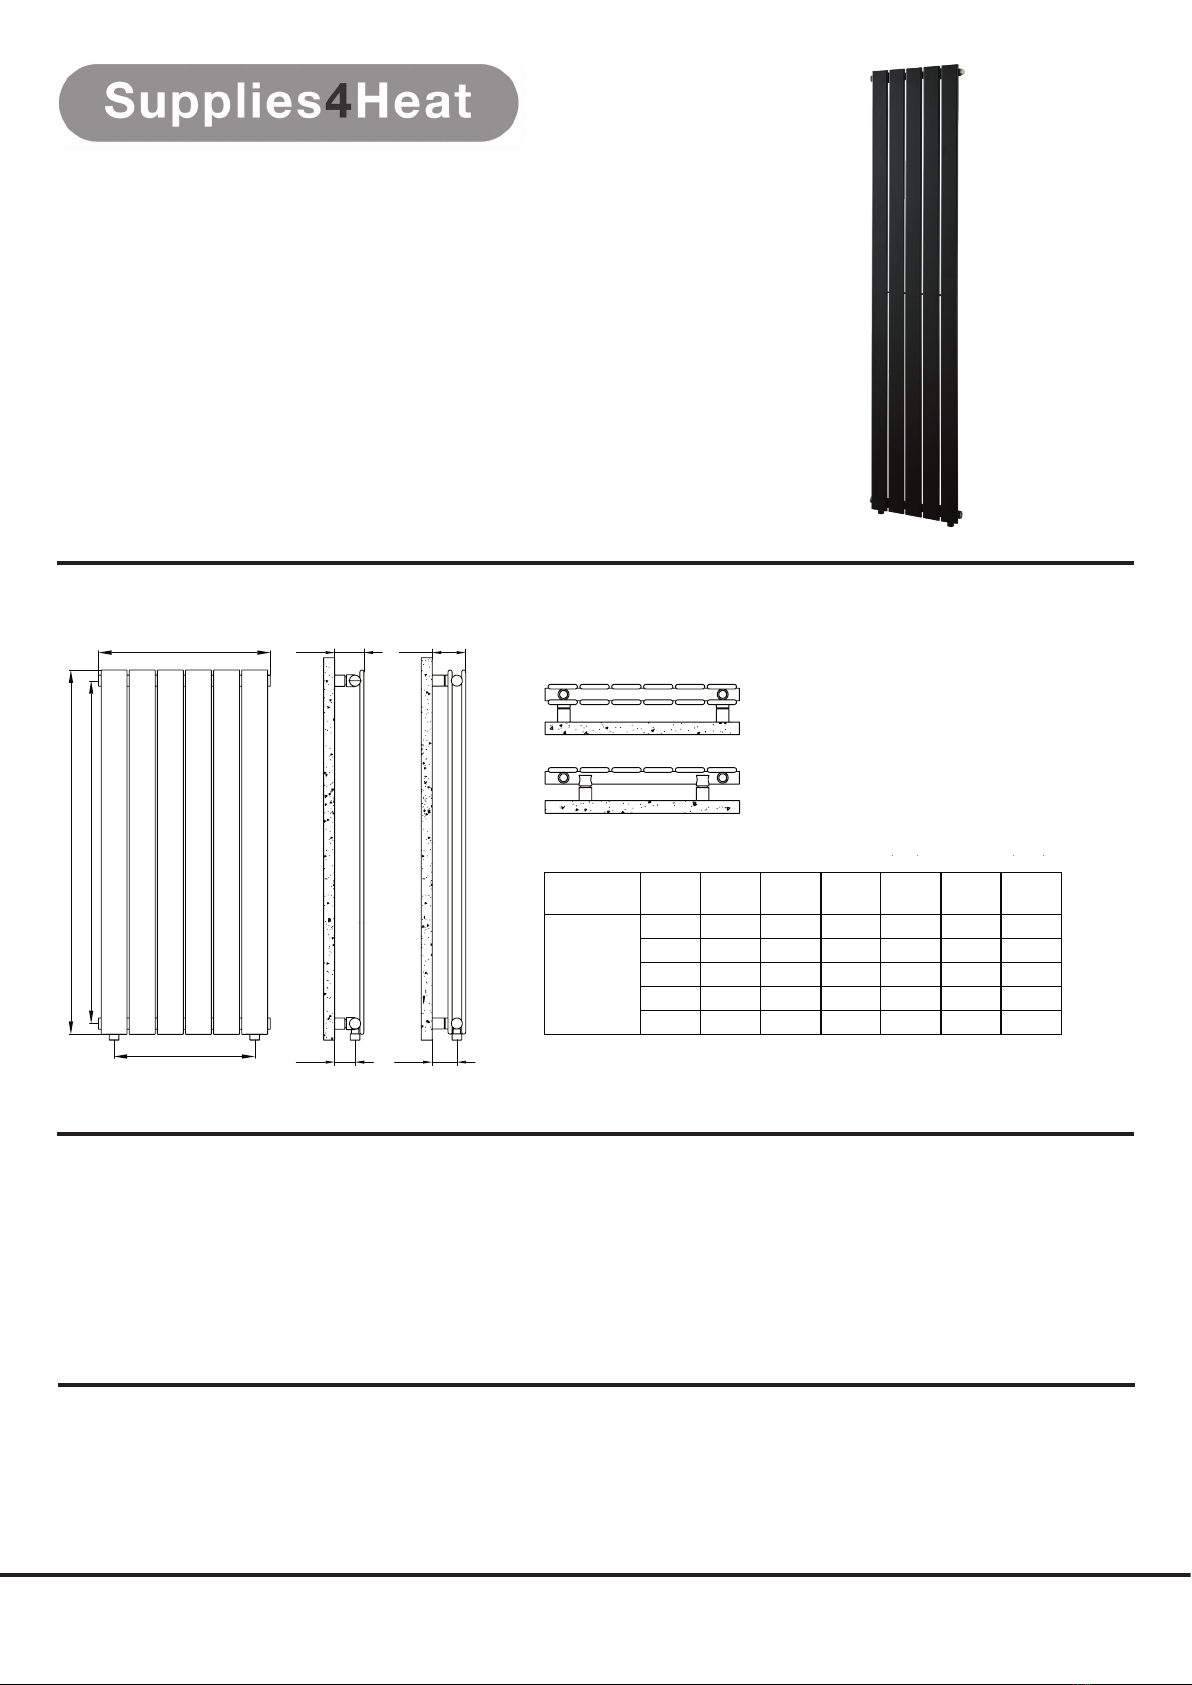
Pipe Centres
Pipe centres left to right = width - 84 mm
Pipe centres from wall = Single; 55 mm - 65 mm
Double; 67 mm - 77 mm
Depth from wall = Single; 79 mm - 89 mm
Double; 91mm - 101mm
Please note: underneath connections only
Commision
Please Note: In accordance with Part L1 2006 of the Building Regulations
and BS7593:1992 code of practice for the treatment of hot water and central
heating systems, we strongly recommend flushing the heating system post
installation of new radiators and then adding the correct quantity and type
of inhibitor for use with your radiator and system to prevent corrosion.
Damage caused to systems not protected by a suitable inhibitor will not be
covered by manufacturer’s guarantee.
= typical bracket xing positions for single range
5Fix Brackets and Hang
With the bracket sleeves rmly xed and level, the radiator can
be hung in position by inserting the brackets into the sleeves and
securing with the grub screws provided.
Hang Radiator
4
PLEASE NOTE :
It is essential that all brackets are level to ensure a vertical alignment for
connecting the pipework.
single range double range
91÷101
67÷77
Model Elem. H H’ H H’ L L’
N° mm mm mm mm mm mm
Water Lily
Single
& double
21820 1762 2020 1962 160 76
31820 1762 2020 1962 236 152
41820 1762 2020 1962 312 228
51820 1762 2020 1962 388 304
61820 1762 2020 1962 464 380
= bracket xing positions for double range
Diagram 1 (single version)
Diagram 2 (double version)
Please Note: In accordance with Part L1 2006 of the Building Regulations
and BS7593:1992 code of practice for the treatment of hot water and central
heating systems, we strongly recommend flushing the heating system post
installation of new radiators and then adding the correct quantity and type
of inhibitor for use with your radiator and system to prevent corrosion.
Damage caused to systems not protected by a suitable inhibitor will not be
covered by manufacturer’s guarantee.
With the bracket sleeves firmly fixed and level, the radiator
can be hung in position by inserting the brackets into the
sleeves and securing with the grub screws provided.
4. Hang Radiator