Sure Torque Smart Load Cell TRQ4 User manual

SLC-TRQ4 manual v1.1 1.
SMARTLOADCELL USER’S MANUAL
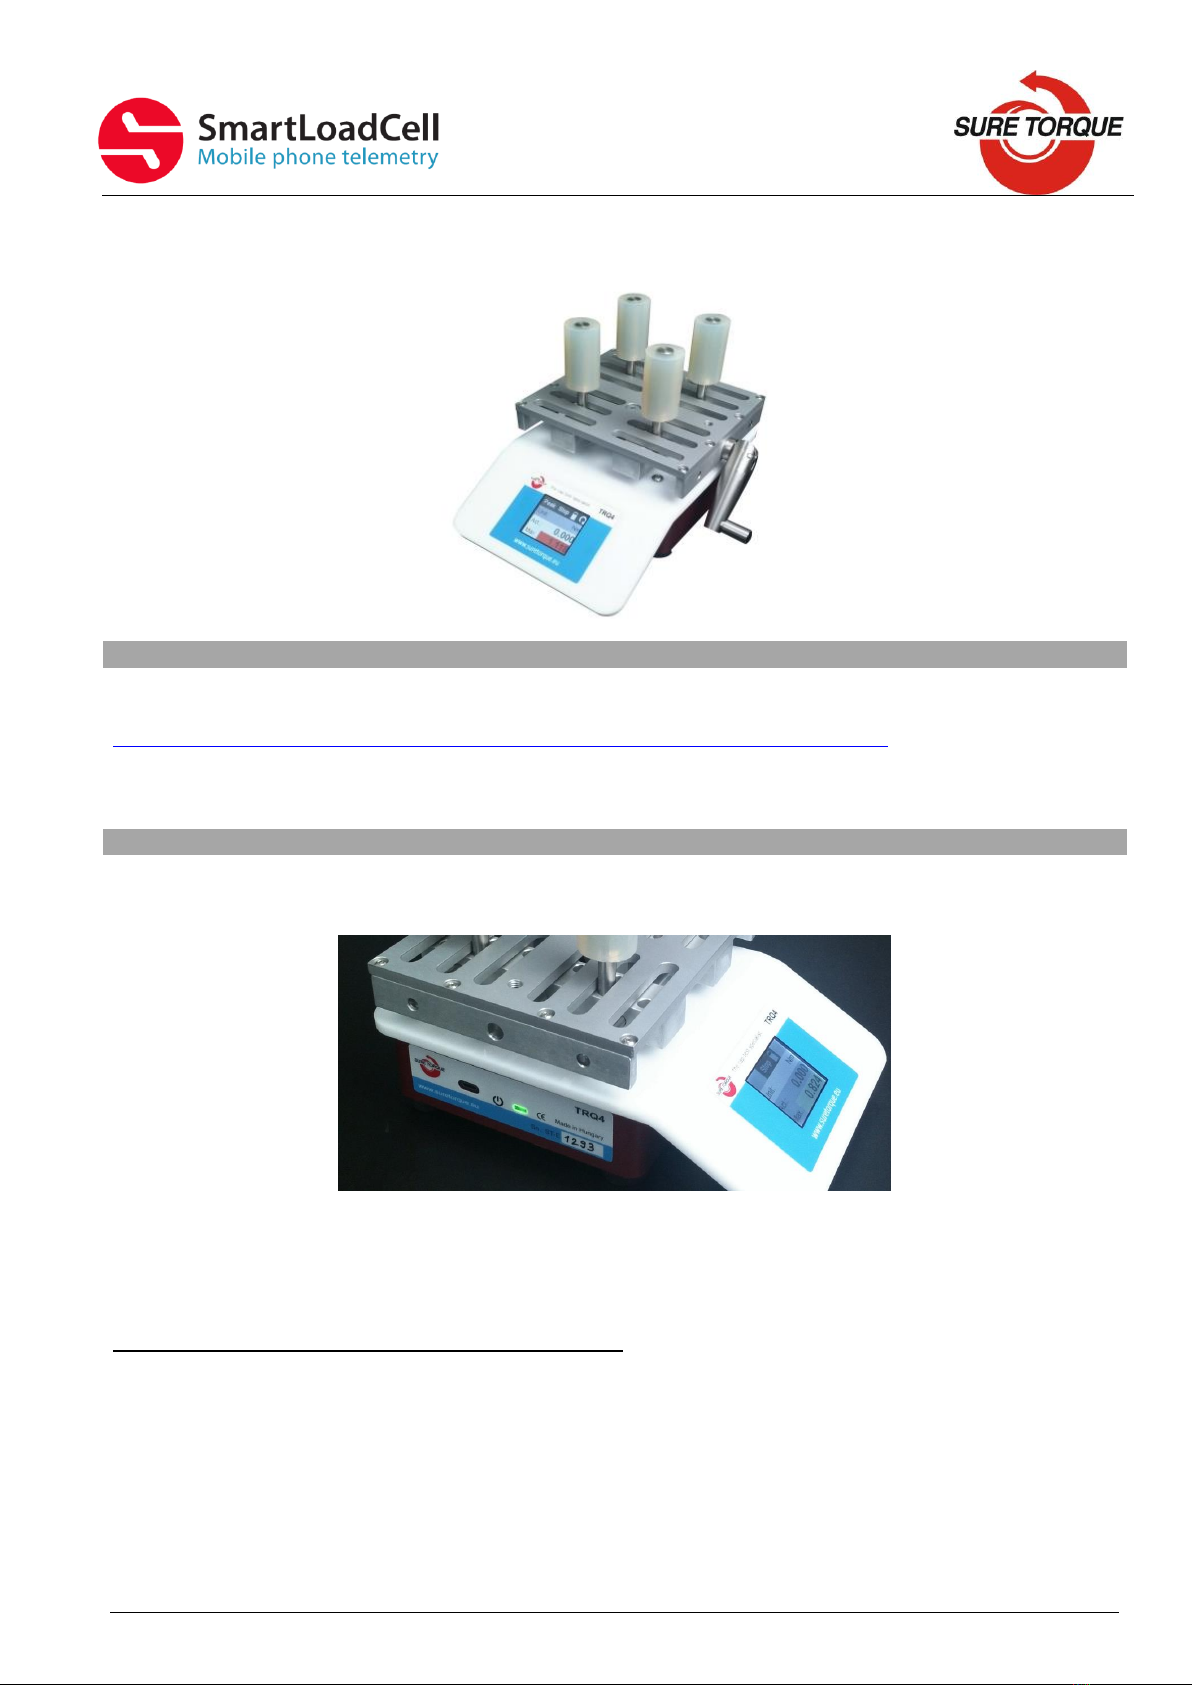
Smart Load Cell TRQ4
manual desktop torque tester
Serial numbers:
TRQ4 torque tester: ST-E……
Date of purchase: ……………………...
Warranty: 3 years
SLC-TRQ4 manual v1.1 2.
TRQ4DESKTOP TORQUE TESTER
INSTALL
Download: www.suretorque.eu / Support / Downloads / SmartLoadCell_Single application
–v_1.14.5 –apk
http://www.suretorque.eu/media/wysiwyg/download/slc_v1.14.5.apk
System requirements: Android 6.0 or higher, 1 GB RAM, 1 GHz Processor, 4 GB ROM
Install the SmartLoadCell Android application on your device!
SETUP –QUICK OVERVIEW
To turn on your TRQ4 device, press and hold the power button on the label on the left
side. The green LED with start blinking once it has turned on.
TRQ4 torque testers have built in LCD screens. They display the current and the peak
values (Actual and Maximum). To change the setup of the screen, connect your device to
an Android smartphone using the SmartLoadCell application.
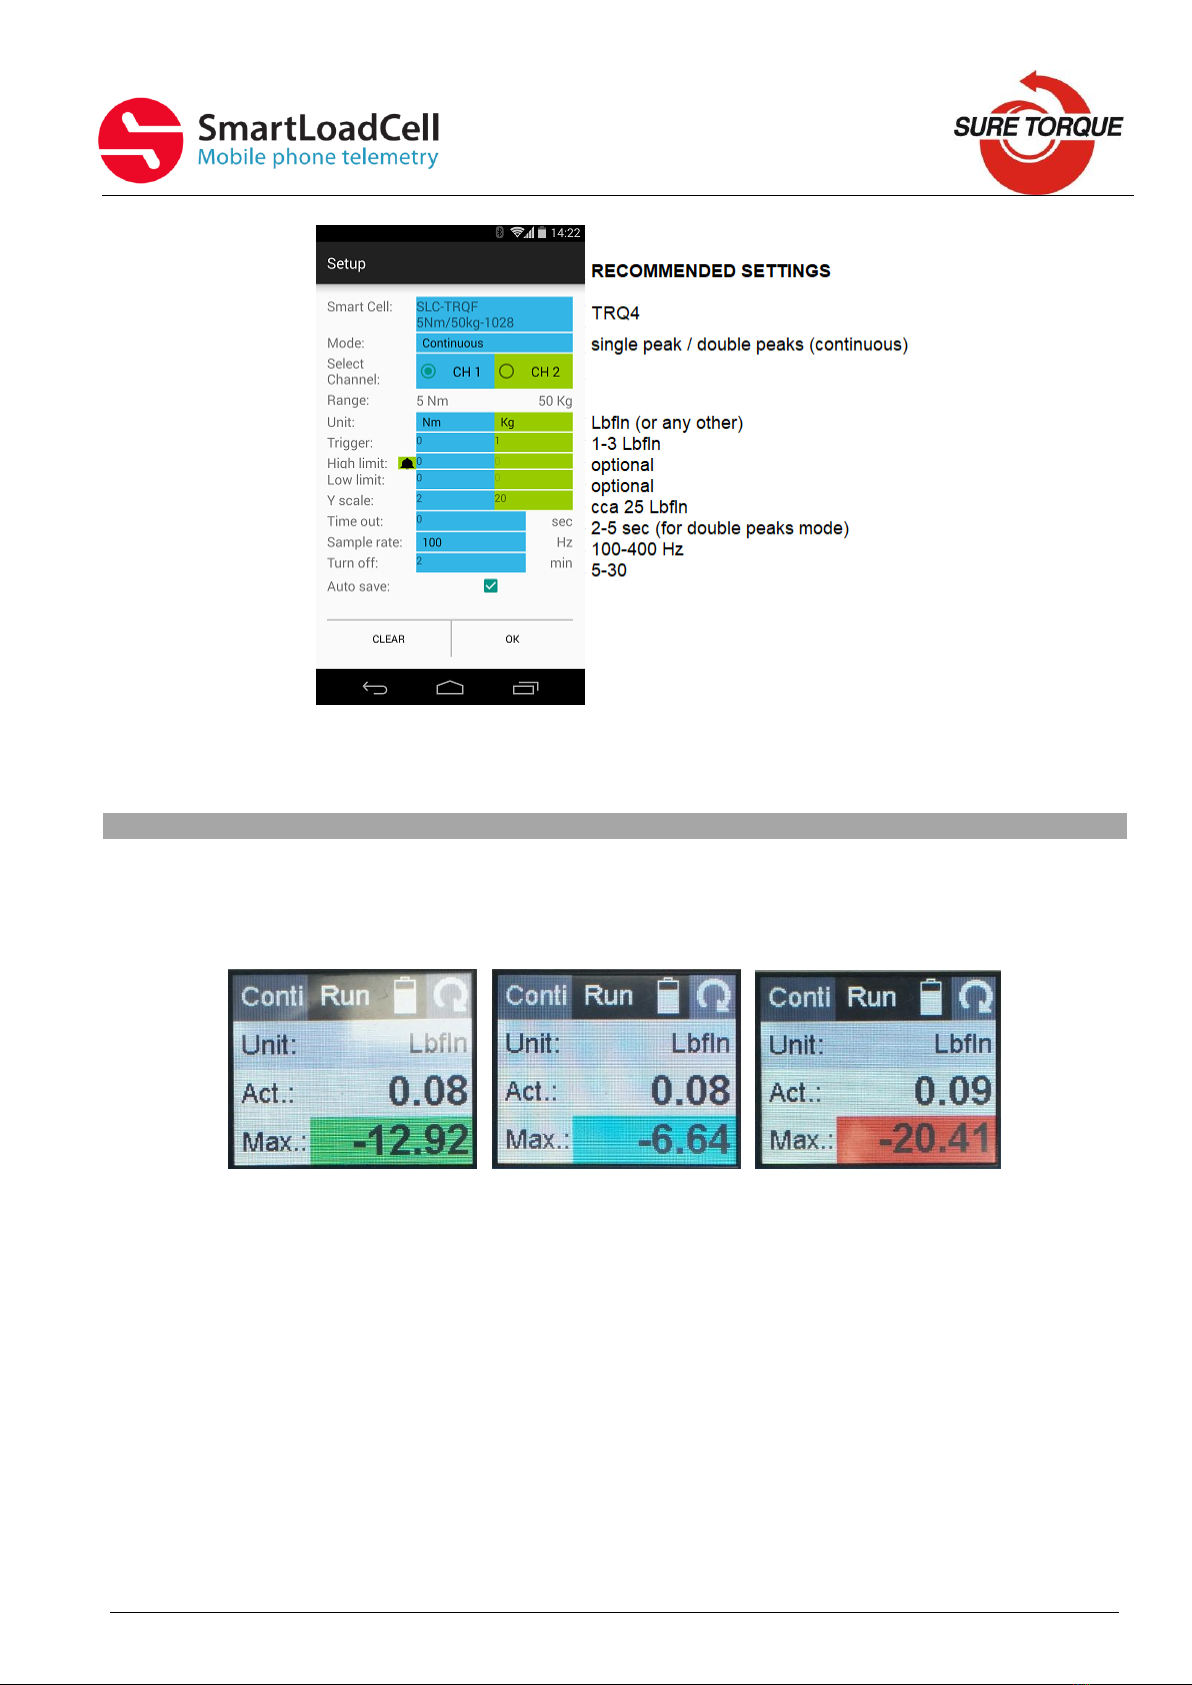
Personalize your settings: Enter menu / setup
Pair your SmartLoadCell with your device and connect (SLC app / Settings menu). The
blue LED will start blinking after a successful connection, then all the important
SmartLoadCell parameters will be uploaded automatically to the phone from the TRQ4’s
memory (calibration data, load cell type, measuring range, etc.)
SLC-TRQ4 manual v1.1 3.
After pressing OK button, all the changes will apply on the phone and on the device’s
screen too. For example when changing the measuring unit, or measuring Mode.
LCD SCREEN FEATURES
The built in LCD screen is designed to show the most important information in a similar
way as in the Android application. Only a few initial settings are needed (measuring unit,
trigger, high and low limits, sample rate, and turn off time), and then the device is ready
to be used without the smartphone as well.
Touchscreen functions:
- Press the Conti/Peak button to change between Continuous and Single Peak modes
- Press the Run/Stop button or the middle of the screen to start / stop a test
- Battery icon indicates the battery charge level
- Press rotate icon to rotate screen upside down.
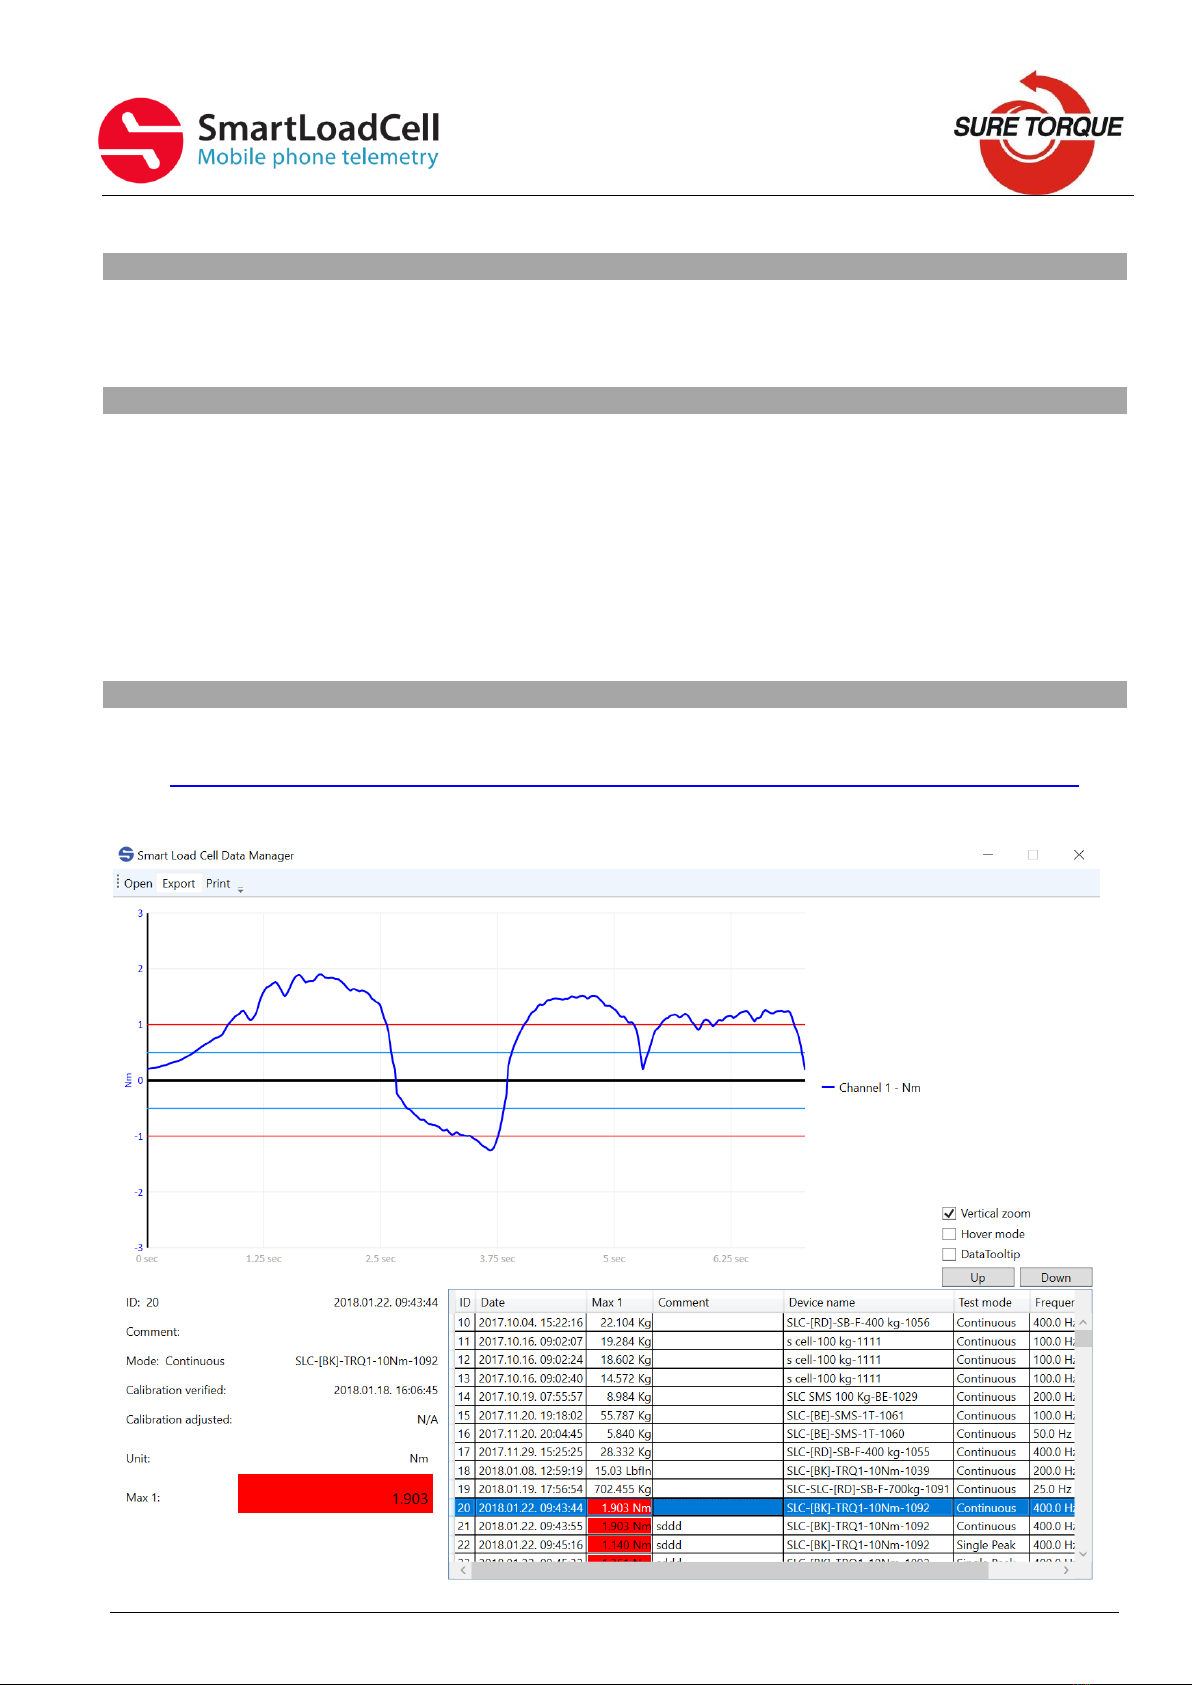
- If high and low limits are set, results will be colored accordingly (see later)
- Press and hold the middle of the screen for at least 1 second, to tare the actual value

SLC-TRQ4 manual v1.1 4.
DOING A TEST
1. Set clamping fingers to the diameter of your sample. Make sure clamping fingers
are set symmetrical to ensure centered grip of the container. TRQ4 is aquiped with
quick lock clamping table that enables super quick sample change:
2. Make sure the unloaded value is 0. If not, hit TARE button, or press and hold the
middle of the touchscreen for at least 1 second (on TRQ3).
3. Tap the diagram area to start recording.
4. Perform your test
Continuous and multiple tests can be stopped by tapping the diagram area again.
Single and Double peak tests will stop automatically.
5. After the test you may add a comment to the test (on the phone). You can also add
the same comment to more tests with checking “Remember” field in the comment
window and with selecting “auto index”you can even add an increasing index to
the same comment
6. You may save result with the save button (unless you have selected auto save). In
auto save mode results will be saved automatically if TRQ4 is connected to the
phone.

SLC-TRQ4 manual v1.1 5.
SETUP –A LIITLE MORE IN THE DETAILS
Measuring modes:
Continuous –records all measuring points
from start to stop
Result: maximum value.
This mode is ideal for monitoring longer
procedures with several peaks as chuck
torque testing
Single peak –Measurement stops
automatic after the 1st peak.
Result: maximum value
This mode is ideal for monitoring short
procedures with only 1 peak as cap
release torque testing
Double peaks –Measurement stops
automatic after the 2nd peak.
Results: Max1, Max2
This mode is ideal for monitoring short
Multiple peaks –Records only the
maximum values of the test cycles –1 test
cycle is represented by 1 point on the
diagram. This test is generally used for

SLC-TRQ4 manual v1.1 6.
procedures with 2 discrete peaks as cap
release and warranty ring break torque
testing
testing hundreds of cycles
Result: maximum of the peaks
1. Select measuring unit
2. Set trigger level –Trigger level is a load level that starts and stops the
measurement recording - “start-stop signal” of the measurement. As long as the
measured value is under the trigger, recording will not be started. Measurement
will be stopped (or paused), if the measured value drops under the trigger level.
Recommended level is between 2-15% of the expected maximum value.
If you need range checking, set high and low limits. Values will be displayed with
different colors:
blue –under range
green –in range
red –over range
(by 2-channel unit select the “primary” channel too)
It is possible to switch on a sound signal for the exceeding of the high limit
with the ring button.
3. Set time out (relevant only in double peaks mode) –This time defines how long the
instrument waits for the start of the second peak’s measurement. If time out
elapses without value over the trigger, MAX2 will be 0.
4. Set Y scale for the diagram’s scaling (default setting is the maximum of the cell,
recommended value is a little above your expected maximum)
5. Select sample rate (6,25 –400 Hz, recommended: 50-200 Hz)
6. Set turn off time (for automatic shut down after disconnecting). For the TRQ3
displayed model it also means a standby time. If the touchscreen is not touched for
the set time interval, the device will automatically turn off.
7. Check Auto save box if you want to save all results automatically. The Android
application will also save those measurements, which were started on the
touchscreen of the TRQ3 (if the device is connected, and auto save is on).
FURTHER FEATURES
CLEAR button on the main screen will clear the screen
CLEAR button on the SETUP screen will clear all the setup parameters including the
SmartLoadCell pairing.
Status LED –Status LED has 3 states:
-Green flashing –unit is ready to use, but unconnected
-Blue flashing –unit connected
-Red - charging
Menu/History –All saved results can be reviewed. Results can be deleted one by one (or
in bulk with hitting the trash button longer). Diagrams can be scrolled and zoomed.
Menu/Export to XML will create an export_11111_22222.xml file in the Download folder
of your android device. Download file can be forwarded to PC via Bluetooth, email,
internet or USB cable.
SLC-TRQ4 manual v1.1 7.
SHUTTING DOWN
Shutting down the SmartLoadCell –To turn off, select the turn-off-button on the main
screen or keep the power button pushed for 10 seconds on the SmartLoadCell unit.
CHARGING
Charging –SmartLoadCells can be charged with any micro USB charger. While charging
the status led on the unit will be red. Once the charging is finished, the red LED will turn
off. Battery state can be monitored by hitting the battery icon on the main screen.
Battery is enough for about 10 hours of operation. Please note that when battery is
almost discharged, it is possible that you experience some spikes in the measurement. It
is recommended not to discharge batteries under 10%.
Attention! Please always fully charge your device when putting it away for a longer
period.
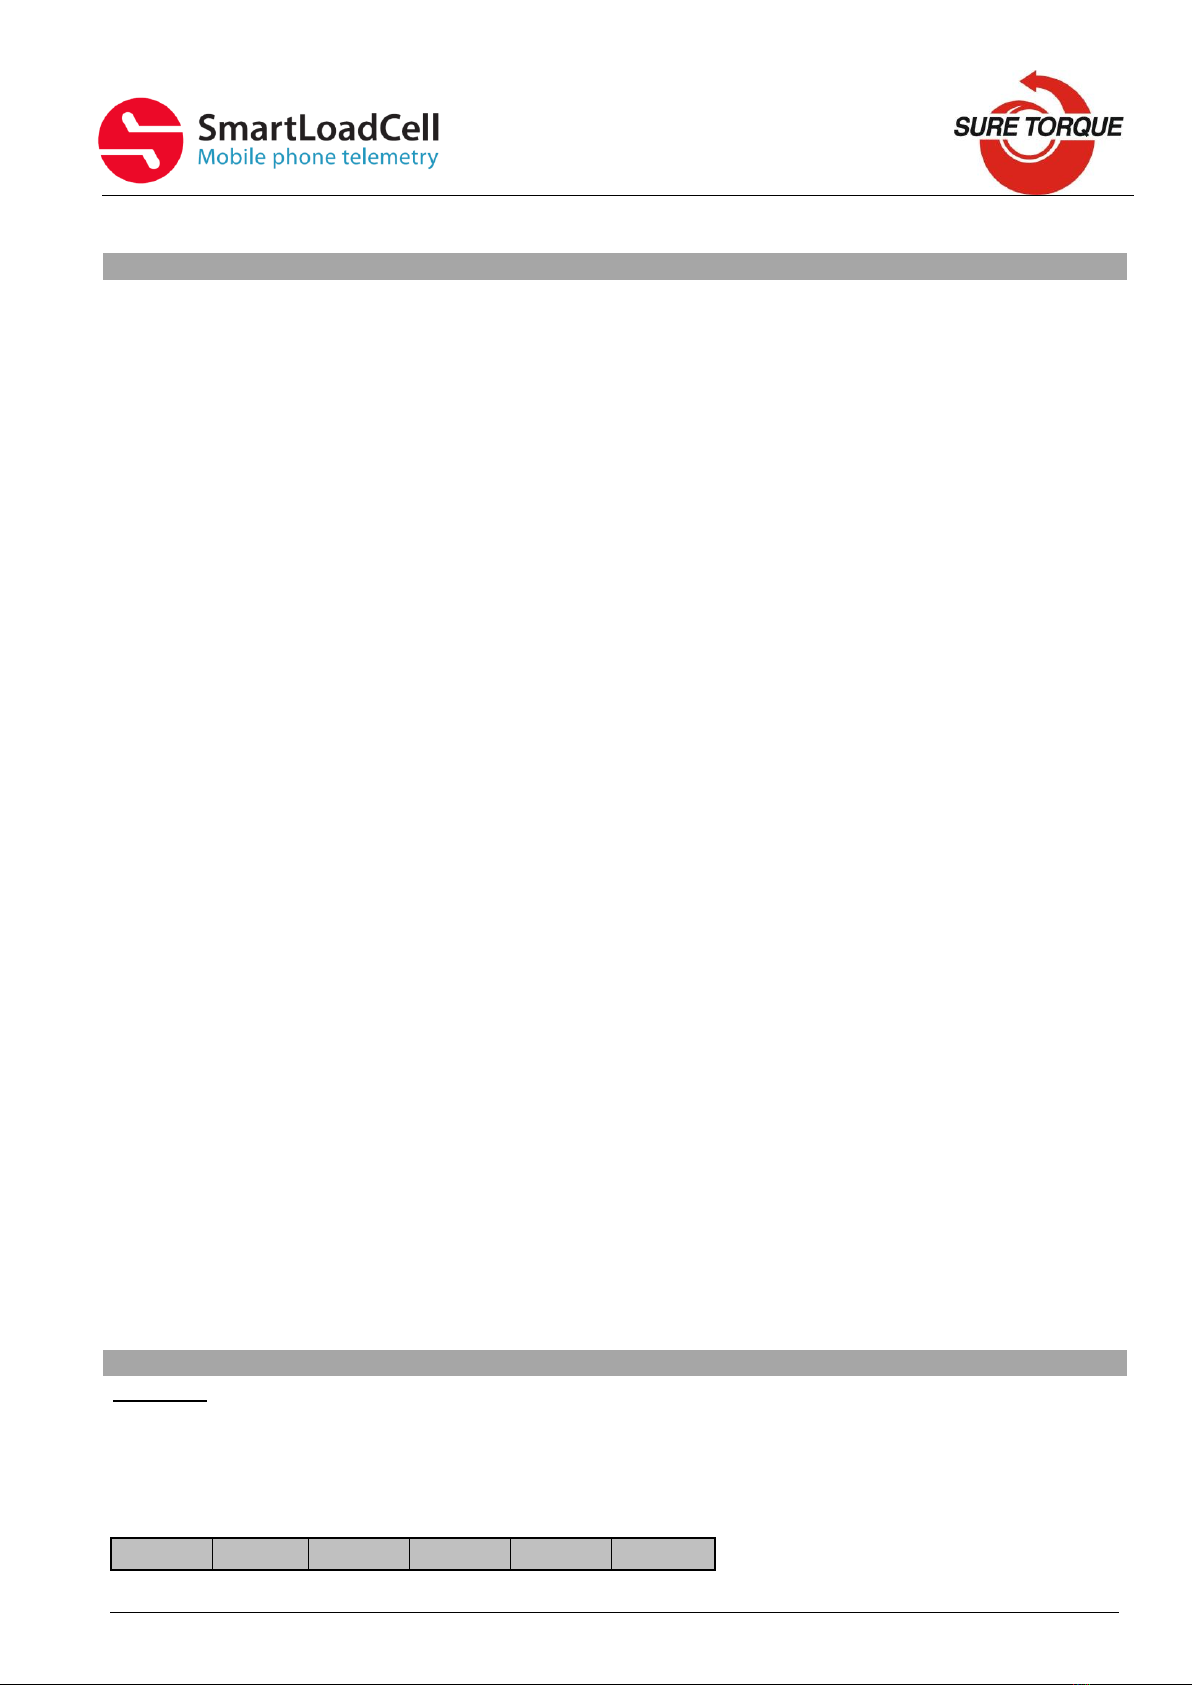
DATA MANAGER PROGRAM
Data manager program for pc can be downloaded in zip form from:
www.suretorque.eu / Useful information / Support / SLC_DAQ_1.1
link: http://www.suretorque.eu/media/wysiwyg/download/SLC_Single_DAQ_2_1_2.zip
With the program you may view all the measurement results saved in the xml. Results
can be exported in csv format or printed in report form.
SLC-TRQ4 manual v1.1 8.
CALIBRATION
Load cells’ calibration should be generally checked (verified) every year. Frequency of the
calibration check may be higher or lower upon the application and the stress of the load
cell. Load cell must be recalibrated only in the case, if the measured values are outside of
the tolerance range during the calibration check.
Calibration check / calibration of the TRQ3:
1. Assemble the calibration kit
2. Mount TRQ4 on the calibration stand
3. Apply the calibration bar in the place of the torque fitment. Mounting bolt torque:
1.5-2.0 Nm
4. Stress the load cell first –apply about 20 LbIn(2Nm) torque changing to both
direction for 5-6 times
5. Make sure the unloaded torque reading is 0 –if not, hit TARA
6. Apply torque by hanging the weight on both sides to different positions and repeat
at least 3 times
7. If measured values are within the tolerance range (+/-1%), calibration is ok. If
not, load cell must be recalibrated
Recalibration with loads:
1. Make sure all the calibration accessories are present and the SmartLoadCell is in
the calibration position
2. Set sample rate to 50Hz
3. Enter the Calibration menu with typing the calibration password
4. Make sure the UNIT and the FULL LOAD are set correctly
5. Apply the +MAX load and press OK
6. Remove load and press OK again
7. If your SmartLoadCell requires negative load calibration too, repeat the last 2 steps
with the negative load calibration too!
Advanced recalibration with mV/V values
1. Enter the advanced load calibration password
2. Make sure the UNIT and the FULL LOAD are set correctly
3. Enter the provided mV/V value to the +MAX, +ZERO (and –MAX, -ZERO if
provided)!
4. Hit Save to save the modified calibration data’s!
Calibration password: 10562348
Advanced calibration password: 84326501
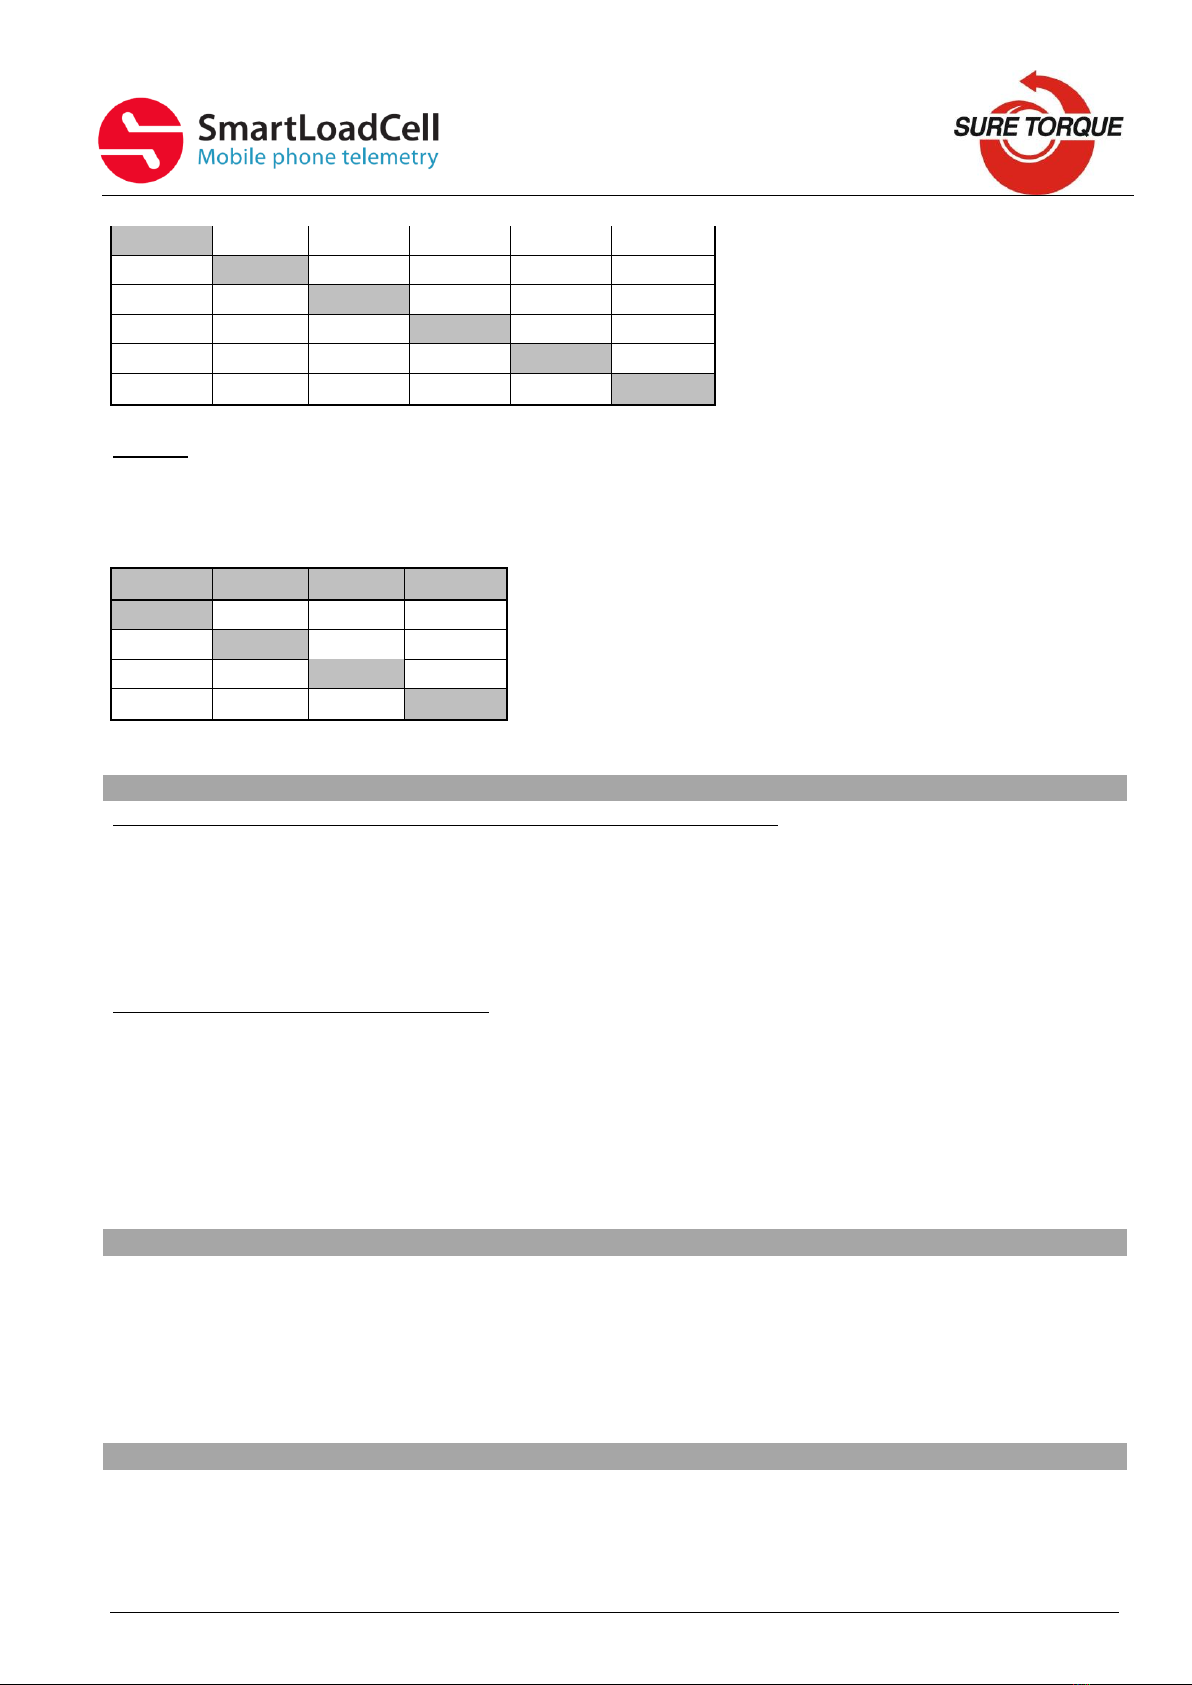
UNITS & CONVERSATION
TORQUE
inlb: inch-pound
ftlb: foot-pound
Nm: Newton-meter
dNm: deci newton-meter - 0,1 Nm
Ncm: Newton-cm, - 0,01 Nm
LbfIn
LbfFt
Nm
dNm
Ncm
Kgfcm
SLC-TRQ4 manual v1.1 9.
1
0.083
0.113
1.13
11.3
1.1521
12
1
1.356
13.56
135.6
13.8255
8.851
0.738
1
10
100
10.1972
0.885
0.074
0.1
1
10
1.0197
0.089
0.007
0.01
0.1
1
0.1020
0.86796
0.072
0.09807
0.98066
9.80661
1
FORCE
N: Newton
Lb: Pounds force
Kg: Kilograms force
T: Ton
N
Kg
Lbf
Ton
1
0.102
0.225
0.0001
9.807
1
2.205
0.001
4.448
0.454
1
0.00045
9806.81
1000
2204.6
1
TROUBLESHOOTING
SmartLoadCell unit connected, but is seems not measuring:
It may happen that the pairing is not successful at the first time. In this case disconnect
and connect again.
If it won’t help: enter MENU/SETTINGS and CLEAR the settings, then select Smart Cell
again and wait until the cell data’s are uploaded (Range value will be filled and status led
turns from green to blue)
SmartLoadCell application freezes:
Enter settings/apps in on your Android device and force stop the application. If this
doesn’t help it is recommended to uninstall the application and then reinstall it again.
Application was developed with English language settings. If you experience malfunction
with different language setting, close the application, change language to English and run
the application again.
MAINTENANCE
SmatLoadCells are precisions measuring devices, handle them with care! In normal case
SmartLoadCells will not require any preventive or systematic maintenance.
Battery is to be changed if it wears out. Battery type: Nokia BL-5C, 1000 mAh. Battery is
located under the cover of the SmartLoadCell unit. If cover is sealed, pay attention on
sealing it with clear silicone when reclosing the cover!
CONTACT
Manufacturing and distribution:
Sure Torque Europe ltd.
H-1134 Budapest, Rozsafa u. 13., HUNGARY
Tel.: +36.1.3917389

Table of contents
Other Sure Torque Test Equipment manuals

Popular Test Equipment manuals by other brands


Kyoritsu Electrical Instruments Works, Ltd.
Kyoritsu Electrical Instruments Works, Ltd. 8031 CE instruction manual

Westward
Westward 1EKN5 Operating instructions and parts manual

Tektronix
Tektronix 7313/R7313 instruction manual

Kleinwächter
Kleinwächter EFM 023 BGT manual

REED
REED R5408 instruction manual

Cosmo
Cosmo LS-1866 Operation manual