SurfaceMaxx SGY-PWA95 User manual
1
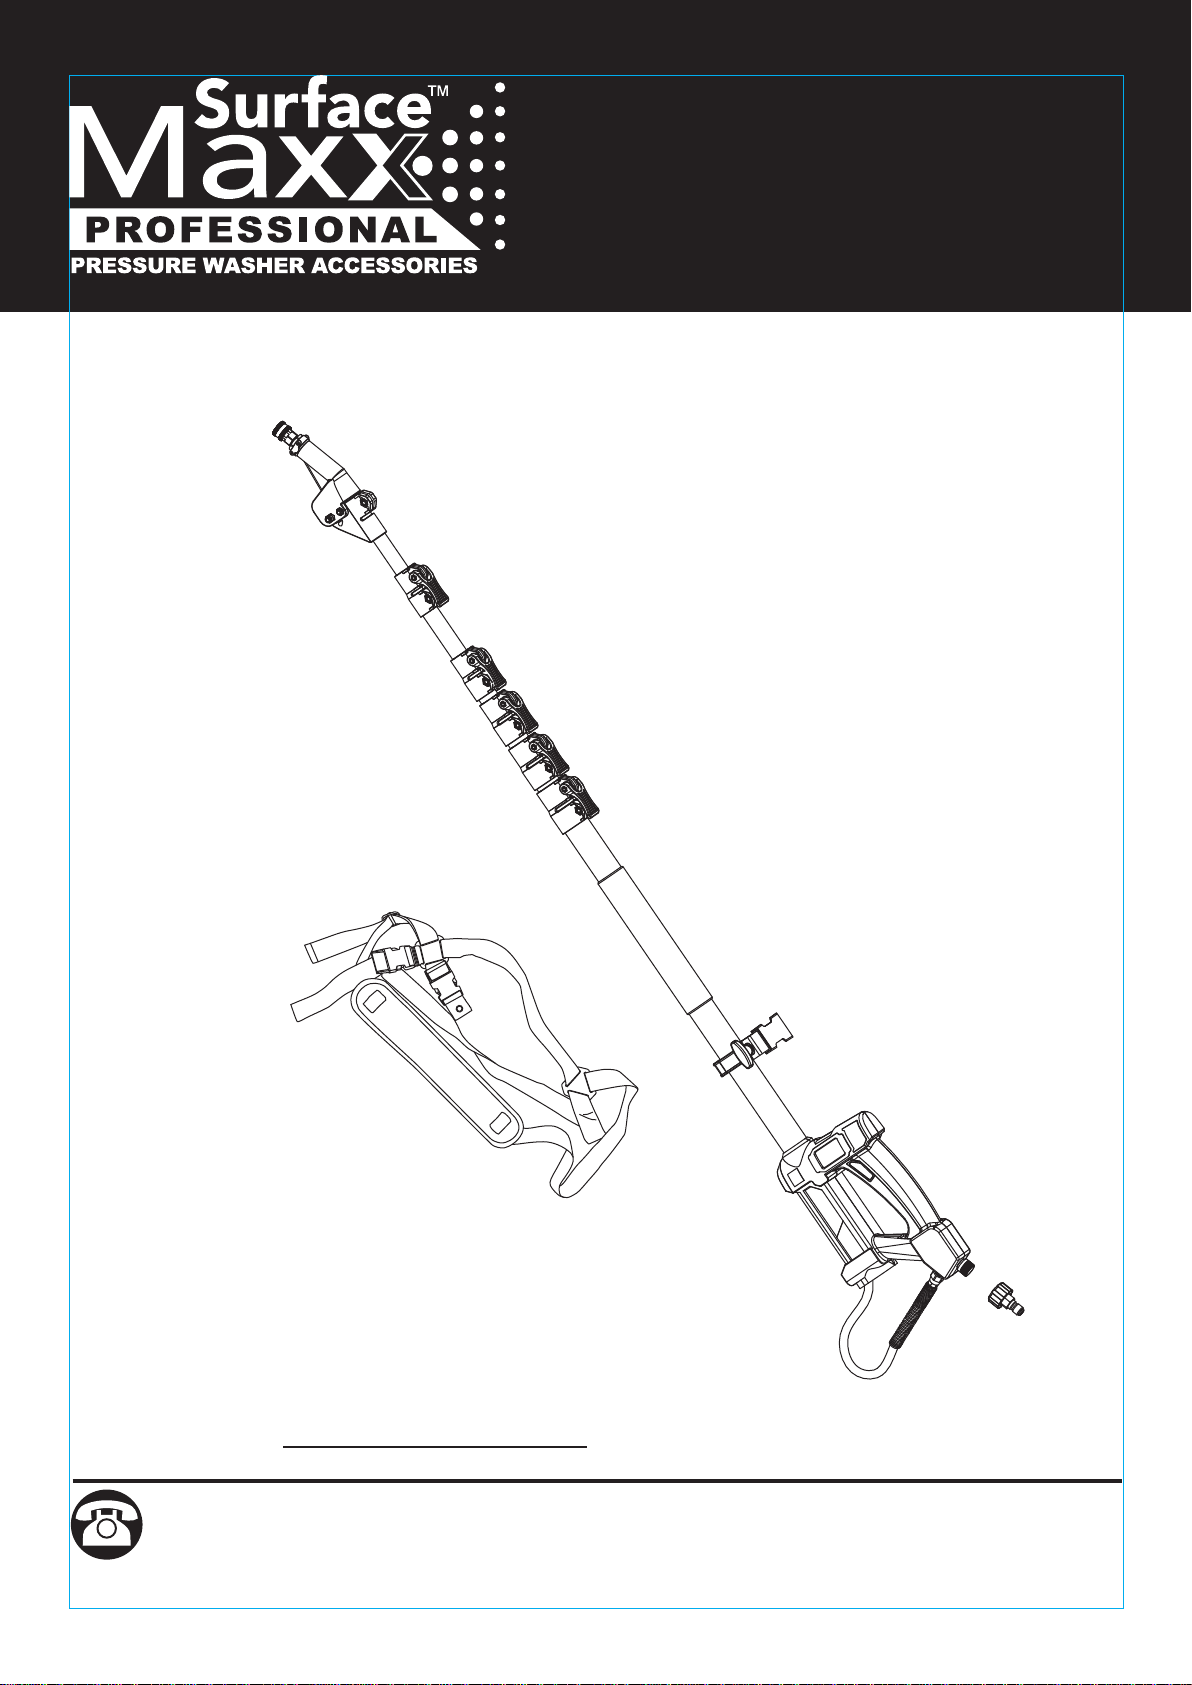
18 FT. Telescoping Wand
with Harness
INSTRUCTION SHEET
ITEM #2637677
MODEL #SGY-PWA95
ATTACH YOUR RECEIPT HERE
Purchase Date
service department at +1 (866) 870-9930, 9 a.m. - 5 p.m., EST, Monday - Friday.
www.surfacemaxx.com
Questions, problems, missing parts? Before returning to your retailer, call our customer
2
www.surfacemaxx.com
TABLE OF CONTENTS
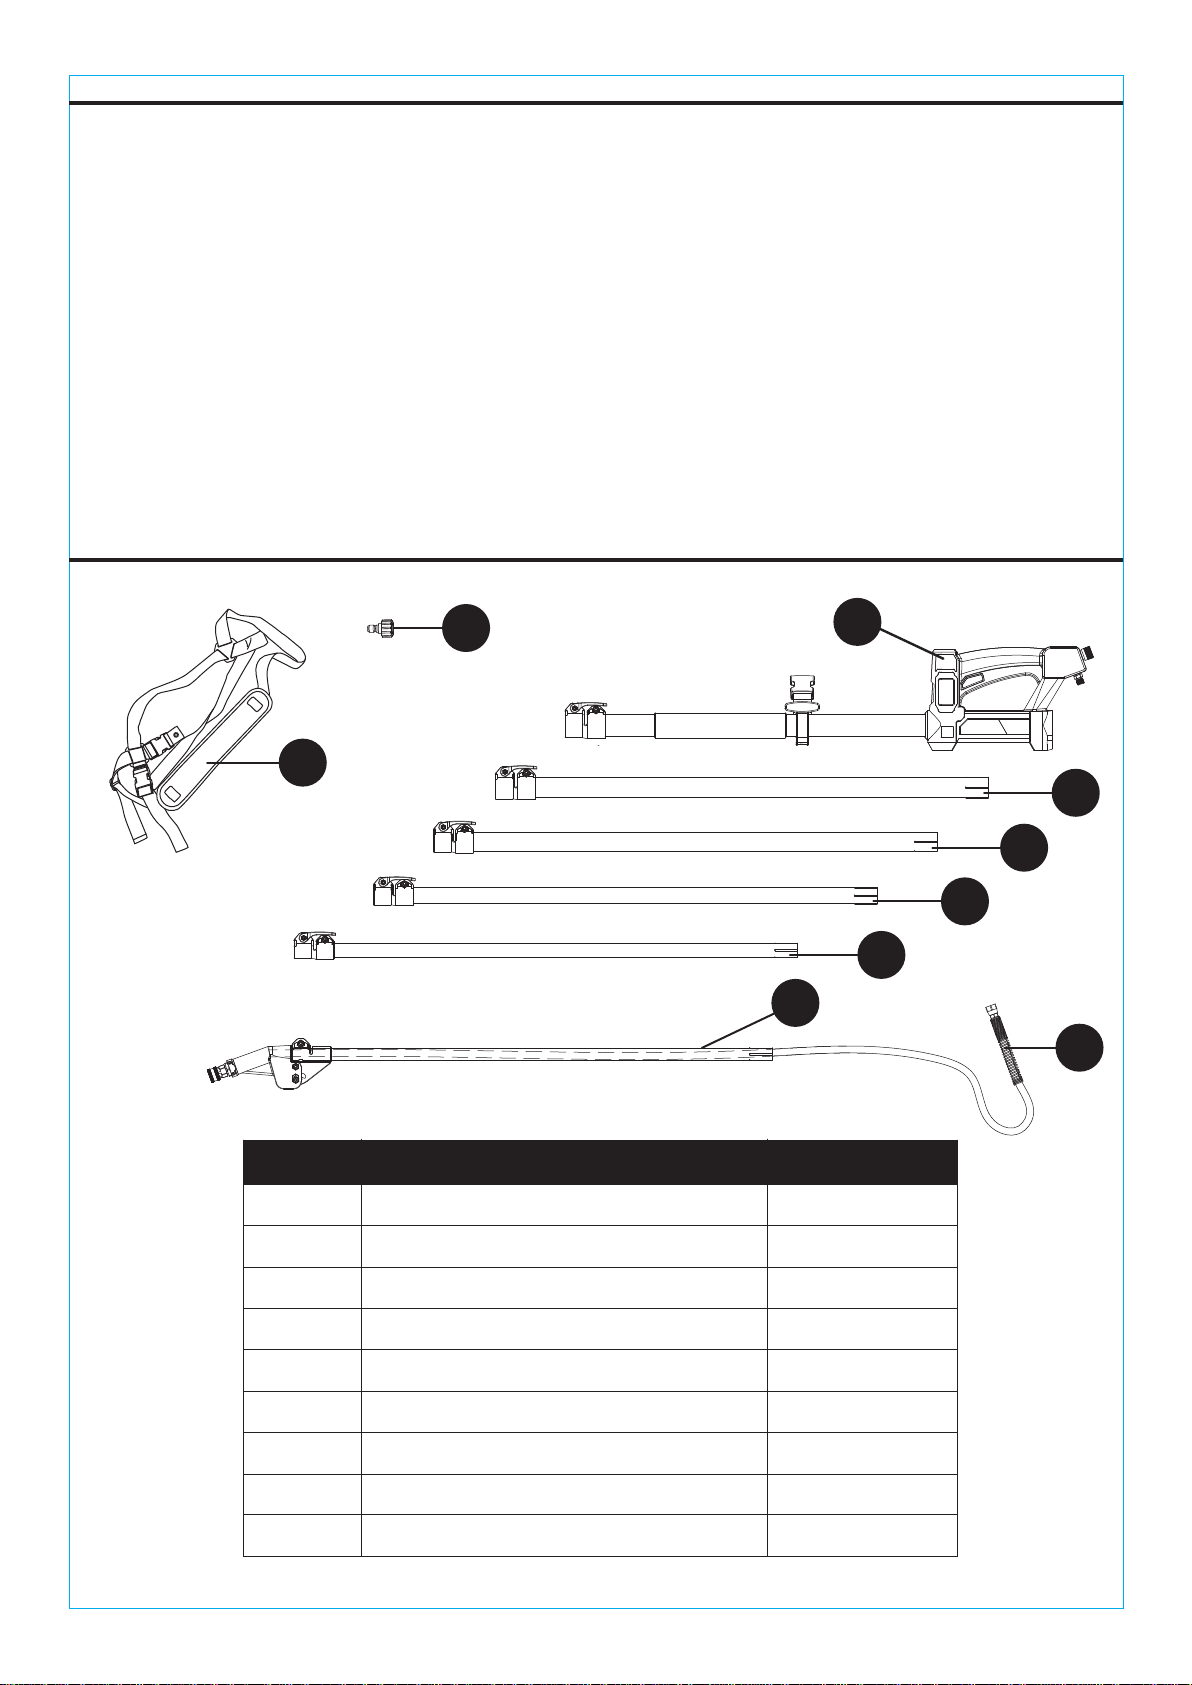
PACKAGE CONTENTS
Product Specifications ...............................................................................................................
Preparation ................................................................................................................................
Wear the Harness ......................................................................................................................
Care and Maintenance ..............................................................................................................
Troubleshooting .....................................................................................................................................
Warranty ....................................................................................................................................
3
Important Safety Information ..................................................................................................... 3
3
Assembling the Telescoping Wand ........................................................................................... 4
5
8
Using the Telescoping Wand .....................................................................................................7
8
8
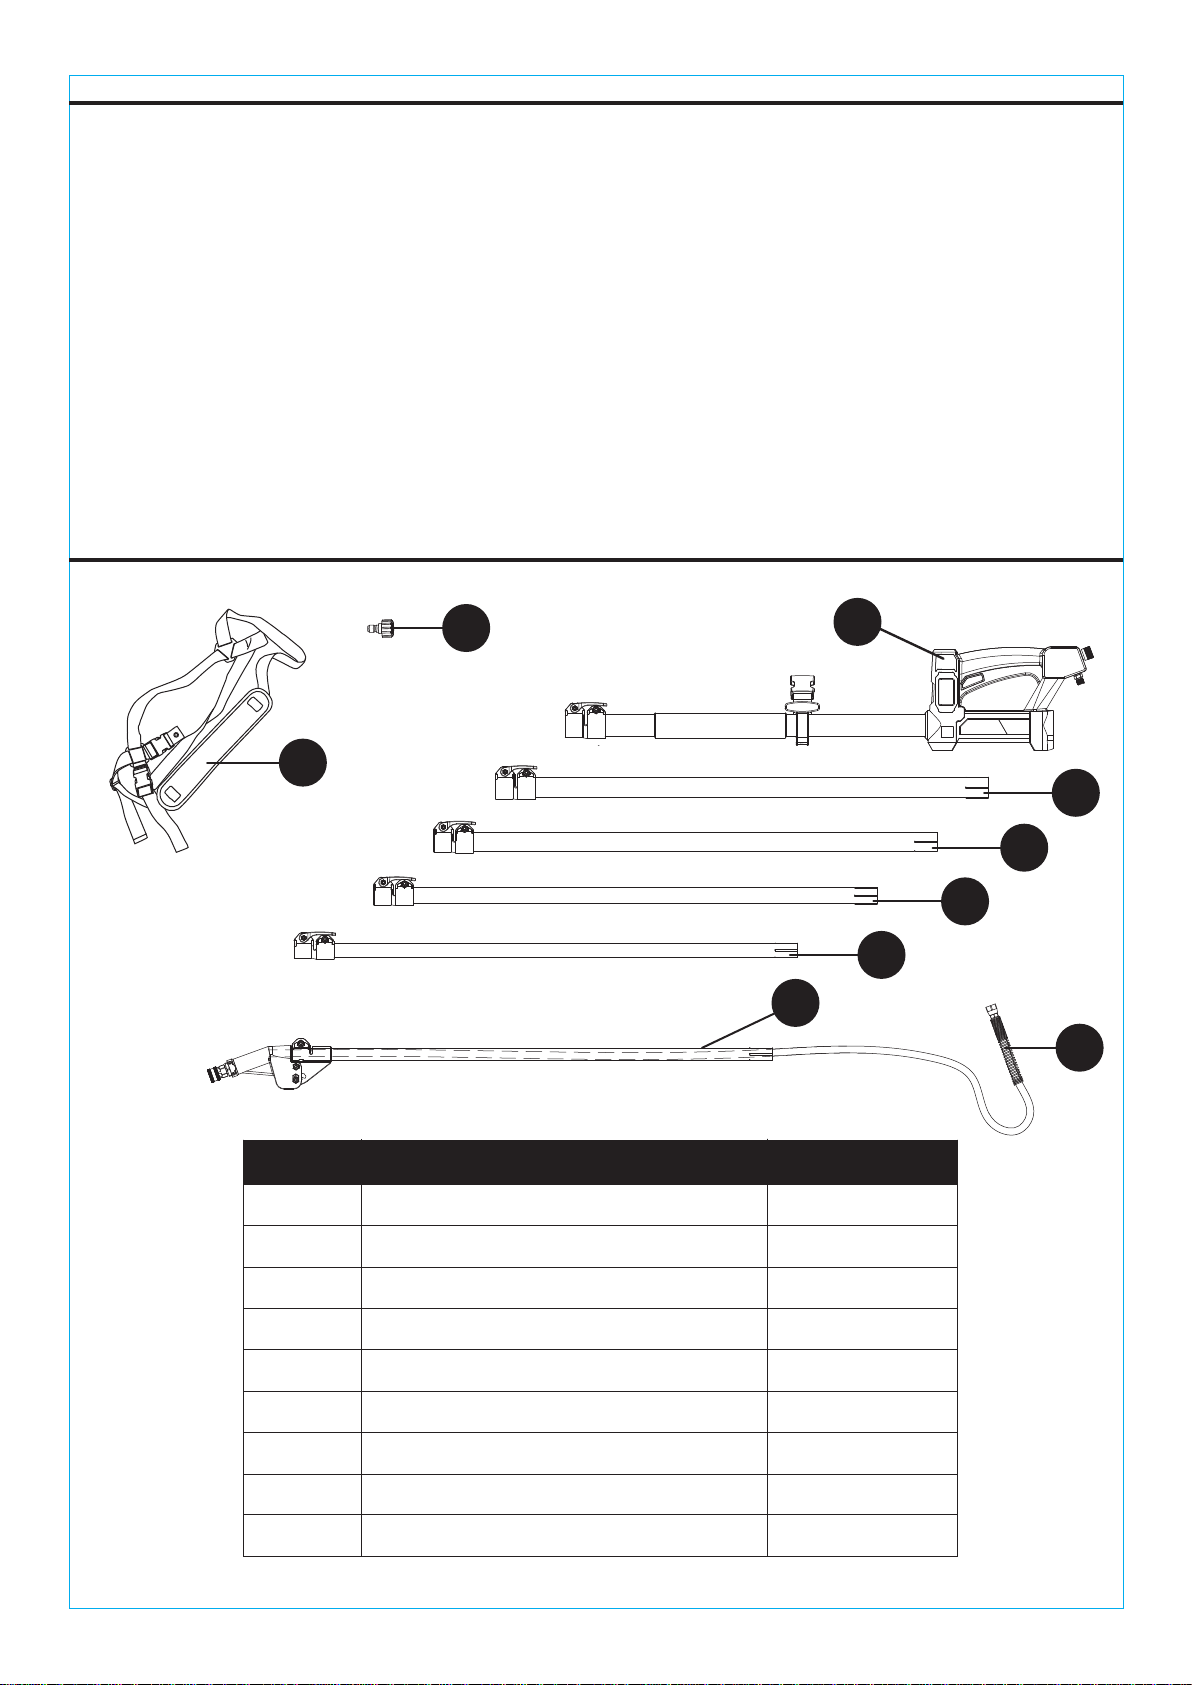
QUANTITYDESCRIPTIONPART
A
Telescoping Wand 1
B
Telescoping Wand 1
C
Telescoping Wand 1
D
Telescoping Wand 1
E
Telescoping Wand 1
F
Telescoping Wand 1
G
Nozzle with Hose 1
H
Harness 1
I
Adapter 1
A
B
C
D
E
F
G
H
I
3
www.surfacemaxx.com
IMPORTANT SAFETY INSTRUCTIONS
PREPARATION
Keep at least 10 feet away from power lines. Do not touch or aim spray at electrical wiring of any
kind.
Do not extend or retract the telescoping wand or change nozzles or accessories while spraying or
while the wand is under pressure. Turn off the pressure washer, shut off the water supply, point
the nozzle in a safe direction, and pull the trigger to release water pressure before making any
changes.
Do not use the telescoping wand while on a ladder or scaffolding.
When using the telescoping wand at any position less than fully extended, make sure the high
pressure hose is located so that it will not be stepped on, tripped over, or otherwise subjected to
damage or stress. Keep the hose clear of the working area.
Do not exceed the maximum rated pressure, volume, or temperature listed in the product
specifications.
Do not remove or alter any warning labels included on the telescoping wand.
Before beginning operation, make certain the area you plan to work in is clear of obstructions or
hazards.
Maintain proper balance and control of telescoping wand at all times.
To minimize the risk of kickback, grip the telescoping wand firmly with both hands. A firm grip
together with a stiff arm will help you maintain control of the telescoping wand if kickback occurs.
To reduce the risk of injury, the user must read and understand this operator’s manual as well as
the operator’s manual for their pressure washer before using this product. Failure to follow all
warnings and precautions may result in death, serious personal injury, or property damage.
DANGER:
WARNING:
SPECIFICATIONS
COMPONENT
Connections
Adapter
Length
Maximum Pressure
Maximum Water Temperature
Maximum Water Flow
M22 Inlet, 1/4 in. Quick Connect Tip, Threaded
Accessory Port
Female M22 x 3/8 in. Male Quick Connect
up to 4,200 PSI
PRODUCT SPECIFICATIONS
4 ft. extends to 18 ft.
140°F (60°C)
8 GPM
Before assembling or operation of product, make sure all parts are present. Compare parts with
package contents list. If any part is missing or damaged, do not attempt to assemble, install or
operate the product.
• Estimated Assembly Time: 10 minutes
• Tools Required for Assembly: Adjustable Wrench (not included)
4
www.surfacemaxx.com
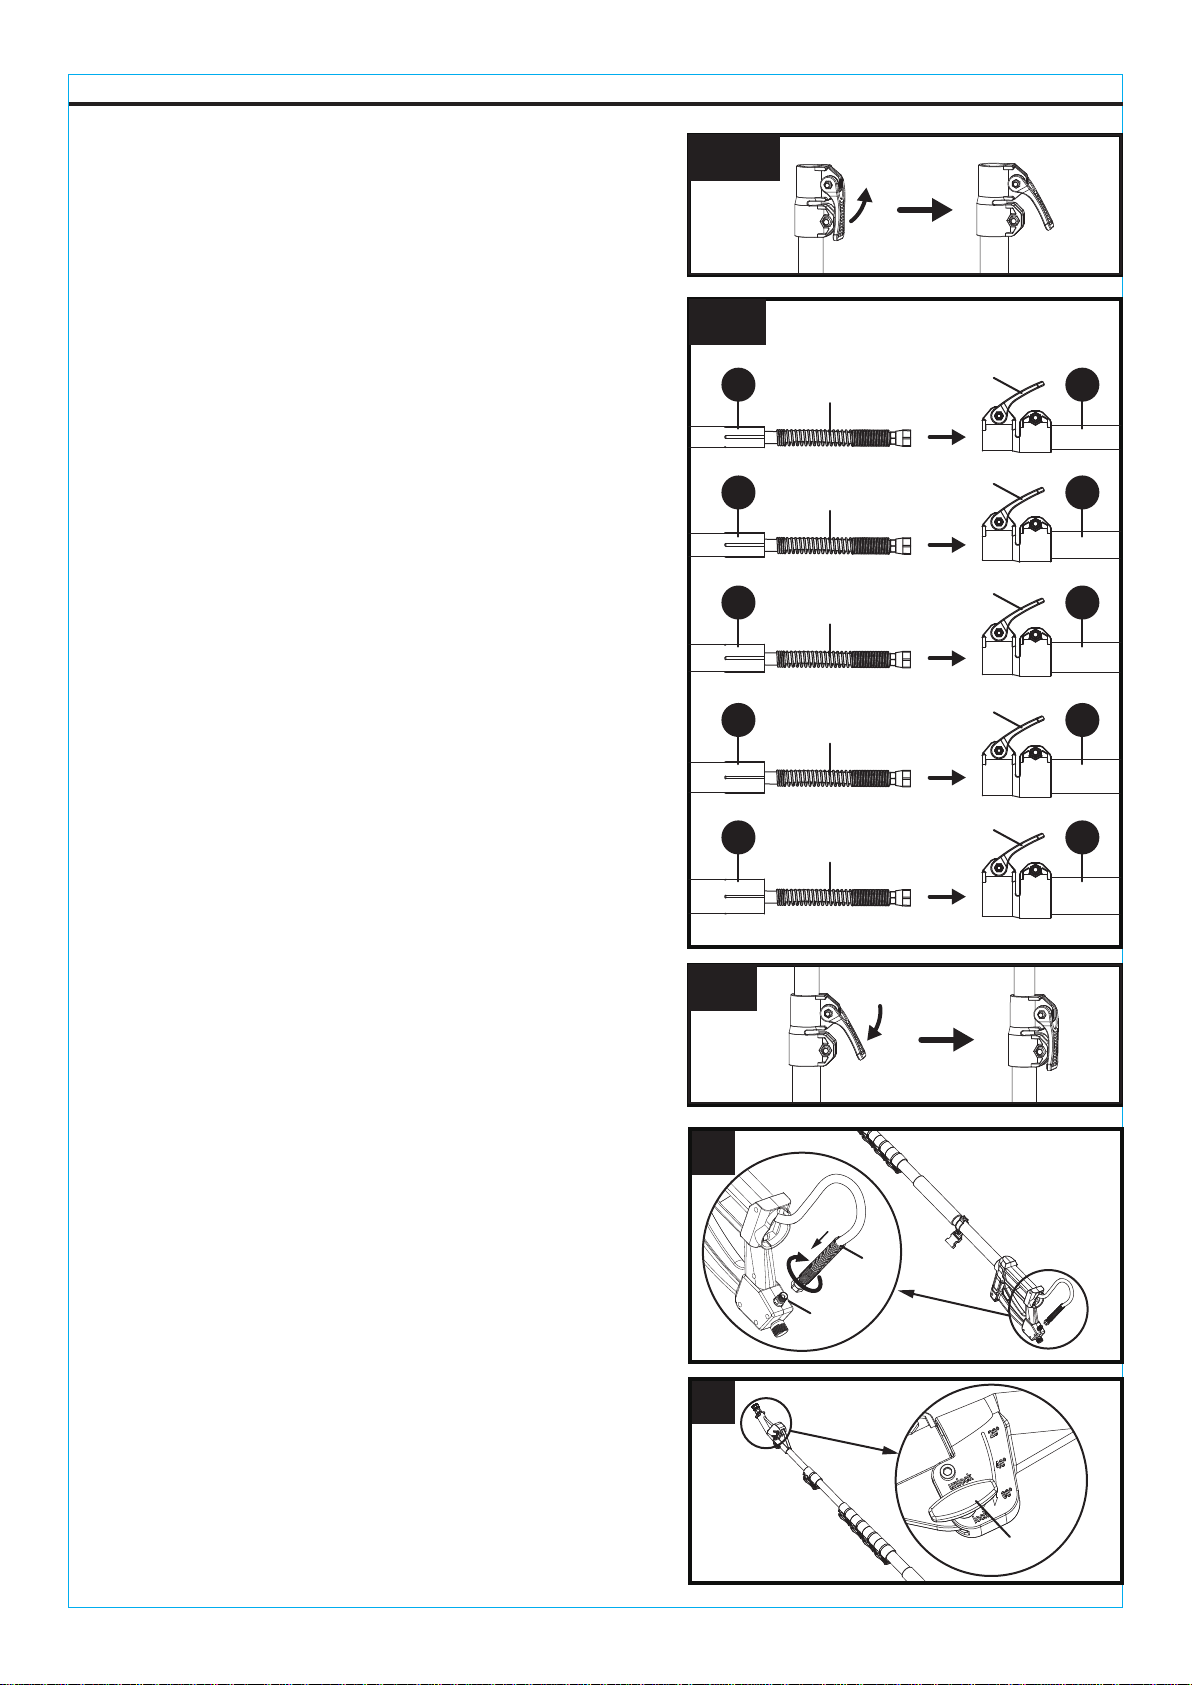
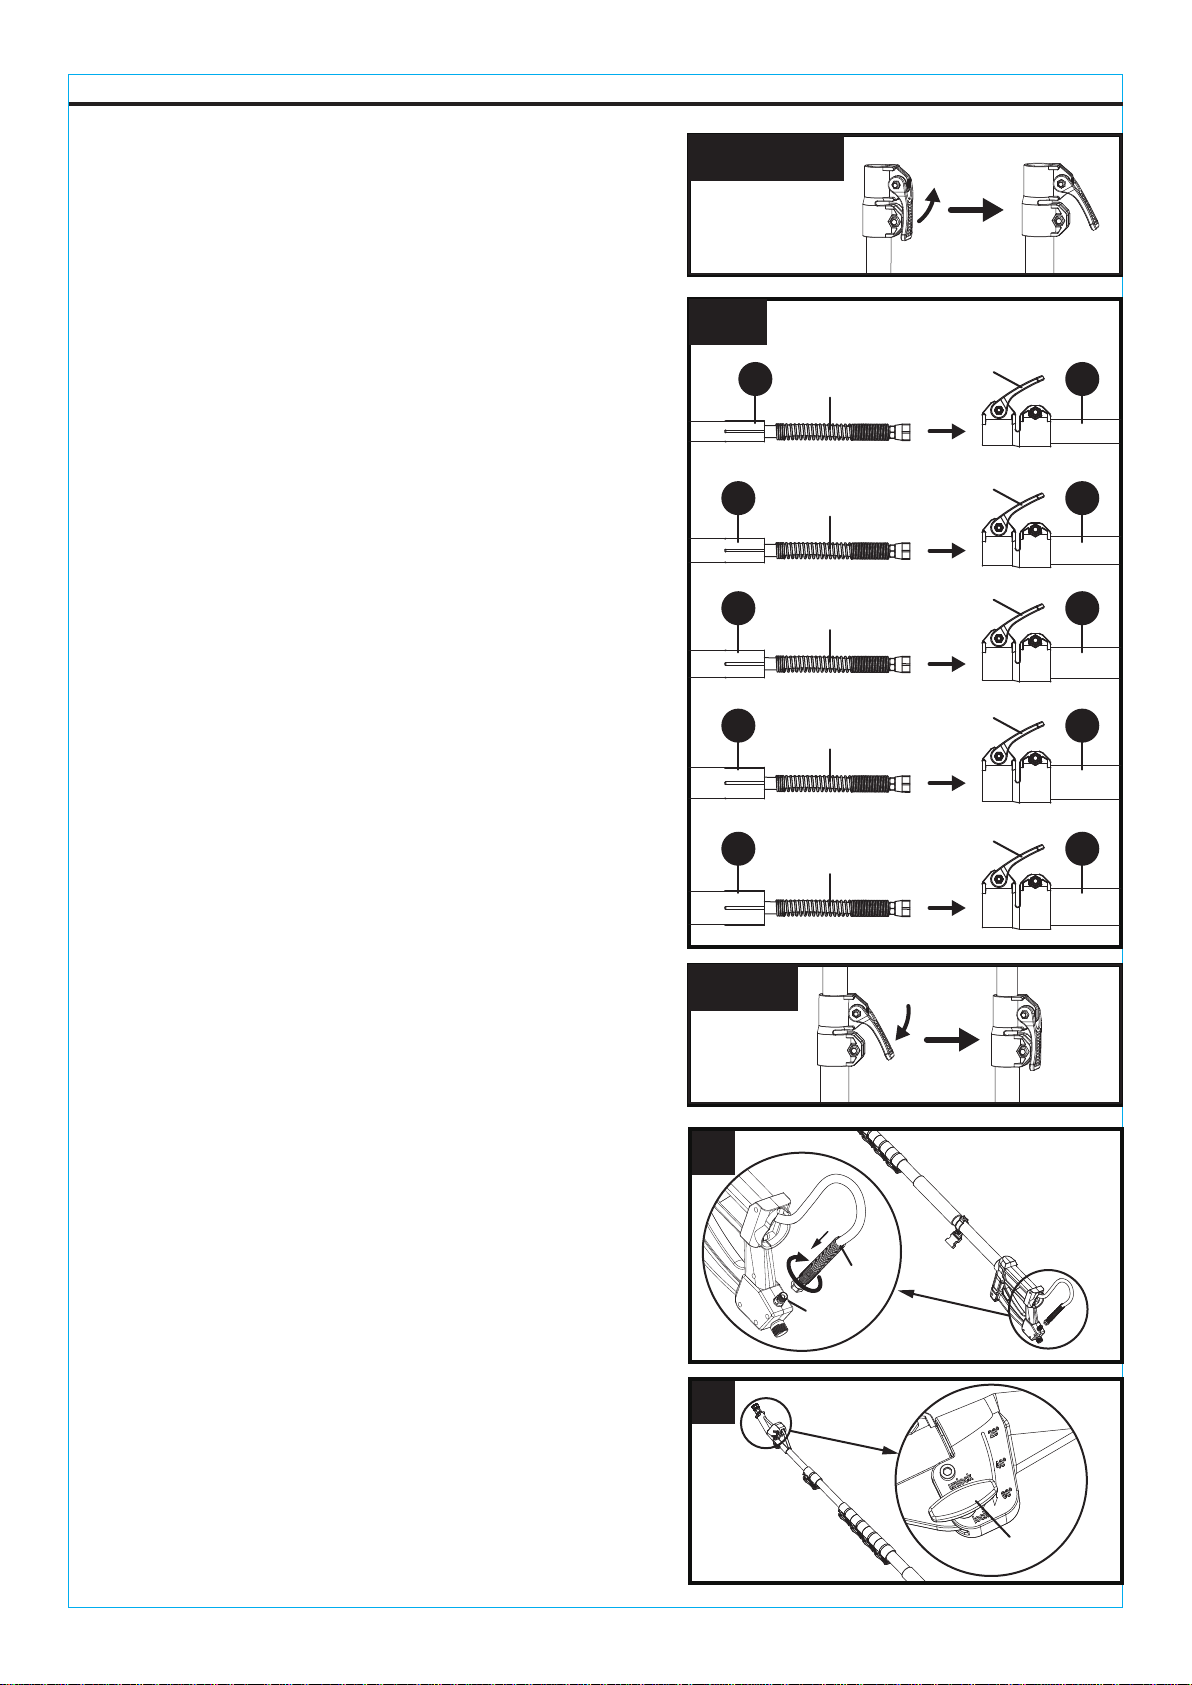
a. Starting with part F, feed hose into the locking
end of the smallest wand section E and feed the
hose through the tube.
b. Slide wand section E over wand section F all the
way up to the bottom of the adjustable head and
then push down on the lock lever.
c. Feed the hose into the locking end of wand
section D and feed the hose through the tube.
Slide wand section D over wand section E all the
way up and push down on the lever to lock.
d. Repeat the previous step with remaining
sections C, B and A.
2. Screw on the hose fitting into the water outlet and
tighten it clockwise.
3. Pivoting and locking construction for 3 position
angle adjustable with 20 - 40 - 60 degrees by
loosening the lock nut and sliding it towards the
wand. Once it is in the desired position, slide the
nut away and tighten.
1. To assemble the 6 sections of the telescoping wand:
ASSEMBLING THE TELESCOPING WAND
Unlock
NOTE: For easier assembly, lay each wand section
out on the ground from smallest to largest before
beginning. Take care to avoid kinking the hose
during assembly. Make sure the lock levers are
unlocked prior to assembling. To unlock pull up on
the base of the lock lever.
See Figures 1 - 3.
Lock Unlock
Lock
LockUnlock
2
Hose
Water
outlet
3
Lock nut
1a-d
Hose Lock lever
E
Lock lever
Lock lever
Lock lever
Lock lever
F
Hose
DE
Hose
CD
Hose
BC
Hose
AB
5
www.surfacemaxx.com
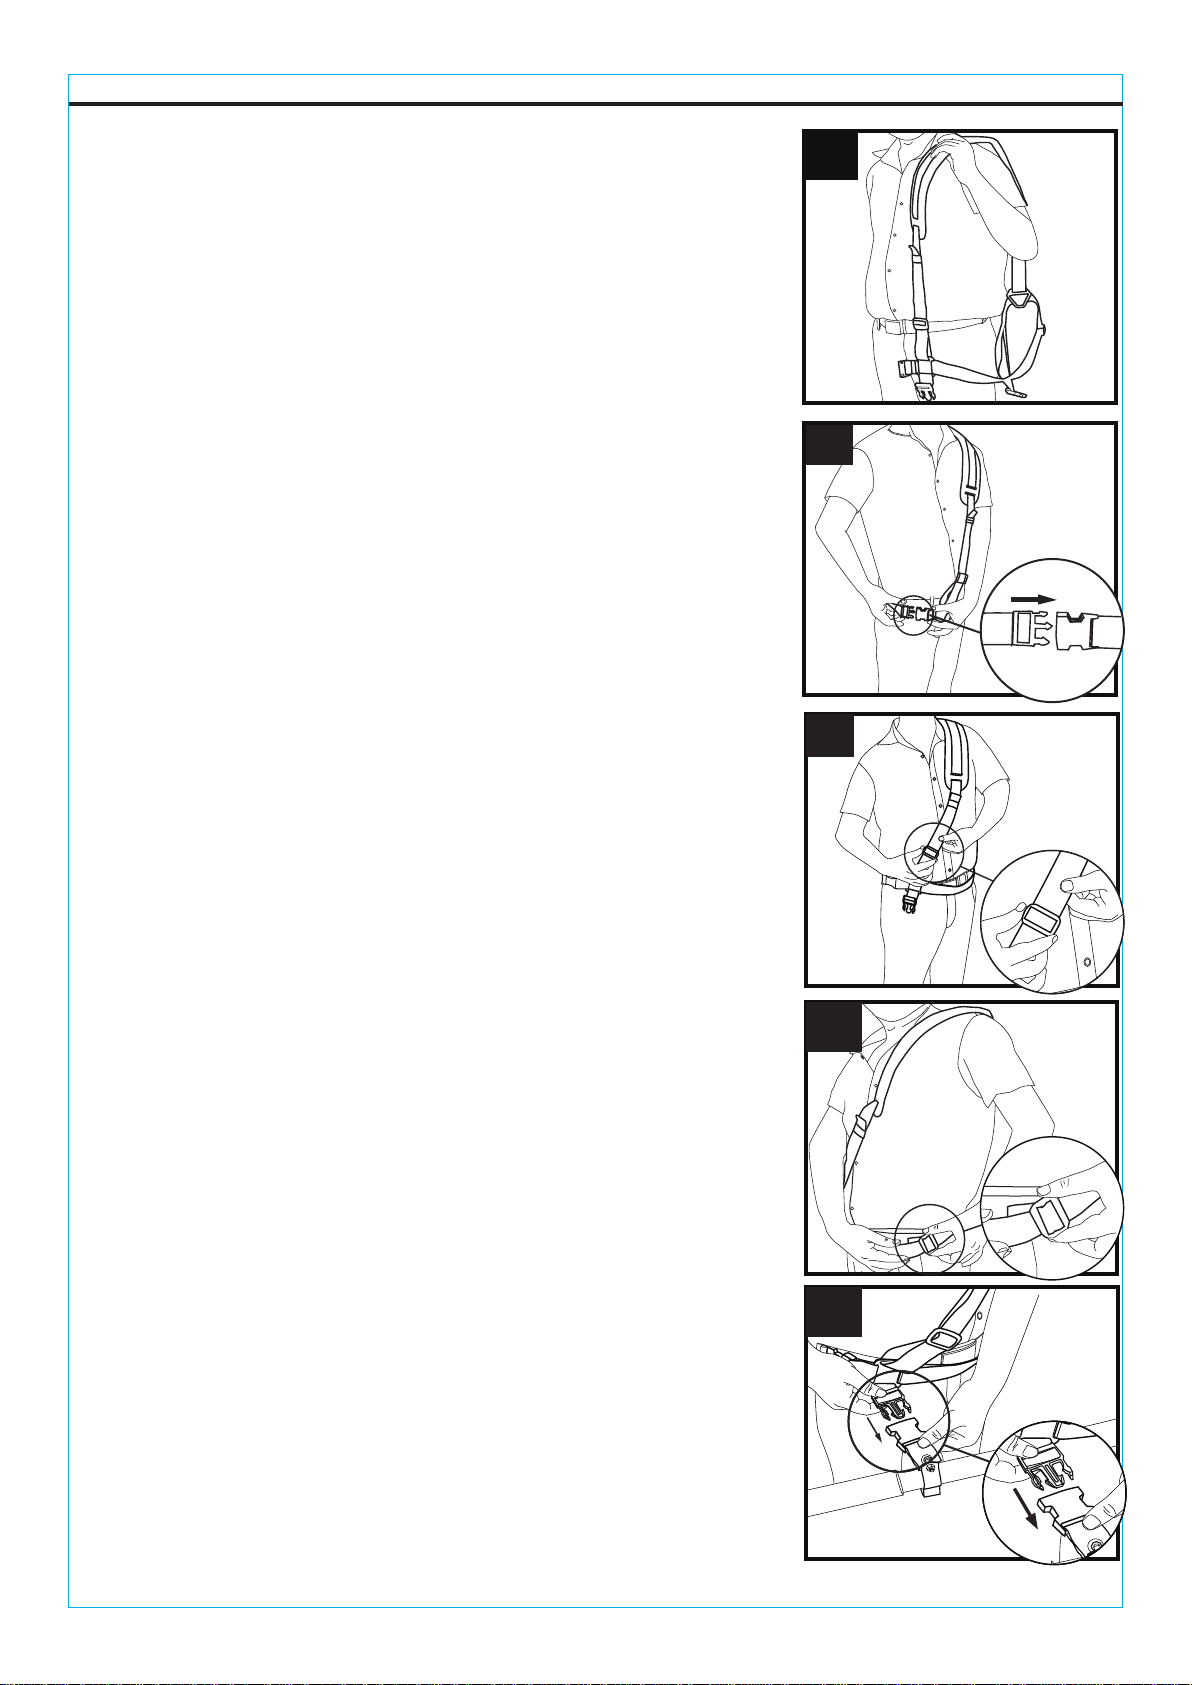
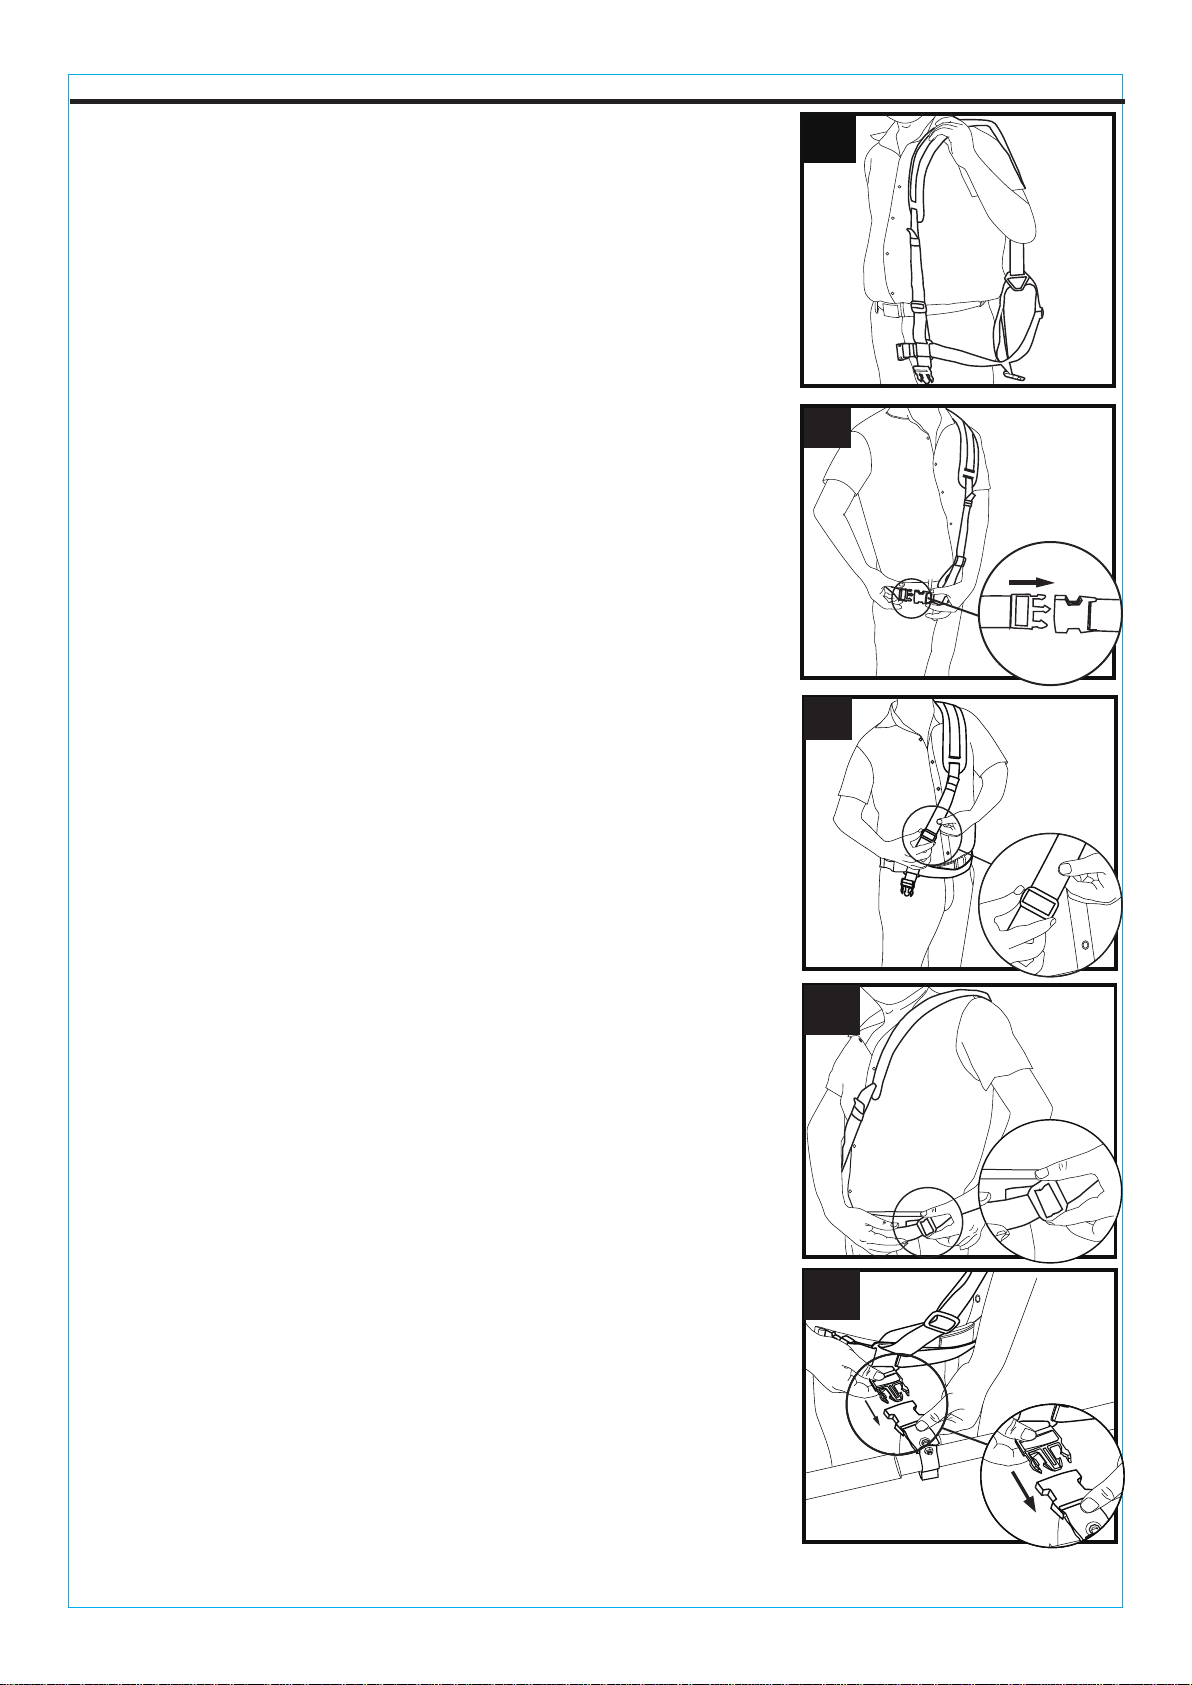
WEAR THE HARNESS
Choose step 2 for left handed operators.
Place padded shoulder strap on your left shoulder.
Wrap waist belt around waist and fasten buckle. Buckle
should rest against the right side of your torso as you look
down.
Adjust shoulder strap to position waist belt at desired height.
Tighten the waist belt.
Fasten wand adapter to telescoping wand and connect
buckle to support belt.
1. HOW TO WEAR HARNESS FOR RIGHT HANDED
OPERATORS
Choose step 1 for right handed operators. 1a
1b
1c
1d
1e
NOTE: It is recommended that the harness be located
between your waist and chest. This will allow for better
support and control when using the wand.
6
www.surfacemaxx.com
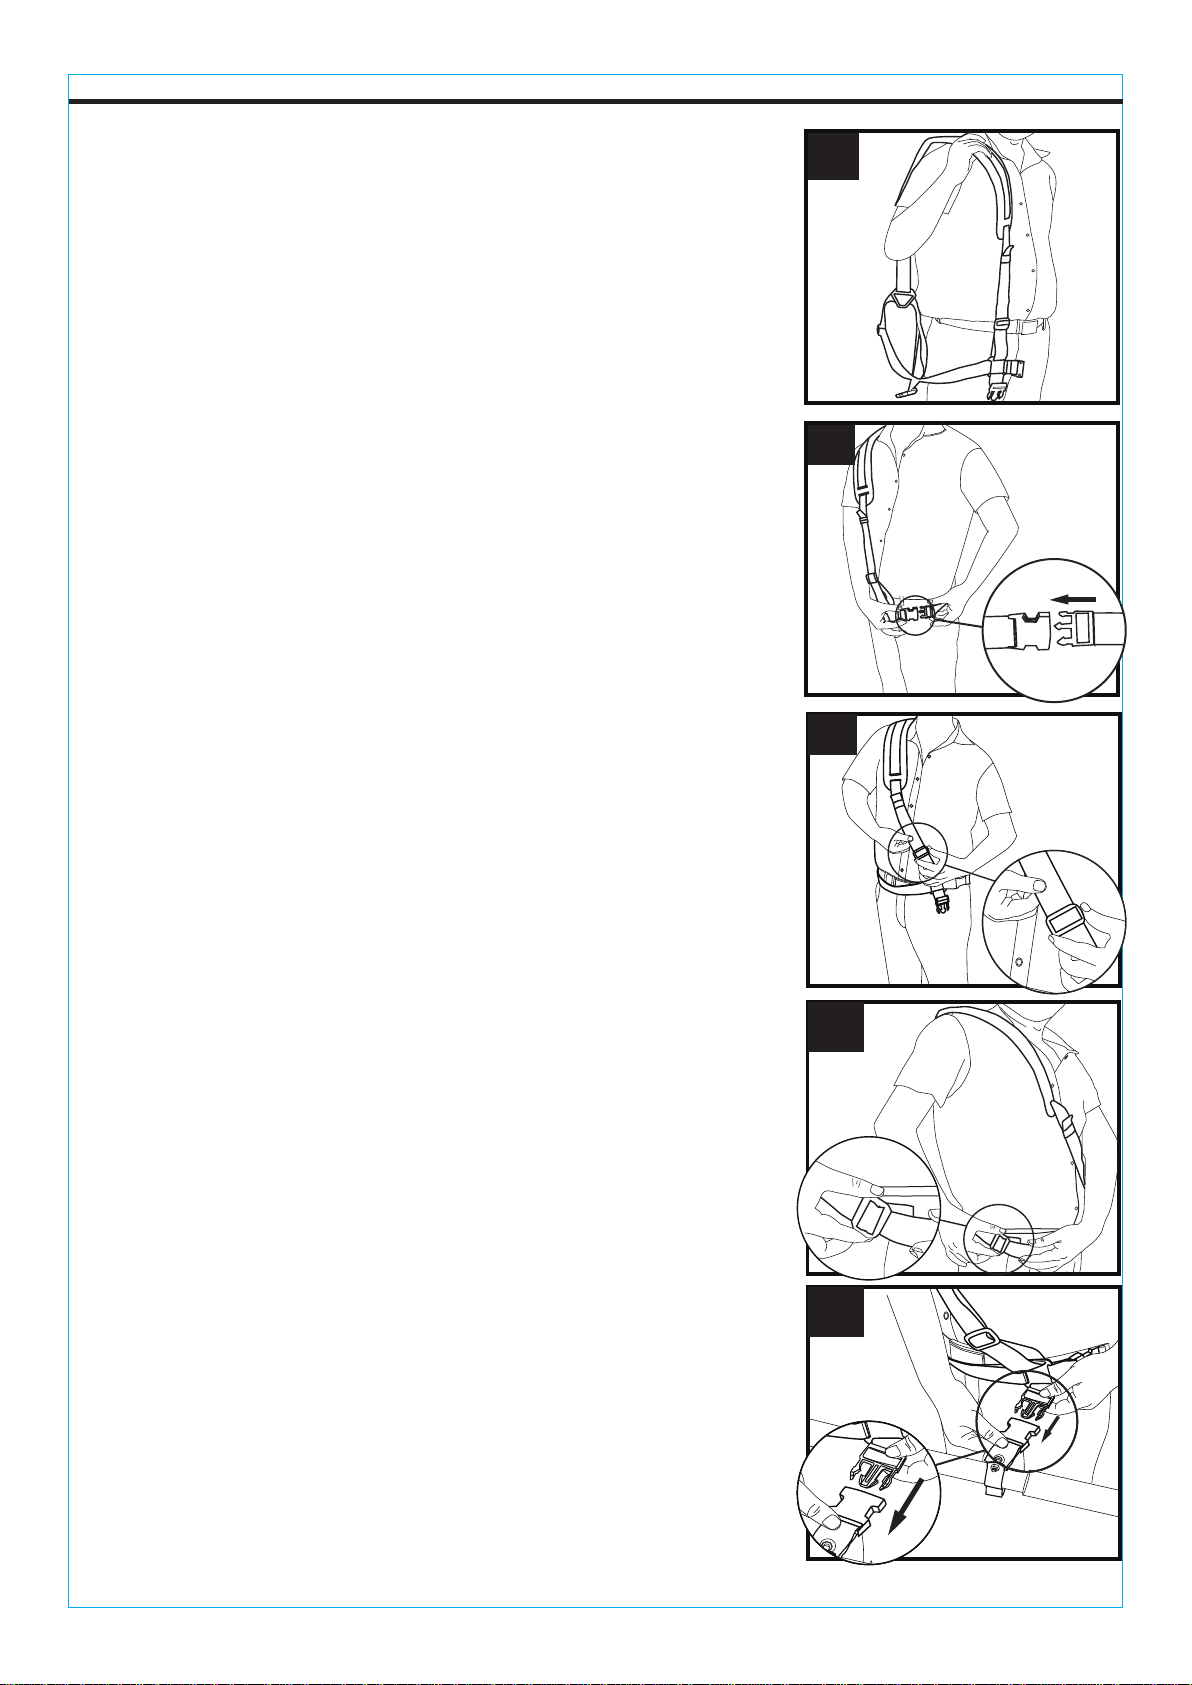
WEAR THE HARNESS
2a
2b
2c
2d
2e
2. HOW TO WEAR HARNESS FOR LEFT HANDED
OPERATORS
Place padded shoulder strap on your right shoulder.
Wrap waist belt around waist and fasten buckle. Buckle
should rest against the left side of your torso as you look
down.
Adjust shoulder strap to position waist belt at desired height.
Tighten the waist belt.
Fasten wand adapter to telescoping wand and connect
buckle to support belt.
NOTE: It is recommended that the harness be located
between your waist and chest. This will allow for better
support and control when using the wand.

7
www.surfacemaxx.com
USING THE TELESCOPING WAND
1. The trigger handle features a lock button to prevent
unintentional use. To lock, slide the lock toward the
trigger so the lock symbol is shown. To unlock, slide
the lock away from the trigger so the unlock symbol
is shown.
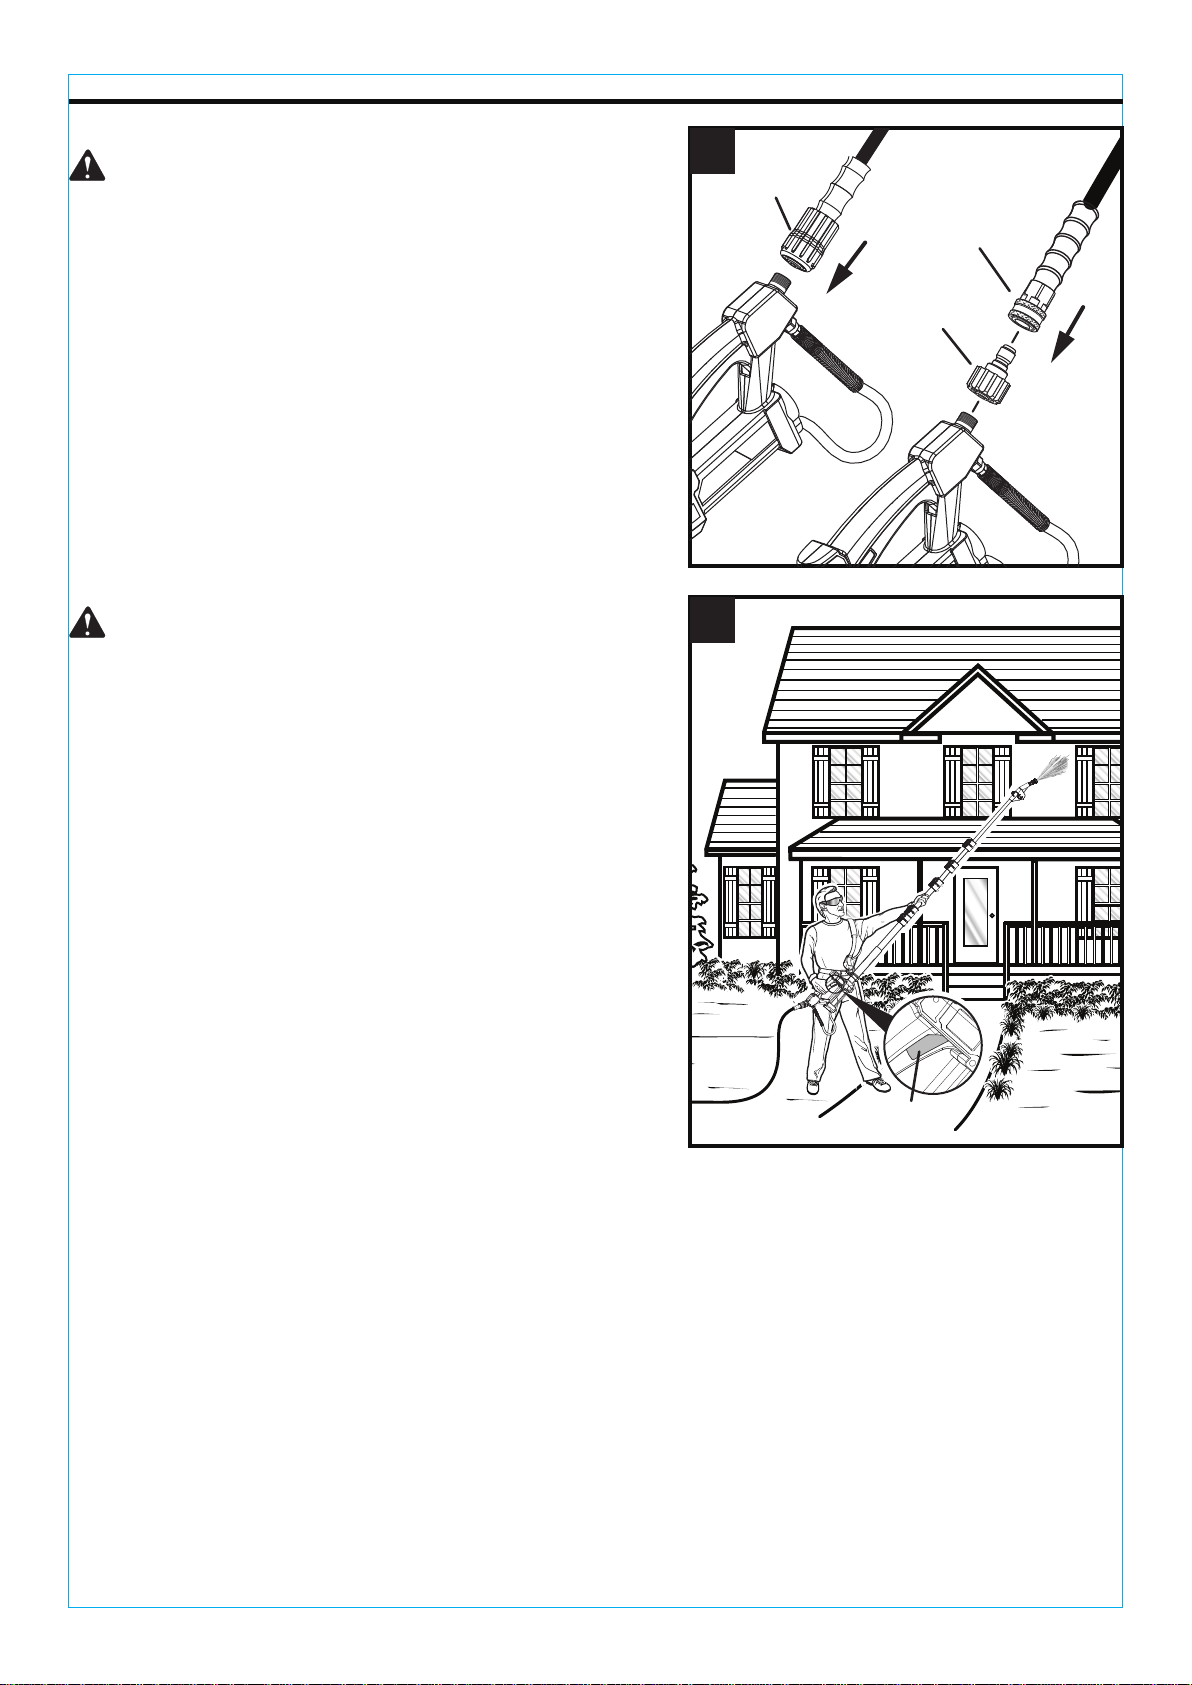
2. Connect the high pressure hose of your pressure
washer to the inlet coupler on the telescoping wand.
3. The telescoping wand can be used retracted, extended, or at any point in between. To adjust the
length of any of the wands, open the lock lever, move the wand to the desired length, then close
the lock lever to secure.
4. Before attempting to use the telescoping wand on your project, move away from the project area
and extend the wand to 50% of its available length. Depress the trigger to release a stream of
water so that you can get a feel for how the unit will perform during use.
5. The telescoping wand will kickback when the trigger is released and/or pressure is lost. Before
releasing the trigger, move the nozzle at least 10 feet away from the surface being cleaned and
make sure you have solid footing.
1
2
Hose with
threaded
coupler
Hose with quick
connect coupler
Quick
connect
adapter
Safety
lock
See Figures 1 - 2.
To reduce the risk of electrocution, possible serious
personal injury or property damage, spray the pressure
stream in a safe direction away from all electrical
devices and bystanders. Ensure proper connection of all
accessories before starting any cleaning project. Fits
most pressure washers. Ensure compatibility and proper
fit before using this accessory. Wear safety glasses or
goggles; do not point at people, pets, electrical devices.
Turn off the pressure washer before changing or
adjusting accessories. For cold water use only. For
outdoor use only – store indoors. Save these instructions.
Refer to them frequently and use them to instruct other
users. If you loan someone this tool, loan them these
instructions also.
WARNING:
Do not use pivoting nozzles when using the telescoping
wand. Pivoting nozzles can increase the risk of kickback
and could result in possible serious personal injury.
WARNING:
NOTE: Always engage the trigger lock before moving
or adjusting the telescoping wand.
NOTE: The inlet coupler on the telescoping wand is
designed to connect to a threaded connector on your
pressure washer’s high pressure hose. If your high
pressure hose has a quick connect coupler instead,
install the adaptor provided before connecting to the
telescoping wand.
NOTE: Never fully extend the wands. Do not extend beyond the lines marked on the wands. This
allows 4 in. of wand to remain inside the next section to help provide stability during operation.
8
www.surfacemaxx.com
6. Adjust the height of the telescoping wand as needed to fit your project requirements.
7. Move to the project area, raise the wand and aim toward the area to be cleaned. Squeeze the
trigger to begin spraying.
8. When placing the wand on the ground, make sure to set it on the ground gently to avoid breaking
any of the plastic components or accessories.
TROUBLESHOOTING
WARRANTY
PROBLEM POSSIBLE CAUSE CORRECTIVE ACTION
Connections leak. 1. Loose connections. 1. Retighten fittings.
2. Sealant worn. 2. Reapply pipe tape.
3. O-ring is worn. 3. Replace O-ring.
Unit won’t spray. 1. Unit power / water supply off. 1. Consult owner's manual.
Wand section will not
stay in place. 1. Lever lock is loose.
2. lever lock is broken.
1. Try tightening the hex screw
on the lock lever.
2. Replace lever lock.
2. Unit is clogged. 2. Reverse flush unit with water.
The manufacturer warrants this product against defects in materials and workmanship for two (2)
years from date of purchase. If within this period a product is found to be defective in material or
workmanship, the product must be returned with a copy of the bill of sale as proof of purchase to
the manufacturer. This warranty does not cover the product becoming defective due to misuse,
accidental damage, improper handing and/or installation and specifically excludes liability for direct,
incidental or consequential damages. As some states do not allow exclusions or limitations on how
long an implied warranty lasts, the above exclusions and limitations may not apply to you. This
warranty gives you specific rights and you may also have other rights which vary from state to state.
For warranty service, call +1 (866) 870-9930, 9 a.m. - 5 p.m., EST, Monday - Friday.
TWO YEARS LIMITED WARRANTY
USING THE TELESCOPING WAND
Printed in China
CARE AND MAINTENANCE
• If a cleaning solution was run through the wand, run just water through the wand before shutting off.
• De-pressurize by squeezing the gun trigger until all of the water has been drained out of the unit.
The telescoping wand will flex as pressure is added or lost. Fully understand how the wand moves
when adding or lessening pressure before attempting a cleaning project. If you are not completely
comfortable with the movement of the wand under changing pressure conditions, do not use this
product. Loss of control of the telescoping wand could result in possible serious personal injury.
WARNING:
Lengthen the telescoping wand only as much as necessary for the project you are attempting and
remain in full control of the telescoping wand at all times. Loss of control of the telescoping wand
could result in possible serious personal injury.
WARNING:

9
Vara Telescópica
Con Arnés de 5,48 M
HOJA DE INSTRUCCIONES
MODELO #SGY-PWA95
www.surfacemaxx.com
ARTÍCULO #2637677
ADJUNTE SU RECIBO AQUÍ
Fecha de compra
¿Preguntas, problemas, piezas faltantes? Antes de volver a la tienda, llame a nuestro
Departamento de Servicio al Cliente al +1 (866) 870-9930, de lunes a viernes de 9 a.m. a
5 p.m., hora estándar del Este.
10
www.surfacemaxx.com
ÍNDICE
CONTENIDO DEL PAQUETE
Especificaciones del producto ..................................................................................................
Preparación ..............................................................................................................................
Uso del arnés ...........................................................................................................................
Cuidado y mantenimiento .........................................................................................................
Solución de problemas .........................................................................................................................
Garantía ....................................................................................................................................
11
Instrucciones importantes de seguridad ...................................................................................11
11
Ensamblaje de la vara telescópica ...........................................................................................12
13
16
Uso de la vara telescópica ....................................................................................................... 15
16
16
CANTIDADDESCRIPCIÓNPIEZA
A
Vara telescópica 1
B
Vara telescópica 1
C
Vara telescópica 1
D
Vara telescópica 1
E
Vara telescópica 1
F
Vara telescópica 1
G
Boquilla con manguera 1
H Arnés
1
I Adaptador
1
A
B
C
D
E
F
G
H
I
11
www.surfacemaxx.com
INSTRUCCIONES IMPORTANTES DE SEGURIDAD
PREPARACIÓN
Mantenga la unidad al menos a 3,04 m de las líneas eléctricas. No toque el chorro ni lo apunte
hacia cableado eléctrico de ningún tipo.
No extienda ni retraiga la vara telescópica ni cambie las boquillas o los accesorios mientras rocía
o mientras la vara está bajo presión. Apague el equipo de lavado con agua a presión, corte el
suministro de agua, apunte la boquilla hacia una dirección segura y apriete el gatillo para liberar
la presión del agua antes de realizar cualquier cambio.
No use la vara telescópica mientras está en una escalera o un andamio.
Cuando utilice la vara telescópica en cualquier posición que no sea la completamente extendida,
asegúrese de que la manguera de alta presión esté ubicada de una manera en que no la pisen,
no cause tropiezos ni se someta a otro tipo de daños. Mantenga la manguera fuera del área de
trabajo.
No exceda la presión máxima indicada, el volumen o la temperatura que aparece en las
especificaciones del producto.
No retire ni altere ninguna etiqueta de advertencia incluida en la vara telescópica.
Antes de comenzar la operación, asegúrese de que el área en la que planea trabajar esté libre
de obstrucciones o peligros.
Mantenga un equilibrio y un control adecuados de la vara telescópica en todo momento.
Para minimizar el riesgo de contragolpes, sujete la vara telescópica firmemente con ambas
manos. Un agarre firme junto con un brazo rígido lo ayudará a mantener el control de la vara
telescópica si se produce un contragolpe.
Para disminuir el riesgo de lesiones, el usuario debe leer y entender este manual del operador,
además del manual del operador del equipo de lavado con agua a presión antes de usar este
producto. No seguir todas las instrucciones y precauciones puede provocar la muerte, lesiones
personales graves o daños materiales.
PELIGRO:
ADVERTENCIA:
ESPECIFICACIONES
COMPONENTE
Conexiones
Adaptador
Largo
Presión máxima
Temperatura de agua máxima
Flujo de agua máximo
Entrada M22, punta de conexión rápida de 1/4 pulg.,
puerto roscado para accesorios
Hembra M22 x conexión rápida macho de 3/8 pulg.
hasta 4200 PSI
ESPECIFICACIONES DEL PRODUCTO
1,21 m se extiende a 5,48 m
60 °C (140 °F)
30,28 LPM
Antes de ensamblar o poner en funcionamiento el producto, asegúrese de tener todas las piezas.
Compare las piezas con la lista del contenido del paquete. No intente ensamblar, instalar ni usar el
producto si falta alguna pieza o si estas están dañadas.
• Tiempo estimado de ensamblaje: 10 minutos
• Herramientas necesarias para el ensamblaje: Llave ajustable (no se incluye)
12
www.surfacemaxx.com
3
Contratuerca
a. Comenzando con la parte F, introduzca la
manguera en el extremo de empalme de la
sección E de vara más pequeña y pase la
manguera a través del tubo.
b. Inserte la sección E de la vara en la sección E
de la vara por completo hasta el fondo del
cabezal ajustable y luego presione la palanca
de bloqueo.
c. Introduzca la manguera en el extremo de
empalme de la sección D de la vara y pase la
manguera a través del tubo. Inserte la sección
D de la vara sobre la sección de la vara E
completamente y presione la palanca para
bloquearla.
d. Repita el paso anterior con el resto de las
secciones C, B y A.
2. Enrosque el conector de la manguera en la salida
de agua y apriételo en dirección de las manecillas
del reloj.
3. Fabricación giratoria y de empalme para ángulo
de 3 posiciones, ajustable en 20, 40 y 60 grados al
aflojar la contratuerca y deslizarla hacia la vara.
Una vez que esté en la posición deseada, deslice
la tuerca y apriétela.
1. Para ensamblar las 6 secciones de la vara telescópica:
ENSAMBLAJE DE LA VARA TELESCÓPICA
Desbloqueo
NOTA: Para facilitar el ensamblaje, coloque cada
sección de la vara en el suelo, de la más pequeña a
la más grande, antes de comenzar. Tenga cuidado
de no doblar la manguera durante el ensamblaje.
Asegúrese de que las palancas de bloqueo estén
desbloqueadas antes de ensamblar. Para
desbloquear, jale la palanca de bloqueo hacia
arriba en la base.
Consulte las figuras 1 y 3.
Bloqueo
Desbloqueo
Bloqueo
BloqueoDesbloqueo
1a-d
Manguera Palanca de bloqueo
E
Palanca de bloqueo
Palanca de bloqueo
Palanca de bloqueo
Palanca de bloqueo
F
Manguera
DE
Manguera
CD
Manguera
BC
Manguera
AB
2
Manguera
Salida de
agua
13
www.surfacemaxx.com
1a
1b
1c
1d
1e
USO DEL ARNÉS
Escoja el paso 2 para usuarios zurdos.
Coloque la correa acolchada sobre su hombro izquierdo.
Coloque el cinturón alrededor de la cintura y ajuste la hebilla.
La hebilla debe quedar contra el lado derecho del torso,
mirado desde arriba hacia abajo.
Ajuste la correa para dejar el cinturón a la altura deseada.
NOTA: Se recomienda que coloque el arnés entre la cintura
y el pecho. Esto otorgará mayor soporte y control cuando
utilice la vara.
Apriete el cinturón.
Ajuste el adaptador de la vara a la vara telescópica y conecte
la hebilla para sujetar el cinturón.
1. CÓMO USAR UN ARNÉS PARA USUARIOS DIESTROS.
Escoja el paso 1 para usuarios diestros.

14
www.surfacemaxx.com
2a
2b
2c
2d
2e
USO DEL ARNÉS
2. CÓMO USAR UN ARNÉS PARA USUARIOS ZURDOS.
Coloque la correa acolchada sobre su hombro derecho.
Coloque el cinturón alrededor de la cintura y ajuste la hebilla.
La hebilla debe quedar contra el lado derecho del torso,
mirado desde arriba hacia abajo.
Ajuste la correa para dejar el cinturón a la altura deseada.
NOTA: Se recomienda que coloque el arnés entre la cintura y
el pecho. Esto otorgará mayor soporte y control cuando utilice
la vara.
Apriete el cinturón.
Ajuste el adaptador de la vara a la vara telescópica y conecte
la hebilla para sujetar el cinturón.
Nota: Los operadores zurdos pueden dar vuelta el acolchado
para el hombro de la correa.
15
www.surfacemaxx.com
USO DE LA VARA TELESCÓPICA
1. El mango del gatillo cuenta con un botón de bloqueo
para evitar un uso involuntario. Para bloquear,
deslice el botón de bloqueo hacia el gatillo para que
aparezca el símbolo de bloqueo. Para desbloquear,
deslice el botón de bloqueo hacia fuera del gatillo
para que aparezca el símbolo de desbloqueo.
2. Conecte la manguera de alta presión del equipo de
lavado con agua a presión en el acoplador de
entrada de la vara telescópica.
3. La vara telescópica se puede utilizar retraída, extendida o en cualquier punto intermedio. Para
ajustar el largo de cualquiera de las varas, abra la palanca de bloqueo, mueva la vara al largo
deseado y cierre la palanca de bloqueo para asegurar.
4. Antes de intentar usar la vara telescópica en su proyecto, aléjese del área del proyecto y
extienda la vara al 50 % de su largo disponible. Apriete el gatillo para liberar vapor de agua de
modo que pueda sentir la forma en que funcionará la unidad durante el uso.
5. La vara telescópica producirá un contragolpe cuando se suelte el gatillo o se pierda la presión.
Antes de soltar el gatillo, mueva la boquilla a al menos 3,04 m de la superficie que se limpiará y
asegúrese de contar con un apoyo sólido
1
2
Manguera con
acoplador
roscado Manguera con
acoplador de
conexión rápida
Adaptador
de conexión
rápida
Dispositivo
de seguridad
Consulte las figuras 1 y 2.
Para reducir el riesgo de electrocución, posibles lesiones
personales graves o daños materiales, rocíe el chorro de
presión en una dirección segura lejos de todos los
dispositivos eléctricos y transeúntes. Asegúrese de que
todos los accesorios estén conectados correctamente
antes de iniciar cualquier proyecto de limpieza.
Compatible con la mayoría de los equipos de lavado con
agua a presión. Verifique que este accesorio sea
compatible y se ajuste bien antes de usarlo. Use lentes
o gafas de seguridad; no apunte a personas, mascotas,
dispositivos eléctricos. Apague el equipo de lavado con
agua a presión antes de cambiar o ajustar los accesorios.
Para uso con agua fría solamente. Solo para uso en
exteriores: almacene en interiores. Guarde estas
instrucciones. Consúltelas periódicamente y úselas para
instruir a otros usuarios. Si le facilita a alguien esta
herramienta, facilítele también estas instrucciones.
ADVERTENCIA:
No utilice boquillas giratorias cuando utilice la vara
telescópica. Las boquillas giratorias pueden aumentar
el riesgo de contragolpe y provocar posibles lesiones
personales graves.
ADVERTENCIA:
NOTA: Siempre active el bloqueo del gatillo antes
de mover o ajustar la vara telescópica.
NOTA: El acoplador de entrada en la vara telescópica
está diseñado para conectarse a un conector roscado
en la manguera de alta presión del equipo de lavado
con agua a presión. Si su manguera de alta presión
tiene un acoplador de conexión rápida en su lugar,
instale el adaptador provisto antes de conectarlo a la
vara telescópica.
NOTA: Nunca extienda completamente las varas. No extienda más allá de las líneas marcadas
en las varas. Esto permite que queden 10,16 cm de vara dentro de la siguiente sección para
ayudar a proporcionar estabilidad durante la operación.
16
www.surfacemaxx.com
GARANTÍA
El fabricante garantiza que este producto está libre de defectos en los materiales y la mano de obra
por dos (2) años a partir de la fecha de compra. Si dentro de este período un producto presenta
defectos en el material o la fabricación, se debe devolver el producto, junto con una copia del recibo
de venta como comprobante de compra, al fabricante. Esta garantía no cubre productos dañados
debido al mal uso, daño accidental, manipulación y/o instalación inadecuada y excluye toda
responsabilidad por daños directos, accidentales o resultantes. Algunos estados no permiten
exclusiones o limitaciones con respecto a cuánto dura una garantía, de modo que las exclusiones y
limitaciones anteriores pueden no aplicarse a usted. Esta garantía le otorga derechos específicos,
pero podría tener también otros derechos que varían según el estado. Para obtener el servicio de
garantía, llame al +1 (866) 870-9930, de lunes a viernes, de 9 a.m. a 5 p.m., hora estándar del Este.
GARANTÍA LIMITADA DE DOS AÑOS
Impreso en China
6. Ajuste la altura de la vara telescópica, según sea necesario, para que se adapte a los requisitos
de su proyecto.
7. Muévase al área del proyecto, levante la vara y apunto al área que desea limpiar. Apriete el
gatillo para comenzar a rociar.
8. Cuando coloque la vara en el suelo, asegúrese de colocarla en el suelo con cuidado para evitar
romper cualquiera de los componentes o accesorios de plástico.
SOLUCIÓN DE PROBLEMAS
PROBLEMA CAUSA POSIBLE ACCIÓN CORRECTIVA
Fuga de las
conexiones. 1. Suelte las conexiones. 1. Vuelva a apretar los conectores.
2. El sellador está desgastado.
2. Vuelva a aplicar cinta para tuberías.
3. La junta tórica está desgastada. 3. Reemplace la junta tórica.
La unidad no
rocía.
1. La alimentación de la unidad o el
suministro de agua está cortado.
1. Consulte el manual del propietario.
La sección de la
vara no
permanece en su
lugar. 2. El bloqueo de la palanca está
dañado.
1. El bloqueo de la palanca está
suelto. 1.
Intente apretar el tornillo hexagonal
en la palanca de bloqueo.
2. Reemplace el bloqueo de la
palanca.
2. La unidad está obstruida. 2. Enjuague la unidad con agua en
reversa.
USO DE LA VARA TELESCÓPICA
CUIDADO Y MANTENIMIENTO
• Si se pasa una solución de limpieza por la vara, pase solo agua por esta antes de apagarla.
• Despresurice la unidad apretando el gatillo de la pistola hasta que se haya drenado toda el agua.
La vara telescópica se flexionará a medida que se aumenta o disminuye la presión. Comprenda
completamente cómo se mueve la vara al aumentar o disminuir la presión antes de intentar iniciar
un proyecto de limpieza. Si no está del todo cómodo con el movimiento de la vara en condiciones
de presión cambiante, no use este producto. La pérdida de control de la vara telescópica podría
provocar lesiones personales graves.
ADVERTENCIA:
Extienda la vara telescópica solo lo necesario para el proyecto que está ejecutando y mantenga el
control absoluto de la vara telescópica en todo momento. La pérdida de control de la vara
telescópica podría provocar lesiones personales graves.
ADVERTENCIA:
This manual suits for next models
1
Table of contents
Languages:
Other SurfaceMaxx Cleaning Equipment manuals


Popular Cleaning Equipment manuals by other brands

Arcora
Arcora WD 22 P Use and maintenance

XtraLight
XtraLight UV-C MOBILE OPERATIONAL & MAINTENANCE GUIDE

Activa
Activa SmartMop user manual

Kärcher
Kärcher Inno-Foam-Set Original operating instructions

Uni-ram
Uni-ram UM10W user manual

Menzer
Menzer ESM 406 Floor Tec Translation of the original operating instructions


