manuals.online logo
Brands
  1. Home
  2. •
  3. Brands
  4. •
  5. Surveon
  6. •
  7. DVR
  8. •
  9. Surveon SMR2000 Series User manual

Surveon SMR2000 Series User manual

© by Surveon Technology, Inc. All rights reserved.
Only qualified service personnel should install and service this product in order to avoid risk of injury from
electrical shock and energy hazard.
Warning!
Observe all ESD (Electro-static Discharge) procedures during installation to avoid damage to the recorder
and its components.
Caution!
●Quick Installation Guide x1
●Product DVD x1 (including manuals)
●Power Cord x1
●HDD Screw x20 (SMR2000 series)
●HDD Screw x40 (SMR5000/8000 series)
●3.5" SATA Hard Drive (at least x2)
●Keyboard
●Mouse
●Monitor
Accessories User Provided Components Tools Required
Flat blade
screwdriver
Philips
screwdriver
Check list for Operating Environment
Before You Start
Users need to prepare the following devices to set up the surveillance system.
Note: The hard drives should be purchased separately.
NVR SMR series
IP Camera Network Cameras (such as Surveon CAM2320)
Network Existing LAN, Switch, Router or Hub (please see the Network Topology below)
Storage Hard Drives
SMR Series
QUICK INSTALLATION GUIDE
Check Network Topology
Make sure you have the right switch/hub for your environment. Either of the following options will work.
Note: For devices without DHCP Server function, please refer to the section “Configuring DHCP Service”
in SMR User Manual.
.
Existing LAN LAN Switch with DHCP Server
Common Topology
Office LAN
Router LAN Switch with built-in DHCP Server D-Link DIR-130
Switch/Hub No DHCP Server function (refer to the Note below) D-Link DES-1108
Reference Product
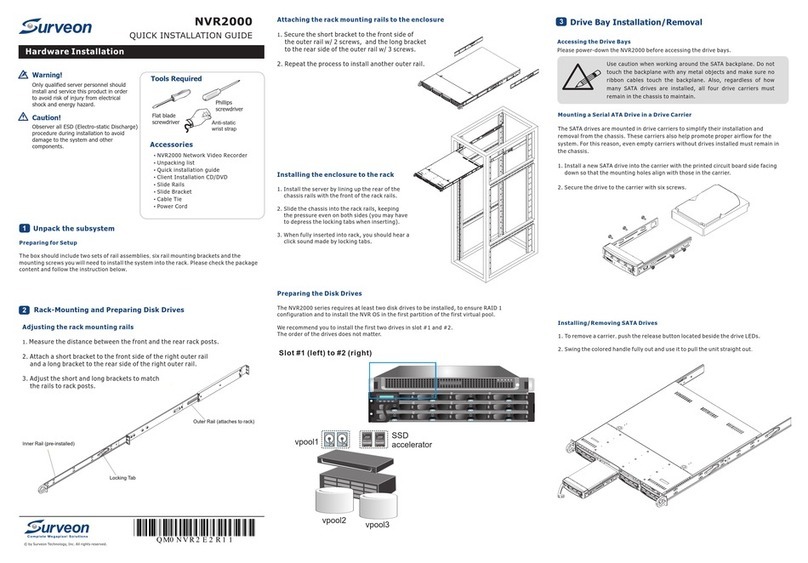
Hard Drive Installation
Hard Drive Installation Prerequisites
When purchasing hard drives, the following factors should be considered:
• Capacity: Use drives with the same capacity. (The maximum is 2TB for SMR2000/5000 series, and 3TB
for SMR8000 series.)
• Drive type: The system uses SATA interface 3.5-inch hard drives. Please ensure that you purchase the
correct hard drives.
Inserting Hard Drive into Drive Tray
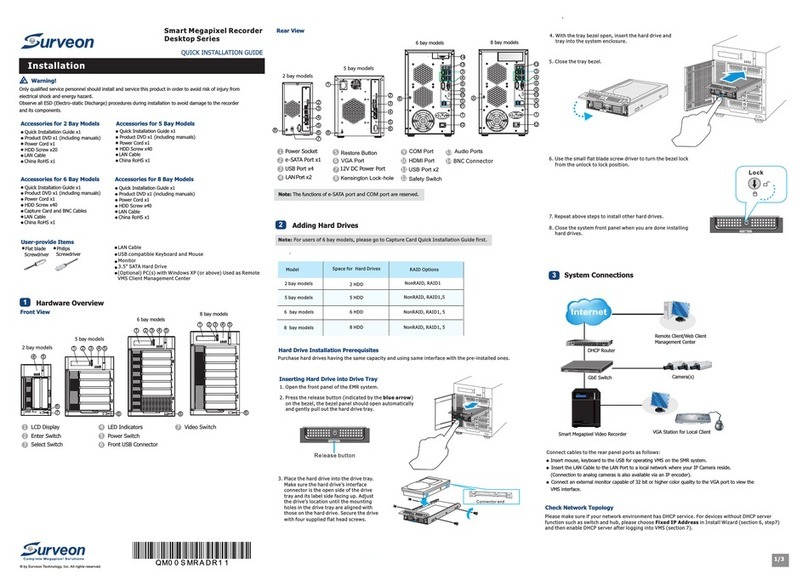
1. Open the front panel of the SMR system.
2. Press the release button (indicated by the blue arrow)
on the bezel, the bezel panel should open automatically
and gently pull out the hard drive tray.
3. Place the hard drive into the drive tray.
Make sure the hard drive’s interface
connector is facing the open side of the
drive tray and its label side facing up.
Adjust the drive’s location until the
mounting holes in the drive tray are aligned
with those on the hard drive. Secure the
drive with four supplied flat head screws.
System Diagram
SMR Series
IP Cameras
Analog Cameras
IP Encoder
VGA Management Station
& Live View
Remote Client
(Optional)
Note: Users can only use the upper LAN port.
USB Port
Upper
LAN Port
VGA Port
• Insert mouse, keyboard or other external devices to the USB port to operate
the Video Management Software (VMS).
• Insert the LAN cable to the upper LAN port to connect the SMR to a local
network where your IP cameras reside. (Connection to analog cameras is
also available via an IP encoder.)
• Connect an external monitor capable of 32bit or higher color quality to the
VGA Port to view the VMS interface.
•VMS/NVR – Local host for the SMR Server, which can not be changed.
•Username – The username for the domain, which is always admin.
•Password – The password for the domain. Default password is admin.
Cabling
The VMS Client will prompt for the following information after the SMR system is powered on:
Click Login after the password is entered.
Please turn over the page and continue the installation process.
Logging into SMR
6
LED Indicators
LCD Display Power Switch
1. Press the Power Switch.
2. See if the System LED is blinking, which means that the
system is starting up.
3. See if the Network LED has turned green, which indicates
that power is on and network is connected.
4. See if the HDD LED is on, which means that the hard drive
can be accessed.
5. The Server name and the IP address will be shown on the LCD
screen (SMR5000/8000 series).
Powering up SMR
5
VMS/NVR:
Username:
Password:
Auto Login
Login Shut Down
Local Host - 127.0.0.1
admin
Overview
Front View
SMR5000 Series
SMR8000 Series
1LCD Display
2Enter Switch
3Select Switch
4LED Indicators
5Power Switch
6
7
Front USB Connector
Video Back Up Button
SMR2000 Series
Rear View
SMR2000 Series
SMR5000 Series
SMR8000 Series
1Power Socket
2
3
4
5
6
2
3
4
3
4
1
5
5
6
6
9
10
11
12
13
7
4 5
1 2 3 4 5
1 2 3 4 5
88
8
1
2e-SATA Port x1
3USB Port x4
4
5
6VGA Port
7
8Kensington Lock-hole
9COM Port
10 HDMI Port
11
LAN Port(GbE Ethernet port) x2
Restore Button
12V DC Power Port
USB Port x2
12 Safety Switch
13 Audio Ports
Note: The function of Video Back Up Button is reserved.
6
6 6
7
4. With the tray bezel open, insert the hard drive and
tray into the system enclosure.
5. Close the tray bezel.
6. Use the small flat blade screwdriver to turn the bezel lock
from the unlock to lock position.
7. Repeat above steps to install other hard drives.
8. Close the system front panel when you are done installing hard drives.
Step4: Display Resolution
Step1: Install Wizard
Step2: Storage Manager
Step3: Initialize the System
Step5: Change Password
Step8: Add Cameras
Step6: Time Settings
Step7: Network Settings
Quick Install Wizard
Step7: Network Settings
SMR Server Name: SMR Server
SMR Server IP Address: Obtain IP Address from DHCP
Fixed IP Address
3. System initialization will start.
The system will shut down after the initialization is done successfully. Please click OK.
Press the power switch to restart the system. About 1.5 minutes later, the Wizard window will
pop again.
Step3: Initialize the System
Initialization System
Initialization will start automatically for enabling the system to achieve the best performance
Progress completed 2%
Step1: Install Wizard
Step2: Storage Manager
Step3: Initialize the System
7. Set an IP address for the SMR Server. Obtaining the IP address from DHCP is recommended.
8. Click Scan for Cameras to add cameras to the SMR server.
9. Click Finish to end the wizard.
10. The VMS will start automatically after the wizard is finished. Please refer to SMR User
Manual for more details.
The IP will change after the system is restarted. Click Next to continue.
The cameras that can be added to the Server will be displayed.
To add a camera to the system, check the box by the camera entry. You may also check the Select
All box at the bottom of the window to select all the cameras found.
Enter the username and password, and press Apply Selected. Click OK to add the selected
cameras to the Server.
Quick Install Wizard
Scan for Cameras
Status: Scan Complete
Select/Deselect All Username: Password:
Rescan
OK
Apply Selected
IP Camera Utility Cancel
Camera Name IP Address Username Password Vendor Model Status
CAM2321 New
New
New
Admin
Admin CAM2320
CAM2321
CAM2321
CAM2320
CAM2321
Mega-Pixel Network
CAM2321
New
IP8161
●●●●
●●●●
●●●●
●●●●
Admin
Admin
admin
●●●●172.18.6.57
172.18.6.147
172.18.6.159
172.18.6.164
If you want to keep using the default password, please tick Use old password.
Click Next to continue.
4. The recommended monitor resolution for the SMR is 1280x1024. Click Open Resolution Tool to
change the resolution setting.
Choose Single Display as the operating mode and Monitor as the display selection in
Primary Device. Change the screen resolution in Display Settings. Click OK to finish.
5. The default password for SMR login is admin. If you want to change the password, please
enter a new one in both the blanks of New Password and Confirm.
Click Next to continue.
Monitor
Display Devices Operating Mode
Display Selection
Single Display
Monitor
Display Settings
Intel®
Graphics Media
Accelerator Driver
Color Correction
Hot Keys
Primary Device
OK Cancel Apply
3D Settings
Scheme Options
Video Overlay
Video Settings
Display Settings
Intel®
Graphics Media
Accelerator Driver
Color Correction
Hot Keys
Display Devices
Monitor
3D Settings
Scheme Options
Video Overlay
Aspect Ratio Options
Advanced Settings
Video Settings
OK Cancel Apply
Rotation
Enable Rotation
Color Quality
Screen Resolution
Refresh Rate
Display Expansion
32 Bit
75 Hertz
1280 x1024
0°
180°
0°
0°
270°
90°
6. Choose the time zone and set the actual date and time for the SMR system.
Step4: Display Resolution
Step1: Install Wizard
Step2: Storage Manager
Step3: Initialize the System
Step5: Change Password
Step6: Time Settings
Quick Install Wizard
Step6: Time Settings
Time
Time Zone
Current System Time 2002-07-04 01:52:08
(UTC+08:00) Taipei
2011-11-01 01:51:09
Click Next to continue.
Quick Install Wizard
Step5: Change Password
Username:
New Password:
Confirm:
Use old password
Admin
Step4: Display Resolution
Step1: Install Wizard
Step2: Storage Manager
Step3: Initialize the System
Step5: Change Password
Step1: Install Wizard
Step2: Storage Manager
Step3: Initialize the System
Step5: Change Password
Step4: Display Resolution
Quick Install Wizard
Step4: Display Resolution
Choose at least 1280x1024 for an optimal View.
If the resolution is lower than 1280x1024, the screen may not be able to accommodate some of the items.
Display Settings 1280x1024 Open Resolution Tool
These are the RAID options for SMR models.
2
2
3
Minimum Hard Drives RAID Options Descriptions
RAID0 Provides no protection, but offers maximum capacity.
Provides best protection. Your data will be mirrored.
Provides protection against one drive failure.
RAID1
RAID5
Create Logical Drive
Please Wait... This might take several minutes.
Current progress 2%
Please click OK after the configuration is done, and the system will reboot automatically.
About 2 minutes later, the Wizard window will appear again. Click Next to continue.
Warning: All hard disk data will be erased.
Click Setting, choose the RAID level in the Advanced Settings dialogue, and then click Create
Logical Drive to create the RAID configuration.
Storage Manager
Storage Usage
Advanced Settings
Disk detention, join NOR Server allocation
Edit
Detail
Disk
Type
USB C -
-
3594
204
D
USB
Logical
Drive
RAID
Level Data Type Online
Used(100%)3.51GB Available(98%)923,66
Advanced Setting
Close
General
RAID
IP Storage
Logical Drive
0
1
0
Free Space
RAID Level
476950(MB)
Drive
Storage (MB)
OS APP
NO YES
YES
Enable Disable
Enable
Enable
Status
Normal
Normal
668
182
Available
Size (MB)
Close
Settings
2. Click Storage Manager to do RAID configuration.
Storage Manager
Advanced Settings
Step1: Install Wizard
Step2: Storage Manager
Please open storage manager to do RAID configuration for the disks installed.
1 Click”Setting”
2 Choose the RAID level, and then click”Create Logical Drive” to create the RAID configuration.
Step2: Storage Manager
Open the Storage Manager
Operating Steps Setting
12RAID Level Create Logical Drive
3
General
Storage Usage
2
Used(73.98%
Detail
lP Srorage
Close
Close
Setting
2626162(MB)
RAID
Free Space
RAID Level
Creat Logical Drive
1
3
Quick Install Wizard
Step4: Display Resolution
Step3: Initialize the System
Step5: Change Password
Step8: Add Cameras
Step6: Time Settings
Step7: Network Settings
When you run the SMR series for the first time, you need to go through the following steps
within the Quick Install Wizard after logging in.
1. Make sure the hard drives are inserted into the SMR case. Click Next to continue.
Install Wizard
7
Step1: Install Wizard
Step2: Storage Manager
Step8: Add Cameras
Step4: Display Resolution
Step3: Initialize the System
Step5: Change Password
Step6: Time Settings
Step7: Network Settings
Step8: Add Cameras
The ‘scan camera’ will add cameras into system into system automatically.
Operating Steps
OK
Select Cameras Enter Username and Password Apply Select OK
Quick Install Wizard
12 3
4
4
Select the cameras you want, enter the correct username and password, and the press Apply Selected.Click OK to add the
selected cameras to the Server.
Scan for camera
Username: Admin Password: ●●●●
Rescan
Apply Selected
IP Camera Utility
CAM2320
CAM2320
CAM6120
IP CAM
IP CAM
IP CAM
172.16.80.8
172.16.80.9
172.16.80.9
172.16.80.240
172.16.80199
Username
Admin
Admin
Admin
Admin
Admin
Admin
Password
●●●●
●●●●
●●●●
●●●●
●●●●
●●●●
Model
CAM2320
CAM2320
CAM6120
CAM2101
CAM4365
CAM2321
Status
New
New
New
New
New
New
Vendor
Scan for camera
Status: Scan Complete
Cancel
Select/Deselect All
CAM3260 172.16.80199 Admin ●●●● CAM3260
New
Camera Name IP Address
Username: Admin Password: ●●●● Apply Selected
2
Select/Deselect All
172.16.80.240
3
1
0
1
5
1

Other manuals for SMR2000 Series

1

This manual suits for next models

2

Other Surveon DVR manuals

Surveon NVR2100 Series User manual

Surveon

Surveon NVR2100 Series User manual

Surveon SMR8040U User manual

Surveon

Surveon SMR8040U User manual

Surveon SMR2000 Series Use and care manual

Surveon

Surveon SMR2000 Series Use and care manual

Surveon SMR5000 Series User manual

Surveon

Surveon SMR5000 Series User manual

Surveon NVR5316 User manual

Surveon

Surveon NVR5316 User manual

Surveon SMR Series User manual

Surveon

Surveon SMR Series User manual

Surveon SMR Series Use and care manual

Surveon

Surveon SMR Series Use and care manual

Surveon NVR2000 Series User manual

Surveon

Surveon NVR2000 Series User manual

Surveon SMR5016 User manual

Surveon

Surveon SMR5016 User manual

Surveon EMR2000 User manual

Surveon

Surveon EMR2000 User manual

Popular DVR manuals by other brands

Sound Devices PIX 260i user guide

Sound Devices

Sound Devices PIX 260i user guide

Axis 262+ user manual

Axis

Axis 262+ user manual

Philips DVR7100/75 user manual

Philips

Philips DVR7100/75 user manual

Vision VHD-400 Series user manual

Vision

Vision VHD-400 Series user manual

Vacron VDH-DXN578A Hardware manual

Vacron

Vacron VDH-DXN578A Hardware manual

Swann DVR4-5100 Easy setup guide

Swann

Swann DVR4-5100 Easy setup guide

Intellix AVR-4005 user manual

Intellix

Intellix AVR-4005 user manual

Dish Network Hopper with Sling quick start guide

Dish Network

Dish Network Hopper with Sling quick start guide

SeaViewer DVR-SD user manual

SeaViewer

SeaViewer DVR-SD user manual

Shenzhen Alersec Technology AL200-NVR Operating	 instruction

Shenzhen Alersec Technology

Shenzhen Alersec Technology AL200-NVR Operating instruction

Winic CW-AR505-8 quick start guide

Winic

Winic CW-AR505-8 quick start guide

Pace HDT8520 manual

Pace

Pace HDT8520 manual

Elgato EyeTV HD quick start guide

Elgato

Elgato EyeTV HD quick start guide

Novus NHDR-5304AHD user manual

Novus

Novus NHDR-5304AHD user manual

TALOS DR04 user manual

TALOS

TALOS DR04 user manual

Vacron VDH-DXC836 Hardware manual

Vacron

Vacron VDH-DXC836 Hardware manual

Philips DVDR3506/37B quick start guide

Philips

Philips DVDR3506/37B quick start guide

EchoStar HDT-610R Wi-Fi user guide

EchoStar

EchoStar HDT-610R Wi-Fi user guide

manuals.online logo
manuals.online logoBrands
  • About & Mission
  • Contact us
  • Privacy Policy
  • Terms and Conditions

Copyright 2025 Manuals.Online. All Rights Reserved.