manuals.online logo
Brands
  1. Home
  2. •
  3. Brands
  4. •
  5. Surveon
  6. •
  7. DVR
  8. •
  9. Surveon NVR2000 Series User manual

Surveon NVR2000 Series User manual

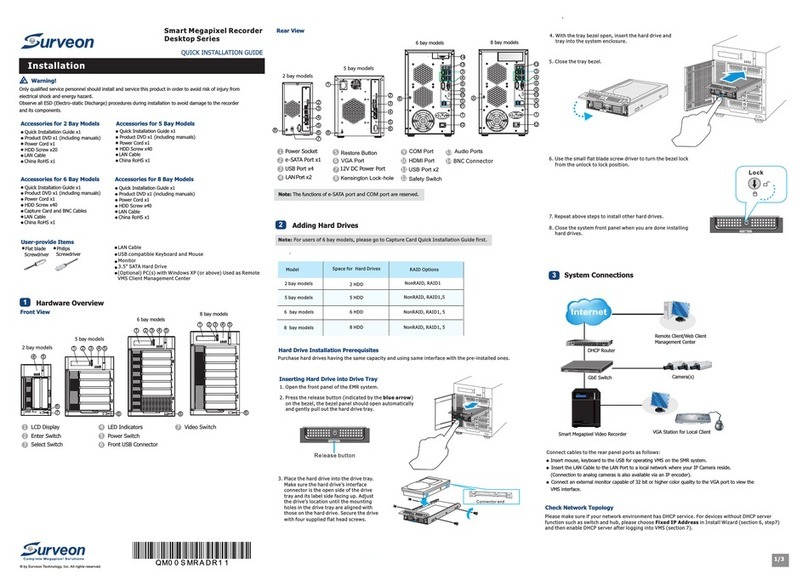
Hardware Installation
2Rack-Mounting and Preparing Disk Drives
Caution!
Warning!
Only qualified server personnel should
install and service this product in order
to avoid risk of injury from electrical
shock and energy hazard.
Observer all ESD (Electro-static Discharge)
procedure during installation to avoid
damage to the system and other
components.
•NVR2000 Network Video Recorder
•
•
•
•
•
•
•
Unpacking list
Quick installation guide
Client Installation CD/DVD
Slide Rails
Slide Bracket
Cable Tie
Power Cord
Tools Required
Accessories
Flat blade
screwdriver
Phillips
screwdriver
Anti-static
wrist strap
1. Measure the distance between the front and the rear rack posts.
2. Attach a short bracket to the front side of the right outer rail
and a long bracket to the rear side of the right outer rail.
3. Adjust the short and long brackets to match
the rails to rack posts.
Adjusting the rack mounting rails
1.
chassis rails with the front of the rack rails.
2. Slide the chassis into the rack rails, keeping
the pressure even on both sides (you may have
to depress the locking tabs when inserting).
3. When fully inserted into rack, you should hear a
click sound made by locking tabs.
Installing the enclosure to the rack
Install the server by lining up the rear of the
vpool2 vpool3
vpool1 SSD
accelerator
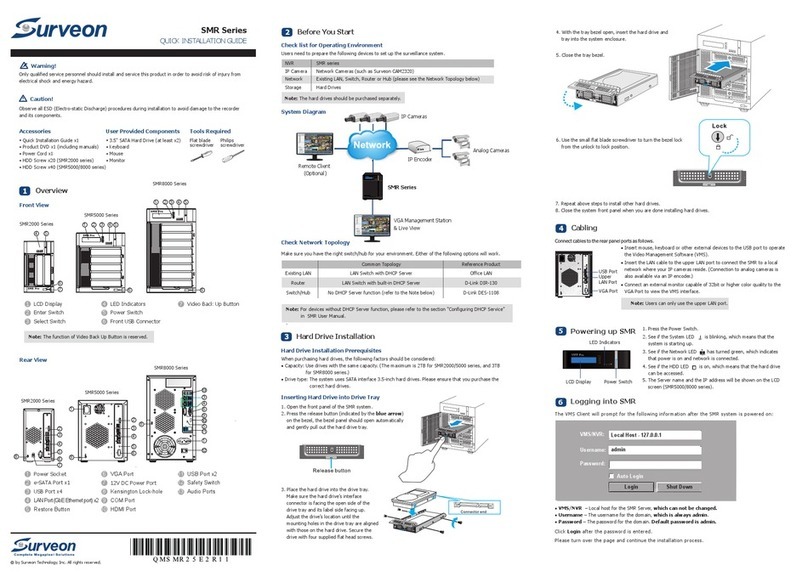
The NVR2000 series requires at least two disk drives to be installed, to ensure RAID 1
configuration and to install the NVR OS in the first partition of the first virtual pool.
We recommend you to install the first two drives in slot #1 and #2.
The order of the drives does not matter.
Preparing the Disk Drives
ESC ENT
PWR
BUSY
MUTE
ATTEN
Slot #1 (left) to #2 (right)
1
the outer rail w/ 2 screws, and the long bracket
to the rear side of the outer rail w/ 3 screws.
2. Repeat the process to install another outer rail.
Attaching the rack mounting rails to the enclosure
. Secure the short bracket to the front side of
Accessing the Drive Bays
Please power-down the NVR2000 before accessing the drive bays.
Drive Bay Installation/Removal
Mounting a Serial ATA Drive in a Drive Carrier
The SATA drives are mounted in drive carriers to simplify their installation and
removal from the chassis. These carriers also help promote proper airflow for the
system. For this reason, even empty carriers without drives installed must remain in
the chassis.
1. Install a new SATA drive into the carrier with the printed circuit board side facing
down so that the mounting holes align with those in the carrier.
2. Secure the drive to the carrier with six screws.
Use caution when working around the SATA backplane. Do not
touch the backplane with any metal objects and make sure no
ribbon cables touch the backplane. Also, regardless of how
many SATA drives are installed, all four drive carriers must
remain in the chassis to maintain.
!
3
Installing/Removing SATA Drives
1. To remove acarrier,push the release button located beside the drive LEDs.
2. Swing the colored handle fully out and use it to pull the unit straight out.
NVR2000
QUICK INSTALLATION GUIDE
Q M0 N V R 2 E 2 R 1 1
© by Surveon Technology, Inc. All rights reserved.
Preparing for Setup
The box should include two sets of rail assemblies,six rail mounting brackets and the
mounting screws you will need to install the system into the rack.Please check the package
content and follow the instruction below.
1Unpack the subsystem
Adding PCI HBA Card
The NVR2000 chassis can accommodate one full-size PCI-Express HBA add-on card with
the use of a riser card.
Installing aHBA Add-on Card (Optional)
1. After powering down the system,remove the PCI slot shield.
2. Fully seat the riser card into the slot,pushing down with your thumbs evenly on both sides
of the card.Seat the HBA card into the riser card.
3. Finish by using ascrew to secure the top of the card shield to the chassis.
The PCI slot shield protects the NVR2000 motherboard and its components from EMI and
aid in proper ventilation,so make sure it is always in place.
4
Cabling
I/O Ports
See the figures below for the colors and locations of the various I/O ports.
5
The USB, VGA, and keyboard ports are provided for local maintenance.
Control Panel
Mouse (green)
Keyboard
(purple) USB0/1 Ports COM1 Port
(Turquoise)
VGA Port
(Blue) LAN1/2 Ports
Slide the left end of the front cover into the chassis until the two pegs are seated in
the chassis wall.
While depressing the tab, insert the right end of the cover into the chassis.Release
the tab to lock the front cover into place.
2
Front Cover
1
2
1
Power button
Accessing the Inside of the System
1. Grasp the two handles on either side and pull the unit straight out until it locks (you will
hear a "click").
2. Depress the two buttons on the top of the chassis to release the top cover. There is a
large rectangular recess in the middle front of the top cover to help you push the cover
away from you until it stops.
3. Lift the top cover from the chassis to gain full access to the inside of the NVR2000.
SAS cable
COM1
COM2
BBU Status
S
A
S
S
A
S
CH0Link
CH1Link
HOST-CH0HOST-CH0 HOST-CH1 SAS Exp.
1.Ctrl Status
2.C_Dirty
3.Temp.
4.BBU Link
5.Hst Bsy
6.Drv Bsy
1
2
36
5
4
USB/Mouse/Keyboard
Power
LAN
Power On
Providing Power
1. lug the power cord from the power supply unit into a high-quality power strip that
offersprotection from electrical noise and power surges. It is recommended that you
use an uninterruptible power supply (UPS).
2. Depress the power button on the front of the chassis to power up the system.
P
6
Make the following connections:
LAN port:to connect the NVR2000 to the Internet
SAS cable: to connect the NVR2000 controller to the storage alley/enclosure
Power cable
(Optional) USB port: to connect external devices such as CD-ROM for recovery
(Optional) Mouse and Keyboard
n
n
n
n
n
Making Host Connections
Note:The port numbering sequence on HBA cards on the host computer should match
that on the RAID enclosure, e.g., HBA port0 to RAID ctrl CH0.

Other Surveon DVR manuals

Surveon SMR Series User manual

Surveon

Surveon SMR Series User manual

Surveon SMR8040U User manual

Surveon

Surveon SMR8040U User manual

Surveon NVR5316 User manual

Surveon

Surveon NVR5316 User manual

Surveon SMR5016 User manual

Surveon

Surveon SMR5016 User manual

Surveon NVR2100 Series User manual

Surveon

Surveon NVR2100 Series User manual

Surveon SMR Series Use and care manual

Surveon

Surveon SMR Series Use and care manual

Surveon SMR2000 Series Use and care manual

Surveon

Surveon SMR2000 Series Use and care manual

Surveon SMR5000 Series User manual

Surveon

Surveon SMR5000 Series User manual

Surveon EMR2000 User manual

Surveon

Surveon EMR2000 User manual

Surveon SMR2000 Series User manual

Surveon

Surveon SMR2000 Series User manual

Popular DVR manuals by other brands

Channel Master CM-7400 quick start guide

Channel Master

Channel Master CM-7400 quick start guide

EverFocus PARAGON 264x1 user manual

EverFocus

EverFocus PARAGON 264x1 user manual

Safety Basement SB-SG900F instruction manual

Safety Basement

Safety Basement SB-SG900F instruction manual

Kaltech DW-709 manual

Kaltech

Kaltech DW-709 manual

Digital Watchdog VMAX 480 quick start guide

Digital Watchdog

Digital Watchdog VMAX 480 quick start guide

Speco DxVS Series Quick setup guide

Speco

Speco DxVS Series Quick setup guide

AVer EH1116H-4 Nano user manual

AVer

AVer EH1116H-4 Nano user manual

EverFocus ECOR Series instruction manual

EverFocus

EverFocus ECOR Series instruction manual

GE Security VSR-300 user manual

GE Security

GE Security VSR-300 user manual

Lawmate PV-RC200HD Operation manual

Lawmate

Lawmate PV-RC200HD Operation manual

Ness H.264 HD-SDI user manual

Ness

Ness H.264 HD-SDI user manual

Daewoo DSD-9520 user guide

Daewoo

Daewoo DSD-9520 user guide

Ness Ultimate Premium H.264 user manual

Ness

Ness Ultimate Premium H.264 user manual

SuperTek PV-800 user manual

SuperTek

SuperTek PV-800 user manual

Radioarena JJVVPP--110000DDVVRR user manual

Radioarena

Radioarena JJVVPP--110000DDVVRR user manual

RMRC FPV1000 manual

RMRC

RMRC FPV1000 manual

2SAN AVS-2704C manual

2SAN

2SAN AVS-2704C manual

Speco D12LX operation instruction

Speco

Speco D12LX operation instruction

manuals.online logo
manuals.online logoBrands
  • About & Mission
  • Contact us
  • Privacy Policy
  • Terms and Conditions

Copyright 2025 Manuals.Online. All Rights Reserved.