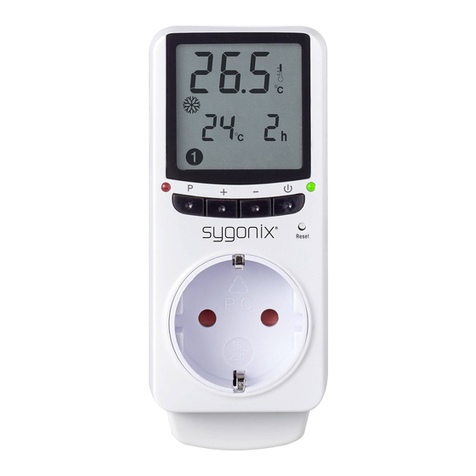
Sygonix 2353939 User manual

• Maintenance, modications and repairs must be carried out by a technician or
a specialist repair centre.
• If you have questions which remain unanswered by these operating instructions,
contact our technical support service or other technical personnel.
b) Installation/connection
Caution, safety hazard!
The product should only be installed by people with relevant electrical
knowledge and experience! *)
If it is not installed properly, you risk:
• your own life
• the life of user of the electrical device
If it is not installed properly, you risk severe damage to property, e.g. by re. You face
the risk of personal liability for personal injury and material damage.
Always consult an electrician!
*) Technical knowledge required to perform the installation:
The following specialist knowledge is required for installation in particular:
• The ‘Five safety rules’: Disconnect from the mains; secure against reactivation;
ensure dead; earth and short-circuit; cover or protect adjacent live parts
• Use of suitable tools, measuring devices and personal protective equipment,
where necessary
• Analysis of measurement results
• Use of electrical installation materials to meet the requirements for disconnection
• IP protection classes
• Installation of electrical installation materials
• Type of power supply (TN system, IT system, TT system) and the corresponding
connection criteria (classic earthing, protective earthing, requisite additional
measures etc.)
If you are not a professional, do not do it yourself, always have it carried out by
a specialist.
Further warnings:
• The design of the product corresponds to protection class II (double or reinforced
isolation). Ensure that the insulation of the housing is neither damaged nor
destroyed.
• During installation, all poles must be disconnected from the mains voltage, e.g. via
a RCD. There must be an appropriately dimensioned fuse or circuit breaker
between the RCD and the product.
• The device must be dead during installation and connection. Furthermore, turn
off the automatic circuit breaker and the RCD to disconnect all poles from the
mains voltage. Secure it against unauthorised reconnection, e.g. with a warning
sign. Check to make sure there is no voltage with a suitable measuring instrument
(e.g. a digital multimeter).
• Never connect the product to the power supply immediately after it has been
transferred from a cold environment into a warm environment (e.g. during
transport). The condensation that forms might destroy the device. Moreover, there
is risk of electric shock!
• Allow the product to reach room temperature. Wait until the condensation
has evaporated. In some cases, this may take several hours. Only once the
condensation has evaporated should it be installed, connected to the power
supply and put into use.
c) Protection class
• The product or its housing has protection class IP20 and is suitable for operation
in dry rooms and indoor use only.
• There is no protection against water, combustible gases or vapours.
Operating instructions
Digital programmable room thermostat with touch
panel
Item no. 2353939
Intended use
The heating thermostat is intended for temperature control in conjunction with an electric
heater. To operate the product, it must be connected directly to the mains voltage. A consumer
also operated via the mains power supply can then be connected to the product and switched
on or off by regulating the temperature.
It is equipped with an internal and external sensor (probe). The external sensor can be used to
measure the temperature at a different location to the thermostat, such as on the oor with an
electric oor heating system.
Button lock can be activated to protect against incorrect operation and the product is equipped
with memory storage to preserve data in case of power failure.
The product has protection class IP20 and is suitable for dry rooms and indoor use only.
Do not use it outdoors. Contact with moisture, e.g. in bathrooms, must be avoided under all
circumstances.
For safety and approval purposes, do not rebuild and/or modify this product. If you use
the product for purposes other than those described above, the product may be damaged.
In addition, improper use can result in short circuits, res, electric shocks or other hazards.
Read the instructions carefully and store them in a safe place. Always provide these operating
instructions when passing the product on to a third party.
This product complies with the statutory national and European requirements. All company and
product names contained herein are trademarks of their respective owners. All rights reserved.
Delivery content
• Thermostat
• 2x screws
• External sensor
• Operating instructions
Up-to-date operating instructions
Download the latest operating instructions at www.conrad.com/downloads or
scan the QR code shown. Follow the instructions on the website.
Description of symbols
The symbol with the lightning in a triangle indicates that there is a risk to your health,
e.g. due to an electric shock.
The symbol with an exclamation mark in a triangle is used to highlight important
information in these operating instructions. Always read this information carefully.
The arrow symbol indicates special information and tips on how to use the product.
This product must only be used in dry, enclosed indoor areas. The product must not
become damp or wet. Risk of life-threatening electric shock!
Safety information
Read the operating instructions and safety information carefully. If you do
not follow the safety information and information on proper handling in these
operating instructions, we will assume no liability for any resulting personal
injury or damage to property. Such cases will invalidate the warranty/
guarantee.
a) General information
• The device is not a toy. Keep it out of the reach of children and pets.
• Do not leave packaging material lying around carelessly. It may become
a dangerous plaything for children.
• Handle the product carefully. Jolts, impacts or a fall even from a low height may
damage the product.
• Protect the product from extreme temperatures, direct sunlight, strong jolts, high
humidity, moisture, ammable gases, vapours and solvents.
• Never expose the product to mechanical stress.
• If it is no longer possible to operate the product safely, stop using it and prevent
unauthorised use. Safe operation can no longer be guaranteed if the product:
- is visibly damaged,
- is no longer working properly,
- has been stored for extended periods in poor ambient conditions or
- has been subjected to any serious transport-related stress.
• Consult a technician if you are not sure how to use or connect the product, or if
you have concerns about safety.

Product description
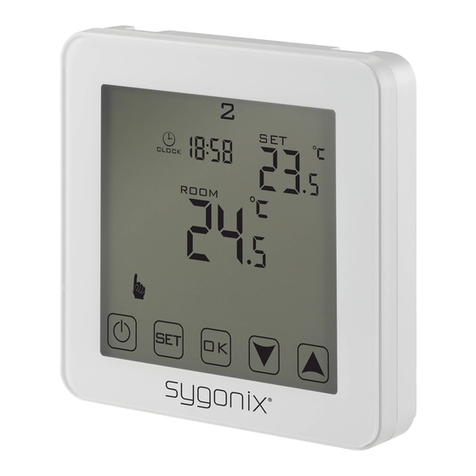
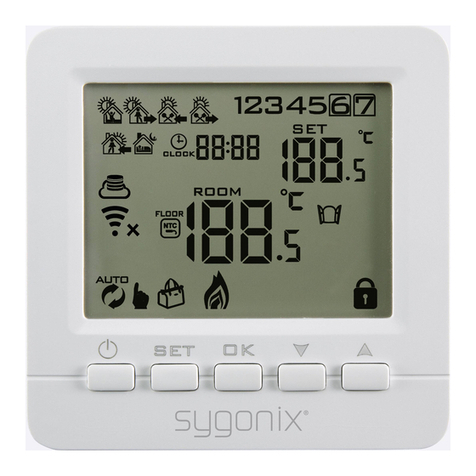
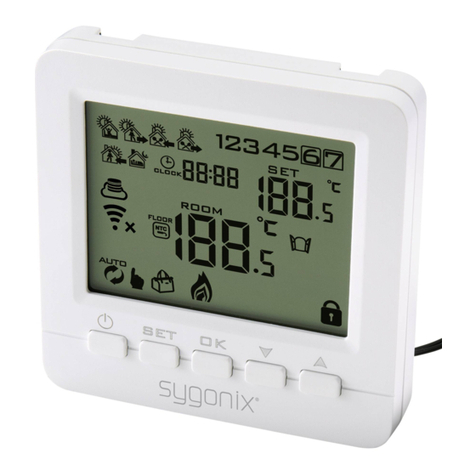
a) Display indicators and operating buttons
1 Holiday mode
2 Heating mode
3 Automatic mode
4 Target temperature setting
5 Measured temperature
Air = internal sensor, Floor = external
sensor
6 Time
7 Button lock
8 Time button
9 Mode button
10 On/off button
11 Up arrow button
12 Down arrow button
13 Day of the week
14 Program
15 Manual mode
b) Connections and fasteners
16
16
16 Front panel mount
17 Holes for fastening screws
18 Terminals
Installation
1. To remove the front panel, hold the rear panel of the thermostat and turn the front panel
anti-clockwise. The two parts are connected by cables.
2. There are six connection terminals (18) on the rear of the room thermostat: These are used
for connection of:
- The main power supply
- The electrical load (consumer)
- The external temperature sensor
3. Connect the neutral wire and phase of the power supply to inputs 3 and 4.
4. Connect the consumer (e.g. an electric radiator or electric oor heating) to the corresponding
outputs 1 and 2.
1
2
4
3
N
L
5
6
N
T
C
L
1
N
1
V
e
r
b
r
a
u
c
h
e
r
-
s
e
i
t
e
If the consumer requires a protective earth connection, it must be connected
separately. The thermostat complies with protection class II and does not by itself
require a protective earth connection.
5. If using an external temperature sensor, it should be connected to the side terminals 5 and
6. You do not have to observe polarity. You can connect the wires as desired.
When routing the connection cable, ensure that is protected from sharp edges.
Never fasten the connection cable with nails, screws or similar.
6. Insert the rear of the thermostat in the ush/surface box. Guide the enclosed fastening
screws through the holes (17) and screw the rear wall together.
Ensure that the cables are not damaged when inserting the wall thermostat into the
ush-mounted/surface-mounted box.
7. Insert the front panel into the mount (16) and turn it clockwise. It should audibly lock into
place.
8. Switch on the mains voltage.
The thermostat can now be operated.
Operation
a) Power on/off
To switch the thermostat on or off, proceed as follows:
• Press the on/off button (10) to switch the thermostat on or off.
• When the thermostat is switched off, the display goes out and no temperature control takes
place.
b) Activating/deactivating button lock
Button lock (child lock) prevents settings from being changed by accidental touch. To activate
and deactivate button lock, proceed as follows:
• To activate button lock, press and hold the down arrow button (12). The button lock symbol
(7) appears on the display and the buttons are locked.
• To deactivate button lock, press and hold the down arrow button (12) again. The button lock
symbol (7) disappears from the display and the buttons are released again.
Depending on the settings set in ‘System settings’ → ‘A5’, two child locks are
possible:
0 = All buttons except the on/off button are locked.
1 = All buttons are locked.
c) Setting the date and time
To set the date and time, proceed as follows:
1. Briey press the time button (8). The minute indicator starts to ash.
- Use the arrow buttons (11, 12) to adjust the value.
- Conrm your entry by briey pressing the time button (8) again.
2. After conrming the minute value, the hour indicator starts to ash.
- Use the arrow buttons (11, 12) to adjust the value.
- Conrm your entry by briey pressing the time button (8) again.
3. After conrming the hour value, the day of the week indicator (13) starts to ash.
- Use the arrow buttons (11, 12) to adjust the value (1 = Monday - 7 = Sunday).
- Conrm your entry by briey pressing the time button (8) again.
4. The settings are saved and the thermostat returns to normal operation.
d) Switching the temperature indicator
If an external sensor is connected, you can switch the temperature display (5) between the
internal sensor (‘Air’) and the external sensor (‘Floor’). Proceed as follows:
• Press and hold the down arrow button (12).
• Press and hold the down arrow button (12) again to switch the display back.
e) Switching between automatic and manual mode
To switch between automatic and manual mode, proceed as follows:
1. Briey press the mode button (9).
- Automatic mode: The symbol for manual mode (15) is displayed. The temperature
settings are based the active program preset.
- Manual mode: The symbol for manual mode (15) appears on the display. The temperature
can be set manually with the arrow buttons (11, 12).
f) Manually overriding automatic mode
To temporarily change the temperature set for automatic mode, proceed as follows:
1. Adjust the set target temperature with the arrow buttons (11, 12) . Both the automatic mode
(3) and manual mode (15) symbols appear on the display.
The manual override remains active until the automatic mode setting reaches the next time
interval. This means:
- The manual override is deactivated and the thermostat returns to automatic mode.
- The symbol for manual mode (15) is displayed.

g) Activating/deactivating holiday mode
Use holiday mode to set a time and temperature for the days you will be away.
To activate holiday mode, proceed as follows:
1. Press and hold the time button (8) for ve seconds until the holiday symbol (1) appears on
the display.
2. Select holiday mode.
- Use the arrow buttons (11, 12) to select ‘ON’.
- Conrm your entry by briey pressing the time button (8).
3. Set the number of days you will be away between 1 and 30.
- Apply the value with the arrow buttons (11, 12).
- Conrm your entry by briey pressing the time button (8).
4. Set the desired temperature.
- Apply the value with the arrow buttons (11, 12).
- Conrm your entry by briey pressing the time button (8).
The holiday symbol (1) continues to appear on the display to indicate that holiday
mode is active.
After the set duration has elapsed, holiday mode switches off automatically. To deactivate
holiday mode, proceed as follows:
1. Briey press the mode button (9) to deactivate holiday mode. The thermostat then returns
to manual or automatic mode.
h) Programming a weekly schedule
Overview
You can set your own temperature setting for six different time periods per day. A symbol
indicates which time period is active.
For example:
1: Wake up 2: Away 3: Home 4: Away 5: Home 6: Sleep
06:00 08:00 11:30 13:30 17:00 22:00
21°C 17°C 21°C 17°C 21°C 15°C
Setting the weekly cycle
For the weekly schedule, you can choose between different weekly cycles (number of
weekdays + weekend). To set the weekly cycle, proceed as follows:
1. If the thermostat is switched on: Press the on/off button (10) to switch the thermostat off.
2. Press and hold the mode button (9) for three to ve seconds. The settings menu opens.
3. Briey press the mode button (9) several times until the setting ‘AC’ is displayed.
4. Use the arrow buttons (11, 12) to select the desired weekly cycle.
0 = 5 days identical + 2 days identical (enabled by default)
1 = 6 days identical + 1 day individual
2 = 7 days identical
5. Press the on/off button (10) to save the setting and exit the setting menu.
Settings are also be saved if no buttons are pressed for approx. ten seconds.
Programming a schedule
To program the different time periods, proceed as follows:
1. If the thermostat is switched off: Press the on/off button (10) to switch the thermostat on.
2. Press and hold the mode button (9) for three to ve seconds. Programming mode opens
and the symbol for the rst time period ‘1: Wake up’ and the time start to ash.
- Use the arrow buttons (11, 12) to adjust the value.
- Conrm your entry by briey pressing the mode button (9).
3. After conrming the time, the temperature starts to ash.
- Use the arrow buttons (11, 12) to adjust the value.
- Conrm your entry by briey pressing the mode button (9).
4. After conrming the temperature, the symbol for the next time period starts to ash.
5. Repeat the procedure for all six time periods.
6. Wait approx. ten seconds without pressing any buttons to save the settings.
To activate or deactivate the programmed schedule, briey press the mode button
(9), see also section “e) Switching between automatic and manual mode”.
System settings
Adjusting system settings may cause your thermostat to behave unexpectedly.
Read all instructions carefully before adjusting any settings.
To open the settings menu and make changes, proceed as follows:
1. If the thermostat is switched on: Press the on/off button (10) to switch the thermostat off.
2. Press and hold the mode button (9) for three to ve seconds. The settings menu opens.
- To go to the next setting, press the mode button (9).
- To change the setting, select the desired value with the arrow buttons (11, 12).
3. Press the on/off button (10) to save the settings and exit the setting menu.
Settings are also be saved if no buttons are pressed for approx. ten seconds.
Code Descriptions Settings Default value
A1 Temperature calibration Setting range:
-9 to +9 °C
-1 °C
A2 Switching differential
(hysteresis)
Setting range:
0.5 to 2.5 °C
Example: For a setting of
1 °C and the thermostat
temperature set to 20 °C,
the thermostat will switch
heating on at 19 °C and
off at 21 °C.
1 °C
A3 High temperature
protection/difference
setting (external sensor)
Setting range: 1 to 9 °C
Example: The limit
value ‘A6’ is set to +45
°C and ‘A3’ to 2 °C. If
a temperature of +45
°C is reached, heating
mode is interrupted. If
the temperature drops to
+43 °C, heating mode is
resumed. This only works
if the indoor temperature
is lower than the target
temperature.
2 °C
A4 Sensor selection N1 = The internal sensor controls
the temperature.
N2 = The external sensor controls
the temperature.
N3 = The internal sensor controls
the temperature. If N3 is
activated, the external sensor
is used as the temperature
limiting sensor.
With all of the settings
above, if the maximum
temperature is reached,
heating mode is
interrupted.
N1
A5 Button lock 0 = All buttons except on/off are
locked
1 = All buttons are locked
0
A6 High temperature
protection
If the temperature measured by
the sensor rises above the value
set here, heating mode is stopped
automatically (e.g. serves as
overheating protection for underoor
heating).
Setting range: +20 to +70 °C
To deactivate this
function, press and hold
the down arrow button
(12) until ‘--’ appears on
the display.
+45 °C
A7 Low temperature
protection
If the temperature measured by
the sensor drops below the value
set here, heating mode is activated
automatically (e.g. serves as frost
protection).
Setting range: +1 to +10 °C
To deactivate this
function, press and hold
the up arrow button (11)
until ‘--’ appears on the
display.
+5 °C
A8 Minimum temperature Sets the lowest selectable
temperature value.
Setting range: +1 to +10 °C
5°C
A9 Maximum temperature Sets the highest selectable
temperature value.
Setting range: +20 to +70 °C
+35 °C
AA Descaling 0 = closed
1 = open
0

This is a publication by Conrad Electronic SE, Klaus-Conrad-Str. 1, D-92240 Hirschau (www.conrad.com).
All rights including translation reserved. Reproduction by any method, e.g. photocopy, microlming, or capture in electronic
data processing systems, requires the prior written approval of the publisher. Reprinting, also in part, is prohibited. This
publication reects the technical status at the time of printing.
Copyright 2021 by Conrad Electronic SE. *2353939_v1_0421_02_DS_m_5L_(1)
Code Descriptions Settings Default value
AB Behaviour after power
failure
0 = Return to previous function
1 = Switch off
2 = Switch on
0
AC Weekly cycle setting 0 = 5 days identical + 2 days
identical
(Mo - Fr + Sa - Su)
1 = 6 days identical + 1 day
individual
(Mo - Sa + Su)
2 = 7 days identical
(Mo - Su)
The correct day of the
week must be set for the
program to recognise the
start of the weekend. For
further information, see
“c) Setting the date and
time”.
0
AD Restore all settings to
factory defaults.
Press and hold the time button (8)
for three to ve seconds until all
elements on the display light up at
the same time. All system settings
are reset to the factory defaults.
Error codes
If the internal or external sensor is faulty, the display shows a corresponding error code and the
thermostat switches heating on until the fault is rectied.
Code Descriptions Suggestion
E1 Internal sensor
error
Switch the thermostat off and contact technical support service
or other technical personnel.
E2 External
sensor error
Check the external sensor connection.
Switch the thermostat off and contact technical support service
or other technical personnel.
Care and cleaning
Do not use any aggressive cleaning agents, rubbing alcohol or other chemical
solutions, as these may damage the housing or impair the functioning of the device.
• Use a dry, lint-free cloth to clean the front panel.
• To prevent scratch marks, do not press too strongly on the surface when cleaning.
Activate button lock when wiping the front panel. Accidentally pressing the buttons
can cause unintended settings.
Disposal
Electronic devices are recyclable waste and must not be placed in household waste.
At the end of its service life, dispose of the product according to the relevant statutory
regulations. Remove any inserted batteries and dispose of them separately from the
product.
You thus full your statutory obligations and contribute to environmental protection.
Specications
Input voltage ......................................... 90 - 240 V/AC, 50/60 Hz
Max. switching capacity ........................ 3000 W (ohmic load)
2000 W (inductive load)
Contact load .........................................16 A, 250 V
Adjustable standard range ....................+5 to +35 °C
Temperature display .............................0 to +40 °C
Display precision ..................................0.5 ºC
Sensor ..................................................1x internal, 1x external
External sensor .....................................NTC (10 k) 1 %
Protection class ....................................IP20
Operating conditions ............................. +1 to +70 ºC, <85 % relative humidity
Storage conditions ................................ +1 to +70 ºC, <85 % relative humidity
Dimensions (W x H x D) .......................94 x 94 x 41.3 mm
Display size ..........................................Ø 52 mm
Length of sensor cable .........................2.5 m
Weight ..................................................139 g

• Si une utilisation en toute sécurité ne peut plus être garantie, cessez d’utiliser le
produit et protégez-le contre toute utilisation accidentelle. Une utilisation en toute
sécurité n’est plus garantie si le produit :
- présente des traces de dommages visibles,
- ne fonctionne plus correctement,
- a été rangé dans des conditions inadéquates sur une longue durée, ou
- a été transporté dans des conditions très rudes.
• Adressez-vous à un technicien, si vous avez des doutes concernant le mode de
fonctionnement, la sécurité ou le branchement de l'appareil.
• Toute opération d’entretien, de réglage ou de réparation doit être effectuée par un
spécialiste ou un atelier spécialisé.
• Si vous avez encore des questions auxquelles ce mode d'emploi n'a pas su
répondre, nous vous prions de vous adresser à notre service technique ou à un
expert.
b) Installation/Raccordement
Attention, consigne importante !
L'installation et le branchement de ce produit ne doivent être effectués que par
des personnes ayant les connaissances et l'expérience pratiques nécessaires
pour la manipulation d'installations électriques ! *)
En cas d’installation incorrecte, vous risquez :
• votre propre vie
• la vie de celui qui met l'appareil électrique en service.
Une installation incorrecte peut générer de sérieux dommages matériels, causés par
un incendie, par exemple. Veuillez noter que vous pouvez être tenu personnellement
responsable en cas de dommages corporels et matériels.
Adressez-vous à un électricien qualié !
*) Connaissances techniques requises pour l’installation :
Pour l’installation, il faut en particulier disposer des connaissances techniques
suivantes :
• Les « 5 règles de sécurité » à appliquer : Mise hors tension ( isoler de l’alimentation
électrique) ; protéger contre la remise en service ; constater l'absence de tension
à tous les pôles ; mise à la terre et mise en court-circuit ; recouvrir ou délimiter les
pièces adjacentes sous tension.
• Utilisation d'outils, d'appareils de mesure et d'équipements de protection
individuelle appropriés, si nécessaire
• Évaluation des résultats de mesure
• Utilisation de matériel d'installation électrique pour garantir les conditions d'une
déconnexion sûre de l'alimentation électrique
• Classes de protection IP
• Montage de matériaux isolants électriques
• Type de réseau d’alimentation (système TN, système IT, système TT) et les
conditions de raccordement correspondantes (mise au neutre classique, mise à la
terre de protection, mesures complémentaires requises, etc.)
Si vous ne disposez pas de connaissances sufsantes dans l'un des domaines
mentionnés ci-dessus, vous devez absolument renoncer au montage et au
branchement indépendant et faire appel à un spécialiste.
Autres avertissements :
• Le produit est un appareil de classe de protection II (isolation renforcée ou double).
Il est important de veiller à ce que l’isolation du boîtier ne soit pas endommagée
ni détruite.
• Avant le montage, tous les pôles doivent être déconnectée de la tension secteur,
par exemple par un dispositif à courant résiduel. Entre le dispositif à courant
résiduel et le produit, il faut prévoir un fusible ou un disjoncteur dimensionné en
conséquence.
• Le raccordement et le montage doivent être effectués uniquement hors tension.
Pour ce faire, désactivez le disjoncteur de sécurité et le disjoncteur de courant
résiduel, ce qui permet de débrancher ou de mettre hors tension tous les pôles
de la tension secteur. Assurez-vous qu'ils ne puissent être remis en marche de
manière intempestive, mettez par exemple un panneau avertisseur. Contrôlez
ensuite l’absence de tension à l’aide d’un instrument de mesure approprié (p. ex.
un multimètre numérique).
• Ne branchez pas le produit à l’alimentation électrique immédiatement après l’avoir
transporté d'un environnement froid à un environnement chaud (par ex. pendant le
transport). L’eau de condensation qui en résulte pourrait éventuellement détruire
l’appareil. Il existe en outre un risque de décharge électrique !
• Attendez d´abord que le produit ait atteint la température ambiante au préalable
avant de le brancher. Attendez que l’eau s'évapore à nouveau. Cela peut
prendre plusieurs heures. Ce n’est qu’ensuite que l’appareil est monté, raccordé
à l’alimentation électrique et mis en service.
c) Indice de protection
• Le produit ou son boîtier est conforme à l'indice de protection IP20 et convient
uniquement pour un fonctionnement dans une zone intérieure sèche.
• Il n'y a pas de protection contre l'eau, les gaz inammables et les vapeurs
Mode d’emploi
Thermostat d’ambiance numérique programmable
avec panneau tactile
N° de commande 2353939
Utilisation prévue
Ce produit est un thermostat de chauffage conçu pour la régulation de la température en
association avec un chauffage électrique. Pour mettre le produit en service, il doit être branché
directement à la tension du secteur. Un consommateur fonctionnant également via le secteur
peut ensuite être connecté à celui-ci et activé ou désactivé en régulant la température.
Le thermostat de chauffage est équipé d'un capteur interne et d'un capteur externe (sonde).
Le capteur externe est conçu pour mesurer la température dans un endroit différent de celui du
thermostat, par exemple au sol en cas de chauffage électrique au sol.
Le produit dispose également d'un verrouillage des touches qui peut être activé pour protéger
contre les erreurs de manipulation et d'une mémoire pour sauvegarder les données en cas de
panne de courant.
Le produit est conforme à la classe de protection IP20 et convient uniquement pour un
montage dans un intérieur sec. Ne l’utilisez pas en plein air. Évitez impérativement tout contact
avec l'humidité, par ex. dans la salle de bains, etc.
Pour des raisons de sécurité et d’homologation, toute transformation et/ou modication du
produit est interdite. Toute utilisation à des ns autres que celles décrites ci-dessus pourrait
endommager le produit. En plus, une utilisation incorrecte peut générer des risques comme par
ex. un court-circuit, un incendie, une électrocution, etc. Lisez attentivement le mode d’emploi
et conservez-le dans un endroit sûr. Ne remettez le produit à un tiers qu’accompagné de son
mode d’emploi.
Le produit est conforme aux exigences des directives européennes et nationales en vigueur.
Tous les noms d’entreprises et appellations de produits contenus dans ce mode d’emploi sont
des marques déposées de leurs propriétaires respectifs. Tous droits réservés.
Contenu d’emballage
• Thermostat
• 2 vis
• Capteur externe
• Mode d'emploi
Modes d'emploi actuels
Téléchargez les modes d’emploi actualisés via le lien www.conrad.
com/downloads ou scannez le Code QR illustré. Suivez les instructions
disponibles sur le site Internet.
Explication des symboles
Le symbole de l’éclair dans un triangle indique un risque pour votre santé, par ex. un
risque d'électrocution.
Le symbole du point d’exclamation dans un triangle attire l’attention sur les
consignes importantes du mode d’emploi à respecter impérativement.
Le symbole de la èche précède les conseils et remarques spéciques à l’utilisation.
L'appareil ne peut être utilisé que dans des locaux secs et fermés. Il convient de
préserver l’appareil de l’eau et de l’humidité. Dans le cas contraire, vous courez un
danger de mort par électrocution !
Consignes de sécurité
Lisez attentivement le mode d’emploi dans son intégralité, en étant
particulièrement attentif aux consignes de sécurité. Nous déclinons toute
responsabilité en cas de dommage corporel ou matériel résultant du non-
respect des consignes de sécurité et des instructions d’utilisation de ce mode
d’emploi. En outre, la garantie est annulée dans de tels cas.
a) Généralités
• Ce produit n’est pas un jouet. Gardez-la hors de portée des enfants et des
animaux domestiques.
• Ne laissez pas traîner le matériel d’emballage. Cela pourrait constituer un jouet
très dangereux pour les enfants.
• Manipulez le produit avec précaution. Les chocs, les coups et les chutes, même
d’une faible hauteur, sufsent pour endommager l’appareil.
• Le produit ne doit pas être exposé à des températures extrêmes, à la lumière
directe du soleil, à des secousses intenses, à une humidité élevée, à l’eau, à des
gaz inammables, à des vapeurs et à des solvants.
• N’exposez pas le produit à des contraintes mécaniques.
Description du produit
a) Afchages et touches de commande
1 Mode vacances
2 Mode réchauffage
3 Fonctionnement automatique
4 Réglage de la température de consigne
5 Température mesurée
Air = sonde interne, Floor = sonde externe
6 Horloge
7 Verrouillage des touches
8 Touche Heure
9 Touche Mode
10 Touche Marche/Arrêt
11 Touche Flèche vers le haut
12 Touche Flèche vers le bas
13 Jour de la semaine
14 Programme
15 Fonctionnement manuel
b) Connexions et éléments de xation
16
16
16 Montage du panneau avant
17 Perçages pour vis de xation
18 Bornes de raccordement
Installation
1. Pour retirer le panneau avant, maintenez la paroi arrière du thermostat et tournez le
panneau avant dans le sens inverse des aiguilles d'une montre. Les deux parties sont
reliées par un câble.
2. Il y a six bornes de raccordement à l’arrière du thermostat mural (18) : Ils servent à la
connexion :
- de l'alimentation principale
- de la charge électrique (consommateur)
- du capteur de température externe
3. Branchez le conducteur neutre et la phase de l’alimentation aux entrées 3 et 4.
4. Branchez le consommateur (par ex. un radiateur électrique ou un chauffage au sol
électrique) sur les sorties 1 et 2 correspondantes.
1
2
4
3
N
L
5
6
N
T
C
L
1
N
1
V
e
r
b
r
a
u
c
h
e
r
-
s
e
i
t
e
Si le consommateur prévoit un raccordement à un conducteur de protection,
installez-le séparément. Le thermostat lui-même est un appareil de classe de
protection II et, en tant que tel, il ne doit pas être raccordé à un conducteur de terre.
5. Si vous souhaitez également utiliser un capteur de température externe, il doit être raccordé
aux bornes latérales 5 et 6. Il n'est pas nécessaire de respecter la polarité. Vous pouvez
brancher les ls comme vous le souhaitez.
Lors de la pose des câbles de connexion, veillez à ce qu’ils ne soient pas
endommagés par des bords tranchants. N'utilisez jamais de clous, de vis ou
d'autres éléments similaires pour xer les câbles.
6. Insérez le panneau arrière du thermostat dans le boîtier encastré ou en saillie. Insérez les
vis de xation fournies dans les trous prévus à cet effet (17) et vissez le panneau arrière.
Veillez à ce que les câbles ne soient pas endommagés lorsque vous insérez le
thermostat mural dans le boîtier encastré ou en saillie.
7. Placez le panneau avant dans le logement (16) et tournez-le dans le sens des aiguilles
d'une montre. Il doit s’enclencher en position de manière audible.
8. Remettre sous tension.
Le thermostat peut de nouveau être mis en service.
Fonctionnement
a) Marche/arrêt
Procédez comme suit pour allumer ou éteindre le thermostat :
• Appuyez sur la touche marche/arrêt (10) pour allumer ou éteindre le thermostat.
• Lorsque le thermostat est éteint, l’écran s'éteint et le contrôle de la température cesse de
fonctionner.
b) Verrouillage/déverrouillage des touches
Le verrouillage des touches (sécurité enfant) vous permet d'éviter de modier les réglages
accidentellement. Procédez comme suit pour activer ou désactiver le verrouillage des touches :
• Pour activer le verrouillage des touches, maintenez la touche Flèche vers le bas (12) en-
foncée. Le symbole de verrouillage des touches (7) apparaît à l'écran et les touches sont
verrouillées.
• Pour désactiver le verrouillage des touches, maintenez à nouveau la touche Flèche vers
le bas (12) enfoncée. L'icône de verrouillage des touches (7) disparaît et les touches sont
à nouveau activées.
Selon les réglages dénis dans la section « Paramètres système » → « A5 », deux
sécurités enfant différentes sont disponibles :
0 = toutes les touches sont verrouillées, sauf la touche marche/arrêt.
1 = toutes les touches sont verrouillées.
c) Réglage de la date et de l’heure
Procédez comme suit pour dénir l'adresse date et l’heure :
1. Appuyez brièvement sur la touche Heure (8). L'afchage des minutes commence à clignoter.
- Utilisez les touches échées (11,12) pour régler la valeur.
- Conrmez la saisie en appuyant brièvement de nouveau sur la touche Heure (8).
2. Après avoir conrmé la valeur des minutes, l'afchage des heures commence à clignoter.
- Utilisez les touches échées (11,12) pour régler la valeur.
- Conrmez la saisie en appuyant brièvement de nouveau sur la touche Heure (8).
3. Après avoir conrmé la valeur des heures, l'afchage du jour de la semaine (13) commence
à clignoter.
- Utilisez les touches échées (11,12) pour ajuster la valeur (1 = lundi...7 = dimanche).
- Conrmez la saisie en appuyant brièvement de nouveau sur la touche Heure (8).
4. Les réglages sont enregistrés et le thermostat reprend son fonctionnement normal.
d) Commutation de l'afchage de la température
Si un capteur externe est connecté, vous pouvez basculer l'afchage de la température (5)
entre le capteur interne (« Air ») et le capteur externe (« Floor »). Pour ce faire, procédez
comme suit :
• Maintenez la touche Flèche vers le bas (12) appuyée.
• Maintenez à nouveau la touche èche vers le bas (12) enfoncée pour revenir à l'afchage.
e) Basculement entre les modes automatique et manuel
Procédez comme suit pour passer du mode automatique au mode manuel :
1. Appuyez brièvement sur la touche Mode (9).
- Mode automatique : L'icône de mode manuel (15) est masquée. La régulation de la
température dépend des réglages dénis pour le programme actif.
- Mode manuel : Le symbole du mode manuel (15) apparaît à l'écran. La température peut
être réglée manuellement à l'aide des touches échées (11,12) .
f) Contournement manuel du mode automatique
Procédez comme suit pour modier temporairement la température dénie pour le mode
automatique :
1. Réglez la température de consigne à l'aide des touches échées (11,12) . L'écran afche
alors simultanément les symboles du mode automatique (3) et du mode manuel (15).

Les réglages effectués par la commande manuelle sont conservés jusqu'au début de
l'intervalle de temps suivant. Ceci signie :
- La commande manuelle est désactivée et le thermostat revient en mode automatique.
- L'icône de mode manuel (15) disparaît.
g) Activation / Désactivation du mode vacances
Utilisez le mode vacances pour dénir des intervalles de temps et des températures
spéciques pour les jours où vous n'êtes pas chez vous.
Procédez comme suit pour activer le mode vacances :
1. Maintenez enfoncée la touche Heure (8) pendant trois à cinq secondes jusqu'à ce que le
symbole vacances (1) apparaisse à l'écran.
2. Choisissez le mode vacances.
- Utilisez les touches échées (11,12) pour sélectionner le paramètre « ON ».
- Conrmez la saisie en appuyant brièvement sur la touche Heure (8).
3. Dénissez une valeur comprise entre « 1 et 30 » pour le nombre de jours pendant lesquels
vous ne serez pas chez vous.
- Réglez la valeur à l'aide des touches (11,12) .
- Conrmez la saisie en appuyant brièvement sur la touche Heure (8).
4. Réglez la température souhaitée.
- Réglez la valeur à l'aide des touches (11,12) .
- Conrmez la saisie en appuyant brièvement sur la touche Heure (8).
Le symbole vacances (1) reste alors afché à l'écran et indique que le mode
vacances est activé.
Après le déroulement de la durée programmée, le mode vacances s’éteint automatiquement.
Procédez comme suit pour désactiver le mode vacances :
1. Appuyez brièvement sur la touche Mode (9) pour désactiver le mode vacances.
Le thermostat revient alors en mode manuel ou automatique.
h) Programmation des horaires hebdomadaires
Aperçu
Vous avez la possibilité de dénir votre propre réglage de la température pour six périodes
différentes par jour. L'une des périodes actuellement activées est indiquée par un symbole
correspondant.
Un exemple :
1 : Réveil 2 : Hors de la
maison
3 : À la
maison
4 : Hors de la
maison
5 : À la
maison
6 : Nuit de
sommeil
06:00 08:00 11:30 13:30 17:00 22:00
21 °C 17 °C 21 °C 17 °C 21 °C 15 °C
Réglage du cycle hebdomadaire
Pour le programme hebdomadaire, vous pouvez choisir entre différents cycles hebdomadaires
(nombre de jours de la semaine + week-end). Procédez comme suit pour régler le cycle
hebdomadaire :
1. Lorsque le thermostat est allumé : Appuyez sur la marche/arrêt (10), pour éteindre le
thermostat.
2. Maintenez la touche Mode (9) enfoncée pendant trois à cinq secondes. Le menu de
conguration s'ouvre.
3. Appuyez plusieurs fois brièvement sur la touche Mode (9) jusqu´à ce que le réglage « AC »
s’afche.
4. À l'aide des touches échées (11,12)., sélectionnez le cycle hebdomadaire souhaité.
0 = 5 jours identiques + 2 jours identiques (activé par défaut)
1 = 6 jours identiques + 1 jour individuel
2 = 7 jours identiques
5. Appuyez de nouveau sur la touche marche/arrêt (10) pour enregistrer le réglage et quitter
le menu de réglage.
Les réglages sont alors enregistrés même si aucune touche n'est actionnée pendant
environ 10 secondes.
Programmation d’un horaire
Procédez comme suit pour programmer les différentes périodes :
1. Lorsque le thermostat est éteint : Appuyez sur la touche marche/arrêt (10) pour allumer
l’appareil.
2. Maintenez la touche Mode (9) enfoncée pendant trois à cinq secondes. Le mode de
programmation s'ouvre et l'écran afche le symbole de la première période « 1 : Réveil » et
l'heure commencent à clignoter.
- Utilisez les touches échées (11,12) pour régler la valeur.
- Conrmez la saisie en appuyant brièvement sur la touche mode (9).
3. Une fois l'heure conrmée, la température commence à clignoter.
- Utilisez les touches échées (11,12) pour régler la valeur.
- Conrmez la saisie en appuyant brièvement sur la touche mode (9).
4. Une fois la température conrmée, le symbole de la période suivante commence à clignoter.
5. Répétez la procédure pour les six périodes.
6. Attendez environ 10 secondes sans appuyer sur les touches pour mémoriser les réglages.
Pour activer ou désactiver l’horaire programmé, appuyez brièvement sur la touche
mode (9), voir également la section “e) Basculement entre les modes automatique
et manuel”.
Réglages du système
Un réglage des paramètres du système peut empêcher le thermostat de fonctionner
correctement. Lisez donc attentivement toutes les instructions avant de les modier.
Pour ouvrir le menu de conguration et effectuer des modications, procédez comme suit :
1. Lorsque le thermostat est allumé : Appuyez sur la marche/arrêt (10), pour éteindre le
thermostat.
2. Maintenez la touche Mode (9) enfoncée pendant trois à cinq secondes. Le menu de
conguration s'ouvre.
- Pour passer au réglage suivant, appuyez sur la touche Mode (9).
- Pour modier le réglage, sélectionnez la valeur souhaitée à l'aide des touches échées
(11,12).
3. Appuyez de nouveau sur la touche marche/arrêt (10) pour enregistrer les réglages et quitter
le menu de conguration.
Les réglages sont alors enregistrés même si aucune touche n'est actionnée pendant
environ 10 secondes.
Code Description Paramètres Valeur par
défaut
A1 Étalonnage de la
température
Plage de réglage :
-9 à +9 °C
-1 °C
A2 Différentiel de
commutation
(hystérésis)
Plage de réglage :
0,5 à 2,5 °C
Exemple : Avec un
réglage de 1 °C et
une température de
+20 °C mesurée par le
thermostat, le thermostat
allume le chauffage
à +19 °C et l’éteint à
+21 °C.
1 °C
A3 Protection haute
température/réglage
différentiel (capteur
externe)
Plage de réglage : 1 à 9 °C
Exemple : La valeur
limite « A6 » est réglée
à +45 °C et « A3 » à
2 °C. Si une température
de +45 °C est atteinte,
le fonctionnement du
chauffage est interrompu.
Si la température chute
à +43 °C, le chauffage
reprend. Cela ne
fonctionne que si la
température à l’intérieur
est inférieure à la
température de consigne.
2 °C
A4 Sélection du capteur N1 = la température est contrôlée
par le capteur interne.
N2 = la température est contrôlée
par le capteur externe.
N3 = la température est contrôlée
par le capteur interne. Lorsque
N3 est activé, le capteur
externe est utilisé comme
capteur pour la limitation de la
température.
Tous les réglages
ci-dessus prévoient
d'interrompre le
fonctionnement du
chauffage lorsque la
température maximale est
atteinte.
N1
A5 Verrouillage des touches 0 = toutes les touches sauf marche/
arrêt sont verrouillées
1 = toutes les touches sont
verrouillées.
0

Ceci est une publication de Conrad Electronic SE, Klaus-Conrad-Str. 1, D-92240 Hirschau (www.conrad.com).
Tous droits réservés, y compris ceux de traduction. Toute reproduction, quelle qu'elle soit (p. ex. photocopie, microlm,
saisie dans des installations de traitement de données) nécessite une autorisation écrite de l'éditeur. Toute réimpression,
même par extraits, est interdite. Cette publication correspond au niveau technique du moment de la mise sous presse.
Copyright 2021 by Conrad Electronic SE. *2353939_v1_0421_02_DS_m_5L_(1)
Code Description Paramètres Valeur par
défaut
A6 Protection haute
température
Si la température mesurée par
le capteur dépasse la valeur
dénie ici, le chauffage s'arrête
automatiquement (par exemple,
il sert de protection contre la
surchauffe du chauffage au sol).
Plage de réglage : +20 à +70 °C
Pour désactiver cette
fonction, maintenez la
touche Flèche vers le bas
(12) enfoncée jusqu'à ce
que l'écran afche « -- ».
45 °C
A7 Protection contre les
basses températures
Si la température mesurée par le
capteur chute en dessous de la
valeur dénie ici, le chauffage est
automatiquement déclenché (sert
par exemple de protection contre
le gel).
Plage de réglage : +1 à +10 °C
Pour désactiver cette
fonction, maintenez
la touche Flèche vers
le haut (11) enfoncée
jusqu'à ce que « -- »
s'afche à l'écran.
+ 5 °C
A8 Température minimale Dénit la valeur de température
minimale sélectionnable
Plage de réglage : +1 à +10 °C
+ 5 °C
A9 Température maximale Dénit la valeur de température
maximale sélectionnable
Plage de réglage : +20 à +70 °C
+ 35 °C
AA Détartrage 0 = fermé
1 = ouvert
0
AB Comportement après
une panne de courant
0 = retour à la fonction précédente
1 = mise hors tension
2 = mise sous tension
0
CA Réglage du cycle
hebdomadaire
0 = 5 jours identiques + 2 jours
identiques (lun-ven + sam-dim)
1 = 6 jours identiques + 1 jour
individuel (lun-sam. + dim)
2 = 7 jours identiques
(lun-dim)
Pour que le programme
détecte le début du
week-end, le bon jour de
la semaine doit être réglé.
Référez-vous au chapitre
“c) Réglage de la date et
de l’heure”
pour plus d'informations.
0
AD Rétablir les réglages
d'usine
Maintenez la touche Heure (8)
enfoncée pendant trois à cinq
secondes jusqu'à ce que tous les
éléments de l'écran s'allument
simultanément. Cette opération
réinitialise tous les paramètres du
système aux valeurs par défaut en
l'usine.
Codes d'erreur
Si le capteur interne ou externe présente un dysfonctionnement, un code d'erreur correspondant
s'afche sur l'écran et le thermostat casse le chauffage jusqu'à ce que le dysfonctionnement
soit réglé.
Code Description Action corrective
E1 Dysfonctionnement
du capteur interne
Éteignez le thermostat et contactez notre service technique
ou d'autres professionnels.
E2 Dysfonctionnement
du capteur externe
Assurez-vous que le capteur externe est correctement
branché.
Éteignez le thermostat et contactez notre service technique
ou d'autres professionnels.
Entretien et nettoyage
N'utilisez en aucun cas des produits de nettoyage agressifs, à base d'alcool ou toute
autre solution chimique, car ceux-ci pourraient endommager le boîtier ou altérer le
fonctionnement de l’appareil.
• Utilisez un chiffon sec et non pelucheux pour nettoyer le panneau avant.
• Lors du nettoyage, ne pas appuyer trop fort sur la surface an d'éviter les rayures.
Avant de nettoyer le panneau avant, activez toujours le verrouillage des touches.
Une pression accidentelle sur les boutons peut entraîner une modication
involontaire de vos réglages.
Élimination des déchets
Les appareils électroniques sont des matériaux recyclables et ne doivent pas
être éliminés avec les ordures ménagères. En n de vie, éliminez le produit
conformément aux dispositions légales en vigueur. Enlevez les accumulateurs
éventuellement insérés et recyclez-les séparément du produit.
Vous respectez ainsi les ordonnances légales et contribuez à la protection de
l’environnement.
Données techniques
Tension d'entrée ................................... 90 – 240 V/CA, 50/60 Hz
Puissance de commutation max. .......... 3000 W (charge ohmique)
2000 W (charge inductive)
Charge de contact ................................16 A, 250 V
Plage standard réglable ........................+5 à +35 °C
Afchage de la température .................0 à +40 °C
Précision d’afchage ............................0,5 ºC
Capteur .................................................1 x interne, 1 externe
Capteur externe ....................................NTC (10 k) 1 %
Indice de protection ..............................IP20
Conditions de service ........................... +1 à +70 ºC, < 85 % d’humidité relative
Conditions de stockage ........................ +1 à +70 ºC, < 85 % d’humidité relative
Dimensions (l x H x P) ..........................94 x 94 x 41,3 mm
Taille de l'écran .....................................Ø 52 mm
Longueur du câble du capteur ..............2,5 m
Poids .....................................................139 g

• Als het product niet langer veilig gebruikt kan worden, stel het dan buiten bedrijf
en zorg ervoor dat niemand het per ongeluk kan gebruiken. Veilig gebruik kan niet
langer worden gegarandeerd als het product:
- zichtbaar is beschadigd,
- niet meer naar behoren werkt,
- tijdens een langere periode is opgeslagen onder slechte omstandigheden of
- tijdens het vervoer aan hoge belastingen onderhevig is geweest.
• Raadpleeg een expert wanneer u twijfelt over het gebruik, de veiligheid of het
aansluiten van het product.
• Laat onderhoud, aanpassingen en reparaties alleen uitvoeren door een specialist
of in een erkend servicecentrum.
• Als u nog vragen hebt die niet door deze gebruiksaanwijzing zijn beantwoord,
neem dan contact op met onze technische dienst of andere specialisten.
b) Aansluiten/inbouwen
Let op, belangrijke aanwijzing!
De inbouw en aansluiting van dit product mag alleen worden uitgevoerd door
personen die voldoende kennis en praktische ervaring in de omgang met
elektrische installaties hebben! *)
Onjuiste installatie brengt gevaar:
• Voor uw eigen leven.
• Voor degene die het elektrische apparaat in gebruik neemt.
Bij een ondeskundige installatie loopt u bovendien het risico op ernstige materiële
schade, bijvoorbeeld door brand. Houd er rekening mee dat u bij persoonlijk letsel
en materiële schade aansprakelijk kunt worden gesteld.
Wend u tot een elektricien.
*) Benodigde vakkundige kennis voor de installatie:
Voor de installatie is in het bijzonder onderstaande vakkennis vereist:
• De toe te passen "5 veiligheidsregels": Loskoppelen (spanningsloos maken);
beveiligen tegen herinschakelen; vaststellen dat er geen spanning staat op alle
polen; aarden en kortsluiten; aangrenzende delen onder spanning afdekken of
isoleren.
• Gebruik van geschikte gereedschappen, meetapparatuur en persoonlijke
beschermingsmiddelen, indien nodig
• Analyse van meetresultaten
• Gebruik van elektrisch installatiemateriaal om de voorwaarden voor een veilige
scheiding van de voedingsspanning te waarborgen
• IP-beschermingsklassen
• Aanbrengen van elektrische isolatiematerialen
• Soort elektriciteitsnet (TN-systeem, IT-systeem, TT-systeem) en de hieruit
voortvloeiende aansluitvoorwaarden (klassieke nulleider, aarde, benodigde
veiligheidsmaatregelen etc.)
Mocht u op een van de bovengenoemde gebieden niet voldoende kennis hebben,
dan mag u dit apparaat niet aansluiten en moet u een vakman inschakelen.
Andere waarschuwingen:
• Het product is conform veiligheidsklasse II (versterkte of dubbele isolatie). Er moet
op gelet worden dat de isolatie van de behuizing niet wordt beschadigd.
• Nog voor de montage moeten alle polen van de netspanning worden
gescheiden, bijv. via een aardlekschakelaar. Tussen de aardlekschakelaar en
het product moet zich een overeenkomstig gedimensioneerde zekering resp. een
zekeringsautomaat bevinden.
• Aansluiting en montage mogen alleen in spanningsvrije toestand worden
uitgevoerd. Deactiveer hiervoor de zekering en de aardlekschakelaar, waardoor
alle polen van de netspanning worden gescheiden resp. spanningsvrij worden
geschakeld. Borg deze tegen onbevoegd herinschakelen, bijvoorbeeld door
een waarschuwing aan te brengen. Controleer of het circuit spanningsvrij is met
behulp van een meetinstrument (bijv. multimeter).
• Sluit het product niet direct aan op de stroomvoorziening nadat het van een koude
naar een warme omgeving is gebracht (bijv. tijdens het transport). De condens die
hierbij ontstaat, kan in bepaalde gevallen het product onherstelbaar beschadigen.
Bovendien bestaat er gevaar voor elektrische schokken!
• Laat het apparaat daarom eerst op kamertemperatuur komen. Wacht tot de
condens verdampt is. Dit kan soms een aantal uur duren. Pas dan mag het
apparaat worden gemonteerd, op de stroomvoorziening worden aangesloten en
in werking worden gesteld.
c) Beschermingsklasse
• Het product en de behuizing voldoet aan beschermingsklasse IP20 en is
uitsluitend geschikt voor gebruik in droge binnenruimtes.
• Tegen water, brandbare gassen en dampen bestaat daarentegen geen
bescherming
Gebruiksaanwijzing
Digitaal programmeerbare kamerthermostaat met
touchpanel
Bestelnr. 2353939
Beoogd gebruik
Dit product is een verwarmingsthermostaat die bedoeld is voor de temperatuurregeling in
combinatie met een elektrische verwarming. Om het product in gebruik te kunnen nemen,
moet het direct op de netspanning worden aangesloten. Vervolgens kan een eveneens via de
netspanning werkende verbruiker daarop worden aangesloten en door de temperatuurregeling
worden in- of uitgeschakeld.
De verwarmingsthermostaat is uitgerust met een interne en een externe sensor (voeler). De
externe sensor is bedoeld om de temperatuur op een andere plaats dan die van de thermostaat
te meten, bijvoorbeeld op de vloer bij een elektrische vloerverwarming.
Het product beschikt bovendien over een activeerbare toetsvergrendeling ter bescherming
tegen verkeerde bediening en een geheugen voor back-up bij stroomuitval.
Het product voldoet aan beschermingsklasse IP20 en is uitsluitend geschikt voor montage
in droge binnenruimtes. Gebruik het dus niet in de openlucht. Contact met vocht, zoals in de
badkamer, moet te allen tijde vermeden worden.
In verband met veiligheid en normering zijn geen aanpassingen en/of wijzigingen aan dit
product toegestaan. Als u het product voor andere doeleinden gebruikt dan hierboven
beschreven, kan het product beschadigd raken. Bovendien kan oneigenlijk gebruik gevaren
zoals kortsluiting, brand, elektrische schokken en dergelijke met zich brengen. Lees de
gebruiksaanwijzing zorgvuldig door en bewaar deze goed. Geef het product alleen samen met
de gebruiksaanwijzing door aan derden.
Dit product voldoet aan alle nationale en Europese wettelijke normen. Alle vermelde bedrijfs-
en productnamen zijn handelsmerken van de respectievelijke eigenaren. Alle rechten
voorbehouden.
Omvang van de levering
• Thermostaat
• 2x schroef
• Externe sensor
• Gebruiksaanwijzing
Actuele gebruiksaanwijzingen
Download de meest recente gebruiksaanwijzing via de link www.conrad.
com/downloads of scan de afgebeelde QR-code. Volg de instructies op de
website.
Verklaring van de symbolen
Het symbool met een bliksemschicht in een driehoek wordt gebruikt als er gevaar
voor uw gezondheid bestaat bijv. door elektrische schokken.
Het symbool met een uitroepteken in een driehoek duidt op belangrijke aanwijzingen
in deze gebruiksaanwijzing die beslist opgevolgd moeten worden.
U ziet het pijl-symbool waar bijzondere tips en aanwijzingen over de bediening
worden gegeven.
Het product mag alleen binnenshuis in droge, gesloten ruimtes worden gebruikt.
Het product mag niet vochtig of nat worden. Er bestaat levensgevaar door een
elektrische schok!
Veiligheidsinstructies
Lees de gebruiksaanwijzing zorgvuldig door en let vooral op de
veiligheidsinstructies. Als u de veiligheidsinstructies en de aanwijzingen
voor een juiste bediening in deze gebruiksaanwijzing niet opvolgt, kunnen
wij niet aansprakelijk worden gesteld voor het daardoor ontstane persoonlijke
letsel of schade aan voorwerpen. Bovendien vervalt in dergelijke gevallen de
aansprakelijkheid/garantie.
a) Algemeen
• Het product is geen speelgoed. Houd het uit de buurt van kinderen en huisdieren.
• Laat verpakkingsmateriaal niet achteloos rondslingeren. Dit kan gevaarlijk
materiaal worden voor spelende kinderen.
• Behandel het product met zorg. Schokken, stoten of zelfs vallen vanaf een geringe
hoogte kunnen het product beschadigen.
• Bescherm het product tegen extreme temperaturen, direct zonlicht, zware
schokken, hoge luchtvochtigheid, vocht, ontvlambare gassen, dampen en
oplosmiddelen.
• Stel het product niet bloot aan welke mechanische belasting dan ook.

Productbeschrijving
a) Display- en bedieningstoetsen
1 Vakantiemodus
2 Verwarming
3 Automatische werking
4 Instelling van de gewenste temperatuur
5 Gemeten temperatuur
Air = interne sensor, Floor = externe
sensor
6 Tijd
7 Toetsvergrendeling
8 Toets tijd
9 Toets modus
10 Aan/uit-knop
11 Toets pijl omhoog
12 Toets pijl omlaag
13 Weekdag
14 Programma
15 Handmatige bediening
b) Aansluitingen en bevestigingselementen
16
16
16 Opname van het frontpaneel
17 Gaten voor bevestigingsschroeven
18 Aansluitklemmen
Installatie
1. Om het frontpaneel te verwijderen, houdt u de achterwand van de thermostaat vast en
draait u het frontpaneel tegen de klok in. De beide onderdelen zijn met een kabel met
elkaar verbonden.
2. Op de achterkant van de wandthermostaat bevinden zich 6 aansluitklemmen (18): Deze
dienen voor de aansluiting:
- de hoofdstroomvoorziening
- de elektrische last (verbruiker)
- de externe temperatuursensor
3. Sluit de nulleider en de fase van de stroomvoorziening aan op de ingangen 3 en 4.
4. Sluit de verbruiker (bijv. een elektrische radiator of een elektrische vloerverwarming) aan
op de uitgangen 1 en 2.
1
2
4
3
N
L
5
6
N
T
C
L
1
N
1
V
e
r
b
r
a
u
c
h
e
r
-
s
e
i
t
e
Indien de verbruiker een aardedraad heeft moet deze afzonderlijk worden
geïnstalleerd. De thermostaat zelf is conform veiligheidsklasse II en hoeft als
zodanig niet op een aardleiding te worden aangesloten.
5. Als u bovendien een externe temperatuursensor wilt gebruiken, moet deze op de klemmen
5 en 6 aan de zijkant worden aangesloten. De polariteit is hierbij niet van belang. U kunt de
draden naar wens aansluiten.
Zorg dat de aansluitkabels niet worden geknikt, afgekneld of door scherpe randen
worden beschadigd. Gebruik onder geen enkele omstandigheden spijkers,
schroeven etc. om de kabels te bevestigen.
6. Plaats de achterplaat van de thermostaat in de inbouw-/opbouwdoos. Voer de meegeleverde
bevestigingsschroeven door de daarvoor bestemde gaten (17) en schroef de achterwand
vast.
Let erop dat de kabels bij het plaatsen van de wandthermostaat in de inbouw-/
opbouwdoos niet worden beschadigd.
7. Plaats het frontpaneel in de houder (16) en draai het rechtsom. Let erop dat deze hoorbaar
vast klikt.
8. Schakel de netspanning in.
De thermostaat kan nu in werking worden gesteld.
Gebruik
a) In-/ uitschakelen
Ga als volgt te werk om de thermostaat in of uit te schakelen:
• Tik op de aan/uit-knop (10) om de thermostaat aan of uit te zetten.
• Als de thermostaat wordt uitgeschakeld, gaat het display uit en stopt de temperatuurrege-
ling.
b) Activeren/deactiveren van de toetsvergrendeling
Met de toetsvergrendeling (kinderslot) kunt u voorkomen dat de instellingen door onbedoeld
aanraken worden gewijzigd. Ga als volgt te werk om de toetsvergrendeling te activeren of te
deactiveren:
• Om de toetsvergrendeling te activeren, houdt u de toets pijl omlaag (12) ingedrukt. Het
symbool voor de toetsvergrendeling (7) verschijnt op het display en de toetsen zijn geblok-
keerd.
• Om de toetsvergrendeling te deactiveren, houdt u de toets pijl omlaag (12) opnieuw lang
ingedrukt. Het symbool voor de toetsvergrendeling (7) wordt verborgen en de toetsen zijn
weer vrijgegeven.
Afhankelijk van de instellingen die onder "systeeminstellingen" → "A5" zijn
ingesteld, zijn er twee verschillende kinderbeveiligingen beschikbaar:
0 = behalve de aan/uit-knop zijn alle toetsen geblokkeerd.
1 = alle toetsen zijn geblokkeerd.
c) Datum en tijd instellen
Volg de onderstaande stappen om de datum en tijd in te stellen:
1. Druk kort op de knop Tijd (8). De minutenweergave begint te knipperen.
- Gebruik de pijltoetsen (11,12)om de waarde aan te passen.
- Bevestig de invoer door nogmaals kort op de knop Tijd (8) te tikken.
2. Nadat u de waarde van de minuten hebt bevestigd, begint de uuraanduiding te knipperen.
- Gebruik de pijltoetsen (11,12)om de waarde aan te passen.
- Bevestig de invoer door nogmaals kort op de knop Tijd (8) te tikken.
3. Nadat u de waarde van de uren hebt bevestigd, begint de weergave van de weekdag (13)
te knipperen.
- Gebruik de pijltoetsen (11,12) om de waarde aan te passen (1 = maandag...7 = zondag).
- Bevestig de invoer door nogmaals kort op de knop Tijd (8) te tikken.
4. De instellingen worden opgeslagen en de thermostaat keert terug naar de normale werking.
d) Temperatuurweergave omschakelen
Als een externe sensor is aangesloten, kunt u de temperatuurweergave (5) tussen de interne
sensor ("Air") en de externe sensor ("Floor") omschakelen. Ga daarbij als volgt te werk:
• Houd de toets pijl omlaag (12) lang ingedrukt.
• Houd de toets pijl omlaag (12) opnieuw lang ingedrukt om de weergave weer terug te
schakelen.
e) Omschakelen tussen automatische en handmatige modus
Ga als volgt te werk om tussen automatische en handmatige modus om te schakelen:
1. Druk kort op de toets Modus (9).
- Automatische modus: Het symbool voor handbediening (15) is verborgen. De
temperatuurregeling is afhankelijk van de instellingen die voor het actieve programma
zijn vastgelegd.
- Handmatige modus: Het symbool voor handbediening (15) verschijnt op het display. De
temperatuur kan handmatig met de pijltoetsen (11,12) worden ingesteld.

f) Automatische modus handmatig overbruggen
Ga als volgt te werk om de temperatuur die voor de automatische modus is vastgelegd tijdelijk
te wijzigen:
1. Pas de gewenste temperatuur aan met de pijltoetsen (11,12) . Op het display worden
vervolgens de symbolen voor automatische modus (3) en handmatige modus (15)
gelijktijdig weergegeven.
De via de handmatige overbrugging uitgevoerde instellingen blijven tot het begin van het
volgende tijdsinterval behouden. Dit betekent:
- De handmatige overbrugging wordt gedeactiveerd en de thermostaat keert terug naar
de automatische modus.
- Het symbool voor handbediening (15) verdwijnt.
g) Activeer/deactiveer vakantiemodus
Gebruik de vakantiemodus om voor de dagen waarop u niet thuis bent, bepaalde
tijdsintervallen en temperaturen vast te leggen.
Ga als volgt te werk om de vakantiemodus in te schakelen:
1. Houd gedurende drie tot vijf seconden de toets Tijd (8) ingedrukt tot het vakantiesymbool
(1) op het display verschijnt.
2. Kies de vakantiemodus.
- Selecteer met de pijltoetsen (11,12) de instelling "ON".
- Bevestig de invoer door kort op de toets Tijd (8) te tikken.
3. Stel voor het aantal dagen dat u niet thuis zult zijn een waarde tussen 1 en 30 in.
- Pas de waarde aan met de pijltoetsen (11,12).
- Bevestig de invoer door kort op de toets Tijd (8) te tikken.
4. Stel de gewenste temperatuur in.
- Pas de waarde aan met de pijltoetsen (11,12).
- Bevestig de invoer door kort op de toets Tijd (8) te tikken.
Vervolgens blijft het vakantiesymbool (1) op het display weergegeven en geeft aan
dat de vakantiemodus is geactiveerd.
Nadat de ingestelde tijd verlopen is, wordt de vakantiemodus automatisch uitgeschakeld. Ga
als volgt te werk om de vakantiemodus handmatig te deactiveren:
1. Tik kort op de toets Modus (9) om de vakantiemodus uit te schakelen. De thermostaat
keert vervolgens weer terug in de handmatige modus of automatische modus.
h) Weekschema programmeren
Overzicht
U hebt de mogelijkheid om voor zes verschillende perioden per dag een eigen
temperatuurinstelling in te stellen. Welke van de tijden momenteel geactiveerd is, wordt door
een overeenkomstig symbool weergegeven.
Een voorbeeld:
1: Wakker
worden
2: Buiten huis 3: Thuis 4: Buiten huis 5: Thuis 6: Nachtrust
06:00 08:00 11:30 13:30 17:00 22:00
21 °C 17 °C 21 °C 17 °C 21 °C 15 °C
Weekcyclus instellen
Voor het weekschema kunt u kiezen uit verschillende schakelcycli (aantal weekdagen +
weekend). Volg de onderstaande stappen om de weekcyclus in te stellen:
1. Als de thermostaat is ingeschakeld: Druk op de aan/uit-knop (10) om de thermostaat uit
te schakelen.
2. Houd de toets Modus (9) drie tot vijf seconden ingedrukt. Het instelmenu wordt geopend.
3. Druk meermaals kort na elkaar op de toets Modus (9), tot de instelling "AC" zichtbaar wordt.
4. Selecteerde gewenste weekcyclus met de pijltjestoetsen (11,12).
0 = 5 dagen identiek + 2 dagen identiek (standaard geactiveerd)
1 = 6 dagen identiek + 1 dag individueel
2 = 7 dagen identiek
5. Tik opnieuw op de aan/uit-knop (10) om de instelling op te slaan en het instelmenu te
verlaten.
De instellingen worden ook opgeslagen als er ongeveer 10 seconden lang geen
toets wordt ingedrukt.
Tijdschema programmeren
Ga als volgt te werk om de verschillende tijdsperiodes te programmeren:
1. Als de thermostaat is uitgeschakeld: Druk op de aan/uit-knop (10) om de thermostaat aan
te zetten.
2. Houd de toets Modus (9) drie tot vijf seconden ingedrukt. De programmeermodus wordt
geopend en op het display verschijnt het symbool van de eerste periode "1: Ochtend" en de
tijdweergave begint te knipperen.
- Gebruik de pijltoetsen (11,12)om de waarde aan te passen.
- Bevestig de invoer door kort op de toets Modus (9) te tikken.
3. Nadat u de tijd hebt bevestigd, begint de temperatuur te knipperen.
- Gebruik de pijltoetsen (11,12)om de waarde aan te passen.
- Bevestig de invoer door kort op de toets Modus (9) te tikken.
4. Nadat u de temperatuur hebt bevestigd, begint het symbool van de volgende periode te
knipperen.
5. Herhaal de procedure voor alle zes perioden.
6. Wacht ongeveer 10 seconden zonder daarbij op een knop te drukken om de instellingen
op te slaan.
Om het geprogrammeerde tijdschema te activeren of te deactiveren, tikt u kort op
de toets Modus (9), zie ook het gedeelte “e) Omschakelen tussen automatische en
handmatige modus”.
Systeeminstellingen
Een aanpassing van de systeeminstellingen kan ertoe leiden dat de werking van
de thermostaat niet meer storingsvrij mogelijk is. Lees daarom alle instructies
zorgvuldig door voordat u wijzigingen aan hen aanbrengt.
Ga als volgt te werk om het instellingenmenu te openen en wijzigingen aan te brengen:
1. Als de thermostaat is ingeschakeld: Druk op de aan/uit-knop (10) om de thermostaat uit
te schakelen.
2. Houd de toets Modus (9) drie tot vijf seconden ingedrukt. Het instelmenu wordt geopend.
- Om naar de volgende instelling te gaan, tikt u op de toets Modus (9).
- Om de instelling te wijzigen, kiest u de gewenste waarde met de pijltoetsen (11,12).
3. Tik opnieuw op de aan/uit-knop (10) om de instellingen op te slaan en het instelmenu te
verlaten.
De instellingen worden ook opgeslagen als er ongeveer 10 seconden lang geen
toets wordt ingedrukt.
Code Beschrijving Instellingen Standaard
A1 Temperatuur kalibreren Instelbereik:
-9 tot +9 °C
-1 °C
A2 Schakelverschil
(hysterese)
Instelbereik:
0,5 tot 2,5 °C
Voorbeeld: Bij een
instelling van 1 °C en
een door de thermostaat
gemeten temperatuur
van +20 °C schakelt
de thermostaat de
verwarming bij +19 °C in
en bij +21 °C weer uit.
1 °C
A3 Hoge
temperatuurbescherming/
differentiaalinstelling
(externe sensor)
Instelbereik: 1 tot 9 °C
Voorbeeld: De
grenswaarde "A6" is
ingesteld op +45 °C en
"A3" op 2 °C. Als een
temperatuur van +45 °C
wordt bereikt, wordt de
verwarming onderbroken.
Als de temperatuur
daalt tot +43 °C, wordt
de verwarming weer
opgenomen. Dit werkt
echter alleen als de
binnentemperatuur lager
is dan de ingestelde
temperatuur.
2 °C
A4 Sensorkeuze N1 = De temperatuurregeling
gebeurt door de interne sensor.
N2 = De temperatuurregeling wordt
uitgevoerd door de externe
sensor.
N3 = De temperatuurregeling
gebeurt door de interne sensor.
Als N3 is geactiveerd, wordt de
externe sensor als sensor voor
de temperatuurbegrenzing
gebruikt.
Alle bovenstaande
instellingen bepalen dat
de verwarmingsmodus
bij het bereiken van de
maximale temperatuur
wordt onderbroken.
N1

Dit is een publicatie van Conrad Electronic SE, Klaus-Conrad-Str. 1, D-92240 Hirschau (www.conrad.com).
Alle rechten voorbehouden met inbegrip van vertalingen. Reproducties van welke aard dan ook, bijvoorbeeld fotokopie,
microverlming of de registratie in elektronische gegevensverwerkingsapparatuur, vereisen de schriftelijke toestemming
van de uitgever. Nadruk, ook van uittreksels, is verboden. De publicatie is een weergave van de technische stand bij het
ter perse gaan.
Copyright 2021 by Conrad Electronic SE. *2353939_v1_0421_02_DS_m_5L_(1)
Code Beschrijving Instellingen Standaard
A5 Toetsvergrendeling 0 = Alle toetsen behalve aan/uit
worden geblokkeerd
1 = Alle toetsen zijn geblokkeerd
0
A6 Bescherming tegen hoge
temperaturen
Als de door de sensor gemeten
temperatuur boven de hier
ingestelde waarde stijgt,
wordt de verwarmingsmodus
automatisch gestopt (dient bijv.
als oververhittingsbeveiliging bij
vloerverwarmingen).
Instelbereik: +20 tot +70 °C
Om deze functie uit
te schakelen, houdt
u de pijltoets omlaag
(12) ingedrukt tot op
het display "--" wordt
weergegeven.
+ 45 °C
A7 Lage
temperatuurbeveiliging
Als de door de sensor gemeten
temperatuur onder de hier
ingestelde waarde daalt,
wordt de verwarmingsmodus
automatisch gestart (dient bijv. als
vorstbescherming).
Instelbereik: +1 tot +10 °C
Om deze functie uit te
schakelen, houdt u de
pijltoets omhoog(11)
ingedrukt tot op het
display "--" wordt
weergegeven.
+ 5 °C
A8 Minimale temperatuur Stelt de laagste selecteerbare
temperatuurwaarde in
Instelbereik: +1 tot +10 °C
+ 5 °C
A9 Maximale temperatuur Stelt de hoogste selecteerbare
temperatuurwaarde in
Instelbereik: +20 tot +70 °C
+ 35 °C
AA Ontkalken 0 = gesloten
1 = geopend
0
AB Gedrag na stroomuitval 0 = Terug naar de vorige functie
1 = Uitschakelen
2 = Inschakelen
0
AC De weekcyclus instellen 0 = 5 dagen identiek + 2 dagen
identiek (ma-vr + za-zo)
1 = 6 dagen identiek + 1 dag
individueel (ma-za + zo)
2 = 7 dagen identiek (ma-zo)
Om ervoor te zorgen dat
het programma het begin
van het weekend herkent,
moet de juiste weekdag
zijn ingesteld. Zie voor
details het gedeelte “c)
Datum en tijd instellen”.
0
AD Terugzetten naar de
fabrieksinstellingen
Houd de toets Tijd (8) drie tot
vijf seconden ingedrukt, tot alle
elementen van het display gelijktijdig
oplichten. Hierdoor worden alle
instellingen gereset naar de originele
fabrieksinstellingen.
Foutcodes
Als de interne of externe sensor een storing vertoont, wordt op het display een bijbehorende
foutcode weergegeven en de thermostaat zet de verwarmingsmodus uit tot de storing is
verholpen.
Code Beschrijving Maatregelen om het te verhelpen
E1 Storing in de
interne sensor
Schakel de thermostaat uit en neem contact op met onze
technische klantenservice of een vakman.
E2 Storing in de
externe sensor
Zorg ervoor dat de externe sensor correct is aangesloten.
Schakel de thermostaat uit en neem contact op met onze
technische klantenservice of een vakman.
Onderhoud en reiniging
Gebruik in geen geval agressieve reinigingsmiddelen, reinigingsalcohol of andere
chemische oplossingen, omdat deze de behuizing kunnen beschadigen of de
functie kunnen belemmeren.
• Gebruik een droog, pluisvrij doekje om het frontpaneel van de thermostaat schoon te
maken.
• Druk tijdens het reinigen niet te stevig op het oppervlak om krassen te voorkomen.
Activeer voor het reinigen van het frontpaneel altijd de toetsvergrendeling. Het per
ongeluk indrukken van de toetsen kan leiden tot een onbedoelde wijziging van uw
instellingen.
Verwijdering
Elektronische apparaten zijn recyclebare stoffen en horen niet bij het huisvuil.
Voer het product aan het einde van zijn levensduur volgens de geldende wettelijke
bepalingen af. Verwijder eventueel geplaatste accu’s en voer deze gescheiden van
het product af.
U voldoet daarmee aan de wettelijke verplichtingen en draagt bij aan de bescherming
van het milieu.
Technische gegevens
Ingangsspanning .................................. 90 – 240 V/AC, 50/60 Hz
Max. schakelvermogen ......................... 3000 W (ohmse last)
2000 W (inductieve last)
Contactbelasting ...................................16 A, 250 V
Instelbaar standaardbereik ...................+5 tot +35 °C
Temperatuurweergave ..........................0 tot +40 °C
Weergavenauwkeurigheid ....................0,5 ºC
Sensor ..................................................1x intern, 1x extern
Externe sensor .....................................NTC (10 k) 1 %
Beschermingsklasse .............................IP20
Bedrijfscondities ................................... +1 tot +70 ºC, < 85 % relatieve luchtvochtigheid
Opslagcondities .................................... +1 tot +70 ºC, < 85 % relatieve luchtvochtigheid
Afmetingen (b x h x d) ..........................94 x 94 x 41,3 mm
Grootte van het display .........................Ø 52 mm
Lengte van de sensorkabel ..................2,5 m
Gewicht .................................................139 g

• Nel caso in cui non sia più possibile l'uso in piena sicurezza, scollegare il prodotto
dall'alimentazione ed evitare che possa essere utilizzato in modo improprio. La
sicurezza d'uso non è più garantita, se il prodotto:
- presenta danni visibili,
- non funziona più correttamente,
- è stato conservato per periodi prolungati in condizioni ambientali sfavorevoli
oppure
- è stato esposto a considerevoli sollecitazioni dovute al trasporto.
• Rivolgersi a un esperto in caso di dubbi relativi al funzionamento, alla sicurezza o
alle modalità di collegamento del prodotto.
• Far eseguire i lavori di manutenzione, adattamento e riparazione esclusivamente
da un esperto o da un laboratorio specializzato.
• In caso di ulteriori domande a cui non viene data risposta nelle presenti istruzioni
per l'uso, rivolgersi al nostro servizio clienti tecnico oppure ad altri professionisti.
b) Installazione/collegamento
Attenzione, avviso importante!
L’installazione e il collegamento di questo prodotto devono essere effettuati
solo da persone con dimostrata conoscenza ed esperienza pratica nella
gestione degli impianti elettrici! *)
A causa di un'installazione non corretta si rischia:
• la propria vita.
• La vita di chi mette in funzione il dispositivo elettrico.
In caso di installazione non corretta, si rischiano anche gravi danni alla proprietà, ad
esempio a causa di un incendio. Si noti che in caso di danni a persone e cose si può
essere ritenuti personalmente responsabili.
Consultare un elettricista qualicato!
*) Competenze per l'installazione:
Per l'installazione sono necessarie in particolare le seguenti competenze:
• Le “cinque regole di sicurezza" applicabili: mettere fuori tensione (sezionare da
tutte le sorgenti di alimentazione di tensione); assicurare contro il reinserimento;
assicurare l’assenza di tensione su tutti i poli; eseguire la messa a terra e in
cortocircuito; coprire o proteggere le parti adiacenti sotto tensione.
• Utilizzo di strumenti, misuratori e dispositivi di protezione individuale adatti, se
necessario
• Valutazione dei risultati di misurazione
• Utilizzo di materiale di installazione elettrico per garantire le condizioni per un
sezionamento sicuro dall'alimentazione di tensione
• Tipi di protezione IP
• Montaggio di materiali isolanti elettrici
• Tipo di rete di alimentazione (sistema TN, sistema IT, sistema TT) e le seguenti
condizioni di connessione (azzeramento classico, messa a terra di protezione,
misure aggiuntive necessarie, ecc.)
In mancanza di conoscenze sufcienti, anche solo in uno dei settori sopra indicati,
è importante evitare di procedere al montaggio e al collegamento autonomo e
chiedere a un esperto.
Altre avvertenze:
• il prodotto è un apparecchio di classe di protezione II (isolamento rinforzato o
doppio). È importante garantire che l'isolamento dell'alloggiamento non sia
danneggiato o distrutto.
• Ancora prima del montaggio, tutti i poli devono essere separati dalla tensione di
rete, ad esempio tramite un interruttore differenziale. Tra l’interruttore differenziale
e il prodotto deve esserci un fusibile o un interruttore automatico dimensionato in
modo corretto.
• Il collegamento e il montaggio possono essere effettuati solo in assenza di
tensione. A tale scopo, disattivare l’interruttore automatico e l’interruttore
differenziale in modo che tutti i poli siano separati dalla tensione di rete o
commutati senza tensione. Onde evitare una riaccensione involontaria apporre
ad es. un segnale di pericolo. Vericare l’assenza di tensioni usando un rilevatore
adatto (ad es. un multimetro digitale).
• Non collegare il prodotto all’alimentazione di corrente subito dopo averlo spostato
da un ambiente freddo a un ambiente caldo (ad es. durante il trasporto). La
condensa che si forma in questo caso potrebbe danneggiare il prodotto. Sussiste
anche il rischio di scosse elettriche!
• Lasciare sempre che il prodotto raggiunga la temperatura ambiente. Attendere
che l’acqua sia evaporata. Ciò può richiedere diverse ore. Solo allora il prodotto
potrà essere montato, collegato all’alimentazione di tensione e messo in funzione.
c) Categoria di protezione
• Il prodotto o il suo alloggiamento è conforme al tipo di protezione IP20 ed è adatto
esclusivamente per l'uso in ambienti interni asciutti.
• Non sussiste invece protezione contro acqua, gas e vapori inammabili
Istruzioni per l’uso
Termostato ambiente digitale programmabile con
pannello touch
N°. 2353939
Utilizzo conforme
Questo prodotto è un termostato per riscaldamento, progettato per la regolazione della
temperatura in combinazione con un riscaldamento elettrico. Per essere azionato, il prodotto
deve essere collegato direttamente alla tensione di rete. Successivamente è possibile collegare
un’utenza alimentata anche tramite l’alimentazione di rete, con accensione o spegnimento
mediante regolazione della temperatura.
Il termostato per riscaldamento è dotato di un sensore interno ed esterno (sensore). Il sensore
esterno è progettato per misurare la temperatura in un luogo diverso da quello del termostato,
ad es. sul pavimento in caso di riscaldamento a pavimento elettrico.
Il prodotto dispone inoltre di un blocco tasti attivabile per la protezione da errori di funzionamento
e di una memoria per il backup dei dati in caso di interruzione dell'alimentazione.
Il prodotto è conforme al tipo di protezione IP20 ed è adatto esclusivamente per il montaggio in
ambienti interni asciutti. Pertanto, non deve essere utilizzato all'aperto. Bisogna assolutamente
evitare il contatto con l'umidità, per esempio in una stanza da bagno.
Per motivi di sicurezza e di omologazione, il prodotto non deve essere smontato e/o modicato.
Nel caso in cui il prodotto venga utilizzato per scopi diversi da quelli precedentemente descritti,
esso potrebbe subire dei danni. Inoltre, un uso improprio può causare pericoli come ad es.
corto circuito, incendio, scosse elettriche, ecc. Leggere attentamente le istruzioni per l'uso
e rispettarle. Cedere il prodotto a terzi solo insieme alle istruzioni per l'uso.
Questo prodotto è conforme ai relativi requisiti nazionali ed europei. Tutti i nomi di società e di
prodotti citati sono marchi di fabbrica dei rispettivi proprietari. Tutti i diritti riservati.
Contenuto della confezione
• Termostato
• 2 viti
• Sensore esterno
• istruzioni per l'uso
Istruzioni per l'uso aggiornate
È possibile scaricare le istruzioni per l'uso aggiornate al link www.conrad.
com/downloads o tramite la scansione del codice QR. Seguire le istruzioni
sul sito web.
Spiegazione dei simboli
Il simbolo con il fulmine in un triangolo è usato per segnalare un rischio per la salute,
come per esempio le scosse elettriche.
Il simbolo composto da un punto esclamativo inscritto in un triangolo indica istruzioni
importanti all’interno di questo manuale che è necessario osservare in qualsivoglia
caso.
Il simbolo della freccia indica suggerimenti e note speciali per l’utilizzo.
Il prodotto deve essere usato e può funzionare solo in interni senza troppa umidità.
Il prodotto non deve venire a contatto con umidità e non deve essere bagnato.
Potrebbe vericarsi una scarica elettrica mortale!
Istruzioni di sicurezza
Leggere attentamente le istruzioni per l'uso e rispettare in particolare le
avvertenze per la sicurezza. Nel caso in cui non vengano osservate le
avvertenze per la sicurezza e le indicazioni relative all'utilizzo conforme
contenute in queste istruzioni per l'uso, non ci assumiamo alcuna
responsabilità per eventuali conseguenti danni a cose o persone. Inoltre in
questi casi la garanzia decade.
a) Informazioni generali
• Questo prodotto non è un giocattolo. Tenerla fuori dalla portata di bambini
e animali domestici.
• Non lasciare incustodito il materiale di imballaggio. Potrebbe trasformarsi in un
pericoloso giocattolo per i bambini.
• Maneggiare il prodotto con cautela. Urti, colpi o la caduta anche da un'altezza
minima potrebbero danneggiarlo.
• Proteggere il prodotto dalle temperature estreme, dalla luce solare diretta, da
forti vibrazioni, dall’acqua, dall'eccessiva umidità, da gas, vapori o solventi
inammabili.
• Non sottoporre il prodotto ad alcuna sollecitazione meccanica.

Descrizione del prodotto
a) Display e pulsanti di comando
1 Modalità vacanza
2 Modalità di riscaldamento
3 Modalità automatica
4 Impostazione della temperatura richiesta
5 Temperatura misurata
Air = sensore interno, Floor = sensore
esterno
6 Ora del giorno
7 Blocco tasti
8 Tasto Ora
9 Tasto Modalità
10 Tasto On/Off
11 Tasto freccia su
12 Tasto freccia giù
13 Giorno della settimana
14 Programma
15 Funzionamento manuale
b) Collegamenti e dispositivi di ssaggio
16
16
16 Supporto del pannello frontale
17 Fori per viti di ssaggio
18 Terminali di collegamento
Installazione
1. Per rimuovere il pannello frontale, tenere saldamente la parete posteriore del termostato e
ruotare il pannello frontale in senso antiorario. Le due parti sono collegate tra loro tramite
cavo.
2. Sul retro del termostato a parete sono presenti 6 morsetti di collegamento (18): Questi
servono per collegare:
- L'alimentazione principale
- Il carico elettrico (utenza)
- Il sensore di temperatura esterno
3. Collegare il conduttore neutro e la fase di alimentazione di corrente agli ingressi 3 e 4.
4. Collegare l’utenza (ad es. un radiatore elettrico o un riscaldamento a pavimento elettrico)
alle uscite corrispondenti 1 e 2.
1
2
4
3
N
L
5
6
N
T
C
L
1
N
1
V
e
r
b
r
a
u
c
h
e
r
-
s
e
i
t
e
Se l’utenza prevede il collegamento a un conduttore di protezione, questo deve
essere installato separatamente. Il termostato stesso è un apparecchio di classe di
protezione II e non deve essere collegato come tale a un conduttore di protezione.
5. Se si desidera utilizzare anche un sensore di temperatura esterno, questo deve essere
collegato ai morsetti laterali 5 e 6. La polarità non deve essere presa in considerazione.
È possibile collegare i li a piacere.
Durante la posa dei cavi di collegamento, accertarsi che essi non vengano
schiacciati né danneggiati da spigoli appuntiti. Non utilizzare mai chiodi, viti o simili
per ssare i cavi.
6. Inserire la parete posteriore del termostato nella presa da incasso/da parete. Inserire le viti
di ssaggio in dotazione attraverso i fori previsti (17) e avvitare la parete posteriore.
Assicurarsi che i cavi non vengano danneggiati quando si inserisce il termostato
a parete nella presa da incasso/da parete.
7. Inserire il pannello frontale nel supporto (16) e ruotarlo in senso orario. Prestare attenzione
che scatti in posizione.
8. Accendere l'alimentazione.
A questo punto è possibile mettere in funzione il termostato.
Funzionamento
a) Accensione/spegnimento
Per accendere o spegnere il termostato procedere come segue:
• Premere il tasto On/Off (10) per accendere o spegnere il termostato.
• Quando il termostato viene spento, il display si spegne e la regolazione della temperatura
smette di funzionare.
b) Attivazione/disattivazione del blocco tasti
Con il blocco tasti (sicurezza bambini) è possibile evitare che le impostazioni vengano
modicate a causa di un contatto involontario. Per attivare o disattivare il blocco tasti,
procedere come segue:
• Per attivare il blocco tasti, tenere premuto il tasto freccia giù (12). Il simbolo del blocco tasti
(7) appare sul display e i tasti sono bloccati.
• Per disattivare il blocco tasti, tenere premuto di nuovo il tasto freccia giù (12). Il simbolo del
blocco tasti (7) scompare e i tasti vengono nuovamente sbloccati.
A seconda delle impostazioni denite in “Impostazioni di sistema” → “A5” sono
disponibili due diversi tipi di sicurezza per bambini:
0 = tutti i tasti sono bloccati, tranne il tasto On/Off
1 = tutti i tasti sono bloccati.
c) Impostazione della data e dell’ora
Per impostare la data e l’ora, procedere come segue:
1. Premere brevemente il pulsante ora (8). Il display dei minuti inizia a lampeggiare.
- Utilizzare i tasti freccia (11,12)per regolare il valore.
- Confermare l’inserimento toccando ancora brevemente il tasto Ora (8).
2. Dopo aver confermato il valore dei minuti, la visualizzazione dell'ora inizia a lampeggiare.
- Utilizzare i tasti freccia (11,12)per regolare il valore.
- Confermare l’inserimento toccando ancora brevemente il tasto Ora (8).
3. Dopo aver confermato il valore delle ore, la visualizzazione del giorno della settimana (13)
inizia a lampeggiare.
- Utilizzare i tasti freccia (11,12)per regolare il valore (1 = lunedì...7 = domenica).
- Confermare l’inserimento toccando ancora brevemente il tasto Ora (8).
4. Le impostazioni vengono salvate e il termostato ritorna al funzionamento normale.
d) Commutare l'indicazione della temperatura
Se è collegato un sensore esterno, è possibile commutare l'indicatore di temperatura (5) tra il
sensore interno ("Air") e il sensore esterno ("Floor"). Procedere come segue:
• Tenere premuto il tasto freccia giù (12).
• Tenere ancora premuto il tasto freccia giù (12) per tornare alla visualizzazione.
e) Commutare la modalità automatica e manuale
Per commutare tra la modalità automatica e manuale, procedere come segue:
1. Premere brevemente il pulsante Modalità (9).
- Modalità automatica: Il simbolo del funzionamento manuale (15) è nascosto. La
regolazione della temperatura dipende dalle impostazioni stabilite per il programma
attivo.
- Funzionamento manuale: Sul display appare il simbolo del funzionamento manuale (15).
La temperatura può essere impostata manualmente tramite i tasti freccia (11,12) .
f) Collegare manualmente il funzionamento automatico
Per modicare temporaneamente la temperatura impostata per il funzionamento automatico,
procedere come segue:
1. Regolare la temperatura impostata con i tasti freccia (11,12) . Sul display vengono
visualizzati contemporaneamente i simboli per la modalità automatica (3) e manuale (15).
Le impostazioni effettuate tramite il collegamento manuale rimangono invariate no all'inizio
del successivo intervallo di tempo. Ciò signica:

- Il blocco manuale viene disattivato e il termostato ritorna al funzionamento automatico.
- Il simbolo del funzionamento manuale (15) scompare.
g) Attivazione/disattivazione della modalità vacanza
Utilizzate la modalità vacanza per impostare intervalli di tempo e temperature
specici per i giorni in cui non siete a casa.
Per attivare la modalità vacanza, procedere come segue:
1. Tenere premuto il tasto Ora (8) per tre/cinque secondi no a quando sul display non appare
l'icona vacanza (1).
2. Selezionare la modalità vacanza.
- Selezionare l’impostazione “ON” con i tasti freccia (11,12) .
- Confermare l’inserimento toccando brevemente il tasto Ora (8).
3. Impostare un valore compreso tra "1 - 30" per il numero di giorni che non sarete a casa.
- Regolare il valore con i tasti freccia (11,12) .
- Confermare l’inserimento toccando brevemente il tasto Ora (8).
4. Impostare la temperatura desiderata.
- Regolare il valore con i tasti freccia (11,12) .
- Confermare l’inserimento toccando brevemente il tasto Ora (8).
Quindi, l'icona di vacanza (1) rimane visualizzata sul display e indica che la modalità
vacanza è attivata.
Trascorso il tempo impostato, la modalità vacanza si spegnerà automaticamente. Per
disattivare manualmente la modalità vacanza, procedere come segue:
1. Toccare brevemente il tasto Mode (9) per disattivare la modalità vacanza. Il termostato
ritorna quindi alla modalità manuale o automatica.
h) Programmare il piano settimanale
Panoramica
È possibile impostare una temperatura particolare per sei diversi periodi al giorno. Il periodo di
tempo attualmente attivato è indicato da un simbolo corrispondente.
Un esempio:
1: Sveglia 2: Fuori casa 3: A casa 4: Fuori casa 5: A casa 6: Riposo
notturno
06:00 08:00 11:30 13:30 17:00 22:00
21 °C 17 °C 21 °C 17 °C 21 °C 15 °C
Impostare il ciclo della settimana
Per il piano settimanale è possibile scegliere tra diversi cicli della settimana (numero di giorni
della settimana + ne settimana). Per impostare il ciclo della settimana, procedere come segue:
1. Quando il termostato è acceso: Premere il tasto On/Off (10) per spegnere il termostato.
2. Tenere premuto il tasto Modalità (9) per tre o cinque secondi. Si apre il menu delle
impostazioni.
3. Toccare brevemente più volte il tasto Modalità (9) no a quando non viene visualizzata
l’impostazione “AC”.
4. Selezionare il ciclo della settimana desiderato con i tasti freccia (11,12).
0 = 5 giorni identici + 2 giorni identici (attivato per impostazione predenita)
1 = 6 giorni identici + 1 giorno individuale
2 = 7 giorni identici
5. Toccare nuovamente il tasto On/Off (10) per salvare l’impostazione e uscire dal menu delle
impostazioni.
Le impostazioni vengono salvate anche se non viene premuto alcun tasto per circa
10 secondi.
Programmazione del calendario
Per programmare i diversi periodi di tempo, procedere come segue:
1. Quando il termostato è spento: Premere il tasto On/Off (10) per accendere il termostato.
2. Tenere premuto il tasto Modalità (9) per tre o cinque secondi. La modalità di programmazione
si apre e sul display appare il simbolo del primo periodo "1: Sveglia" e l'ora inizia a
lampeggiare.
- Utilizzare i tasti freccia (11,12)per regolare il valore.
- Confermare l’inserimento toccando brevemente il tasto Modalità (9).
3. Dopo aver confermato l'ora, la temperatura inizia a lampeggiare.
- Utilizzare i tasti freccia (11,12)per regolare il valore.
- Confermare l’inserimento toccando brevemente il tasto Modalità (9).
4. Dopo aver confermato la temperatura, il simbolo del periodo di tempo successivo inizia a
lampeggiare.
5. Ripetere la procedura per tutti e sei i periodi di tempo.
6. Attendere circa 10 secondi senza premere i tasti per salvare le impostazioni.
Per attivare o disattivare il calendario programmata, toccare brevemente il tasto
Modalità (9), vedere anche la sezione “e) Commutare la modalità automatica e
manuale”.
Impostazioni di sistema
La regolazione delle impostazioni del sistema può determinare un funzionamento
non più corretto del termostato. Leggere attentamente tutte le istruzioni prima di
apportare modiche.
Per aprire il menu delle impostazioni e apportare modiche, procedere come segue:
1. Quando il termostato è acceso: Premere il tasto On/Off (10) per spegnere il termostato.
2. Tenere premuto il tasto Modalità (9) per tre o cinque secondi. Si apre il menu delle
impostazioni.
- Per passare all’impostazione successiva, toccare il tasto Modalità (9).
- Per modicare l'impostazione, selezionare il valore desiderato con i tasti freccia (11,12).
3. Toccare nuovamente il tasto On/Off (10) per salvare le impostazioni e uscire dal menu delle
impostazioni.
Le impostazioni vengono salvate anche se non viene premuto alcun tasto per circa
10 secondi.
Codice Descrizione Impostazioni Valore
standard
A1 Calibrazione
temperatura
Intervallo di impostazione:
da -9 a +9 °C
-1 °C
A2 Differenza di
commutazione (isteresi)
Intervallo di impostazione:
Da 0,5 a 2,5 °C
Esempio: Con
un'impostazione di 1 °C e
una temperatura misurata
dal termostato di +20 °C,
il termostato accende il
riscaldamento a +19 °C e
si spegne nuovamente a
+21 °C.
1 °C
A3 Protezione da
alte temperature/
impostazione
differenziale (sensore
esterno)
Intervallo di impostazione: da 1 a
9 °C
Esempio: Il valore limite
"A6" è impostato su
+45 °C e "A3" su 2 °C.
Se si raggiunge una
temperatura di +45
°C, il funzionamento
del riscaldamento
viene interrotto. Se la
temperatura scende a
+43 °C, il funzionamento
del riscaldamento
riprende. Questo funziona
solo se la temperatura
interna è inferiore alla
temperatura richiesta.
2 °C
A4 Selezione sensore N1 = la regolazione della
temperatura avviene tramite il
sensore interno.
N2 = la regolazione della
temperatura avviene tramite il
sensore esterno.
N3 = la regolazione della
temperatura avviene tramite
il sensore interno. Quando
N3 è attivato, il sensore
esterno viene utilizzato come
sensore per la limitazione della
temperatura.
Tutte le impostazioni
precedenti prevedono
che il funzionamento
del riscaldamento
venga interrotto al
raggiungimento della
temperatura massima.
N1
A5 Blocco tasti 0 = tutti i tasti sono bloccati, tranne il
tasto On/Off
1 = tutti i tasti sono bloccati
0

Questa è una pubblicazione Conrad Electronic SE, Klaus-Conrad-Str. 1, D-92240 Hirschau (www.conrad.com).
Tutti i diritti, compresa la traduzione, sono riservati. È vietata la riproduzione di qualsivoglia genere, quali fotocopie, mi-
crolm o memorizzazione in attrezzature per l’elaborazione elettronica dei dati, senza il permesso scritto dell’editore. Le
ristampe, compresi gli estratti, sono vietate. La pubblicazione è aggiornata no al momento della stampa.
Copyright 2021 by Conrad Electronic SE. *2353939_v1_0421_02_DS_m_5L_(1)
Codice Descrizione Impostazioni Valore
standard
A6 Protezione alta
temperatura
Se la temperatura misurata dal
sensore supera il valore impostato,
il funzionamento del riscaldamento
si arresta automaticamente (ad
es. serve come protezione da
surriscaldamento per i riscaldamenti
a pavimento).
Intervallo di impostazione: da +20
a +70 °C
Per disattivare questa
funzione, tenere premuto
il tasto freccia giù (12)
no a quando sul display
non viene visualizzato
"--".
± 45 °C
A7 Protezione bassa
temperatura
Se la temperatura misurata dal
sensore scende al di sotto del
valore impostato, il funzionamento
del riscaldamento viene avviato
automaticamente (ad es. serve
come protezione antigelo).
Intervallo di impostazione: da 1 a
+10 °C
Per disattivare questa
funzione, tenere premuto
il tasto freccia su(11) no
a quando sul display non
viene visualizzato "--".
± 5 °C
A8 Temperatura minima Imposta il valore di temperatura
minimo selezionabile
Intervallo di impostazione: da 1 a
+10 °C
± 5 °C
A9 Temperatura massima Imposta il valore di temperatura
massimo selezionabile
Intervallo di impostazione: da +20
a +70 °C
± 35 °C
AA Decalcicazione 0 = chiuso
1 = aperto
0
A
partire
da
Comportamento dopo
un'interruzione di
corrente
0 = ritorno alla funzione precedente
1 = spegnimento
2 = accensione
0
CA Impostazione del ciclo
della settimana
0 = 5 giorni identici + 2 giorni identici
(lun–ven + sab–dom.)
1 = 6 giorni identici + 1 giorno
individuale (lun–sab. + dom)
2 = 7 giorni identici
(lun–dom)
Afnché il programma
rilevi l'inizio del ne
settimana, è necessario
impostare il giorno della
settimana corretto. Per
ulteriori informazioni
vedere il capitolo
“c) Impostazione della
data e dell’ora”.
0
AD Ripristinare le
impostazioni di fabbrica
Tenere premuto il tasto Ora (8) per
tre o cinque secondi no a quando
tutti gli elementi del display non si
accendono contemporaneamente.
In questo modo, tutte le impostazioni
saranno ripristinate alle impostazioni
di fabbrica.
Codici di errore
Se il sensore interno o esterno presenta un guasto, sul display viene visualizzato un codice di
errore corrispondente e il termostato imposta il funzionamento del riscaldamento no a quando
non viene risolto il guasto.
Codice Descrizione Azioni per la risoluzione
E1 Guasto del
sensore
interno
Spegnere il termostato e contattare il nostro servizio di
assistenza tecnica o altro personale specializzato.
E2 Guasto sul
sensore
esterno
Assicurarsi che il sensore esterno sia collegato
correttamente.
Spegnere il termostato e contattare il nostro servizio di
assistenza tecnica o altro personale specializzato.
Manutenzione e pulizia
Non utilizzare agenti pulenti abrasivi, detergenti a base di alcol o altre soluzioni
chimiche, in quanto potrebbero danneggiare l'alloggiamento o interferire con il
funzionamento dell'apparecchiatura..
• Pulire il pannello frontale utilizzando un panno asciutto e non slacciato.
• Durante la pulizia non premere troppo forte sulla supercie per evitare graf.
Prima di pulire il pannello frontale, attivare sempre il blocco tasti. L'azionamento
accidentale dei tasti può causare una modica involontaria delle impostazioni.
Smaltimento
I dispositivi elettronici sono materiali riciclabili e non devono essere smaltiti tra i riuti
domestici. Alla ne della sua vita utile, il prodotto deve essere smaltito in conformità
alle disposizioni di legge vigenti. Rimuovere gli accumulatori inseriti e smaltirli
separatamente dal prodotto.
In questo modo si rispettano gli obblighi di legge contribuendo al contempo alla
tutela ambientale.
Dati tecnici
Tensione di ingresso ............................. 90 – 240 V/CA, 50/60 Hz
Max. potenza di commutazione ............ 3000 W (carico ohmico)
2000 W (carico induttivo)
Carico di contatto ..................................16 A, 250 V
Intervallo standard regolabile ...............da 5 a +35 ºC
Display della temperatura .....................da 0 a +40 ºC
Precisione display .................................0,5 ºC
Sensore ................................................1 x interno, 1 x esterno
Sensore esterno ...................................NTC (10 k) 1 %
Categoria di protezione ........................IP20
Condizioni d’esercizio ........................... Da +1 a +70 ºC, umidità relativa < 85 %
Condizioni di immagazzinamento ......... Da +1 a +70 ºC, umidità relativa < 85 %
Dimensioni (L x A x P)...........................94 x 94 x 41,3 mm
Dimensioni del display ..........................Ø 52 mm
Lunghezza del cavo del sensore ..........2,5 m
Peso .....................................................139 g

• Jeśli bezpieczna praca nie jest już możliwa, należy przerwać użytkowanie
i zabezpieczyć produkt przed ponownym użyciem. Bezpieczna praca nie jest
zapewniona, jeśli produkt:
- posiada widoczne uszkodzenia,
- nie działa prawidłowo,
- był przechowywany przez dłuższy czas w niekorzystnych warunkach lub
- został nadmiernie obciążony podczas transportu.
• W przypadku pojawienia się jakichkolwiek wątpliwości dotyczących pracy,
bezpieczeństwa lub podłączenia produktu, należy skonsultować się ze specjalistą.
• Prace konserwacyjne, regulacyjne i naprawy może przeprowadzać wyłącznie
specjalista lub specjalistyczny warsztat.
• Jeśli pojawią się jakiekolwiek pytania, na które nie ma odpowiedzi w niniejszej
instrukcji, prosimy o kontakt z naszym biurem obsługi klienta lub z innym
specjalistą.
b) Instalacja/podłączenie
Uwaga, ważna wskazówka!
Instalacja i podłączenie tego produktu mogą być wykonywane wyłącznie
przez osoby posiadające odpowiednią wiedzę i praktyczne doświadczenie
w zakresie instalacji elektrycznych! *)
Nieprawidłowa instalacja naraża użytkownika na niebezpieczeństwo:
• utraty życia,
• utraty życia przez osobę, która uruchamia urządzenie elektryczne.
Jeżeli instalacja nie zostanie przeprowadzona prawidłowo, istnieje ryzyko powstania
poważnych szkód materialnych, np. w wyniku pożaru. Pamiętaj, że możesz zostać
pociągnięty do osobistej odpowiedzialności za obrażenia ciała lub uszkodzenie
mienia.
Dlatego należy zawsze zwracać się do elektryka!
*) Wiedza specjalistyczna potrzebna do instalacji:
Do przeprowadzenia instalacji potrzebna jest w szczególności następująca wiedza
specjalistyczna:
• „Pięć zasad bezpieczeństwa”, które należy stosować: Wyłączyć (odłączyć od
zasilania), zabezpieczyć przed ponownym włączeniem, sprawdzić brak napięcia
na wszystkich biegunach, uziemić i zewrzeć, zakryć lub odgrodzić przyległe
części znajdujące się pod napięciem
• Używanie odpowiednich narzędzi, mierników i środków ochrony indywidualnej,
tam gdzie to konieczne
• Ocena wyników pomiarów
• Stosowanie materiałów elektroinstalacyjnych, w celu zapewnienia warunków
bezpiecznego odłączenia od zasilania
• Stopnie ochrony IP
• Stosowanie materiałów elektroizolacyjnych
• Typy sieci zasilającej (układ TN, IT, TT) i wynikające z nich warunki przyłączenia
(standardowe zerowanie, uziemienie ochronne, wymagane działania dodatkowe
itp.)
Jeśli nie posiadasz wystarczającej wiedzy choćby w jednej z wyżej wymienionych
dziedzin, powinieneś bezwzględnie zrezygnować zarówno z instalacji, jak
i samodzielnego podłączenia i zlecić to zadanie specjaliście.
Dalsze wskazówki ostrzegawcze:
• Produkt jest urządzeniem o II klasie ochronności (wzmocniona lub podwójna
izolacja). Należy zwrócić uwagę, aby izolacja obudowy nie została uszkodzona
ani zniszczona.
• Przed montażem wszystkie bieguny muszą być odłączone od napięcia
zasilającego, np. poprzez wyłącznik różnicowo-prądowy. Pomiędzy wyłącznikiem
różnicowo-prądowym a produktem musi być dostępny odpowiednio dobrany
bezpiecznik lub bezpiecznik automatyczny.
• Podłączenie i montaż mogą być przeprowadzane tylko w stanie beznapięciowym.
W tym celu należy wyłączyć bezpiecznik automatyczny i wyłącznik różnicowo-
prądowy, co spowoduje odłączenie wszystkich biegunów od napięcia zasilającego
lub pozbawienie ich napięcia. Zabezpiecz je przed nieuprawnionym ponownym
włączeniem, np. za pomocą tabliczki ostrzegawczej. Następnie sprawdź brak
napięcia za pomocą odpowiedniego miernika (np. cyfrowy miernik uniwersalny).
• Nie należy podłączać produktu do zasilania bezpośrednio po przeniesieniu go
z zimnego do ciepłego otoczenia (np. podczas transportu). W ten sposób może
utworzyć się woda kondensacyjna, która uszkodzi produkt. Ponadto istnieje
zagrożenie porażenia prądem elektrycznym!
• Zawsze najpierw pozwól produktowi osiągnąć temperaturę pokojową. Poczekaj,
aż kondensat całkowicie wyparuje. W pewnych okolicznościach może to potrwać
kilka godzin. Dopiero wtedy urządzenie może zostać zamontowane, podłączone
do zasilania elektrycznego i uruchomione.
c) Stopień ochrony
• Produkt lub jego obudowa spełnia wymogi klasy ochrony IP20 i nadaje się do
eksploatacji wyłącznie w suchych pomieszczeniach wewnętrznych.
• Nie ma jednak ochrony przed wodą, łatwopalnymi gazami i oparami.
Instrukcja obsługi
Cyfrowy programowalny termostat pokojowy z
panelem dotykowym
Nr zamówienia 2353939
Użytkowanie zgodne z przeznaczeniem
Ten produkt jest termostatem grzewczym przeznaczonym do regulacji temperatury
w połączeniu z ogrzewaniem elektrycznym. Aby uruchomić produkt, musi on być podłączony
bezpośrednio do napięcia zasilającego. Następnie można do niego podłączyć odbiornik, który
jest również zasilany z sieci i włączać lub wyłączać go poprzez regulację temperatury.
Termostat grzewczy wyposażony jest w wewnętrzny i zewnętrzny czujnik (sondę). Zewnętrzny
czujnik jest przeznaczony do pomiaru temperatury w innym miejscu niż miejsce położenia
termostatu, np. na podłodze w przypadku elektrycznego ogrzewania podłogowego.
Produkt posiada również blokadę przycisków, która może być aktywowana w celu ochrony
przed błędną obsługą oraz pamięć do tworzenia kopii zapasowych danych w przypadku awarii
zasilania elektrycznego.
Produkt jest zgodny z klasą ochrony IP20 i nadaje się do montażu wyłącznie w suchych
pomieszczeniach wewnętrznych. Nie użytkuj produktu na wolnym powietrzu. Należy
bezwzględnie unikać kontaktu z wilgocią, np. w łazience.
Ze względów bezpieczeństwa oraz certykacji produktu nie można w żaden sposób
przebudowywać i/lub zmieniać. W przypadku korzystania z produktu w celach innych niż
opisane może on ulec uszkodzeniu. Niewłaściwe użytkowanie może ponadto spowodować
zagrożenia, takie jak zwarcie, pożar, porażenie prądem elektrycznym itp. Dokładnie przeczytaj
instrukcję obsługi i zachowaj ją do późniejszego wykorzystania. Produkt można przekazywać
osobom trzecim wyłącznie z załączoną instrukcją obsługi.
Produkt ten jest zgodny z obowiązującymi wymogami krajowymi i europejskimi. Wszystkie
zawarte w instrukcji obsługi nazwy rm i produktów są znakami towarowymi należącymi do ich
właścicieli. Wszelkie prawa zastrzeżone.
Zakres dostawy
• Termostat
• 2 śruby
• Czujnik zewnętrzny
• Instrukcja obsługi
Aktualne instrukcje obsługi
Aktualne instrukcje obsługi można pobrać, klikając link www.conrad.com/
downloads lub skanując przedstawiony kod QR. Przestrzegaj instrukcji na
stronie internetowej.
Objaśnienie symboli
Symbol błyskawicy w trójkącie jest stosowany, gdy istnieje ryzyko dla zdrowia, np.
wskutek porażenia prądem elektrycznym.
Symbol z wykrzyknikiem w trójkącie wskazuje na ważne wskazówki w tej instrukcji
użytkowania, których należy bezwzględnie przestrzegać.
Symbol „strzałki” pojawia się, gdy podawane są konkretne wskazówki i uwagi
dotyczące obsługi.
Produkt może być ustawiany i eksploatowany tylko w suchych, zamkniętych,
wewnętrznych pomieszczeniach. Produkt nie może być wilgotny lub mokry. Istnieje
zagrożenie życia wskutek porażenia prądem elektrycznym!
Wskazówki dotyczące bezpieczeństwa użytkowania
Dokładnie przeczytaj instrukcję obsługi i przestrzegaj zawartych
w niej wskazówek dotyczących bezpieczeństwa. Nie ponosimy
żadnej odpowiedzialności za obrażenia oraz szkody spowodowane
nieprzestrzeganiem wskazówek bezpieczeństwa i informacji dotyczących
prawidłowego użytkowania zawartych w niniejszej instrukcji obsługi. Poza
tym w takich przypadkach wygasa rękojmia/gwarancja.
a) Ogólne informacje
• Produkt nie jest zabawką. Przechowuj go w miejscu niedostępnym dla dzieci
i zwierząt.
• Nie pozostawiaj materiałów opakowaniowych bez nadzoru. Mogą one stać się
niebezpieczną zabawką dla dzieci.
• Z produktem należy obchodzić się ostrożnie. Wstrząsy, uderzenia lub upadek
produktu nawet z niewielkiej wysokości spowodują jego uszkodzenie.
• Chroń produkt przed ekstremalnymi temperaturami, bezpośrednim
promieniowaniem słonecznym, silnymi wibracjami, wysoką wilgotnością, wilgocią,
palnymi gazami, oparami i rozpuszczalnikami.
• Nie narażaj produktu na obciążenia mechaniczne.

Opis produktu
a) Wskazania wyświetlacza i przyciski obsługowe
1 Tryb urlopowy
2 Tryb ogrzewania
3 Tryb automatyczny
4 Ustawienie temperatury zadanej
5 Zmierzona temperatura
Air = czujnik wewnętrzny, Floor = czujnik
zewnętrzny
6 Godzina
7 Blokada przycisków
8 Przycisk godziny
9 Przycisk trybu
10 Przycisk włącz/wyłącz
11 Przycisk strzałka do góry
12 Przycisk strzałka w dół
13 Dzień tygodnia
14 Program
15 Tryb ręczny
b) Przyłącza i elementy mocujące
16
16
16 Mocowanie przedniego panelu
17 Otwory na śruby mocujące
18 Zaciski przyłączeniowe
Instalacja
1. Aby usunąć przedni panel, przytrzymaj tylną ściankę termostatu i przekręć przedni panel
w kierunku przeciwnym do ruchu wskazówek zegara. Obie części są połączone ze sobą
kablami.
2. Z tyłu termostatu ściennego znajduje się 6 zacisków przyłączeniowych (18): Służą one do
podłączenia:
- zasilania głównego
- obciążenia elektrycznego (odbiornik)
- zewnętrznego czujnika temperatury
3. Podłącz przewód neutralny i fazę zasilania elektrycznego do wejść 3 i 4.
4. Podłącz odbiornik (np. grzejnik elektryczny lub elektryczne ogrzewanie podłogowe) do
odpowiednich wyjść 1 i 2.
1
2
4
3
N
L
5
6
N
T
C
L
1
N
1
V
e
r
b
r
a
u
c
h
e
r
-
s
e
i
t
e
Jeśli odbiornik przewiduje podłączenie do przewodu ochronnego, należy go
zainstalować oddzielnie. Sam termostat jest środkiem technicznym klasy ochrony
II i jako taki nie musi być podłączony do przewodu ochronnego.
5. Jeśli chcesz dodatkowo skorzystać z zewnętrznego czujnika temperatury, należy go
podłączyć do bocznych zacisków 5 i 6. Nie ma potrzeby uwzględniania biegunowości.
Przewody można łączyć według własnego uznania.
Podczas układania przewodów przyłączeniowych należy uważać, aby nie zostały
one uszkodzone przez ostre krawędzie. W żadnym wypadku nie należy używać
gwoździ, śrub lub podobnych elementów do mocowania kabli.
6. Włożyć tylną ścianę termostatu do puszki podtynkowej/natynkowej. Włożyć załączone
śruby mocujące przez przewidziane do tego celu otwory (17) i przykręcić tylną ścianę.
Upewnij się, że kable podczas montażu termostatu ściennego nie zostaną
uszkodzone w puszce podtynkowej/natynkowej.
7. Umieść przedni panel w uchwycie (16) i obróć go w kierunku zgodnym z ruchem wskazówek
zegara. Zwrócić uwagę, aby słyszalnie zatrzasnął się na swoim miejscu.
8. Włącz napięcie zasilające.
Termostat można teraz uruchomić.
Eksploatacja
a) Włączanie/wyłączanie
Aby włączyć lub wyłączyć termostat, należy postępować w następujący sposób:
• Dotknij przycisku Włącz/Wyłącz (10), aby włączyć lub wyłączyć termostat.
• Po wyłączeniu termostatu wskaźnik zgaśnie, a regulacja temperatury przestaje działać.
b) Włączanie/wyłączanie blokady przycisków
Blokada przycisków (zabezpieczenie przed dziećmi) zapobiega przypadkowej zmianie
ustawień na skutek dotknięcia. Postępuj w następujący sposób, aby włączyć lub wyłączyć
blokadę przycisków:
• Aby włączyć blokadę przycisków, przytrzymaj naciśnięty przycisk ze strzałką w dół (12).
Symbol blokady przycisków (7) pojawia się na wyświetlaczu i przyciski są zablokowane.
• Aby wyłączyć blokadę przycisków, ponownie przytrzymaj naciśnięty przycisk ze strzałką
w dół (12). Symbol blokady przycisków (7) znika i przyciski są ponownie zwolnione.
W zależności od ustawień określonych w „ustawieniach systemowych” → „A5”, do
wyboru są dwa różne zabezpieczenia przed dziećmi:
0 = wszystkie przyciski są zablokowane, z wyjątkiem przycisku Włącz/Wyłącz.
1 = wszystkie przyciski są zablokowane.
c) Ustawianie daty i godziny
Wykonaj poniższe czynności, aby ustawić datę i godzinę:
1. Naciśnij krótko przycisk godziny (8). Wskazanie minut zaczyna migać.
- Użyj przycisków ze strzałkami (11,12), aby dopasować wartość.
- Potwierdź wprowadzenie, naciskając ponownie krótko przycisk godziny (8).
2. Po potwierdzeniu wartości minut zaczyna migać wskazanie godziny.
- Użyj przycisków ze strzałkami (11,12), aby dopasować wartość.
- Potwierdź wprowadzenie, naciskając ponownie krótko przycisk godziny (8).
3. Po potwierdzeniu wartości godziny, zaczyna migać wskazanie dnia tygodnia (13).
- Użyj przycisków ze strzałkami (11,12), aby dopasować wartość (1 = poniedziałek...7 =
niedziela).
- Potwierdź wprowadzenie, naciskając ponownie krótko przycisk godziny (8).
4. Ustawienia zostaną zapisane, a termostat powraca do normalnego trybu pracy.
d) Przełączanie wskazania temperatury
Jeśli podłączony jest zewnętrzny czujnik, wskazanie temperatury (5) można przełączać
między czujnikiem wewnętrznym („Air”) a czujnikiem zewnętrznym („Floor”). W tym celu należy
postępować w następujący sposób:
• Naciśnij i przytrzymaj przycisk ze strzałką w dół (12).
• Naciśnij i przytrzymaj ponownie przycisk ze strzałką w dół (12), aby ponownie przełączyć
wskazanie.
e) Przełączanie między trybem automatycznym a ręcznym
Aby przełączać pomiędzy trybem automatycznym a ręcznym, należy postąpić następująco:
1. Naciśnij krótko przycisk trybu(9).
- Tryb automatyczny: Symbol trybu ręcznego (15) jest niewidoczny. Regulacja temperatury
zależy od ustawień, które zostały ustalone dla aktywnego programu.
- Tryb ręczny: Na wyświetlaczu pojawi się symbol trybu ręcznego (15). Temperaturę
można ustawić ręcznie za pomocą przycisków ze strzałkami (11,12).
f) Ręczne mostkowanie trybu automatycznego
Aby tymczasowo zmienić temperaturę, która została ustalona dla trybu automatycznego,
należy postępować w następujący sposób:
1. Dostosuj ustawioną temperaturę zadaną za pomocą przycisków ze strzałkami (11,12) . Na
wyświetlaczu zostaną wtedy jednocześnie wyświetlone symbole dla trybu automatycznego
(3) i trybu ręcznego (15).

Ustawienia dokonane za pomocą ręcznego mostkowania zostają zachowane do początku
następnego przedziału czasowego. Znaczenie:
- Ręczne mostkowanie jest wyłączone i termostat powraca do trybu automatycznego.
- Symbol trybu ręcznego (15) zostaje ukryty.
g) Włączanie/wyłączanie trybu urlopowego
Użyj trybu urlopowego, aby ustawić określone przedziały czasu i temperatury dla
dni, w których nie ma Cię w domu.
Aby aktywować tryb urlopowy, należy postępować w następujący sposób:
1. Przytrzymaj przez trzy do pięciu sekund przycisk godziny (8), aż na wyświetlaczu pojawi
się symbol urlopu (1).
2. Wybierz tryb urlopowy.
- Za pomocą przycisków ze strzałkami (11,12) wybierz ustawienie „ON”.
- Potwierdź wprowadzenie, naciskając krótko przycisk godziny (8).
3. Ustaw wartość z zakresu „1 - 30” dla liczby dni, w których nie będzie Cibie w domu.
- Dostosuj wartość za pomocą przycisków ze strzałkami (11,12).
- Potwierdź wprowadzenie, naciskając krótko przycisk godziny (8).
4. Ustaw wymaganą temperaturę.
- Dostosuj wartość za pomocą przycisków ze strzałkami (11,12).
- Potwierdź wprowadzenie, naciskając krótko przycisk godziny (8).
Następnie symbol urlopu (1) pozostaje wyświetlony na wyświetlaczu i wskazuje, że
tryb urlopowy jest aktywny.
Po upływie ustalonego czasu tryb urlopowy automatycznie się wyłączy. Postępuj w następujący
sposób, aby ręcznie wyłączyć tryb urlopowy:
1. Naciśnij krótko przycisk trybu (9), aby wyłączyć tryb urlopowy. Termostat powraca do trybu
ręcznego lub automatycznego.
h) Programowanie planu tygodniowego
Przegląd
Użytkownik ma możliwość ustawienia własnej temperatury dla sześciu różnych okresów w
ciągu dnia. Który z przedziałów czasowych jest aktualnie aktywny, jest wskazywany przez
odpowiedni symbol.
Przykład:
1: Budzenie 2: Poza
domem
3: W domu 4: Poza
domem
5: W domu 6: Nocny
wypoczynek
06:00 08:00 11:30 13:30 17:00 22:00
21°C 17°C 21°C 17°C 21°C 15°C
Ustawianie cyklu tygodniowego
Do planu tygodniowego można wybierać pomiędzy różnymi cyklami tygodniowymi (liczba dni
tygodnia + weekend). Aby ustawić cykl tygodniowy, należy wykonać następujące czynności:
1. Gdy termostat jest włączony: Naciśnij przycisk Włącz/Wyłącz (10), aby wyłączyć termostat.
2. Naciśnij i przytrzymaj przez trzy do pięciu sekund przycisk trybu (9). Otwiera się menu
ustawień.
3. Naciśnij kilkakrotnie krótko przycisk trybu (9), aż pojawi się ustawienie „AC”.
4. Wybrać wymagany cykl tygodniowy przyciskami ze strzałkami (11,12).
0 = 5 identycznych dni + 2 identyczne dni (domyślnie włączony)
1 = 6 identycznych dni + 1 indywidualny dzień
2 = 7 identycznych dni
5. Naciśnij ponownie przycisk Włącz/Wyłącz (10), aby zapisać ustawienie i opuścić menu
ustawień.
Ustawienia zostaną zapisane również wtedy, gdy przez około 10 sekund nie
zostanie naciśnięty żaden przycisk.
Programowanie harmonogramu
Aby zaprogramować różne okresy czasu, należy postępować w następujący sposób:
1. Gdy termostat jest wyłączony: Naciśnij przycisk Włącz/Wyłącz (10), aby włączyć termostat.
2. Naciśnij i przytrzymaj przez trzy do pięciu sekund przycisk trybu (9). Otwiera się
tryb programowania i na wyświetlaczu pojawia się symbol pierwszego okresu czasu
„1: Budzenie”, a godzina zaczyna migać.
- Użyj przycisków ze strzałkami (11,12), aby dopasować wartość.
- Potwierdź wprowadzenie, naciskając krótko przycisk trybu (9).
3. Po potwierdzeniu godziny zacznie migać temperatura.
- Użyj przycisków ze strzałkami (11,12), aby dopasować wartość.
- Potwierdź wprowadzenie, naciskając krótko przycisk trybu (9).
4. Po potwierdzeniu temperatury zacznie migać symbol następnego okresu czasu.
5. Powtórz procedurę dla wszystkich sześciu okresów czasu.
6. Poczekaj około 10 sekund, bez naciskania przycisków, aby zapisać ustawienia.
Aby aktywować lub dezaktywować zaprogramowany harmonogram, naciśnij
krótko przycisk trybu (9), patrz również punkt “e) Przełączanie między trybem
automatycznym a ręcznym”.
Ustawienia systemowe
Dostosowanie ustawień systemowych może sprawić, że praca termostatu bez
zakłóceń nie będzie już możliwa. W związku z tym przed dokonaniem jakichkolwiek
zmian należy uważnie zapoznać się z wszystkimi instrukcjami.
Aby otworzyć menu ustawień i dokonać zmian, należy postępować w następujący sposób:
1. Gdy termostat jest włączony: Naciśnij przycisk Włącz/Wyłącz (10), aby wyłączyć termostat.
2. Naciśnij i przytrzymaj przez trzy do pięciu sekund przycisk trybu (9). Otwiera się menu
ustawień.
- Aby przejść do następnego ustawienia, naciśnij przycisk trybu (9).
- Aby zmienić ustawienie, wybierz wymaganą wartość za pomocą przycisków ze strzałkami
(11,12).
3. Naciśnij ponownie przycisk Włącz/Wyłącz (10), aby zapisać ustawienia i opuścić menu
ustawień.
Ustawienia zostaną zapisane również wtedy, gdy przez około 10 sekund nie
zostanie naciśnięty żaden przycisk.
Kod Opis Ustawienia Wartość
standardowa
A1 Kalibracja temperatury Zakres ustawień:
-9 do +9 °C
-1°C
A2 Różnica przełączania
(histereza)
Zakres ustawień:
0,5 do 2,5 °C
Przykład: Przy ustawieniu
1 °C i temperaturze
+20 °C mierzonej przez
termostat, termostat
ten włącza ogrzewanie
przy +19 °C i wyłącza je
ponownie przy +21 °C.
1°C
A3 Zabezpieczenie przed
wysoką temperaturą
/ ustawienie różnicy
(zewnętrzny czujnik)
Zakres ustawień: 1 do 9 °C
Przykład: Wartość
graniczna „A6” jest
ustawiona na +45 °C
i „A3” na 2 °C. Gdy
temperatura osiągnie
+45 °C, tryb ogrzewania
zostaje wyłączony. Gdy
temperatura spadnie do
+43 °C, tryb ogrzewania
zostaje wznowiony.
Działa to jednak tylko
wtedy, gdy temperatura
wewnętrzna jest niższa
niż temperatura zadana.
2 °C
A4 Wybór czujnika N1 = temperatura jest regulowana
przez wewnętrzny czujnik.
N2 = temperatura jest regulowana
przez zewnętrzny czujnik.
N3 = temperatura jest regulowana
przez wewnętrzny czujnik.
Jeśli N3 jest aktywne,
zewnętrzny czujnik używany
jest stosowany jako czujnik do
ograniczania temperatury.
Wszystkie wyżej
wymienione ustawienia
umożliwiają przerwanie
trybu ogrzewania po
osiągnięciu maksymalnej
temperatury.
N1
A5 Blokada przycisków 0 = wszystkie przyciski poza Włącz/
Wyłącz są zablokowane
1 = wszystkie przyciski są
zablokowane
0

Niniejsza publikacja została wydana przez Conrad Electronic SE, Klaus-Conrad-Str. 1, D-92240 Hirschau,
Niemcy (www.conrad.com).
Wszelkie prawa, w tym przekład, są zastrzeżone. Reprodukowanie w jakiejkolwiek formie, kopiowanie, tworzenie mikro-
lmów lub przechowywanie za pomocą urządzeń elektronicznych do przetwarzania danych jest zabronione bez pisemnej
zgody wydawcy. Kopiowanie, również we fragmentach, jest zabronione. Publikacja ta odpowiada stanowi technicznemu
urządzeń w chwili druku.
Copyright 2021 by Conrad Electronic SE. *2353939_v1_0421_02_DS_m_5L_(1)
Kod Opis Ustawienia Wartość
standardowa
A6 Zabezpieczenie przed
wysoką temperaturę
Gdy temperatura zmierzona przez
czujnik wzrasta powyżej ustawionej
tutaj wartości, tryb ogrzewania
zostaje automatycznie zatrzymany
(służy np. jako zabezpieczenie
przed przegrzaniem w ogrzewaniu
podłogowym).
Zakres ustawień: +20 do +70 °C
Aby wyłączyć tę funkcję,
należy przytrzymać
naciśnięty przycisk ze
strzałką w dół (12), aż na
wyświetlaczu pojawi się
symbol „--”.
+ 45 °C
A7 Zabezpieczenie przed
niską temperaturą
Gdy temperatura zmierzona przez
czujnik spadnie poniżej ustawionej
tutaj wartości, tryb ogrzewania
zostaje automatycznie uruchomiony
(służy np. jako zabezpieczenie przed
zamarzaniem).
Zakres ustawień: +1 do +10 °C
Aby wyłączyć tę funkcję,
należy przytrzymać
naciśnięty przycisk ze
strzałką w górę (11) , aż
na wyświetlaczu pojawi
się symbol „--”.
+5 °C
A8 Minimalna temperatura Ustawia najniższą możliwą do
wybrania wartość temperatury
Zakres ustawień: +1 do +10 °C
+5 °C
A9 Maksymalna
temperatura
Ustawia najwyższą możliwą do
wybrania wartość temperatury
Zakres ustawień: +20 do +70 °C
+35 °C
AA Odkamienianie 0 = zamknięty
1 = otwarty
0
AB Postępowanie w
przypadku awarii
zasilania
0 = powrót do poprzedniej funkcji
1 = wyłączenie
2 = włączenie
0
AC Ustawienie cyklu
tygodniowego
0 = 5 identycznych dni + 2
identyczne dni
(pn.–pt. + sob.–niedz.)
1 = 6 identycznych dni +
1 indywidualny dzień
(pn.–sob. + niedz.)
2 = 7 identycznych dni
(pn.–niedz.)
Aby program mógł
rozpoznać początek
weekendu, należy
ustawić prawidłowy dzień
tygodnia. Informacje na
ten temat można znaleźć
w punkcie
“c) Ustawianie daty i
godziny”.
0
AD Przywracanie ustawień
fabrycznych
Naciskaj przez trzy do pięciu sekund
przycisk godziny (8), aż wszystkie
elementy wyświetlacza zaświecą
się jednocześnie. Dzięki temu
wszystkie ustawienia systemowe
zostaną zresetowane do ustawień
fabrycznych.
Kody błędów
Gdy wewnętrzny lub zewnętrzny czujnik będzie wykazywał usterkę, na wyświetlaczu pojawi się
odpowiedni kod błędu, a termostat ustawia tryb ogrzewania aż do usunięcia usterki.
Kod Opis Środki zaradcze
E1 Usterka
czujnika
wewnętrznego
Wyłącz termostat i skontaktuj się z naszym działem pomocy
technicznej lub innym wykwalikowanym specjalistą.
E2 Usterka
czujnika
zewnętrznego
Upewnij się, że zewnętrzny czujnik jest prawidłowo podłączony.
Wyłącz termostat i skontaktuj się z naszym działem pomocy
technicznej lub innym wykwalikowanym specjalistą.
Pielęgnacja i czyszczenie
Nie należy używać silnie działających detergentów, alkoholu ani innych
rozpuszczalników chemicznych, ponieważ może to spowodować uszkodzenie
obudowy lub ograniczyć funkcjonowanie urządzenia.
• Do czyszczenia przedniego panelu używaj suchej, niepozostawiającej włókien szmatki.
• Podczas czyszczenia nie naciskaj zbyt mocno na powierzchnię, aby uniknąć zarysowań.
Przed czyszczeniem przedniego panelu zawsze aktywuj blokadę przycisków.
Przypadkowe naciśnięcie przycisków może prowadzić do niezamierzonej zmiany
ustawień.
Utylizacja
Urządzenia elektroniczne mogą być poddane recyklingowi i nie zaliczają się do
odpadów z gospodarstw domowych. Produkt należy zutylizować po zakończeniu
jego eksploatacji zgodnie z obowiązującymi przepisami prawnymi. Należy wyjąć
wszystkie włożone akumulatory i utylizować je oddzielnie od produktu.
W ten sposób użytkownik spełnia wymogi prawne i ma swój wkład w ochronę
środowiska.
Dane techniczne
Napięcie wejściowe .............................. 90 – 240 V/AC, 50/60 Hz
Maks. moc załączalna .......................... 3000 W (obciążenie rezystancyjne)
2000 W (obciążenie indukcyjne)
Obciążenie styków ................................16 A, 250 V
Regulowany zakres standardowy .........+5 do +35 °C
Wyświetlanie temperatury ....................0 do +40 °C
Dokładność wskazań ............................0,5 ºC
Czujnik ..................................................1 wewnętrzny, 1 zewnętrzny
Czujnik zewnętrzny ...............................NTC (10 k) 1 %
Stopień ochrony ....................................IP20
Warunki eksploatacji ............................. +1 do +70 ºC, < 85 % wilgotności względnej powietrza
Warunki przechowywania ..................... +1 do +70 ºC, < 85 % wilgotności względnej powietrza
Wymiary (szer. × wys. × głęb.) .............94 x 94 x 41,3 mm
Rozmiar wyświetlacza ..........................Ø 52 mm
Długość kabla czujnika .........................2,5 m
Masa .....................................................139 g
Table of contents
Languages:
Other Sygonix Thermostat manuals

Sygonix
Sygonix 1385634 User manual

Sygonix
Sygonix 2735095 User manual

Sygonix
Sygonix 2686283 User manual

Sygonix
Sygonix 1593775 User manual

Sygonix
Sygonix 2269125 User manual

Sygonix
Sygonix 2269125 User manual

Sygonix
Sygonix 2250409 User manual

Sygonix
Sygonix tx.2 User manual

Sygonix
Sygonix 2380477 User manual

Sygonix
Sygonix tx.1 User manual