Sym Maxsym TL TL 500 User manual

SANYANG MOTOR CO.,LTD.
NO.3 Chung Hua Road, Hukou, Hsinchu, Taiwan R.O.C.
T +886-3-598-1911
F +886-3-597-1981
W http://www.sym-global.com/
Owner's Manual
TL47W1-EU

1
1. Contents
1. Contents ....................................................................................................................... 1
2. Before Riding ............................................................................................................... 3
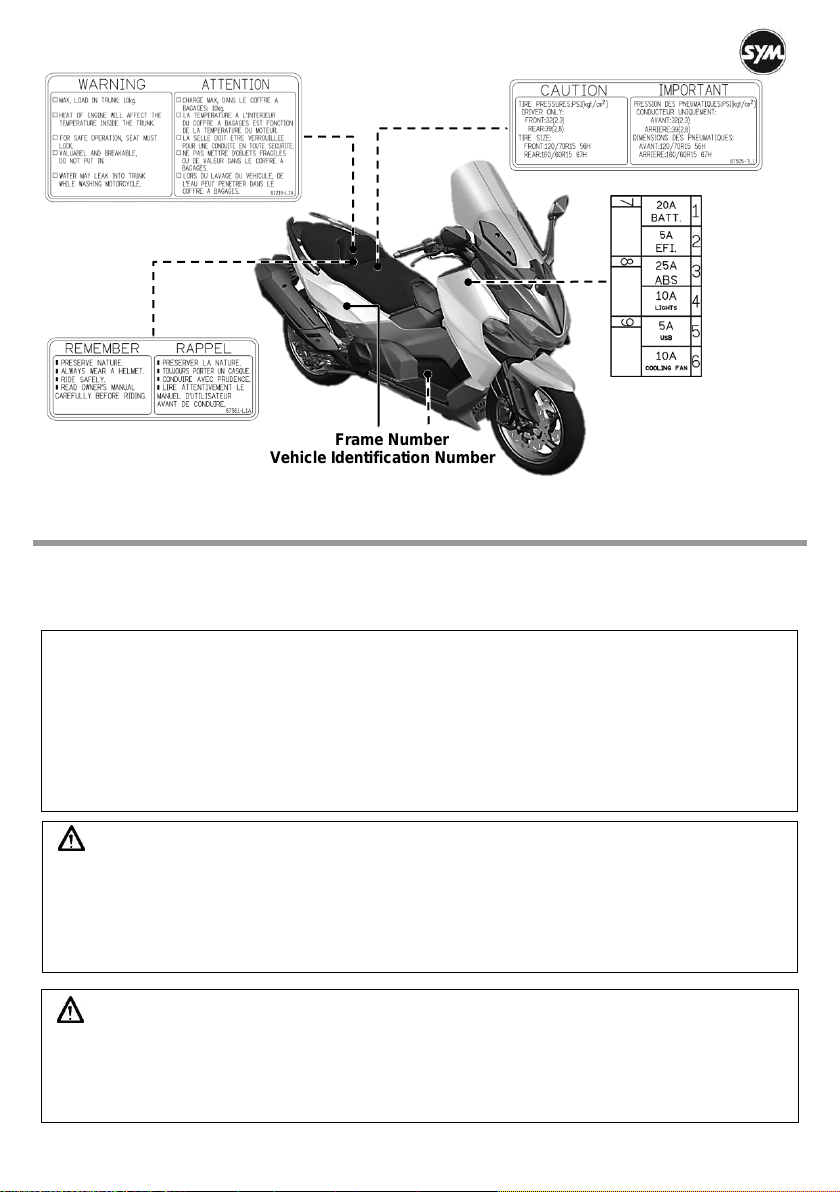
3. Serial Number/Labels Location .................................................................................. 3
4. Safe Riding ....................................................................................................................4
5. Driving .......................................................................................................................... 5
6. Use Genuine Spare Parts ........................................................................................... 5
7. Parts Location ............................................................................................................. 6
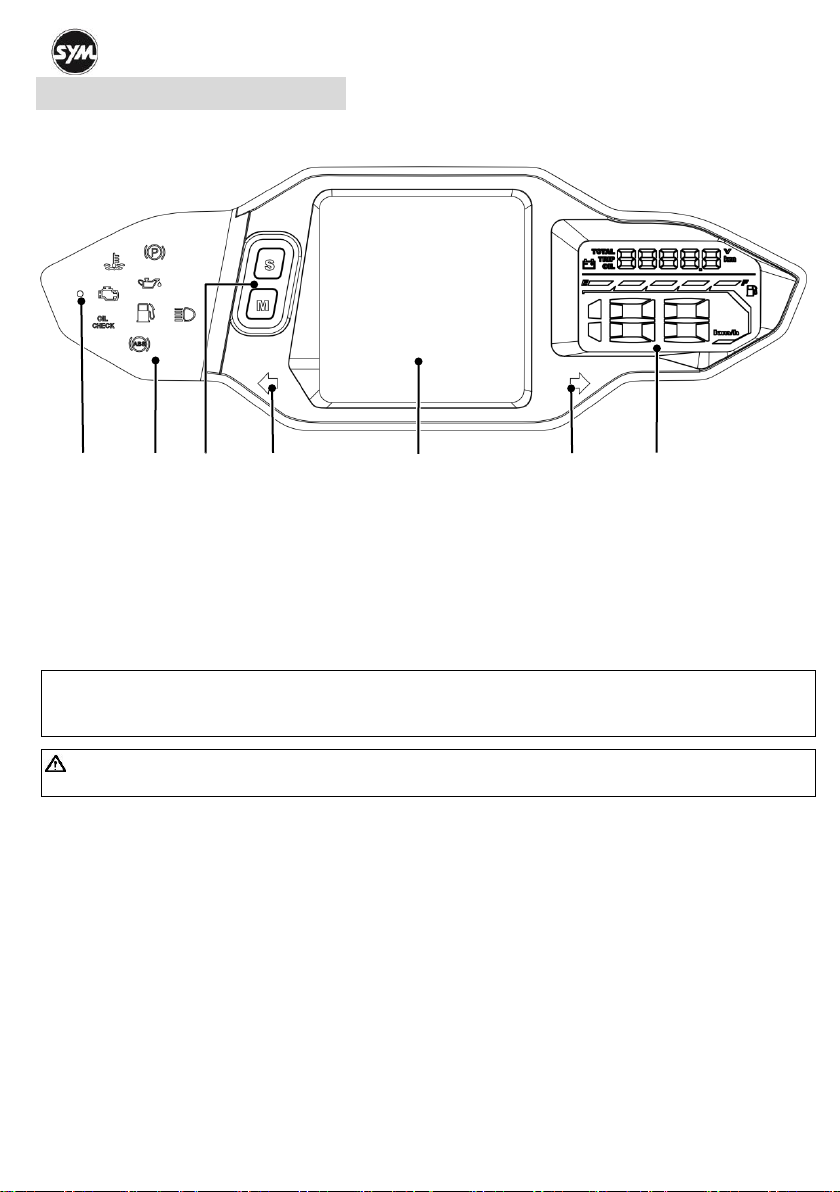
Combination instrument ...................................................................................................... 9
Ignition switch ................................................................................................................ 20
Right handlebar switches ...................................................................................................22
Left handlebar switches .................................................................................................... 22
Front/rear brake lever ....................................................................................................... 23
Windscreen ................................................................................................................... 24
Fuel tank cap ................................................................................................................. 24
Front compartment ......................................................................................................... 26
Luggage box/tool kit/helmet hook ..................................................................................... 26
Side stand/parking brake ................................................................................................. 27
Main stand .................................................................................................................... 28
Rear view mirror ............................................................................................................. 28
Passenger footrest ......................................................................................................... 29
8. How to Start the Engine ............................................................................................ 29
To start the engine .......................................................................................................... 29
To stop the engine .......................................................................................................... 29
9. How to Ride the Scooter ........................................................................................... 30
Break-in ........................................................................................................................ 30
Tips of fuel economy ....................................................................................................... 30
Throttle control ............................................................................................................... 30
Moving off ...................................................................................................................... 31
Breaking ........................................................................................................................ 31
Anti-lock Brake System ................................................................................................... 31
Park the scooter ............................................................................................................. 32
10.Maintenance and Adjustment .................................................................................. 32
Importance of maintenance .............................................................................................. 32
Routine checks .............................................................................................................. 33
Oil level inspection / oil change ........................................................................................ 33

2
Fuel inspection ................................................................................................................ 35
Coolant level inspection / filling ......................................................................................... 36
Coolant change .............................................................................................................. 37
Brake system inspection .................................................................................................. 37
Throttle free play inspection ............................................................................................. 38
Tire / tire pressure inspection ........................................................................................... 39
Steering / front fork inspection .......................................................................................... 40
Fuse inspection .............................................................................................................. 40
Battery inspection ........................................................................................................... 41
Drive chain inspection ..................................................................................................... 42
Spark plug inspection ...................................................................................................... 44
Air cleaner/ V-belt case air cleaner inspection .................................................................... 44
Headlight adjustment ...................................................................................................... 46
Rear shock absorber adjustment ...................................................................................... 46
General lubrication ......................................................................................................... 47
Vehicle data recorder ...................................................................................................... 47
11. Taking Care of Your Scooter ................................................................................... 47
Washing ......................................................................................................................... 47
Storage........................................................................................................................... 48
12.Trouble Shooting ...................................................................................................... 48
Diagnosis when engine does not start ............................................................................... 48
Overheating ................................................................................................................... 48
EFi warning indicator light on ........................................................................................... 49
ABS indicator light on ...................................................................................................... 49
Low oil pressure indicator on ............................................................................................ 50
13. Periodic Maintenance Schedule .............................................................................. 51
14.Specification .............................................................................................................. 53

3
2. Before Riding
This manual describes the correct usage of this scooter including safety riding, simple inspection methods
and so on.
For a more comfortable and safety riding, please read this manual carefully.
For your benefit, please ask your SYM dealer the operating manual and carefully read the following:
Correct use of the scooter.
Pre-delivery inspection and maintenance.
Thank you very much for your patronage
In order to maximize your scooter’s performance, a periodical inspection and maintenance should be
completely carried out.
We recommend that after riding your new scooter for the first 300 kilometers, you should take your
scooter to the original dealer for an initial inspection, and to have your scooter inspected periodically
every 1000 kilometers thereafter.
In case the scooter’s specifications and construction are modified and different from the photos and
diagrams on the owner’s manual / catalogues, the specifications and construction of the actual scooter
shall prevail.
3. Serial Number/Labels location
The labels on your scooter provide important safety information. Read the labels thoroughly and do not
remove them. Contact your authorized SYM dealer for replacement if any label is missed or damaged.
Engine Number

4
4. Safe Riding
It is very important to be relaxed and clothe properly when driving, observe traffic regulations, do not rush,
always drive carefully and relaxed.
Usually, most people would ride their newly bought scooter very carefully, but after they became familiar with
their scooters, they tended to become reckless which may result in an accident.
To remind you:
Please wear a safety helmet, and properly tighten the chin belt when riding a scooter.
Clothes with open or loose cuffs may be blown by wind and cause the cuffs to get caught on the
steering handle and thus affects riding safety.
So, put on clothes with tight sleeves.
Hold the steering handle by both hands when riding. Never ride with only one hand.
Observe the speed limit.
Wear suitable low-heel shoes.
Perform periodical maintenance and inspection in accordance with the schedule.
WARNING!!
To avoid getting burned by exhaust pipe when taking a passenger. Make sure your passenger has
put his/her feet on the pedals.
After running, the exhaust pipe is very hot, be careful not to get burned when conducting an
inspection or maintenance.
After running, the exhaust pipe is very hot, select a suitable location to park your scooter to avoid
others getting burned by the exhaust pipe.
CAUTION:
Modified scooter will affect its structure or performance, and cause poor engine operation or exhaust
noise, which will result in shortening the scooter’s service life.
Besides, modification is illegal and does not conform to the original design and specifications.
A modified scooter will not be covered by warranty, therefore, do not modify your scooter at will.
Tire and rim modifications will make it unsafe to ride and may cause severe injury or death.
Frame Number
Vehicle Identification Number

5
5. Driving
Keep the related parts of your body such as arms, palms, lumbar, and toes relax and ride with the most
comfortable posture in order to be able to react quickly whenever it is necessary.
Rider’s posture will greatly affect riding safety. Always keep your body’s gravity in the center of the
saddle, if your body’s gravity is on the rear part of saddle, the front wheel load will be reduced, and this
will cause the steering handle shaking. It is dangerous to ride a scooter with an unstable handle.
It will be much easier to make a turn if rider inclines his body inward when turning. On the other hand,
the rider will feel unstable if his body and the scooter do not incline.
The scooter is hard to control on a bumpy, unleveled, unpaved road, try to know the road conditions in
advance, slow down and use your shoulder’s force to control the handle.
Suggestion: Do not load objects on the front pedals unnecessarily, to avoid affecting the riding safety
and the operation of steering handle.
CAUTION:
The rider’s feeling on the handle is slightly different with a load or without a load.
Overload may cause the handle to swing and affects the riding safety.
Therefore, do not overload your scooter.
Overloading the scooter will cause the scooter to become unstable and hard to maneuver, it may cause
serious damage to the tires and rims, as well as it may change the center of gravity, which could result in
an accident that could cause injury or death. Do not exceed the maximum authorized load.
CAUTION:
Do not place flammable materials such as rags between the body side cover and engine to avoid
components damaging by fire.
Do not load objects on areas not specified for loading to avoid damage.
SUGGESTION
To maximize the scooter’s performance and prolong its service life:
The first month or first 1000km is the wear- in period for the engine and components.
Avoid rapid acceleration, and do not exceed the recommended engine revolution limits (page 30).
6. Use Genuine Spare Parts
In order to maintain the scooter’s best performance, each part’s quality, material, and machined precision
must conform with the design requirements. “SYM Genuine Spare Parts” were made from the same high
quality materials used for the original scooter. No parts would be sold to the market until they could meet the
designed specifications through sophisticated engineering and stringent quality control. Therefore, it is
necessary to purchase “SYM Genuine Spare Parts” from “SYM Authorized Dealers or Franchised
Dealers” when replacing spare parts. If you buy cheap, or fake substitute parts from the market, no
guarantee can be provided either for the quality or durability. Also, it may result in unexpected troubles and
lower the scooter’s performance.
Always use SYM Genuine Spare Parts to keep your scooters pure blood and to ensure its long service
life.

6
7. Parts Location
1. Windscreen
2. Camcorder installation hole
3. Engine air cleaner
4. Front turn indicators
5. Headlight & position light
6. Front brake calipers
7. Front brake discs
8. Side stand
9. Oil level inspection window
10. Oil drain bolt
11. Oil filler cap
12. Passenger footrests
13. Rear shock absorber
14. Tail/brake light
15. Seat
16. Helmet hook
17. V-belt case air cleaner, left
18. Fuel tank cap
MAXSYM TL (TL47W1-EU)
TL 500 (TL47W1-EU)
1
2
3
4
5
6
8
9
10
11
13
14
15
16
17
18
7
12

7
1. License plate light
2. Rear turn indicators
3. Muffler
4. Rear brake disk
5. Rear/parking brake caliper
6. Main stand
7. V-belt case air cleaner, right
8. Oil Filter screen
9. Oil Filter cartridge
10. Coolant level inspection window
11. Coolant reserve tank
12. Front fork
13. Battery
14. Diagnostic tool connector
15. Fuse box
16. Tool kit
17. Luggage box
18. Passenger handlebar
1
2
3
4
5
6
7
8
9
10 11
12
13
14
17 16
18
15

8
1. Rear brake lever
2. Rear view mirrors
3. Left handlebar switches
4. Rear brake fluid reservoir
5. Combination instrument
6. Front brake fluid reservoir
7. Right handlebar switches
8. Front brake lever
9. Throttle grip
10. Right compartment
11. USB power outlet
12. Ignition switch
13. Left compartment
1
2
3
4
6
7
2
5
8
13
12
10
11
9

9
Combination Instrument
This instrument is integrated with a brightness sensor; the sensor controls the brightness of the TFT
display and the multi-function meter. The combination instrument is activated when the ignition switch is
turned on. Most indicators are lit up shortly and the welcome animation appears on the TFT display, and
the text and digits in the multi-function meter is lit up as marquee for function test, then the whole
combination instrument turns to operational mode.
NOTE :
Do not wipe plastic components, such as the instrument panel, the headlight, body covers, etc. with
solvents, such as gasoline. Wiping plastic components with solvents can damage these components.
WARNING:
Never operate the instrument buttons while riding the scooter.
MAXSYM TL (TL47W1-EU)
TL 500 (TL47W1-EU)
2
4
5
1. Brightness sensor
2. Indicators
3
2
2
3. Setting buttons
4. TFT display
1
5. Multi-function meter

10
Indicators
○AHigh Coolant Temperature Indicator
This indicator goes on whenever the coolant rises to 115∘C. The certain value can be checked in the TFT
display (page 15). If this indicatorcomes on when the scooter is in operation, stop the engine and move the
scooter to a safe place, and check the coolant level in the reserve tank (page 36) and the radiator fan.
○BEFi Warning Indicator
When turn the ignition switch to “ON” position, the EFi warning indicator remains on initially. It should go off
immediately after the engine is running. It displays the condition of the EFi system is working correctly. If
there is any problem on the EFi system, the warning indicator remains on all the time. Please contact your
SYM authorized dealer if this light goes on.
○C Oil Check Indicator
The oil check indicator shows how long the engine oil is used. The oil check indicator light turns on at every
1,000km riding distance according to the oil distance meter (page 17). When this indicator comes on,
please check the oil level in the oil level inspection window (page 33). In oil meter mode, quickly press the
S button twice to reset the oil check indicator.
○D ABS Indicator
The ABS (Anti-lock Brake System) indicator light goes on when the ignition switch is turned on and goes
off shortly after the scooter starts moving. If the ABS is normal, it stays off. If something is wrong with the
ABS, the indicator goes on and stays on. When the indicator is on, the ABS does not function, but if the
ABS fails, the conventional brake system will still work normally.
○E Low Fuel Indicator
The low fuel indicator light goes on when the fuel level goes down to 1 steady bar (page 19).
○FHigh Beam Indicator
This indicator turns on with high beam headlight is turned on.
○A
○B
○C
○D
○E
○F
○G
○
G
○H
○I

11
○GTurn Signal Indicator
The corresponding turn signal indicator light blinks when the turn signal switch is pushed to the right or left.
○HLow Oil Pressure Indicator
This indicator goes on whenever the ignition switch is in “On”position without engine running or the oil
pressure is dangerously low. It should go off immediately after the engine is running. If this indicator lights
up more than 5 seconds, have the scooter checked by an authorized SYM dealer. Refer to page 49 for
more information.
○IParking Brake Indicator
This scooter is equipped with parking brake. Kick down the side stand to activate this parking brake (page
27). This indicator goes on when the side stand is kicked down. The rear wheel will be locked when the
parking brake is activated. The engine will be stopped if the side stand is kicked down while the engine is
running. This indicator goes off when the side stand is up.
Setting Buttons
○A S Button
Push this button to reset the trip meter, oil mileage meter in the multifunction meter. This button is also
used to set the clock in the TFT display (page 13).
○B M Button
Press this button to switch meter mode of the multifunction meter (page 17). This button is also used to set
the clock in the TFT display (page 13).
TFT Display Navigation
The up button ○A,select button ○Band down button ○Con the left handlebar switches are used to
operate the functions showed in the TFT display.
○A
○B
○A
○B
○C

12
TFT Display
Activation and function test
The combination instrument is activated when the ignition switch is turned on. The welcome animation ○A
appears on the display for seconds and the selected function screen displays after the animation.
Themes and function screens
This combination instrument is built-in three display themes and each theme contains five function screens.
Every function screen in different themes shares the same items.
RPM
Speedometer
Clock
Trip computer
Vehicle info
Theme 1
Theme 2
Theme 3
○A

13
Function screen layout
Theme 1 is used for layout description in this section.
RPM
This tachometer shows the engine speed in revolutions per minute (rpm). Do not operate the engine in the
red zone. The current fuel consumption level is shown in kilometers/liters (km/l); the light bar varies with
the current fuel consumption. Your style of riding can be adapted to the desired fuel consumption. If the
scooter is stationary, “0.0”will be shown in the display area.
Speedometer
The speedometer shows the current vehicle speed in kilometers/hour (km/h), the reading synchronizes
with the multi-function meter’s speedometer. The current fuel consumption level is shown in
kilometers/liters (km/l); the light bar varies with the current fuel consumption. Your style of riding can be
adapted to the desired fuel consumption. If the scooter is stationary, “0.0”will be shown in the display area.
Clock
This function screen displays one digital and one alternative style. This clock displays only 12-hour mode.
To set the clock, do the below steps:
Turn the ignition switch on, push and hold M button, the hour display starts blinking. Push the S button to
adjust the hours.
○A
○B
○C
A. Clock
B. Tachometer
C.
Current fuel consumption
a. Red zone
○A
○B
○C
A. Clock
B. Speedometer
C. Current fuel consumption
○A
○B
A. Digital style
B. Alternative style
○a

14
Push the M button. The hour display stops blinking and the minute display start blinking. Push the S
button to adjust the tens place in the minute display.
Push the M button. The tens place stops blinking and the units display starts blinking. Push the S button
to adjust the units place in the minute display.
Push M button to finish clock setting.
Trip computer
This function screen displays four items of the trip computer.
Average vehicle speed: The average vehicle speed is calculated by the total travelled distance and
travelled time since the last average vehicle speed reset. The average vehicle speed is reset
automatically when the ignition switch is turned off over 30 minutes. This item only displays in km/h.
Travelled distance: The travelled distance is the total driving distance since the last travelled distance
reset. The travelled distance is reset automatically when the ignition switch is turned off over 30 minutes.
This item only displays in km. Display range: 0~999.9 km. This travelled distance also resets
automatically when the values reach the maximum limit 999.9.
Travelled time: The travelled time is the total driving distance since the last travelled time reset. The
travelled time is reset automatically when the ignition switch is turned off over 30 minutes.
Max RPM: This function records the maximum engine revolution of this scooter since the last max rpm
reset. The max rpm is reset automatically when the ignition switch is turned off over 30 minutes.
Vehicle information
This function screen displays two items of the vehicle information.
Battery voltage gauge: This gauge shows current battery voltage. The values synchronize with the
multi-function meter’s battery voltage gauge (page 17). Display range: 8.0~16.0V.
NOTE :
When the battery is disconnected, the clock is reset to 12:00 AM and starts working again when the
battery is reconnected.
If the clock is idled about 30 seconds while setting, it will exit setting mode automatically and starts
working again.
If the ignition switch is turned off while setting the clock, the clock will exit setting mode when the
ignition switch is turned on again.
The clock works normally by the backup power even the ignition switch is turned off.
A. Clock
B. Average vehicle speed
C. Travelled distance
D. Travelled time
E. Max RPM (maximum engine revolution)
○A
○B
○C
○D
○E

15
Coolant temperature gauge: It shows current coolant temperature. The high coolant temperature
indicator goes on whenever the coolant rises to 115∘C (page 10). If the coolant temperature signal is in
fault, the stationary symbol “-.-”is displayed. Display range: -40 ~ 130∘C.
NOTE :
If the battery voltage is below 12.0V when the ignition switch is turned on, and the engine is hard to
start or cannot be started, have your scooter checked by an authorized SYM dealer.
If the battery voltage is below 12.0V or above 15.5V when the engine is running, have your scooter
checked by an authorized SYM dealer.
○A
○B
○C
A. Clock
B. Battery voltage gauge
C. Coolant temperature gauge

16
Function screen select
Push the up or down button to select function screens in any theme. The function screens can be switched
in the below order.
Theme select
To select the themes, follow the below steps:
○1In any function screen, push and hold the select button.
○2The select mode appears, push up or down button to choose a theme.
○3Push the select button to finish selecting theme.
NOTE :
The TFT display only shows the last selected function screen every time you turn the ignition switch on.
The function screen select can be operated while riding, do not distract from your current drive.
○A
○B
○C
○D
A. Up button
B. Down button
C. Sequence when pushing up button
D. Sequence when pushing down button
○A
○B
○C
○F
○E
A. Up button
B. Select button
C. Down button
D. Select mode
E. Sequence when pushing up button
F. Sequence when pushing down button
○D
Push and hold
Push only
○B
○1
○2
○3

17
Multi-function Meter
○AMulti-function display
The below display modes can be shifted circularly by pushing the M button.
Odometer
This odometer shows the total distance in kilometers the scooter has been ridden. It cannot be reset.
NOTE :
The select mode only demonstrates rpm function screen.
The TFT display always shows the previously selected theme/function screen every time you turn the
ignition switch on.
When the battery is reconnected, the TFT display will be reset to the previous selected theme/function
screen.
The theme select can be operated while riding, do not distract from your current drive.
NOTE :
The multi-function display always shows the previously selected display modes every time you turn the
ignition switch on.
The multi-function display shows in odometer mode after the battery is reconnected.
NOTE :
The data is maintained in the combination instrument even when the battery is disconnected.
When the figures come to 99999, they will return to 0 and the odometer starts working again.
This odometer only shows in kilometers.
○A
○B
○C
A. Multi-function display
- Odometer
- Trip meter
- Oil distance meter
- Battery voltage gauge
B. Fuel gauge
C. Speedometer

18
Trip meter
This trip meter shows the distance in kilometers since it was last reset to zero.
In trip meter mode, push and hold S button to reset trip meter.
Display range: 0~999.9 km.
Oil distance meter
This meter records how long the engine oil is used. The oil check indicator (page 10) goes on at every
1,000km riding distance according to this oil distance meter. When the oil check indicator goes on, please
check the oil level in the oil level inspection window (page 33).
In oil distance mode, quickly push S button twice to reset the oil distance meter.
Display range: 0~9999.9 km.
Battery voltage gauge
The battery voltage display shows current battery voltage.
Display range: 8~16 V.
NOTE :
When the figures come to 999.9, they will return to 0 and the trip meter starts working again.
This trip meter only shows in kilometers.
NOTE :
If the oil distance meter is not reset, the oil check indicator will go on permanently until it is reset.
If the oil distancemeter is not reset, when the oil distance exceed the maximum limit 9999.9 km, the meter
will return to 0 km and continue adding up values. In this condition, the oil check indicator light will not go
off until it is reset.
This oil distance meter only shows in kilometers.
NOTE :
If the battery voltage is below 12.0V when the ignition switch is turned on, and the engine is hard to start
or cannot be started, have your scooter checked by an authorized SYM dealer.
If the battery voltage is below 12.0V or above 15.5V when the engine is running, have your scooter
checked by an authorized SYM dealer.

19
○BFuel Gauge
This digital fuel gauge indicates the fuel level. There are 5 bars in the fuel gauge. If the fuel tank is full, all
the 5 bars go on ○a. The low fuel level indicator (page 10) goes on when there’s only the first sector ○b
remains, go refuel the fuel tank immediately. If the fuel level signal is in fault, all 5 bars blink ○c, have your
scooter checked by an authorized SYM dealer.
○C Speedometer
This digital speedometer displays the current vehicle speed only in km/h.
Display range: 0~199 km/h
○a
○b
○c
Table of contents
Other Sym Scooter manuals

Sym
Sym GTS 250 User manual

Sym
Sym ATTILA RS-21 EFi 150 User manual

Sym
Sym Joymax Z LW12W1-EU User manual

Sym
Sym 2009 FIDDLE II 125 User manual

Sym
Sym MIO ELECTRIC User manual

Sym
Sym FS05W1-EU Series User manual

Sym
Sym XC05W2-EU Series User manual

Sym
Sym MAXSYM 400i User manual

Sym
Sym JOYRIDE 125 User manual

Sym
Sym EuroMX 125 User manual

Sym
Sym XA05W4-EU Series User manual

Sym
Sym Symphony cargo AY05W9-EU Series User manual

Sym
Sym Symphony ST XB05W4-EU Series User manual

Sym
Sym ALA125CC User manual

Sym
Sym Jet 100 User manual

Sym
Sym JE05W1-6 User manual

Sym
Sym GTS 250 User manual

Sym
Sym FIDDLE 125 User manual

Sym
Sym RV 250i User manual

Sym
Sym TUSCANY 150 User manual