Sym TUSCANY 150 User manual

VIETNAM MANUFACTURING & EXPORT PROCESSING CO., LTD (VMEP)
Nhon Trach 2 Industrial Zone, Hiep Phuoc Commune,
Nhon Trach District, Dong Nai Province, Viet Nam
Tell No: 02513-569000
Owner’s Manual
(Model: VW6, VW7)

1
1. CONTENTS
1. Contents ................................................................................................................... 1
2. Control location ......................................................................................................... 3
3. Before riding ............................................................................................................. 4
4. Safe riding ................................................................................................................ 4
5. Driving ...................................................................................................................... 5
6. Use genuine spare parts ........................................................................................... 5
7. Use of each component ............................................................................................ 6
Gauges .................................................................................................................... 6
Operation of ignition switch ....................................................................................... 8
Operation of steering handle lock switch .................................................................... 8
Operation of seat open switch ................................................................................... 8
Operation of fuel fill cap cover open switch ................................................................ 8
Description of anti theft intelligent lock (for Intelligent lock model) ............................... 9
Use of buttons ........................................................................................................ 12
Storage box............................................................................................................... 13
Helmet holder hook.................................................................................................... 13
Luggage hook ........................................................................................................... 13
USB charger.............................................................................................................. 13
Fuel fill cap............................................................................................................... 14
Brake....................................................................................................................... 14
Important points and cautions for starting engine ..................................................... 15
8. The best way to drive off ......................................................................................... 16
The control of throttle valve handle .......................................................................... 16
Parking method ....................................................................................................... 16
9. Inspection and maintenance before riding ................................................................ 17
Routine inspection .................................................................................................. 17
Engine oil inspection and change ............................................................................ 17
Fuel inspection ....................................................................................................... 18
Transmission oil inspection and change.................................................................... 18
Brake System Inspection ......................................................................................... 19
Throttle valve handle clearance adjustment ............................................................. 21
Inspection and maintenance of battery ..................................................................... 21
Tire inspection ........................................................................................................ 22
Steering handle front shock absorbers inspection .................................................... 22
Checking and changing fuses .................................................................................. 23
Checking the turn signal lights and horn ................................................................... 23

2
1. CONTENTS
Checking the front and rear lights ............................................................................ 23
Checking the brake light .......................................................................................... 23
Checking for fuel leakage ........................................................................................ 24
Checking the lubrication of body’s various mechanisms ........................................... 24
Checking the spark plug .......................................................................................... 24
Checking the air cleaner .......................................................................................... 24
10.When there is an abnormal condition or a trouble ..................................................... 25
Diagnosis when engine does not start ...................................................................... 25
11.Suggestions on engine fuel ..................................................................................... 25
12.Transmission oil ...................................................................................................... 25
13.Cautions for riding scooter ....................................................................................... 26
14.Combined brake system (CBS) ................................................................................ 27
15.Periodical maintenance schedule............................................................................... 28
16.Specification ........................................................................................................... 29

3
2. CONTROL LOCATION
Front light/
Position light
Storage box
Fuel tank cap
Air Cleaner
Side stand
Main stand
Engine number
Rear brake lever
Right Hand
Switch
Exhaust muffler
Left Hand Switch
Front turn
signal light
Front brake level
Rear turn
signal light
Battery
Ignition switch
Tail/Stop light
Frame number

4
3. BEFORE RIDING
This manual describes the correct usage of this scooter including safety riding, simple inspection methods
and so on.
For a more comfortable and safety riding, please read this manual carefully.
For your benefit, please ask your SYM dealer the operating manual and carefully read the following:
Correct use of the motorcycle.
Pre-delivery inspection and maintenance.
Thank you very much for your patronage
In order to maximize your motorcycle’s performance, a periodical inspection and maintenance
should be completely carried out.
We recommend that after riding your new motorcycle for the first 300 Kilometers, you should take
your motorcycle to the original dealer for an initial inspection, and to have your motorcycle inspected
periodically every 1,000 kilometers there after.
In case the scooter’s specifications and construction are modified and different from the photos and
diagrams on the owner’s manual / catalogues, the specifications and construction of the actual
scooter shall prevail.
4. SAFE RIDING
It is very important to be relax and clothe properly when driving, observe traffic regulations, do not rush,
always drive carefully and relaxed.
Usually, most people would ride their newly bought scooter very carefully, but after they became familiar
with their scooters, they tended to become reckless which may result in an accident.
To remind you:
Please wear a safety helmet, and properly tighten the chin belt when riding a motorcycle.
Clothes with open or loose cuffs may be blown by wind and cause the cuffs to get caught on the
steering handle and thus affects riding safety.
So, put on clothes with tight sleeves.
Hold the steering handle by both hands when riding. Never ride with only one hand.
Observe the speed limit.
Wear suitable low-heel shoes.
Perform periodical maintenance and inspection in accordance with the schedule.
WARNING!!
To avoid getting burned by exhaust pipe when taking a passenger. Make sure your passenger has
put his/her feet on the pedals.
After running, the exhaust pipe is very hot, be careful not to get burned when conducting an
inspection or maintenance.
After running, the exhaust pipe is very hot, select a suitable location to park your scooter to avoid
others getting burned by the exhaust pipe.
CAUTION:
Modified motorcycle will affect its structure or performance, and cause poor engine operation or
exhaust noise, which will result in shortening the motorcycle’s service life.
Besides, modification is illegal and does not conform to the original design and specifications.
A modified motorcycle will not be covered by warranty, therefore, do not modify your motorcycle at will.

5
5. DRIVING
Keep the related parts of your body such as arms, palms, lumbar, and toes relax and ride with
the most comfortable posture in order to be able to react quickly whenever it is necessary.
Rider’s posture will greatly affect riding safety. Always keep your body’s gravity in the center of the
seat, if your body’s gravity is on the rear part of seat, the front wheel load will be reduced, and this
will cause the steering handle shaking. It is dangerous to ride a scooter with an unstable handle.
It will be much easier to make a turn if rider inclines his body inward when turning. On the other
hand, the rider will feel unstable if his body and the scooter do not incline.
The scooter is hard to control on a bumpy, unleveled, unpaved road, try to know the road conditions
in advance, slow down and use your shoulder’s force to control the handle.
Suggestion: Do not load objects on the front pedals unnecessarily, to avoid affecting the riding safety
and the operation of steering handle.
CAUTION:
The rider’s feeling on the handle is slightly different with a load or without a load.
Overload may cause the handle to swing and affects the riding safety.
Therefore, do not overload your scooter.
CAUTION:
Do not place flammable materials such as rags between the body side cover and engine to avoid
components damaging by fire.
Do not load objects on areas not specified for loading to avoid damage.
SUGGESTION
To maximize the motorcycle’s performance and prolong its service life:
The first month or first 1000km is the wear- in period for the engine and components.
Avoid rapid acceleration, and keep the speed below 80km/hr.
6. USE GENUINE SPARE PARTS
In order to maintain the scooter’s best performance, each part’s quality, material, and machined
precision must conform with the design requirements. “SYM Genuine Spare Parts” were made from
the same high quality materials used for the original scooter. No parts would be sold to the market
until they could meet the designed specifications through sophisticated engineering and stringent
quality control. Therefore, it is necessary to purchase “SYM Genuine Spare Parts” from “SYM
Authorized Dealers or Franchised Dealers” when replacing spare parts. If you buy cheap, or fake
substitute parts from the market, no guarantee can be provided either for the quality or durability.
Also, it may result in unexpected troubles and lower the scooter’s performance.
Always use SYM Genuine Spare Parts to keep your scooters pure blood and to ensure its long
service life.

6
7. USE OF EACH COMPONENT
(The following is SYM 4 stroke Air cooled 150c.c. scooter’s basic operation, and they could
vary from different individual models. Please consult the end of this manual.)
§GAUGES §
The panel figure for speedometer may vary from model to model, but the location usually are the same.
CAUTION:
Do not wipe plastic components, e.g. instrument panel, headlight, with organic solvents such as
gasoline…etc to avoid damaging these components.
Speedometer:
Indicates driving speed.
ODO: Shows the total distance by vehicle.
This value cannot delete the zeros.
Display range: 0 ~ 99999 km (Display volume over 99999, return to zero).
TRIP: Displays the distance on a journey
Display range: 0.0 ~ 999.9 km (Display volume over 999.9, return to zero).
Delete: Under TRIP mode, long press “SET” to clear TRIP mileage value.
OIL: Displays distance in the measuring mode the engine oil change itinerary.
Display range: 0.0 ~ 9999.9 km (Display volume over 9999.9, return to zero).
Delete: Under OIL mode, to push “SET" two times to let OIL return to zero.
High Beam Indicator:
This indicator comes on with high beam headlight is turned on.
Turn (left/ right) Signal Indicator:
The left or right Indicator will be flashing according to the operated directions of turn signal light
switch when it is turned on.
Turn righ
t signal
indicator
Fuel meter
Low fuel load
warning light
Turn left signal
indicator
Engine oil replacement
warning
light
High beam
indicator
Voltmeter/
Time
ODO/TRIP/OIL
“
M
ODE”
button
“
S
ET”
button
EFI indicator
Speedometer

7
Voltage:
Display average voltage of battery.
Clock:
Show time (Display range: 0:00 ~ 23:59 (hh:mm))
Fuel Meter:
Display the fuel level in the tank.
Fuel warning level displays six bars and tapered from top to bottom.
EFI indicator:
It displays the condition of the EFI system. If there is problem in the EFI system, the warning
indicator will blink or light up all the time.
Engine oil change warning light:
It is used to indicate the oil exchange time, with lights when the vehicle was driven about 1,000km
for the first time, and after every 2,000km, the indicator light will light up, warn the users to replace
the oil.
After finish oil change, put the main switch in “ON”, short press "SET" button two times in “OIL”
mode, then the indicator light will go out.
Low fuel load warning light:
When there is a little fuel inside the tank, the warning lamp will be on.
Button Function:
(When not specified, long press is 2 seconds, short press is 0.5 seconds).
Long press the “MODE” button and “SET” button at the same time to switch between mile and km,
and it should be saved when the machine is turned on or off.
Clock Setting:
In time display mode, when the scooter is stationary, long press the "MODE" button more than 2
seconds to enter the time setting, at this time press “MODE”button 0.5 second, it can switching
over setting mode (Hour →minutes tens digit →minute unit digits).
Short press "SET" button once, figure add 1.
(The clock setting state will automatically exit the setting mode without any operation for 30 second.)
Short press “MODE”
Press “SET” to adjust
HOUR
MINUTE (tens digits)
MINUTE (unit digits)
Return to normal mode
Short press “MODE”
Short press “MODE”
Press “SET” to adjust
Long press “SET”
Short press “MODE”
Short press “SET”
two times
Short press “MODE”
Short press
“ MODE”
TOTAL
TRIP Clear TRIP mileage value
OIL Clear OIL mileage value

8
§OPERATION OF IGNITION SWITCH §
“ON” position:
Engine can be started in this position.
Ignition switch key can not be removed.
“OFF” position:
Engine is shut off and can not be
started in this position.
Ignition switch key can be removed.
Some models are equipped with
intelligent lock.
If the intelligent lock can not be
released under abnormal conditions,
please turn on the switch and release
it with the key.
§ OPERATION OF STEERING HANDLE LOCK SWITCH §
“Steering handle lock” position
Turn the steering handle to left and press
ignition switch key (or knob) down and then
lightly turn it to left to the “LOCK” position.
The steering handle is locked in this position.
Ignition switch key can be removed.
When unlocking, simply turn the key from the
“LOCK” position to the “OFF” position.
§OPERATION OF SEAT OPEN SWITCH §
“Seat open” position
How to open: From the “OFF” position turn the ignition key (or knob) to the left
(counterclockwise) to open the seat.
How to lock: Press down firmly on the seat, the seat will automatically lock.
§OPERATION OF FUEL FILL CAP COVER OPEN SWITCH §
“Fuel fill cap cover open” position
How to open: From the “ON” position turn the ignition key (or knob) to the right (clockwise)
to open the fuel fill cap cover.
How to lock: Push the fuel fill cap cover and it locks automatically.
CAUTION:
Never operate the ignition switch key when the motorcycle is running. To turn the ignition switch to
“OFF” and “LOCK” position will shut off the electrical system and that may result in a dangerous
accident. Therefore, the ignition switch can only be turned off after the motorcycle has been
completely stopped.
Always remove the key and be sure to take the key away with you after locking the steering
handle before leaving your motorcycle.
If ignition switch remains in the “ON” position for a prolonged period after the engine has been
stopped, the battery’s capacity will be reduced and this may affect the engine’s start ability.
Make sure to take the key away with you before you lock your seat.
OPEN
Keyless
type
CAUTION:
Make s
ure to take the key
away with you before you lock
your seat.
Key set type
Smart key
(remove the key
after pressing the switch)
Keyless type
(
Smar
t k
e
y
)

9
§DESCRIPTION OF ANTI THEFT INTELLIGENT LOCK (for Intelligent lock model) §
1. Set the anti-theft Alert: when the motorcycle ignition lock is off
Acousto-optic warning: press the remote control security "lock" button for a short time, the horn
will sound Bi, the direction light will flash once, and the lock head will be locked. After 3 seconds, it
will enter the acousto-optic warning state.
Silent alert: press the "mute" button of the remote control for a short time, the horn will sound Bi,
the direction light will flash once, and the lock will be locked. After 3 seconds, it will enter the silent
alert state.
2. Remove anti-theft alert and automatic recovery alert
In the alert state, press the "unlock" key of the remote control, the horn will sound bi - Bi, the
direction light will flash twice, and the lock will unlock to release the alert. If ACC is not turned on or
the host is not vibrated within 30 seconds, the alarm system will be deemed to have been removed
by mistake and will automatically return to the original anti-theft alarm state.
Note: if the "unlock" key is pressed twice in 2 seconds, it will be completely released and will no
longer automatically return to the alert state.
3. Prompt set alert
Stop and turn off the engine in the release state (turn off the main switch), If the alarm is not set
after 5 seconds, the horn will sound bi - bi - Bi, and the direction lights will flash three times.
4. ACC emergency alarm
In the anti-theft alarm state, if the switch lock is opened by force (main switch is on), the horn will
give an alarm, and the direction lights will flash synchronously. You can press the remote control to
"unlock" Key or close the switch lock to stop the alarm.
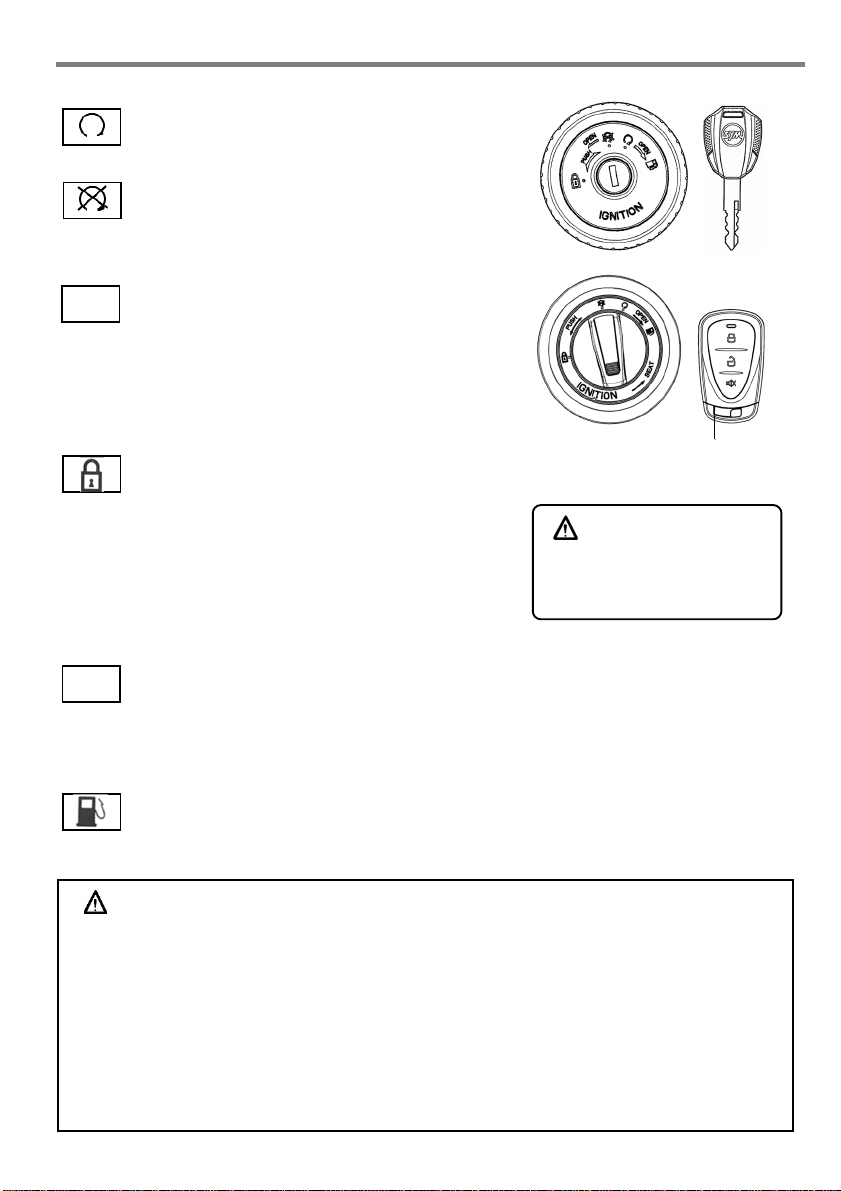
When leaving the vehicle, please make sure that the main switch is turned to
"lock" and lock the direction handle
5. Lock is automatically locked
In the release state, the knob lock is turned from off to lock, the lock head will lock automatically
after 1 second, and it will enter the sound and light warning state after 3 seconds. In the lock state,
press the release key of the remote control once. If the lock gear is not exited within 15 seconds, it
will automatically return to the alert state. In the release state, the lock gear is turned to the off gear,
with three beeps in 5 seconds, and the lock will be automatically locked in 15 seconds.
6. Protection of solenoid valve for malicious operation
In 10 seconds, if the solenoid valve is operated continuously for 10 times (press "unlock" and
"unlock" for a short time), it is judged as malicious operation, and the system will automatically
protect it. (10 times of single function operation and 5 cycles of arming / releasing cycle).
In the protection state, press the remote control host to respond normally, but the lock solenoid
valve does not respond (does not act) 15 seconds later, it will automatically exit the protection and
return to normal.

10
7. PKE Function: Passive Keyless Entry
When the user holds the Remote in an area with a distance from the Remote to the Motorcycle
from less than 3m, the PKE feature will activate. Keyless automatically unlocks without to press the
Unlock button on the Remote.
And vice versa, the feature automatically turn OFF Keyless of the Motorcycle when the user holds
the Remote away from a distance > 3m.
This feature helps users to ensure safety even if users forget to lock off the Motorcycle.
8. Alarm pause
When the vehicle is under vibration alarm state, the alarm can be suspended by short pressing the
fortification key, release key or mute key, and the original fortification state will not change.
9. Alarm mode
Trigger
Alert state First vibration trigger
Vibrate again in 15 seconds
Emergency alarm of main
switch
Acousto-optic warning Alarm three times
Acousto-optic alarm for 15
seconds (after 8
consecutive cycles, enter
the defense list
Sound alarm)
In the anti-theft alert, the
switch is forced to open,
and the main switch is
opened to enter the
periodic sound and light
alarm (after 8 consecutive
cycles, the silent warning
light flashes into the single
tone alarm)
Silent alert The lights flashed
three times The lights flashed eight
times
10.LED status
State LED status
Fortification Flash 4 times every 1.5 seconds, and turn off after 5 seconds
Relieve Flash once every 1 second and turn off after 5 seconds
Main switch ON Normally on for 5 seconds and then off
Alarm Flashing with alarm
11. SPECIFICATION
Working voltage: 9 ~ 16V
Static current: average ≤2mA
Working current: ≤600mA
Modulation mode: ASK
Working voltage of remote control: 3V
Horn sound level: 90 - 115db
Working frequency: 433.92mhz.

11
CAUTION:
1. When using the spare key, insert and remove the key in the same gear.
2. When leaving the vehicle, make sure that the main switch is turned to "lock"
3. Please keep the spare key "key code" aluminum plate properly. If the key is lost, you can order a
new spare key from the dealer with the "key code". If the key is not available, it may cause your
car to fail to start.
4. Ensure the battery capacity≥6ah.
5. If the vehicle is not riding for a long time, the battery must be disconnected and the battery should
be charged and maintained every month.
6. The effective distance of the remote control button must be more than or equal to 20 meters.
Please avoid touching the remote controller within the effective distance to unlock the vehicle.
7. When the operating distance of the remote control is less than 10 meters, pay attention to replace
the built-in battery of the remote control, and the battery specification must be consistent with
SYM factory specification.
8. Pay attention not to install other electronic components not approved by SYM, so as to avoid
frequent abnormal power loss of vehicle battery.
9. Please do not directly expose the remote controller to the sun and rain.
10. In noisy and vibration environment, it is necessary to consider whether fortification is necessary to
prevent battery power loss caused by long-time alarm.
11. The remote control battery is not in the three packs.
12. If the user disassembles the machine by himself or is damaged artificially, it is not covered by the
warranty.

12
§USE OF BUTTONS §
Electrical starter button
This is a starting motor button (switch) for engine starting.
With the main switch “ON”, press this button while holding the front or rear brake lever will
start the engine.
CAUTION:
Release this button immediately after engine has been starter, and never press the button again
to avoid damaging the engine.
This mechanism is a safety design. The engine can only be started after the front or rear brake
lever (pedal) has been applied.
Do not use light system. Turn headlight and turn signal light to the “off” position when the engine
is being started.
High/low beam switch
This is the high and low beam of headlight switching switch. Press this switch to switch between
high and beams.
This is for high beam.
This is for low beam (please turn to low beam riding in city).
Horn Switch
Press this button down when ignition switch is in the “ON”position, the horn will sound.
Turn Signal Switch
Turn signal lights are used when turning left/ right or changing lane.
Turn ignition switch to the “ON”position, and slide the turn signal switch to left or right.
Then, the turn signal lights will flash.
To release, simply return the turn signal light button to the original position.
Left-side turn signal light flashing means you intend to make a left turn.
Right-side turn signal light flashing means you intend to make a right turn.
High/
low beam
switch
Horn switch
Electrical starter
button
Turn signal switch

13
§STORAGE BOX §
This box is located under the seat.
Maximum load capacity: 10kg.
Do not store valuables in the box.
Make sure that the seat has been locked
completely after it was pressed down.
Take out valuables before washing to avoid
wetting these objects.
Do not place thermal sensitive objects in the box
because of engine’s heat and high temperature.
§HELMET HOLDER HOOK §
Helmet holder hooks on the left and right sides,
below the seat. The helmet holder is designed to
secure your helmet when parking.
Open the seat, hang your helmet on the hooks at
the seat hinge and lower the seat to lock.
To remove a helmet, unlock the seat.
Lift the helmet off the holder and lower the seat,
making sure it securely locked before riding.
CAUTION:
Use the helmet holder only while parked.
Do not ride with a helmet secured by the holder.
Riding with a helmet attached to the holder can interfere with the rear wheel or suspension
and could cause a crash in which you can be seriously hurt.
§LUGGAGE HOOK §
The luggage hook is designed to be compact and
handy just below the scooter handlebar.
When using, simply pull out and push inward to hide
the hanger on the scooter body when not in use.
Maximum load: 01kg
CAUTION:
Do not hang overload or hang too
cumbersome, to avoid affecting the riding
safety and the operation of steering handle.
§USB CHARGER §
The scooter has a USB charging port for
charging electronic devices.
Output: DC 5V/3.4A, 9V/2.5A, 12V/2A.
CAUTION:
Do not start or operate the vehicle without installing the battery, because it may burn the USB
charging port.
Do not spray water or liquid into the charging port when using the USB charging port.
Storage box
Helmet
hold
er h
ook
Luggage hook
USB charger

14
§FUEL FILL CAP §
1. Open the fuel fill cap cover: From the “ON”position,
turn the ignition key (or knob) to the right (clockwise)
the fuel fill cap cover will automatically pop out.
Then open the fuel fill cap by lifting the swivel cap
and turning it counterclockwise.
2. Do not fill above the fuel upper limit when refueling.
3. After refueling, turn the fuel filler cap clockwise to
close, then slide the cap down. Push in the fuel fill
cap cover to close.
CAUTION:
Main stand should be put down on the ground,
engine should be shut off and flames should be
strictly prohibited to ensure safety when refueling.
Do not fill above fuel upper limit when refueling.
Otherwise, fuel will flow out through a hole on the
cap that may damage the body’s painting, in
serious cases; it serious cases; it may cause a fire
to burn down the motorcycle.
Make sure that the arrow marks on the fuel fill cap
and fuel tank are aligned.
§BRAKE §
Pull the right brake lever to operate the front brake.
Pull the left brake lever to operate the front and rear brake simultaneously.
Avoid unnecessary sudden braking.
Use front and rear wheel brakes simultaneously when braking.
Avoid brake continuously for a long period of time because that may overheat the brakes and
reduce its braking efficiency.
Slow down and brake early when riding in rainy days on slippery roads. Never apply the brakes
suddenly to prevent skidding and falling.
Using only the front brake or the rear brake increases the risk of falling because the scooter is
tend to pulled to one side.
《Engine Brake》
Return the throttle valve handle back to its original position, and apply engine brake.
It is necessary to apply brake both for front wheel and for rear wheel intermittently when riding on a
long or stiff slope.
Fuel fill cap
For Front wheel
For Front wheel
and Rear wheel
Fuel fill cap cover
close position

15
IMPORTANT POINTS AND CAUTIONS FOR STARTING ENGINE
CAUTION:
Please check the oil and fuel volume are adequate or not before starting the engine.
To start the engine the main parking stand must be firmly on the ground and the brake is applied
on the rear wheel to prevent the motorcycle from moving forward suddenly.
1. Turn ignition switch key (or knob) to the “ON” position.
2. Apply hand rear wheel brake.
3. Do not accelerate, press starter button when the brake is applied.
[We care for you! Before drive off, keep the hand brake applied on the rear wheel.]
CAUTION:
If the engine does not start after the starter button has been pressed for 3 - 5 seconds rotate the
throttle 1/8th to 1/4th open and press the starter button again.
In order to avoid damaging the starter motor, please do not press the starter button continuously
over 15 seconds.
If engine still can not be started after pressing starter button over 15 times, stop and wait for 10
seconds before start it again.
It is harder to get the engine started after the motorcycle has been left idle for a long time or after
refueling only after the fuel has been depleted. Then, it is necessary to press starting lever or starter
button several times, and keep the throttle valve handle at the close position to start the engine.
It may need several minutes to warm up engine if it is a cold start.
Exhaust contains harmful gases (CO), therefore please start the engine at a well ventilated place.
1/4
1/8

16
8. THE BEST WAY TO DRIVE OFF
Turn on the turn signal light before moving, and make sure no vehicle is coming from behind. Then,
drive off.
§THE CONTROL OF THROTTLE VALVE HANDLE §
Acceleration: To increase speed. When riding on an inclined road, turn the throttle valve handle slowly
to allow the engine to output its power.
Deceleration: To decrease speed.
§PARKING METHOD §
When approaching the parking lot:
1. Turn on the turn signal light early, and pay attention to the vehicles in front, from rear, left and right,
then take the inner lane and approach slowly.
2. Return the throttle valve handle back to its original position, and apply brakes in advance.
(Brake light comes on when braking to warn drivers of vehicles behind).
When stop completely:
3. Press the turn signal switch back to its original position, and turn the ignition switch key to the
“OFF” position to shut off the engine.
4. Get off the scooter from left side after the engine has been stopped, and select a parking place
where the scooter will not interfere with traffic and the ground is level, then put down scooter’s
main parking stand.
5. Hold the steering handle with your left hand, and hold down the front end of seat or hold the
parking handle on the lower-left side of seat with your right hand.
6. Press the main parking stand with your right foot, put down the main parking stand firmly on the
ground.
To remind you: Lock the steering handle and remove the key after parking to prevent the scooter
from being stolen.
CAUTION:
Park your motorcycle at a safe place where it will not interfere with traffic.
Deceleration
Acceleration

17
9. INSPECTION AND MAINTENANCE BEFORE RIDING
(Please refer to the components location diagram for the following components.)
§ROUTINE INSPECTION §
Check Items Check Key Points
Engine Oil Is there enough engine oil?
Fuel Is it enough? Gasoline 95 or Gasohol 91, 95 (E10)
Brake Front Braking condition?
(Brake lever free play: 10 ~ 20mm)
Rear Braking condition?
(Brake
lever free play: 10 ~ 20mm)
Tires Front Is tire pressure normal?
Standard: 25PSI (1.75kgf/cm2)
Rear Is tire pressure normal?
Standard: 29PSI (2.0 kg/cm2).
Steering Handle Does the handle vibrate abnormally or is difficult to turn?
Speedometer, lights, and
rearview mirror Is it operated properly?
Do lights come on? Can it be seen clearly from behind?
Tightness of Main Components Are screws, nuts loosen?
Abnormal Points Do the previous troubles still exist?
CAUTION:
If any problem founded during routine inspection, correct the problem before using the motorcycle
again, have your motorcycle checked and repaired by the “SYM dealer or authorized service
personnel” if necessary.
§ENGINE OIL INSPECTION AND CHANGE §
INSPECTION:
1. Use the main parking stand to support the scooter
on a level ground, remove the dipstick after
engine stopped for 5 minutes. Wipe oil off the
dipstick and then insert it into the guide tube again
(Do not rotate it).
2. Remove the dipstick and check whether oil level
is in between the upper and lower marks.
Add oil to upper limit if oil is under the lower limit.
(Check cylinder, crankcase…etc for leakage.)
Upper limit
Lower limit

18
OIL CHANGE:
Change engine oil after the first 1,000km, and change the
engine oil every 2,000km there after.
In order to maintain the engine’s maximum performance,
check whether the engine oil is enough every 500km.
Add oil to upper limit if the engine oil has been found to
be inadequate.
Engine Oil: Use SAE 10W – 40 grade or better engine oil.
Otherwise, damage will not be covered by warranty.
Oil Capacity: 1.00 Liter (0.80 liter for routine change).
【Oil Filter Cleaning】
The oil filter nut assembly of the element, and remove the
element. Remove the foreign materials from the element by
using a gasoline or air spraying gun.
WARNING:
Oil level will not be correct when checking the oil level
with the motorcycle parked on an unleveled ground or
immediately after the engine stopped.
Engine and exhaust pipe are hot right after engine
stopped. Pay special attention not to get burned when
checking or replacing engine oil.
If the oil lever approach lower limit again after refilled,
check the engine for leaks and refill it again.
Keep away from spark and flames when refilling the oil.
Avoid oil emulsification
Warming up at regular intervals.
Warm car runs in a minute every time.
At least run 10 km once a month.
Replace oil when 3 months or 2000km.
§FUEL INSPECTION §
Turn main switch key to “ON” position, and check fuel gauge’s needle range to make sure there is
enough amount of fuel in the fuel tank.
This scooter’s engine is designed for using the unleaded fuel of Gasoline 95 or Gasohol 91, 95 (E10).
Firmly secure the main stand on the ground, shut off the engine and keep flames away from the
scooter when refueling.
Do not fill above fuel upper limit lever when refueling.
Make sure the fuel tank cap had been tighten properly.
§TRANSMISSION OIL INSPECTION AND CHANGE §
INSPECTION:
Use the main stand to support the scooter on a level ground, after the engine stops, wait for 3 ~ 5
minutes. Remove the transmission oil infusion bolt, put a measuring glass under the drain bolt, and
remove the drain bolt. Let the oil flows into measuring glass and check for decreased or not (at
disassembly:180c.c./ at change: 170c.c).
OIL REPLACEMENT:
Stop the engine and use the main stand to support your scooter on a lever ground. Remove the
infusion bolt and drain bolt, drain out the oil.
Install the drain bolt and tighten it. Fill new transmission oil (170c.c.), and install the infusion bolt and
tighten it. (make sure that bolts are tightened and check that there’s no leakage.)
Recommend Oil: SAE 140.
Upper limit
Lower limit
Oil filter
Filter nut

19
§BRAKE SYSTEM INSPECTION §
This scooter is equipped with a disk brake system on the front wheel and the rear wheel. If there is
something wrong when applying the brakes, have the brake system checked by an authorized SYM
dealer.
Inspection of Brake Free Play: (Brake lever free play must checked with the engine shut off.)
Brake lever free play for front and rear wheels.
◆If checking the hand-braking lever for front wheels and rear wheel, its free play (the stroke of
hand-braking lever from no braking to initial braking) should be 10 ~ 20mm. It is abnormal if the feel
is spongy when holding the hand-braking lever forcefully.
Front / Rear Brake Fluid Level Inspection:
With the scooter in an upright position, check the
fluid level. It should be above the LOWER level
mark. If the level is at or below the LOWER level
mark, check the brake pads for wear.
Worn pads should be replaced. If the pads are not
worn, have your brake system inspected for leaks.
If the brake fluid level is below the lower level,
contact your SYM authorized dealer to adjust the
fluid level.
Recommended Brake Fluid:
WELL RUN BRAKE OIL (DOT 3 or DOT 4).
CAUTION:
Brake fluid may harm painted surfaces and plastic parts. Spilled fluid must be cleaned up
immediately.
Refill with the same type of brake fluid.
WARNING:
Use only DOT 3 or DOT 4 brake fluid.
Brake fluid is easy to absorb moisture from the air, any absorbed moisture will reduce the braking
efficiency greatly.
Never let water or dirt enter the reservoirs when refilling.
Contact an authorized SYM dealer immediately if any brake fluid leakage is found.
For font wheel
and rear wheel
10 ~20mm
10 ~20mm
For front wheel
This manual suits for next models
2
Table of contents
Other Sym Scooter manuals

Sym
Sym Citycom 300i User manual

Sym
Sym Citycom.300i User manual

Sym
Sym Tonik 50 User manual

Sym
Sym ATTILA RS-21 EFi 150 User manual

Sym
Sym Joyride 200 EFi User manual

Sym
Sym JE05W1-6 User manual

Sym
Sym Symphony cargo AY05W9-EU Series User manual

Sym
Sym Mio FS11W1-EU Series User manual

Sym
Sym JET 50 series User manual

Sym
Sym ALA125CC User manual

Sym
Sym Jet 4 125 User manual

Sym
Sym GTS 250 User manual

Sym
Sym HD300 User manual

Sym
Sym Jet4 AD12W1-6; Jet4 AD12W1-6C User manual

Sym
Sym 2009 FIDDLE II 125 User manual

Sym
Sym MaxSym 600i ABS User manual

Sym
Sym MAXSYM 400i User manual

Sym
Sym Fiddle II 50 SYM Series User manual

Sym
Sym Scooter User manual

Sym
Sym RS-50 User manual