SyncEV BG EVS7G User manual

Installation and User Guide
EV Charger | 202205.NH www.syncev.co.uk
IMPORTANT NOTICE
To commission your charger and register
for the 3 year warranty, please visit:
www.syncev.co.uk/portal/login
or use the QR code.
3 year warranty available as long as charger
installation is registered, otherwise standard
warranty is for a period of 1 year.
BOX CONTENT
•EV charger
•Decorative trim
•Installation template
•Accessories pack containing:
»Power connector
»Cord grip and screws
»M25 gland
»25mm blanking plug
»Fixing screw caps
»Assembly screws
IDENTIFICATION LABEL
EV Charger
Type 2 socket, 7.4kW
EVS7G, EVS7GG, EVS7GGR
3
WARRANTY
year
Tools needed:
4mm Hex bit/allen key; PZ 2 screwdriver; suitable drill bit and xings
INTRODUCTION
This guide is intended for use by competent electrical installers to explain basic requirements and options to
be considered when installed a SyncEV BG Charger. The unit is designed for installations inside or outside,
the advanced safety technology we have built into the unit ensures its safe usage. This guide provides
information to assist when installing the EVS7 charger and should not be used with other EV chargers.

Installation and User Guide
EV Charger | 202205.NH www.syncev.co.uk
SAFETY INFORMATION
Warning: The supplied SyncEV BG charger is manufactured to be safe
without risk provide they are installed correctly, used, and maintained
in accordance with the manufacturers recommendations and installed
by a competent electrical installer in accordance with national and local
regulations and legislation applicable at the time of installation, eg:
BS7671:2018 amendment 2.
The single phase EV charger should be connected to a 230V/240V
nominal AC supply. The supply should run from a dedicated 40A circuit
breaker. We recommend the use of a Type B curve circuit breakers. The
EV charger features an integral 30mA type-A RCD with 6mA DC leakage
detection and therefore an external RCD is not usually required:
1. For cables without earthed metallic covering installed in walls or
partitions at a depth of less than 50mm and also within walls and
partitions with metal parts, and not protected by steel conduit or similar
then RCD protection is required. This can be achieved by using the
BG IP65 EV protection enclosure (CFEV1A) when mounted next to the
existing consumer unit as it includes a double pole 40A 30mA Type A
RCD device to protect the circuit. This can be used if the cable has no
mechanical protection where it passes through walls and partitions and
if the cable is buried within the ground before reaching the EV charger.
This will be in compliance with the current BS7671 Amendment 2
Wiring Regulations.
2. If the cable is clipped directly to the surface of a wall and does not
pass through a wall or partition to the EV charger then a standard B
type 40A MCB may be installed into the Consumer unit, however RCD
protection may be required for other reasons such as if it forms part of
a TT system and the earth fault loop impedance values cannot be met.
This will be in compliance with the current BS7671 Amendment 2 Wiring
Regulations.
To conform with BS 7671, on occasions a double pole MCB/RCD
or other means of isolation may be required.
Important note: A DC Leakage fault in the vehicle may “blind”
a type “AC” RCD and render it ineective, never feed any EVSE
from an upstream Type “AC” RCD.
EARTHING REQUIREMENTS
The supplied EV charger features an on-board safety monitoring system
to detect low or high voltage supplies and potential earth-neutral
faults, this in accordance with regulation 722.411.4.1 (iv) of BS7671
2018 (Compliant on single phase supplies only). If such a condition is
encountered the charge cycle is ended or prevented and the EV charger
indicator goes red and eectively becomes a double insulated (class II)
device. The vehicle becomes isolated from incoming supply and poses
no risk to touch. This feature removes the requirement for an earth
electrode where it may be ineective or introduce further risk.
The EV charger may be connected directly to a TN-C-S (PME) earthing
system without any special arrangements. It remains the responsibility
of the installer to conduct a risk assessment of the immediate area to a
range of 10 meters (equipotential zone) to ensure no other conductive
metal xings pose risks (mixture of TT/TN-S and TN-C-S), this is
important where cable length may enable charging inside or outside
of a building/ garage where the vehicle is within touch distance.
Where certain conditions dictate an earth electrode must be used it
shall be independent from the distributors earth system with no direct
interconnection (the incoming supply SWA protective earth should be
isolated from the housing and/ or earth electrode). The electrical installer
shall install a suitable electrode complete with termination housing and
covers where appropriate, warning labels should be visible and close
to the unconnected SWA protective earth eg inside the charger.
The earth connection shall be made from the electrode to the charger
via copper conductor earth wire of an appropriate CSA for the
installation. The earth wire shall be installed in conduit where there
is a risk of mechanical damage or UV exposure. Additional note:
SyncEV BG recommend Earth electrode impedance to be <100 ohms.
SURGE PROTECTION
Guidance on requirements for surge protection devices given In
BS7671: section 443.
The EV charger is protected against transient over voltages (+/-2kV
Line-Earth and +/-1kV Line-Line as a requirement of EN 61000-6-1),
a direct lightning strike carries a current of 30~ 200kA the EV charger’s
internal protection would provide little or no protection in such an
event, likewise nor would an SPD rated less than 30kA. If life support
equipment or business operations could be aected by a lightning strike
central SPD protection is advised if it does not already exist.
The guidance on risk calculation in section 443.5 of BS7671 in most
cases is not possible due to unknown location of any SPD already
tted, length of cables to calculate LP etc, it is therefore recommended
a common sense approach is used on choice of SPD (or if required).
ISOLATION AND SWITCHING FOR SAFETY
AND MAINTENANCE
To ensure that the EV charger can be “turned o” to enhance security
and enable maintenance activities, a double pole isolator (or DP RCD or
RCBO) suitably rated must be installed within the customer’s property.
An isolator switch is a mandatory requirement for “new builds”, but
optional for existing dwellings (at customer’s request), the switch should
be mounted at a height of between 500mm and 1500mm above nished
oor level to comply with regulations. The switch should be rated at
45 Amps. All installations must comply to BS7671: 2018 regulations
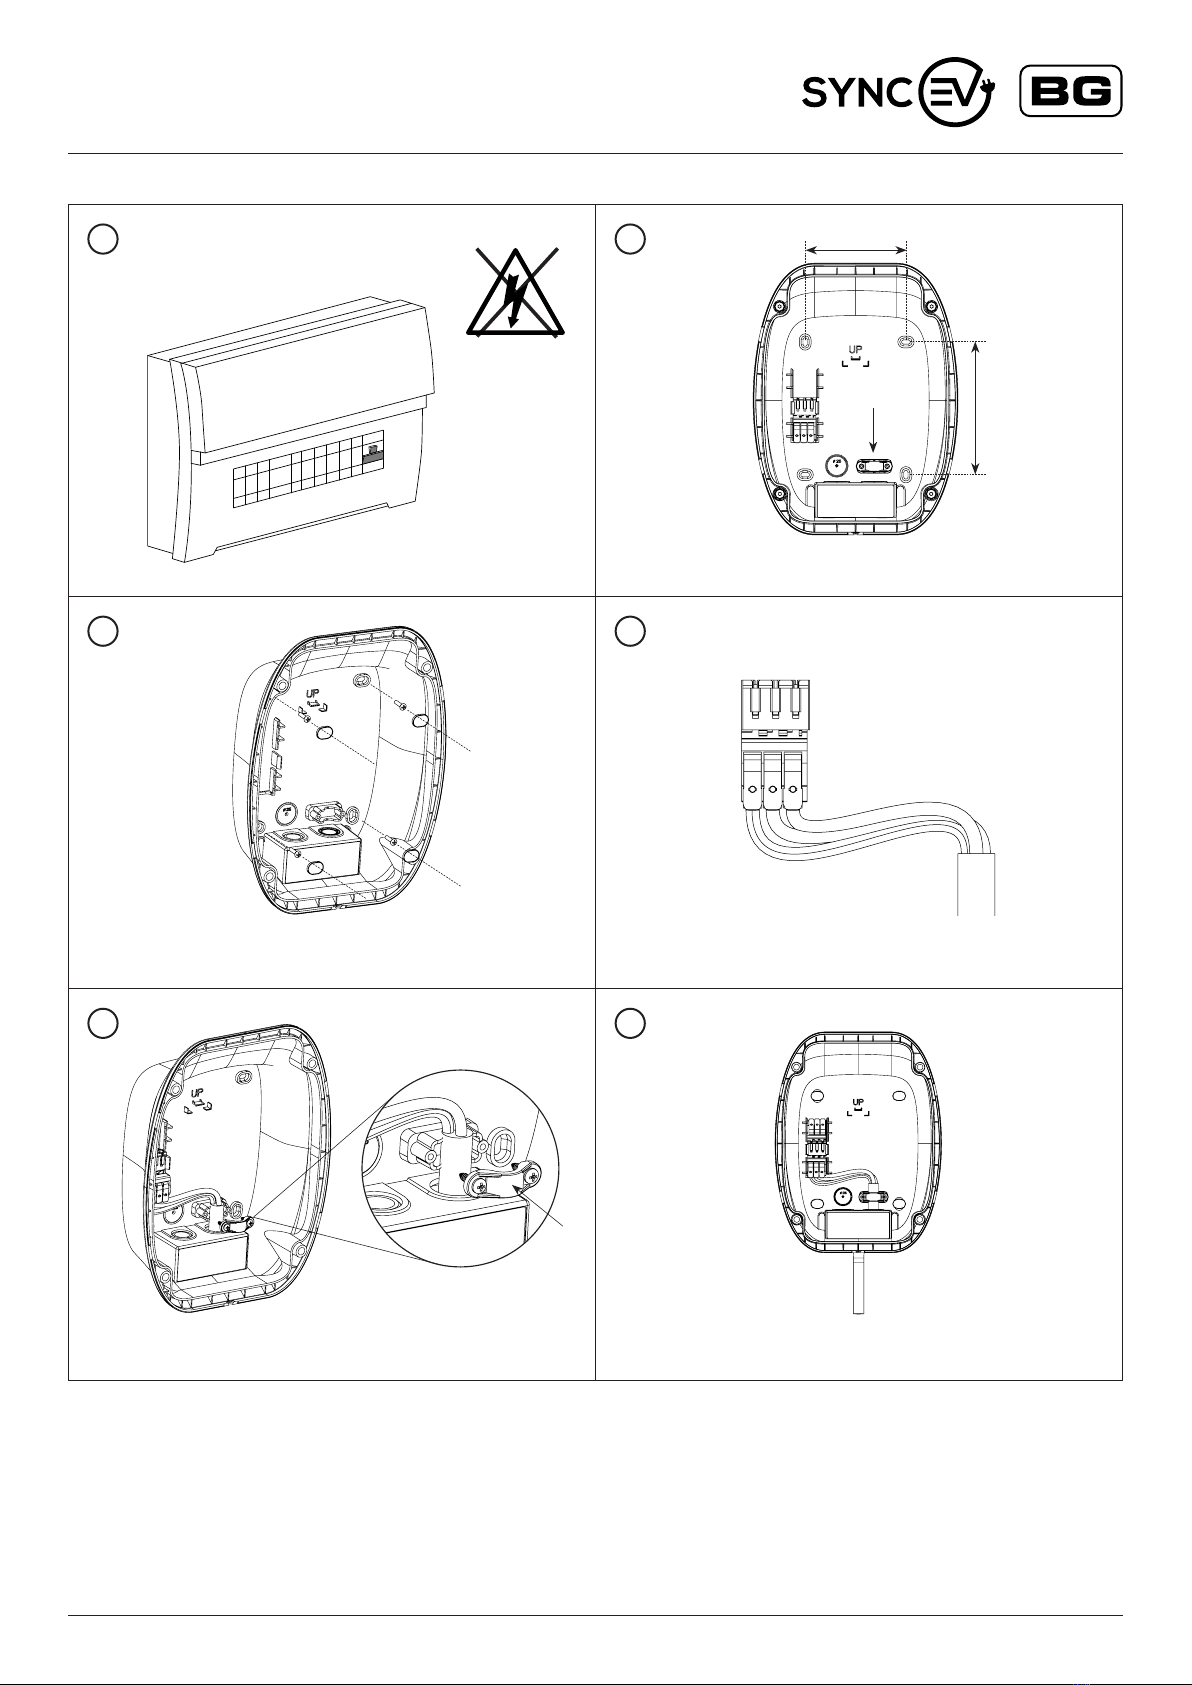
INSTALLATION
The EV charger is suitable for installation inside and outside on a solid
wall or structure. The installer should consult with the building owner
to establish their preferred installation location. This should take
into consideration the length of charging cable and risk of vehicle
impact etc.
It is recommended the charger is installed at a height of
500mm-1500mm as per building regulations BS8300:2018.
Ensure suitable xings are used depending on the mounting surface.
To avoid unnecessary dust inside the enclosure, it is recommended
to use the included xing hole template drill the surface, before tting
the enclosure.
Ensure installation wall has been checked for electric cabling or
pipework with a suitable detector.
NOTE: if any groundworks are required e.g cable trenching or earth
electrode tment, it is advisable to check if underground services
could be present before commencement. Plans may be available at:
www.linesearchbeforeudig.co.uk (free to domestic users)
The EVcharger is suitable for bottom or rear cable entry, if using rear
cable entry ensure the blanking plug supplied is tted to the open
bottom cable entry hole. If using SWA cable the included 25mm
compression gland is NOT suitable, and an alternative gland will be
required. Do not drill alternative cable entries into the charger housing.
SyncEV BG recommends using EV-Ultra™ – Power & Data Combined
cable on installs that require a CT clamp to use the chargers dynamic
load management capabilities. Please see:
www.doncastercables.com/uploads/EV-Ultra_Datasheet.pdf
If Load Balancing is required, we suggest of the SyncEV BG CT clamp,
EVA120CT1. This should be tted around the incoming power to the
main fuse and the correct max load (A) to be entered during set up and
installation steps.
All of the cables that are to be connected into the supply connector
should have their insulation stripped back 18-20mm. Connectors
supplied are suitable for cables of 4-6mm2and suitable for solid
and stranded cores.

Installation and User Guide
EV Charger | 202205.NH www.syncev.co.uk
1
3
2
4
110mm
Cable entry
145mm
Ensure the supplied caps are tted over installation
screws to maintain IP rating
Ensure supplied cord grip is tted on incoming power
cable if using bottom cable entry location.
Ensure connector is fully inserted, then clip
power connector into the base.
Use included hole template to drill xing holes
Ensure correct polarity when making
incoming power connections
LEN
5 6

Installation and User Guide
EV Charger | 202205.NH www.syncev.co.uk
For dynamic load balancing, ensure connections are made
in correct polarity to CT + and CT terminals
To remove trim, pry at shown points with a at toolSnap front cover trim into place
4mm
2.5 N m
FINAL ELECTRICAL TESTING
To meet the BS7671:2018 (18th edition) requirements for testing of an
electrical installation, the following tests and checks shall be performed
by a competent electrical installer before during and after a SyncEV BG
charger is installed:
• A visual inspection of the installation including the existing
electrical installation.
• Verication of the characteristics of the electrical supply at
the origin of the installation to conrm the supply is suitable
for the additional load.
• A test to conrm the continuity of the circuit protective conductors.
• A test to conrm the integrity of the circuit insulation resistance.
• A test to conrm the polarity of the installation is correct.
• Where applicable a test to conrm the earth electrode
resistance is within acceptable tolerances.
(or)
• An earth loop impedance test.
• A test of the mechanical operation of residual current
devices (RCD’s).
• A test to conrm the operation of residual current devices (RCD’s) is
within stipulated time scales (at the rated current and at ve times the
rated current operating current).
• A test or calculated measurement of the prospective fault current.
• A verication of the functional operation of the EV charger.
Anelectricalinstallationcerticatemustbecompleted.
EnsureelectricaltestingisdonebeforeEVcharger
commissioningandnetworksetupisperformed.
9
7
10
8

Installation and User Guide
EV Charger | 202205.NH www.syncev.co.uk
WI-FI CONNECTION GUIDE
Thisistheinstallersresponsibilityandmustbedonetocompletetheinstallation.
WerecommendtheWiFirouterissettoonly2.4GHzbandduringsetuptoreducetheriskofpossibleissuesduringsetup.Oncesetup
theroutercanthenberestoredtoboth2.4GHzand5GHzbands.
Upon powering the Sync EV BG charger, the status indicator light will show Yellow. This indicates that the health of the charging unit is good but
there is no connection to the Sync EV Network.
The BG EV Charging installer app can be downloaded via the installer portal on www.syncev.co.uk
1. Connect to the EV charger through the BG EV installer application.
The app will scan for available Bluetooth devices and select
the one matching the ChargerID Code on the EV charger
identication label.
2. The EV charger will then request the password, The default
password is also on the identication label. We recommend this is
changed during set up and noted on the identication label.
3. Once this is entered the app will then show the full
conguration page.
Scan and select the required WifI SSD, and enter the
correct password. This screen will also allow the conguration of
charge mode and if load balancing (Power distribution)
is required.
For Charge Mode, the default is APP which requires a conrmation
within the SYNC EV app to start charging,
this can be changed to a Plug and Charge function which
will charge without secondary conrmation.
For load balancing, if a CT clamp is tted this should be enabled and
set to the correct home current limit. This should be the same or less
than the main fuse rating. With this setting, the EV charger will reduce
its charging rate to limit the total home load to be under the limit. If the
available current is under the minimum of 6 Amps the EV charger will
pause the charging session.
Whenallthecorrectfunctionsareentered,selectSettoupload
settings.TheEVchargerwillbeeptoconrm.
After 15 seconds, the Yellow Indicator should turn Blue to conrm
connection to network and app server. If the EV charger continues
to show yellow, the charger should be power cycled and reconnected
via the app to check correct settings.
GSMandRFIDenabledchargingpoints
For detailed information, please visit the installer portal for set up
and conguration of these features.
1 2 3

Installation and User Guide
EV Charger | 202205.NH www.syncev.co.uk
SYNC EV APP
YouwillnowneedtoinformyourcustomertodownloadtheSYNCEVApplication
apps.apple.com/gb/app/sync-ev/id1528884639 play.google.com/store/apps/details?id=syncev.co.uk&hl=en_GB&gl=GB
4 5 6
1. Once downloaded, please register an account, the chargers
QR code ID and Pin code can be found on the charge point
identication label on the EV charger and enclosed on the cover
of the installation and user guide.
NOTE: The nal step during the sign up process presents you with
an option to input payment card details for Sync EV future public
charging network. This is not mandatory and it
can be skipped by pressing the “X” in the top left corner.
2. Scan the QR code within the app to register this EV charger
to the customers account.
3. Once scanned, enter the PIN code to conrm set up.
SET UP AND COMMISSIONING

Installation and User Guide
EV Charger | 202205.NH www.syncev.co.uk
APP FEATURES
Livestatusandchargingstateofthecharger
Authentication, to prevent unwanted use of the charge point, or plug and charge modes
ScheduleCharging
Enables you to set start and end times to match your o-peak
electricity taris or preference, with optional minimum and maximum
kWh charge limits.
EnableSmartChargingwithAgileOctopusorOctopusGo
Agile Octopus (requires compatible tarrif) to optimise your charging
schedule based on the current price per kWh, to only chagre when the
price is below the set limit.
Octopus Go (requires compatible tarrif) to have the charging schedules
during the times with discounted price per kWh
Power management and congurations to restrict charge rates
from 6A to 32A.
TROUBLESHOOTING
Forfurtherinformation,ortorefertoourFAQs,pleasevisitourwebsite–www.syncev.co.uk
The status of the EV charger can be identied by referencing the colour shown on the LED indicator
• SOLID BLUE – Standby – Charger has power and is connected to the Sync EV network
• FLASHING GREEN – Charger is connected but not charging, awaiting conrmation of charge in APP or scheduled start time
• SOLID GREEN – Charger is active and Charging
• SOLID YELLOW – Charger is oine from network, check local network is active and Wi-Fi is working on the 2.4Ghz band.
• SOLID RED – Indicates the charger is in fault mode and has stopped charging for users safety.
Potential causes:
»Internal RCD has tripped
»Vehicle fault
»Under or over suitable charging voltage
Remove connection to EV vehicle and reset power to the EV charger.

Installation and User Guide
EV Charger | 202205.NH www.syncev.co.uk
ENVIRONMENTAL PROTECTION
This symbol is known as the “Crossed-out Wheelie Bin Symbol”. When this symbol is marked on a product or battery, it means
that it should not be disposed of with your general household waste. Some chemicals contained within electrical/electronic products
or batteries can be harmful to health and the environment. Only dispose of electrical/electronic/battery items in separate collection
schemes, which cater for the recovery and recycling of materials contained within. Your co-operation is vital to ensure the success of
these schemes and for the protection of the environment.
GUARANTEE
SyncEV BG products are guaranteed against faulty materials and workmanship for a period of 3 years from date of delivery: products
will be repaired or (at BG Electrical’s discretion) replacements will be supplied or (at BG Electrical’s discretion) a credit note will be issued.
This guarantee is subject to BG Electrical’s conditions of sale and in particular to the following conditions being met:
1. Notication of any defect is given to BG Electrical as soon as reasonably practicable after becoming apparent, and the products then returned
to BG Electrical.
2. The products have only been operated under normal operating conditions and have only been subject to normal use.
3. No work (other than normal and proper maintenance) has been carried out to the products without BG Electrical’s prior written consent.
4. The products have been assembled, or incorporated into other goods, by a qualied and recognised electrician and only in accordance
with any instructions issued by BG Electrical.
5. The defect has not arisen from an item manufactured or supplied by a person other than BG Electrical.
6. 3 year warranty available as long as charger installation is registered, otherwise standard warranty is for a period of 1 year.
Luceco PLC – Staord Park 1, Telford, TF3 3BD, England | (EU) Luceco SE – C/ Bobinadora 1-5, 08302 Mataro, Spain
If you have any further technical assistance you can get in touch with our Support Team:
support@syncev.co.uk
TECHNICAL
STANDARDS
Voltage 220-240V ac
Frequency 50-60Hz
Rating 6-32A output
Wi-Fi 2.4GHz Band b/g/n/e/i
RCD protection 6mA DC and 30mA AC Type A
Wi-Fi security WPA/WPA2/WPA2-Enterprise/WPS
Bluetooth 4.2 BR/EDR and BLE RFID - Supports ISO 14443, suitable for M1 cards
Approvalstandard IEC 61851-1
Communication protocol OCPP1.6J
This manual suits for next models
2
Popular Automobile Batteries Charger manuals by other brands

Jackson
Jackson SUPERCHARGER with PowerCard installation instructions

ULTIMATE SPEED
ULTIMATE SPEED ULGD 10 A1 Translation of the original instructions

Schumacher
Schumacher Elite SE-1555A Features guide

Vynco
Vynco E1V2 User's operating manual

Hamron
Hamron 608-200 User instructions

Charge Amps
Charge Amps Dawn quick guide