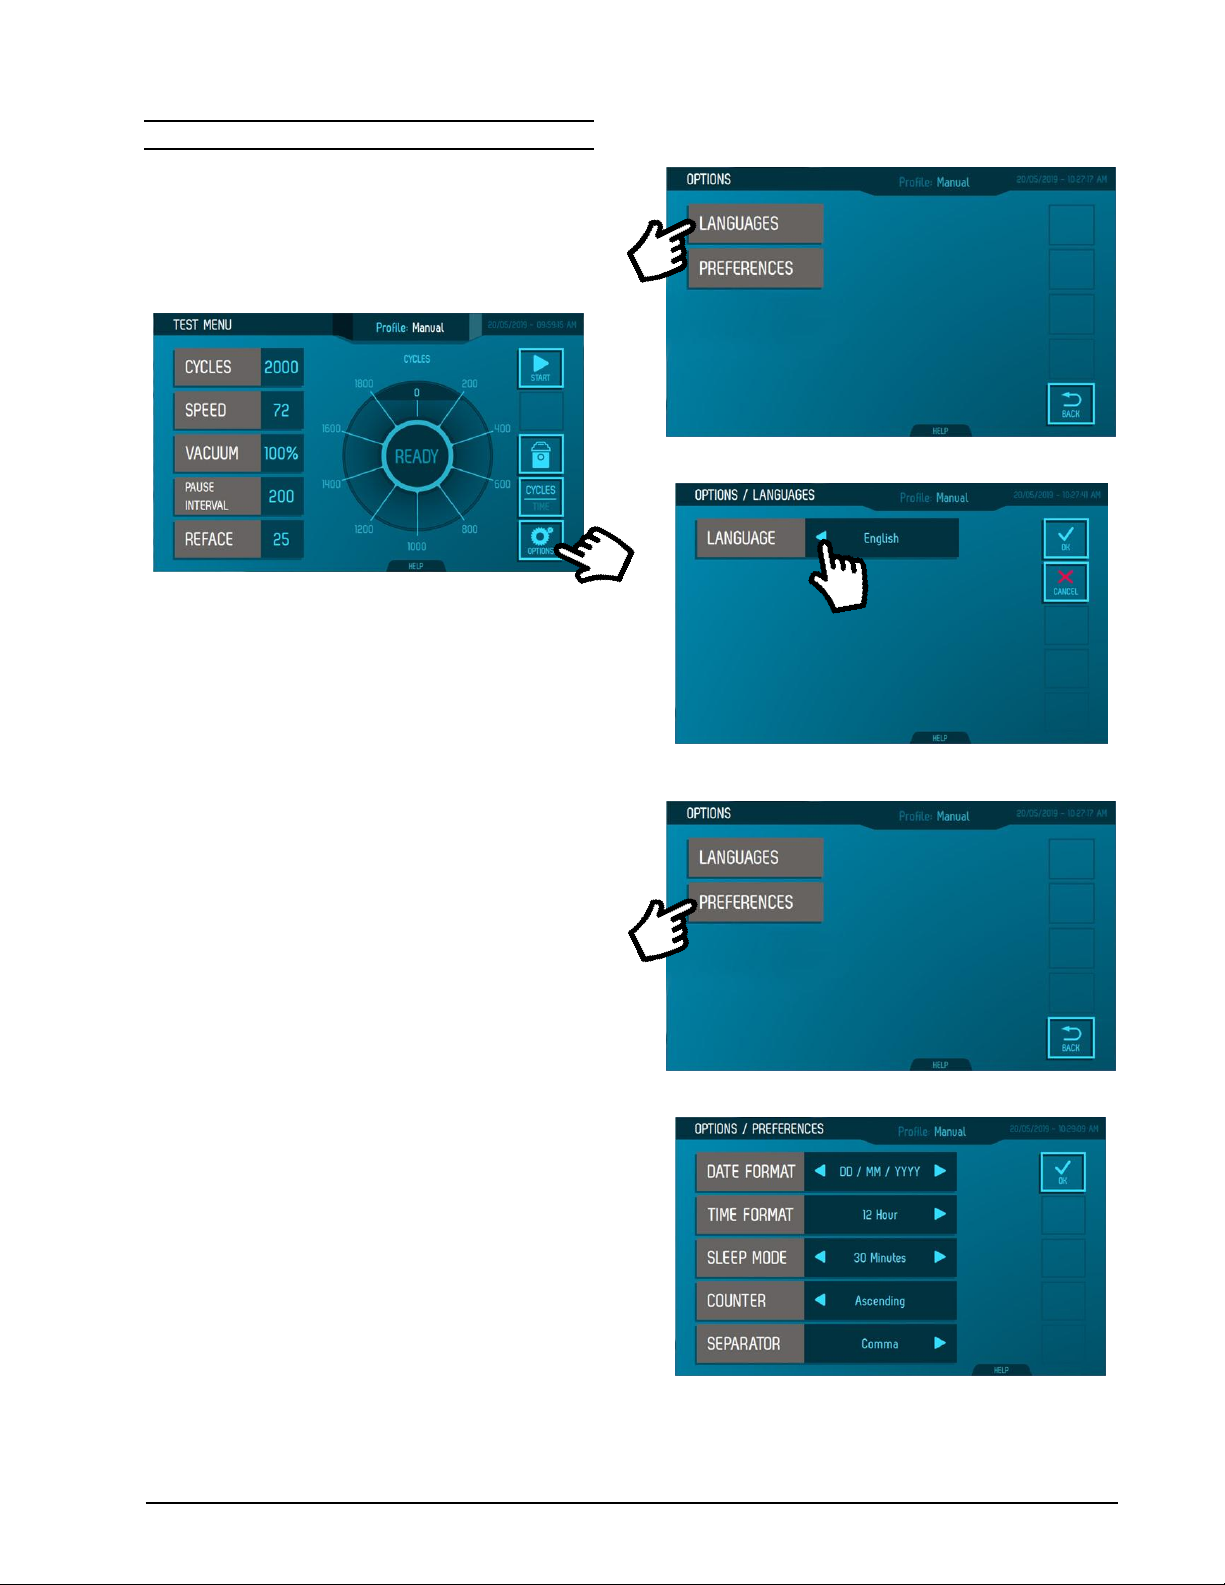
Model 1700 / 1750 Rotary Platform Abraser 2Operating Instructions ver. 1.0
p/n 135505
LIMITED WARRANTY
Taber Industries, (“Taber”) warrants that its products are
free from defects in material and workmanship. This
Limited Warranty shall be applicable for a period of one
year from the date of initial shipment of any product. The
terms of this Limited Warranty do not in any way extend
to parts of the product thereof which have a life, under
normal usage, inherently shorter than the one year
previously stated. Taber will, at its option, repair or
replace the defective product if Taber determines it is
defective within the warranty period and if it is returned,
freight prepaid, to Taber. Replacement parts will be
shipped F.O.B. Taber’s plant. Taber is not obligated to
furnish service under this Limited Warranty: a) to repair
damage resulting from attempts by personnel other than
Taber representatives to install, repair, or service the
product; b) to repair damage resulting from improper use
or from connecting the product to incompatible
equipment; or c) if personnel other than Taber
representatives, without Taber’s prior permission, modify
the product.
EXCEPT AS EXPRESSLY SET FORTH HEREIN,
TABER MAKES NO OTHER REPRESENTATIONS,
PROMISES, GUARANTEES OR WARRANTIES,
EXPRESS OR IMPLIED, STATUTORY OR OTHER-
WISE, INCLUDING BUT NOT LIMITED TO, ANY
IMPLIED WARRANTIES OF MERCHANTABILITY AND
FITNESS FOR A PARTICULAR PURPOSE, AND
TABER EXPRESSLY DISCLAIMS ALL WARRANTIES
NOT EXPRESSLY STATED HEREIN. IN THE EVENT
THE PRODUCT IS NOT FREE FROM DEFECTS AS
WARRANTED ABOVE, A CUSTOMER’S SOLE
REMEDY SHALL BE REPAIR OR REPLACEMENT AS
PROVIDED ABOVE. UNDER NO CIRCUMSTANCES
SHALL TABER BE LIABLE FOR ANY INJURIES,
DAMAGE TO OR REPLACEMENT OF OTHER
PRODUCTS OR PROPERTY, COSTS FOR
RECOVERING, REPROGRAMMING, OR REPRODUC-
ING ANY PROGRAM OR DATA USED WITH THE
PRODUCT.
EXCEPT AS EXPRESSLY PROVIDED HEREIN, IN NO
EVENT SHALL TABER BE LIABLE TO ANY
CUSTOMER OR ANY THIRD PARTY FOR ANY
INDIRECT, INCIDENTAL, CONSEQUENTIAL, SPECIAL
OR PUNITIVE DAMAGES OF ANY KIND OR NATURE
ARISING OUT OF OR RELATING TO THIS WARRANTY
OR CONNECTED WITH OR RESULTING FROM THE
MANUFACTURE, SALE, DELIVERY, RESALE,
REPAIR, REPLACEMENT, OR USE OF ANY PRODUCT
OR THE FURNISHING OF ANY SERVICE OR PART
THEREOF, WHETHER SUCH LIABILITY IS BASED IN
CONTRACT, TORT, NEGLIGENCE, STRICT LIABILITY
OR OTHERWISE, EVEN IF WARNED OF THE
POSSIBILITY OF ANY SUCH DAMAGES.
TABER IS NOT RESPONSIBLE FOR THE LOSS OF
ANY DATA UNDER ANY CIRCUMSTANCES AND ANY
SPECIAL, INCIDENTAL, OR CONSEQUENTIAL
DAMAGES THAT MAY RESULT THEREOF.
CLAIMS FOR SHORTAGES
We use extreme care during packaging to eliminate
the possibility of error. If a shipping error is
discovered:
1. Carefully examine the packing materials and
ensure nothing was inadvertently overlooked when
the shipment was unpacked.
2. Notify the company you purchased the product
from and immediately report the shortage.
3. File any claim within 30 days from shipment.
CLAIMS FOR DAMAGES
Claims for loss or damage in transit should be made
promptly and directly to the transportation
company.
CONTENTS
Contents of the shipping container include the
following:
Model Model
1700 1750
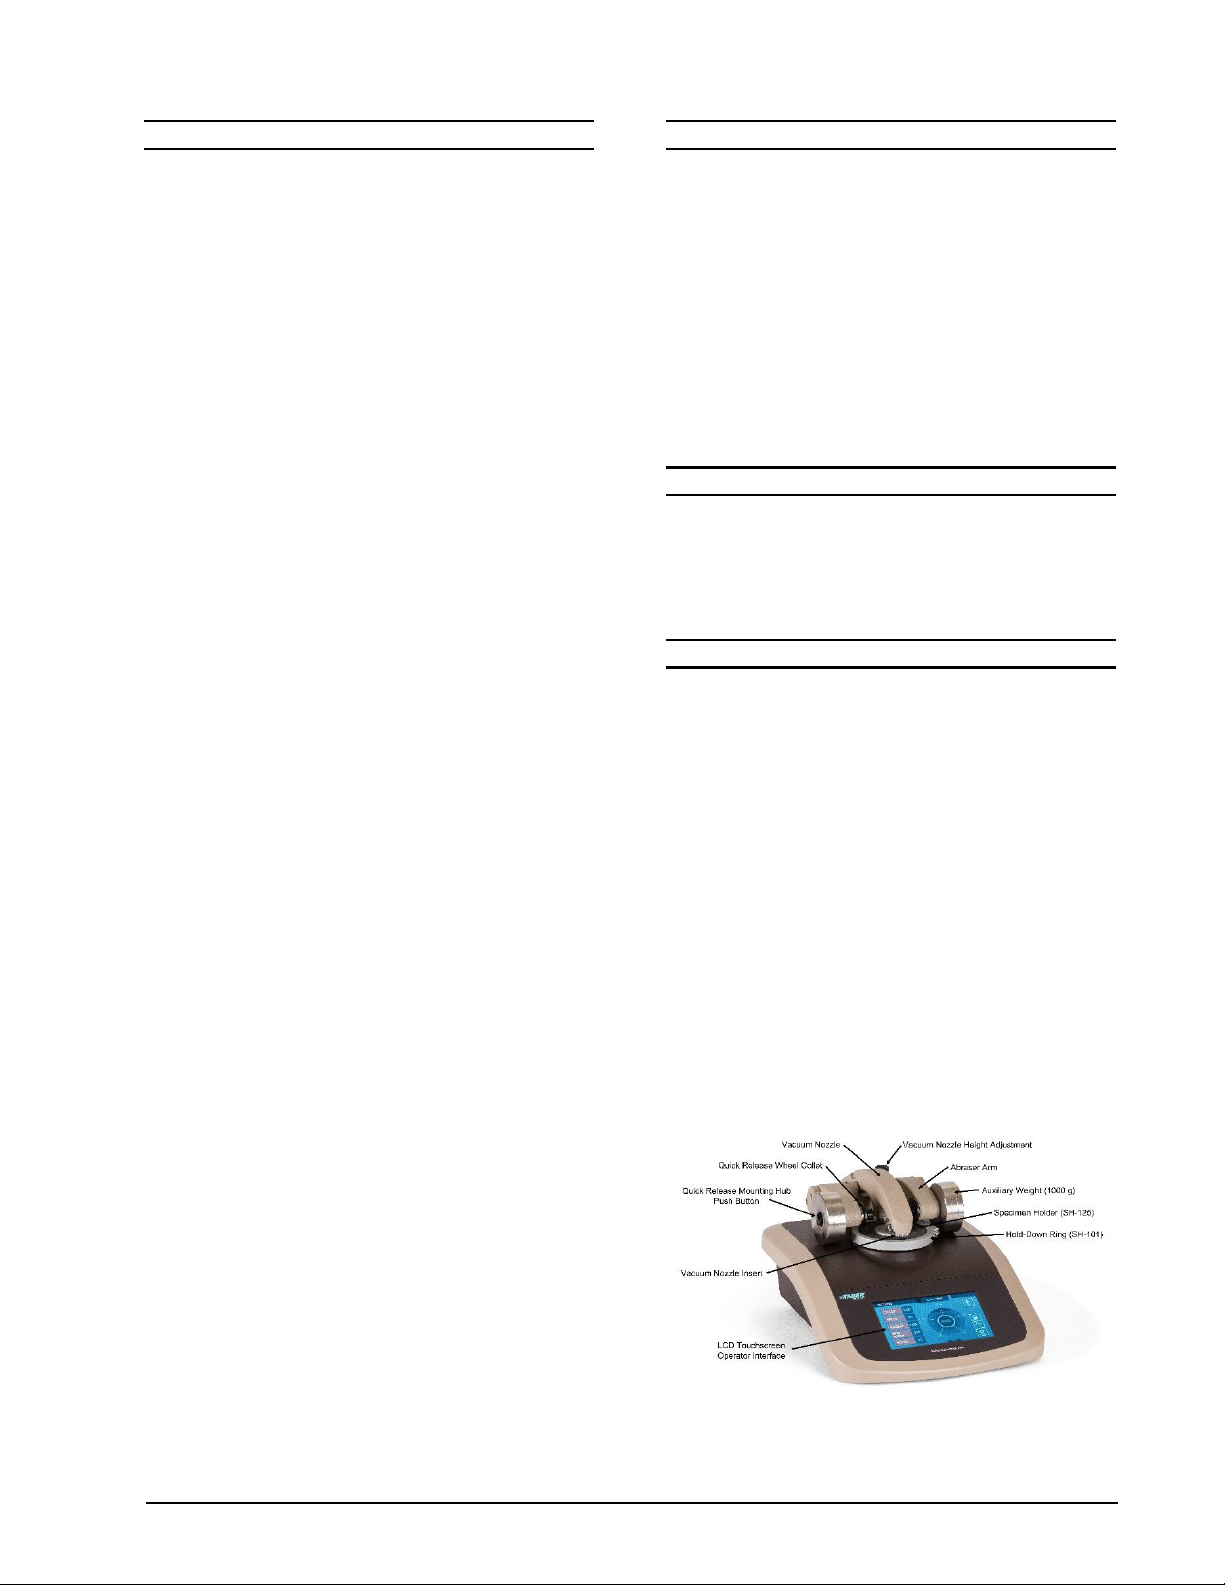
Rotary Platform Abraser
Vacuum System (box 2) 1 1
Vacuum Y-Adaptor & Hose Kit N/A 1
Auxiliary Weights (500 g load) 2 4
Auxiliary Weights (1000 g load) 2 4
Specimen Holder (SH-125)* 1 2
Hold Down Ring (SH-101)* 1 2
Hand Brush (S-12) 1 1
Torx T25 Screwdriver 1 1
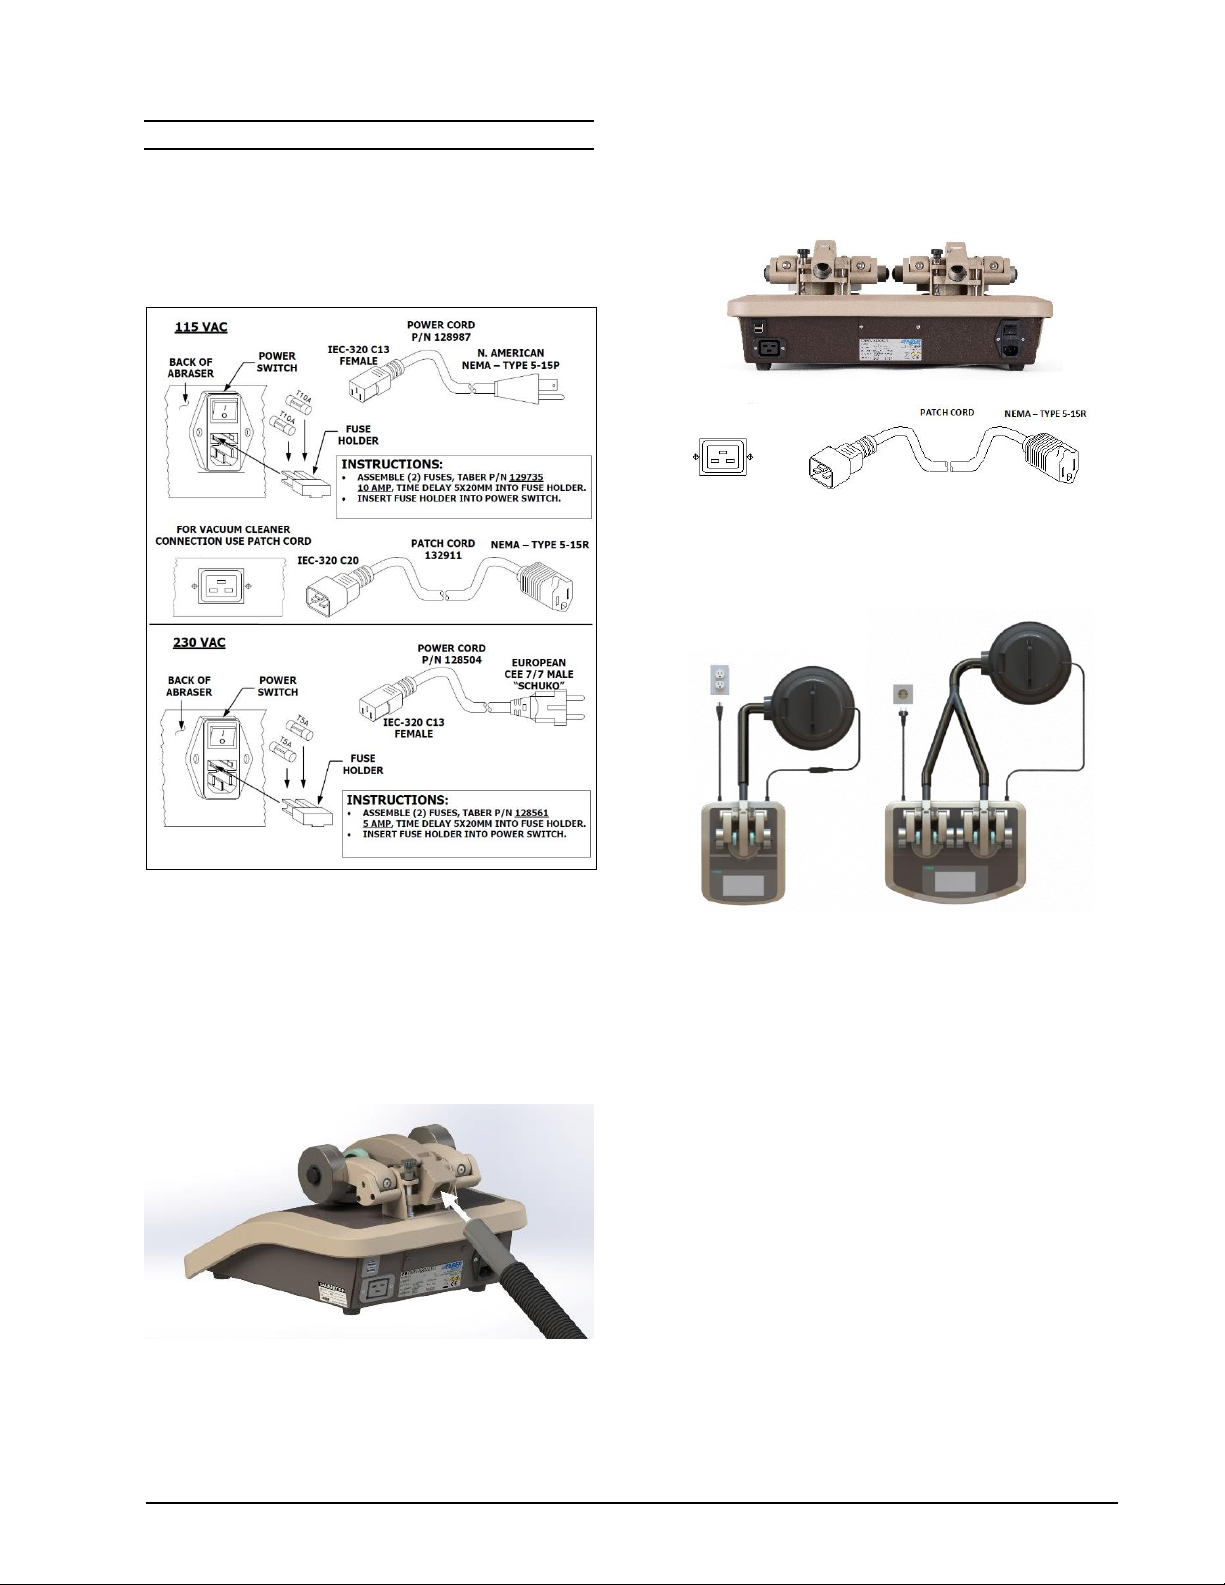
Power Cord Kit 115/230 VAC 1 1
Operating Instructions 1 1
*Mounted on the Abraser