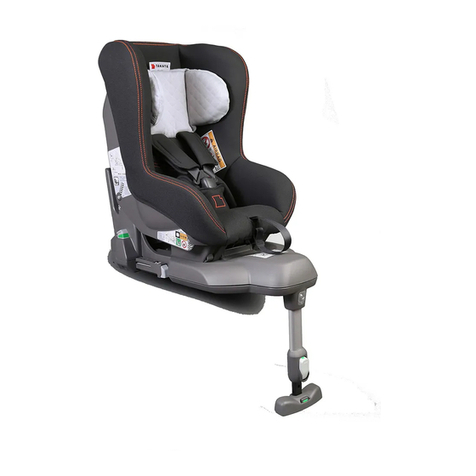
TAKATA MIDI I-SIZE PLUS User manual

40-105 cm
JSfS AhffbGbH
J
oyson
S
a
f
ety
S
ystems
A
sc
h
a
ff
en
b
urg
G
m
bH
Bahnweg 1 · 63743 Aschaffenburg
/
G
erman
y
www.takata-childseats.com

de
it
pt
fr
es
en
nl
3
INHALT
1. GESAMTANSICHT DER EINZEL-
KOMPONENTEN
2. SICHERHEITSHINWEISE VOR BENUT-
ZUNG DES MIDI I-SIZE PLUS
3. GRUNDLEGENDE HANDHABUNG
4. BENUTZUNG IM FAHRZEUG
5. SICHERN IHRES KINDES
6. PFLEGE UND AUFBEWAHRUNG
7. HINWEISE ZUR ENTSORGUNG
8. SERVICE
Begriffsklärung
In diesem Bedienungshandbuch sind wichtige Themen
mit den folgenden Zeichen gekennzeichnet:
WARNUNG!
Eine fehlerhafte Handhabung kann tödlich sein oder
zu ernsthaften Verletzungen führen.
ACHTUNG!
Eine fehlerhafte Handhabung kann zu Verletzungen
führen.
HINWEIS!
Praktische Tipps zur Benutzung des MIDI I-SIZE
PLUS.
3erlaubte Anwendung
2Verbot
Bei Missachtung der Warnhinweise in diesem
Handbuch gefährden Sie die Sicherheit Ihres Kindes
oder anderer Fahrzeuginsassen bei einem Unfall.
© Copyright 2018 [310 35 81 _ 04.18] Joyson Safety
Systems Aschaffenburg GmbH. Die hier enthaltenen
Informationen unterliegen Änderungen ohne vorherige
Mitteilung. Die Joyson Safety Systems Aschaffenburg
GmbH haftet nicht für technische Irrtümer oder
Auslassungen in diesen Informationen. Text und
Bilder sind Eigentum der Joyson Safety Systems
Aschaffenburg GmbH und dürfen ohne Zustimmung
der Joyson Safety Systems Aschaffenburg GmbH
nicht kopiert oder anderweitig verwendet werden.
Das gekaufte Produkt kann u.U. von der Beschreibung
in diesem Bedienungshandbuch abweichen. Das
aktuellste Bedienungshandbuch können Sie von
unserem Kundenservice (siehe Kapitel 8 – Service)
anfordern.
1. GESAMTANSICHT DER
EINZELKOMPONENTEN
[Abbildung MIDI_I-SIZE_PLUS_001]
A. MIDI I-SIZE PLUS
(Front- und Rückansicht)
(1) verstellbares Innenkissen mit AIRPADS und
Sitzverkleinerer für Babies mit AIRPADS
(2) Schultergurte mit Schulterpolstern
(3) Gurtschloss mit Stoffpolster
(4) Beckengurte mit Beckenpolstern
(5) Gurtlösehebel mit zentralem Zuggurt
(6) Bezug
(7) Gurtverbindungsteil
(8) Verstellschieber für das Innenkissen
(9) Fach für Bedienungshandbuch
B. MIDI I-SIZE PLUS
(Ansicht von unten)
(10) Rastbolzen im Fußbereich
(11) Raststange im Fußbereich
(12) Rastbolzen im Gesäßbereich
(13) Raststange im Gesäßbereich
(14) Verstellhebel für die Sitzneigungsverstellung
(15) Sicherheitsabdeckungen
C. I-SIZE BASE (PLUS) (ISO-Ansicht)
(16) Stützfuß
(17) Druckknopf zur Stützfußhöhenverriegelung
(18) ISOFIX-Konnektoren
(19) Entriegelungsschieber des ISOFIX-Konnektors
(20) Sicherungsknopf des Entriegelungsschiebers des
ISOFIX-Konnektors
(21) Druckknopf zur ISOFIX-Längsverstellung
(22) hintere Rastarme mit Rasthaken
(23) Entriegelungselement der hinteren Rasthaken
(24) vordere Rasthaken
(25) Entriegelungsschieber des Stützfuß-Klappmecha-
nismus
Vor dem ersten Gebrauch
Bitte versichern Sie sich vor dem ersten Gebrauch des
Autokindersitzes MIDI I-SIZE PLUS, dass die
folgenden Artikel vorhanden sind:
A. MIDI I-SIZE PLUS,
B. I-SIZE BASE (PLUS),
C. Bedienungshandbücher für den MIDI I-SIZE
PLUS und die I-SIZE BASE (PLUS),
D. Fahrzeugliste für die I-SIZE BASE (PLUS),
E. Einführtrichter.

4
Sollten Artikel fehlen oder beschädigt sein, benutzen
Sie bitte den MIDI I-SIZE PLUS nicht und wenden
Sie sich an Ihren Händler oder unseren Kundenservice
(siehe Kapitel 8 – Service).
2. SICHERHEITSHINWEISE
VOR BENUTZUNG DES
MIDI I-SIZE PLUS
ACHTUNG!
Bitte lesen Sie dieses Bedienungshandbuch vor
Benutzung des Autokindersitzes MIDI I-SIZE PLUS
sorgfältig durch und folgen Sie den Anweisungen.
Bewahren Sie das Bedienungshandbuch sorgfältig auf
(z.B. im Fach für das Bedienungshandbuch auf der
Rückseite des MIDI I-SIZE PLUS), damit Sie es
immer benutzen können, wenn Sie es benötigen.
Folgen Sie zusätzlich den Anweisungen des
Fahrzeugherstellers in dessen Fahrzeug der MIDI
I-SIZE PLUS eingebaut wird und fahren Sie stets
umsichtig.
HINWEIS!
Wir weisen Sie darauf hin, dass der MIDI I-SIZE
PLUS im Falle eines Unfalles Ihr Kind nicht immer
vor Verletzungen schützen kann.
Im Notfall
[MIDI_I-SIZE_PLUS_002] In Notfällen wie Unfällen
etc. sollten Sie Ruhe bewahren und eine Panik
vermeiden.
Retten Sie Ihr Kind wie folgt:
1. Gurt durch Drücken der Verschlusstaste des
Gurtschlosses öffnen und den Gurt vom Kind
entfernen.
2. Nehmen Sie Ihr Kind vorsichtig aus dem
MIDI I-SIZE PLUS.
HINWEIS!
Wenn der Gurt nicht durch Drücken der Verschlusstas-
te geöffnet werden kann, schneiden Sie die Gurtbänder
durch und nehmen Sie Ihr Kind aus dem MIDI I-SIZE
PLUS.
ACHTUNG!
Der MIDI I-SIZE PLUS mit der I-SIZE BASE
(PLUS) ist ein Kinder
rückhaltesystem der
Kategorie „i-Size“. Es ist nach
der Regelung Nr.
129 zur Verwendung auf solchen
Fahrzeugsitzen
genehmigt worden, die gemäß
den
Angaben des
Fahrzeugherstellers im Fahrzeu
handbuch für
i-Size-Rückhaltesysteme geeignet sind.
Im Zweifelsfall kann der Hersteller des Kinderrück-
haltesystems oder der Einzelhändler befragt werden.
ACHTUNG!
[FF>15M] NACH VORNE GERICHTET ERST
AB EINEM ALTER DES KINDES VON 15
MONATEN VERWENDEN (siehe Einbauanleitung).
HINWEIS!
Die Befestigung des MIDI I-SIZE PLUS im Fahrzeug
mit der I-SIZE BASE (PLUS) zur Verbindung mit den
fahrzeugseitigen ISOFIX-Verankerungen darf auch auf
ISOFIX-Fahrzeugsitzen erfolgen.
Eine derartige Befestigung ist nur auf bestimmten
6LW]HQHLQ]HOQHU)DKU]HXJHJHHLJQHW6LH¿QGHQLQGHU
beiliegenden Fahrzeugliste eine Übersicht der
Fahrzeuge und Fahrzeugsitze, die zum Zeitpunkt der
Produktion für diese Befestigung geeignet sind.
WARNUNG!
Die Befestigung des MIDI I-SIZE PLUS im Fahrzeug
muss ausschließlich mit der I-SIZE BASE (PLUS)
und der Verbindung mit den fahrzeugseitigen
ISOFIX-Verankerungen erfolgen. Eine Befestigung
des MIDI I-SIZE PLUS oder der I-SIZE BASE
(PLUS) im Fahrzeug über den 3-Punkt-Sicherheitsgurt
ist technisch nicht vorgesehen und daher unzulässig.
HINWEIS!
Die fahrzeugseitigen ISOFIX-Verankerungen sind
0HWDOOEJHOGLHVLFK]ZLVFKHQGHU)DKU]HXJVLW]ÀlFKH
XQGGHU)DKU]HXJVLW]OHKQHEH¿QGHQXQGN|QQHQGXUFK
den Sitzbezug oder Kunststoffkappen abgedeckt sein.
Bitte lesen Sie im Bedienungshandbuch Ihres
Fahrzeuges nach, wo und wie Sie die ISOFIX-Veran-
NHUXQJHQ¿QGHQXQGIUHLOHJHQN|QQHQ
ACHTUNG!
Bitte beachten Sie, dass die Zulassung nach ECE-R129
erlischt, wenn Sie nicht von der Joyson Safety Systems
Aschaffenburg GmbH genehmigte Änderungen am
MIDI I-SIZE PLUS oder der I-SIZE BASE (PLUS)
vornehmen.
Der Zulassungs-Aufkleber mit dem Konformitätszeichen
(Buchstabe E in einem Kreis) und der Zulassungsnum-
PHUEH¿QGHWVLFKDXIGHU8QWHUVHLWHGHV0,',,6,=(
PLUS und auf der Unterseite der I-SIZE BASE (PLUS)
[ECE].

de
it
pt
fr
es
en
nl
5
Der MIDI I-SIZE PLUS erfüllt die folgenden Gewichts-
und Größenklassen:
AUSRICHTUNG rückwärts gerichtet
GRÖSSE 40 – 105 cm
GEWICHT max. 19 kg
ALTER bis mindestens 15 Monate
ISOFIX-Größenklassen D
AUSRICHTUNG vorwärts gerichtet
GRÖSSE 71 – 105 cm
GEWICHT max. 19 kg
ALTER ab frühestens 15 Monate
ISOFIX-Größenklassen B1
ACHTUNG!
[Airbag Warning] Der MIDI I-SIZE PLUS darf
rückwärts gerichtet nicht auf einem Beifahrersitz mit
aktiviertem Beifahrer-Airbag verwendet werden.
Wenn der Beifahrer-Airbag deaktiviert ist und der
Fahrzeughersteller den Beifahrersitz als geeignet für
die Autokindersitzklasse (i-Size oder ISOFIX)
kennzeichnet, dann können Sie den MIDI I-SIZE
PLUS auf dem Beifahrersitz verwenden. Beachten Sie
bei der Verwendung des MIDI I-SIZE PLUS auf dem
Beifahrersitz immer die Hinweise des Fahrzeugher-
stellers
• zur Deaktivierung des Beifahrer-Airbags,
• ob der Beifahrersitz als geeignet gekennzeichnet ist
•
und ob dieser mit ISOFIX-Verankerungen ausgestat-
tet ist.
Der Kindersitz MIDI I-SIZE PLUS darf in den USA,
in Kanada und in Australien weder gewerbsmäßig
vertrieben, noch verkauft oder benutzt werden.
Checkliste – Installation im Fahrzeug
[MIDI_I-SIZE_PLUS_003]
Fahrzeugsitze
3vom Fahrzeughersteller als geeignet für die
entsprechenden Autokindersitzklassen gekenn-
zeichnet
2nicht vom Fahrzeughersteller als geeignet für die
entsprechenden Autokindersitzklassen gekenn-
zeichnet
Fahrzeugsitzrichtung
3Vorwärts
2Rückwärts
2Seitlich
Sicherheitssysteme des Fahrzeugsitzes zur
Befestigung mit der I-SIZE BASE (PLUS)
3ISOFIX-System
23-Punkt-Sicherheitsgurt
22-Punkt-Sicherheitsgurt
Kindersitzausrichtung
3gegen die Fahrtrichtung (ohne Sitzneigungsver-
stellung)
3in Fahrtrichtung (mit Sitzneigungsverstellung)
WARNHINWEISE:
[MIDI_I-SIZE_PLUS_004] Lassen Sie Ihr Kind
niemals unbeaufsichtigt im Fahrzeug.
[MIDI_I-SIZE_PLUS_005] Setzen Sie ihr Kind immer
vor Beginn und niemals während der Fahrt in den
Autokindersitz MIDI I-SIZE PLUS. Nehmen Sie es
nicht während der Fahrt heraus.
[MIDI_I-SIZE_PLUS_006 + MIDI_I-SIZE_
PLUS_007] Achten Sie darauf, dass keine Gurtbänder
verdreht sind und diese fest um die Schultern sowie im
Beckenbereich anliegen, wenn Sie Ihr Kind im MIDI
I-SIZE PLUS anschnallen.
Bringen Sie die Beckengurte tief an, damit der
Beckenbereich Ihres Kindes geschützt ist. Sollten die
Beckengurte über den Bauch Ihres Kindes laufen,
gefährden Sie bei einem Unfall die Sicherheit Ihres
Kindes.
[MIDI_I-SIZE_PLUS_008] Achten Sie darauf, dass der
Scheitel Ihres Kindes unterhalb der Oberkante des
verstellbaren Innenkissens des MIDI I-SIZE PLUS liegt.
Übersteigt der Scheitel Ihres Kindes die Oberkante des
verstellbaren Innenkissens, gefährden Sie die Sicherheit
Ihres Kindes bei einem Unfall. Sobald in der obersten
Position des Innenkissens der Scheitel Ihres Kindes die
Oberkante des verstellbaren Innenkissens erreicht oder
übersteigt, ist es notwendig auf den nächst größeren
Autokindersitz, z.B. den MAXI, zu wechseln.
[MIDI_I-SIZE_PLUS_009] Sichern Sie den MIDI
I-SIZE PLUS bei jedem Gebrauch im Fahrzeug gegen
das nach vorn Schleudern bei einer plötzlichen
Bremsung, auch wenn Ihr Kind nicht im MIDI I-SIZE
PLUS sitzt. So vermeiden Sie, dass der MIDI I-SIZE
PLUS bei einem Unfall oder einer plötzlichen Bremsung
nach vorne geschleudert wird.
[MIDI_I-SIZE_PLUS_038] Achten Sie darauf, dass der
Stützfuß der I-SIZE BASE (PLUS) immer vollständig

6
XQGIHVWDXIGHP)DKU]HXJERGHQDXÀLHJW%HDFKWHQ6LH
hinsichtlich eventuell vorhandener Bodenstaufächer
Ihres Fahrzeuges auch die Hinweise im Bedienungs-
handbuch Ihres Fahrzeuges.
[MIDI_I-SIZE_PLUS_010] Beschädigen Sie die Gurte
nicht mit Messern oder anderen scharfen Gegenständen
(weder die Fahrzeug-Sicherheitsgurte noch die Gurte
des MIDI I-SIZE PLUS). Der Autokindersitz MIDI
I-SIZE PLUS kann seine Funktion (z.B. Verringerung
des Verletzungsrisikos) nicht vollständig erfüllen, wenn
die Gurte beschädigt sind oder Schnitte aufweisen.
[MIDI_I-SIZE_PLUS_011] Um die Rückhaltewirkung
QLFKWQHJDWLY]XEHHLQÀXVVHQYHUZHQGHQRGHU
demontieren Sie den MIDI I-SIZE PLUS nicht anders
als in diesem Bedienungshandbuch beschrieben.
Entfernen oder ersetzen Sie keine Teile durch
Materialien, die nicht von der Joyson Safety Systems
Aschaffenburg GmbH freigegeben sind.
[MIDI_I-SIZE_PLUS_012] Ersetzen Sie nach einem
Unfall den MIDI I-SIZE PLUS und die I-SIZE BASE
(PLUS) durch einen neuen MIDI I-SIZE PLUS mit
I-SIZE BASE (PLUS), denn durch einen Unfall können
am MIDI I-SIZE PLUS und der I-SIZE BASE (PLUS) u.
U. Schäden entstehen, die nicht von außen erkennbar sind.
[MIDI_I-SIZE_PLUS_013] Der MIDI I-SIZE PLUS
erhitzt sich unter starker Sonneneinwirkung. Um zu
vermeiden, dass sich ein Kind an aufgeheizten Teilen
verbrennen kann, sollte ein Erwachsener die Kunststoff-
und Metallteile des MIDI I-SIZE PLUS vor dem
Gebrauch auf Hitze überprüfen.
[MIDI_I-SIZE_PLUS_014] Installieren Sie den
Autokindersitz MIDI I-SIZE PLUS so, dass die stabilen
Teile (Kunststoffteile usw.) nicht in den Fahrzeugtüren
eingeklemmt werden können.
[MIDI_I-SIZE_PLUS_015] Lassen Sie keine scharfen,
spitzen oder schweren Gegenstände im Fahrzeug liegen.
Bei einem Unfall könnten diese Gegenstände herumge-
schleudert werden und gefährliche Verletzungen bei
Kindern oder anderen Fahrzeuginsassen verursachen.
Auch Gepäckstücke oder andere lose Gegenstände, die
im Fall einer Kollision herumgeschleudert werden,
können Verletzungen bei Kindern oder anderen
Fahrzeuginsassen verursachen und müssen demzufolge
gut gesichert sein.
Sichern Sie Ihr Kind immer mit den Gurten des MIDI
I-SIZE PLUS, auch wenn Sie den MIDI I-SIZE PLUS
nicht im Auto verwenden, zum Beispiel während Sie
den MIDI I-SIZE PLUS mit Ihrem Kind herumtragen
oder abstellen.
Stellen Sie den MIDI I-SIZE PLUS mit Ihrem Kind auf
keinen Fall (be- oder unbeaufsichtigt) auf erhöhte, schrä-
ge oder unebene Flächen (z. B. auf einen Tisch, eine
Wickelkommode, eine Treppe, eine Rampe usw.).
[MIDI_I-SIZE_PLUS_016] Benutzen Sie den MIDI
I-SIZE PLUS mit den Originalbezügen und den
originalen AIRPADS und seitlichen Crash-Polstern.
Diese Strukturen sowie die Bezüge sind wesentlicher
Bestandteil der schützenden Ausstattung und speziell für
die Anwendung im MIDI I-SIZE PLUS entwickelt.
[MIDI_I-SIZE_PLUS_048 a + b] Achten Sie bei jedem
Gebrauch darauf, dass alle AIRPADS korrekt verbaut
und befestigt sind.
HINWEIS!
Lassen Sie Ihr Kind nicht zu lange im MIDI I-SIZE
PLUS sitzen. Wir empfehlen einen Zeitraum von
jeweils maximal 1 bis 2 Stunden. Es ist für die
Muskelentwicklung Ihres Kindes sehr wichtig, seine
Position regelmäßig zu verändern und es z.B. bei
Pausen aus dem MIDI I-SIZE PLUS zu nehmen.
HINWEIS!
Der MIDI I-SIZE PLUS ist für eine maxi-
male Nutzungsdauer von ca. 6 Jahren nach dem Kauf
ausgelegt. Kunststoffe unterliegen einem generellen
Alterungsprozess (besonders unter direkter Sonnen-
einstrahlung). Durch diesen Alterungsprozess können
negative Eigenschaftsänderungen am MIDI I-SIZE
PLUS entstehen, die nicht mit den Augen wahrnehm-
bar sind.
Bei weiteren Fragen zu diesen Anleitungen wenden
Sie sich bitte an den Kundenservice (siehe Kapitel 8
– Service).
3. GRUNDLEGENDE
HANDHABUNG
ACHTUNG!
Achten Sie immer auf eine stabile Unterlage bei der
Benutzung des Autokindersitzes MIDI
I-SIZE PLUS
und der I-SIZE BASE (PLUS).
ACHTUNG!
Klemmen Sie Ihre Finger oder andere Körperteile nicht
im Dreh- und Ausziehbereich beweglicher Teile des
Kindersitzes ein.

de
it
pt
fr
es
en
nl
7
MIDI I-SIZE PLUS
Innenkissen- und Schultergurtpositionen
verstellen
Je nach Größe Ihres Kindes muss das Innenkissen und
die Schultergurtposition des Autokindersitzes MIDI
I-SIZE PLUS angepasst werden, um Ihrem Kind
optimalen Komfort im Gebrauch und maximalen
Schutz bei einem Unfall zu gewährleisten.
[MIDI_I-SIZE_PLUS_017 + MIDI_I-SIZE_
PLUS_018] Das Innenkissen und die Schultergurte
des MIDI I-SIZE PLUS lassen sich über einen
Verstellmechanismus in 5 Positionen verrasten.
ACHTUNG!
[MIDI_I-SIZE_PLUS_049 + MIDI_I-SIZE_
PLUS_050] Überprüfen Sie, ob das Innenkissen und
die Schultergurte korrekt positioniert sind. Die Flügel
des Innenkissens mit den AIRPADS, die den Kopf
schützen, sollen sich bei richtiger Einstellung neben
dem Kopf und deren Unterkante maximal 2 cm (1 - 2
Finger breit) über den Schultern Ihres Kindes
EH¿QGHQ
Schritt 1 – Entriegeln des verstellbaren Innenkissens
[MIDI_I-SIZE_PLUS_019] Öffnen Sie das Fach für
das Bedienungshandbuch auf der Rückseite des
Autokindersitzes MIDI I-SIZE PLUS.
[MIDI_I-SIZE_PLUS_020] Drücken Sie den
Verstellschieber für das Innenkissen auf der Rückseite
des Autokindersitzes MIDI I-SIZE PLUS bis zum
Anschlag zusammen.
Schritt 2 – Verstellen und Verriegeln des Innenkissens
Halten Sie den Verstellschieber gedrückt und schieben
Sie gleichzeitig das Innenkissen nach oben oder unten,
um die Position des Innenkissens und der Schultergur-
te auf die Größe Ihres Kindes anzupassen. Lassen sie
den Verstellschieber für das Innenkissen wieder los.
Der Verstellschieber ist in seiner Position verriegelt,
wenn die Metallstange auf beiden Seiten in die
Rastleisten einrastet.
ACHTUNG!
Bitte kontrollieren und vergewissern Sie sich bei
jedem Verstellvorgang, ob der Verstellschieber
verrastet ist. Dazu können Sie den Verstellschieber
leicht (mit geringer Handkraft) nach oben und unten
bewegen ohne diesen zusammenzudrücken.
Sitzverkleinerer für Babies anpassen
Der Sitzverkleinerer für Babies kann individuell
stufenweise angepasst werden, um Ihr Kind optimal
im Sitz zu positionieren. Er besteht aus zwei
Polsterblöcken (einer davon klappbar), dem
Körper-Einleger sowie dem Kopf-Einleger.
3[MIDI_I-SIZE_PLUS_056 a] Ab Geburt bis ca.
60 cm werden beide Polsterblöcke, der Körper-
Einleger sowie der Kopf-Einleger (in der
niedrigeren Befestigungs-Position am Körper-
Einleger) benötigt.
3[MIDI_I-SIZE_PLUS_056 b] Ab ca. 61 cm bis
ca. 75 cm kann der unterste Block entfernt werden
und das Kopf-Polster in die obere Befestigungs-
Position am Körper-Einleger umgesteckt werden.
WARNUNG!
[MIDI_I-SIZE_PLUS_048 a + b] Achten Sie bei
jedem Gebrauch darauf, dass alle AIRPADS korrekt
verbaut und befestigt sind.
Gurte lösen und Gurtschloss öffnen
Bevor Sie Ihr Kind in den Autokindersitz MIDI
I-SIZE PLUS legen oder herausnehmen, müssen die
Gurte gelockert und das Gurtschloss geöffnet werden.
Der MIDI I-SIZE PLUS ist mit einem zentralen
Gurtlösehebel ausgestattet, der zum Lösen der Gurte
verwendet wird.
WARNUNG!
[Magnets] In diesem Produkt sind Magnete zur
Erhöhung des Bedienkomforts beim An- und Ab-
schnallen des Kindes verbaut. Personen, welchen
elektrisch aktive Implantate eingesetzt wurden (z.B.
Herzschrittmacher), sollten sich dem magnetischen
Feld in der Nähe dieser Magnete nicht aussetzen, da
dies u.U. zu elektromagnetischen Interferenzen führen
könnte. Sollten Sie sich diesbezüglich nicht sicher
sein, wenden Sie sich bitte an Ihren Kinderarzt oder
$U]W=XVlW]OLFKH,QIRUPDWLRQHQKLHU]X¿QGHQVLHDXI
unserer Internetseite in der Rubrik FAQ.
Schritt 1 – Klemmung der Gurte lösen
[MIDI_I-SIZE_PLUS_021] Um die Gurte zu lösen,
ziehen Sie den Gurtlösehebel nach oben und halten
Sie diesen in Position.
Schritt 2 – Gurte lockern
Ziehen Sie gleichzeitig die Schultergurte bis zum
Anschlag sanft nach vorne.
Schritt 3 – Gurtschloss öffnen
[MIDI_I-SIZE_PLUS_022 a] Zum Öffnen des Gurt-
de

8
schlosses die rote Verschlusstaste am Gurtschloss
drücken und die Gurtschlosslaschen herausziehen. Das
Gurtschloss kann nach vorne umgeklappt werden und
wird dort magnetisch in Position gehalten, um Ihnen
das Hineinlegen und Herausnehmen des Kindes zu
erleichtern.
[MIDI_I-SIZE_PLUS_022 b] Die beiden Gurtschloss-
laschen werden magnetisch zusammen gehalten und
können einfach auseinander gezogen und seitlich
ebenfalls mittels der Magnete außen an der Kindersitz-
schale befestigt werden.
Einstellen der Sitzneigung
[MIDI_I-SIZE_PLUS_023 + MIDI_I-SIZE_
PLUS_024] Sie können den vorwärts gerichtet
eingebauten MIDI I-SIZE PLUS in der Neigung
verändern, indem Sie am vorderen Ende unter den
Rand der Schale greifen, den Verstellhebel für die
Sitzneigungsverstellung nach oben drücken und dabei
die Schale am vorderen Ende nach oben bzw. unten
kippen. Durch Loslassen des Verstellhebels für die
Sitzneigungsverstellung in der oberen oder unteren
Verstellposition des Sitzes rastet die Schale in der
Endposition ein.
ACHTUNG!
Bitte kontrollieren und vergewissern Sie sich bei
jedem Verstellvorgang, ob die Sitzschale und der
Verstellhebel verrastet sind. Dazu können Sie die
Sitzschale leicht (mit geringer Handkraft) nach oben
und unten bewegen ohne den Verstellhebel für die
Sitzneigungsverstellung zu betätigen.
HINWEIS!
Die Sitzneigungsverstellung ist nur in vorwärts
gerichteter Einbaulage möglich.
Sollte beim rückwärts gerichteten Einbau des MIDI
I-SIZE PLUS die Verrastung auf der I-SIZE BASE
(PLUS) nicht möglich sein, prüfen Sie bitte, ob
eventuell die Sitzneigung verstellt ist. Stellen Sie diese
dann gegebenenfalls um und verrasten Sie den MIDI
I-SIZE PLUS erneut auf der I-SIZE BASE (PLUS).
HINWEIS!
Die vorwärts gerichtete Verwendung ist erst nach
Entfernen der beiden Sicherheitsabdeckungen
möglich. Vorwärts gerichtet darf der MIDI I-SIZE
PLUS erst für ein Kind ab 15 Monaten verwendet
werden.
I-SIZE BASE (PLUS)
Für die grundlegende Handhabung der I-SIZE BASE
(PLUS) (Einstellungen, Montage und Demontage im
Fahrzeug) lesen Sie bitte das entsprechenden Kapitel
im Handbuch für die I-SIZE BASE (PLUS).
4. BENUTZUNG IM
FAHRZEUG
HINWEIS!
Durch die dauerhafte Verwendung der I-SIZE BASE
(PLUS) und des MIDI I-SIZE PLUS können
Abnutzungsspuren auf dem Fahrzeugsitz nicht
ausgeschlossen werden.
Befestigen der I-SIZE BASE (PLUS)
Für die grundlegende Handhabung der I-SIZE BASE
(PLUS) (Einstellungen, Montage und Demontage im
Fahrzeug) lesen Sie bitte das entsprechenden Kapitel
im Handbuch für die I-SIZE BASE (PLUS).
Befestigen des rückwärts gerichteten MIDI
I-SIZE PLUS [MIDI_I-SIZE_PLUS_039]
Schritt 1 – Kontrolle der I-SIZE BASE (PLUS)
WARNUNG!
Die Befestigung des MIDI I-SIZE PLUS im Fahrzeug
muss ausschließlich auf der I-SIZE BASE (PLUS)
erfolgen. Vergewissern Sie sich daher, dass die I-SIZE
BASE (PLUS) sicher auf dem Fahrzeugsitz steht und
korrekt befestigt ist. Wenn Sie feststellen, dass sich die
I-SIZE BASE (PLUS) auf dem Fahrzeugsitz
verschieben lässt, dann wiederholen Sie alle Schritte
des Kapitels 4 – Benutzung im Fahrzeug (Handbuch
I-SIZE BASE (PLUS)).
WARNUNG!
[MIDI_I-SIZE_PLUS_040] Vor Installation des MIDI
I-SIZE PLUS auf der I-SIZE BASE (PLUS)
vergewissern Sie sich, dass die beiden hinteren
Rasthaken an der I-SIZE BASE (PLUS) geöffnet sind. Sie
erkennen dies, wenn auf beiden Seiten der I-SIZE BASE
(PLUS) an den beiden Entriegelungselementen der
hinteren Rasthaken rote Markierungen zu sehen sind.
Drücken Sie bei unklaren Farb- oder Lichtverhältnis-
sen eines der beiden synchronisierten Entriegelungs-
elemente der hinteren Rasthaken, um sicher zu stellen,
dass beide hinteren Rasthaken geöffnet sind.

de
it
pt
fr
es
en
nl
9
Schritt 2 – Verrasten mit der I-SIZE BASE (PLUS)
[MIDI_I-SIZE_PLUS_041] Richten Sie den MIDI
I-SIZE PLUS entgegen der Fahrtrichtung aus und
positionieren Sie den MIDI I-SIZE PLUS mittig über
der I-SIZE BASE (PLUS). Anschließend drücken Sie
die beiden Rastbolzen im Fußbereich des MIDI I-SIZE
PLUS in die beiden hinteren Rasthaken der I-SIZE
BASE (PLUS). Orientieren Sie sich dabei an den
Pfeilen auf den Außenseiten des MIDI I-SIZE PLUS
und den hinteren Rastarmen der I-SIZE BASE (PLUS).
Die Verbindung zwischen Rastbolzen und den hinteren
Rasthaken ist korrekt verrastet, wenn Sie an den beiden
hinteren Rasthaken der I-SIZE BASE (PLUS) 2
Klick-Geräusche (1 Klick-Geräusch pro Seite) hören
und an beiden Entriegelungselementen der hinteren
Rasthaken grüne Markierungen erkennbar sind.
[MIDI_I-SIZE_PLUS_042] Um die Raststange im
Gesäßbereich des MIDI I-SIZE PLUS mit den vorderen
Rasthaken der I-SIZE BASE (PLUS) zu verbinden,
müssen Sie den Rückenlehnenbereich des MIDI I-SIZE
PLUS von oben auf die I-SIZE BASE (PLUS) drücken,
bis Sie ein Klick-Geräusch hören.
WARNUNG!
[MIDI_I-SIZE_PLUS_042] Verwenden Sie den MIDI
I-SIZE PLUS auf keinen Fall, wenn der MIDI I-SIZE
PLUS nicht korrekt mit der I-SIZE BASE (PLUS)
verbunden ist. Sie erkennen die korrekte Verrastung,
wenn 2 grüne Markierungen an den beiden Entriege-
lungselementen der hinteren Rasthaken sichtbar sind
und Sie vor Installation des MIDI I-SIZE PLUS auf
der I-SIZE BASE (PLUS) sichergestellt hatten, dass
die beiden hinteren Rasthaken geöffnet waren
[MIDI_I-SIZE_PLUS_040].
HINWEIS!
[MIDI_I-SIZE_PLUS_043] Kontrollieren Sie die
korrekte Verrastung des MIDI I-SIZE PLUS mit der
I-SIZE BASE (PLUS), indem Sie mit geringer
Handkraft den MIDI I-SIZE PLUS in alle Richtungen
rütteln. Sollte der MIDI I-SIZE PLUS nicht korrekt
mit der I-SIZE BASE (PLUS) verbunden sein, dann
wiederholen Sie den Schritt 2 – Verrasten mit der
I-SIZE BASE (PLUS) bis zur korrekten Verrastung.
Befestigen des vorwärts gerichteten MIDI I-SIZE
PLUS [MIDI_I-SIZE_PLUS_044]
Schritt 1 – Kontrolle der I-SIZE BASE (PLUS)
WARNUNG!
Die Befestigung des MIDI I-SIZE PLUS im Fahrzeug
muss ausschließlich auf der I-SIZE BASE (PLUS)
erfolgen. Vergewissern Sie sich daher, dass die I-SIZE
BASE (PLUS) sicher auf dem Fahrzeugsitz steht und
korrekt befestigt ist. Wenn Sie feststellen, dass sich die
I-SIZE BASE (PLUS) auf dem Fahrzeugsitz
verschieben lässt, dann wiederholen Sie alle Schritte
des Kapitels 4 – Benutzung im Fahrzeug (Handbuch
I-SIZE BASE (PLUS)).
WARNUNG!
[MIDI_I-SIZE_PLUS_040] Vor Installation des MIDI
I-SIZE PLUS auf der I-SIZE BASE (PLUS)
vergewissern Sie sich, dass die beiden hinteren
Rasthaken an der I-SIZE BASE (PLUS) geöffnet sind.
Sie erkennen dies, wenn auf beiden Seiten der I-SIZE
BASE (PLUS) an den beiden Entriegelungselementen
der hinteren Rasthaken rote Markierungen zu sehen
sind.
Drücken Sie bei unklaren Farb- oder Lichtverhältnis-
sen eines der beiden synchronisierten Entriegelungs-
elemente der hinteren Rasthaken, um sicher zu stellen,
dass beide hinteren Rasthaken geöffnet sind.
Schritt 2 – Entfernen der Sicherheitsabdeckungen
Lösen Sie die beiden Sicherheitsabdeckungen indem
Sie diese von hinten mit dem Finger aus der Schale
herausdrücken und dann von den Rastbolzen
abnehmen.
Schritt 3 – Verrasten mit der I-SIZE BASE (PLUS)
[MIDI_I-SIZE_PLUS_045] Richten Sie den MIDI
I-SIZE PLUS in Fahrtrichtung aus und positionieren
Sie den MIDI I-SIZE PLUS mittig über der I-SIZE
BASE (PLUS). Anschließend drücken Sie die beiden
Rastbolzen im Gesäßbereich des MIDI I-SIZE PLUS
in die beiden hinteren Rasthaken der I-SIZE BASE
(PLUS). Orientieren Sie sich dabei an den Pfeilen auf
den Außenseiten des MIDI I-SIZE PLUS und den
hinteren Rastarmen der I-SIZE BASE (PLUS). Die
Verbindung zwischen Rastbolzen und den hinteren
Rasthaken ist korrekt verrastet, wenn Sie an den
beiden hinteren Rasthaken der I-SIZE BASE (PLUS)
2 Klick-Geräusche (1 Klick-Geräusch pro Seite) hören
und an beiden Entriegelungselementen der hinteren
Rasthaken grüne Markierungen erkennbar sind.
[MIDI_I-SIZE_PLUS_046] Um die Raststange im
Fußbereich des MIDI I-SIZE PLUS mit den vorderen
Rasthaken der I-SIZE BASE (PLUS) zu verbinden,
PVVHQ6LHGLH6LW]ÀlFKHGHV0,',,6,=(3/86YRQ
oben auf die I-SIZE BASE (PLUS) drücken, bis Sie
ein Klick-Geräusch hören.
de

10
WARNUNG!
[MIDI_I-SIZE_PLUS_046] Verwenden Sie den MIDI
I-SIZE PLUS auf keinen Fall, wenn der MIDI I-SIZE
PLUS nicht korrekt mit der I-SIZE BASE (PLUS)
verbunden ist. Sie erkennen die korrekte Verrastung,
wenn 2 grüne Markierungen an den beiden Entriege-
lungselementen der hinteren Rasthaken sichtbar sind
und Sie vor Installation des MIDI I-SIZE PLUS auf
der I-SIZE BASE (PLUS) sichergestellt hatten, dass
die beiden hinteren Rasthaken geöffnet waren
[MIDI_I-SIZE_PLUS_040].
HINWEIS!
[MIDI_I-SIZE_PLUS_043] Kontrollieren Sie die
korrekte Verrastung des MIDI I-SIZE PLUS mit der
I-SIZE BASE (PLUS), indem Sie mit geringer
Handkraft den MIDI I-SIZE PLUS in alle Richtungen
rütteln. Sollte der MIDI I-SIZE PLUS nicht korrekt
mit der I-SIZE BASE (PLUS) verbunden sein, dann
wiederholen Sie den Schritt 2 – Verrasten mit der
I-SIZE BASE (PLUS) bis zur korrekten Verrastung.
Demontage des MIDI I-SIZE PLUS von der
I-SIZE BASE (PLUS)
Schritt 1 – Entriegeln der hinteren Rasthaken
[MIDI_I-SIZE_PLUS_031] Die Entriegelung der
beiden hinteren Rasthaken ist synchronisiert. Deshalb
müssen Sie nur eines der beiden Entriegelungselemen-
te an den hinteren Rastarmen der I-SIZE BASE
(PLUS) bis zum Anschlag drücken. Kippen Sie
gleichzeitig den MIDI I-SIZE PLUS nach vorne (in
Fahrtrichtung), so dass die Rastbolzen des MIDI
I-SIZE PLUS aus den hinteren Rasthaken der I-SIZE
BASE (PLUS) geschwenkt werden.
Schritt 2 – Aushaken aus den vorderen Rasthaken und
Herausnehmen
[MIDI_I-SIZE_PLUS_047] Haken Sie die Raststange
des MIDI I-SIZE PLUS aus den vorderen Rasthaken
der I-SIZE BASE (PLUS) indem Sie den MIDI I-SIZE
PLUS nach hinten schieben(entgegen der Fahrtrich-
tung). Anschließend können Sie den MIDI I-SIZE
PLUS von der I-SIZE BASE (PLUS) heben und aus
Ihrem Fahrzeug nehmen.
Demontage der I-SIZE BASE (PLUS)
Für die grundlegende Handhabung der I-SIZE BASE
(PLUS) (Einstellungen, Montage und Demontage im
Fahrzeug) lesen Sie bitte das entsprechenden Kapitel
im Handbuch für die I-SIZE BASE (PLUS).
5. SICHERN IHRES KINDES
HINWEIS!
Zur Sicherheit Ihres Kindes lassen Sie Ihr Kind
möglichst auf der Gehwegseite beziehungsweise am
Fahrbahnrand ein- und aussteigen.
Schritt 1 – Gurte anlegen
[MIDI_I-SIZE_PLUS_021 + MIDI_I-SIZE_PLUS_022
a + b] Bevor Sie Ihr Kind in den Autokindersitz MIDI
I-SIZE PLUS setzen, lösen und öffnen Sie bitte die
Gurte wie in Kapitel 3 – Grundlegende Handhabung
(Gurte lösen und Gurtschloss öffnen) beschrieben und
legen Sie die Gurtbänder seitlich ab.
[MIDI_I-SIZE_PLUS_006 + MIDI_I-SIZE_PLUS_007]
Wenn Sie Ihr Kind in den MIDI I-SIZE PLUS
gesetzt
haben, führen Sie die Schultergurte über die Schultern
und die Beckengurte über das Becken Ihres
Kindes, ohne
die Gurte zu verdrehen oder zu vertauschen.
Schritt 2 – Schließen des Gurtschlosses
[MIDI_I-SIZE_PLUS_051 a + b] Zum Schließen der
Gurte am Autokindersitz MIDI I-SIZE PLUS müssen
Sie die beiden magnetischen Gurtschlosslaschen wieder
zusammenfügen.
Drücken Sie die beiden Gurtschlosslaschen fest in das
Gurtschloss, bis Sie ein Klick-Geräusch hören.
WARNUNG!
Bitte überprüfen Sie vor jedem Gebrauch, ob die Gurt-
laschen und das Gurtschloss korrekt verschlossen
sind.
Kontrollieren Sie dies, indem Sie die Gurtlaschen
nach
oben ziehen, ohne die rote Verschlusstaste am Gurt-
schloss zu drücken.
Schritt 3 – Einstellen des Beckengurtes
WARNUNG!
Bringen Sie die Beckengurte tief an, damit der Becken-
bereich Ihres Kindes geschützt ist. Sollten die Becken-
gurte über den Bauch Ihres Kindes laufen, gefährden
Sie bei einem Unfall die Sicherheit Ihres Kindes.
Achten Sie bitte auch darauf, dass sich das Stoffpols-
ter hinter dem Gurtschloss nicht verschoben hat und
Ihr Kind vor den Kunststoffteilen des Gurtschlosses
geschützt ist.
Schritt 4 – Spannen der Gurte
[MIDI_I-SIZE_PLUS_052 a + b] Zum Spannen der Gurte
ziehen Sie das Ende des zentralen Zuggurtes nach vorn
– nicht nach oben, nicht nach unten und auch nicht seitlich.

de
it
pt
fr
es
en
nl
11
ACHTUNG!
Sie haben die korrekte Gurtspannung erreicht, wenn
zwischen der Schulter Ihres Kindes und dem
Schultergurt nur Platz für einen Finger ist.
Schritt 5 – Kontrolle der seitlichen Crash-Polster
WARNUNG!
[MIDI_I-SIZE_PLUS_048 a + b] Achten Sie bei
jedem Gebrauch darauf, dass alle AIRPADS korrekt
verbaut und befestigt sind.
Schritt 6 – Kontrolle der Größe
WARNUNG!
[MIDI_I-SIZE_PLUS_008] Achten Sie darauf, dass
der Scheitel Ihres Kindes unterhalb der Oberkante des
verstellbaren Innenkissens des MIDI I-SIZE PLUS
liegt. Übersteigt der Scheitel Ihres Kindes die
Oberkante des verstellbaren Innenkissens, gefährden
Sie die Sicherheit Ihres Kindes bei einem Unfall.
Sobald in der obersten Position des Innenkissens der
Scheitel Ihres Kindes die Oberkante des verstellbaren
Innenkissens erreicht oder übersteigt, ist es notwendig
auf den nächst größeren Autokindersitz, z.B. den
MAXI, zu wechseln.
Checkliste – Sicherung Ihres Kindes:
Bitte achten Sie darauf, dass...
• die Position des verstellbaren Innenkissens mit den
AIRPADS (wie in diesem Bedienungshandbuch
beschrieben) eingestellt sind.
•
der Beckengurt nicht über den Bauch des Kindes verläuft.
• das Gurtschloss und die Gurtschlosslaschen richtig
geschlossen sind.
• die Gurte sicher um Ihr Kind gespannt und nicht
verdreht sind.
• der Scheitel Ihres Kindes unterhalb der Oberkante
des verstellbaren Innenkissens des MIDI I-SIZE
PLUS liegt.
• alle AIRPADS korrekt verbaut und befestigt sind.
Herausnehmen Ihres Kindes
[MIDI_I-SIZE_PLUS_053 a - d] Bevor Sie Ihr Kind
aus dem MIDI I-SIZE PLUS heben können, müssen
Sie die Gurte lösen und das Gurtschloss öffnen. Bitte
gehen Sie dazu entsprechend den Erläuterungen in
Kapitel 3 – Grundlegende Handhabung (Gurte lösen
und Gurtschloss öffnen) vor. Erst danach können Sie
Ihr Kind aus dem MIDI I-SIZE PLUS heben.
6. PFLEGE UND
AUFBEWAHRUNG
Abnehmen aller Bezüge
Schritt 1 – Abnehmen des Innenkissens
Öffnen Sie die Klettverschlüsse der Schulterpolster und
des Innenkissens. Nehmen Sie die Schulterpolster von
den Schultergurten. Entfernen Sie das Innenkissen von
der Rückenplatte, indem Sie in der obersten Position
die untere Tasche auf der Rückseite des Innenkissens
nach unten von der Rückenplatte abziehen. Anschlie-
ßend das Innenkissen von der Rückenplatte nach oben
hin abziehen.
Schritt 2 – Entnehmen der seitlichen Crash-Polster
(AIRPADS)
WARNUNG!
Die in das verstellbare Innenkissen und den Sitzver-
kleinerer für Babies eingelegten AIRPADS sind nicht
waschbar und müssen vor dem Waschen aus dem
verstellbaren Innenkissen und aus dem Sitzverkleinerer
für Babies entfernt werden.
[MIDI_I-SIZE_PLUS_054] Legen Sie dazu das
Innenkissen oder den Sitzverkleinerer für Babies mit
der Vorderseite auf eine ebene Fläche. Anschließend
können Sie in die Bezugsöffnung auf der Rückseite
greifen und die AIRPADS, die sich in den seitlichen
Flügeln des Innenkissens sowie in den seitlichen
Flügeln (Schultern und Kopf) des Sitzverkleinerers für
%DELHVEH¿QGHQZLHLP%LOGJH]HLJWDXIEHLGHQ6HLWHQ
herausziehen.
Schritt 3 – Öffnen des Gurtschlosses und Abnehmen
der Beckenpolster
[MIDI_I-SIZE_PLUS_022 a] Öffnen Sie das Gurt-
schloss und ziehen Sie die Gurtschlosslaschen
auseinander. Öffnen Sie die Beckenpolster an den
Klettverschlüssen und nehmen Sie die Beckenpolster
von den Beckengurten.
Schritt 4 – Abnehmen des Bezuges
Nach dem Abnehmen des Innenkissens bringen Sie die
Rückenplatte wieder in die unterste Position. Lösen Sie
den umlaufenden Gummizug sowie die Kunststoffele-
mente des Bezuges und öffnen Sie die seitlichen Klett-
verschlüsse innen links und rechts, um die Gurte aus
dem Bezug lösen zu können. Ziehen Sie den gesamten
Bezug von der Schale nach oben ab und schieben dabei
das Gurtschloss nach unten durch den Bezug heraus.
de

12
Aufziehen der Bezüge
Um alle Bezüge vollständig auf den MIDI
I-SIZE
PLUS aufzuziehen, folgen Sie bitte den voran
gestellten
Ausführungen zum Thema „Abnehmen aller Bezüge“
in umgekehrter Reihenfolge.
[MIDI_I-SIZE_PLUS_016] Benutzen Sie den MIDI
I-SIZE PLUS mit den Originalbezügen und den
originalen AIRPADS und seitlichen Crash-Polstern.
Diese Strukturen sowie die Bezüge sind wesentlicher
Bestandteil der schützenden Ausstattung und speziell für
die Anwendung im MIDI I-SIZE PLUS entwickelt.
WARNUNG!
Zum Abnehmen des Bezuges ist es nur nötig, das
Gurtschloss zu öffnen. Das Gurtsystem muss dafür
nicht auseinander genommen werden.
[MIDI_I-SIZE_PLUS_055] Falls Sie trotzdem
irrtümlich die Gurte auseinander genommen haben,
achten Sie beim wieder Zusammensetzen darauf, dass
nach dem Einfädeln der beiden Schultergurte in die
Rückenplatte die Gurtbänder über dem metallischen
Bolzen in der Rückenplatte verlaufen. Achten Sie
ebenfalls darauf, dass die Gurte nicht verdreht oder
vertauscht in das Gurtverbindungsteil des zentralen
Zuggurts auf der Unterseite des MIDI I-SIZE PLUS
eingehängt sind.
5HLQLJXQJXQG3ÀHJH
Die Bezüge des Autokindersitzes MIDI I-SIZE PLUS
(das verstellbare Innenkissen, der Schalenbezug und
die Gurtpolster) sind abnehmbar und waschbar.
HINWEIS!
%HDFKWHQ6LHLPPHUGLHMHZHLOLJHQ3ÀHJHDQOHLWXQJHQ
auf den Bezugsetiketten, um zu erfahren, ob diese in
der Maschine gewaschen werden können oder nur für
Handwäschen geeignet sind. Ausschlaggebend sind
LPPHUGLHMHZHLOLJHQ3ÀHJHDQOHLWXQJHQDXIGHQ
Bezugsetiketten.
WARNUNG!
Die in das verstellbare Innenkissen und den Sitzver-
kleinerer für Babies eingelegten AIRPADS sind nicht
waschbar und müssen vor dem Waschen aus dem
verstellbaren Innenkissen entfernt werden.
WARNUNG!
[MIDI_I-SIZE_PLUS_048 a + b] Achten Sie nach
jedem Waschen darauf, dass alle AIRPADS korrekt
verbaut und befestigt sind.
Kontrollieren Sie, ob das Gurtsystem ordnungsgemäß
befestigt und funktionsfähig ist und ob der MIDI
I-SIZE PLUS unbeschädigt ist. Bitte wenden Sie sich
bei Fragen dazu an unseren Kundenservice.
Die Kunststoffteile können mit klarem Wasser oder
einer milden Seifenlösung gereinigt werden. Um eine
Schimmelpilzbildung zu vermeiden, muss der MIDI
I-SIZE PLUS an einem gut belüfteten und trockenen
Ort aufbewahrt werden.
7. HINWEISE ZUR
ENTSORGUNG
Für die korrekte Entsorgung der Verpackung oder des
Autokindersitzes MIDI I-SIZE PLUS beachten Sie
bitte die entsprechenden Vorschriften und Umweltbe-
stimmungen ihres Landes sowie eventuelle Material-
kennzeichnungen auf der Verpackung oder auf den
Kindersitz-Komponenten.
8. SERVICE
Um den Autokindersitz MIDI I-SIZE PLUS stetig
verbessern zu können, freuen wir uns, wenn Sie uns
Ihr Feedback geben. Bitte senden Sie uns alle Ihre
Anmerkungen zum Beispiel zu den Themen Design,
Bedienerfreundlichkeit, Materialien, Bedienungshand-
buch usw. an unseren Kundenservice unter folgender
Adresse:
Um eine Antwort an Sie zu erleichtern, geben Sie bitte
immer die Zulassungsnummern (oranger Aufkleber auf
der Unterseite oder der Rückseite jedes Produktes)
sowie die Barcode-Nummern (schwarz-weißer
Aufkleber auf der Unterseite oder der Rückseite jedes
3URGXNWHVDQ(EHQVR¿QGHQ6LHDXIGHU8QWHUVHLWH
oder der Rückseite der Produkte einen Datumsstempel
(z.B. hinter dem Fach für das Benutzerhandbuch), der
ebenfalls für die Beantwortung Ihrer Fragen hilfreich
sein kann.

de
it
pt
fr
es
en
nl
13
CONTENTS
1. OVERVIEW OF COMPONENTS
2. SAFETY INSTRUCTIONS BEFORE USING
YOUR MIDI I-SIZE PLUS
3. BASIC INSTRUCTIONS
4. USE IN THE VEHICLE
5. SECURING YOUR CHILD
6. CARE AND MAINTENANCE
7. INFORMATION REGARDING DISPOSAL
8. SERVICE
'H¿QLWLRQV
Key points in these instructions are highlighted as
follows:
WARNING!
Indicates when incorrect use may lead to a fatality or
serious injuries.
CAUTION!
Indicates when incorrect use may lead to injuries.
NOTE!
Highlights practical tips for using the MIDI I-SIZE
PLUS.
3Indicates permitted usage.
2Indicates non-permitted usage.
Failure to observe the warnings in these instructions
may seriously risk your child’s safety, and the safety
of other passengers, in the event of an accident.
© Copyright 2018 [310 35 81 _ 04.18] Joyson Safety
Systems Aschaffenburg GmbH. Information subject to
change without prior notice. Joyson Safety Systems
Aschaffenburg GmbH cannot be held responsible for
any technical errors or omissions. All text and images
are property of Joyson Safety Systems Aschaffenburg
GmbH and cannot be copied or used in any other way
without the approval of Joyson Safety Systems
Aschaffenburg GmbH.
The product purchased may differ in part from the
description given in these instructions. For the latest
version of the manual, contact our customer services
(see Section 8 – Service).
1. OVERVIEW OF
COMPONENTS
[Figure MIDI_I-SIZE_PLUS_001]
A. MIDI I-SIZE PLUS
(Front and back view)
(1) Adjustable inner padding with AIRPADS and
seat reducer for babies with AIRPADS
(2) Shoulder straps with shoulder pads
(3) Seatbelt buckle with padding
(4) Lap belt with lap pads
(5) Belt loosening lever with central pull strap
(6) Cover
(7) Belt connection section
(8) Slider to adjust inner padding
(9) Compartment for manual
B. MIDI I-SIZE PLUS
(view from below)
(10) Connection bolt in foot area
(11) Connection rod in foot area
(12) Connection bolt in seat area
(13) Connection rod in seat area
(14) Lever for seat inclination adjustment
(15) Safety cap
C. I-SIZE BASE (PLUS) (ISO view)
(16) Support leg
(17) Button to adjust support leg
(18) ISOFIX connectors
(19) Release slider for the ISOFIX connector
(20) Locking slider of the release slider for the
ISOFIX connector
(21) Button to adjust ISOFIX length
(22) Rear connection arms with connection hooks
(23) Release element for rear connection hooks
(24) Front connection hooks
(25) Release slider for support leg folding mechanism
%HIRUHXVLQJWKHVHDWIRUWKH¿UVWWLPH
%HIRUH\RX¿UVWXVHWKH0,',,6,=(3/86FKLOGFDU
seat, please ensure you are in possession of each of the
following items:
A. MIDI I-SIZE PLUS,
B. I-SIZE BASE (PLUS),
C. Instruction manuals for the MIDI I-SIZE PLUS
and the I-SIZE BASE (PLUS),
D.
Vehicle list for the I-SIZE BASE (PLUS),
E. Feeder.
en

14
NOTE!
Securing the MIDI I-SIZE PLUS via the I-SIZE
BASE (PLUS) and the vehicle’s ISOFIX points is also
permitted on vehicle seats approved as ISOFIX
positions in the vehicle.
This is only suitable for certain seats in certain vehicles.
The vehicle list supplied provides an overview
of all
suitable vehicles and seats at the time of going to
print.
WARNING!
The MIDI I-SIZE PLUS must only be secured via the
I-SIZE BASE (PLUS) and the vehicle’s ISOFIX
points. The MIDI I-SIZE PLUS seat or the I-SIZE
BASE (PLUS) have not been designed to be used with
a three-point seatbelt and should not be secured in this
way.
NOTE!
The ISOFIX points installed in the vehicle are metal
brackets positioned between the base and back of the
seat. They may be covered by the seat cover or plastic
caps. Please see your vehicle’s manual for further
information on where the points are found, and how
they can be uncovered.
CAUTION!
3OHDVHQRWHWKDW(&(5FHUWL¿FDWLRQFHDVHVWRDSSO\
if any changes are made to the MIDI I-SIZE PLUS or
I-SIZE BASE (PLUS) without approval from Joyson
Safety Systems Aschaffenburg GmbH.
7KHFHUWL¿FDWLRQVWLFNHUIHDWXULQJDV\PEROWKHOHWWHU
(LQDFLUFOHDQGFHUWL¿FDWLRQQXPEHULVIRXQGRQWKH
underside of the MIDI I-SIZE PLUS and on the
underside of the I-SIZE BASE (PLUS) [ECE].
The MIDI I-SIZE PLUS meets the following weight
and size classes:
DIRECTION Backward-facing
SIZE 40 – 105 cm
WEIGHT max. 19 kg
AGE up to min. 15 months
ISOFIX size classes D
DIRECTION Forward-facing
SIZE 71 – 105 cm
WEIGHT max. 19 kg
AGE from at least 15 months
ISOFIX size classes B1
If any item is missing or damaged, do not use the
MIDI I-SIZE PLUS seat. Contact your dealer or our
customer services (see Section 8 – Service).
2. SAFETY INSTRUCTIONS
BEFORE USING YOUR
MIDI I-SIZE PLUS
CAUTION!
Please read these instructions carefully before using
your MIDI I-SIZE PLUS child car seat. Keep the
manual in a safe place (e.g. in the special compartment
for the manual at the back of the MIDI I-SIZE PLUS),
so that you always have it on hand. Also follow the
instructions provided by your vehicle manufacturer,
and drive carefully at all times.
NOTE!
Please remember that in the case of an accident, the
MIDI I-SIZE PLUS cannot always prevent your child
from injury.
In case of an emergency
[MIDI_I-SIZE_PLUS_002] In emergencies such as
accidents, keep calm and try not to panic.
Remove your child from the vehicle as follows:
1. Press the release button on the seatbelt buckle,
and take the strap off the child.
2. Carefully remove your child from the MIDI
I-SIZE PLUS.
NOTE!
If the strap is not released when the button is pressed,
cut through it, before removing your child from the
MIDI I-SIZE PLUS.
CAUTION!
The MIDI I-SIZE PLUS seat in
conjunction with
the I-SIZE BASE (PLUS)
is an “i-Size” Child
Restraint System. It is approved
to Regulation
No.129, for use in “i-Size compatible”
vehicle
seating positions as indicated by vehicle
manufacturers in the vehicle users’ manual. If in
doubt, consult either the child restraint
manufacturer or the retailer.
CAUTION!
[FF>15M] DO NOT USE FORWARD FACING
BEFORE THE CHILD’S AGE EXCEEDS
15 months (Refer to instructions).

it
pt
fr
es
nl
15
CAUTION!
[Airbag Warning] The MIDI I-SIZE PLUS may not be
used on the front passenger seat in a backward-facing
position with the airbag activated. If the passenger
airbag has been deactivated and the vehicle’s manufac-
turer has approved the seat as suitable for use with i-size
child car seats (i-Size or ISOFIX), you may use the
MIDI I-SIZE PLUS in this position. When using the
MIDI I-SIZE PLUS in this way, always follow the
vehicle manufacturer’s instructions regarding:
• deactivating the passenger airbag,
• the suitability of the passenger seat
•
ZKHWKHUWKHVHDWLV¿WWHGZLWK,62),;SRLQWV
The MIDI I-SIZE PLUS child seat may not be
distributed or used for commercial purposes in the
USA, Canada, or Australia.
Checklist – installation in the vehicle
[MIDI_I-SIZE_PLUS_003]
Vehicle seat
3Labelled by the vehicle manufacturer as suitable
for this class of child car seat
2Not labelled by the vehicle manufacturer as
suitable for this class of child car seat
Vehicle seat direction
3Forward
2Backward
2Sideways
Vehicle safety system for securing the I-SIZE
BASE (PLUS)
3ISOFIX system
2Three-point safety belt
2Two-point safety belt
Child seat direction
3Against the direction of travel
(without seat inclination adjustment)
3In the direction of travel
(with seat inclination adjustment)
WARNING NOTES:
[MIDI_I-SIZE_PLUS_004] Never leave your child
unattended in the vehicle.
[MIDI_I-SIZE_PLUS_005] Always seat your child in the
MIDI I-SIZE PLUS child car seat before the
start of
your journey – never during travel. Never remove
your
child from the seat while the vehicle is in motion.
[MIDI_I-SIZE_PLUS_006 + MIDI_I-SIZE_PLUS_007]
Check that the safety straps have not become twisted,
and that they lie snug to the child’s shoulders and lap,
when fastening your child into the MIDI I-SIZE PLUS.
Pull the lap belt down as far as possible, so that the lap
area of your child is protected. If the lap belt runs across
your child’s stomach, there is a risk of internal injuries in
the event of an accident.
[MIDI_I-SIZE_PLUS_008] Check that the top of your
child’s head is lower than the top edge of the adjustable
inner padding of the MIDI I-SIZE PLUS. If the headrest
is too low, there is a greater risk of injury in the case of
an accident. As soon as the top of your child’s head
reaches or exceeds the top edge of the adjustable inner
padding, when the inner padding is at its highest point,
you should switch to the next size of child seats, e.g. the
MAXI.
[MIDI_I-SIZE_PLUS_009] Secure your MIDI I-SIZE
PLUS in place whenever it is in the vehicle, regardless
of whether a child is using it. This prevents the MIDI
,6,=(3/86IURPÀ\LQJIRUZDUGLQWKHHYHQWRIDQ
accident or when braking sharply.
[MIDI_I-SIZE_PLUS_038] Please ensure that the
support leg of the I-SIZE BASE (PLUS) lies completely
DQGÀXVKDJDLQVWWKHYHKLFOHÀRRU3OHDVHUHIHUWRWKH
information given in your vehicle’s manual about
storage compartments in the footwell of your vehicle.
[MIDI_I-SIZE_PLUS_010] Take care not to damage the
vehicle’s seatbelts, or the straps of the MIDI I-SIZE
PLUS, with knives or other sharp objects. The MIDI
I-SIZE PLUS cannot properly protect children from injury
if the straps have been cut or in some way damaged.
[MIDI_I-SIZE_PLUS_011] Using or disassembling the
MIDI I-SIZE PLUS in any way other than described in
these instructions can cause serious injury. Do not
remove any components or replace them with parts that
have not been approved by Joyson Safety Systems
Aschaffenburg GmbH.
[MIDI_I-SIZE_PLUS_012] After an accident, replace
the MIDI I-SIZE PLUS seat and the I-SIZE BASE
(PLUS) with a new MIDI I-SIZE PLUS seat and a new
I-SIZE BASE (PLUS). Accidents can cause damage to
the MIDI I-SIZE PLUS seat and the I-SIZE BASE
(PLUS) that may not be visible to the naked eye.
de
en
en

16
[MIDI_I-SIZE_PLUS_013] The MIDI I-SIZE PLUS
can heat up when placed in direct sunlight. To prevent
burns, ensure that an adult checks all plastic and metal
parts of the seat before use.
[MIDI_I-SIZE_PLUS_014] Position the MIDI I-SIZE
PLUS so that static parts (plastic elements, etc.) do not get
stuck in vehicle doors during normal use of the vehicle.
[MIDI_I-SIZE_PLUS_015] Do not leave any sharp,
pointy or heavy objects around the vehicle. In the case
RIDQDFFLGHQWWKHVHREMHFWVPD\À\DURXQGWKHFDELQ
injuring children or other passengers. Luggage and other
potentially dangerous items should also be secured in
place.
Always secure your child with the MIDI I-SIZE PLUS
straps, even if you are not using the seat in the car (e.g.
when carrying your child around in it, or putting the seat
down somewhere).
Never leave your child in the MIDI I-SIZE PLUS
(whether attended or not) on a raised, slanted or uneven
surface, such as a table, a baby-changing table, steps or a
ramp.
[MIDI_I-SIZE_PLUS_016] Only use the MIDI I-SIZE
PLUS with original covers, AIRPADS and side crash
pads. These are key safety components and have been
developed specially for use in the MIDI I-SIZE PLUS
seat.
[MIDI_I-SIZE_PLUS_048 a + b] Always ensure that all
WKH$,53$'6DUH¿WWHGFRUUHFWO\DQGDWWDFKHG
NOTE!
Do not leave your child sitting in the MIDI I-SIZE
PLUS for too long. We recommend a limit of one to
two hours. It is very important for muscle develop-
ment that children regularly change their position. As
such, you should also remove your child from the
MIDI I-SIZE PLUS when taking breaks.
NOTE!
The MIDI I-SIZE PLUS should not be used for any
more than six years after purchase. Plastics deteriorate
generally over time, particularly when exposed to
direct sunlight. This deterioration is
not always visible
to the naked eye, and can compromise
the performance
of the MIDI I-SIZE PLUS seat.
Should you have any other queries as to the use of this
product, please contact our customer services (see
Section 8 – Service).
3. BASIC INSTRUCTIONS
CAUTION!
Always place the MIDI I-SIZE PLUS child car seat
DQGWKH,6,=(%$6(3/86RQDÀDWVWDEOHVXUIDFH
CAUTION!
%HFDUHIXOWKDW\RXU¿QJHUVDQGRWKHUERG\SDUWVGRQRW
get caught in any moving sections of the seat.
MIDI I-SIZE PLUS
Adjusting the position of the inner padding and
shoulder strap
The inner padding and shoulder straps of the MIDI
I-SIZE PLUS should be adjusted to the size of your
child, so as to provide maximum comfort and
maximum protection in the case of an accident.
[MIDI_I-SIZE_PLUS_017 + MIDI_I-SIZE_PLUS_018]
7KHVHFRPSRQHQWVFDQEHVHWWR¿YHGLIIHUHQW
positions, via a special adjustment mechanism.
NOTE!
The inner padding and shoulder straps of the MIDI
I-SIZE PLUS should be adjusted to the size of your
child, so as to provide maximum comfort and
maximum protection in the case of an accident.
[MIDI_I-SIZE_PLUS_017 + MIDI_I-SIZE_
3/86B@7KHVHFRPSRQHQWVFDQEHVHWWR¿YH
different positions, via a special adjustment mechanism.
[MIDI_I-SIZE_PLUS_049 + MIDI_I-SIZE_
PLUS_050] Check that the inner padding and shoulder
straps are correctly positioned. The wings of the inner
padding with the AIRPADS protect the head, and
should therefore be positioned beside your child’s
head, and the lower edge of the AIRPADS should be
PD[FP¿QJHUVDERYHWKHVKRXOGHUV
Step 1 – Unlock the adjustable inner padding
[MIDI_I-SIZE_PLUS_019] Open the compartment
for the manual on the backside of the MIDI I-SIZE
PLUS child car seat.
[MIDI_I-SIZE_PLUS_020] Fully depress the slider to
adjust the inner padding on the back of the MIDI
I-SIZE PLUS child car seat.
Step 2 – Adjust and fasten the inner padding
Keep the slider pressed down, and at the same time,
slide the inner padding up or down, to adjust this and
the shoulder straps to the size of your child. Then
release the slider again. The slider is locked in place
when the metal arm clicks into the slots on each side.

de
it
pt
fr
es
en
nl
17
CAUTION!
Whenever you adjust the seat, check that the slider is
locked into position again. To do this, gently try to
move the slider up or down, without pushing it in.
Adjust seat reducer for babies
The seat reducer for babies can be individually
adjusted in stages to ensure your child is in exactly the
right position in the seat. It consists of two upholstered
pads (one of which is foldable), the body support
insert and the head support insert.
3[MIDI_I-SIZE_PLUS_056 a] Both pads, the
body support insert and the head support insert
(in the lower attachment position on the body
support insert) will be required from birth up to
approx. 60 cm.
3[MIDI_I-SIZE_PLUS_056 b] The lower pad can
removed from approx. 61 cm to approx. 75 cm
and the head support switched to the upper
attachment position on the body support insert.
WARNING!
[MIDI_I-SIZE_PLUS_048 a + b] Always ensure that
DOOWKH$,53$'6DUH¿WWHGFRUUHFWO\DQGDWWDFKHG
Loosening the straps and opening the buckle
Before placing your child in the MIDI I-SIZE PLUS
child car seat or removing your child from it, loosen
the straps and open the buckle. The MIDI I-SIZE
PLUS features a central lever that is used to loosen the
straps.
WARNING!
[Magnets] This product contains magnets to make it
easier to secure and unfasten the child. Wearers of
electrically active implants (for example, pacemakers)
VKRXOGQRWEHH[SRVHGWRWKHPDJQHWLF¿HOGDURXQG
these magnets as this could result in electromagnetic
inference. If you are unsure, please contact your
paediatrician or GP. Additional information is available
on our website under FAQ
.
Step 1 – Unblock the straps
[MIDI_I-SIZE_PLUS_021] To loosen the straps, pull
the lever up and hold it in this position.
Step 2 – Loosen straps
At the same time, pull the shoulder straps gently
forward as far as possible.
Step 3 – Open the buckle
[MIDI_I-SIZE_PLUS_022 a] To open the buckle,
press the red button on it, and remove the tongues. The
buckle can be folded down and held in position by the
magnets making it easier to lift your child in and out
of the seat.
[MIDI_I-SIZE_PLUS_022 b] The two tongues are
held together magnetically and can be easily separated
by pulling them apart and attached on the outside of
the seat shell also using the magnets.
Adjusting the seat inclination
[MIDI_I-SIZE_PLUS_023 + MIDI_I-SIZE_PLUS_024]
The inclination of the forward facing MIDI I-SIZE
PLUS can be adjusted by pressing the seat inclination
lever below the front end of the shell upwards. Keep
the seat inclination lever pressed, and at the same
time, pivot the shell up or down at the front end. Then
release the seat inclination lever again so that the seat
shell is locked in upper or lower position. This is
indicated by a click.
CAUTION!
Whenever you adjust the seat inclination, check that
the seat shell and lever are locked into position again.
To do this, gently try to move the front end of the shell
up or down, without pressing the inclination lever.
NOTE!
The inclination of the seat can only be adjusted when
installing the MIDI I-SIZE PLUS forward facing on
the I-SIZE BASE (PLUS).
If it is not possible to install the MIDI I-SIZE PLUS
rearward facing on the I-SIZE BASE (PLUS), please
kindly check the position of the inclination. If
necessary, change the inclination and install the MIDI
I-SIZE PLUS rearward facing on the I-SIZE BASE
(PLUS) again.
NOTE!
The forward facing usage mode is only possible after
removing both safety caps. Forward facing usage of
the MIDI I-SIZE PLUS is only allowed if the child’s
age exceeds 15 months.
I-SIZE BASE (PLUS)
For basic instructions regarding the I-SIZE BASE
(PLUS) (adjustments, securing in and removing from
the vehicle) please read the respective section in the
instruction manual of the I-SIZE BASE (PLUS).
en

18
4. USE IN THE VEHICLE
NOTE!
Long-term use of the I-SIZE BASE (PLUS) and MIDI
I-SIZE PLUS may result in wear and tear of the vehicle
seat.
Securing the TAKATA I-SIZE BASE (PLUS)
For basic instructions regarding the I-SIZE BASE
(PLUS) (adjustments, securing in and removing from
the vehicle) please read the respective section in the
instruction manual of the I-SIZE BASE (PLUS).
Securing the MIDI I-SIZE PLUS in a
backward-
facing position [MIDI_I-SIZE_PLUS_039]
Step 1 – Check the I-SIZE BASE (PLUS)
WARNING!
The MIDI I-SIZE PLUS must only be secured via the
I-SIZE BASE (PLUS). As such, ensure that the I-SIZE
%$6(3/86LVDWWDFKHG¿UPO\DQGFRUUHFWO\WRWKH
vehicle seat. If you notice that the I-SIZE BASE
(PLUS) can still be moved around, repeat all the steps
in Section 4 – Use in the vehicle (Instructions I-SIZE
BASE (PLUS)).
WARNING!
[MIDI_I-SIZE_PLUS_040] Before installing the
MIDI I-SIZE PLUS on the I-SIZE BASE (PLUS),
check that both rear connection hooks of the I-SIZE
BASE (PLUS) are open. The connection hooks have
been correctly unlocked if you can see a red marking
on the top of each release element.
,QFDVHRIXQFOHDUFRORXURULQGLI¿FXOWOLJKWFRQGLWLRQV
push down one of the release elements on the exterior
of the connection arms to ensure that both connection
hooks are open.
Step 2 – Lock the seat into the I-SIZE BASE (PLUS)
[MIDI_I-SIZE_PLUS_041] Turn the MIDI I-SIZE
PLUS against the direction of travel, and place it above
the middle of the I-SIZE BASE (PLUS). Press the two
connection bolts in the foot area of the MIDI I-SIZE
PLUS into the rear connection hooks of the I-SIZE
BASE (PLUS). For guidance, use the arrows on the
outside of the seat and on the rear connection arms of
the I-SIZE BASE (PLUS). The bolts are properly
locked into the rear connection hooks when each one
clicks into place, and you can see a green marking on
the top of each hook’s release element.
[MIDI_I-SIZE_PLUS_042] To secure the connection
rod in the seat area of the MIDI I-SIZE PLUS with the
front connection hooks of the I-SIZE BASE (PLUS),
press down from above on the back section of the MIDI
I-SIZE PLUS, until you hear a click.
WARNING!
[MIDI_I-SIZE_PLUS_042] Do not use the MIDI
I-SIZE PLUS if it is not correctly secured to the
I-SIZE BASE (PLUS). It is properly locked in place
when you can see a green marking on the top of each
rear hook’s release element and if you checked prior to
installation of the MIDI
I-SIZE PLUS on the I-SIZE
BASE (PLUS)
that the rear connection hooks were
open [MIDI_I-SIZE_PLUS_040].
NOTE!
[MIDI_I-SIZE_PLUS_043] Check the MIDI I-SIZE
PLUS is correctly secured to the I-SIZE BASE
(PLUS), by gently shaking the seat in each direction.
If the seat is not properly secured to the base, repeat
Step 2 – Lock the seat into the I-SIZE BASE (PLUS)
until it is in the correct position.
Securing the MIDI I-SIZE PLUS in a
forward-
facing position [MIDI_I-SIZE_PLUS_044]
Step 1 – Check the I-SIZE BASE (PLUS)
WARNING!
The MIDI I-SIZE PLUS must only be secured via the
I-SIZE BASE (PLUS). As such, ensure that the I-SIZE
%$6(3/86LVDWWDFKHG¿UPO\DQGFRUUHFWO\WRWKH
vehicle seat. If you notice that the I-SIZE BASE (PLUS)
can still be moved around, repeat all the steps in Section 4
– Use in the vehicle (Instructions I-SIZE BASE (PLUS)).
WARNING!
[MIDI_I-SIZE_PLUS_040] Before installing the
MIDI I-SIZE PLUS on the I-SIZE BASE (PLUS),
check that both rear connection hooks of the I-SIZE
BASE (PLUS) are open. The connection hooks have
been correctly unlocked if you can see a red marking
on the top of each release element.
,QFDVHRIXQFOHDUFRORXURULQGLI¿FXOWOLJKWFRQGLWLRQV
push down one of the release elements on the exterior
of the connection arms to ensure that both connection
hooks are open.
Step 2 – Remove the safety caps
Remove the two safety caps by pushing them out of
the shell from the rear side of the blockings, and take
them off the connection bolts.

de
it
pt
fr
es
en
nl
19
Step 3 – Lock the seat into the I-SIZE BASE (PLUS)
[MIDI_I-SIZE_PLUS_045] Turn the MIDI I-SIZE
PLUS so that it faces the direction of travel, and place
it above the middle of the I-SIZE BASE (PLUS).
Press the two connection bolts in the seat area of the
MIDI I-SIZE PLUS into the rear connection hooks of
the I-SIZE BASE (PLUS). For guidance, use the
arrows on the outside of the seat and on the rear
connection arms of the I-SIZE BASE (PLUS). The
bolts are properly locked into the rear connection
hooks when each one clicks into place, and you can
see a green marking on the top of each hook’s release
element.
[MIDI_I-SIZE_PLUS_046] To secure the connection
rod in the foot area of the MIDI I-SIZE PLUS with the
front connection hooks of the I-SIZE BASE (PLUS),
press down from above on the seat section of the
MIDI I-SIZE PLUS, until you hear a click.
WARNING!
[MIDI_I-SIZE_PLUS_046] Do not use the MIDI
I-SIZE PLUS if it is not correctly secured to the
I-SIZE BASE (PLUS). It is properly locked in place
when you can see a green marking on the top of each
rear hook’s release element and if you checked prior to
installation of the MIDI
I-SIZE PLUS on the I-SIZE
BASE (PLUS)
that the rear connection hooks were
open [MIDI_I-SIZE_PLUS_040].
NOTE!
[MIDI_I-SIZE_PLUS_043] Check the MIDI I-SIZE
PLUS is correctly secured to the I-SIZE BASE
(PLUS), by gently shaking the seat in each direction.
If the seat is not properly secured to the base, repeat
Step 2 – Lock the seat into the I-SIZE BASE (PLUS)
until it is in the correct position.
Removing the MIDI I-SIZE PLUS from the
I-SIZE BASE (PLUS)
Step 1 – Release the rear connection hooks
[MIDI_I-SIZE_PLUS_031] The rear hooks unlock
together, so you only need to push down one of the
release elements on the I-SIZE BASE (PLUS) rear
connection arms. At the same time, tilt the MIDI
I-SIZE PLUS forward (in the direction of travel), so
that the connection bolts of the seat come out of the
rear connection hooks of the base.
Step 2 – Free the seat from the front connection hooks
and remove
[MIDI_I-SIZE_PLUS_047] Free the connection rod of
the MIDI I-SIZE PLUS from the front hooks of the
I-SIZE BASE (PLUS) by sliding the MIDI I-SIZE PLUS
backward, against the direction of travel. You should
now be able to lift the MIDI I-SIZE PLUS from the
I-SIZE BASE (PLUS), and remove it from your vehicle.
Removing the I-SIZE BASE (PLUS)
For basic instructions regarding the I-SIZE BASE
(PLUS) (adjustments, securing in and removing from
the vehicle) please read the respective section in the
instruction manual of the I-SIZE BASE (PLUS).
5. SECURING YOUR CHILD
NOTE!
For safety reasons, children should always get in and
out from the passenger side of the vehicle, or directly
onto a sidewalk.
Step 1 – Fasten the straps
[MIDI_I-SIZE_PLUS_021 + MIDI_I-SIZE_PLUS_022
a + b] Before sitting your child in the MIDI I-SIZE
PLUS, loosen and open the straps, as described in
Section 3 – Basic instructions (Loosening the straps and
opening the buckle), and move them out of the way.
[MIDI_I-SIZE_PLUS_006 + MIDI_I-SIZE_PLUS_007]
Once your child is sat in the MIDI I-SIZE PLUS, place
the shoulder straps over the shoulders and the lap belt
over your child’s lap, taking care not to twist or tangle
the straps.
Step 2 – Close the belt buckle
[MIDI_I-SIZE_PLUS_051 a + b] To secure the straps on
the MIDI I-SIZE PLUS child car seat, bring the two
magnetic belt tongues together again.
3XVKWKHWRQJXHV¿UPO\LQWRWKHEXFNOHXQWLO\RXKHDU
them click into place.
WARNING!
Before every journey, always ensure that the tongues
and buckle are locked together. You can check this by
pulling the tongues up, without pressing the red button
on the buckle.
en

20
Step 3 – Adjust the lap belt
WARNING!
Pull the lap belt down as far as possible, so that the lap
area of your child is protected. If the lap belt runs
across your child’s stomach, there is a risk of internal
injuries in the event of an accident.
Ensure that the cushion behind the buckle has not
slipped out of place, so that it no longer protects your
child against the buckle’s plastic components.
Step 4 – Tighten the straps
[MIDI_I-SIZE_PLUS_052 a + b] To tighten the straps,
pull the end of the central pull strap forward (not up or
down, and not to the side).
CAUTION!
You can ensure that the belt tension is correct if only one
¿QJHU¿WVEHWZHHQWKHFKLOGDQGWKHVKRXOGHUVWUDSVDQGWKH
lap belt of the MIDI I-SIZE PLUS after tightening them.
Step 5 – Check the side crash pads
WARNING!
[MIDI_I-SIZE_PLUS_048 a + b] Always ensure that
DOOWKH$,53$'6DUH¿WWHGFRUUHFWO\DQGDWWDFKHG
Step 6 – Check the size of the seat
WARNING!
[MIDI_I-SIZE_PLUS_008] Check that the top of
your child’s head is lower than the top edge of the
adjustable inner padding of the MIDI I-SIZE PLUS. If
the headrest is too low, there is a greater risk of injury
in the case of an accident. As soon as the top of your
child’s head reaches or exceeds the top edge of the
adjustable inner padding, when the inner padding is at
its highest point, you should switch to the next size of
child seats, e.g. the MAXI.
Checklist – securing your child:
Please ensure that:
•
the height of the adjustable inner padding with the
AIRPADS is
adjusted to your child (as described in these
instructions).
• the lap belt does not run over your child’s stomach.
• the buckle and tongues are correctly secured.
•
WKHVWUDSV¿WVQXJO\DURXQG\RXUFKLOGDQGDUHQRWWZLVWHG
• the top of your child’s head is lower than the top
edge of the adjustable inner padding of the
MIDI I-SIZE PLUS.
DOOWKH$,53$'6DUH¿WWHGFRUUHFWO\DQGDWWDFKHG
Removing your child
[MIDI_I-SIZE_PLUS_053 a - d] Before you can lift
your child out of the MIDI I-SIZE PLUS, you must
loosen the straps and open the buckle. To do this,
follow the instructions in Section 3 – Basic instruc-
tions (Loosening the straps and opening the buckle).
You can then lift your child from the MIDI I-SIZE
PLUS.
6. CARE AND
MAINTENANCE
Removing the covers
Step 1 – Remove the inner padding
Open the shoulder pads’ Velcro and take the shoulder
pads off the shoulder belts. Remove the inner padding
IURPWKHEDFNSODWHE\¿UVWSODFLQJLWLQWKHKLJKHVW
position. Then pull the lower pouch on the rear of the
padding down and away from the back plate. Follo-
wing this, pull the inner padding up and away from
the back plate.
Step 2 – Remove the side crash pads (AIRPADS)
WARNING!
The AIRPADS in the adjustable inner padding and in
the seat reducers for babies are not washable and must
be removed from the adjustable inner padding and
from the seat reducer for babies before washing.
[MIDI_I-SIZE_PLUS_054] To do this, lie the inner
padding or the seat reducer for babies down, with its
front side on an even surface. You can then reach into
the back through the opening of the cover. Remove the
AIRPADS in the side wings of the padding and in the
side wings (shoulders and head) of the seat reducer for
babies, as shown in the illustration.
Step 3 – Open the belt buckle and remove the lap pads
[MIDI_I-SIZE_PLUS_022 a] Open the buckle and pull
the tongues out. Open the lap pads’ Velcro and take the
lap pads off the lap belts.
Step 4 – Remove the cover
After removing the inner padding, return the back plate
to its lowest position. Loosen the bungees and fold out
the plastic components around the edge of the cover.
Open the Velcro at the inner sides of the cover, so that
you can take off the cover of the shell. Remove the straps
from the cover and thread the buckle out of the cover.

de
it
pt
fr
es
en
nl
21
Reattaching the covers
To fully reattach all MIDI I-SIZE PLUS covers, please
follow the instructions for “Removing the covers” in
reverse.
[MIDI_I-SIZE_PLUS_016] Only use the MIDI I-SIZE
PLUS with original covers, AIRPADS and side crash
pads. These are key safety components and have been
developed specially for use in the MIDI I-SIZE PLUS
seat.
WARNING!
In order to remove the cover, it is only necessary to
open the buckle and to pull the tongues out. It is not
required to take apart the harness system.
[MIDI_I-SIZE_PLUS_055] Should you have
unintentionally disassembled the harness system, please
ensure that, after threading the shoulder straps back into
the back plate, they run over the metal bolt in the back
plate. Similarly, check that the straps are not twisted or
tangled in the belt connection section of the central pull
strap on the underside of the MIDI I-SIZE PLUS.
Cleaning and care
The covers of your MIDI I-SIZE PLUS child car seat
(the adjustable inner padding, the seat cover, and the
belt pads) are removable and washable.
NOTE!
Always check the care instructions on the cover labels,
to see whether or not they are machine washable.
These instructions should take precedence over any
others.
WARNING!
The AIRPADS in the adjustable inner padding and the seat
reducer for babies are not washable and must be removed
from the adjustable inner padding before washing.
WARNING!
[MIDI_I-SIZE_PLUS_048 a + b] Always ensure that
DOOWKH$,53$'6DUH¿WWHGFRUUHFWO\DQGDWWDFKHGDIWHU
washing.
Check that the belt system is attached properly and
working correctly and that the MIDI I-SIZE PLUS has
not been damaged. Should you have any queries on
this matter, please contact our customer services.
Plastic components can be cleaned with water or a
mild soapy solution. To avoid the build-up of mould,
store the MIDI I-SIZE PLUS in a well-
ventilated, dry place.
7. INFORMATION
REGARDING DISPOSAL
Please follow local regulations when disposing of
MIDI I-SIZE PLUS packaging and the seat itself,
observing any information stated on the packaging and
seat components regarding the materials.
8. SERVICE
As part of our efforts to continually improve our
products, we welcome your feedback. Please send any
comments on issues such as design, user-friendliness,
materials and this instruction manual to our customer
services at:
To ensure a swift response, please provide the
FHUWL¿FDWLRQQXPEHUVRUDQJHODEHORQWKHXQGHUVLGHRU
the backside of each product) as well as the barcode
number (black and white label on the underside or the
EDFNVLGHRIHDFKSURGXFW$GGLWLRQDOO\\RXZLOO¿QG
a time stamp on the underside or the backside of the
products (e.g. behind the compartment for the
manual), which also may be helpful for answering
your questions.
en
Other manuals for MIDI I-SIZE PLUS
1
Table of contents
Languages:
Other TAKATA Car Seat manuals

TAKATA
TAKATA I-SIZE BASE PLUS User manual

TAKATA
TAKATA I-SIZE BASE PLUS User manual

TAKATA
TAKATA MINI I-SIZE User manual

TAKATA
TAKATA MIDI I-SIZE User manual

TAKATA
TAKATA MAXI User manual

TAKATA
TAKATA MIDI I-SIZE PLUS User manual

TAKATA
TAKATA MIDI User manual

TAKATA
TAKATA I-SIZE BASE User manual

TAKATA
TAKATA Mini User manual