manuals.online logo
Brands
  1. Home
  2. •
  3. Brands
  4. •
  5. Talkswitch
  6. •
  7. IP Phone
  8. •
  9. Talkswitch TS-850i User manual

Talkswitch TS-850i User manual

Other manuals for TS-850i

1

Other Talkswitch IP Phone manuals

Talkswitch TS-480i User manual

Talkswitch

Talkswitch TS-480i User manual

Talkswitch TS-9133i User manual

Talkswitch

Talkswitch TS-9133i User manual

Talkswitch TS-550i User manual

Talkswitch

Talkswitch TS-550i User manual

Talkswitch TS-480i Guide

Talkswitch

Talkswitch TS-480i Guide

Talkswitch TS-480i User manual

Talkswitch

Talkswitch TS-480i User manual

Talkswitch TS-9112i User manual

Talkswitch

Talkswitch TS-9112i User manual

Talkswitch TS-350i User manual

Talkswitch

Talkswitch TS-350i User manual

Talkswitch TS-9133i User manual

Talkswitch

Talkswitch TS-9133i User manual

Popular IP Phone manuals by other brands

Cortelco C62 VoIP Phone user guide

Cortelco

Cortelco C62 VoIP Phone user guide

VanillaIP Polycom IP300 user manual

VanillaIP

VanillaIP Polycom IP300 user manual

Yealink Yealink SIP-T22P Quick installation guide

Yealink

Yealink Yealink SIP-T22P Quick installation guide

Viking SR-IP product manual

Viking

Viking SR-IP product manual

Yealink VP59 Teams user guide

Yealink

Yealink VP59 Teams user guide

Panasonic KX-UT133-B Administrator's guide

Panasonic

Panasonic KX-UT133-B Administrator's guide

Avaya one-X 9600 Series overview

Avaya

Avaya one-X 9600 Series overview

AVA Enterprises B179 Installation and administration guide

AVA Enterprises

AVA Enterprises B179 Installation and administration guide

Cisco Unified 7900 Series System guide

Cisco

Cisco Unified 7900 Series System guide

Polycom SoundPoint IP 450 datasheet

Polycom

Polycom SoundPoint IP 450 datasheet

Cisco SPA-500 Series user guide

Cisco

Cisco SPA-500 Series user guide

IPitomy IP290 user manual

IPitomy

IPitomy IP290 user manual

Polycom SoundPoint IP 650 user guide

Polycom

Polycom SoundPoint IP 650 user guide

Proximus Maestro 3016 IP quick start guide

Proximus

Proximus Maestro 3016 IP quick start guide

Polycom IP 450 user guide

Polycom

Polycom IP 450 user guide

Fanvil X4 user manual

Fanvil

Fanvil X4 user manual

Snom 320 quick start guide

Snom

Snom 320 quick start guide

Avaya Integral 5 R3.0 user guide

Avaya

Avaya Integral 5 R3.0 user guide

manuals.online logo
manuals.online logoBrands
  • About & Mission
  • Contact us
  • Privacy Policy
  • Terms and Conditions

Copyright 2025 Manuals.Online. All Rights Reserved.

ANSWERS WITH INTELLIGENCE®
TALKSWITCH START GUIDE
TALKSWITCH
TS-850i TELEPHONE
CT.TP005.010902
1545 CARLING AVENUE, SUITE 510
OTTAWA, ONTARIO, CANADA K1Z 8P9
www.talkswitch.com
TS-850i start guide cover_F-B_print:. 1/22/2009 1:55 PM Page 1
EVERY CALL COUNTS 1
Introduction
Congratulations on your purchase of the TS-850i Cordless
DECT Phone!
This guide describes how to install and configure your
TS-850i with a TalkSwitch system. For more information,
see the support section at http://global.talkswitch.com.
Installing the base
1. Place the base near a wired Ethernet router, either
on a tabletop or mounted on a wall. Avoid placing
the base in a location with a lot of metal, or near
devices that cause interference.
2. Connect the Ethernet cable from the WAN port on
the base to a LAN port on your router or Ethernet
switch. The TalkSwitch unit must be connected to
the same LAN.
Base / WAN
Router / LAN
2 TS-850i START GUIDE
3. Optionally connect the telephone cable from the
Line port on the base to the telephone wall socket.
This will allow you to use the TS-850i as a regular
phone as well.
4. Connect the power adapter from the power outlet to
the power supply connector.
Base
Phone socket
Base
AC 110/220 V
EVERY CALL COUNTS 3
Installing the handset charger
1. Place the handset charger within the signal range of
the base. The handset has an indoor signal range of
up to 150 feet (50 meters) from the base. Concrete
and metal objects might affect the signal range.
2. Connect the power adapter from the power outlet to
the power supply connector.
4 TS-850i START GUIDE
Installing the batteries
1. Push in and down on the two holes in the back of
the handset to release the battery cover.
2. Insert the batteries into the handset, making sure
that their plus and minus ends are facing as shown
in the illustration.
3. Slide the battery cover shut.
EVERY CALL COUNTS 5
Charging the batteries
1. Place the handset in the handset charger. The
handset turns on, and the battery charge indicator
in the display starts to flash.
2. Charge the batteries for at least 10 hours before
first use.
6 TS-850i START GUIDE
Registering handsets with the base
1. Press the Reset button on the back of the base. A
five-minute registration period starts, which allows
handsets to register with the base.
NOTE: If you have multiple bases, only reset one base
at a time, and wait five minutes before resetting the
next base.
2. If the handset is turned off, press the Red Phone
key to turn it on.
A base can support up to three handsets with three
concurrent calls. It can support up to eight handsets
if they aren’t all used at once. If you have more than
three handsets and are getting busy signals, add more
bases to your installation in order to handle
more calls.
Reset button
enables handset registration
EVERY CALL COUNTS 7
3. Place the handset in the handset charger. The
handset automatically registers with the base, and
the Configure SIP Domain message appears on the
display. This message indicates that you must
configure the TS-850i as an IP extension, as
described later.
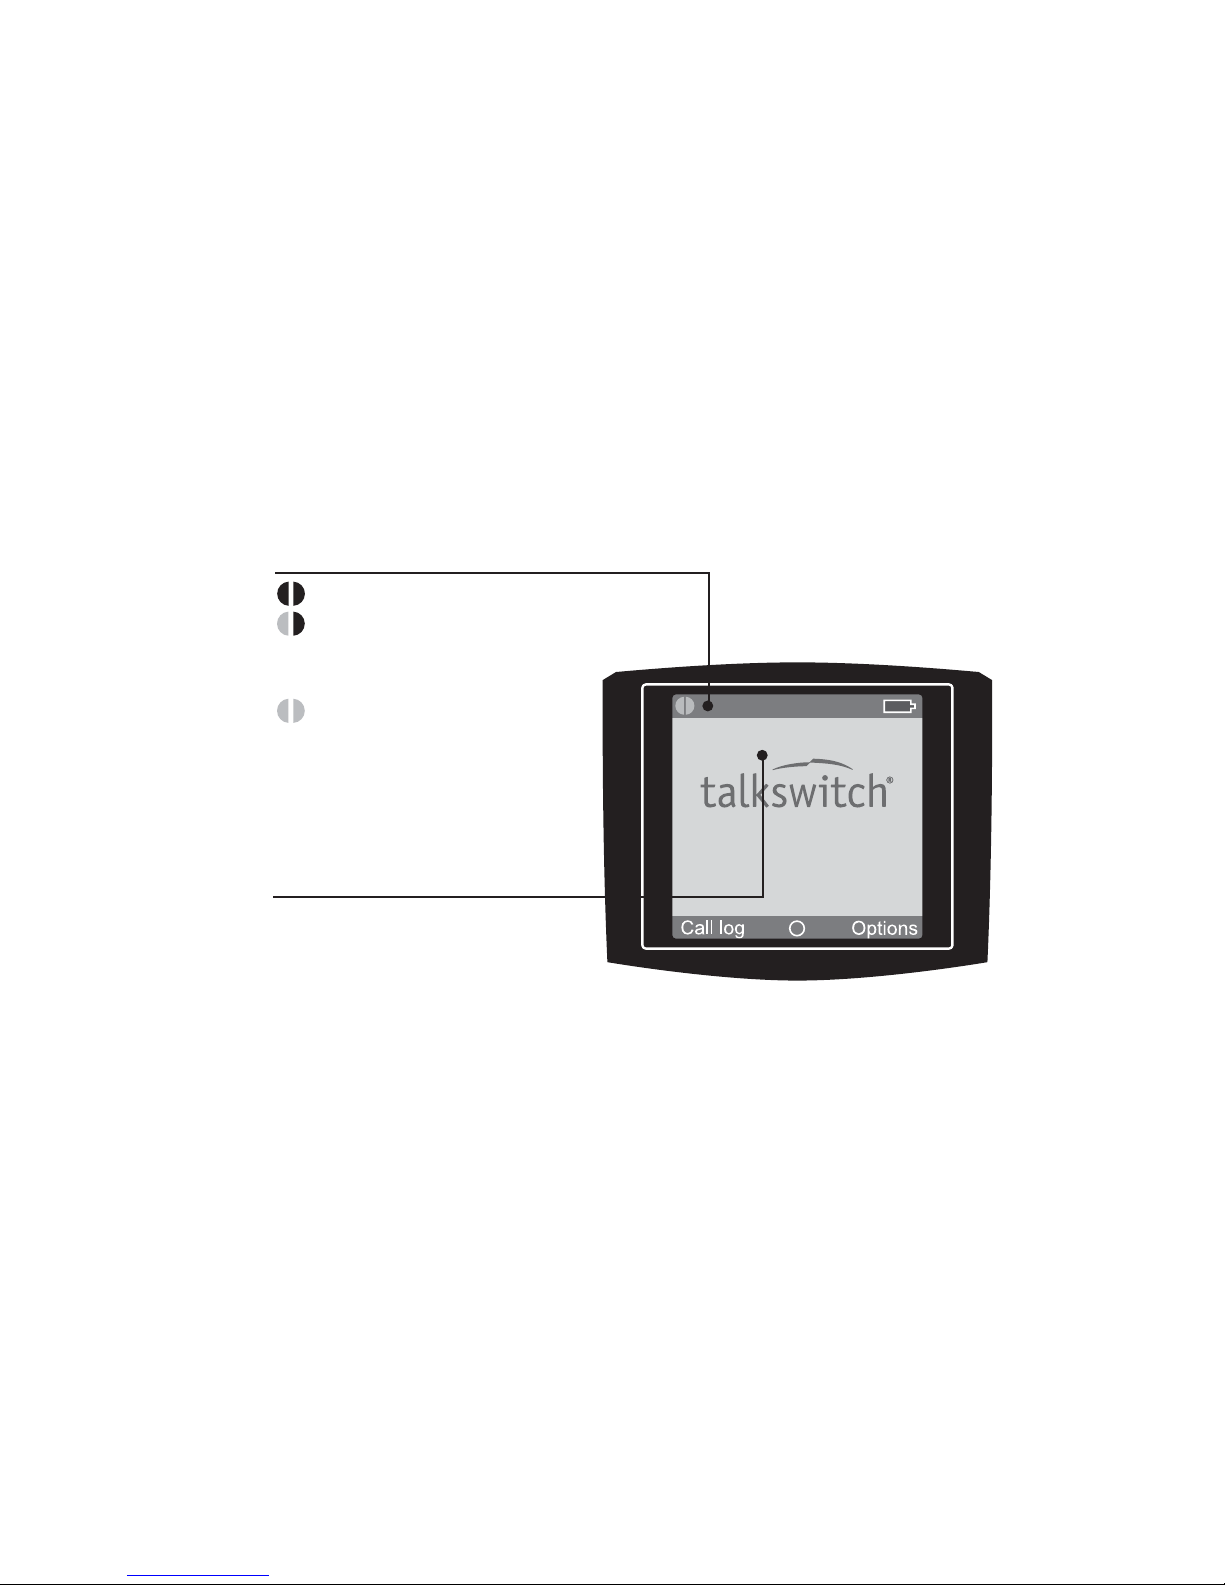
Once the handset is registered, the left connection
status indicator in the display will turn yellow.
4. Once the handset is registered, you can place
additional handsets in the handset charger for
registration. If the five-minute registration period
has expired, but the handsets aren’t all registered,
press the Reset button on the back of the base to
start a new registration period.
Handset 1
01:27
01/01/07
Handset name
Connection status indicators
Black/black – out of range of the base
Yellow/black – within range of the base,
but not ready for
Internet calls
Yellow/yellow – within range of
the base, and
ready for
Internet calls
8 TS-850i START GUIDE
Configuring the TS-850i as an IP extension
You can configure the phone as an IP extension located
within the office, or outside the office (i.e. an external
IP extension).
Before configuring a phone, ensure that no handsets
registered with the associated base are being used. If a
handset is on a call, the call will be terminated when the
system resets the base during configuration of
the phone.
NOTE: The TS-850i requires version 6.11 or greater of the
TalkSwitch management software, which is available in
the support section at http://global.talkswitch.com.
Configuring the TS-850i for use within the office
If the TS-850i is located within the office, it connects to
your TalkSwitch system over the local area
network (LAN).
1. Launch the TalkSwitch management software.
2. Select the Local Extensions/Fax page.
3. Select an available extension number.
EVERY CALL COUNTS 9
Activate Extension area
1. Ensure the Activate extension check box is selected.
2. Set the Extension type to IP extension.
3. Enter the user’s First name and Last name. The names
are used for caller ID, and appear within other pages
of the TalkSwitch management software. The Last
name is used with the dial-by-name directory.
4. Select TalkSwitch as the Type of phone, and then
select TalkSwitch 850i as the model.
5. Select the language for prompts heard by the user of
the extension in the System prompt language list.