Tanco A Series Service manual

handbook
A200 EH Autowrap
A200 EH/V.01-19-ENG
OPERATOR’S
Innovation in Agricultural Machinery

Tanco Autowrap - A200 EH
Operator’s Manual
1
Chapter Contents Page
1 SAFETY DECALS 2
2 INTRODUCTION 3
3 TECHNICAL SPECIFICATIONS 5
4 SAFETY PRECAUTIONS 7
5 BALE WRAPPING 11
6 MACHINE SETUP 13
7 CONTROLLER INFORMATION 19
8 ELECTRO-HYDRAULICS 26
9 TROUBLESHOOTING 29
10 MAINTENANCE 32
11 GUARANTEE 34
12 DECLARATION OF CONFORMITY 35
TABLE OF CONTENTS

Tanco Autowrap - A200 EH
Operator’s Manual
2
The following safety decals have been placed on your machine in the areas indicated. They are intended for your personal safety and for the safety of the other people working
with you. Walk around your machine and note the content and locations of these warning signs. Review these decals and the operating instructions in the manual with your
machine operators. Ensure that these decals are always legible. If they are not, replace them.
1. Read the operator’s manual carefully
2. Stand clear of the machine when in operation
3. Hoses are under pressure at all times
4. Do not exceed Turntable speed of 30 R.P.M
5. Read the operator’s manual for correct operation
6. Ensure that nuts are kept tight at all times
1. SAFETY DECALS
7. Danger keep hands clear of sharp blades
8. Application of Film to Pre-stretcher

Tanco Autowrap - A200 EH
Operator’s Manual
3
2. INTRODUCTION
Tanco Autowrap Ltd congratulates you on your choice of the TANCO AUTOWRAP A200 EH bale wrapping machine. We are certain you will be satised with the machine, and that you will
have the pleasure of your investment for many years.
This manual is meant to explain how TANCO AUTOWRAP A200 EH is setup, attached to tractor, used and how it works, and shall together with the spare part’s list be a reference for
maintenance and troubleshooting. So take good care of this book; it is a part of the machine.
Read carefully through this manual, and especially the safety instructions, before starting the machine. Follow the instructions thoroughly, if problems should occur, check the trouble-
shooting guide to try to establish the problem. Ask your dealer for advice before you attempt anything that may make the problem worse.

Tanco Autowrap - A200 EH
Operator’s Manual
4
4
3
5
2
61
Item No. Description
1 Chassis
2 Turntable
3 Cut & Start
4 Dispenser
5 3 Point Linkage
6 Bale Drop Mat
2. INTRODUCTION

Tanco Autowrap - A200 EH
Operator’s Manual
5
Technical Specications A200 EH Autowrap
Height 2110mm
Width 1870mm
Length 2300mm
Weight 740 kg
Table Speed 30 R.P.M.
Maximum Bale Diameter 1500mm
Maximum Bale Weight 1200 kg
Capacity 35 Bales per hour (Apx.)
Pre-Stretcher(s) 1 x 750mm Width; 55 & 70% Stretch
Hydraulic Connection 2 x 1/2” m.c.
Oil Pressure 150 bar
Oil Amount (Max / Min) 25 lts/min)
Maximum Counter Pressure 10 bar
Electrical Connection 12 V DC
NB: Tanco Autowrap Ltd. reserves the right to modify the construction and/or technical specications without warning and without rights to changes on already delivered products.
3. TECHNICAL SPECIFICATIONS

Tanco Autowrap - A200 EH
Operator’s Manual
6
3. TECHNICAL SPECIFICATIONS
1998
2296 1890

Tanco Autowrap - A200 EH
Operator’s Manual
7
GENERAL SAFETY RECOMMENDATIONS
Basic Principles
Before operating the machine, always ensure that the tractor and machine meet with work safety and road trac regulations.
1. In addition to recommendations given in this manual, legislation on work safety and accident prevention must also be respected.
2. Advice is indicated on the machine, specifying safety recommendations in order to prevent accidents.
3. Before travelling on public roads, the operator must ensure that the machine conforms to road trac regulations.
4. Before starting work, the operator must be familiar with all the machine controls, handling devices and their functions. Once at work, it is too late to do this!
5. Do not wear loose clothing, which could become caught up in moving elements.
6. The tractor should be equipped with a safety cab.
7. Before starting up the machine and begining work, check the surrounding area (beware of children!). Make sure there is sucient visibility.
keep all people and animals away from the danger zone of the machine (risk of protection!!).
8. Carrying people or animals on the machine when working or transport is strictly forbidden.
9. Machine must only be attached to tractor using means provided and in accordance with current Safety standards.
10. Special care should be taken when attaching or removing the machine from the tractor.
11. Before transporting the machine on public roads, ensure that all legally required guards and indicators (lights, reectors…) are in place and in good operations.
12. All operating controls (cords, cables, rods etc.) must be positioned so that they cannot be set o accidently, risking accident or damage.
13. Before travelling on public roads, put the machine into it transport position as instructed in this operator’s manual.
14. Never leave the tractor seat while the machine is operating.
15. Drive speed must be adapted to ground conditions as well as to roads and path. Always avoid abrupt changes of directions.
4. SAFETY PRECAUTIONS

Tanco Autowrap - A200 EH
Operator’s Manual
8
16. Before operating the machine, ensure that all safety guards are rmly in place and in good condition. If worn or damaged, replace immediately.
17. Before operating the machine, check the tightness of all nuts and bolts, particularly on xing elements (blades tines, knives, spades etc.).
18. Keep clear of the machine operating area.
19. Warning! Danger of crushing and shearing can exist when components are operated by hydraulic or pneumatic controls.
20. Before leaving the tractor or before adjusting, maintaining or repairing the machine, turn o the engine, remove the ignition key and wait until all moving parts have come to a
complete stop.
21. Do not stand between the tractor and the machine unless the hand break is tight and/or stops have been placed under the wheels.
22. Before any adjustments, maintenance or repairs are carried out, ensure that the machine cannot be started up accidentally.
Attaching Implements to Tractor
1. When attaching or removing the machine from the tractor, position hydraulic lift control lever in such a way that it cannot be set o accidentally.
2. When attaching the machine to the tractor hydraulic linkage, ensure that diameter of the link pins corresponds to the diameter of the ball joints.
3. Warning! Danger of crushing and shearing can exist in the lifting zone of the tractor hydraulic linkage!
4. Do not stand between the tractor and the machine when operating the outer lever of the lift mechanism.
5. In transport, the machine lift mechanism should be stabilized by the tractor tie rods, to avoid otation and side shifting.
6. When transporting the machine, lock the hydraulic lift control lever in place so that it cannot be lowered accidentally.
Hydraulic Systems
1. Warning! Hydraulic system is under pressure.
2. When tting hydraulic motors or cylinders, ensure that connections have been made correctly, as per manufactures instructions.
3. Before connecting hoses to the tractor hydraulics, ensure that tractor and machine circuits are not under pressure.
4. SAFETY PRECAUTIONS
Tanco Autowrap - A200 EH
Operator’s Manual
9
4. It is strongly recommended that the operator marks the hydraulic connections between tractor and machine to avoid making a wrong connection.
Warning! Functions could be reversed (For example: lift/lower)
5. Check hydraulic hoses regularly! Worn or damaged hoses must be replaced immediately. Replacement parts must be in accordance with the manufactures recommendations
concerning specications and quality.
6. Should a leak be found, take all necessary precautions to avoid accidents.
7. Any liquid under pressure (particularly oil from hydraulics) can be penetrate the skin and cause severe injury. If injured, see a doctor immediately, there could be a danger of
infection.
8. Before any adjustments, maintenance or repairs are carried out, lower the machine, depressurize the circuit, turn o the engine and remove the ignition key.
Safe Maintenance
1. Before checking for any machine malfunction and before adjusting, maintaining or repairing the machine turn o engine and remove ignition key.
2. Check tightness of nuts and bolts regularly. Retighten if necessary.
3. If the machine is raised, prop it up in a stable position before carrying out any maintenance work
4. When replacing a work part, wear protective gloves and use only standardized tools.
5. It is forbidden to discard any oil, grease or lters. These must be given to waste disposal organizations to protect the environment.
6. Disconnect power source before any work is done to the electric system.
7. Check safety guards regularly, particularly those that are subject to wear. Replace immediately if damaged.
8. Spare parts used must be in accordance with specications and standards as dened by the manufacturer. Use only genuine TANCO parts.
9. Before any electric welding is carried out on tractor or attached machine, disconnect generator and battery terminals.
10. Repairs on elements under pressure or tension (spring, accumulators etc.), must only be carried out by competent persons with standardised equipment.
4. SAFETY PRECAUTIONS

Tanco Autowrap - A200 EH
Operator’s Manual
10
Special Safety Instructions
1. Stop engine of the tractor before working on machine.
2. Use the Safety Bar (1) to prop up the Tip Frame (2) before attempting to carry out work in
this area. (See Fig 4.1)
Fig 4.1 Propping Tip Frame
4. SAFETY PRECAUTIONS
Operating Safety Instructions
1. Operators should have their hands on the controls at all times when the machine is in use.
2. Autowrap control unit and level controls must remain in the tractor cap at all times. The operator must at no time leave the tractor cab when the machine is in motion.
3. Keep onlookers clear of machine at all times. Danger zone is 5 meters.
4. Beware of rotating turntable and all moving parts.
5. If not operated correctly the bale could y o the turntable. The end support rollers must always be tted. Do not exceed recommended turntable speed of 30 rpm Misshape
en bales combined with excessive turntable can be dangerous.
6. Care must be taken when tipping bales from the machine on sloping ground and during subsequent handling to ensure that they do not roll, thus causing hazard.
THINK OF YOUR PERSONAL SAFETY AND THAT OF OTHERS AT ALL TIMES

Tanco Autowrap - A200 EH
Operator’s Manual
11
5. BALE WRAPPING
Bale Wrapping Principles
The advantages of round bale silage are many, and include fewer feed units, a exible harvesting system, large capacity and the possibility of selling feed units.
In principle, the same fermentation processes occur whether the fodder is placed in a silo or pressed into bales and packed in plastic, i.e. lactic acid fermentation in anaerobic conditions.
The oxygen in the bale must be exhausted before fermentation begins.
The grass should be dried to approximately 30-40% solid content. The solid content can be determined by twisting the grass by hand. If drops of liquid are forced out of the grass, the
solid content is less than 25%. Low solid content (wet grass) can lead to increased butyric acid fermentation if preservatives are not added to the grass. If the solid content is too high,
(over 50%), normal fermentation will not take place and there will be enough oxygen in the bale to produce mould fungus.
The Baler
It is vital that the baler produces compact, well-formed bales, as misshapen bales can be dicult to wrap. Wrapping will also often take longer, thereby increasing the amount of plastic
used.
Dicult Bales
When a misshapen bale is wrapped, it will have a tendency to move outwards or inwards on the roller. If the bale begins to move outwards, the machine must be lifted slightly at the rear
edge to get the bale to rest against the support roller on the main frame. It can therefore be useful to use a hydraulic top link to make this adjustment easier.
If the bale to be wrapped is conical you must ensure that the sharp end is pointed at the tractor. It will then be easier to get the bale to lie correctly during packing. It is easy for such a
bale to “turn” forward in the direction in which it is pointing, and therefore lie against the support rollers. If the bale is lying on a slope it must be picked up from the lower side. A hydrau-
lic top link will again be advantageous.
Types of Plastic
A good type of plastic with good adhesive properties, and which is recommended for bale wrapping, must be used. The thickness of the plastic foil should be at least 25 µ. (25/1,000 mm).
In order that the plastic tightens suciently around the bale, it is stretched before being wrapped, so it is somewhat thinner when it is put on the bale. With short-term storage (up to
eight weeks) it is recommended that bales have a minimum of four layers of plastic at the thinnest points, with at least 52-53% overlap.
For long-term storage, or when the grass is wet when it is wrapped, the bale should have 90-100 µ plastic (six layers) and the same amount of overlap. If thinner plastic is used, more lay-
ers should be applied. If it is very hot the plastic will be stretched further, and more layers should be applied. It is better to have slightly too much than too little plastic on the bale.
From experience, light colored plastic produces slightly lower temperatures within the bale, and tends to improve feed quality.
Storage Location
Care should be taken in nding a suitable location for the storage of bales. The storage location should preferably be prepared before the bales are laid out. An elevation close to well-
drained roads is recommended. If the wrapped bales are simply placed on stubble there is a danger of the plastic being pierced. A tarpaulin or a thin layer of sand should therefore be laid
where the bales are to be stored over the winter.

Tanco Autowrap - A200 EH
Operator’s Manual
12
5. BALE WRAPPING
Bales should be stored in the shade as far as possible. This reduces the danger of air leakage in the bales. A bale which is stored in sunlight and which therefore undergoes greater swings
in temperature “pumps in” a great deal of air in comparison to a bale stored in the shade. According to “Teknik for Lantbruket” [Technology for Agriculture] in Sweden, a bale stored in the
shade has only 40% of the air leakage of a bale which is stored in sunlight.
Stacking / Protection
If bales are hard and well formed, they can be stacked vertically, but loose and misshapen bales with low solid content should not be stacked higher than one layer, as this could easily
cause deformity and the danger of runo will be increased.
Bales can also be stored on their sides. The layer of plastic is thicker here, providing greater protection against piercing.
Bales should be covered with a tarpaulin or a ne-mesh net to protect against birds and small rodents. If the plastic is pierced, it must be sealed with weatherproof, hard-wearing tape,
preferably under the outermost layer of plastic. Ensure that the hole is adequately sealed.
For Best Wrapping Results...
1. Harvest the grass early.
2. Ensure the grass is dried out to 30-40% solid content. If there is a danger of rain, bale and wrap the
grass anyway.
3. Take care not to mix any earth in with the grass.
4. Use a baler that produces even, rm bales. Bales 1.2mtrs in width and with a diameter of 1.2-1.5mtrs
are preferred sizes.
5. Wrap the bales as soon after baling as possible; never more than two hours afterwards.
6. Use a good plastic type, applying six layers of plastic. This removes the need to use preservatives.
7. Store bales in the shade to reduce the danger of air leakage.

Tanco Autowrap - A200 EH
Operator’s Manual
13
6. MACHINE SETUP
Mounting of the Machine
Be careful! There is a danger of being crushed when working implements are tted and connected. Carry out the tting procedures slowly and carefully, and use separate and
approved lifting equipment to make the work easier. Note the section on safety precautions and pay attention to the various safety decals displayed on dierent parts of the bale
wrapper.
Three Point Linkage
TANCO AUTOWRAP A200 EH model is intended for rear mounting to the three point linkage, Category 2. When attached to three point linkage, make sure the machine is level across the
tractor. Tighten up and lock the lifting arms so there is no sideways movement.
Top Link
Adjust the top link of the tractor so that the machine is level with the ground. It is recommended to use a hydraulic top link, as this makes it easy to adjust the angle of the machine.
During the wrapping process it is recommended to tilt the machine towards the tractor, as this will prevent the bale from falling o the turntable.

Tanco Autowrap - A200 EH
Operator’s Manual
14
A200 EH Control Box
A200EH Controller
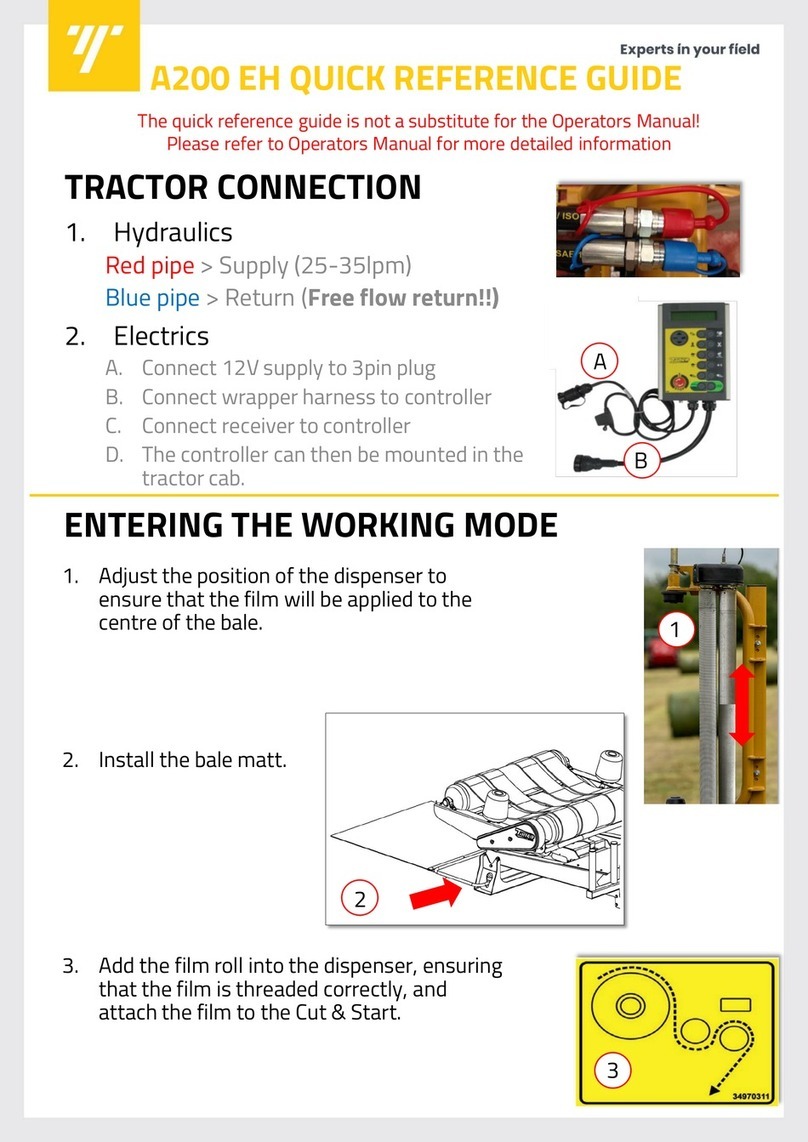
The A200EH electronic controller activates the automatic functions of the machine and also enables the operator to manually operate the
machine. This unit should be mounted in the tractor cab within in reach and where it can be conveniently viewed by the operator. A suc-
tion pad is supplied with the controller, this should be used mount it (usually to the side window of the cab). The controller’s 12v electrical
supply is connected with a 3 pin euro plug which is compatible with the socket found on most modern tractors. If the tractor does not have
a 3 pin euro socket then one should be tted with the power cables going straight to the battery. The controller is protected from electri-
cal overload with two 15amp fuses in an enclosure on the power cable. The controller is connected to the communication cable from the
machine with a 24 pin connector. Take care when connecting this cable and also ensure that the cables is not under strain and will not be
damaged by sharp edges or the movement of the machine.
The controller is not waterproof so it should be protected from rain and stored indoors when not in use.
6. MACHINE SETUP

Tanco Autowrap - A200 EH
Operator’s Manual
15
6. MACHINE SETUP
Mounting of Plastic Film (See Fig. 6.6 & 6.7)
When loading a plastic roll, rst ensure the Top Cone is pushed up to the latched
position, then push back the Dispenser Insert until held in position by the
Bottom Latch.
Place the Roll on the Bottom Cone and release the Top Latch.
BEWARE OF FINGERS!
Pull the lm between the rollers on the Dispenser Insert in the direction of the
arrow, as shown below. (See also the sticker on the dispenser).
Release the Bottom Latch and allow the rollers to lie against the roll of lm.
Pull the lm from the roll and tie it to the bale.
Bottom Cone
Bottom Latch
Dispenser Insert
Top Cone
Top Latch
Fig. 6.6

Tanco Autowrap - A200 EH
Operator’s Manual
16
Gear Bolt
Pos. 1 Pos. 2
Tanco Dual Stretch Dispenser
All Tanco Autowrap machines are supplied with a patented dual stretch gear system.
This system enables a quick change of stretch levels on the Film Dispenser.
If the Gear Bolt is tted in Position 1 (See Fig. 6.8), the top set of gears provide the stretch @ 70%.
By removing the Gear Bolt from Position 1 and tting it in Position 2, the bottom set of gears become the
stretch gears giving 55% (for use in hotter climates or with square bales).
Fig. 6.8
Inner Gear Outer Gear % Stretch
60 Tooth 35 Tooth 70%
58 Tooth 37 Tooth 55%
54 Tooth 41 Tooth 32%
Tanco Dispenser Gear Combinations
6. MACHINE SETUP

Tanco Autowrap - A200 EH
Operator’s Manual
17
Support Rollers
To allow for stability of the bale during the wrapping process the support rollers can be adjusted
dierent sized bales. It is important that the support rollers are adjusted so that the bale is in the
middle of the table. When the bale is on the table (See Fig. 6.9) the distance between the ends of the
bale and the support rollers (D) should be <50mm.
Support Roller Adjustment (See Fig. 6.10)
The support rollers have three adjustment positions (3). In order to move the support roller (1) disconnect
the locking bolt (2) from its original position and move the roller to adjust to distance D. Once the roller is
in its desired position x it in place with the locking bolt (2).
6. MACHINE SETUP
D D
Fig. 6.9
B
3
2
1
Fig. 6.10

Tanco Autowrap - A200 EH
Operator’s Manual
18
6. MACHINE SETUP
1
2
3
4
Chain Tensioning (See Fig 6.11)
The roller drive chain is located inside the plastic guard.
To adjust the chain tension loosed the bearing mounting bolts (2). Use the adjusting screw (4) to move the
bearing and so adjust the chain tension. Retighten the bearing mounting bolts. Measure the distance from
the bearing to the edge of turntable end-plate, check that this measurement is the same on the opposite end
of the roller, if not adjust the second bearing.
Fig. 6.11

Tanco Autowrap - A200 EH
Operator’s Manual
19
7. EH CONTROLLER INFORMATION
A200 EH Controller
The Tanco Autowrap Bale Wrap Controller enables the operator to monitor and control the operation of the bale wrapper at any stage of the wrapping cycle. .
There are 2 operating modes – Automatic and Manual. The Automatic Mode permits ‘one-touch wrapping’ to ease the workload on the operator. The controller is fully programmable to
optimise wrapping performance. Bale counts are automatically logged in any one of 10 selectable memory stores, in addition to a grand total memory store.
IMPORTANT SAFETY INFORMATION!
Please read and understand the instructions for using this controller before operating the machine.
This controller is tted with a push-button type On/O Emergency Stop switch. Always ensure the controller is switched OFF via this switch before attempting any adjustment or mainte-
nance to the machine.
Please follow ALL other safety instructions given in the manufacturers’ Operator’s Manual for this machine.
Controller Main Operating Functions & Display
The principal instrument features and operating functions of the Controller are shown in Fig. 7.1 overleaf.
This manual suits for next models
1
Table of contents
Other Tanco Farm Equipment manuals

Tanco
Tanco Autowrap 1320 Service manual

Tanco
Tanco 1300 Series Service manual

Tanco
Tanco 580A User manual

Tanco
Tanco E100 SA Service manual

Tanco
Tanco D80 Service manual

Tanco
Tanco i73 Service manual

Tanco
Tanco A200 EH User manual

Tanco
Tanco 1400 Autowrap Service manual

Tanco
Tanco 404 S Service manual

Tanco
Tanco S100 A User manual