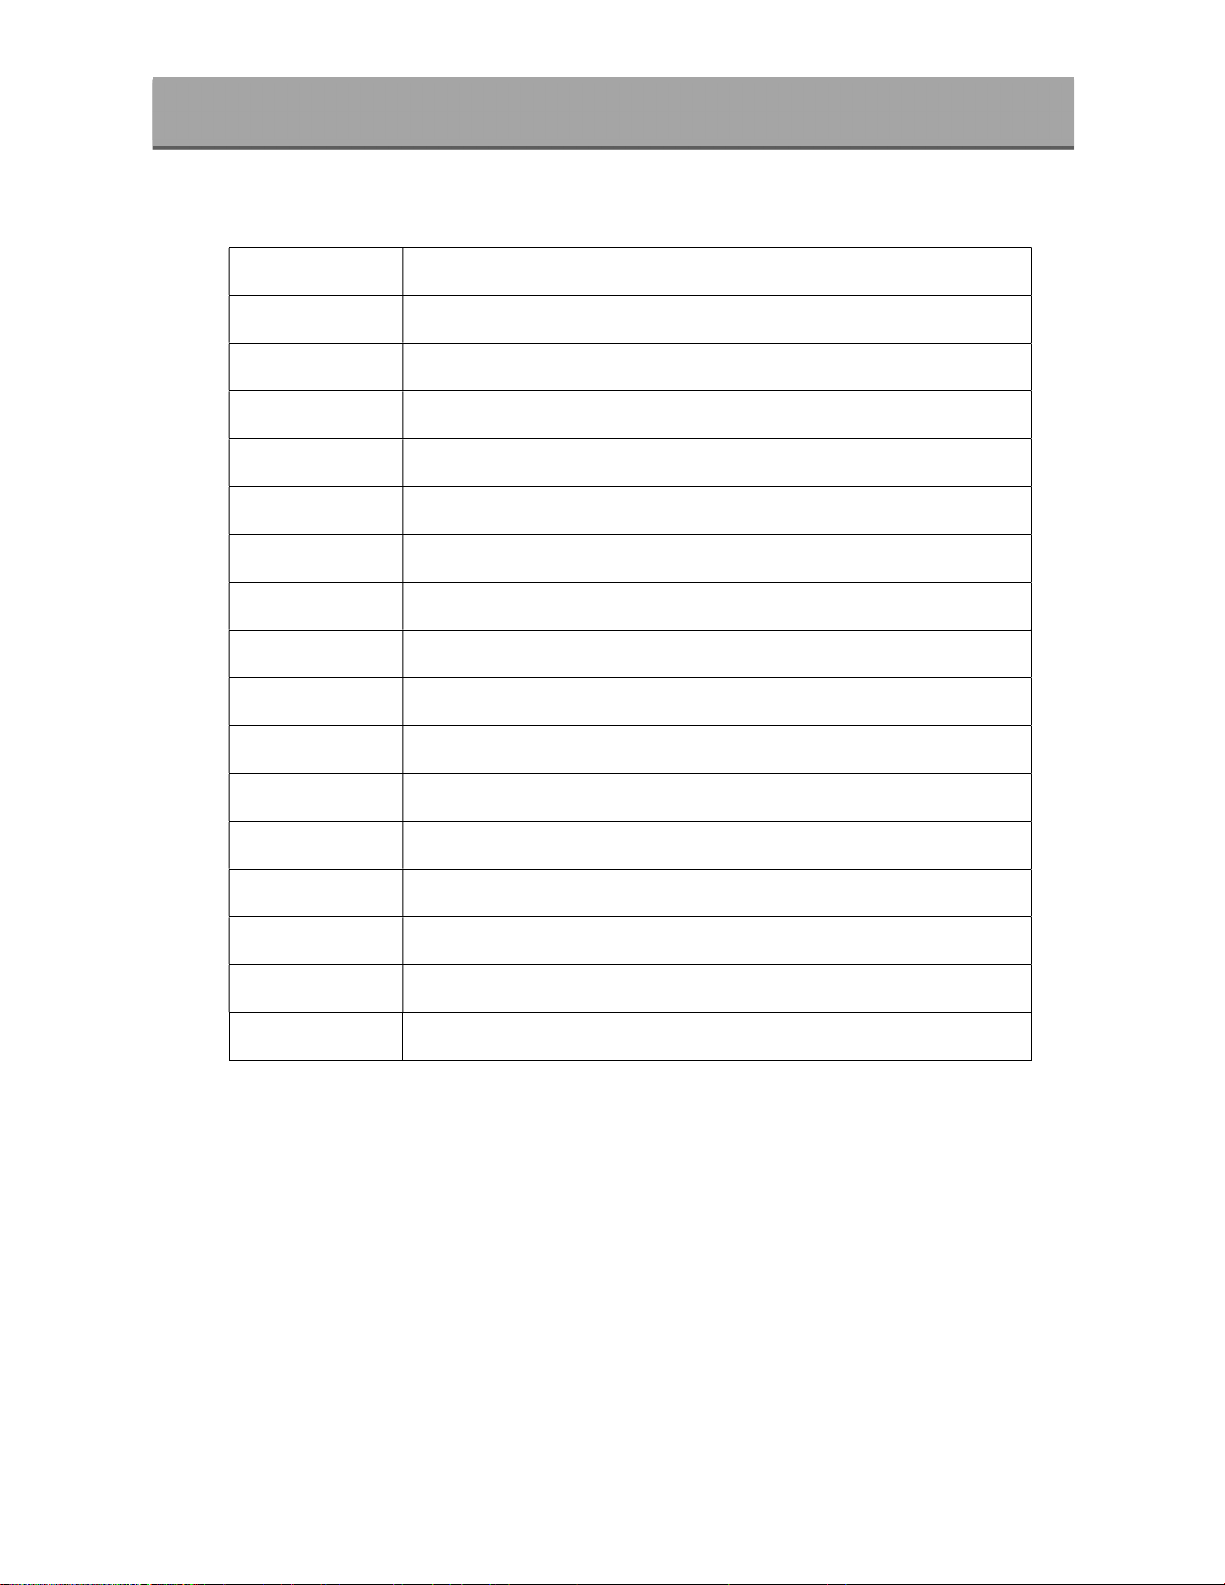
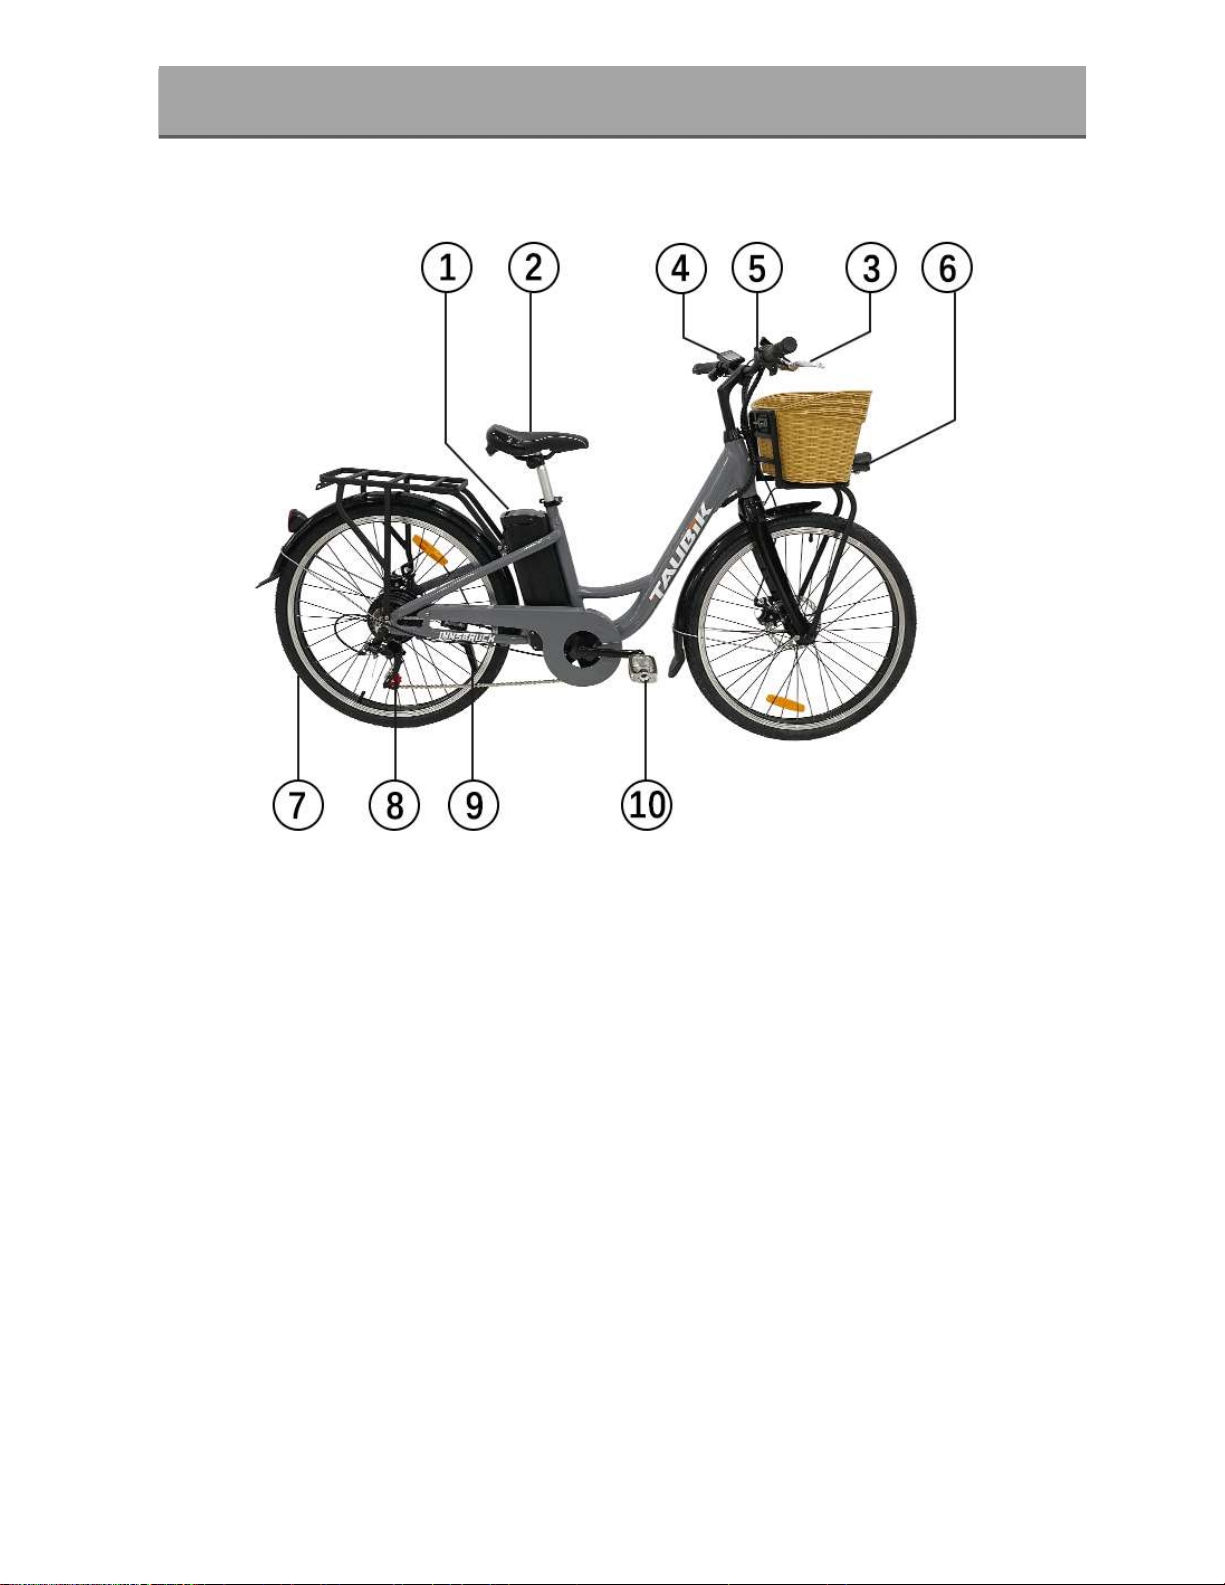
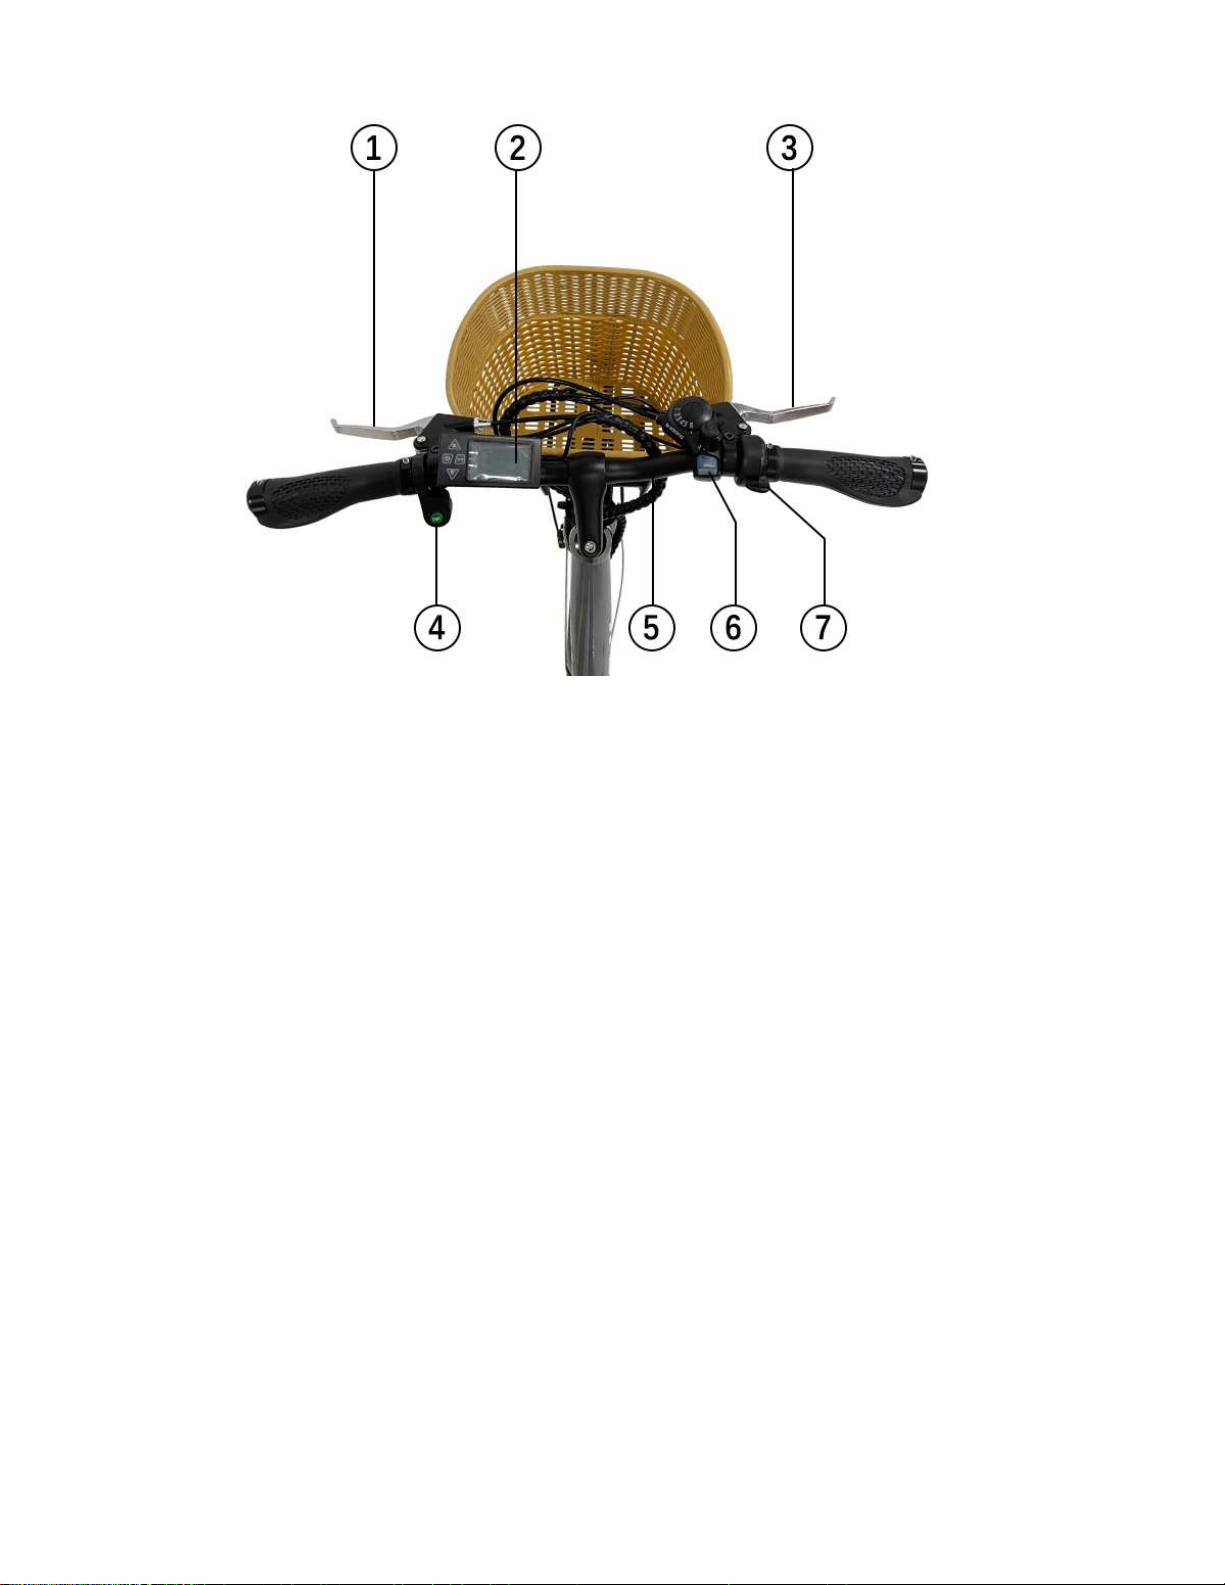
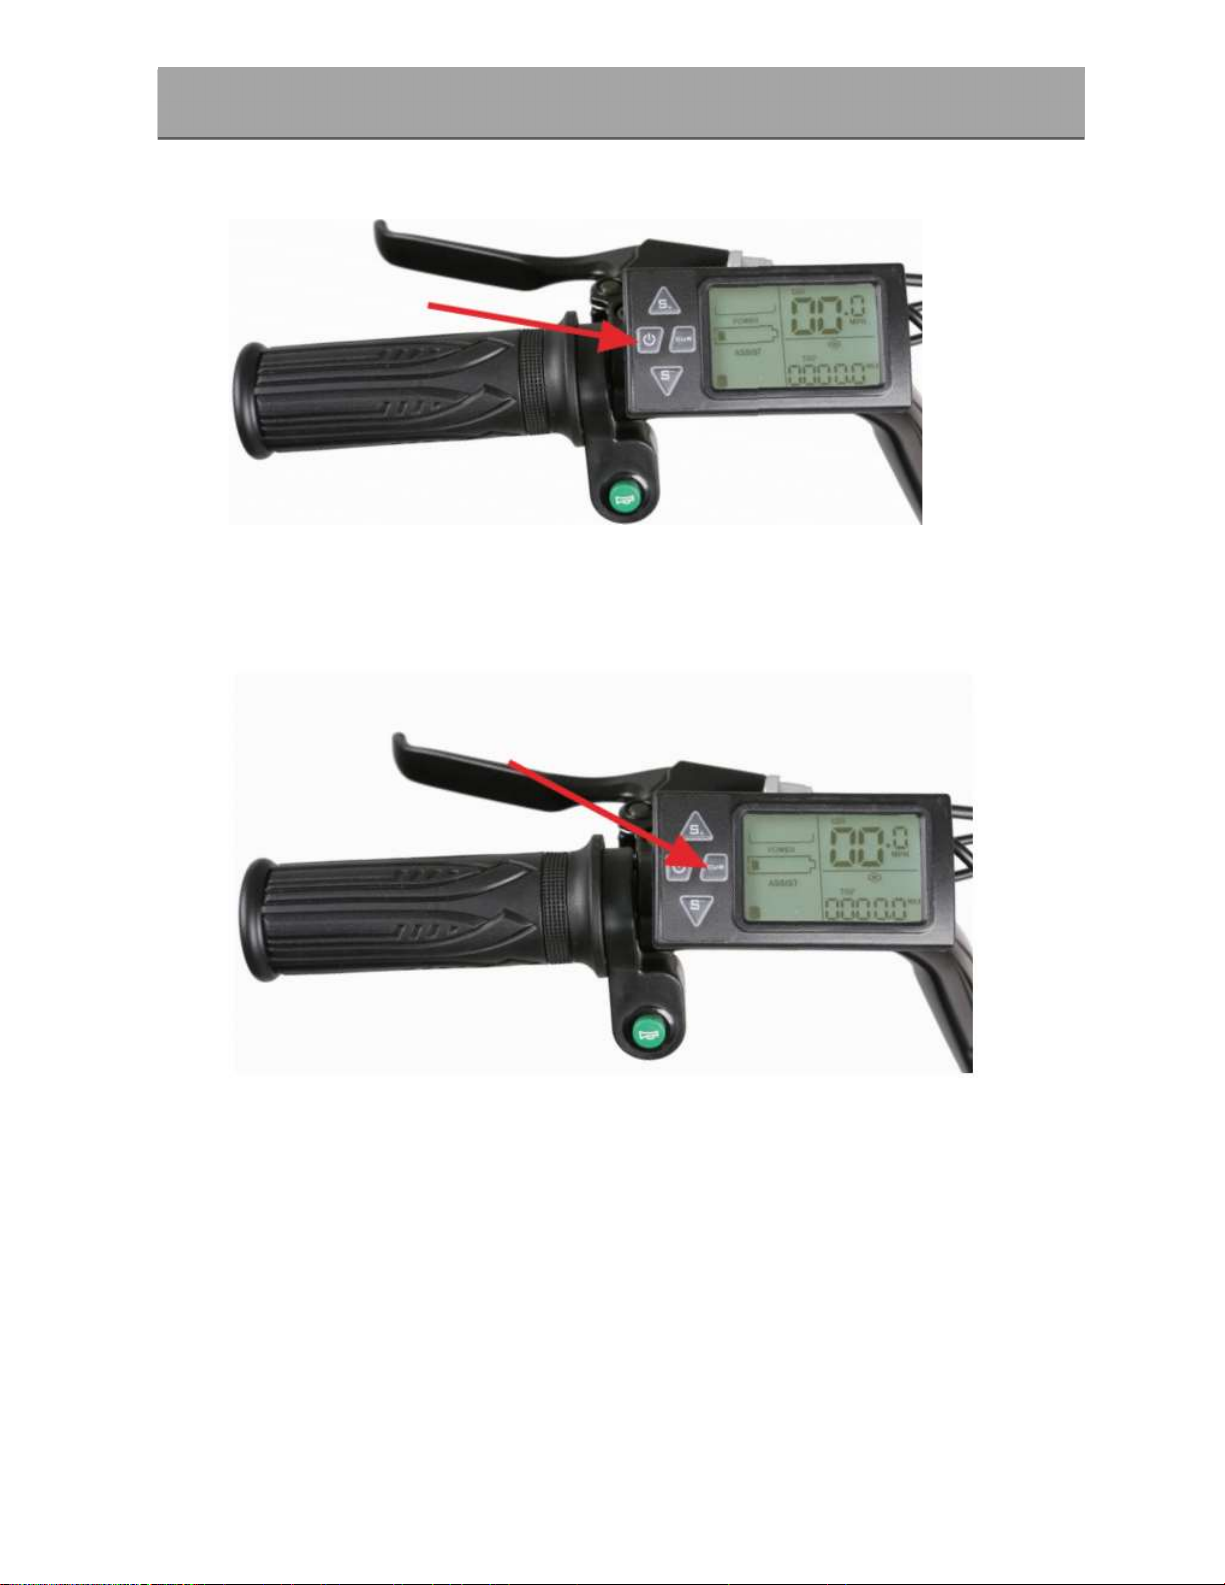
TAUBIK INNSBRUCK User manual

INNSBRUCK
User Manual

1
Thank you for choosing and purchasing our E-Bike. For your
driving safety, please read this manual carefully to ensure that you can
follow the correct instructions, safety warnings and precautions before
using it.
Strictly abide by local laws and regulations and traffic laws. The
company is not responsible for any consequences caused by violation
of the above laws and regulations.
Strictly follow the instructions in the manual for corresponding
operations. The company is not responsible for any consequences
caused by improper use, speeding, overloading etc...
Do not use this E-Bike to do stunts, it will increase the probability of
injury and damage to the E-Bike.
Please always wear a helmet.
Do not leave the battery near fire or heat sources.
Please regularly check whether the brake performance is good.
Please do not modify, repair or disassemble the product on your own.
Do not sit on the product either when driving or stationary.
Avoid using used, defective and/or aftermarket batteries.
People who should not ride the product include:
i. Anyone under the influence of alcohol or drugs.
ii. Anyone who suffers from disease that puts them at risk if they
engage in strenuous physical activity.
iii. Anyone who has problems with balance or with motor skills that
would interfere with their ability to maintain balance.
iv. Anyone whose weight is outside the stated limits (see
Specifications).
v. Pregnant women.
SAFETY INSTRUCTIONS

2
Model INNSBRUCK
Max Load 120KG
Motor 350W/36V
Battery 10Ah
Max Speed 25km/h
Derailleur Rear: Shimano 6
Max Distance 40km (Pure Power)
Max Distance 70-110km (Pedal assist)
Sensor Speed Sensor
Frame Aluminum
Brake Type Disc brake
Tire Size 26” X 1.75
Tire Pressure 50~90 psi
Charger 42V/2A
Charge Time 4-6 hours
Fork Magnesium alloy fork
Net Weight 27kg
SPECIFICATIONS

3
PARTS DIAGRAMS
Features & Parts
1. Battery Pack
2. Seat
3. Brake Lever
4. Display
5. Throttle
6.
Headlight
7. 26inch Tire
8. Rear Derailleur
9. Kickstand
10.Pedal

4
1. Left Brake Lever for front brake
2. LCD Display
3. Right Brake Right for rear brake
4. Horn
5. Handlebar
6. Shifter for rear derailleur Shimano 6 speed
7. Thumb Throttle

5
DISPLAY PANEL
1)Headlight:Indicates the headlight on
2)Battery Display: Indicates the Battery Capacity
3)Speed Display:
- CUR: Current speed
- MAX: Max speed
- AVG: Average Speed
Unit MPH, KM/H
4)Multifunction display area
Total mileage ODO, single mileage TRIP, digital voltage VOL, digital current
CUR, remaining mileage RM (requires the support of battery protection board
software), running time T1, T2
5)Power support state display area /level of pedal assistance
6)Fault state display area
Motor fault , Switch fault , Controller fault , Power break brake
, Undervoltage protection

6
Turn on the electrical system—Press and hold the start button on LCD display
panel for approximately 3 seconds until power is delivered to the LCD Display.
Turn on the headlight if needed or desired. Once the LCD Display is on,
press “CUR” button to turn the headlight on. Press it again to turn the
headlight off.
DISPLAY BUTTON

7
Select the desired level of pedal assistance—Select the level from
0-5 by pressing “S+” and “S-” . Level 1 corresponds to the lowest level of
pedal assistance, and level 5 corresponds to the highest level of pedal
assistance. Level 0 indicates pedal assistance is inactive. Start in PAS level
0 or 1 and adjust from there.
Begin riding carefully—Hold handlebars and start pedaling on a flat
surface, in a low gear (1 or 2), most riders should be able to begin pedal-
ing the bike with pedal assist level 0 or 1. You may also use the throttle to
accelerate and maintain your desired speed.
Turn off the electrical system— by pressing and holding the start
button approximately 3 seconds again before getting off the bike.
Turn off the battery and remove the key when you park.

8
Error 1 Reserve
Error 2 Brake Failure
Error 3 Power assist sensor failure (riding sign)
Error 4 6KM/H cruise
Error 5 Real-time cruise
Error 6 Battery under voltage
Error 7 Motor failure
Error 8 Throttle failure
Error 9 Controller failure
Error 10 Communication reception failure
Error 11 Communication sending failure
Error 12 BMS communication failure
Error 13 Headlight failure
ERROR CODE

9
Only use the provided charging cable to charge your INNSBRUCK battery
pack. Using any other unauthorized charger may cause damage to your battery
pack and/or.
CHARGING THE BATTCRY RACK
• Ensure the EBIKE is turned off.
• Remove the battery pack from the battery dock.
• Ensure that the charging port is clean and dry.
• Make sure that there is no dust, debris or dirt inside the port.
• Plug the charger into a grounded wall outlet.
• The charging indicator light ON ,the charger will be green.
• Connect the cable with the power supply (100V~240V; 50/60 Hz).
• Align and connect the 1-pin charging cable into the charging port of the
battery pack.
DO NOT FORCE OR BEND THE CHARGING CABE INTO THE
CHARGING PORT, AS IT MAY CAUSE THE PRONG TO BEND OR BREAK.
CHARGING
CAUTION

10
FAILURE TO FOLLOW ANY OF THE FOLLOWING SAFETY
PRECAUTIONS CAN AND MAY LEAD TO DAMAGE TO YOUR DEVICE, VOID
YOUR MANUEACIURER WARRANTY ; LEAD TO PROPERIY DAMAGE,
CAUSE SERIOUS BODIIY INJURY, AND CAN LEAD TO DEATH.
OPERATING CONDITIONS
Any INNSBRUCK that does not work properly can cause you
to lose control and fall. Inspect the entire device thoroughly
before every ride, and do not ride it until any problems have
been corrected.
KICKSTAND
Never ride your EBIKE with the kickstand down.
OPERATING YOUR Ebike
Make sure the battery pack is fully charged before the first Initial use. Before
turning on your E-bike, sit on it like a standard bicycle to get comfortable with
the device before using It with the motor.
GEARS
Your Ebike is equipped with 6 gears. The lowest gear (1) is for easier and uphill
pedaling, and the highest gear (6) is for maximum speed on level or downhill
terrain. Change gears only while pedaling.
The rear wheel contains 6 chain sprockets. When the chain is around the
largest sprocket you are in 1st gear, or the lowest gear. When the chain is
around the smallest sprocket, you are in 6th gear, or the highest gear.

11
PROBLEM POSSIBLE CAUSES SOLUTION
Motor will not engage 1. Low battery
2. Battery loose or
unplugged
3. Severed wire connection
1. Recharge battery
2. Make sure battery
connections are secure
3. Contact customer
support
Feels shaky when driving
1. Low tire pressure
2. Wheel is not securely
fastened
1. Inflate to 40 psi
2. Fasten wheel securely
3. Replace bearings
3. Bearings in steering system
are worn out
Mileage not being
recorded correctly
1. Infrequently charged
2. Defective or worn-out
battery pack
3. Cold temperature
affecting battery
performance
4 Defective or incorrect
charger damaged battery
1. Charge battery pack
more often
2. Replace battery pack
3. Allow battery pack to
reach room temperature
and fully recharge it.
4. Contact customer
support
LCD Display not
registering
1. Low battery
2. Display is broken
3. Bad battery cells
4. Faulty charger burns out
display
1. Recharge battery pack
2. Replace display
3. Replace battery pack
4. Contact customer
support
TROUBLE SHOOTING

12
The above table is only meant to act as a guide to help you figure out any
problems you may have with your EBIKE. If you are unable to get your
EBIKE to operate properly, please ask for support.
PROBLEM POSSIBLE CAUSES SOLUTION
Brakes squealing 1. Dirty brake pad
2. Hard edges on new
brakes
3. Brake pads are too tight
1. Clean the brake pad
2.
Squealing will stop the
more you ride
3. Adjust brake pads to l-
2mm gap from wheel
Stiffness when steering 1. Grime build-
up in steering
system
2. Bearings in steering
system are worn out
1. Clean steering system
2. Replace bearings
Table of contents
Other TAUBIK Bicycle manuals