Taurus 912800 User manual

Model:
912800
800W
complies with
INTERNATIONAL
IEC60335
SAFETY SPECIFICATIONS
PLEASE READ ALL INSTRUCTIONS BEFORE USE
PROCESSADOR DE CUINAR
ENGLISH / AFRIKAANS
/SPANISH / FRENCH /
PORTUGUESE

1
6
11
12
14
15
16
17 23
24
25
18
19
20
21
22
13
7
8
9
10
2
5
3
4
1
6
11
12
14
15
16
17 23
24
25
18
19
20
21
22
13
7
8
9
10
2
5
3
4
ENGLISH MANUAL
Dear customer,
Thank you for choosing to purchase a Taurus brand
product. Thanks to its technology, design and opera-
tion and the fact that it exceeds the strictest quality
standards, a fully satisfactory use and long product
life can be assured.
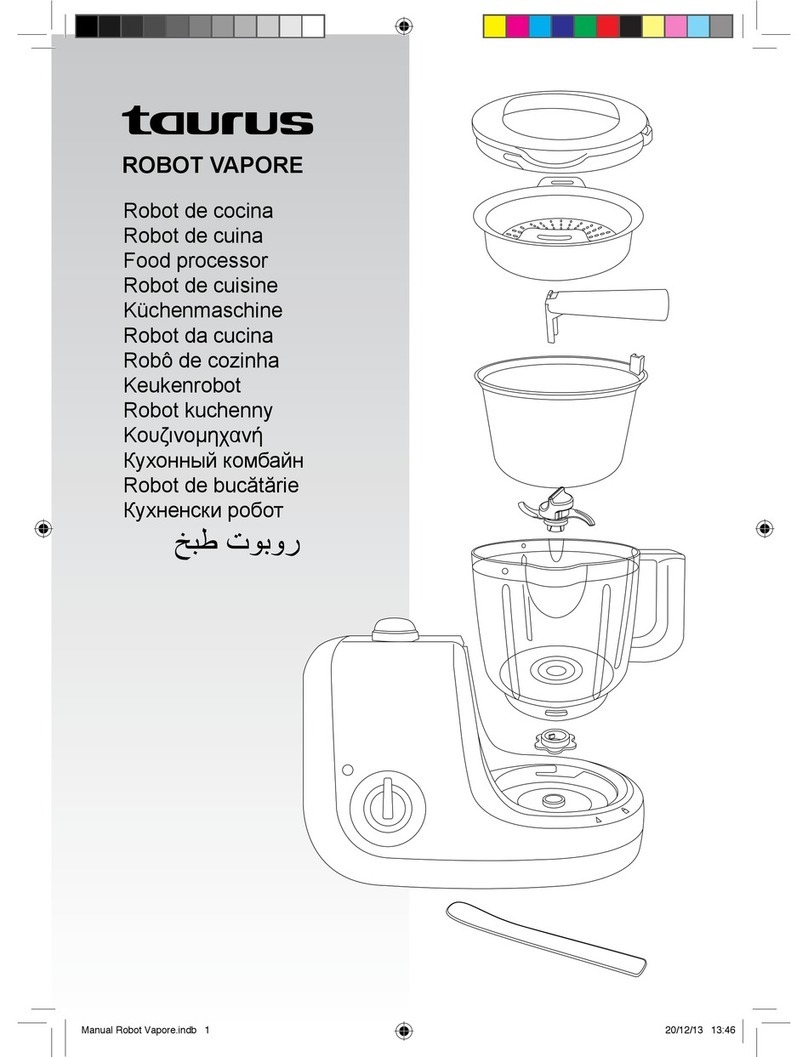
1. Parts description
1. Cup
2. Blender lid
3. Blender jar
4. Motor unit
5. Egg holder
6. Juicer pusher
7. Juicer cover
8. Juicer filter
9. Juicer bowl
10. Juicer base
11. Food pusher inner
12. Food pusher
13. Food processor lid
14. Slicing disc
15. Food processor bowl
16. Shaft
17. Shredding disc
18. French fry disc
19. Dough kneader
20. Chopping blade
21. Whisk holder
22. Whisks
23. Citrus press
24. Strainer
25. Spatula
26. Spillage sensor
27. Boil dry temperature sensor
2. Safety advice and warnings!
Read these instructions carefully before switching
on the appliance and keep them for future reference.
Failure to follow and observe these instructions
could lead to an accident. Clean all the parts of the
product that will be in contact with food, as indicated
in the cleaning section, before use.
2.1. Use or working environment:
2.1.1. Keep the working area clean and well lit. Clut-
tered and dark areas invite accidents.
2.1.2. Use the appliance in a well ventilated area.
2.1.3. Do not place the appliance on hot surfaces,
such as cooking plates, gas burners, ovens or
similar items.
2.1.4. Keep children and bystanders away when
using this appliance.
2.1.5. Place the appliance on a horizontal, flat, stable
surface suitable for withstanding high temperatures
26
27

and away from other heat sources and contact with
water.
2.1.6. Keep the appliance away from flammable
material such as textiles, curtains, cardboard or
paper, etc.
2.1.7. Do not place flammable material near the
appliance.
2.1.8. Do not use the appliance in association with a
programmer, timer or other device that automatically
switches it on.
2.1.9. Do not use the appliance if the cable or plug
is damaged.
2.1.10. Ensure that the voltage indicated on the
rating label matches the mains power supply voltage
before plugging in the
appliance.
2.1.11. Connect the appliance to the mains power
supply with an earth socket withstanding a minimum
of 10 amperes.
2.1.12. The appliance’s plug must fit into the mains
power supply socket properly. Do not alter the plug.
2.1.13. If using a multi plug check ratings carefully
as the current used by several appliances could eas-
ily exceed the rating of the multi plug.
2.1.14. If any of the appliance casings breaks, im-
mediately disconnect the appliance from the mains
power supply to prevent the possibility of an electric
shock.
2.1.15. Do not use the appliance if it has fallen on
the floor or if there are visible signs of damage.
2.1.16. Do not force the power cord. Never use the
power cord to lift up, carry or unplug the appliance.
2.1.17. Do not wrap the power cord around the
appliance.
2.1.18. Do not clip or crease the power cord.
2.1.19. Do not allow the power cord to hang or
to come into contact with the hot surfaces of the
appliance.
2.1.20. Check the state of the power cord. Damaged
or tangled cables increase the risk of electric shock.
2.1.21. The appliance is not suitable for outdoor use.
2.1.22. Power cord should be regularly examined
for signs of damage, and if the cord is damaged, the
appliance must not be used.
2.1.23. Do not touch the plug with wet hands.
2.2. Personal safety:
2.2.1. CAUTION: Do not leave the appliance unat-
tended during use as there is a risk of an accident.
2.2.2. Do not touch the heated parts of the appli-
ance, as it may cause serious burns.
2.2.3. This appliance is only for domestic use, not
for industrial or professional use. It is not intended to
be used by guests in hospitality environments such
as bed and breakfast, hotels, motels, and other types
of residential environments, even in farm houses,
areas of the kitchen staff in shops, offices and other
work environments.
2.2.4. This appliance is not intended for use by
persons (including children) with reduced physical,
sensory or mental capabilities, or lack of experience
and knowledge, unless they have been given super-
vision or instruction concerning use of the appliance
by a person responsible for their safety.
2.2.5. This appliance is not a toy. Children should be
supervised to ensure that they do not play with the
appliance.
2.3. Use and care:
2.3.1. Fully unroll the appliance’s power cable before
each use.
2.3.2. Do not use the appliance if the parts or acces-
sories are not properly fitted.
2.3.3. Do not use the appliance when empty.
2.3.4. Do not turn the appliance over while it is in
use
or connected to the mains power supply.
2.3.5. Do not cover the cooking surface or food with
aluminium foil and other similar materials.
2.3.6. Unplug the appliance from the mains power
supply when not
in use and before undertaking any cleaning task.
2.3.7. This appliance should be stored out of reach
of children.
2.3.8. Do not store the appliance if it is still hot.
2.3.9. Never leave the appliance unattended when in
use and keep out of the reach of children.
2.3.10. If, for some reason, the appliance were to
catch fire, disconnect the appliance from the mains
power supply and DO NOT USE WATER TO PUT THE
FIRE OUT.
2.4. Service:
2.4.1. Make sure that the appliance is serviced only
by suitably qualified technician, and that only original
spare parts or accessories are used to replace exist-
ing parts/accessories.
2.4.2. If the power cord is damaged, the manu-
facturer or its service agent or a similarly qualified
person must
replace it in order to avoid a hazard.
2.4.3. Any misuse or failure to follow the instruc-
tions for use renders the guarantee and the manufac-
turer’s liability null and void.
3. Instructions for use
3.1. Before use:
3.1.1. Remove the appliance’s protective film(if
applicable).
3.1.2. Before using the product for the first time,
clean the parts that will come into contact with food
in the manner described in the cleaning section.
3.2. Use and care:
3.2.1. Assembling the blender jar(3):
3.2.1.1. Place the blender jar into the motor unit(4).
3.2.1.2. Lock the jar into the "locked" position.
3.2.2.
Assembling the blender lid(2).
3.2.2.1. To take the Blender lid off of the blender jar,
you must press the Locker keys simultaneously.
Caution: Hot steam might escape from the openings.
3.2.3. Assembling the food processor bowl(15).
3.2.3.1. Fit the shaft(16) into the motor unit.
3.2.3.2. Fit the food processor bowl(15) on the
motor unit.
3.2.3.3. Turn the food processor bowl(15) clockwise
until it locks into place.

3.2.3.4. Then fit the adjustable slicer disc(14) onto
the Shaft(16). You can also fit the Coarse & fine
shredding disc(17), the French fry disc(18), the
Dough kneader(19), the Chopping blade(20) or the
Whisk holder(21) as desired. (The Egg whisk(22)
must be inserted into the Whisk holder(21) before
fitting the Whisk holder(21) onto the Shaft(16).
Fit the Food processor lid(13) onto the Food proces-
sor bowl(15) as the picture shows. Ensuring the top
of the Shaft(16) locates into the centre of the Food
processor lid(13)
Then turn the Food processor lid(13) in a clockwise
direction, until it locks.
Reverse the above procedure to disassembly the
Food processor bowl(15), if necessary.
Once assembled and ready for use, use the control
knob to select your desired speed.
3.2.4, Assembling the citrus press(23)
3.2.4.1. Fit the Shaft(16) and the Food processor
bowl(15) onto the Motor unit(4) following the above
instructions.
Fit the Strainer(24) on the Food processor bowl(15)
as the picture illustrates.
3.2.4.2. Turn the Strainer (24)in a clockwise direc-
tion, until it locks.
Place the Citrus press(23) over the Shaft(16). Turn-
ing the Citrus press until it drops all the way down.
Press the citrus fruit onto the cone.
Use the lowest speed setting for this.
Take care not to press your hand directly onto the
cone as the motor is powerful and it may cause
injury.
3.2.5. Taking apart the juicer extractor
A- Take out the Juicer pusher.
B- Pull at the bottom of the hooks.
C- Pull the hooks upwards; Then you can take off
the Juicer cover, the Juicer filter and the Juicer bowl
in sequence if necessary.
D- Reverse the above process to refit the juice
extractor if necessary.
3.2.6. Assembling the juice extractor
3.2.6.1. Place the juice extractor on the motor
unit(4).

3.2.6.2. Hold the juice extractor and the motor
unit(4) as illustrated in the picture below.
3.2.6.3. Then revolve thejuicer in a clockwise direc-
tion until it locks.
3.3. Using the Juicer
3.3.1. Plug the appliance into a wall socket and
place the prepared ingredients for juicing into the
feeder tube. Switch the speed selection dial to the
lowest one and use the food pusher provided to
push the ingredients down towards the filter.
3.3.2. Tips for juicing:
•The standard processing time for juicing is 30- 90
seconds.
•Peel citrus fruits, pineapples, melons, etc. before
you juice them.
•Remove the pips of cherries, plums, apricots,
peaches, etc. before you juice them.
•Always check the Juicer filter(8) before use.
Do not use the juicer if there is any damage
to the Juicer filter(8) or the grating disc at the
center of the Juicer filter.
3.4. Using the blender (diagram 1)
3.4.1. Add all the required ingredients into the
blender jar(3).
3.4.2. Place the blender lid(2) on, Press the Blender
lid(2) until you hear a clicking noise.
3.4.3. Place the Cup(1) into the Blender lid(2).
3.4.4. Place the blender jar(3) onto the Motor
unit(4).
3.4.5. Select your desired speed setting with the
control knob.
3.5. Using the egg steamer (diagram 2)
3.5.1. Place your eggs in the Egg holder(5), then
take the Egg holder and place it into the blender
jar(3) fill with water until th MIN mark.
3.5.2. Cover the Blender lid(2), Press the Blender
lid(2) until hear a clicking noise.
3.5.3. Place the Cup(1) into the Blender lid(2).
3.5.4. Place the blender jar(3) onto the Motor.
unit(4), select the heat function, cook at 100 degrees
for 12-15 min.
Diagram 1 Digram 2

3.6. Using the food processor
3.6.1. Fit the shaft (16) and the food processor bowl
(15) onto the motor unit (4).
3.6.2. Fit an attachment over the shaft (16).
Always fit the bowl and attachment onto the machine
before add ingredients.
3.6.3. Fit the Food processor lid(13). Ensuring the
top of the Shaft(16) locates into the centre of the
Food processor lid(13).
Do not use the Food processor lid(13) to operate the
processor, always use the knob.
3.6.4. Turn on and select a speed.
The processor won’t work if the Food processor
bowl(15) or the Food processor lid(13) is fitted
incorrectly.
Use the pulse (p) for short bursts. The pulse will
operate for as long as the knob is held in position.
3.6.5. Reverse the above procedure to remove the
Food processor lid(13), attachments and the Food
processor bowl(15).
Always turn off before removing the Food processor
lid(13).
Important
•Your food processor is not suitable for crushing
or grinding coffee beans, or converting granulated
sugar to caster sugar.
•Avoid contact with the plastic when adding almond
essence or flavouring to mixtures, as this may result
in permanent markings.
3.7. Using the chopping blade(20)
3.7.1. The chopping blade(20) is the most versatile
of all the attachments
3.7.2. The length of the processing time will deter-
mine the texture achieved.
3.7.3. For coarser texture use the pulse control.
3.7.4. Use the chopping blade(12) for cake and
pastry making, chopping raw and cooked meat,
vegetables, nuts, pate, dips, pureeing soups and to
also make crumbs from biscuits and bread. It can
also be used for yeasted dough mixes if the Dough
kneader(19) is not supplied.
Hints
•Cut food such as meat, bread, vegetables into
cubes approximately 2cm/3/4in before processing.
•Biscuits should be broken into pieces and added
down the feed tube whilst the machine is running.
•When making pastry use fat straight from the fridge
cut into 2cm/3/4in cubes.
•Take care not to over-process.
3.8. Using the citrus press
3.8.1. Fit the shaft(16) and the food processor
bowl(15) onto the motor unit(4).
3.8.2. Fit the Strainer(24) on the Food processor
bowl(15).
3.8.3. Place the Citrus press(23) over the Shaft(16).
Turning the Citrus press(23) until it drops all the way
down.
3.8.4. Cut the fruit in half. Then turn on and press
the fruit onto the Citrus press(23).
Note: The Citrus press(23) will not operate if the
Strainer(24) is not fitted correctly.
3.9. Using the egg whisk
You can use the Egg whisk(22) to whip cream,
to whisk eggs and egg whites and to make instant
pudding, mayonnaise and sponge cake mixture. Do
not use the Egg whisk(22) to prepare cake mixtures
with butter or margarine or to knead dough. Use the
Dough kneader(19) for these jobs.
Do not fill the bowl beyond the maximum indication.
•Make sure the bowl and the Egg whisk(22) are dry
and free from grease when you whisk egg whites.
The egg whites have to be at room temperature.
•Always clean the Egg whisk(22) after use.
3.10. Coarse & fine shredding disc(17)
Use the shredding side for cheese, carrots, potatoes
and foods of a similar texture.
3.11. Adjustable slicer disc(14)
Use the slicer for cheese, carrots, potatoes, cabbage
cucumber, courgette, beetroot and onions.
3.12. French fry disc(18)
Use to cut: potatoes for julienne style French fries;
firm ingredients for salads, garnishes, casseroles
and stir fries(eg carrot, swede, courgette, cucum-
ber).

3.13. Programs and LCD Panel
CHUNKY:
When the ‘ ’ mark on the LCD screen lights up, It
means the motor unit is set to the chunky setting.
This is the default setting.
•The temperature area will show the current tem-
perature and will show the temperature increasing to
until the pre-set temperature is reached. The pre-set
temperature is 100oC.
•When the program is complete you will hear a
beep.
•The pre-set heating time will be 30 minutes.
•The pre-set blending time will be 5 seconds.
•When the program is complete you will hear a
beep.
SMOOTH:
When the‘ ’ mark on the LCD screen lights up, It
means the motor unit is set to the smooth setting.
•The temperature area will show the current tem-
perature and will show the temperature increasing to
until the pre-set temperature is reached. The pre-set
temperature is 100oC.
•The pre-set heating time will be 30 minutes.
•The pre-set blending time will be 3 minutes.
•When the program is complete you will
hear a beep.
BLEND:
When the‘ ’ mark on the LCD screen lights up, It
means the motor unit is set to the BLEND setting.
•Press the "m" button until the triangle reaches the
blend function.
•The display will show the following:
•TEMP - 0
•TIME - 00:00
•SPEED -
•Turn the ON/OFF button, selecting speed 1 to 5.
The speed will be shown in the SPEED area by
increassing 1 to 5 rectangles.
•No need to set time or temp on this setting.
HEAT:
When the ‘ ’ mark on the LCD screen lights up, It
means the motor unit is set to the simmer setting.
•Press the "m" button until the triangle reaches the
HEAT function.
•The TEMPERATURE will blink and you will
have to enter the desired cooking tempera-
ture by using the +/- buttons. You can set a
temperature from 0 to 100oC.
•Then press the M button and the TIME
button wil blink and you will have to enter
the desired cooking time by pressing the
+/- buttons. You can set a maximum time of
30 minutes.
•Now you just have to turn the ON/OFF button on
any place.
•The TEMPERATURE are will show the tem-
perature increasing.
•The TIME area will show the time count-
down.
•There will be NO BLENDING.
•When the program is complete you will
hear a beep
TEMP:
Temperature Display.
You can set the desired temperature
The temperature will display on the LCD next to the
‘TEMP’ mark.
TIME:
Time Display
You can set the desired time of operation.
The time will display on the LCD next to the “TIME”
mark.
SPEED:
The unit has variable speed control.
ON/OFF buttons: move the knob from the OFF/ON
position towards the MAX.
‘P’ :Pulse function:
This unit has a Pulse function. This can be used
when you want complete control of chopping/
blending.
BLEND
HEAT

•The blades will rotate at maximum power only
while you are holding the “Pulse” button.
•Avoid holding the button continuously for more
than 15 seconds at a time.
•This function is specifically for the blender, chopper
and food processor attachments and should not be
used for the juice extractor or citrus juicer attach-
ment.
‘M’ button: this is used to select the desired MODE.
Use this button to scroll between pre-set functions.
“+” button: used to increase either time or tem-
perature
“-“ button: used to decrease either time or tempera-
ture
4. Cleaning
4.1. Disconnect the appliance from the mains power
supply and allow it to cool completely before under-
taking any cleaning task.
4.2. Heating blender jar: After pouring out the soup
you need to add some water into the heating blender
jar, then using the P switch you can clean the heating
blender jar well. For difficult remove lumps, first soak
in water. After the lumps soften then clean again.
For lime scale, put some white vinegar in the jar and
soak for a while. Then the unit can be cleaned as
normal.
4.3. Processor bowl: You are able to quickly and
easily preclean the food processor bowl with the
pulse button. Simply add some water and washing-
up liquid to the dirty bowl and secure the lid. Then
use the pulse button until the bowl is clean. When
you preclean the food processor bowl in this way,
make sure the food processor blade is assembled in
the bowl.
Once you have pre-cleaned you may use warm
soapy water to clean all the attachments.
•Always exercise extreme caution when washing
the blades/blade assembly. Never run your hand or
fingers along the blades.
•To clean the appliance body, use a damp cloth to
wipe it and dry thoroughly.
•Never submerge the motor unit and cord in water
or any other liquid, and never place them under
running water.
4.3. Clean the outer parts of the appliance with a
damp cloth with a few drops of washing-up liquid
Choosing a speed for all functions
Tool/ Attach-
ment Function Speed Maximum
capacity KB time
blender jar Blending juice
Carrot
1-5
5
1.6L(640g
Carrot & 960g
water)
30sec
Cooking soup 1250ml
Chopping blade Grinding meat
Cutting vegetables
Making stuffing: cutting meat and veg-
etables both (need to put meat first)
1-5 500g meat 30sec
Discs-slicing/
shredding/ chip-
ping/
mashing
Slicing/ shredding/ chipping/mashing
food and vegetables such as as car-
rots, cheese
1 1200ml 30sec
Citrus Press
components
Citrus fruits juicing 1 1200ml 30sec
Whisk
components
Egg white 1 8 piece 30sec
Juicer Juicing 5 500g 30sec

and then dry. CAUTION! Do not immerse electrical
parts of the appliance in any liquid.
4.4. Do not use solvents, or products with an acid
or base pH such as bleach, or abrasive products, for
cleaning the appliance.
4.5. Never submerge the appliance in water or any
other liquid or place it under running water.
5. Anomalies and repair
5.1. Take the appliance to an authorised support
centre if product is damaged or other problems
arise.
5.2. If the connection to the mains has been dam-
aged, it must be replaced and you should proceed as
you would in the case of damage.
6. Troubleshooting guide
6.2. Abnormal conditions:
If the machine experiences an abnormal condition, it
will automatically stop and turn into standby mode.
An Error code will display on the LCD screen.
Overflow of the heating blending jar:
The spillage sensor is there for when the liquid
in the blender is too much. When the machine
experiences an overflow, the machine will enter
standby mode.
Remove some liquid and clean the spillage sensor
before continuing.
Note: soup in the heating blender jar cannot exceed
cold state 1600ml hot state 1250ml.
When the LCD displays ‘E02’ it indicates the lid is
properly secured on the blender
26
27
No. Problem Reason Solution
1 Switch not working The appliance is not
powered on.
Check your connection to
the power supply.
The appliance fails to
start
Press the power switch
2 LCD shows E01 Too much liquid in the jug
blender
Reduce the amount of
liquid
There is some food on
the spillage sensor.
Clean the food off the
spillage sensor
3 LCD show E02 There is not enough liquid
in the jug.
Add more liquid
The jug blender cover is
not correctly fitted.
Ensure the jug blender lid
is properly fitted.
4 LCD show E03 Attachments incorrectly
assembled.
Assemble attachments
according to user manual.

1
6
11
12
14
15
16
17 23
24
25
18
19
20
21
22
13
7
8
9
10
2
5
3
4
1
6
11
12
14
15
16
17 23
24
25
18
19
20
21
22
13
7
8
9
10
2
5
3
4
AFRIKAANS HANDLEIDING
Geagte kliënt,
Baie dankie vir u keuse om 'n Taurus handelsmerk
produk te koop. Danksy die tegnologie, ontwerp en
werking en die feit dat dit voldoen aan die strengste
gehalte standaarde,is u verseker van ‘n volle
bevredigende gebruik en lang
1. Parte beskrywing
1. Koppie
2. Blender deksel
3. Blender houer
4. Motor eenheid
5. Eier houer
6. VerSapper drukker
7. Versapper deksel
8. Versapper filter
9. Versapper bak
10. Versapper basis
11. Kos drukker binneste
12. Kos drukker
13. Kos verwerker deksel
14. Sny skyf
15. Kos verwerker bak
16. Draaias
17. Verkleining skyf
18. Franse skyfies skyf
19. Deeg menger
20. Kap lem
21. Klits houer
22. Klitsers
23. Sitrus drukker
24. Sif
25. Spatel
26. Vermorsing sensor
27. Droog kook temperatuur sensor
2. Veiligheids advies en waarskuwing!
Lees hierdie instruksies sorgvuldig deur voordat
u die toestel aanskakel en hou dit vir toekomstige
verwysing. Versuim om hierdie instruksies te volg en
op te let kan lei tot 'n ongeluk. Maak al die dele van
die produk wat met voedsel in aanraking kom, soos
aangedui in die skoonmaakafdeling, voor gebruik.
2.1. Gebruik en werksomgewing:
2.1.1. Hou die werk oppervlak skoon en helder
verlig. Ongelukke gebeur in donker areas.
2.1.2. Gebruik die produk in n goed geventileerde
area.
2.1.3. Moenie die toestel naby `n warm gas of
elektri- ese brander of qn warm oond plaas nie.
2.1.4. Streng toesig is nodig as die toestel naby of
deur kinders gebruik word.
2.1.5. Plaas toestel op `n stabiele area en weg van
water.
26
27

2.1.6. `n Brand mag ontstaan as die rooster bedek
is of aan vlambare material raak, insluitende gordyne
as dit in werking is.
2.1.7. Die toestel is nie geskik om op aan `n tydsbe-
heer toestel te Koppel nie.
2.1.8. Moenie die toestel gebruik as die koord of
prop beskadig is.
2.1.9. Maak seker die spanning soos aangedui op
die gradering etiket kom ooreen met die hoofspan-
ning.
2.2.10. Prop in elektriese uitlaat.
2.1.11. Die toestel prop moet in die hoof prop pas
en moenie die prop verander.
2.1.12. Indien `n multi prop gebruik word maak
seker die toestel se strome oorskry nie die gradering
van die multi prop.
2.1.13. Moenie die toestel gebruik as die prop of
koord beskadig isnie of enige sigbare skade aan die
omhulsel is nie.
2.1.14. Moenie die toestel gebruik as dit op die vloer
geval het en daar is sigbare skade.
2.1.15. Moenie die koord gebruik om die toestel te
dra, op te tel of van diemuurprop te ontkoppel nie.
2.1.16. Die koord mag nooit om die toestel gedraai
word nie.
2.1.17. Moenie die koord plooi nie.
2.1.18. Die koord Moenie oor die kant van die tafel
of toonbank hang of aan warm oppervlaktes raak
nie.
2.1.19. Maak seker die koord is nie beskadig of
verstrengel nie.
2.1.20. Die toestel moet nie buite gebruik word nie
2.1.21. Moenie die prop met nat hande hanteer nie
2.2. Persoonlike veiligheid
2.2.1. LET WEL: Moenie die toestel sonder toesig
laat nie.
2.2.2. Moenie warm oppervlaktes aanraak nie
gebruik handvatsels of knoppe want dit kan lei tot
ernstige brandwonde.
2.2.3. Die toestel is nie geskik vir industriele gebruik
soos kantore,hotelle motelle en gastehuise.
2.2.4. Die toestel is nie geskik vir gebruik deur
vermin- dered fisiese verstandelike vermoens of
gebrek aan ervaring of kennis tensy hulle opleiding
gehad het.
2.2.5. Die toestel is nie `n speelding and kinders
moet altyd toesig he om te verhoed dat hulle met die
toestel speel.
2.3. Use and care:
2.3.1. Die kabel moet ten volle afgewikkel word voor
gebruik.
2.3.2. Die toestel moet nie gebruik word as die par te
of bykomstighede nie behoorlik pas.
2.3.3. Die toestel moet nooit leeg gebruik word nie.
2.3.4. Die Toestel moet nooit gedraai word terwyl dit
in werking is of in die muurprop gekoppel is.
2.3.5. Die kook oppervlakte moet nooit toegemaak
word me foelie of soor tgelyke materiaal.
2.3.6. Ontkoppel die toestel van die hooftoevoer as
dit nie in gebruik is nie en laat dit heeltemal afkoel
voordat dit skoongemaak word. As dele afgehaal
word of toe- gevoeg word,moet die toestel nie in
werking wees nie.
2.3.7. Die toestel moet buite bereik van kinders
gestoor word.
2.3.8. Die toestel moet heeltemal afkoel voor dit
gestoor word.
2.3.9. Die toestel moet altyd onder toesig wees wan-
neer in gebruik en moet buite bereik van kinders
gehou word.
2.3.10. As die toestel aan die brand slaan ontkop-
pel van die muursok en gooi n kombuis vadoek oor
MOET NOOIT WATER GEBRUIK!!!
2.4. Diens:
2.4.1.Die toestel moet deur `n gekwalifiseerde
tegnikus gediens word
2.4.2 As die koord beskadig word moet dit deur die
diensagent of `n gekwalifiseerde person vervang
word om brandgevaar te verhoed
2.4.3.Enige misbruik en mislukking om instruksies te
volg lewer die waarborg nul en leemte
3. Instruksies vir gebruik
3.1. Voor gebruik:
3.1.1. Verqyder die toestel se beskermende laag.
(indien toepaslik)
3.1.2. Voor die toestel vir die eerste keer gebruik
word maak alle par te skoon wat met kos in aanrak-
ing kom soos voorgeskryf in skoonmaak ar tikel.
3.2. Gebruik en sorg:
3.2.1. Sit blender houer aanmekaar(3):

3.2.1.1. Plaas blender houer op motor(4).
3.2.1.2. Maak die pot in die "geslote" posisie.
3.2.2. Sit blender deksel aanmekaar(2).
3.2.2.1. Om die Blender-deksel uit die blenderhouer
te verwyder, moet jy gelyktydig die sluit sleutels
druk.Let op: Warm stoom kan uit die openinge
ontsnap.
3.2.3. Sit kos verwerker bak aanmekaar(15).
3.2.3.1. Sit die draaias(16) op die motor eenheid
3.2.3.2. Sit die voedselverwerkersbak (15) op die
motor.
3.2.3.3. Draai die bak(15) kloksgewys tot dit in plek
sluit

3.2.3.4. Pas dan die verstelbare sny skyf (14) op
diedraaias (16). U kan ook die Grof-en-fyngeknipte
skyf (18), die Franse braai-skyf (18), die deeg-
knieër (19), die snyblaar (20) of die Klitshouer (21)
soos verlang, pas. (Die eierklitser (22) moet in die
Klitshouer (21) geplaas word voordat die Klitshouer
(21) op die As (1) geplaas word. Plaas die voed-
selverwerkerdeksel (13) op die voedselverwerkers-
bak (15) soos die foto toon. Verseker die bokant
van die Skag. (16) geplaas is in die middel van die
voedselverwerker deksel (13)Draai dan die Voed-
selverwerker deksel (13) in die kloksgewys rigting
totdat dit sluit.Draai die bogenoemde prosedure om
die voedselverwerkersbak (15) om af te haal, indien
nodig. Sodra jy gereed is vir gebruik, gebruik die
beheerknop om die gewenste spoed te kies.
3.2.4, Sit sitrus drukker aanmekaar(23)
3.2.4.1. Sit die draaias (16) en die Kosverwerk-
ersbak (15) op die Motor-eenheid (4) aan en volg
instruksies.Sit die sif (24) op die voedselverwerkers-
bak (15) soos die prentjie illustreer
3.2.4.2. Draai die sif (24) in die kloksgewys rigting
totdat dit sluit.Sit die Sitruspers (23) oor die Skag
(16). Draai die Sitruspers totdat dit heeltemal af val.
Druk die sitrusvrugte op die keël.Gebruik die laagste
spoedinstelling hiervoor. Wees versigtig om nie jou
hand direk op die keël te druk nie, aangesien die mo-
tor kragtig is en dit kan besering veroorsaak.
3.2.5. Na gebruik
A- Haal die sap drukker uit.B- Trek aan die onderkant
van die hake. C- Trek die hake opwaarts; Dan kan
jy die drukker-deksel afhaal, die sapper-filter en die
sapper bak in volgorde, indien nodig, afneem.D-
Herhaal die proses om weer aanmekaar te sit indien
nodig.
3.2.6. Aanmekaarsit van sap ekstraktor
3.2.6.1. Plaas op die motor eenheid(4). 3.2.6.1.
Place the juice extractor on the motor unit(4).

3.2.6.2. Hou die sap-ekstraktor en die motor-eenheid
(4) soos in die prentjie hieronder geïllustreer.
3.2.6.3. Draai dan die versapper kloksgewys totdat
dit sluit.
3.3. Gebruik versapper
3.3.1. Konnekteer die apparaat aan 'n krag prop en
plaas die voorbereide bestanddele vir versapping in
die toevoerbuis. Skakel die spoed seleksie skakelaar
na die laagste en gebruik die voedselpyp wat voors-
ien word om die bestanddele na die filter te druk.
3.3.2. Wenke vir versapping:
• Die standaard verwerkingstyd vir versapping
is 30-90 sekondes.• Sny sitrusvrugte, pynap-
pels, spanspekke, ensovoorts voordat jy dit sap.•
Verwyder die pitte van kersies, pruime, appelkose,
perskes, ens voordat u dit sap.• Kontroleer altyd
die versapper filter (8) voor gebruik. Moet nie die
sapapparaat gebruik indien die versapper-filter (8) of
die rasperskyfie in die middel van die versapper-filter
beskadig is nie.
3.4. Gebruik die blender (diagram 1)
3.4.1. Voeg al die benodige bestanddele in die
blender houer (3).3.4.2. Plaas die blender deksel (2)
op, druk die Blender deksel (2) totdat jy 'n klikge-
luid hoor. 3.4.3. Plaas die koppie (1) in die Blender
deksel (2). 3.4.4. Plaas die blender houer (3) op die
Motor-eenheid (4).3.4.5. Kies die verlangde spoedin-
stelling met die knoppie.
3.4.2. Place the blender lid(2) on, Press the Blender
lid(2) until you hear a clicking noise.
3.4.3. Place the Cup(1) into the Blender lid(2).
3.4.4. Place the blender jar(3) onto the Motor
unit(4).
3.4.5. Select your desired speed setting with the
control knob.
3.5. Gebruik die eier stoomer (diagram 2)
3.5.1. Plaas jou eiers in die eierhouer (5), neem dan
die eierhouer en plaas dit in die blender houer (3) Vul
met water tot die MIN punt.
3.5.2. Bedek die Blender deksel (2), druk die Blender
deksel (2) tot 'n klikgeluid hoor.
3.5.3. Plaas die koppie (1) in die Blender deksel (2).
3.5.4. Plaas die blender op die motor eenheid(4),
kies die hitte funksie, kook by 100 grade vir 12-15
min.
Diagram 1 Digram 2

3.6. Using the food processor
3.6.1. Sit die draaias (16) en die voedselverwerk-
ersbak(15) op die motor eenheid (4).3.6.2. Sit 'n
aanhegting oor die skag (16). Sit altyd die bak en die
aanhegting op die masjien voor jy bestanddele by-
voeg.3.6.3. Sit die deksel van die voedselverwerker
op(13). Verseker dat die bokant van die draaias (16)
in die middel van die voedselverwerkerdeksel (13)
geplaas word. Moenie die deksel vir voedselver-
werker (13) gebruik om die verwerker te gebruik
nie, gebruik altyd die knoppie. 3.6.4. Skakel aan
en kies 'n spoed. Die verwerker sal nie werk as die
voedselverwerkingsbak (15) of die voedselverwerker
deksel (13) verkeerd op is nie.Gebruik die pols (p)
vir kort uitbarstings. Die pols sal werk vir so lank
as wat die knop in posisie gehou word. 3.6.5. Draai
die bogenoemde prosedure om die voedselverwerk-
erdeksel (13), aanhangsels en die voedselverwerk-
ingsbak (15) te verwyder.Skakel altyd af voordat
die deksel van die voedselverwerker verwyder word
(13).
Belangrik
• Jou kosverwerker is nie geskik vir die fynmaak
van koffiebone, of om granulatsuiker te omskep in
strooisuiker nie.• Vermy kontak met die plastiek
wanneer amandel of ander geurmiddels by mengsels
gevoeg word, aangesien dit permanente merke kan
veroorsaak.
3.7. Gebruik die opkap lem(20)
3.7.1. Die lem (12) is die mees veelsydige van al die
aanhangsels3.7.2. Die lengte van die verwerkings-
tyd bepaal die tekstuur wat behaal word.3.7.3. Vir
growwe tekstuur gebruik die polsbeheer.3.7.4. Ge-
bruik die snylem (12) vir koek en gebak, kap rou en
gekookte vleis, groente, neute, pate, dips, puree sop
en maak ook krummels van koekies en brood. Dit
kan ook vir gemengde deegmengsels gebruik word
indien die deegmenger (21) nie verskaf word nie.
Wenke
• Sny kos soos vleis, brood, groente in blokkies
ongeveer 2cm / 3 / 4 voor verwerking.
• Koekies moet in stukkies gebreek word en in die
toevoerbuis gevoer word terwyl masjien draai .•
Gebruik vet uit die yskas, sny dit in 2cm / 3 / 4in
blokkies vir die maak van deeg.
• Pas op om nie te oorverwerk nie.
3.8. Gebruik sap drukker
3.8.1. Sit die as(16) in die voedselverwerkersbak
(15) op die motor eenheid (4).3.8.2. Sit die sif (24)
op die voedselverwerkersbak (15).3.8.3. Sit die
Sitruspers (23) op die as (16). Draai die Sitruspers
(23) totdat dit heeltemal af gaan.3.8.4. Sny die
vrugte in die helfte. Draai dan weer en druk die
vrugte op die Sitruspers (23). Neem kennis: Die
Sitruspers (23) sal nie werk as die sif (24) nie korrek
op is nie.
3.9. Gebruik die eier klitser
Jy kan die Eiersklitser (24) gebruik om room
te klits, eiers en eierwitte te klits en om
nagereg, mayonnaise en sponskoekmengsel
te maak. Moenie die Eiersklitser (24) gebruik
om koekmengsels met botter of margarien
te berei of om deeg te knie nie. Gebruik die
deeg menger (21) vir hierdie werk. Moenie
die bak verby maksimum volmaak nie.
• Maak seker dat die bak en die Eiersklit-
ser (24) droog is en vry van vet wanneer jy
eierwitte klits.Die eiers moet by kamertem-
peratuur wees.
• Maak die eierklitser (24) altyd skoon na
gebruik.
3.10. Growwe en fyn sny skywe(19)
Gebruik die rasper kant vir kaas, wortels, aartappels
en kosse van 'n soortgelyke tekstuur.
3.11. Verstelbare snyskyf(16)
Gebruik die snyer vir kaas, wortels, aartappels,
koolkomkommers, courgette, beet en uie.
3.12. French fry disc(20)
Gebruik om te sny: aartappels vir julienne-styl
skyfies; stewige bestanddele vir slaaie, granerings,
braaidisse en roerbraaiers (bv. wortel, courgette,
komkommer).

3.13. Programme en LCD paneel
CHUNKY:
Wanneer die ' ' merk op die LCD-skerm brand,
beteken dit dat die motor-eenheid op die dun plek
ingestel is.Dit is die vooraf ingestelde stelling.• Die
temperatuur gebied sal die huidige temperatuur
toon en sal die temperatuur laat vermeerder tot die
vooraf ingestelde temperatuur bereik is. Die vooraf
ingestelde temperatuur is 100oC.
• Wanneer die program voltooi is, sal jy 'n biep hoor.
• Die vooraf ingestelde verwarmingstyd sal 30
minute wees.
• Die voorafbepaalde versneltyd sal 5 sekondes
wees.
• Wanneer die program voltooi is, sal jy 'n biep hoor.
GLADDE:
Wanneer die '' merk op die LCD-skerm brand,
beteken dit dat die motor-eenheid op die gladde plek
ingestel is.
• Die temperatuur gebied sal die huidige temperatuur
toon en sal die temperatuur laat vermeerder tot die
vooraf ingestelde temperatuur bereik is. Die vooraf
ingestelde temperatuur is 100oC.
• Die vooraf ingestelde verwarmingstyd sal 30
minute wees.
• Die voorafbepaalde vermengingstyd sal 3 minute
wees.
• Wanneer die program voltooi is, sal jy 'n biep hoor.
MENG:
Wanneer die '' merk op die LCD skerm brand,
beteken dit dat die motor is ingestel op die meng
instelling.
• Druk die "m" knoppie totdat die driehoek die
mengfunksie bereik.
• Die vertoning sal die volgende aandui:
• TEMP – 0
• TYD - 00:00
• SPOED –
• Draai die AAN / UIT-knoppie, kies spoed 1 tot 5.
Die spoed sal in die SPOED-gebied gewys word
deur 1 tot 5 reghoeke te verhoog
.• Nie nodig om tyd of temp op hierdie instelling
te stel nie.
HITTE:
Wanneer die ' ' merk op die LCD-skerm aangaan,
beteken dit dat die motor is ingestel op die simmer
instelling.
• Druk die "m" knoppie totdat die driehoek die
HITTE-funksie bereik.
• Die TEMPERATUUR sal flits en jy sal die gewenste
kooktemperatuur moet invoer deur die +/- knoppies
te gebruik. Jy kan 'n temperatuur van 0 tot 100oC
stel.
• Druk dan op die M-knoppie en die TYD-knoppie
sal flits ken jy sal die gewenste kooktyd moet invoer
deur op die +/- knoppies te druk. U kan 'n maksi-
mum tyd van 30 minute stel.
• Nou moet jy net die AAN / AF-knoppie op enige
plek draai.
• Die TEMPERATUUR sal die temperatuur laat
toeneem.
• Die TYD-area sal die tyd aftelling wys.
• Daar sal GEEN MENG wees nie.
• Wanneer die program voltooi is, sal jy 'n biep hoor
TEMP:
Temperatuur vertoon.U kan die gewenste temper-
atuur instel. Die temperatuur sal op die LCD langs die
'TEMP'-vertoon word.
TYD:
Time Display
You can set the desired time of operation. The time
will display on the LCD next to the “TIME” mark.
Die eenheid het veranderlike spoedbeheer.
AAN/AF knoppie: Draai die knop van AAN/AF na die
MAX
P’ :Pols aksie:
Hierdie eenheid het 'n polssfunksie. Dit kan gebruik
word wanneer u volledige beheer van sny / vermeng-
ing wil hê.
• Die lemme sal slegs teen maksimum krag draai
terwyl u die "Pulse" -knoppie hou.
• Vermy om die knoppie vir langer as 15 sekondes
BLEND
HEAT

op 'n keer in te hou.
• Hierdie funksie is spesifiek vir die blender, snyer
en byvoegsels van voedselverwerker en moet nie
gebruik word vir die sap-onttrekkings of sitrusdruk-
ker nie.
'M' knoppie: dit word gebruik om die gewenste
MODE te kies. Gebruik hierdie knoppie om tussen
vooraf ingestelde funksies te blaai
. "+" Knoppie: gebruik om tyd of temperatuur te
verhoog
"-" knoppie: gebruik om tyd of temperatuur te
verminderture
4. Skoonmaak
4.1. Skakel die toestel af van die kragtoevoer en laat
dit heeltemal afkoel voordat u enige skoonmaakwerk
onderneem.
4.2. Verhit blender houer: Nadat jy die sop uitge-
gooi het, moet jy water by die verwarmingsblender
houer voeg, en dan met die P-skakelaar kan jy die
verwarmingsblender houer goed skoonmaak. Vir
moeilike verwyder kos, moet u eers in water staan.
Nadat die kos sag geword het, maak dan weer
skoon. Vir kalk, sit 'n paar druppel wit asyn in die pot
en week vir 'n rukkie. Dan kan die eenheid normaal-
weg skoongemaak word.
4.3. Voedsel verwerker bak: Jy kan vinnig en maklik
die voedselverwerkingsbak met die polsslag skoon-
maak. Voeg net 'n bietjie water en wasbakvloeistof
by die vuil bak en maak die deksel vas. Gebruik dan
die polsslag totdat die bak skoon is. Wanneer jy die
kosverwerkerbak so op die regte manier skoonmaak,
maak seker dat die kosverwerkerslem in die bak
gemonteer is.Sodra jy vooraf skoongemaak het, mag
jy warm seepwater gebruik om al die bylae skoon
te maak.• Wees altyd uiters versigtig wanneer u die
lemme was. Moet nooit jou hand of vingers oor die
lemme gly nie.
• Om die toestel se liggaam skoon te maak, gebruik
'n klam lap om dit uit te vee en deeglik droog te
maak.• Moet nooit die motor en die koord in water
of enige ander vloeistof dompel nie, en plaas dit
nooit onder lopende water nie.
4.3. Maak die buitenste dele van die apparaat skoon
met 'n klam lap met 'n paar druppels opwasmiddel
Kies `n spoed vir alle funksies
Aanhegsel Funksie Spoed Max kapasiteit KB tyd
Blender houer Meng of versap wortels 1-5
5
1.6L(640g Carrot
1.6L(640g wortel &
960g water)
30sec
Kook sop 1250ml
Kap lem maal vleis Sny groente maak vulsel:
vleis en groente sny (moet vleis
eerste sit)
1-5 500g vleis 30sec
Skyfies / sny /
versnippering /
fynmaak
Sny / versnipper / skyfies / fynmaak
van kos en groente soos wortels,
kaas
1 1200ml 30sec
Sitrus Pers
komponente
Sitrus vrugte sap 1 1200ml 30sec
Klits Eierwit 1 8 stuk 30sec
Versapper Sap 5 500g 30sec

4.4. Moet nie oplosmiddels, of produkte met 'n
suur of basis pH soos bleikmiddel of skuurprodukte
gebruik vir die skoonmaak van die apparaat nie.
4.5. Moet nooit die apparaat in water of enige ander
vloeistof dompel of onder vloeibare water hou nie
5. Anomilee en herstel
Neem die toestel na 'n gemagtigde tegniese onder-
steuning diens indien die produk beskadig of ander
probleme ontstaan. Moet nie probeer om self te
demonteer of herstel van die toestel nie, want dit kan
gevaarlikwees
5.2. As die konneksie aan die hoofleiding beskadig
is, moet dit vervang word en u moet voor tgaan as u
sou in die geval van skade.
6.2. Abnormale toestande:
As die masjien 'n abnormale toestand ervaar, sal dit
outomaties stop en in die bystand gaan. 'N Foutkode
sal op die LCD skerm vertoon word.
6. Probleemgids
6.1. Wanfunksie en Oplossing Oorvloei van die
verwarmingsmengsel houer: Die morssensor is
daar vir wanneer die vloeistof in die blender te veel
is. As die masjien 'n oorloop ervaar, sal die masjien
in die standby-modus gaan.Verwyder vloeistof en
maak die stortingsensor skoon voordat u verder
gaan.NB: Sop in die verhitting blender pot kan nie
koue toestand 1600ml warm staat 1250ml oorskry.
Wanneer die LCD 'E02' vertoon, dui dit daarop dat
die deksel goed op die blender vasgemaak is.
26
27
No. Probleem Rede Oplossing
1 Switch not working Die toestel is nie aang-
eskakel
Gaan die kragprop na
Die toestel wil nie aan-
skakel
Druk die krag knoppie
2 LCD wys E01 Te veel vloeistof in die
blender
Verminder die voedstof
Daar is voedsel op die
kos sensor
Maak sensor skoon
3 LCD wys E02 Daar is te min vloeistof
in houer
Voeg meer vloeistof by
Die blender se deksel is
nie korrek op nie
Sit deksel korrek op
4 LCD wys E03 Aanhegsels verkeerd aan Sit korrek aan

1
6
11
12
14
15
16
17 23
24
25
18
19
20
21
22
13
7
8
9
10
2
5
3
4
1
6
11
12
14
15
16
17 23
24
25
18
19
20
21
22
13
7
8
9
10
2
5
3
4
ESPAÑOL MANUAL
Estimado cliente,
Gracias por elegir comprar un producto de la marca
Taurus. Gracias a su tecnología, diseño y funciona-
miento y al hecho de que supera los más estrictos
estándares de calidad, se puede asegurar un uso
totalmente satisfactorio y una larga vida del product
1. Descripción de las piezas
1 taza
2. Cubeta de la licuadora
3. Bote de la licuadora
4. Unidad de motor
5. Soporte para huevos
6. Empujador de Juicer
7. Cubierta Juicer
8. Filtro Juicer
9. tazón Exprimidor
10. Juicer base
11. Empujador de alimentos interior
12. Empujador de alimentos
13. Tapa del procesador de alimentos
14. Disco de rebanado
15. Tazón del procesador de alimentos
16. Eje
17. Disco de trituración
18. Disco de frituras
19. Amasadora de masa
20. Cuchilla de cortar
21. Soporte de batidor
22. Whisks
23. Prensa cítrica
24. Colador
25. Espátula
26. Sensor de derrame
27. Sensor de temperatura seca en ebullición
2. Consejos y advertencias de seguridad!
Lea atentamente estas instrucciones antes de en-
cender el aparato y guárdelas para futuras consultas.
El incumplimiento de estas instrucciones podría dar
lugar a un accidente. Limpie todas las partes del
producto que estarán en contacto con los alimentos,
como se indica en la sección de limpieza, antes de
usarlas.
2.1. Uso o ambiente de trabajo:
2.1.1. Mantenga el área de trabajo limpia y bien
iluminada. Las áreas desordenadas y oscuras invitan
a accidentes.
2.1.2. Utilice el aparato en un lugar bien ventilado.
2.1.3. No coloque el aparato sobre superficies cali-
entes, tales como placas de cocción, quemadores
de gas, hornos o artículos similares.
2.1.4. Mantenga alejados a los niños y transeúntes
cuando utilice este aparato.
26
27
Table of contents
Languages:
Other Taurus Food Processor manuals

Taurus
Taurus ROWZER User manual

Taurus
Taurus ROBOT VAPORE User manual

Taurus
Taurus ROBOT VAPORE User manual

Taurus
Taurus PICAR 400 User manual

Taurus
Taurus ELOANE User manual

Taurus
Taurus INALSA Easy Prep User manual

Taurus
Taurus BATEDORA 800 User manual

Taurus
Taurus 912500 User manual

Taurus
Taurus MYCOOK 1.8 User manual

Taurus
Taurus FOODIE User manual