tayco One-Touch User manual

One-Touch
installation guide
March 2017


table of contents
General Instructions 1/2
installation checklist .............................................................................................................................................................1
care and maintenance ........................................................................................................................................................ 2
Mobile Training Desk 3/16
mobile training desk assembly ............................................................................................................................................3
shelf assembly ....................................................................................................................................................................9
ganging mechanism removal.............................................................................................................................................11
ganging mechanism for back to back connection..............................................................................................................12
ganging mechanism for "L" connection..............................................................................................................................13
ganging mechanism for straight onnection........................................................................................................................14
wire trough and power/data attachment to metal modesty................................................................................................15
worksurface BYRNE grommmet installation......................................................................................................................16

6LWH$FFHVVLELOLW\
6LWH3UHSDUDWLRQ
)XUQLWXUH3ODQV
:DVWH0DQDJHPHQW
JUNE 2011 one-touch table 1

)DEULFV
/DPLQDWHV
$FU\OLF*OD]LQJ
3DLQWHG0HWDOV
JUNE 2011 one-touch table 2
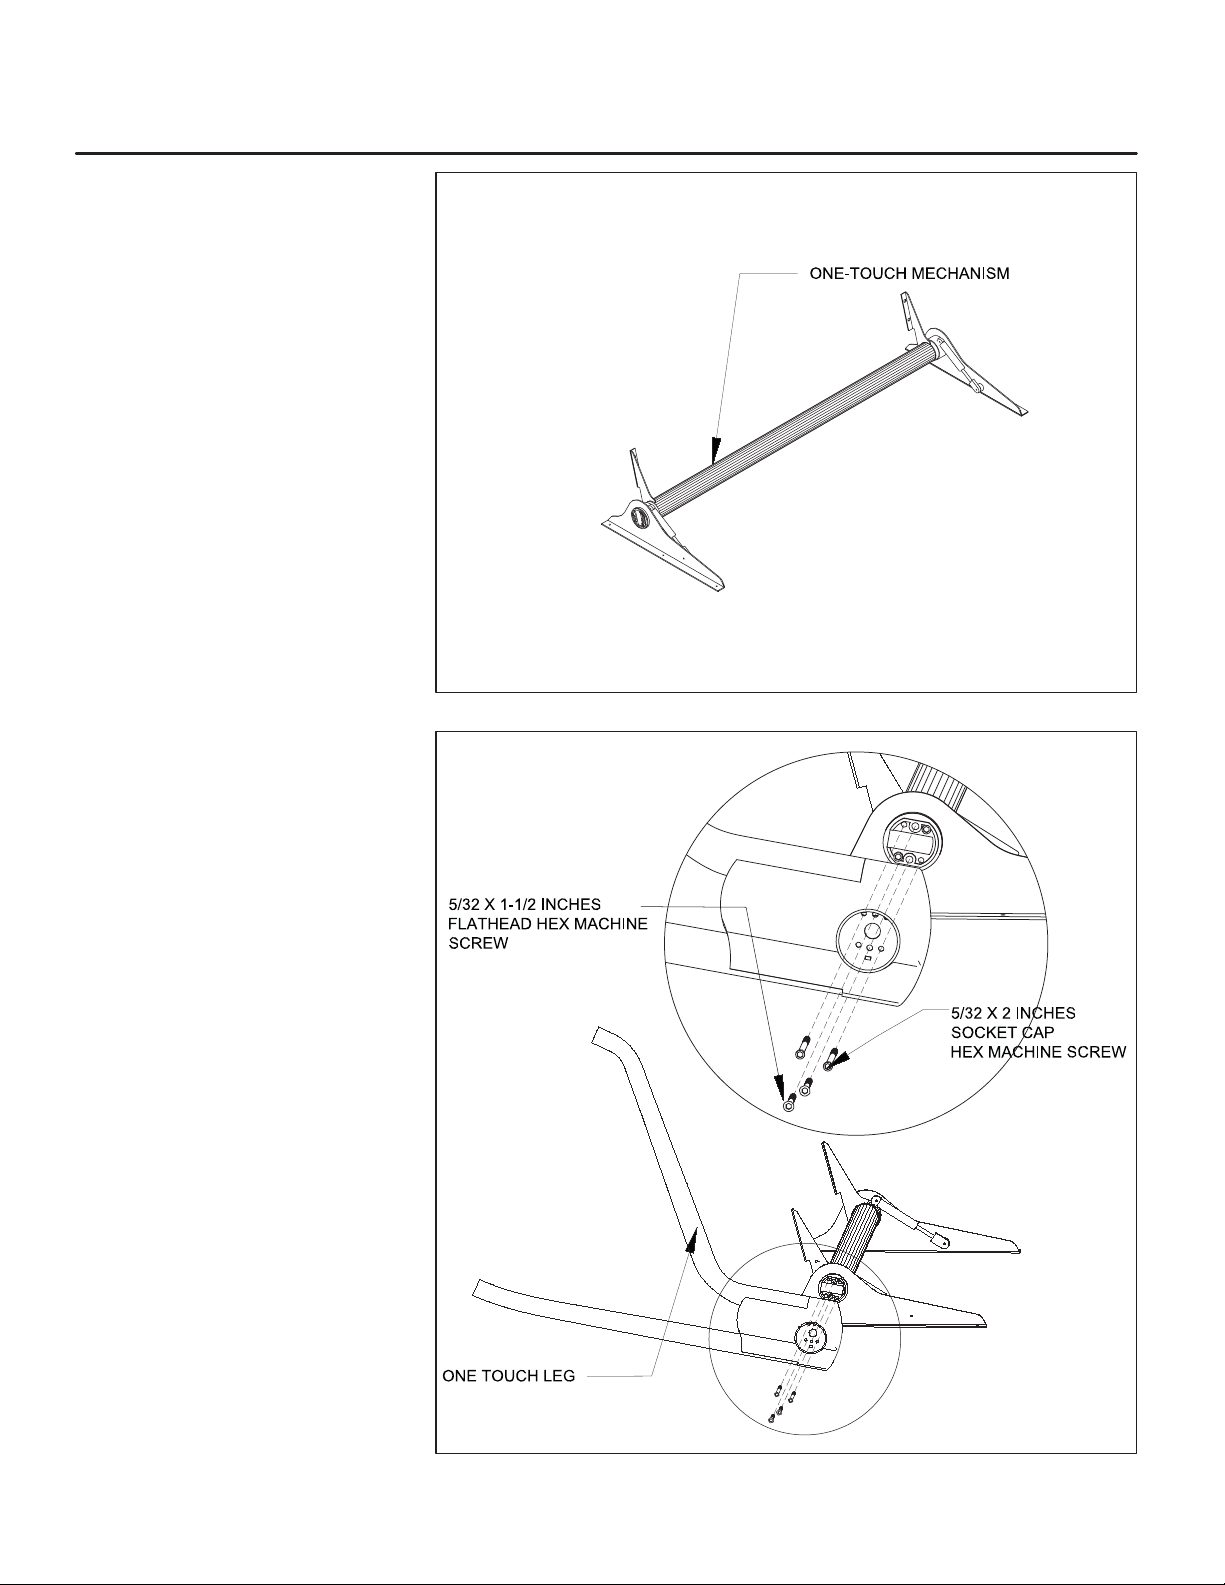
mobile training desk
1. Place the One-Touch mechanism
on a clean, flat, smooth surface
(Figure 1).
2. Attach the leg to the mechanism
with two 5/32 x 1-1/2 inches
flathead hex machine screw and
two 5/32 x 2 inches socket cap
using the hex bit (Figure 2).
FIGURE 1
FIGURE 2
JUNE 2011 one-touch table 3
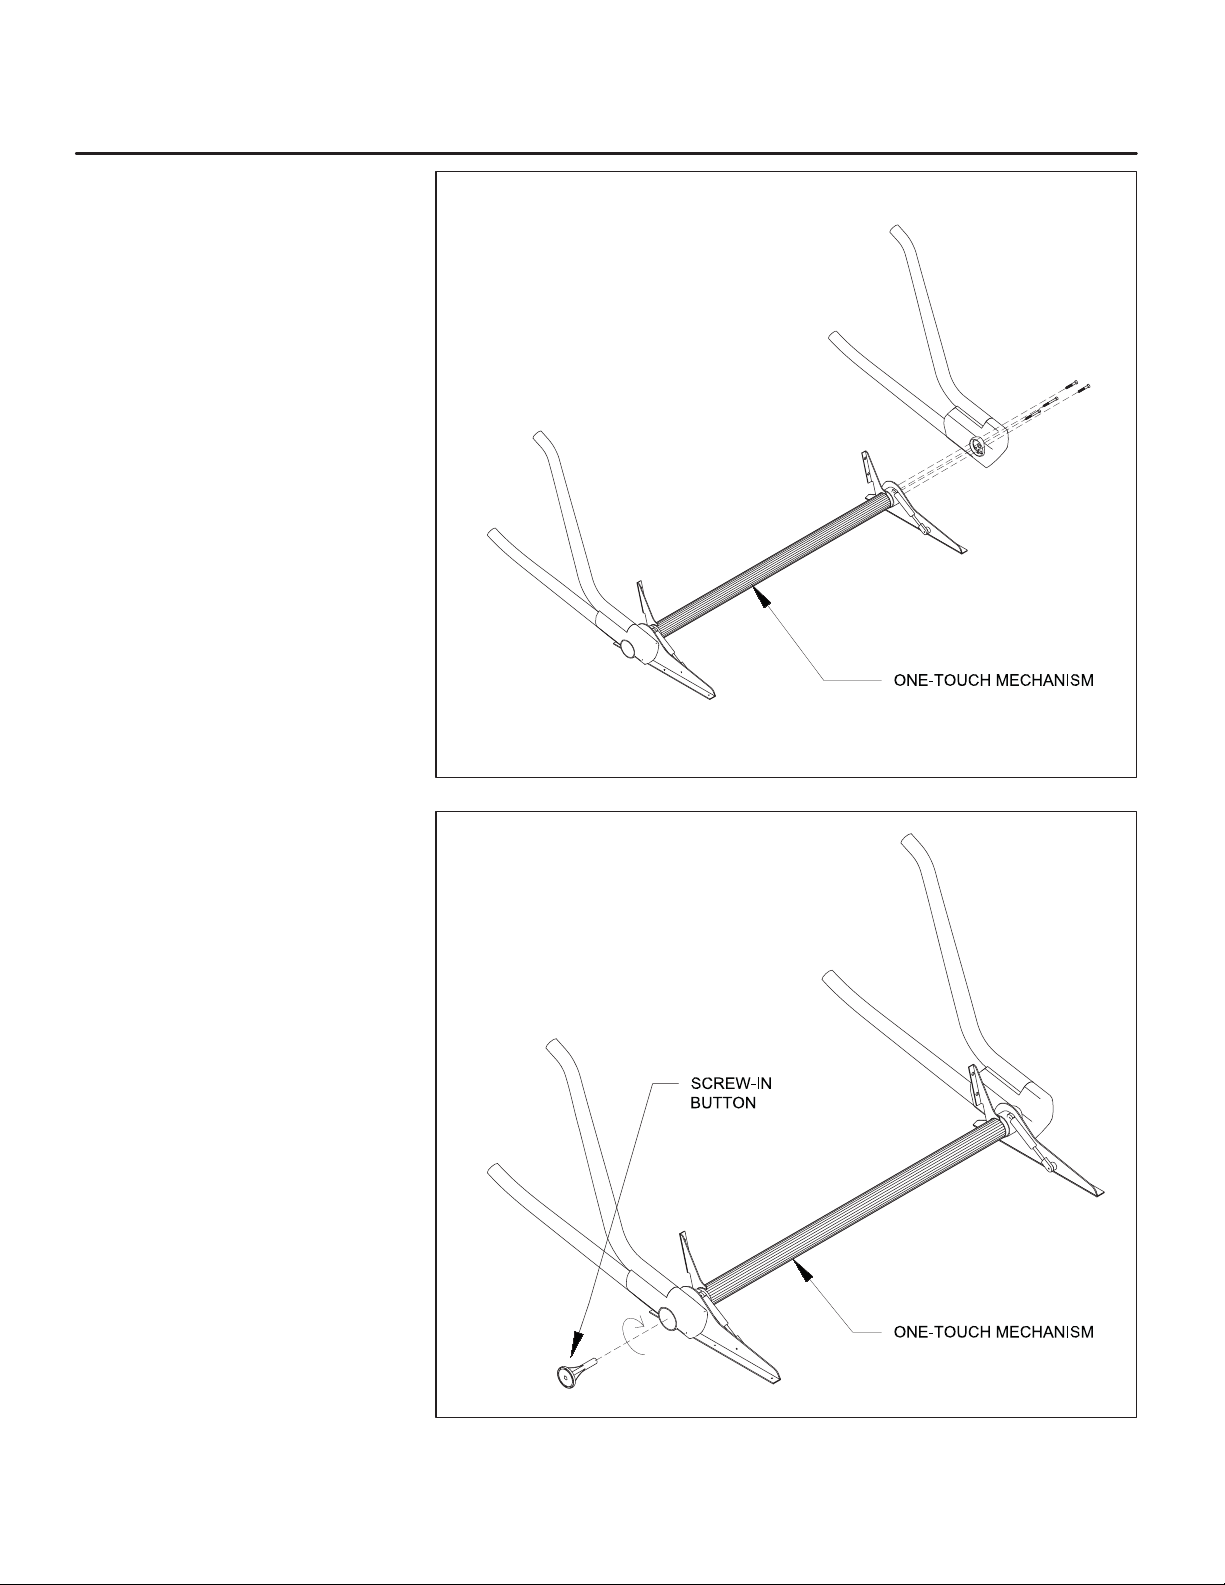
mobile training desk - cont'd.
3. Repeat step 2 to fasten the leg
(Figure 3).
4. Insert the screw-in button into the
One-Touch mechanism. Turn the
screw-in button clockwise until
tightened (Figure 4).
5. Repeat step 4 to install the
screw-in button on the other side.
FIGURE 3
FIGURE 4
JUNE 2011 one-touch table 4

mobile training desk - cont'd.
6. Push and hold the screw-in
button to lift the legs up
(Figure 5).
7. Place the button caps on
(Figure 6).
FIGURE 5
FIGURE 6
PUSH and
HOLD
JUNE 2011 one-touch table 5

mobile training desk - cont'd.
8. Install the assembled One-Touch
mechanism to the worksurface
with 1-inch oval head screws
using #2 Robertson bit on the
pre-drilled positioning holes
(Figure 7).
9. Install the laminate (or metal
modesty) to the specified
brackets on the mechanism with
1-inch oval head screws using #2
Robertson bit (Figure 8 shows the
laminate modesty).
FIGURE 7
FIGURE 8
JUNE 2011 one-touch table 6
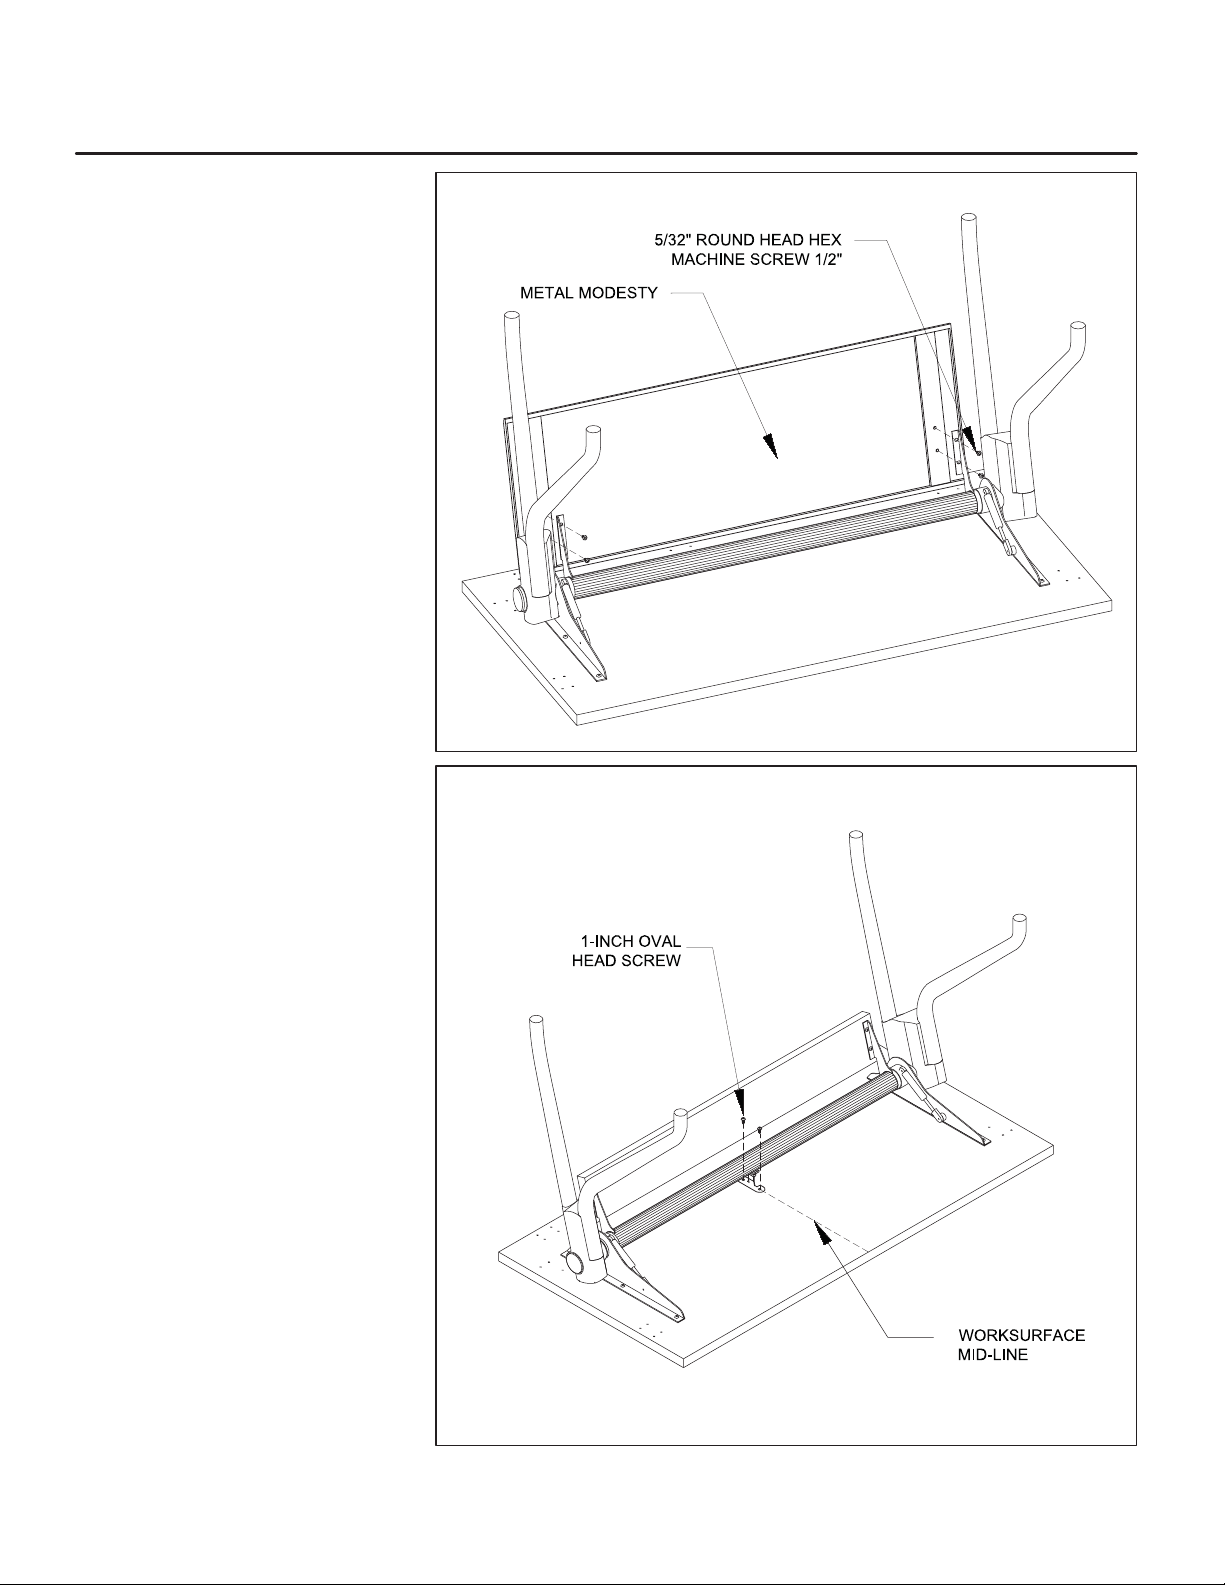
mobile training desk - cont'd
9. Install the metal modesty to the
brackets on the mechanism with
5/32-inch Round head Hex
machine head screw 1/2-inch
using the Hex bit, (Figure 9),
10. Install the mechanism support at
the middle of the mechanism
using two 1-inch oval head
screws with #2 Robertson bit
(Figure 10).
FIGURE 9
FIGURE 10
JUNE 2011 one-touch table 7
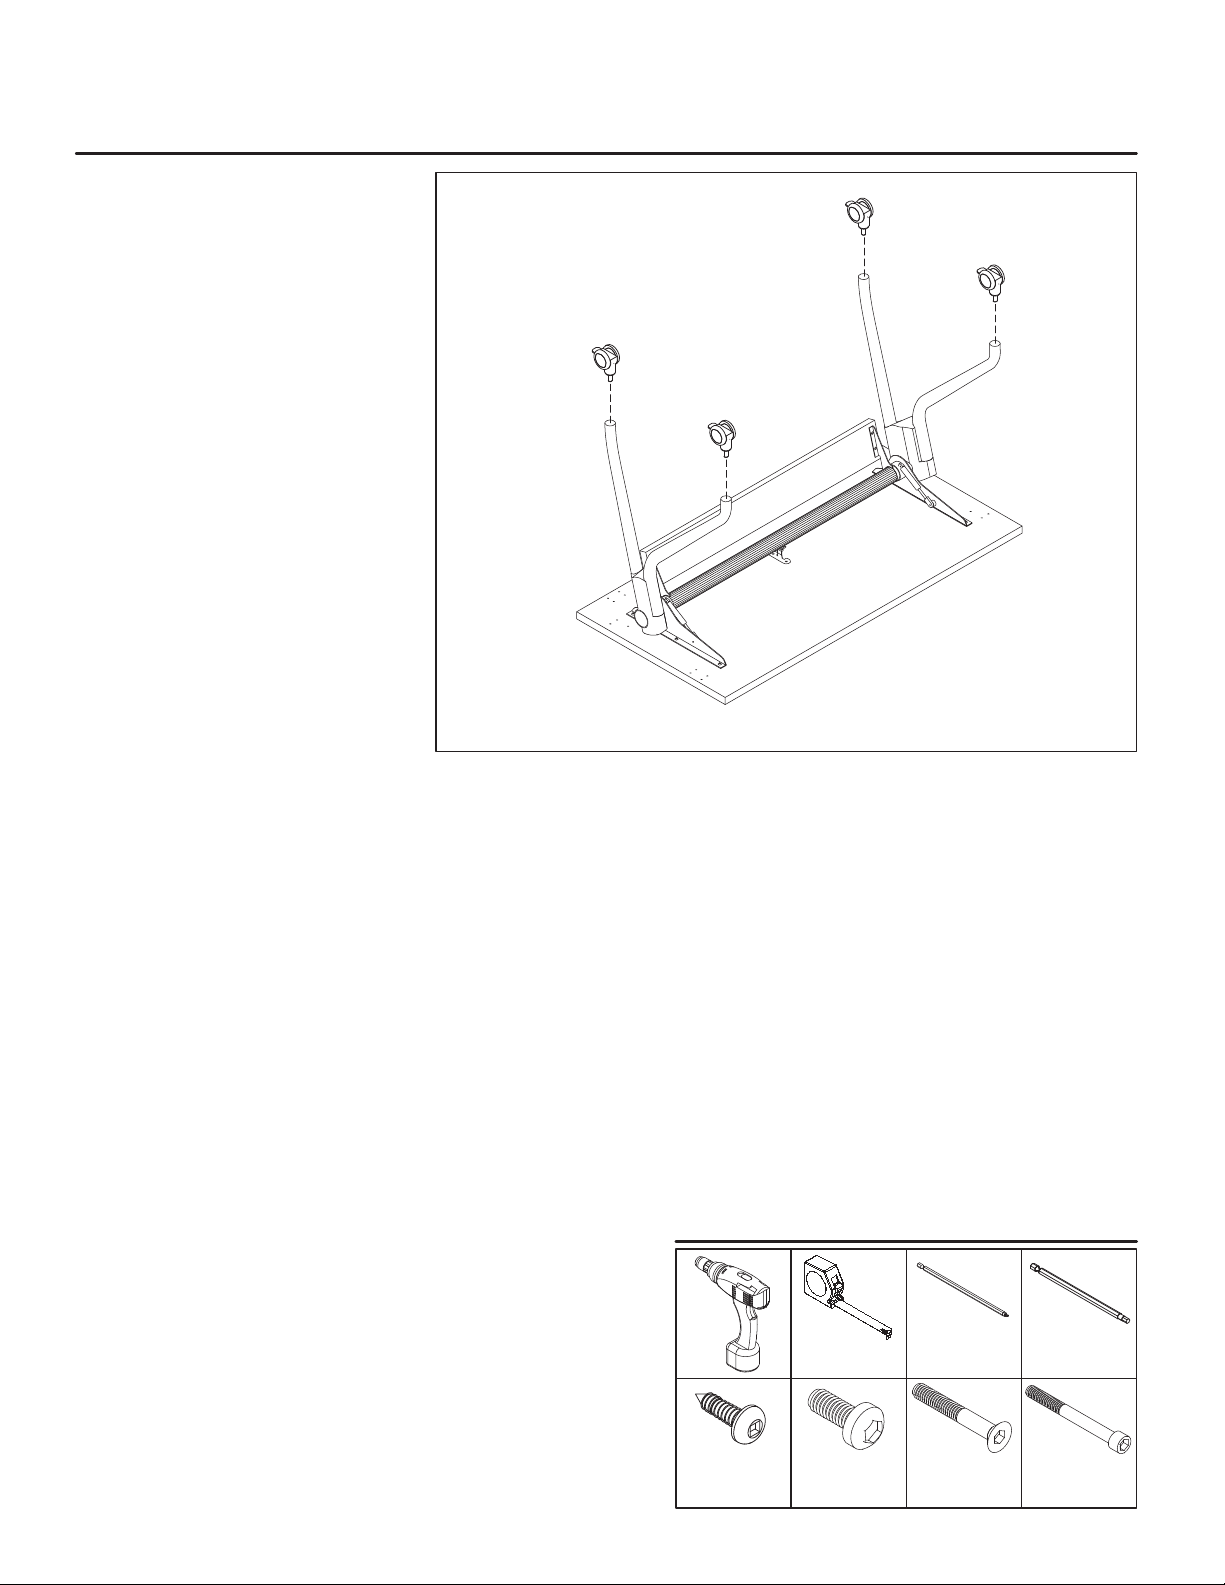
mobile training desk - cont'd
tools and hardware needed
drill
measuring
tape
#2 Robertson
long bit
10. Place the casters on (Figure 10).
8, 1" oval head
screw
6" hex bit
4, 5/32" flathead
hex machine
screw 1 1/2"
4, 5/32" socket
cap hex machine
screw 2"
4, 5/32" round
head hexmachine
screw 1/2"
JUNE 2011 one-touch table 8
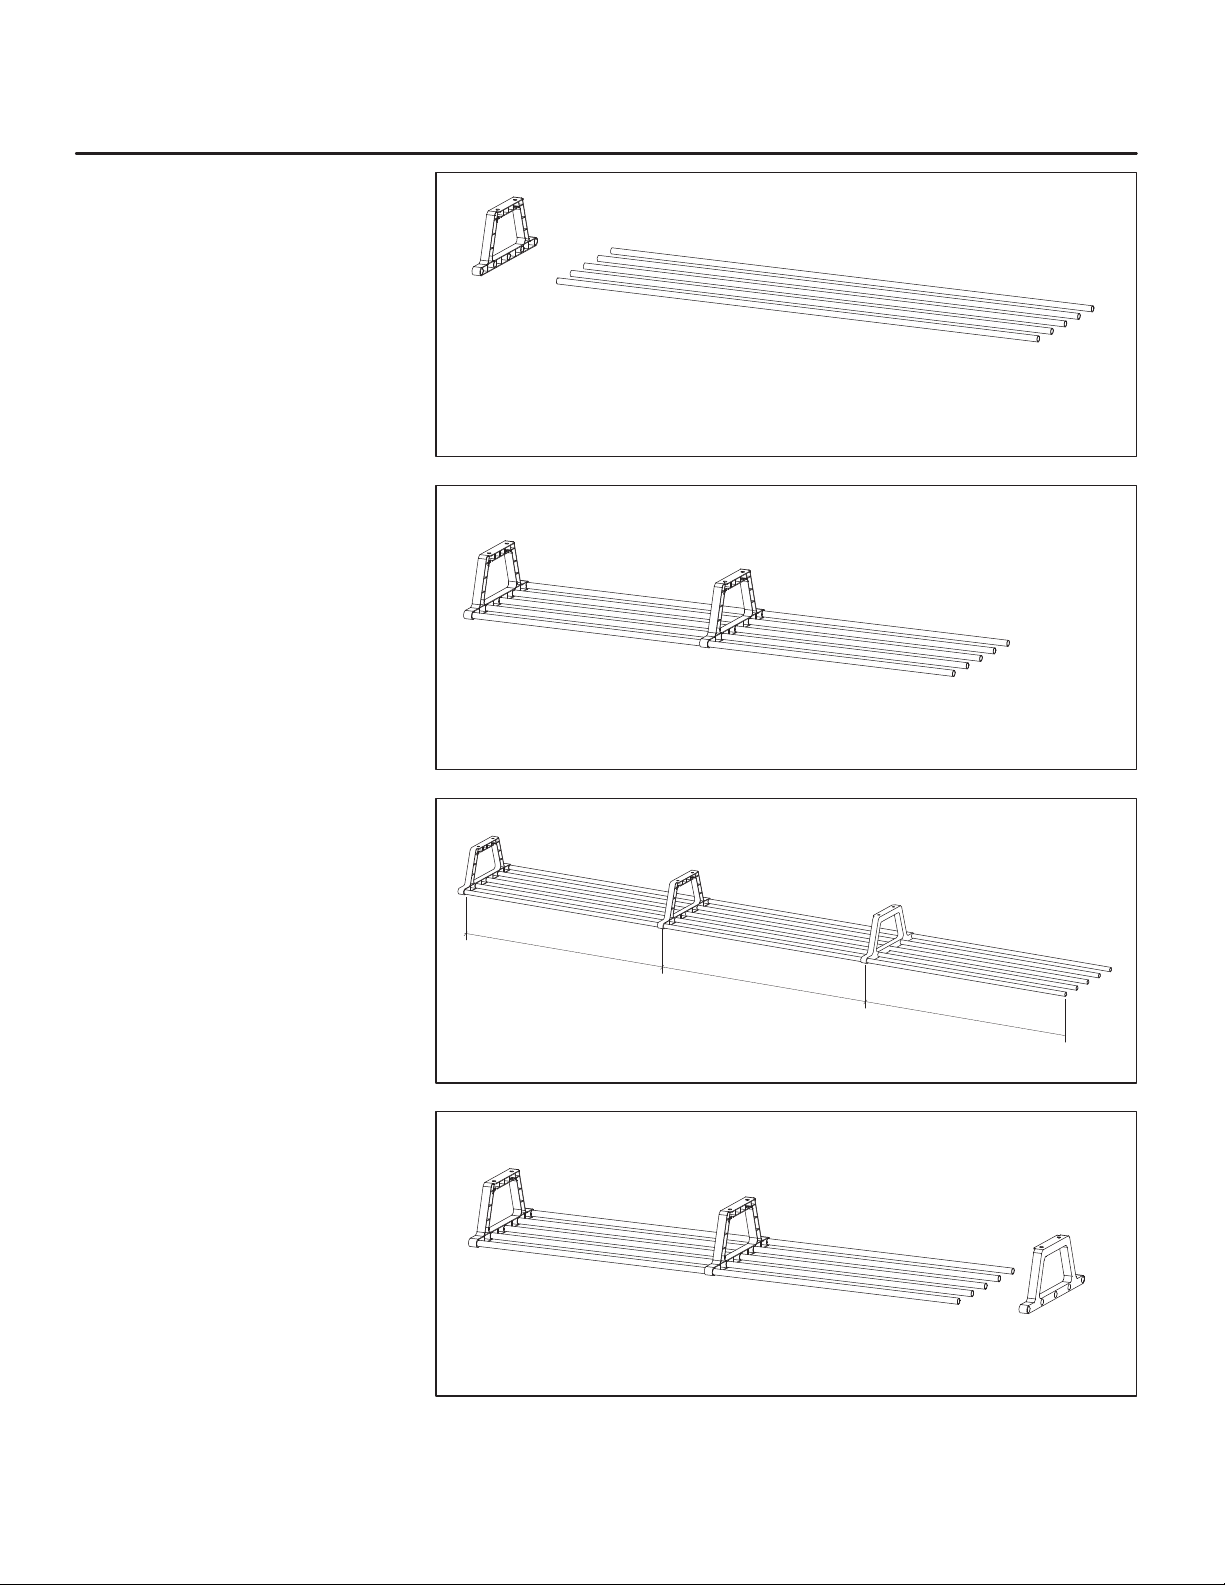
mobile training desk - shelf assembly
NOTES:
> The middle shelf bracket is not
required for 42-inch width
worksurfaces.
> The middle shelf bracket is a
pass-trough bracket.
1. Insert the metal rods into the end
shelf bracket (Figure 1).
2. Slide the middle shelf bracket into
the middle of the shelf (Figure 2).
For 72 inches wide shelf, insert
another middle shelf and space
them into three equal parts
(Figure 3).
3. Insert the end of the metal rods to
the other end shelf bracket
(Figure 4).
FIGURE 1
FIGURE 4
FIGURE 2
FIGURE 3
EQ.
EQ.
EQ.
JUNE 2011 one-touch table 9
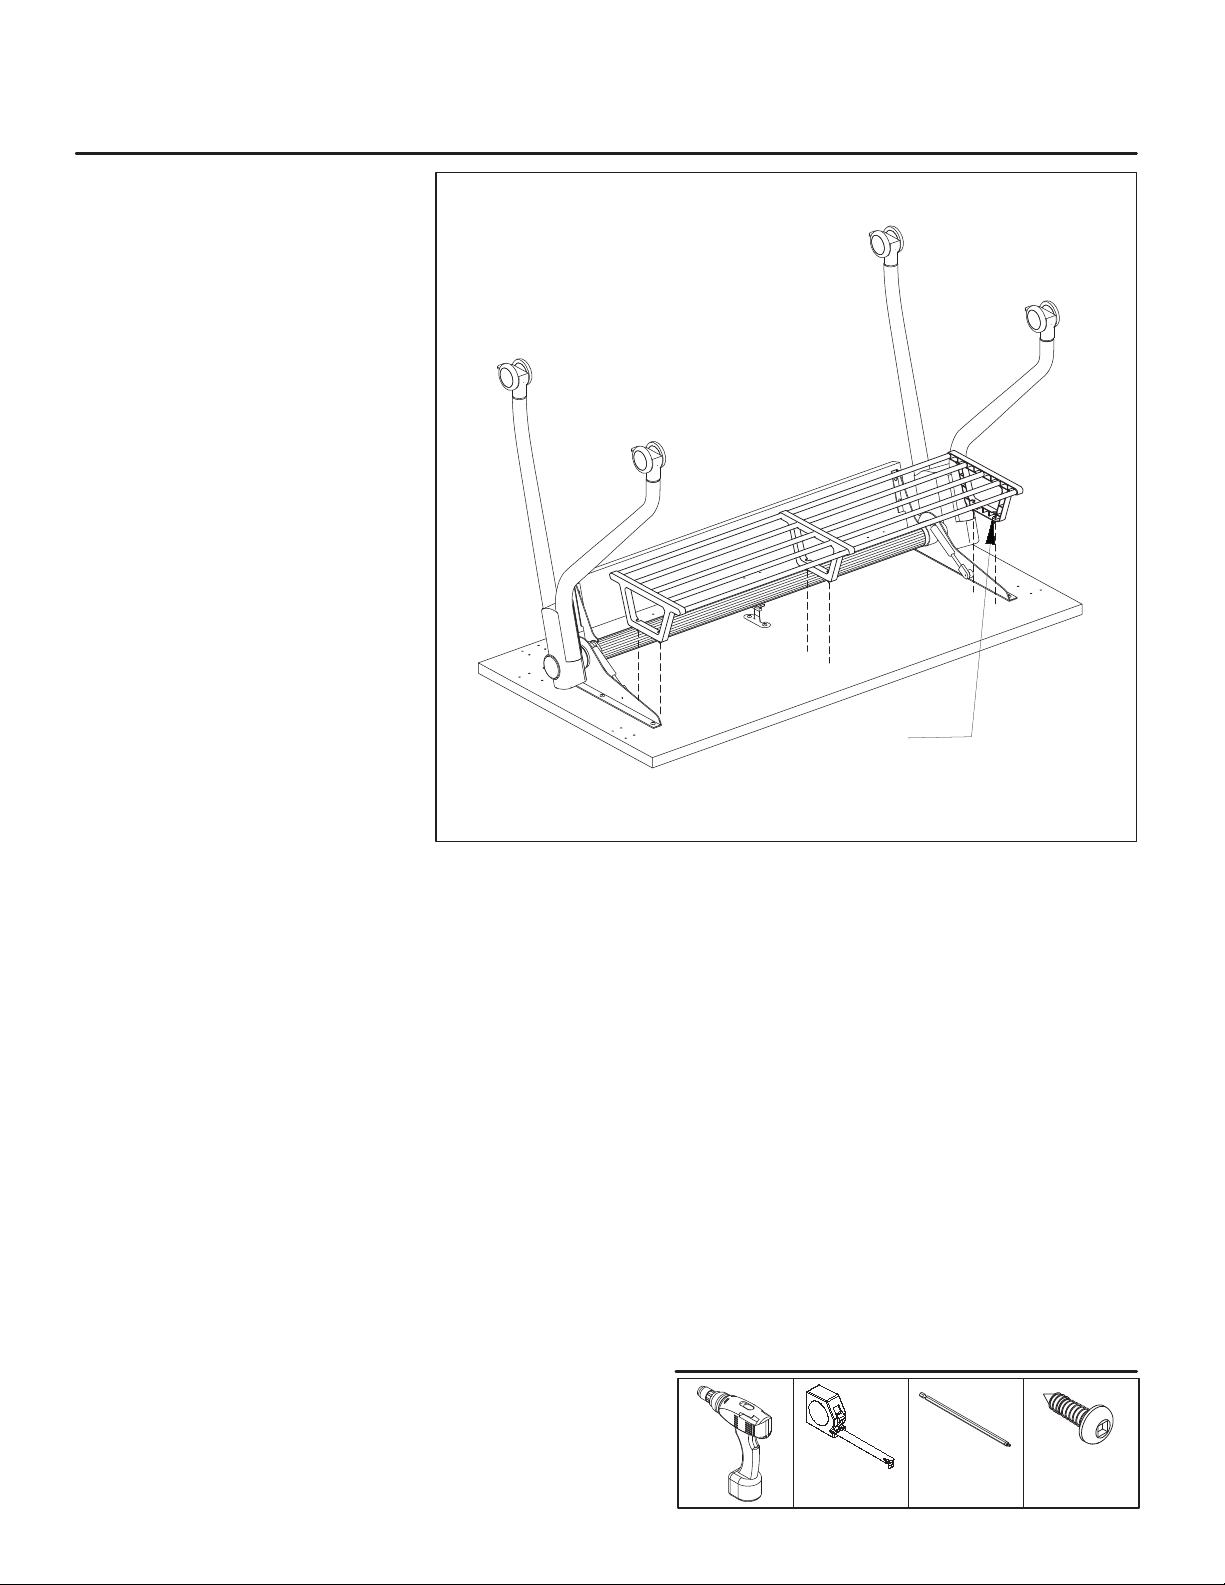
mobile training desk - shelf assembly (cont'd)
tools and hardware needed
drill
measuring
tape
#2 Robertson
long bit
4. Position the assembled shelf to
the worksurface assembly (in
between the arms of the
mechanism) while providing a
small allowance between the shelf
and the One-Touch mechanism.
5. Secure the ends of the shelf
assembly first with 1-inch oval
head screws with #2 Robertson
bit and then secure the middle
shelf bracket along the mid-line of
the worksurface (Figure 5).
FIGURE 5
1" oval head
screw
1-INCH OVAL
HEAD SCREW
WORKSURFACE # OF 1-INCH OVAL
LENGTH HEAD SCREWS
42" 4
48" 6
60" 6
72" 8
JUNE 2011 one-touch table 10
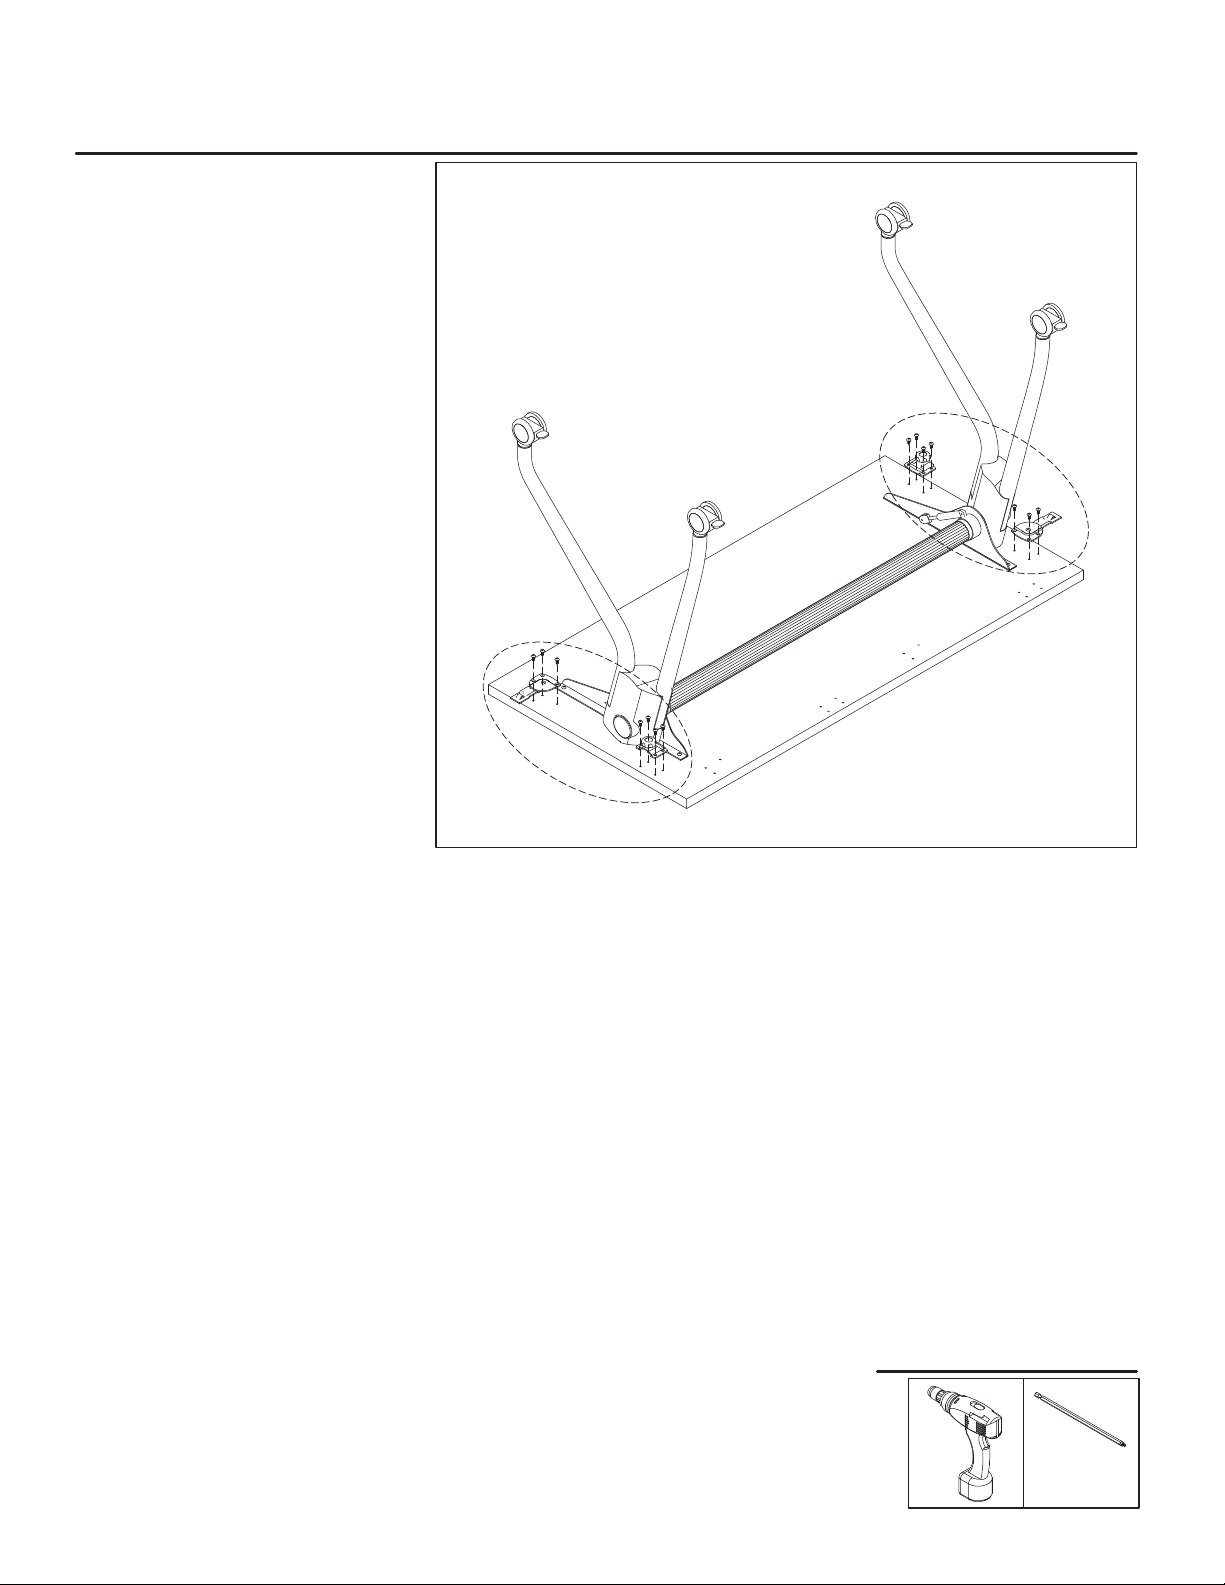
1. Inspect where the ganging
mechanisms are located; the
standard location is on the ends.
2. Remove the screw on the
ganging mechanisms using a #2
Robertson bit.
tools and hardware needed
ganging mechanism removal
drill #2 Robertson bit
FIGURE 1
JUNE 2011 one-touch table 11

1. Place the table top face down on a
smooth clean surface. Install the
ganging mechanisms to the front
of the desks with the provided
#10x11/16-inch oval head screws
using #2 Robertson bit. (Figure 1).
2. Connect the two worksurfaces by
inserting the ganging mechanism
parts in each other and tightening
the knob (Figure 2).
ganging mechanism for back-to-back connection
FIGURE 2
tools and hardware needed
drill #2 Robertson bit
14, #10; 11/16"
ovalhead screw
user edge
user edge
FIGURE 1
A
B
JUNE 2011 one-touch table 12

1. Place the table top face down on
a smooth clean surface. Install
the ganging mechanisms to the:
(A) front of the desk and to the
(B) side of the desk with the
provided #10x11/16-inch oval
head screws using #2 Robertson
bit (Figure 1).
2. Connect the two worksurfaces by
inserting the ganging mechanism
parts in each other and tightening
the knob (Figure 2).
ganging mechanism for "L" end connection
FIGURE 2
tools and hardware needed
drill #2 Robertson bit
14, #10; 11/16"
ovalhead screw
user edge
user edge
A
B
A
A
NOTES:
> To gang two worksurfaces;
both must have the same
width.
FIGURE 1
JUNE 2011 one-touch table 13

1. Place the table top face down on
a smooth clean surface. Install
the ganging mechanism on the
side of both desks with the
provided #10x11/16-inch oval
head screws using #2 Robertson
bit (Figure 1).
2. Connect two worksurfaces by
inserting the ganging mechanism
parts in each other and tightening
the knob (Figure 2).
FIGURE 1
tools and hardware needed
drill #2 Robertson bit
14, #10; 11/16"
ovalhead screw
ganging mechanism for straight connection
user edge
user edge
FIGURE 2
AB
A
B
JUNE 2011 one-touch table 14
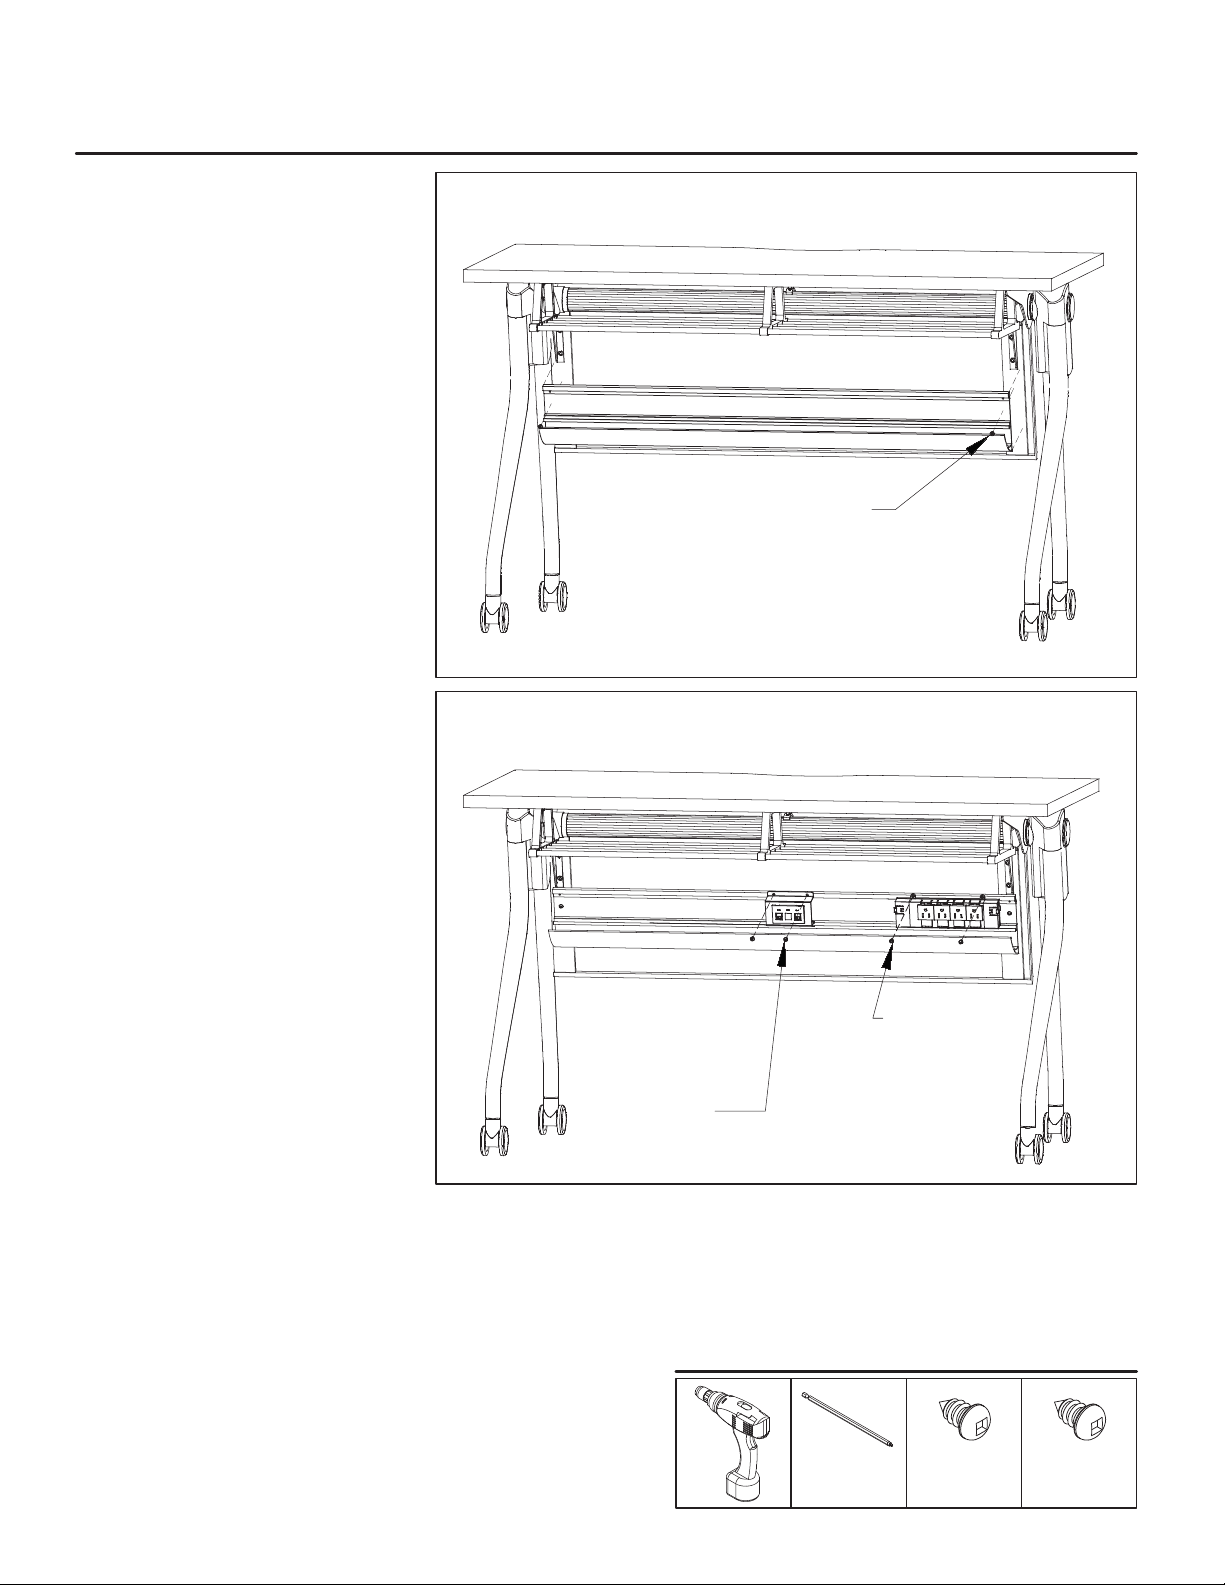
wire trough and power/data
attachment to metal modesty
tools & hardware needed
1. Secure the horizontal wire
management trough to the metal
modesty below the mechanism
brackets using two, #6, 3/8"
sheet metal screw with #2
Robertson bit (Figure 1).
2. Insert the bottom edge of the
trough mounted data box and
secure with two, #6, 3/8-inch
metal screws (Figure 2).
3. Mount the trough mounted
power box to the horizontal wire
management trough with 2, #6,
5/8-inch metal screws (Figure 2).
FIGURE 1
FIGURE 2
drill
#2 Robertson
long bit
2, #6; 5/8" sheet
metal screw
4, #6; 3/8"sheet
metal screw
#6x3/8" SHEET
METAL SCREW
#6x5/8" SHEET
METAL SCREW
#6x3/8" SHEET
METAL SCREW
JUNE 2011 one-touch table 15
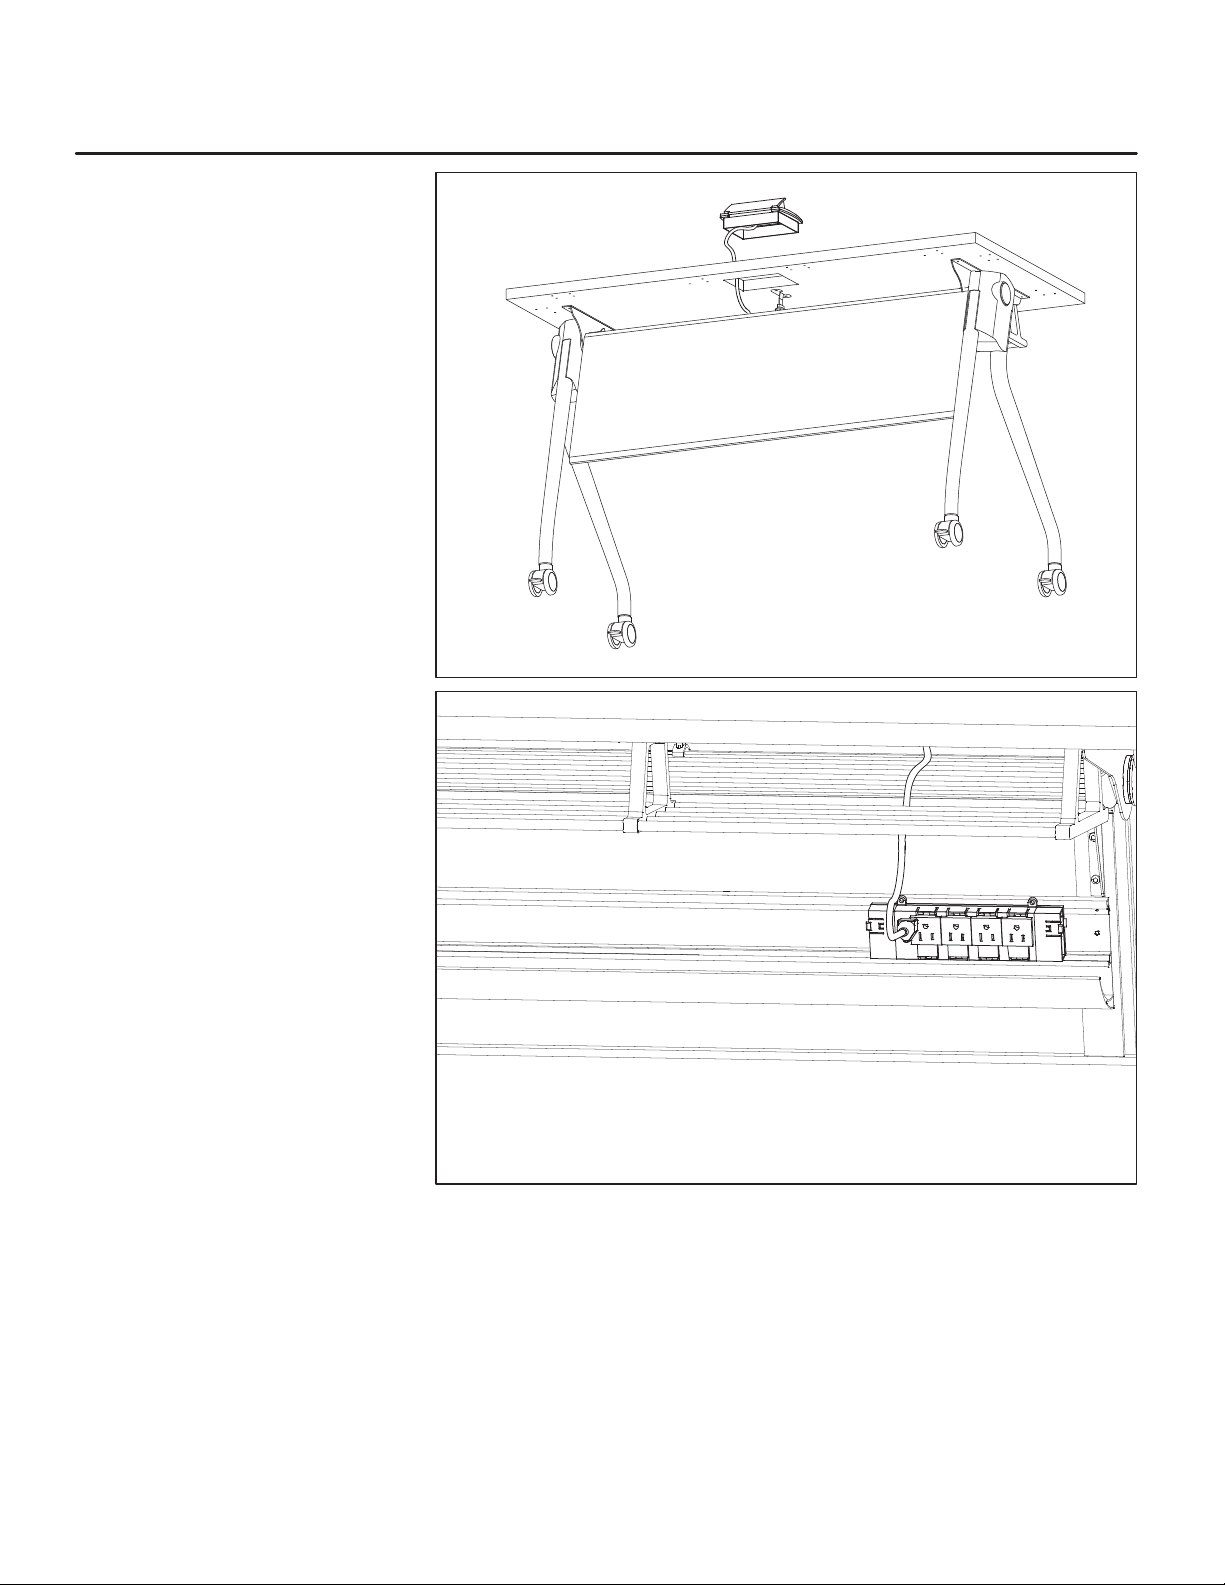
worksurface BYRNE grommet installation
1. Mount the worksurface BYRNE
grommet to the indicated hole
on the worksurface (Figure 1).
2. Run the power cord inside the
modesty and plug the power
cord to the power bar (Figure 2).
FIGURE 1
FIGURE 2
JUNE 2011 one-touch table 16

MARCH 2017SCENE 2
tayco.com
0317
Table of contents
Other tayco Indoor Furnishing manuals

tayco
tayco Halifax User manual

tayco
tayco Height Adjustable Tables User manual

tayco
tayco Kip User manual

tayco
tayco Halifax User manual

tayco
tayco Metro User manual

tayco
tayco Scene User manual

tayco
tayco Norris Series User manual

tayco
tayco The Shield Series User manual

tayco
tayco Hanna Series User manual

tayco
tayco Up User manual

Popular Indoor Furnishing manuals by other brands

Country Living
Country Living ACS00600 owner's manual

Alice's Home
Alice's Home NOAH IBSAJPUX2 manual

dobue MOVELARIA
dobue MOVELARIA 3000589 Assembly instruction

StyleWell
StyleWell TB8002BK Use and care guide

Mocka
Mocka Lewis Assembly instructions

Aqua Creek Products
Aqua Creek Products SPA LIFT ULTRA manual


