TDS HELIOS 6000 User manual

USER MANUAL
ComponentManual content
Unpacking
To install the battery
Operating InstructionsLED Lights
Battery
Run time
Depth Rating
LED Life
Material
Oxidation
Size
Weight
LED
Parameters
Brightness
(Lumen)
Turbo light
Wide Light:1x CXB2540 5000k Ra92 110°
Spot Light:1x 8°Spot Light LED
Red Light:6x LED CREE XB-D N4 620nm
Blue Light:8x LED CREE XB-D M2 465nm
6000Lm
4 x 18650 Li-ion battery pack
Wide Light:approx 55 min 、Spot Light: 300+ min
Turbo light:30min
100m / 330ft
Over 50000 hours
Aviation aluminum
Hard anodic oxidation
57 (D) x 128 (L) mm
485g land (Include the battery)
230g in water (Include the battery)
Wide Light:5000 Lm / Spot Light:300 Lm
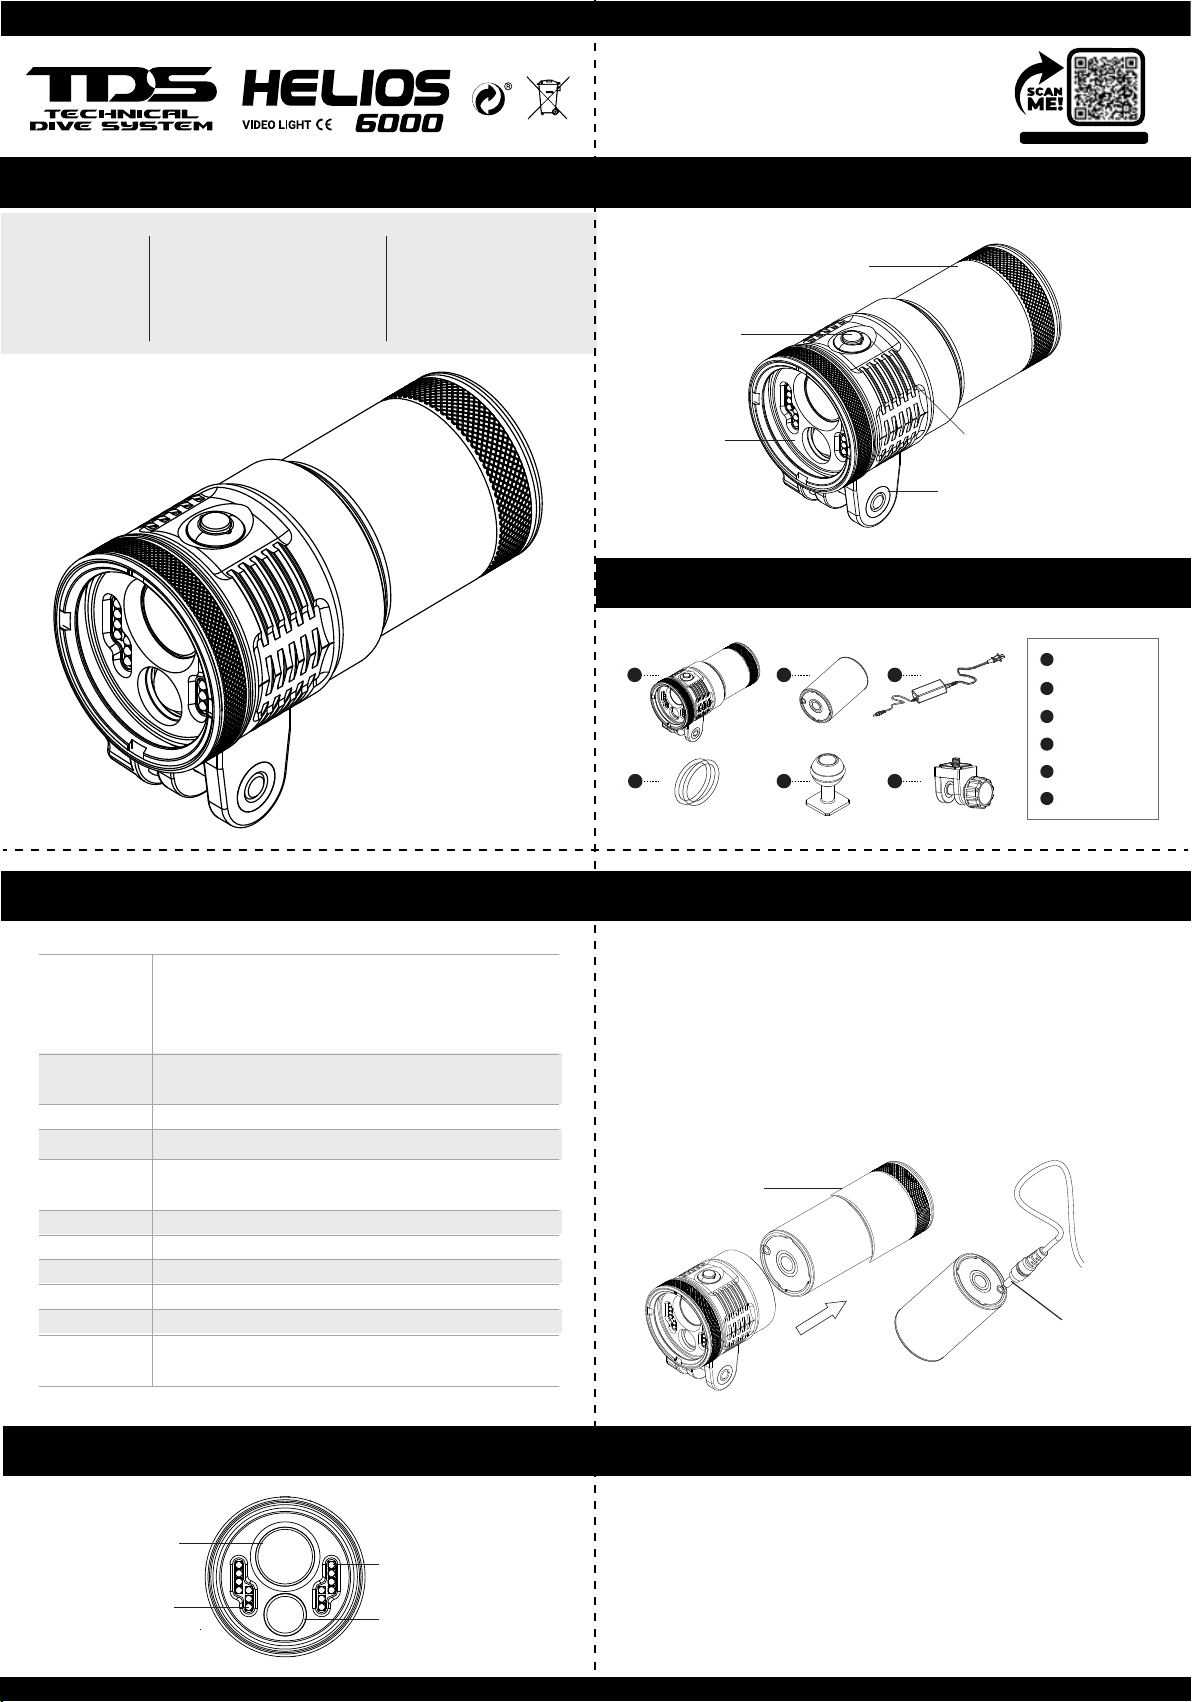
Spot Light
Blue Light (8pcs)
Red Light (6pcs)
Wide Light
Please read the manual carefully
before using the video light
Light Head
Tail Cap
Switch Button
Battery Level Indicator
YS Adapter
5 64
321
Ball mount
5
YS Adapter
6
O Ring
4
Charger
3
Li-ion battery
2
Video light
1
1.Turn the tail cap counter-clockwise to open.
2.Loading the Li-ion battery into the tail cap, make sure the
polarity battery must match the polarity of the diving light
contacts.
3.Turn the tail cap clockwise to reattach the tail to the head
of the video light.
Tail Cap
Turn ON:Pressing the Switch Button for 1 second.
(Start wide light:100% brightness)
Turn OFF:Pressing the Switch Button for 3 seconds.
( Switch from current mode to next mode before turning off )
Instructions
- Component
- Specifications
- Unpacking
How to use
- To install the battery
- Operating Instructions
- Battery Level Indicator
- Automatic Overheat Protection
- To charge the battery
Maintenance and Warranty
- General Maintenance
- Warning
- Warranty
- Troubles Shooting
Specifications
DC charger plug
UPDATE INSTRUCTIONS
www.tdsdive.com www.tdsdive.com
(On-State) Pressing the Switch Button for 1.5 second. (SOS- State) Pressing the Switch Button for less than 1 second.
(SOS- State) Pressing the Switch Button for 3 seconds.
Blue Light: Battery level is 100% - 80%;
Green Light: Battery level is 80% - 30%;
Red Light: Battery level is 30% - 5%;
Flash red Light: Battery level is < 5%.
Caution:When the battery level indicator is flash red.
1. Unable to switch the mode and adjust the brightness;
2. Only 20% brightness output;
3. Auto shutdown after 10 minutes .
When being used at a temperature higher than 50°C ,
the light will automatically reduce the brightness by
20% to reduce heat and protect the components.
1. Insert the plug of the DC charger into the battery (as shown
in the battery installation illustration).
2. Plug the charger into the power outlet. When the battery
starts to charge, the charger's indicator light will turn red.
3. When the battery is fully charged, the indicator light on the
charger will turn green.
4. Be sure to charge the first charge up to 100% capacity.
(On-State) Pressing the Switch Button for less than 1 second.
Switch mode:(Wide/Spot / Red / Blue)
Adjustment brightness:(Wide/Spot / Red / Blue)
Switch mode:(SOS / Flash explosion)
Turn OFF SOS:
(On-State) Pressing the Switch Button for less than 1 second.
(25%Wide light state) Pressing the Switch Button for
1.5 seconds turn to the turbo light mode.
(On-turbo light mode) Pressing the Switch Button for
1.5 seconds return to the 25%wide light state.
Gear adjustment:Colar light(Blue+Red)
Turbo light mode
There two-rings in the tail cap. Use silicone to keep the
O-rings well lubricated. It is important to lubricate the
o-rings if the flashlight has not been used in a long time or
if the o-ring is hard. If the O-ring is damaged, broken or
deformed it should be replaced with the spare.
Note:Do not use a sharp tool to remove the O-rings.
Failure to comply with these warning may result in damage
to the video light and will nullify the warranty.
General Maintenance
1.Do not open the tail cap when the video light is in the water.
2.Do not shine the light directly into your eyes or another
person’s eyes.
3.Do not touch the battery and charger with wet hands.
4.Use only the manufacturer’s battery and charger with this
system.
5.If the video light will not be used for a long period of time the
battery should be removed.
Warning
(OFF- State) Pressing the Switch Button for 3 seconds
Turn On SOS:
Wide Light
Colar light (blue+ red) Blue light
Spot light Red light
Color 1
Color 5
Color 2
Color 4
Color 3
75%100%
50%25%
Flash explosionSOS
Battery Level Indicator
Automatic Overheat Protection
Before returing the video light to the vendor, please try the
following to improve function.
Troubles Shooting
To Charge the battery
Warranty
Symptom Solution
The video light
does not work
Indicator light is
green when the
battery begins
charging
Internal Leakage
Water
Check the battery to make sure
that it is inserted in the correct
direction
Check the battery is charged
Check the tail cap is tight
Check the battery to make sure
that it is inserted into the charger
in the correct direction and that
the battery has good contact with
the charging terminal.
Check the O Rings in the tail
cap to make sure that they are
not broken and that there is no
debris which might
We offer a warranty against manufacturing defects for three
years from the date of purchase. All manufacturing defects
occurring within three years from the date of purchase will be
repaired free of charge. Proof of purchase is required for
warranty support.
The warranty does not cover failures or defects resulting from
misuse (e.g., modifications or damage), natural disasters,
problems with the charger or battery, including improper
battery installation.
MANUAL DE
INSTRUCCIONES
ComponentesContenido del manual
Desembalar
Instalación batería
Instrucciones de funcionamientoLuces LED
Batería
Tiempo
funcionamiento
Profundidad
Vida útil LED
Material
Oxidación
Tamaño
Peso
Parámetros
LED
Pontencia
(Lumen)
Luz turbo
Haz de luz:1x CXB2540 5000k Ra92 110°
Punto de luz:1x 8° Spot Light LED
Luz roja:6x LED CREE XB-D N4 620nm
Luz azul:8x LED CREE XB-D M2 465nm
6000 Lm
4 x 18650 Pack batería Li-ion
Haz de luz: aprox 55 min 、Spot Light: 300+ min
Turbo light:30min
100m / 330ft
Más de 50000 horas
Aluminio anodizado
Oxidación fuerte anodizado
57 (D) x 128 (L) mm
485g Fuera del agua (Incluída la batería)
230g En el agua (Incluída la batería)
Haz de luz:5000 Lm / Spot Light:300 Lm
Punto de luz
Luz azul (8pcs)
Luz roja (6pcs)
Haz de luz
Por favor, lea atentamente
el manual antes de utilizar el foco
Cabezal
de luz
Tapa trasera
Botón
interruptor
Indicador de nivel
de batería
YS Adaptador
5 64
321
Soporte bola
5
YS Adaptador
6
Juntas Tóricas
4
Cargador
3
Batería Li-ion
2
Foco vídeo
1
1. Gire la tapa trasera en sentido contrario a las agujas del
reloj para abrirla.
2. Cargue la batería de iones de litio en la tapa trasera,
asegúrese de que la polaridad de la batería debe coincidir
con la polaridad de los contactos de la luz de buceo.
3. Gire la tapa trasera en el sentido de las agujas del reloj
para volver a colocar la tapa en la cabeza de la luz de
vídeo.
Tapa trasera
Encender: Pulse el botón y manténgalo pulsado durante 1
segundo, la carga y el indicador se encenderá, a continuación,
pulse y suelte inmediatamente el botón.
Estará al 100% de potencia.
Apagar: Pulsar el botón y mantenerlo pulsado durante
más de 2 segundos.
Instrucciones
- Componentes
- Especificaciones
- Desembalaje
Modo de empleo
- Para instalar la batería
- Instrucciones de uso
- Protección térmica
- Indicador del nivel de la batería
- Para cargar la batería
Mantenimiento y garantía
- Mantenimiento general
- Advertencias
- Garantía
- Solución de problemas
Especificaciones
Conexión DC Cargador
ACTUALIZACIONES MANUAL
www.tdsdive.com www.tdsdive.com

(Estado encendido) Presiona el interruptor durante 1,5 segundos. (Estado SOS) Presionando el botón del interruptor durante
menos de 1 segundo.
(Estado ENCENDIDO) Presionando el botón interruptor
durante 3 segundos.
Luz azul: El nivel de la batería es del 100% al 80%;
Luz verde: El nivel de la batería es del 80% - 30%;
Luz roja: El nivel de la batería es del 30% al 5%;
Luz roja intermitente: El nivel de la batería es < 5%.
Precaución:Cuando el indicador de nivel de batería
parpadea en rojo.
1. No se puede cambiar el modo ni ajustar la potencia;
2. Sólo hay un 20% de salida de potencia;
3. Apagado automático después de 10 minutos
Cuando se utiliza a una temperatura superior a 50°C , la
luz se reducirá automáticamente y la potencia bajará al
20% para reducir el calor y proteger los componentes.
1. Inserte el enchufe del cargador de DC en la batería (como se
muestra en la ilustración de instalación batería).
2. Enchufe el cargador en la toma de corriente. Cuando la
batería empiece a cargarse, el indicador luminoso del cargador
se pondrá en rojo.
3. Cuando la batería esté completamente cargada, el indicador
luminoso del cargador se pondrá en verde.
4. Asegúrese de realizar la primera carga hasta al 100% de su
capacidad.
Ofrecemos una garantía contra defectos de fabricación de
tres años a partir de la fecha de compra. Todos los defectos
de fabricación que se produzcan en el plazo de tres años a
partir de la fecha de compra serán reparados sin coste alguno.
Se requiere un comprobante de compra para el soporte de la
garantía.
La garantía no cubre los fallos o defectos resultantes del mal
uso (por ejemplo, modificaciones o daños), desastres natu-
rales, problemas con el cargador o batería, incluida la insta-
lación incorrecta de la misma.
(Estado encendido) Presiona el interruptor menos de 1 segundo.
Modos de conmutación:
Ajuste de potencia
Cambiar de modo:(SOS / Explosión de flash)
(Estado encendido) Presiona el interruptor menos de 1 segundo.
(25%Estado Haz de luz) Pulsando el botón del interruptor
durante 1,5 segundos se pasa al modo de luz turbo.
(Modo de luz turbo) Al pulsar el botón del interruptor durante
1,5 segundos vuelve al estado de haz de luz del 25%.
Ajustes de Color: (Azul + rojo)
Modo luz turbo
Hay dos juntas en la tapa trasera. Utilice grasa de silicona
para mantener las juntas tóricas bien lubricadas. Es impor-
tante lubricar las juntas tóricas si el foco no se ha utilizado en
mucho tiempo o si la junta tórica está dura. Si la junta tórica
está dañada, rota o deformada debe ser sustituida por la de
repuesto.
Nota: No utilice una herramienta afilada para retirar las
juntas tóricas.
El incumplimiento de estas advertencias puede provocar
daños en la luz de vídeo y anulará la garantía.
Mantenimiento general
1.No abra la tapa de trasera cuando la luz de vídeo esté en el
agua.
2.No dirija la luz directamente a sus ojos o a los de otra persona.
3.No toque la batería ni el cargador con las manos mojadas.
4.Utilice sólo la batería y cargador originales.
5.Si el foco no se va a utilizar durante un largo período de
tiempo, la batería debe ser retirada y almacenada con su
carga completa.
Advertencia
(Estado APAGADO) Presionando el botón del interruptor
durante 3 segundos.
Encendido SOS:
Haz de luz
Color de luz (azul + rojo) Luz azul
Punto de luz Luz roja
Color 1
Color 5
Color 2
Color 4
Color 3
75%100%
50%25%
Flash explosionSOS
Indicador de nivel de batería
Protección automática contra el sobrecalentamiento
Antes de devolver el foco de vídeo al proveedor, por favor,
verifique lo siguiente..
Solución de problemas
Carga de la batería
Garantía
Problema Solución
La luz de vídeo
no funciona.
La luz indicadora
es verde cuando
la batería
comienza a cargar.
Entrada interna
de agua
Compruebe que la batería está insertada en la
dirección correcta
Compruebe que la batería está cargada
Compruebe que la tapa trasera está apretada
Compruebe que la batería está insertada en el
cargador en la dirección correcta y que la
batería tiene buen contacto con el terminal de
carga.
Compruebe las juntas tóricas de la tapa
trasera para asegurarse de que no están rotos
y de que no hay residuos en ellos.
Apagado SOS:
This manual suits for next models
1
Table of contents
Languages:


