Teac SB21204WD User manual

95cm 2.1CH BT Soundbar with Wired Soundbar
SB21204WD
Call us between Monday to Friday - 8.30AM to 5PM
AEST
*Please have your purchase receipt and the product's
serial number ready
For other enquiries and support please visit
www.teac.com.au
TEAC Warranty Service Hotline
1300 553 315
USER MANUAL

IMPORTANT SAFETY INSTRUCTIONS
USB POWER CABLE
To recharge and power on the soundbar, use the provided USB cable and then connect to a
power outlet or USB slot of a computer.
• Heed all warnings and follow all instrucons.
• Do not use this soundbar near water.
• Clean the unit with a dry cloth.
• Do not block any venlaon openings. Install in accordance with the
manufacturer’s instrucons.
• Do not install near any heat sources such as radiators, heat registers,
stoves, or other devices (including ampliers) that produce heat.
• Use only aachments / accessories specied by the manufacturer.
• To reduce the risk of electric shock, do not remove cover (or back).
There are no user serviceable parts inside.
• Do not expose the soundbar to dripping or splashing liquids.
Do not place objects lled with liquids (such as vases) on the soundbar.
• Only use aachments/accessories speciedby the manufacturer.
• Unplug this soundbar during light storms or when unused for long periods of me.
• Refer all servicing to qualied service personnel. Servicing is required when the
soundbar has been damaged in a way, such as power-supply cord or plug is damaged,
liquid has been spilled or objects have fallen onto the soundbar, the soundbar has
been exposed to the rain or moisture, does not operate normally or has been dropped.
• No naked ame sources, such as lit candles, should be placed on the soundbar.
• Dispose of used electrical products and baeries safely according to your local
authority and regulaons.
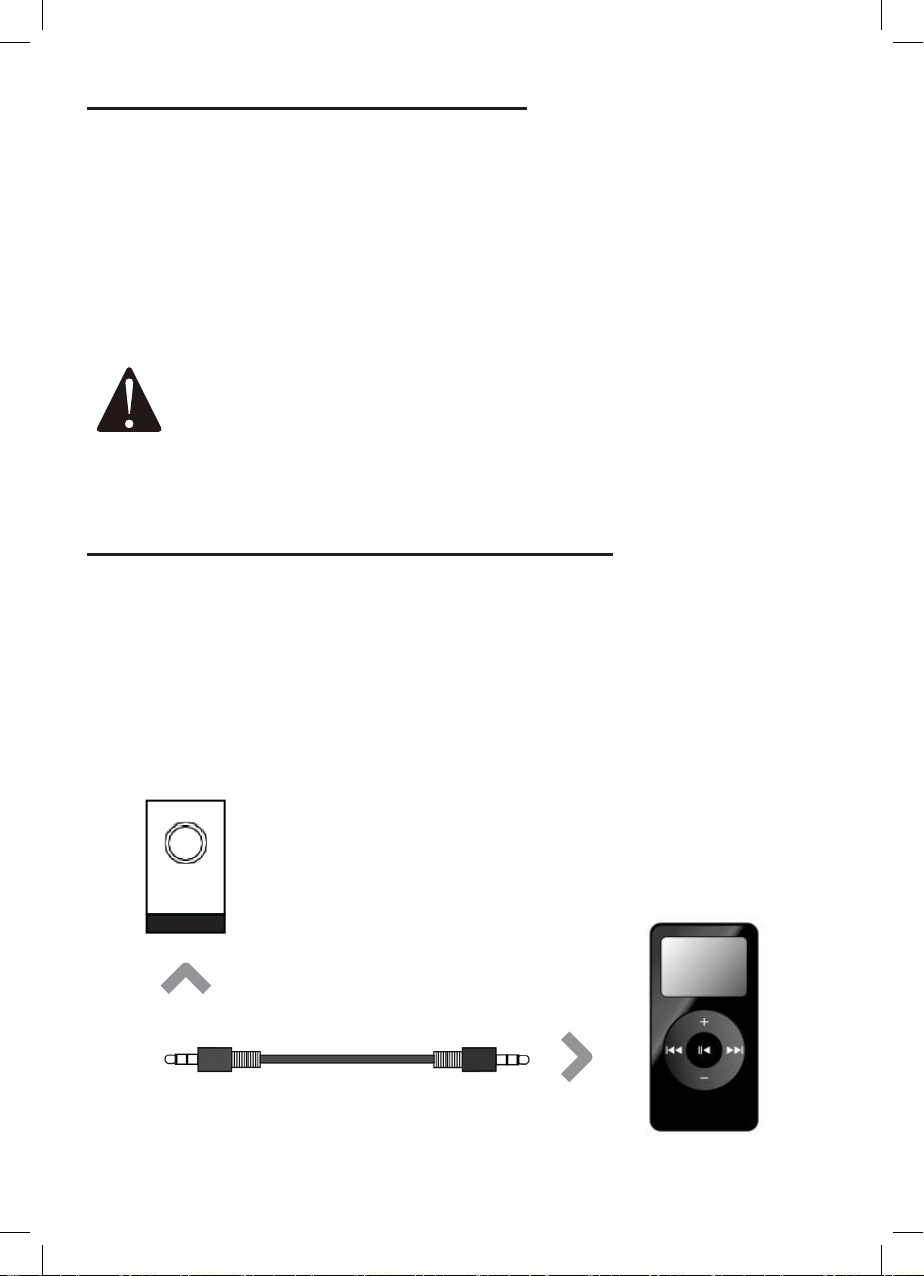
LINE IN
Connect any
audio device with
a 3.5mm plug
RECYCLING ELECTRICAL PRODUCTS
You should now recycle your waste electrical goods and
in doing so help the environment.
This symbol means an electrical product should
not be disposed of with normal household waste.
Please ensure it is taken to a suitable facility for
disposal when nished with.
RISK OF ELECTRIC SHOCKD O
NOTO PEN
!
CAUTION
!
IMPORTANT:Please reada ll instructions carefully
before usea nd keep forf uturer eference.

QUICK SYSTEM INSTALLATION GUIDE
Place the paper guide on the wall where
you want to hang the soundbar.
Locate the screw holes on the paper
guide and mark a point with a pencil.
It is advisable to leave no more than 5mm
between the head of the screw and the wall to
minimize the inclinaon angle of the soundbar
Make the holes with the corresponding
drill bit according to the type of wall.
For a beer sound experience, it is advisable
to place the soundbar at ear level height.
Verify with a level gauge that the inclinaon
angle of the soundbar is zero degrees.

PACKAGE CONTENTS
CONTROL AND FUNCTIONS
• SB21204WD Soundbar
• Remote Control
• Power Adaptor
• AUX In cable
• User manual
• 3.5mm to 3.5mm Line In cable
• Subwoofer
Side View/Control Buons
Back View
1. Power
2. Mode (short press)
Play/Pause (long press)
3. Volume +/Next
4. Volume - /Previous
5. Line In
6. USB Function
7. Line out
8. Subwoofer Output
9. AUX Input
10. DC Power Input
11. FM Antenna

CONTROL AND FUNCTIONS
Remote Control
Using the Remote Control
The remote control sensor at the front of the soundbar is sensive to the remote control’s
commands up to a maximum of 8 metres away and within a maximum arc of 30 degrees.
Please note that the operang distance may vary depending on the brightness of the room.

SOUNDBAR HOOK SCHEMATIC
WIRED SUBWOOFER

USING THE AUX IN CABLE
1. Use the AUX Stereo Audio Cable (included) to connect to the TV’s stereo AUX
(L/R) audio output socket.
2. Connect the audio output cable of the soundbar via the ‘AUX’ input sockets
of the unit. Then press MODE on the remote control or press the Mode
buon on the unit to scroll to the AUX IN funcon.
3. Turn on your television.
AUX stereo audio cable
Rear view of the unit
Troubleshoong
If you are not receiving a picture or encountering interference, please ensure that the AUX
cable is being connected to ‘output’ AUX port on your TV set. This will ensure that the sound is
being exported correctly. If your TV does not have ‘output’ AUX port, please use an alternave
connecon method.
AUX

USING THE MP3 LINK CONNECTION (LINE IN)
1. Plug one end of a 3.5mm to 3.5mm Line In cable (included) into the Line In port on the unit.
Before use, disconnect any cables connected to the Stereo RCA Inputs.
2. Plug the other end of the cable into the audio output/headphone output on an MP3 player or
other audio source.
3. Press the Power buon on the soundbar or POWER buon directly on the remote control
to switch on the unit. Press the Mode buon repeatedly on the soundbar or press the MODE
buon on remote control repeatedly to enter LINE in mode. Audio played through the
connected device will now be heard through the speakers.
3.5mm to 3.5mm
Line In cable
Audio device
LINE -IN
CONNECTING TO THE MAINS SUPPLY
1. Ensure that the power supply voltage is in the voltage of 100V~240V. Connecng the unit to
any other power source may cause damage to the unit.
2. Unwind the mains cable to its full length.
3. Connect the mains plug to a mains socket.
4. Make sure the mains plug is fully inserted into the mains socket.
5. Connect the adapter to the unit via the DC input Socket. (DC-18V-IN)
Ensure all audio connecons of the unit are connected before connecng
to the mains power socket.
Unplug the power cord from the outlet when the unit is use for an
extended period of me.

CONNECTING THE SOUNDBAR AND SUBWOOFER
USING THE BLUETOOTH FUNCTION
Pairing a Bluetooth Device for the First Time
1. Press the POWER buon on the unit or the POWER buon on the remote control to switch on
the unit.
2. Select and press the MODE buon repeatedly on the remote control unl in Bluetooth mode
or press the Mode buon repeatedly on the sound bar to enter Bluetooth mode.
3. Using the nave controls on your Bluetooth device, select the “SB21204WD” in your Bluetooth
sengs to pair.
4. When successfully paired and connected, a beep will issue from the unit. Aer inial pairing,
the unit will stay paired unless unpaired manually by the user.
5. If your device becomes unpaired or is unable to connect, repeat the above steps.
1. Connect the subwoofer cable to the soundbar.
2. Please ensure that your soundbar is being mains powered and switched ‘ON’ for inial set up.
To do this, press the Power buon on the unit or the POWER buon on the remote control .
3. If you are having connecvity issues, try moving the subwoofer closer to the soundbar.

PLAYING AUDIO WIRELESSLY
USING THE USB FUNCTION
USING THE FM FUNCTION
1. Follow the instrucons for pairing a Bluetooth device.
2. Use the nave controls on the connected Bluetooth Device to select a track.
3. Long Press the ‘Play/Pause’ buon to Play or Pause the track.
4. Skip Forwards/Backwards to a selected track using the remote control.
5. Audio played through the connected Bluetooth device will now be heard through the speakers.
1. Insert USB to Play Music Automacally.
2. Select and press the MODE buon repeatedly on the remote control unl in USB mode, or press
the Mode buon repeatedly on the soundbar to enter USB mode.
3. Long Press the ‘Play/Pause’ buon to Play or Pause the track.
4. Skip Forwards/Backwards to a selected track using the remote control.
5. Audio played through the connected Bluetooth device will now be heard through the speakers.
1. Select and press the MODE buon repeatedly on the remote control, or press the Mode
buon on the soundbar repeatedly to enter FM mode.
2. Ensure that the wire aerial on the back panel of the soundbar is extended.
3. When in FM mode, press and hold the ‘Play/Pause’buon on the remote or on the soundbar
to begin searching for available FM staons.
4. Aer the search is complete, the soundbar will save the staons with good signal. To scroll
through these saved staons, press the ‘Previous/Next’ buons on the remote control .
PLEASE NOTE:
If you are having trouble with receiving staons, complete another auto-scan and adjust the
aerial as necessary.

TROUBLESHOOTING
If you are experiencing any issues with your device please refer to the below table for a soluon.
ISSUE POSSIBLE CAUSE/SOLUTION
No power/funcon
Check whether the power is switched on or o at the
wall.
Check whether the power adaptor is
properly connected to the power outlet.
No sound
Check whether cables are properly installed. If they
are, please try an alternave cable to connect to your
TV if possible.
Check unit is out of standby mode.
No sound from Bluetooth connecon Forget the soundbar from your device and reconnect.
Funcon disturbance
Switch o and unplug the unit. Leave it for
2 minutes and switch it on again.
If a parcular mode is causing problems,
please try an alternave connecon to
your TV such as Opcal or Bluetooth.
Remote control does not work properly
Check whether the baery has run out or not. Replace
with a new one if necessary.
Check whether there is an obstacle in
front of the remote sensor.
Power Supply DC 18V / 1.3A
RMS Power 44W (Soundbar 2 x 12W + Subwoofer 20W)
Speaker Output Power 90W (Soundbar + Subwoofer)
Speaker Size & Number (Soundbar) 2” Full range speaker x 4
Speaker Size (Wired Subwoofer) 5”
Bluetooth Version 5.0
Bluetooth Distance 10M
Frequency Response 70HZ - 18KHZ
Working environment -10~ +55C
Audio Input AUX In / Line-in / USB / Bluetooth
Soundbar Dimensions 95 x 5.5 x 6.5cm
Wired Subwoofer Dimensions 13.5 x 25 x 35cm
Net Weight (Soundbar + Subwoofer) 4.45kg
PRODUCT SPECIFICATIONS

TERMS AND CONDITIONS
Our goods come with guarantees that cannot be excluded under the Australian Consumer Law.
You are entled to a replacement or refund for a major failure and for compensaon for any
other reasonably foreseeable loss or damage. You are also entled to have the goods repaired or
replaced if the goods fail to be of acceptable quality and the failure does not amount to a major
failure.
1. TEAC warrants that this product is free from defects in material and workmanship under
normal domesc use with reasonable care and skill. Maintenance and cleaning (i.e. laser head) is
not covered by this warranty. The TEAC warranty only applies to TEAC products purchased NEW
from a TEAC Authorised Retailer in Australia. This warranty only applies to the original purchaser
and cannot be transferred.
2. The benets to the consumer given by this Warranty are in addion to other rights and
remedies of the consumer under a law in relaon to goods or services to which the warranty
relates, being the Australian Consumer Law.
3. Refund or replacement via your TEAC Authorised Retailer is available for a period of 14 days
aer purchase for goods that have been inspected and determined to have a major failure.
Refund and exchange is not applicable for change of mind.
4. Subject to the terms herein, this warranty eecvely covers TEAC products under the 12
Month Replacement Warranty Scheme, 12 months from the date of original purchase.
5. The warranty is void and warranty claims may be refused, subject to the Australian Consumer
Law, if:
a) The product was not transported, installed, operated or maintained according to manufacturer
instrucon, or
b) The product was abused, damaged, tampered, altered or repaired by any unauthorised
persons,
or
c) Product failure is due to accidents during use, installaon or transit, power surges, use of
defecve or incompable external devices, exposure to abnormal condions such as excessive
temperatures or humidity, or entry of liquids, objects or creatures into the product, cockroach
infestaons, or
d) The customer is unable to provide proof of purchase of the product for vericaon, or
e) The serial number of the product is missing or has been tampered with.
6. No one is authorised to assume any liability on behalf of TEAC or impose any obligaon on it,
in connecon with the sale of any equipment other than as stated in this warranty and outlined
above.
7. TEAC and/or its Authorised Service Centres reserve the right to inspect and verify whether the
product is exhibing a major failure as claimed by customers/retailers.
Table of contents
Other Teac Speakers System manuals