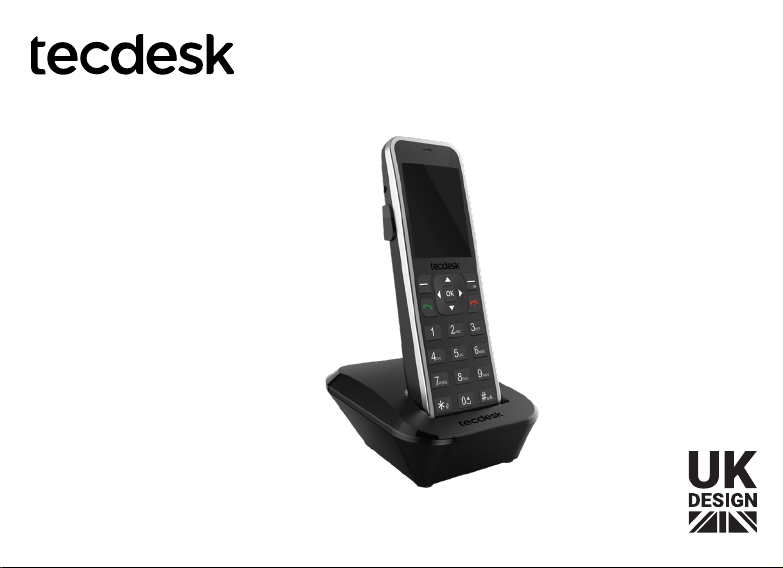
Tecdesk 5 User manual
User Manual
English
| Model 5
SIM Desk Phone
2
INTRODUCTION
In order to make best use of your Tecdesk Model 5 SIM desk phone, please read this manual carefully. This phone is designed for use with a
valid SIM card from your mobile network operator.
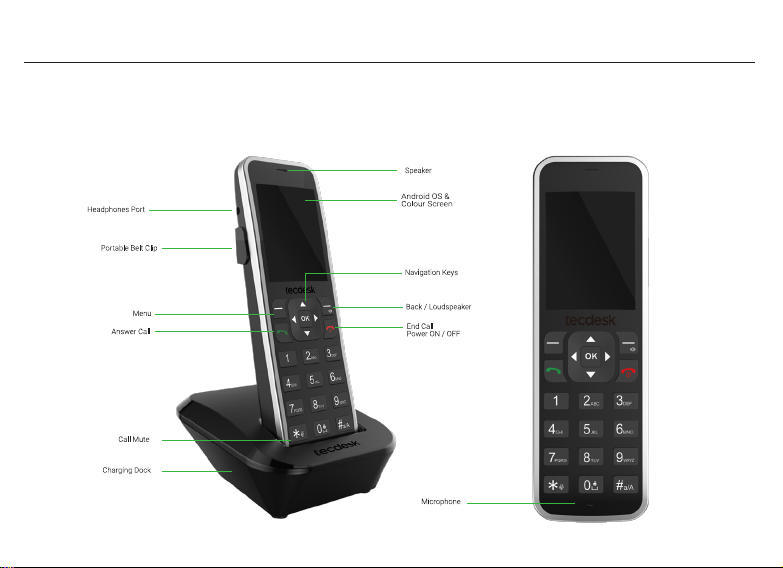
Illustration Overview
User Manual | English

3
IMPORTANT NOTE
1. Oninstallingyourphoneforthersttime,chargethebatterybetween12and16hours.Subsequently,ifthephoneisleftinthecharging
cradle over night, it will be enough to keep the battery charged.
2. Toextendthebatterylifeofyourphone,itisrecommendednottoleavethephonechargingonthecradleforlongperiodsoftime(i.e.
holidays, days-off etc)
3. If the phone is not going to be used for a long period of time, remove the battery.
4. Ifthebatteryhasnotbeenusedforalongperiodoftimeoritiscompletelyexhausted,itislikelythatthephonescreenwillnotturnon.
Only once the battery has been charging for a while will you be able to switch the phone back on to use it.
5. Thereisanincreasedriskofexplosionifbatteryisreplacedbyanincorrectorunauthorisedbattery.Disposeoftheusedbatteries
according to the instructions.
Installation and Commissioning
These instructions are intended for the safe and effective use of your phone. Please follow these guidelines as failure to do so might cause
the product to malfunction, or even a potential hazard to your health.
- Always read the safety instructions carefully.
- Keep this user manual for future reference.
- Keep the phone away from humidity.
- Placethephoneonareliableatsurfacebeforesettingitup.
- Ifanyofthefollowingsituationsarise,havetheunitcheckedbyanapprovedservicetechnician:exposuretomoisture,droppedand
damaged, obvious signs of breakage.
- Donotplacethephoneinadamproomatadistanceoflessthan1.5mfromawatersource.Keepthedeviceawayfromwaterorany
formofliquid.
- Donotusethedeviceinenvironmentswheretherearerisksofexplosions.
- Maintain the phone in an environmentally-friendly manner.

4
INSTALLATION
1. Remove the back cover from the phone by sliding it down from the grip.
2. Ifthebatteryisalreadyinstalled,removethebatteryfromthephone.
3. Insert the SIM card gently into it’s respective slot. Make sure the gold contact on the SIM card is facing down and the bevelled edge is
aligned with the corresponding edge of the SIM card slot. This also applies if you would like to install a memory card.
4. Insert the battery making sure you match the battery connectors together. Replace the back cover onto the phone and slide up.
5. Turn the phone ON by pressing the [ ] ON/OFF key on your phone for 3 seconds.
6. Ifyouareaskedtoentera1PIN, please contact your mobile network operator or company administrator. This PIN should be supplied
with your SIM pack.
¹PINandPUK:Thepersonalidenticationnumber(PIN)protectsyourSIMcardfromunauthoriseduse.Thepinunblockingkey(PUK)numbercanunlockaPINlock.
The PIN and PUK are supplied with the SIM card. For more details contact your mobile network provider.

5
CHARGING YOUR PHONE
1. Connectthechargingadaptorprovidedtoapowersocketinyouroceorhome.
2. ConnecttheTypeCchargingconnectortothechargingdock.
3. Place the phone into the cradle to charge the battery.
4. When the battery is fully charged, you will notice a full battery icon in the top right of the screen.

6
Charging Indicator
When your phone is charging in the cradle, you'll see the movement on the battery icon [ ] displayed at the screen bar. When your phone
is fully charged, the movement will stop and you'll see the battery level on icon to be full [ ].
Low Battery Warning
Whenyourbatteryislow,youwillseea'lowbattery'noticationdisplayedonthescreenofyourphone.Onceyou'renotied,youmustplace
the phone in to the charging cradle or connect the power adapter to charge the battery.
Locking / Unlocking your phone
There are three ways to lock and unlock your phone including a) * Key b) PIN c) Password.
To unlock the phone via * Key, press [ * ] key and [ # ] key on your keypad. To lock the phone, press [ ] once.
Head over to Settings > Security for the details on how to set up password or PIN lock code.
BASIC PHONE FUNCTIONS
Calls
You can make calls in two different ways.
Call via Keypad
EnterthephonenumberusingthenumerickeysonthephoneandthenpresstheDialkey[ ] .
To delete any numbers entered, press [ ] on the right located underneath the ‘clear’ title on the screen.
To end any call, press [ ] .
Call via Contacts
PresstheDialkey[ ] and either select a recently dialled number or ‘Contacts’.
7
If selecting a recently dialled number, use the navigation keys [ ] to select the number and press the button in the middle of the navigation
keysorpresstheDialkey[ ] to make the call.
If selecting ‘Contacts’, use the navigation keys [ ] to select your contact and press the button in the middle of the navigation keys or press
theDialkey[ ] to make the call.
Answering and Ending Calls
To answer an incoming call, press [ ].Toendanexistingcall,press[ ].
MAIN MENU
To enter the main menu, press [ ] button on the left or the center button the navigation key [ ].
Contacts
With this menu you can access your contact list. To access contacts, press [ ] button on the left.
Usingthenavigationkeys(pressleftorrightkeyasnecessary),goto'Contacts'andselect‘OK’.Toselect'OK',youcaneitherpress[ ]
or the button in the center of the navigation keys [ ].
Once you select 'Contacts' from the main menu, you can view all contacts by using the navigation keys [ ]. You can search for a saved
contact name or a number on your contact list by navigating to the search button on your screen. Type a name or phone number on the
search bar [ ] to view the contact details or to make a call.
Add Contact: To add a new contact, go to Contacts > Options > Select Add contact. You can choose either to save contacts to the Phone or
SIMcard.Usingthekeypad,enterthename,phonenumberandotherdetails.Onceallthenecessaryeldsarelled,press[ ] button on
the left to select Options > Save.
Contacts to display: Using this option you'll get a choice to display the contacts saved on SIM only, on Phone only or all the contacts on your
contact list. Go to Contacts > Options > Contacts to display > Select > choose 'All contacts' or 'Phone' or 'SIM card' using the navigation keys
> Select. The list will now display the contacts based on what you chose.

8
Import/Export: Using this option, you can manage your contact storage, copy them, move them from SIM card to the device or vice versa.
YoucanalsosharethecontactonyourlistviaBluetooth.GotoContacts>Options>Import/Export>select'Sharevisiblecontacts'using
navigationkeys>selectthecontact/contactsyouwanttoshare>Options>Done>select'Bluetooth'.
If you choose to send via Bluetooth, scan for devices and you'll see the list of available Bluetooth devices. Select the correct Bluetooth name
and your contact will be sent.
Batch Delete:Deleteasingle,multipleorallcontactsusingthisoption.
SIM Capacity: With this option, you can track the number of contacts saved on your SIM card.
History
To access History, go to the main menu by pressing [ ] button on the left > History > select by pressing the button in the middle of the
navigation keys [ ].
This function allows you to view your call history. You can view either view ‘all calls’ or dialled, missed and received calls separately. For an
individual view, use the navigation keys [ ] to move left or right.
You can delete an individual contact or number from the call history by selecting the contact name or number on your call log > select
'Detail'>Options>Removefromcalllog.
To clear all calls from the history, select options > Clear call logs > 'Choose' by pressing the button in the middle of the navigation keys [ ]
> Options > Select all > Options > Clear all the call log.
If you'd like to block a number or contact on your list from making calls, you can add them to black list. To do so go to call log . highlight the
name or the number using navigation keys > Options > Add to blacklist > choose by pressing the button in the middle of the navigation keys.
Messaging
This function allows you to view SMS messages that have been sent and received. To access Messaging, press [ ] icon on the left or the

9
center button on the navigation keys [ ].Usingthenavigationkeys(pressleftorrightkeyasnecessary),goto'Messaging'andselectby
pressing the button in the center of the navigation keys [ ].
New Message
Tocreateanewmessageforthersttime>select'New'bypressing the button in the middle of the navigation keys [ ]. If your message
boxalreadycontainssomemessages,pressoptions>slect'NewMessage'.Typethephonenumberorbrowsethecontactfromyour
contact list by selecting [ ]. After selecting the contact, select ‘Type message’ using the navigation button and type the message using
the keypad displayed on the screen. You can also insert a subject or an attachment. Select 'Options' by pressing the icon [ ] on the left.
Once you've completed typing the message, adding subject or an attachment > press ‘Send’.
Delete and Share the message
- To delete a thread, open the messaging app > highlight the message you want to delete > select 'options' by pressing the icon [ ] on
the left > select 'delete thread' using the [ ] on the left > press [ ]againtoselect/checkthebox>selectdeleteandconrm
'delete'. Please note that you cannot delete the locked messages until it is unlocked.
- Using the share option, you can share the message through SMS, Bluetooth or any other available applications like Gmail.
Received Messages: Youwillreceiveanoticationwhenyoureceiveanewmessage.Openthe'messaging'app>you'llsee the messages
received and sent on the same conversation window.
Message settings
Withthisfunctionyoucanadjustthemessagingfontsize,assignlimittostoringSMS&MMSperconversation,managenotication
settings, ringtone and all.
- To adjust the font size, go to the 'messaging' app > select 'options' using [ ] icon on the left > select 'settings' > select 'general' by
pressing the center button on the navigation keys > select 'Font size setting' > increase or decrease the font size using the navigation
keys > press 'OK'.
- Toassignthetextmessagelimit,gotothe'messaging'app>select'options'using[ ] icon on the left > select 'settings' > select
'general'pressingthecenterbuttononthenavigationkeys>select'Textmessagelimit'>Enterthenumber>pressOK.Youcanalsoset
limit to Multimedia message limit. You can also choose to delete the old messages as limits are reached.
- To delete the old messages, go to the 'messaging' app > select 'options' using [ ] icon on the left > select 'settings' > select

10
'general' pressing the center button on the navigation keys > select 'delete old messages' > you can check or uncheck the option using
the center button on the navigation keys.
- You can choose whether to include recipient's number while forwarding a SMS. Go to messaging > options > settings > general
> check or uncheck the option 'SMS forward number' using the center button on the navigation keys.
- Youcanchoosetobenotiedwhenreceivinganewmessage.Gotomessaging>options>settings>general>check
orunchecktheoption'notications'usingthecenterbuttononthenavigationkeys.
- Tochangethenoticationsound,gotomessaging>options>settings>generalsettings>sound>chooseonefromthelistofsounds
available on your device > press 'OK' using the navigation keys.
- YoucanrequestadeliveryreportforeachSMSyousend.Toenableordisabledeliveryreports,checkorunchecktheoptionusingthe
center button on the navigation keys.
- You can choose whether to store SMS on a SIM card or Phone. To enable or disable saving SMS on a SIM card, check or uncheck the
option using the center button on the navigation keys [ ]. Enabling this option means any new SMS received are saved on SIM card
by default.
- MultimediaMessaging(MMS)servicedependentonyourserviceprovider.Forfurtherdetails,contactyournetworkserviceprovider.
Settings
To access 'Settings', press [ ] icon on the left or the center button on the navigation keys [ ] which takes you to the Main Menu. Using
thenavigationkeys(pressleftorrightkeyasnecessary),select'Settings'bypressingthebuttoninthecenterofthenavigationkeys[ ].
This function allows you to manage overall settings of the device that includes Common Settings, Personal Settings and System Settings.
Common Settings
Wi-Fi: Go to settings > Wi-Fi > select by pressing the button in the center of the navigation keys [ ]. To turn the Wi-Fi function ON, press
the center button on the navigation keys [ ]. When the Wi-Fi is ON, you can see the list of available networks. Select the Network you want
to connect to by using the button in the center of the navigation keys [ ].EnterthePassword(ifthenetworkisprotectedbyapassword).

11
Using the navigation keys, select 'Connect'. You're now connected to the internet.
Bluetooth: Go to Settings > Bluetooth > select by pressing the button in the middle of the navigation keys [ ]. To turn the Bluetooth
function ON, press the center button on the navigation keys [ ]. When the Bluetooth is ON, you can see the list of available devices which
also means your device is visible to all other nearby Bluetooth devices. You can change your Bluetooth name by selecting Options >
Rename Phone > type the name > Rename.
If the device you're looking for isn't visible on the list of available devices, select 'Options' > Search for devices > 'Select' by pressing center
button on the navigation keys. To pair the Bluetooth, simply select the device from the list of available device. Once paired, you can begin
transferringles.
YoucandenetimeframeforhowlongyouwantyourBluetoothtobevisible.GotoSettings>Bluetooth>Options>Visibilitytimeout
> select the time of your choice using center button on the navigation keys. To turn 'OFF' the Bluetooth function, Settings > Bluetooth >
Options > Select.
Airplane Mode: To put your phone on the airplane mode, Go to settings > select ‘More’ using the navigation keys & press the center button
>pressthecenterbuttonagaintocheckthebox[ ]. You can now see the airplane icon [ ] on your screen bar. Enabling this feature
means you will no longer be able to receive calls and messages. To deactivatetheairplanemode,uncheckthebox.Youwillnolongersee
the icon of an airplane on the screen bar.
Mobile Network Settings
DataRoaming-Enablingthisoptionwillallowyoutoconnecttoyourdataserviceswhen1 roaming.Toenableroaming,gotoSettings>Data
roaming > check or uncheck the option using the center button on the navigation keys.
PreferredNetworkType-Youcanchoosethenetworktypefrom2Gonly,3G/2Gonlyor4G/3G/2Gmode.Toselectthepreferrednetwork
type, go to Settings > Preferred network type > select one of the options using the center button on the navigation keys. You can also enable
ordisabletheVoLTEcallavailability.
1 Roaming is a service that's dependent on your service provider. For further details, contact your network service provider.

12
Portable Wi-Fi hotspot: Portable Wi-Fi hotspot is a functionality that allows you to share the cellular data i.e. your device's internet
connection with the other devices, which is also known as tethering. To set up the Wi-Fi hotspot, create a name and a password that the
otherdevicesrequiretoconnecttoyourpersonalhotspot.
Audio Proles: Tochangetheaudioprole,gotosettings>select‘Audioproles’usingthenavigationkeys>selectoneofthedefaultaudio
modes>Select>Use.Alternatively,youcancreateaproleofyourown.
Tocreateanewprole,selectOptions>Addprolename>OK.Select'Edit'fromtheoptionstoadjustthevolume/selectcallringtones
fromyourphone/adjustkeynoticationssoundand/orthescreenlocksound.Todeletetheproleyoucreated,selecttheproleusing
[ ]>Options>Delete>selectusingcenterkeyonthenavigationkeys>OK.
Display: Toaccess'Display',gotosettings>select‘Display’.Thisfunctionallowsyoutomanagewallpapers,brightness&sleeptimeofyour
phone.
Brightness-Toadjustthebrightnessofyourscreen,gotosettings>select‘Display’>select'Brightness'usingthecenterbuttononthe
navigation keys > use the left or right key on the navigation keys to decrease or increase the brightness respectively.
Wallpaper-Tochangethewallpaper,gotosettings>select‘Display’>Wallpapers>ndthewallpaperofyourchoiceusingthenavigation
keys and select the one you prefer using center button on the navigation keys.
Sleep - You can activate your phone to go on sleep mode within a certain time of inactivity. Select the ‘Sleep’ option and choose the time
based on your preference > select using the center button on the navigation keys [ ].
Accessibility: To access Accessibility, go to settings > select ‘Accessibility’.
Texttospeech-Texttospeech(TTS)convertsthetextintospokenvoiceoutput.Toenablethisfunction,gotosettings>Accessibility>
select'Texttospeech'usingthecenterbuttononthenavigationkeys[ ]>selectthefunctionsyou'dliketoapplyTTSbycheckingthebox.
Data Usage: With this function, you can monitor and keep track of how much data is a particular app is using from both mobile data & Wi-Fi.
Call Settings: CallsettingsallowsyoutomanagefunctionslikeVoicemail,Fixeddialling,Callforwarding,Callbarring,Callrecording,Fade-in
ringer and other call settings.

13
General Settings
Fade-in ringer: When enabled, incoming call ringer volume will be turned up. To enable or disable this function, go to Settings > Call settings
>select'Generalsettings'>Fade-inringer>checkoruncheckthebox[ ].
Call recording: You can record the conversations using this function. To turn ON/OFF the automatic recording, go to Settings > Call settings
>select'Generalsettings'>Callrecording>checkoruncheckthebox[ ].
Personal
Security:ThisfunctionallowsyoutosetupaScreenlock,LockscreenmessageandSIMcardlock.
Screen Lock:ToaddaScreenlock,gotoSettings>Security>ScreenLock>andselect‘None’or‘*Key’or'PIN'or'Password'.
TolockyourphonebyPIN,gotoSettings>Security>ScreenLock>Chooseyour1PIN > type the number you want to keep as your PIN code
>usingthenavigationkeysselectContinue>toconrmtypethePINnumberagain>usingthenavigationkeysselectOK.
TolockyourphonebyPassword,gotoSettings>Security>ScreenLock>Chooseyour1Password > type the word you want to keep as
yourPassword>usingthenavigationkeysselectContinue>toconrmtypethepasswordagain>usingthenavigationkeysselectOK.
To remove the 'Screen lock', go to Settings > Security > Screen lock > select ‘None’.
Lock screen message: You can set up a message that displays on your screen while your phone is locked. Go to Settings > Security >
Lockscreenmessage>typethemessageusingkeypad>select'Save'usingthenavigationkeys.
Lock SIM card: To lock your SIM card, please go to Settings > Security > Set up SIM card lock > select 'lock SIM card' > input 4 - 8 numbers >
selectOK>toconrmtypethe2PIN number again > using the navigation keys select OK.
¹ Both the PIN and Password needs to be at least 4 characters. Password is case sensitive.
2You only have 3 PIN attempts. If you incorrectly enter your PIN 3 times, your SIM card will get blocked and you may need to reach out to your network provider to
unblock it.

14
Date & Time: Select between ‘Automatic date & time’ or ‘Automatic time zone’. If selecting ‘Automatic date & time’, this options relies on
the network or internet to display an accurate result. If selecting ‘Automatic time zone’, this option relies on the time zone you’re in to
displayanaccurateresult.ToaccessDateandtime,gotosettings>select'Automatictimezone'or'Automaticdate&time'usingthe
navigationkeys.Youcanalsochoosewhetherornotdisplaythetimeon24-hourformat.
Language & Input: This function gives you the option to select the phone display language and the phone keyboard language. To
changethelanguage,gotoSettings>select'Language&input'>selectLanguage>selectthelanguageofyourchoiceusingthe
navigation keys. You can also change the input method with this option.
GotoSettings>select'Language&input'>selectKeyboard&InputMethods>selectthekeyboardofyourchoiceusingthenavigation
keys. Furthermore, you can select 'Set up input methods' to customise the keyboard settings.
Scheduled Power On & Off: Thisfunctionallowsyoutomanuallyenterthetime(s)andday(s)thatyouwouldlikeyourphonetoturnon
andoff.Youmayusethisfeaturetosavebatterylife(ifnotinthecradle)oryoumaynotwanttobedisturbedoncertaindaysandtimes.
To access this function, go to Settings > select 'Schedule power on & off' > select ON or OFF option using button on the navigation keys
>setthetime>pressDoneusingthecentralbuttononthenavigationkeys.YoucanalsochooseifyouwanttheON/OFFscheduleto
repeat. To select the day, select Repeat > select the days > select 'OK' by pressing the [ ] center button on the navigation keys and
select'Done'bypressingthe[ ] center button on the navigation keys again.
System
Storage: To access 'Storage', go to settings > select ‘Storage’. This function allows you to view details on how much storage the
applications in your phone are consuming. You also have the ability to Erase Phone storage from here. Using the navigation keys select
'ErasePhoneStorage'>pressthebuttononthenavigationkeys>pressthebuttonagaintoconrm.Pleasenoteifyouselectthis
option, you will erase all the data on the phone.
Battery: This function displays the battery percentage of your phone. To access Battery, go to settings > select ‘Battery’.
Apps: This function allows you to view and manage the list of apps on your phone. You can monitor the running time and size of the
apps.Ifyou'dliketoresetanydownloadedapp,gotoSettings>Apps>Downloaded>highlighttheappyou'dliketoresetusingthe
navigation keys > select 'options' > select 'Reset app preferences' > reset apps.

15
Reset:ThisfunctionallowsyoutodeleteallDRMlicenses,resetnetworksettingsanderasealldataonyourphone.Werecommendyou
speak to your company administrator or mobile network provider before using this function.
Factory data reset - This function will erase all data from your phone's internal storage that can't be undone. To access this function, go to
settings > select 'Reset' using the navigations keys > select Factory data reset > select 'Reset phone' using the navigation keys and press the
button in the middle of the navigation keys [ ].
Network settings reset - This function will reset all the network settings, including Wi-Fi, Cellular data and Bluetooth. This will also delete any
saved Wi-Fi networks & Paired Bluetooth devices.
About Phone: This function displays technical and legal information about your device. You can also view the phone number, signal status,
signal strength, battery status, roaming status and more using this option. To view these status, go to Settings > About phone > Status.
Youcanalsoviewthe'IMEInumber'ofyourphonewhichmightberequiredforanyserviceandrepairworks.
Clock
This function allows you to access Alarm, World Time and Stopwatch. To access Clock, press [ ] button on the left or the center button
on the navigation keys [ ] > select 'Clock' using the navigation keys.
Alarm:ToaddanAlarm,gotoMainMenu>Clock>OptionsAddAlarm>'SetTime'usingthenavigationkeys>Done.Todeleteanexisting
alarm,highlightthetime>Options>select'DeleteAlarm'>Done.
Settings - To edit the snooze length, go to alarm > Options > Settings > select 'Snooze length' > select minutes > Ok.
Edit-Youcaneditanexistingalarmincludingtime,repeat,ringtone,SilenceafterandAlarmName.
Alarm Ringtone - To change the alarm ringtone, go to clock > Alarm > Options > Edit > Alarm ringtone > select the ringtone of your choice
fromthelist>Done.
SilenceAfter-Youcandenethe'lengthoftime'foryouralarmtoringbeforeitgoesoff.GotoClock>Alarm>Options>Edit>Silenceafter
>Selectthetimeusingnavigationkeys>Done.

16
Alarm Name - You can name your alarm by going to Alarm > Options > Edit > Alarm Name > type the name using keypad > Ok.
World Time: You can add a city to your worldclock by going into the 'Main Menu' > Clock > go to 'Worldclock' using the right key on the
navigation keys > go to 'Options' by pressing [ ] button on the left > Add world clock > select the city of your choice from the available
list > 'select' by pressing the center button on the navigation keys.
Stopwatch: To access stopwatch, go to Main Menu > Clock > go to 'stopwatch' using the left or right keys > Press the center button on
the navigation keys to start and/or stop. You can also lap, reset and recover timing.
Calendar
ViewtheCalendarbygoingintoMainMenu>Calendar.
File Explorer
Viewaudio,images,videosanddocumentsstoredwithintheinternalandexternalstorageofthephone.
Calculator
Access Calculator by going into the Main Menu > Calculator.
SAFETY INSTRUCTIONS
Before using the phone, please read the safety instructions carefully.
Safety Warnings
1. The working temperature is from -10 to 55 degree Celsius.
2. Ineachcountrytheremaybedifferentrulesinforceregardingtheuseofmobilephones(forexample,whiledriving,hospitals,
service stations or aircraft).

17
3. Observethelawsregardingtheuseofexistingmobilephonesathomeandturnoffthedevicewhenitsuseisprohibitedor
when it may cause interference or dangerous situations.
4. Use the device only in accordance with its intended use and only in places where a phone call is not dangerous.
5. Usethepoweradapterandbatteryassuppliedorrecommendedbymanufacturer.Theriskofexplosionmayincreaseifanunsuitable
orunauthenticadapterisused.Thebatteryshouldneverbeopenedorexposedtoames.Disposetheusedbatteriesaccordingtothe
current guidelines and regulations.
6.Thecorrectoperationofmedicalappliancesmaybealteredbytheuseofmobilephones.Pacemakermanufacturersrecommendthat
aminimumdistanceof20cmbetweendeviceswhenthemobilephoneison.Donotcarryyourphoneinyourpocketornear
your chest.
Attention
1. Donotexposethephonetomoistureorextremeheat(strongsunlightordirectradiation),orcold(persistentfrost).
2. Donotdroptheunitandavoidsubjectingittoshock,impactorpressure.
3. Thephonemaycauseinterferencetonearbytelevisions,radiosandotherelectricalappliances.4.Donoteverspraywithspray
cleaners as it can penetrate through the holes and damage the appliance.
Hearing Protection
Whenlisteningtomusic,adjustthevolumetoamoderatelevel.Continuousexposuretohighvolumemay
impair your hearing.

18
Environmental Recycling
1. Never dispose of the phone with household waste.
2.Askyourgoverningauthorityaboutsuitablemethodsofdisposalwhichminimizetherisktotheenvironment.Thecardboard
box,theplasticcontainedinthepackagingandthepiecesinthemobilephonecanberecycledinaccordancewiththerulesin
force on recycling.
3.Alwaysfollowtheexistingrulesonthesubject.
4.Violatorsaresubjecttosanctionsandmeasuresestablishedbylaw.
Thebinsymbolandcross,locatedonthedevicemeansthatwhentheequipmenthasreachedtheendofits
useful life, it must be brought to collection centers, and that treatment must be separated from urban waste.
Toprotecttheenvironment,whenyoureplacethebatteries,remembertousepublicrecyclingbinsspecied
for batteries.
For more information, please visit www.tecdesk.com.
April2020
tecdesk.com
Table of contents
Other Tecdesk Telephone manuals

Tecdesk
Tecdesk Smart 5500 User manual

Tecdesk
Tecdesk 5500i User manual

Tecdesk
Tecdesk 3500 User manual

Tecdesk
Tecdesk Connect 100 User manual

Tecdesk
Tecdesk 1000 User manual

Tecdesk
Tecdesk 8000 User manual

Tecdesk
Tecdesk 3500 User manual

Tecdesk
Tecdesk 1000V User manual

Tecdesk
Tecdesk Smart 5500 User manual

Tecdesk
Tecdesk Smart 5500 User manual


