Tecdesk 1000V User manual

Tecdesk 1000V
User Manual
English
Fixed Wireless Phones
tecdesk.com

INTRODUCTION 1
PACKAGE CONTENTS 2
GETTING TO KNOW YOUR PHONE 3
ALPHANUMERIC KEYPAD 5
GETTING STARTED 6
SETTING UP 6
BASIC FUNCTIONS 7
CUSTOMISING YOUR SOUNDS 8
CUSTOMISING YOUR SETTINGS 9
SPECIFICATIONS 13
TROUBLESHOOTING 14
LEGAL INFORMATION 15
HEALTH AND SAFETY 17
RF/ SAR INFORMATION 17
DECLARATION OF CONFORMITY 20
CONTENTS

1
INTRODUCTION
Thank you for purchasing the Tecdesk 1000V Desk Phone. This phone is designed for use with GSM 900/1800 and UMTS 900/2100 MHz
networks. You will require a valid SIM card from your network operator. Please refer to your network operator for more information.
Safety Instructions
Please read the following instructions carefully before starting to use the Tecdesk 1000 Desk Phone.
• Always read the safety instructions carefully.
• Keep this manual for future reference.
• Keep the phone away from humidity.
• Place the phone on a reliable at surface before setting it up.
• If any of the following situations arise, have the unit checked by a service technician.
– Exposure to moisture.
– Droppage and damage.
– Obvious signs of breakage.
• Do not place the phone in a damp room at a distance of less than 1.5m from a water source. Keep water away from the device.
• Do not use the device in environments where there are risks of explosions.
• Maintain the desk phone in an environment-friendly manner.
2
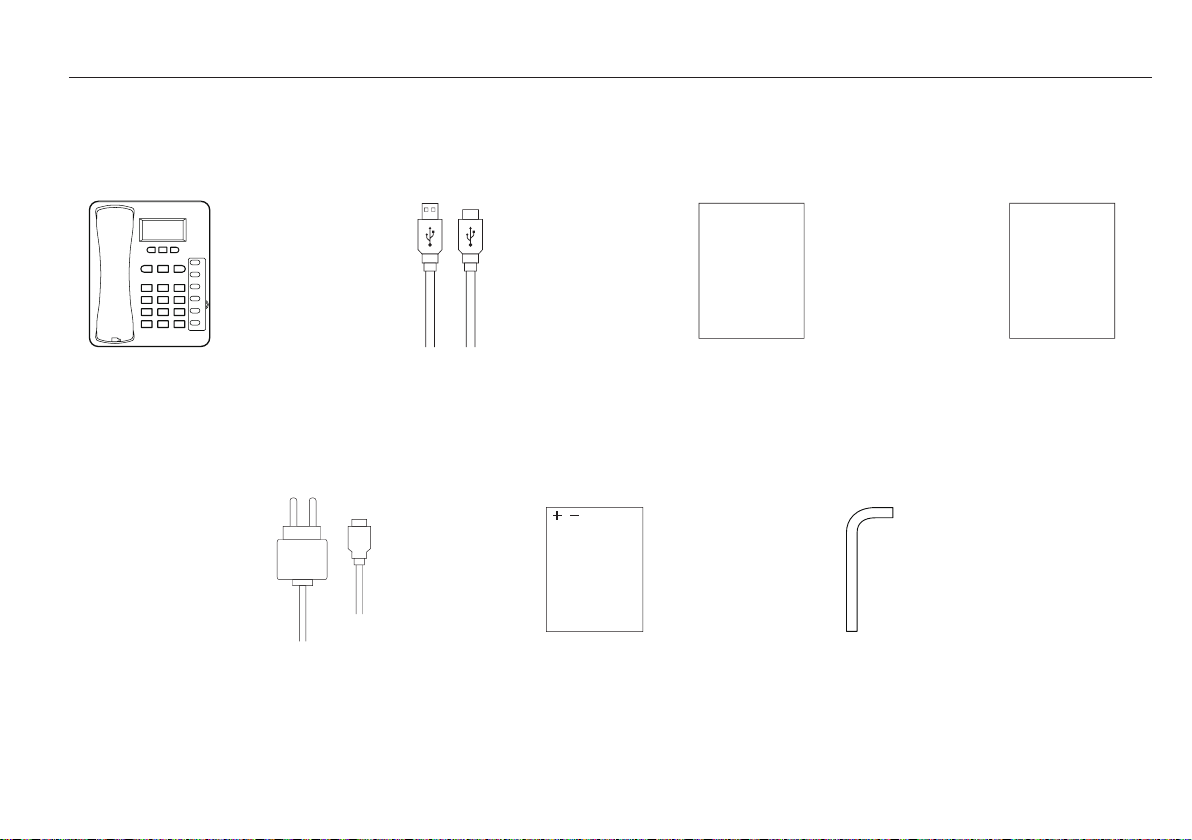
B. USB data cable C. User manual
User Manual
D. Quick start-up guide
Quick
Start-Up
Guide
PACKAGE CONTENTS
Please check the box includes the following components. If there are any items missing please contact your supplier.
A. Tecdesk 1000V
E. AC/DC power
adaptor
F. Ni-MH rechargeable
battery
G. Allen key

3
GETTING TO KNOW YOUR PHONE
1. Handset/receiver
2. Speaker
3. [ ] Dial button
4. [ ]
CCancel button
5. [ ] Up/Volume + button
6. [ ]
OK OK/Enter button
7. LCD screen
8. Jack for receiver cable
9. Alphanumeric keypad
10. [ ] Down/Volume - button
11. [ ] Power ON/OFF/End button
12. M1 - M6 Memory buttons
13. Screw for battery cover
14. Battery compartment cover
15. Jack for receiver cable
16. Security slot (Optional)
17. Micro USB data cable port
18. Power adaptor/charger port
110
11
12
13
14
15
5 6
7
8
16 17 18
3
4
9
2

4
STANDBY MODE
Signal bar
Signal bar
Date Time
Battery indicator
Battery indicator
Network
MAIN MENU

5
Button Lowercase (abc) Uppercase (ABC)
1., ? ! - _ @ 1 . , ? ! - _ @ 1
2 abc2 ABC2
3 def3 DEF3
4 ghi4 GHI4
5 jkl5 JKL5
6 mno6 MNO6
7 pqrs7 PQRS7
8 tuv8 TUV8
9 wxyz9 WXYZ9
0 [SPACE] 0
# Toggle between: numerical / lowercase / uppercase / predictive text
* + and special character selection
ALPHANUMERIC KEYPAD
Refer to the table below when using the alphanumeric keypad. When entering usernames or passwords, you can press the button to
toggle between numbers (123), lowercase characters (abc), and uppercase characters (ABC).

6
GETTING STARTED
SETTING UP
Follow the steps below to install the Desk phone.
- Connect the receiver to the device with the curly cord.
- Remove the battery cover with the Allen key then remove the battery and insert an appropriate SIM card into the device.
- Insert the battery into the battery compartment, ensuring the polarity on the battery matches the polarity of the connectors and the
cover is positioned correctly and secured into place.
- Connect one end of the power adaptor to the Power adaptor/ charger port. Plug the power adaptor into a mains power outlet. The
battery level indicator will stop moving when the device is fully charged.
- When the phone is powered up for the rst time, the default language will be in English. Please refer to the “LANGUAGE”section of
the manual to select an alternative language.
CHARGING THE UNIT
When the battery level is low, there will be a warning tone, a low battery message will be displayed and the empty battery icon will
ash. Plug the power adaptor into the unit to start charging. The battery level indicator will ash during charging mode and once it has
charged, the full battery icon will appear. Charging a completely at battery may take 2 to 3 hours.
POWERING ON/OFF
Press the [ ] button for 2 seconds and the phone will turn ON. The backlight will illuminate and automatically search for a network
operator. When the operators name is shown on the screen, press the [ OK ] button again for 2 seconds. When prompted to INSERT
CODE input the PIN code“2580” and press the [ OK ] button to conrm. The phone is now in Standby mode and is ready to be used. To
turn OFF the device, press the [ ] button for 2 seconds.
Note:
If the power source and battery is connected to the device and there is no SIM card inserted in the device the LCD will display“no SIM
card”. If the SIM card is damaged or your network is not authorised to be used on the device the LCD will display“PLEASE INSERT USIM
Card”. For further information please contact your network operator. Always ensure the device is switched OFF before removing the SIM
card. This will prevent damage to the SIM card and data loss. Do not place the SIM card near any electromagnetic surfaces or
environments and avoid touching the metal connectors on the SIM card. For further information please contact your network operator.

7
BASIC FUNCTIONS
MAKING A CALL
In Standby mode, use the alphanumeric keypad to input the contact number. Press the [ C ] button to delete an incorrect entry.
Press the [ ] button to make a call. To terminate a call replace the handset back on to the main unit.
ANSWERING A CALL
During an incoming call, pick up the receiver to answer the call.
REJECTING AN INCOMING CALL
During an incoming call, press the [ ] button to reject the call.
ADJUSTING THE VOLUME
During an active call, the volume can be adjusted by pressing the [ ][ ] buttons.

8
CUSTOMISING YOUR SOUNDS
In Standby mode press the [ OK ] button to enter into the MAIN MENU to access the “SOUNDS”, “SETTINGS” and “CONTACTS”. Use the
[ ][ ] buttons to toggle between the 3 options and select “SOUNDS” with the [ OK ] button. In the “SOUNDS”submenu, you can set
the “RINGTONE”, “VOLUME”, “KEYTONE” and “WARNING TONE”. Use the [ ][ ] button to toggle between the options and press the
[ OK ] button to make the selection.
RINGTONE
Press the [ OK ] button to bring up the “RINGTONE” option. Use the [ ][ ] buttons to toggle between the ringtones. Press [ OK ]
button to select a ringtone. Press the [ OK ] button on “PLAY” to preview the ringtone and“SELECT” to save it.
VOLUME
Press the [ OK ] button on the “VOLUME”option. Use the [ ][ ] buttons to increase or decrease the volume. Press the [ OK ] button
to save the setting.
KEYTONE
Press the [ OK ] button to enter into the“KEYTONE”option. Use the [ ][ ] button to toggle between the “ON”or “OFF”options to
enable or disable the keypad tone. Press the [ OK ] button on your choice to save the setting.
WARNING TONE
Press the [ OK ] button to enter into the“WARNING TONE” option. Press the [ OK ] button to save the setting.

9
CUSTOMISING YOUR SETTINGS
In Standby mode, press the [ OK ] button to enter into the MAIN MENU to access “SOUND”, “SETTINGS” and “CONTACTS”. Use the
[ ][ ] buttons to toggle between the 3 options and select“SETTINGS” with the [ OK ] button. In the “SETTINGS”submenu, you can
set the “TIME”, “DATE”, “LANGUAGE”, “DISPLAY SETTINGS”, “NETWORK SETTINGS” and “SPEED DIAL”, “FIXED DIAL” and “HOT DIAL”.
Use the [ ][ ] buttons to toggle between the options and press the [ OK ] button to make a selection.
TIME AND DATE
Press the [ OK ] button on “TIME AND DATE” to enter that setting. You will nd the “TIME”, “DATE”, “TIME FORMAT”, “DATE FORMAT”
and “DAYLIGHT SAVING TIME” options. Toggle between them and press the [ OK ] button on the desired selection to make selection.
Time
Press the [ OK ] button to enter into the“TIME” option. Use the [ ][ ] buttons to shift between the hour and minute. Input the
time with the alphanumeric keypad and press [ OK ] to conrm the setting.
Date
Press the [ OK ] button on the “DATE”option to adjust the date. Use the [ ][ ] buttons to shift between day, month and year.
Input the date with the alphanumeric keypad and press [ OK ] to save the settings.
Time Format
Press the [ OK ] button on “TIME FORMAT” option. Use the [ ][ ] buttons to shift between the 12 hour and 24 hour clock. Press
the [ OK ] button to save the desired setting.
Date Format
Press the [ OK ] button to enter into“DATE FORMAT”option. Use the [ ][ ] buttons to shift between the DD/MM/YYYY or
MM/DD/YYYY option. Press the [ OK ] button to save the setting.
Daylight Saving Time
Press the [ OK ] button to enter the “DAYLIGHT SAVING TIME” option. Use the [ ][ ] buttons to toggle between the ON/OFF
options and the [ OK ] button to save the setting.

10
LANGUAGE
In the “SETTINGS”submenu, Use the [ ][ ] buttons to toggle between the options and select “LANGUAGE”by pressing the [ OK ]
button on it. Select “AUTO” or use the [ ][ ] button to toggle between the other language options and press [ OK ] to conrm.
DISPLAY SETTINGS
In the “SETTINGS”submenu, use the [ ][ ] button to toggle between the options. Select “DISPLAY SETTINGS”, and press the [ OK ]
button to conrm. Use the [ ][ ] button to toggle between the options “HOME”, “COMPANY NAME”and “BACKLIGHT”. Press the
[ OK ] button to save the setting.
Home Screen
Press the [ OK ] button to enter into the“HOME SCREEN” option. Use the [ ][ ] buttons to enable either the“CLOCK” or “DATE”
to be displayed on the LCD screen. Ensure you press the [ OK ] button to save the setting.
Company Name
Press the [ OK ] button on the “COMPANY NAME”option. Use the [ ][ ] buttons to toggle between“INSERT NAME” and “DISPLAY
NAME” and press [ OK ] on the desired option. To “INSERT NAME” press the [ OK ] button on the option then use the alphanumeric
keypad to enter the name and press [ OK ] to save. To enable or disable the “DISPLAY NAME” use the [ ][ ] buttons between“ON”
or “OFF”to make your choice then press the [ OK ] button to save the setting.
Backlight
Press [ OK ] button to enter into the“BACKLIGHT TIME” option. Use the [ ][ ] buttons to select the desired backlight time. Press
the [ OK ] button to save.
NETWORK
In the “SETTINGS”submenu, use the [ ][ ] button to toggle between the options. Select “NETWORK SETTING” by pressing the [ OK ]
button on it. Use the [ ][ ] buttons to toggle between the options “NETWORK MODE”,“NETWORK SELECTION” and “PREFERRED
NETWORK”.
Network Mode
Allows you to choose between GSM/WCDMA network or WCDMA only network. Press the [ OK ] button on“NETWORK MODE” to
enter the option.

11
Network Selection
Allows you to set up manual or automatic network search. Press the [ OK ] button to enter into the “SEARCH MODE” option. Use the
[ ][ ] button to select “AUTO” or “MANUAL” search. Press the [ OK ] button to save the desired setting.
Preferred Network
Allows you to set up manual or automatic network selection. Use the [ ][ ] button to toggle between“AUTO”or “MANUAL”
search. Press the [ OK ] button to save the desired setting.
SPEED DIAL
Please ensure the contact numbers are pre-installed into the memory for this feature to work. In the “SETTINGS”submenu, use the
[ ][ ] buttons to toggle between the options and select“SPEED DIAL”. Use the [ ][ ] to shift between the M1-M6 buttons. Press
[ OK ] to select the desired key. Use the [ ][ ] buttons to shift between“EDIT”, “REMOVE” AND “REMOVE ALL”.
Edit
Press the [ OK ] button on the “EDIT” option. Use the alphanumeric keypad to input the contact number. Use the [ C ] button to
delete an incorrect entry. Press the [ OK ] button to save the entry.
Remove
Press the [ OK ] button on the REMOVE” option. Press the [ OK ] button to conrm to remove the current entry. To exit from this
function, press the [ C ] button.
Remove All
Press the [ OK ] button on the “REMOVE ALL” option. Press the [ OK ] button to conrm to remove all the contacts stored in M1 to
M6. To exit from this function, press the [ C ] button.
FIXED DIAL
When enabled this function limits call out to preset numbers only.
In the “SETTINGS”submenu, use the [ ][ ] buttons to toggle between the options to get to“FIXED DIAL”and press [ OK ] to select
the option. You will be prompted to enter a PIN2 code. Please contact your Network Operator for this information. Once entered, use
the [ ][ ] buttons to toggle between the “NAME”and “NUMBER.” Press [ OK ] when on the desired entry and use the alphanumeric
keypad to enter the name or number of the contact. After entering each category, press [ OK ] to save.

12
HOTDIAL
When enabled this function limits call out to a preset number including a number followed by a series of extension numbers to prevent
time consuming re-entry. The congured number is automatically dialled out when the receiver is lifted.
In the “SETTINGS”submenu, use the [ ][ ] buttons to toggle between the options to get to“HOTDIAL” and press [ OK ] to select.
Two options will appear. “HOTDIAL SETTING”allows you to enable/disable the function. To do so press [ OK ] on this option and again on
the desired “ON” or “OFF” option. “HOTDIAL NUMBER” allows you input the desired auto-dial number. If specic extension
numbers are required to reach a specic area, pauses can also be congured in the process to ensure the process is recognised by the
system being called. Press [ OK ] on “HOTDIAL NUMBER” and enter the number in the below format, where the digit(s) between the‘,’
represents the number of seconds desired to pause between the numbers entered. Once the correct series of numbers has been entered
press [ OK ] to save the setting.
02079857548,5, 100,5,105
Contact Number Pause Time
(Secs)
Pause Time
(Secs)
Extension Extension

13
SPECIFICATIONS
• Frequency: GSM 900/1800MHz UMTS 900/2100MHz
• Size: 160*194*41mm (L*W*H)
• Operating temperature limits: - 10 ˚C ~ + 55 ˚C
• Noise: less than 60dB ( A )
• Relative humidity limits: 10% - 95%
• Atmospheric pressure limits: 86 -106Kpa
• Input voltage: 110v - 240v, 50Hz / 60Hz
• Output voltage: DC 5v 600mA
• Battery: 3.6v AAA 650mAh Ni-MH recharge battery
14
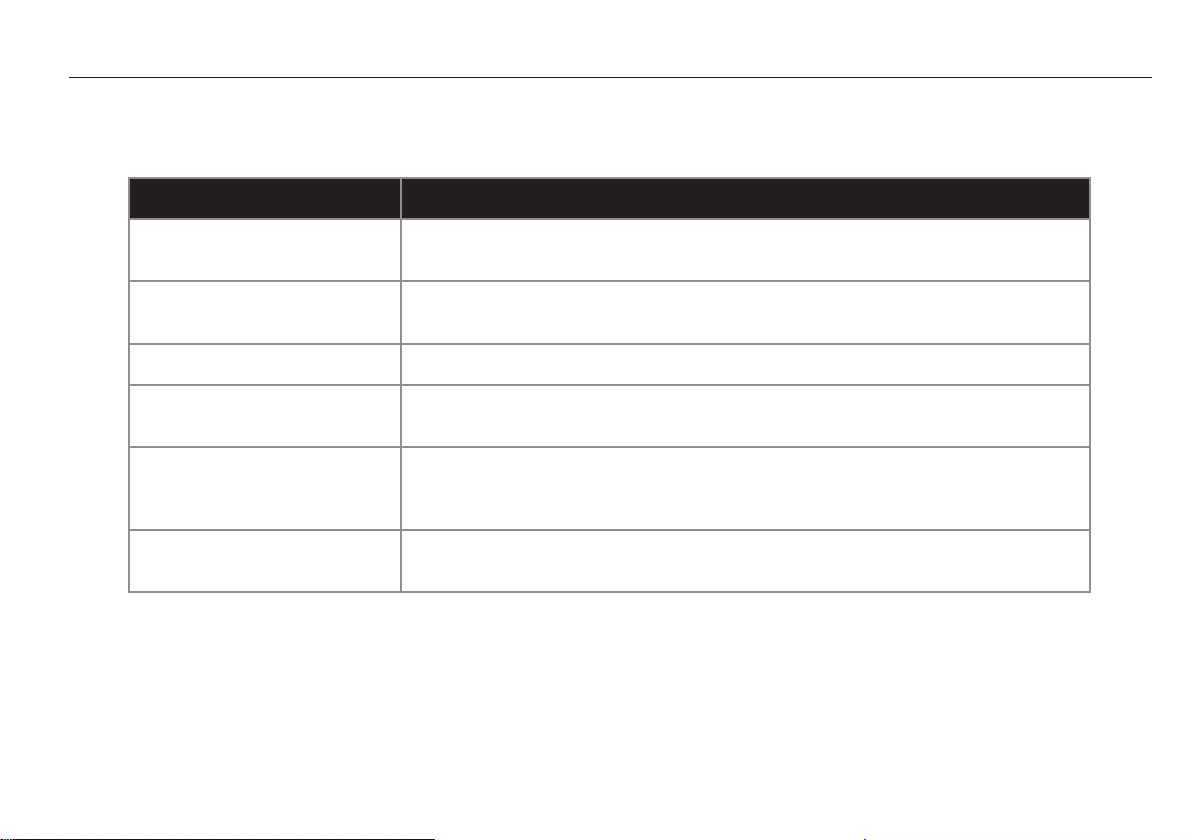
Problem Solution
Cannot power ON 1) Check power source connection.
2) Press the Power ON/OFF button to switch the unit ON.
Cannot connect No signal, or signal is too weak, move the network device to a dierent location to
get a better signal.
Signal indication is low Move the device to a dierent location to get a better signal.
Cannot call or answer 1) Low battery power, charge the device.
2) Possible damaged battery – replace with a Tecdesk approved battery pack.
No dial tone 1) Replace and pick up the receiver again.
2) Check the cable connection on the receiver.
3) Move to a dierent location to get a better signal.
Too noisy during a call 1) Signal too weak – move to a dierent location to get a better signal.
2) Adjust the call and decrease the volume.
TROUBLE SHOOTING

15
LEGAL INFORMATION
NOTICE
The information in this manual is subject to change without notice. Whist every care has been taken in the preparation and design of the
manual, statements, recommendations and information, implied or expressed, these do not constitute a warranty of any kind. No part of
this manual may be reproduced, quoted or translated by any means or in any form photographically, mechanically or electronically,
without the written permission of Tecmobile (International) Ltd.
TRADEMARKS AND PERMISSIONS
The Bluetooth® trademark and logos are owned by the Bluetooth SIG. Google Mail is a trademark of Google Inc.; Wi-Fi, Wi-Fi Protected
Access, Wi-Fi Protected setup, and WPA are trademarks of the Wi-Fi Alliance; Microsoft, Hotmail, Outlook, Windows Live, and Windows
Media are trademarks of Microsoft Corporation; GSM and Global System for Mobile Communications are trademarks of the GSM MOU
Association; JavaScript is a trademark of Oracle America, Inc. All other trademarks are the property of their respective owners and any
use of such trademarks by tecmobile is under license where required.
FCC NOTICE
This phone complies with part 15 of the FCC Rules. Operation is subject to the following two conditions: (1) This device may not cause
harmful interference, and (2) this device must accept any interference received, including interference that may cause undesired
operation. This phone has been tested and found to comply with the limits for a Class B digital device, pursuant to Part 15 of the FCC
Rules. These limits are designed to provide reasonable protection against harmful interference in a residential installation. This equipment
generates, uses and can radiate radio frequency energy and, if not installed and used in accordance with the instructions, may cause
harmful interference to radio communications. However, there is no guarantee that interference will not occur in a particular installation. If
this equipment does cause harmful interference to radio or television reception, which can be determined by turning the equipment o
and on, the user is encouraged to try to correct the interference by one or more of the following measures:
- Re-orientate or relocate the receiving antenna.
- Increase the separation between the equipment and receiver.
- Connect the equipment into an outlet on a circuit dierent from that to which the receiver is connected.
- Consult the dealer or an experienced radio/TV technician for help.
Changes or modications not expressly approved by the party responsible for compliance could void the user‘s authority to operate the
equipment. The antenna(s) used for this transmitter must not be co-located or operating in conjunction with any other antenna or
transmitter.

16
WARRANTY DISCLAIMERS
Although every eort is used to reduce inaccuracies and, except those required by applicable law, no warranties of any kind, either
express or implied, and including but not limited to the implied warranties of tness for a particular use or satisfactory quality, are made
in relation to the contents, accuracy or reliability of this manual. Tecmobile reserves the right to modify, change specications or
information in this manual without any consequential liability or prior notice. Under no circumstances, except as required by applicable
law, will tecmobile or any of its licensors be responsible for indirect damages or consequential loss of income or data however caused.
DISCLAIMER
Third party content and services may be enabled and are available through this device. Some features and accessories referred to in this
manual rely on local network settings and installed software. These may or may not automatically be accepted, in total or in a limited way,
by local service and network providers. As a consequence, some descriptions may not match the features or product which you can
purchase/download. Third party content and services belong to, are the copyright of, are trademarked by and patented by their
respective owners under intellectual property law. They should not be used without the express permission of the service provider or
content owner and, unless given specic permission by them, you should not transmit, upload, publish, modify, copy or distribute in any
way the services or content displayed through this device. The device may contain technology, software or commodities which are
subject to regulations and export laws from the US and other countries. Diversion contrary to law is prohibited. To the fullest extent
permissible by applicable law by using the applications provided withyour device, you acknowledge that the application is provided“as
is”. Tecmobile does not provide a warranty, make any representations, or take any responsibility for the end-user support, content or
functionality of third-party applications provided with your device.

17
HEALTH AND SAFETY
RF/ SAR INFORMATION
Your phone contains a transmitter and receiver. When powered ON it receives and transmits low-level radio-frequency (RF). Country
governments all over the world adopt state security guidelines developed by independent scientic organisations such as ICNIRP and
IEEE. These guidelines establish permitted levels of RF energy for the general population. The guidelines include a substantial safety
margin designed to ensure the safety of all persons, regardless of age and health. Specic Absorption Rate (SAR) is the unit of
measurement for absorbed radio quantity when using mobile devices. SAR tests are conducted using standard operating positions with
the phone transmitting at its highest certied power level, however, the actual SAR level of the phone while operating can be well below
the maximum value. In general, the closer you are to a base station, the lower the power output of the phone. The SAR values may vary,
depending on dierent models of phones. To ensure the health and safety of the users, the phone is designed and manufactured to meet
the radio exposure guidelines. The ICNIRP SAR limit for mobiles devices used by the general public is 2W/kg and highest SAR value for
this device is tested for use at the ear is below the SAR limit recommended by ICNIRP.
Band Test Position Measured SAR
10g (W/kg)
GSM900 Bottom Face 0.495W/kg
GSM1800 Bottom Face 0.59 W/kg
WCDMA VIII Bottom Face 0.547W/kg
WCDMA I Bottom Face 0.974W/kg

18
BATTERIES
• Never use a charger or battery that is damaged in any way. Use the battery correctly.
• Do not short-circuit the battery, which may damage it, cause heat or re.
• Do not dispose of batteries in high temperature or in a re as they may explode. Return the waste battery to the dealer or appointed
recycle locations.
• Do not dispose as household waste.
• Battery charging time depends on the remaining battery charge, the type of battery, and the charger used. The battery can be
charged and discharged hundreds of times, but it will gradually wear out. When the operation time is noticeably shorter than normal,
it is time to replace the battery with a new one.
• Use only original or approved chargers and batteries. Unplug the charger from the electrical plug and the device when not in use.
• Do not over charge as this will damage the battery and shorten its life.
• Leaving the battery in extremely hot or cold places will reduce the capacity of the battery. Batteries are particularly aected by
temperatures below 0°C.
OPERATING ENVIRONMENT
• Remember to follow any special regulations in force in the area you are in, and always switch OFF your phone whenever it is
forbidden to use it or it may cause danger.
• When connecting the phone or any accessory to another device, read its User's Guide for detailed safety instructions. Do not
connect incompatible products.
• It is recommended that the equipment should only be used in the normal operating position
• Do not expose the equipment to temperatures below -10° or above 50°C.
MEDICAL DEVICES
Ensure that you switch OFF your phone in areas near electronic medical equipment that require the phone to be switched OFF such as
heart pacemakers, hearing aids, etc. Most medical devices can shield the phone’s RF signal, but some cannot. If you have any doubts, or
need to nd out more, please consult your doctor or medical device manufacturer.
PACEMAKERS
Pacemaker manufacturers advise the distance between your phone and heart pacemaker should be at least 6 inches (15.3 cm), otherwise
the phone could interfere with the pacemaker. People tted with a pacemaker should note the following:
• Always keep a distance (at least 6 inches) between the phone and the pacemaker, when the phone is switched ON.
• Listen to the phone using the ear which is furthest from the pacemaker.
• Switch OFF your phone if you feel there is interference, and consult the doctor as soon as possible.
This phone, like any wireless phone, operates using radio signals, which cannot guarantee connection in all conditions. Therefore, you
should never rely solely on any wireless phone for essential communications such as medical emergencies. To make or receive calls, the
phone must be switched ON and in a service area with adequate signal strength. To make an emergency call, enter the local emergency
number in standby mode and press the call button.
Table of contents
Other Tecdesk Telephone manuals

Tecdesk
Tecdesk 3500 User manual

Tecdesk
Tecdesk 5500i User manual

Tecdesk
Tecdesk Connect 100 User manual

Tecdesk
Tecdesk Smart 5500 User manual

Tecdesk
Tecdesk Smart 5500 User manual

Tecdesk
Tecdesk 5 User manual

Tecdesk
Tecdesk 8000 User manual

Tecdesk
Tecdesk 1000 User manual

Tecdesk
Tecdesk Smart 5500 User manual

Tecdesk
Tecdesk 3500 User manual


