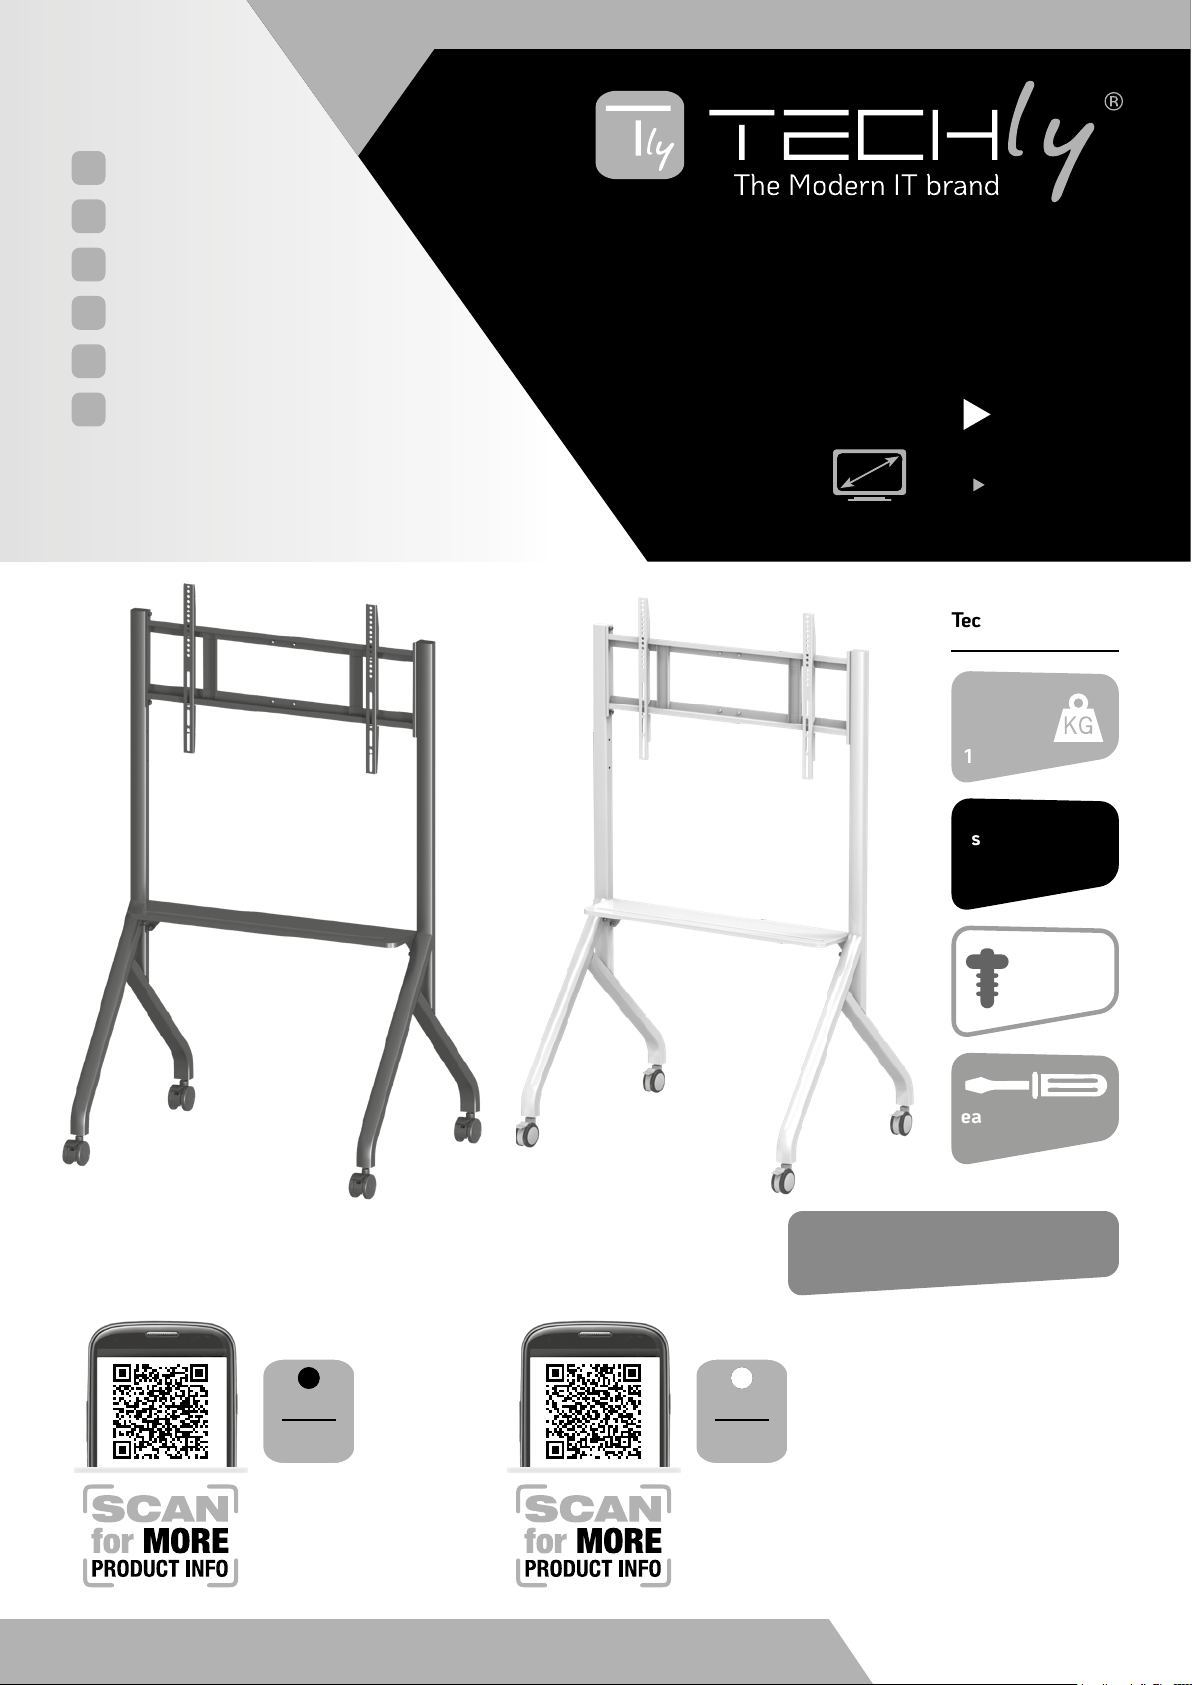
Techly ICA-TR53MB User manual

1
WWW.TECHLY.COM
MULTIFUNCTION
MOBILE TV CART
P/N: ICA-TR53MB
8059018367744
P/N: ICA-TR53MW
8059018367751
standard vesa
800x500 MAX
Technical features
80
176 lb
hardware
included
easy installation
CART 100
MULTIFUNCTION
MOBILE TV CART
55” 86”
140 218 cm
EN User's Manual
IT Manuale d’istruzione
DE Bedienungsanleitung
FR Mode d’emploi
ES Manual de instrucciones
PL Instrukcja użytkownika
BLACK
Color
WHITE
Color

2
WWW.TECHLY.COM
MULTIFUNCTION
MOBILE TV CART
ATTENZIONE:
Prestate molta
attenzione durante la fase di
montaggio. Se il montaggio non è
stato eettuato in modo corretto e
stabile ciò potrebbe causare la caduta della staa,
determinando lesioni o danni a cose e persone.
Rispettare tassativamente il peso massimo
dell’apparecchiatura supportata indicato sulal
confezione.
ACHTUNG:
Seien Sie sehr
vorsichtig bei der Montage.
Wird die Montage nicht auf korrekte
und stabile Weise durchgeführt,
könnte dies zum Herunterfallen der Halterung und
dadurch zu Sach- oder Personenschaden führen.
Beachten Sie unbedingt das auf der Verpackung
angegebene Höchstgewicht des Geräts.
CAUTION:
Be very careful during
the assembly. If the mount is
not properly installed it may fall,
resulting in possible injury and/or
damage. Respect the maximum weight limitation
printed on the box.
IT
Gentile Cliente,
grazie per aver scelto un prodotto Techly.
Istruzioni disimballaggio
• Aprire il cartone con cura, rimuovere il contenuto
e distenderlo su un cartone o altro materiale
protettivo per evitare danni.
• Vericare che il contenuto della confezione corrisponda
alla lista delle parti nella pagina successiva per
assicurarsi che tutti i componenti siano presenti e
non siano danneggiati. Non utilizzare parti difettose o
danneggiate.
• Leggere attentamente le istruzioni riportate nel
presente manuale prima di procedere all’installazione.
• Tenere sempre questo manuale per future
consultazioni.
Importanti informazioni
sulla sicurezza
Leggere cortesemente le istruzioni prima di
cominciare l’installazione e seguire scrupolosamente
tutte le indicazioni contenute qui. Utilizzare adeguati
dispositivi di sicurezza durante l’intallazione.
Contattare del personale qualicato per eettuare
l’installazione:
• Se non avete compreso le indicazioni contenute
in questo manuale o avete dei dubbi in merito alla
sicurezza dell’installazione.
Non utilizzate il prodotto per uno scopo o in una
congurazione non espressamente specicata in
queste istruzioni. Si declina qualsiasi responsabilità
per danni derivanti da un errato assemblaggio, errato
montaggio o uso non corretto del prodotto.
Al termine delle operazioni di montaggio assicurarsi
che il tutto sia stato eettuato a regola d'arte.
Manutenzione
• Vericare periodicamente che il supporto sia sicuro
e sicuro da usare (almeno ogni tre mesi)
EN
Dear Customer,
thanks for choosing a Techly product.
Unpacking Instructions
• Carefully open the carton, remove contents and
lay out on cardboard or other protective surface to
avoid damage.
• Check package contents against the Supplied Parts
List in the next page to assure that all components
were received undamaged. Do not use damaged or
defective parts.
• Carefully read all instructions before attempting
installation.
• Please keep this user's manual for future
consultations.
Important
Safety Information
Please read this instruction before beginning the
installation, and carefully follow all herein contained
recommendations. Use proper safety equipment
during installation.
Please call a qualied installation contractor for help
if you:
• Don't understand these directions or have any
doubts about the safety of the installation.
Do not use this product for any purpose or in
any conguration not explicitly specied in this
instruction. We hereby disclaim any and all liability
for injury or damage arising from incorrect assembly,
incorrect mounting, or incorrect use of this product.
At the end of the installation make sure the procedure
was correctly observed.
Maintenance
• Check that the barcket is secure and safe to use at
regular intervals (at least every three months).
DE
Sehr geehrter Kunde,
danke, dass Sie sich für ein Produkt von
Techly entschieden haben.
Anweisungen zum Auspacken
• Önen Sie den Karton vorsichtig, entnehmen Sie
den Inhalt und breiten Sie ihn auf einem Karton
oder anderem schützenden Material aus, um
Schäden zu vermeiden.
• Überprüfen Sie, ob der Inhalt der Verpackung
der Teileliste auf der nächsten Seite entspricht,
um sicherzustellen, dass alle Bauteile vorhanden
und nicht beschädigt sind. Verwenden Sie keine
defekten oder schadhaften Teile.
• Lesen Sie, bevor Sie mit der Installation beginnen, die
Anweisungen in dieser Anleitung aufmerksam durch.
• Bewahren Sie diese Anleitung zum späteren
Nachschlagen stets auf.
Wichtige Informationen
zur Sicherheit
Lesen Sie vor der Installation bitte alle Anweisungen
und befolgen Sie alle hier enthaltenen Angaben
genau. Verwenden Sie bei der Installation geeignete
Sicherheitsvorrichtungen. Wenden Sie sich in den
folgenden Fällen zum Ausführen der Installation an
Fachleute:
• Wenn Sie die in dieser Anleitung enthaltenen
Angaben nicht verstanden haben oder Zweifel
hinsichtlich der Sicherheit der Installation haben.
Verwenden Sie das Produkt nicht für Zwecke
oder in einer Konguration, die in dieser Anleitung
nicht ausdrücklich genannt werden. Jegliche
Haftung aufgrund von Schäden durch fehlerhaften
Zusammenbau, falsche Montage oder unkorrekte
Verwendung des Produkts ist ausgeschlossen.
Nach den Montagevorgängen sicherstellen, dass alle
Schritte fachgerecht ausgeführt wurden.
Wartung
• Prüfen Sie, ob die Halterungen sicher und sicher ist,
in regelmäßigen Abständen (mindestens alle drei
Monate) verwenden

3
WWW.TECHLY.COM
MULTIFUNCTION
MOBILE TV CART
ATENCIÓN:
Tenga mucho cuidado
durante el montaje.
Si el montaje no ha sido realizado
de manera correcta y estable, esto
podría provocar la caída del estribo, provocando
lesiones o daños a cosa y personas.
Respeten imperativamente el peso máximo del
aparato suportado que se indica en la caja.
UWAGA:
Należy być bardzo
ostrożnym podczas montażu.
Niewłaściwie zamontowany może
spaść powodując uszkodzenia oraz
zagrożenie.
Przed rozpoczęciem montażu upewnij się, że ściana
jest do tego odpowiednia. Przestrzegaj informacji
o maksymalnym obciążeniu uchwytu podanym na
opakowaniu produktu.
ATTENTION:
Soyez très prudent
lors du montage.
Si le montage n'a pas été eectué
correctement et n'est pas stable le
support pourrait tomber et provoquer des lésions
ou des dégâts à des choses ou à des personnes.
Respecter le poids maximum de l'appareil supporté
mentionné sur l'emballage.
FR
Cher Client,
nous vous remercions d'avoir choisi un
produit Techly.
Instructions de désemballage
• Ouvrir l'emballage avec soin, vider le carton et
poser le contenu sur un carton ou tout autre
matériel de protection pour éviter des dégâts.
• Vérier que le contenu du carton correspond à
la liste des pièces de la page suivante, s'assurer
que toutes les pièces sont présentes et ne sont
pas endommagées. Ne pas utiliser de pièces
défectueuses ou endommagées.
• Lire attentivement les instructions du présent
manuel avant d'eectuer l'installation.
• Conserver le manuel pour une consultation future.
Informations importantes
sur la sécurité
Installer et utiliser ce produit avec soin.
Lire les instructions avant de commencer
l'installation et suivre scrupuleusement les
indications mentionnées. Utiliser des dispositifs de
sécurité adéquats pendant l'installation. Contacter
du personnel qualié pour eectuer l'installation:
• Si vous n'avez pas compris les indications présentes
dans ce manuel ou si vous avez des doutes en ce
qui concerne la sécurité de l'installation.
Ne pas utiliser le produit pour un usage ou une
conguration non spéciée dans ces instructions.
Nous déclinons toute responsabilité pour des
dégâts qui seraient dus à une erreur d'assemblage,
une erreur de montage ou une utilisation incorrecte
du produit. Au terme des opérations de montage
s'assurer que tout a été fait dans les règles de l'art.
Entretien
• Vériez périodiquement que le support est sécurisé
et sûr à utiliser (au moins tous les trois mois)
ES
Estimado Cliente,
gracias por haber elegido un producto
Techly.
Instrucciones desembalaje
• Abrir el cartón prestando mucha atención, quitar el
contenido y apoyarlo en un cartón u otro material
de protección para evitar perjuicios.
• Controlar que el contenido del suministro
corresponda a la lista de las partes en la
página siguiente para asegurarse que todos los
componentes estén presentes y no dañados. No
utilizar partes defectuosas o dañadas.
• Leer detenidamente las instrucciones que se
encuentran en este manual antes de seguir con la
instalación.
• Guardar este manual para consultas futuras.
Importantes informaciones
de seguridad
Instalar y utilizar este producto con cura. Leer
detenidamente las instrucciones antes de empezar
con la instalación y seguir escrupulosamente todas
las indicaciones que se encuentran aquí. Utilizar
dispositivos de seguridad adecuados durante la
instalación. Contactar el personal calicado para
efectuar la instalación:
• Si no han entendido las indicaciones que se
encuentran en este manual o tienen dudas acerca
de la seguridad de la instalación.
No utilicen el producto para un objetivo o en una
conguración no especicada expresamente
en estas instrucciones. Se rehúsa todo tipo de
responsabilidad por daños procedentes de un
ensamblaje equivocado, un montaje equivocado o
un uso no correcto del producto. Na vez terminadas
las operaciones de montaje asegurarse que todo
haya sido realizado perfectamente.
Mantenimiento
• Compruebe que los soportes es seguro y seguro
de usar, a intervalos regulares (al menos cada tres
meses)
PL
Szanowny Kliencie,
dziękujemy za wybór produktów Techly.
Rozpakowywanie
• Ostrożnie otwórz opakowanie, wyjmij jego
zawartość i rozłóż na kartonie lub innej powierzchni,
która zapobiegnie uszkodzeniu elementów oraz
podłoża.
• Sprawdź zawartość opakowania z załączoną na
następnej stronie listą elementów upewniając się,
że żaden z nich nie jest uszkodzony. Nie należy
używać wadliwych elementów.
• Przed rozpoczęciem montażu przeczytaj uważnie
instrukcję.
• Zachowaj niniejszą instrukcję na przyszłość.
Ważne informacje dotyczące
bezpieczeństwa
Przeczytaj niniejszą instrukcję przed rozpoczęciem
montażu oraz stosuj się do zawartych w niej
wskazówek. Używaj narzędzi zapewniających
bezpieczeństwo.
Zasięgnij porady u autoryzowanego źródła jeśli:
• Nie rozumiesz niniejszej instrukcji lub masz
wątpliwości dotyczące bezpieczeństwa podczas
montażu.
Nie używaj tego produktu do jakichkolwiek innych
celów niż jest przeznaczony. Producent nie ponosi
żadnej odpowiedzialności za szkody powstałe w
wyniku niewłaściwego montażu oraz za szkody
powstałe w wyniku wykorzystania produktu
niezgodnie z przeznaczeniem.
Na koniec upewnij się, że podczas montażu
postępowałeś zgodnie z instrukcją.
Utrzymanie
• Sprawdź, czy uchwyty są bezpieczne i bezpieczne
w użyciu, w regularnych odstępach czasu (co
najmniej raz na trzy miesiące)

4
WWW.TECHLY.COM
MULTIFUNCTION
MOBILE TV CART
Spare Parts
Main Parts
tray Cx1
wall plate Dx1
bracket Ex2
left column Ax1 right column Bx1 3 inch wheels Fx4
M8x20 M6x16 M8x25
Screw ax12 Screw bx4 Screw cx4
Ø16x8.5x1.0 Ø24x12.5x1.5 Ø20x12.5x3.5
Washer dx4 Washer ex4 Spring Washer fx4
cross screwdriver
spanner

1
5
WWW.TECHLY.COM
MULTIFUNCTION
MOBILE TV CART
EN Adjust the wheels to the braking state, and then screw the four wheels onto the left and right columns.
IT Regolare le ruote allo stato di frenata, quindi avvitare le quattro ruote sulle colonne sinistra e destra.
DE Stellen Sie die Räder auf den Bremszustand ein und schrauben Sie dann die vier Räder an der linken und rechten Säule fest.
FR Ajustez les roues à l’état de freinage, puis vissez les quatre roues sur les colonnes gauche et droite.
ES Ajuste las ruedas al estado de frenado y luego atornille las cuatro ruedas en las columnas izquierda y derecha.
PL Dostosuj koła do stanu hamowania, a następnie przykręć cztery koła do lewej i prawej kolumny.
EN Before installing the wheel, adjust it to the brake state.
IT Prima di installare la ruota, regolarla sullo stato del freno.
DE Stellen Sie das Rad vor dem Einbau auf den Bremszustand ein.
FR Avant d’installer la roue, ajustez-la à l’état de freinage.
ES Antes de instalar la rueda, ajústela al estado del freno.
PL Przed zamontowaniem koła wyreguluj je do stanu hamowania.
Figure 1
e f

2
3
6
WWW.TECHLY.COM
MULTIFUNCTION
MOBILE TV CART
EN There are 3 combinations of installation holes in the wall plate. Choose the combination you need.Turn a screw (a) into the lower hole of the combination
in advance. Do not lock it and reserve a distance of 8mm. Then hang up the wall plate and lock all six screws (a).
IT Ci sono 3 combinazioni di fori di installazione nella piastra a muro. Scegli la combinazione che ti serve. Avvitare preventivamente una vite (a) nel foro inferiore
della combinazione. Non bloccarlo e riservare una distanza di 8 mm. Quindi riagganciare la piastra a parete e bloccare tutte e sei le viti (a).
DE Es gibt 3 Kombinationen von Installationslöchern in der Wandplatte. Wählen Sie die Kombination, die Sie benötigen. Drehen Sie vorab eine Schraube (a)
in das untere Loch der Kombination. Nicht verriegeln und einen Abstand von 8 mm einhalten. Hängen Sie dann die Wandplatte auf und ziehen Sie alle sechs
Schrauben fest (a).
FR Il existe 3 combinaisons de trous d’installation dans la plaque murale. Choisissez la combinaison dont vous avez besoin. Vissez au préalable une vis (a)
dans le trou inférieur de la combinaison. Ne pas le verrouiller et réserver une distance de 8mm. Accrochez ensuite la plaque murale et serrez les six vis (a).
ES Hay 3 combinaciones de oricios de instalación en la placa de pared. Elige la combinación que necesites. Gire un tornillo (a) en el oricio inferior
de la combinación de antemano. No lo bloquee y reserve una distancia de 8 mm. Luego cuelgue la placa de pared y bloquee los seis tornillos (a).
PL W płycie ściennej znajdują się 3 kombinacje otworów montażowych. Wybierz kombinację, której potrzebujesz. Wcześniej wkręcić śrubę (a) w dolny otwór
kombinacji. Nie zamykaj go i zarezerwuj odległość 8 mm. Następnie zawieś płytkę ścienną i zablokuj wszystkie sześć śrub (a).
EN 3 combinations of holes
IT 3 combinazioni di fori
DE 3 Lochkombinationen
FR 3 combinaisons de trous
ES 3 combinaciones de agujeros
PL 3 kombinacje otworów
EN Reserve 8mm
IT Riserva 8mm
DE Reserve 8mm
FR Réserve 8mm
ES Reserva 8mm
PL Rezerwa 8mm
Figure 1
a
a
a
a
EN Turn a screw (a) into the hole as shown in Figure 3 in advance, do not lock and reserve a distance of 8mm. Then hang up the tray and lock all six screws (a).
IT Avvitare preventivamente una vite (a) nel foro come mostrato nella Figura 3, non bloccare e riservare una distanza di 8 mm. Quindi riagganciare il vassoio e
bloccare tutte e sei le viti (a).
DE Drehen Sie vorher eine Schraube (a) wie in Abbildung 3 gezeigt in das Loch, verriegeln Sie es nicht und lassen Sie einen Abstand von 8 mm ein. Hängen Sie
dann das Tablett auf und ziehen Sie alle sechs Schrauben fest (a).
FR Vissez au préalable une vis (a) dans le trou comme indiqué sur la gure 3, ne bloquez pas et réservez une distance de 8 mm. Accrochez ensuite le plateau et
verrouillez les six vis (a).
ES Gire un tornillo (a) en el oricio como se muestra en la Figura 3 con anticipación, no bloquee y reserve una distancia de 8 mm. Luego cuelgue la bandeja y
bloquee los seis tornillos (a).
PL Wkręć wcześniej śrubę (a) w otwór, jak pokazano na rysunku 3, nie blokuj i zachowaj odległość 8 mm. Następnie zawieś tacę i zablokuj wszystkie sześć śrub
(a).
EN Reserve 8mm
IT Riserva 8mm
DE Reserve 8mm
FR Réserve 8mm
ES Reserva 8mm
PL Rezerwa 8mm

4
5
7
WWW.TECHLY.COM
MULTIFUNCTION
MOBILE TV CART
EN As shown in Figure 4, lay the conference screen at, and select the appropriate screw to connect the bracket with the screen.
IT Come mostrato nella Figura 4, appoggiare lo schermo per conferenze in piano e selezionare la vite appropriata per collegare la staa allo schermo.
DE Legen Sie den Konferenzbildschirm wie in Abbildung 4 gezeigt ach hin und wählen Sie die entsprechende Schraube aus, um die Halterung mit dem Bildschirm
zu verbinden.
FR Comme illustré à la Figure 4, posez l’écran de conférence à plat et sélectionnez la vis appropriée pour connecter le support à l’écran.
ES Como se muestra en la Figura 4, coloque la pantalla de conferencias plana y seleccione el tornillo apropiado para conectar el soporte con la pantalla.
PL Jak pokazano na rysunku 4, połóż ekran konferencyjny płasko i wybierz odpowiednią śrubę, aby połączyć wspornik z ekranem.
EN Install the interactive display with the bracket on the wall plate, ensure that the hook is hung on the border of the wall plate, and then lock the safety screw on
the bracket
IT Installare il display interattivo con la staa sulla piastra a parete, assicurarsi che il gancio sia appeso al bordo della piastra a parete, quindi bloccare la vite di
sicurezza sulla staa
DE Installieren Sie das interaktive Display mit der Halterung an der Wandplatte, stellen Sie sicher, dass der Haken am Rand der Wandplatte aufgehängt ist, und
ziehen Sie dann die Sicherheitsschraube an der Halterung fest
FR Installez l’écran interactif avec le support sur la plaque murale, assurez-vous que le crochet est accroché au bord de la plaque murale, puis verrouillez la vis de
sécurité sur le support
ES Instale la pantalla interactiva con el soporte en la placa de pared, asegúrese de que el gancho cuelgue en el borde de la placa de pared y luego bloquee el
tornillo de seguridad en el soporte.
PL Zainstaluj wyświetlacz interaktywny z uchwytem na uchwycie ściennym, upewnij się, że hak jest zawieszony na krawędzi uchwytu ściennego, a następnie
zablokuj śrubę zabezpieczającą na uchwycie
Figure 5
d
cb

6
8
WWW.TECHLY.COM
MULTIFUNCTION
MOBILE TV CART
Figure 5
EN The eect after installation is as follows:
IT L’eetto dopo l’installazione è il seguente:
DE Der Eekt nach der Installation ist wie folgt:
FR L’eet après l’installation est le suivant:
ES El efecto después de la instalación es el siguiente:
PL Efekt po zamontowaniu jest następujący:
All rights reserved. All trademarks and trade names are those of their respective owners.
TECHLY® - Viale Europa 33 - 33077 Sacile (PN) - Italy
This manual suits for next models
3
Table of contents
Other Techly Outdoor Cart manuals

Techly
Techly ICA-TR53LB User manual

Techly
Techly iCa-Tr7 User manual

Techly
Techly ICA-TR31 User manual

Techly
Techly ICA-TR3 User manual

Techly
Techly ICA-TR216T User manual

Techly
Techly ICA-TR3390 User manual

Techly
Techly ICA-TR45 User manual

Techly
Techly ICA-TR33 User manual

Techly
Techly ICA-TR16T User manual

Techly
Techly ICA-TR54 User manual