Technimount System PRO 77 Series User manual

BRACKET PRO SERIE®77
USER GUIDE

Return to Table of Contents
2 BP77 UG 202108-01 www.technimount.com
Copyright 2021 Technimount E.M.S. Holding Inc. (Technimount), an aliated company of Technologies CGC Inc. All
Rights Reserved. No part of this publicaon may be reproduced, transmied, transcribed, stored in a retrieval system,
or translated into any language in any form or by any means without the wrien permission of Technimount or its
aliate companies.
Trademark Aribuons:
Bracket Pro Serie®, Technimount EMS™ are registered trademarks of Technologies CGC Inc.
Laerdal Compact Sucon Unit® 4 (LCSU® 4) is a registered trademark of Laerdal.
Technimount does not have a commercial relaonship with Laerdal. Laerdal does not promote or sell Technimount
products.
In order to ensure connuous improvements to our products and services, we invite you to communicate your
LEGAL NOTICE
Technologies CGC Inc. or Technimount E.M.S. Holding Inc. or its aliates are not expressly associated with the
markeng, distribuon or sale of Laerdal products.
The purchase and use of products designed by Technimount are subject to this limitaon of liability. It is important to
understand that, as Technimount is not the manufacturer of the Stryker (or other brand) stretcher or the manufacturer
of the medical equipment (Dräger or other brand), Technimount cannot guarantee the resistance and durability of
such stretchers and other equipment installed on it.
COPYRIGHT

www.technimount.com BP77 UG 202108-01 3
Return to Table of Contents
OFFICE ADDRESS
Technimount E.M.S. Holding Inc.
3770 Jean Marchand Street, Suite 100-C
Quebec (QC) G2C 1Y6
Canada
www.technimount.com
T + 1 888.639.2758
F + 1 855.339.6351
NOTE:
For any issues with your Technimount product, its components, or for any technical quesons during the installaon
or maintenance processes, please send an email to techsupport@technimount.com.
Please have the serial number of your Technimount product available (as shown in the gure below) when calling
Technimount Technical Support. Include the serial number in all wrien communicaons.
SERIAL NUMBER LOCATION
CONTACT INFORMATION
The serial
number is
written under
the bracket
as shown in
this image

4BP77 UG 202108-01 www.technimount.com
TABLE OF CONTENTS
COPYRIGHT ............................................................................................................................................................2
Legal Notice ...................................................................................................................................................................2
CONTACT INFORMATION.......................................................................................................................................3
Symbols and Definitions ...............................................................................................................................................6
Warning/Caution/Note ................................................................................................................................................7
Product Illustration .....................................................................................................................................................8
Bracket Pro Serie 77 ..............................................................................................................................................8
Front View ..........................................................................................................................................................................8
Back View ............................................................................................................................................................................9
INTRODUCTION ................................................................................................................................................... 10
Purpose of the Document ..........................................................................................................................................10
Product Description ...................................................................................................................................................10
Intended Use of the Product .....................................................................................................................................10
Limitation of Liability ..................................................................................................................................................10
Technical Specifications..............................................................................................................................................11
SUMMARY OF SAFETY PRECAUTIONS ................................................................................................................ 12
Warning/Caution/Note ..............................................................................................................................................12
NOTICE/CERTIFICATION ...................................................................................................................................... 14
INSTALLATION GUIDE .......................................................................................................................................... 15
Removing the Packaging for Installation .................................................................................................................15
Tools Required for Installation.................................................................................................................................15
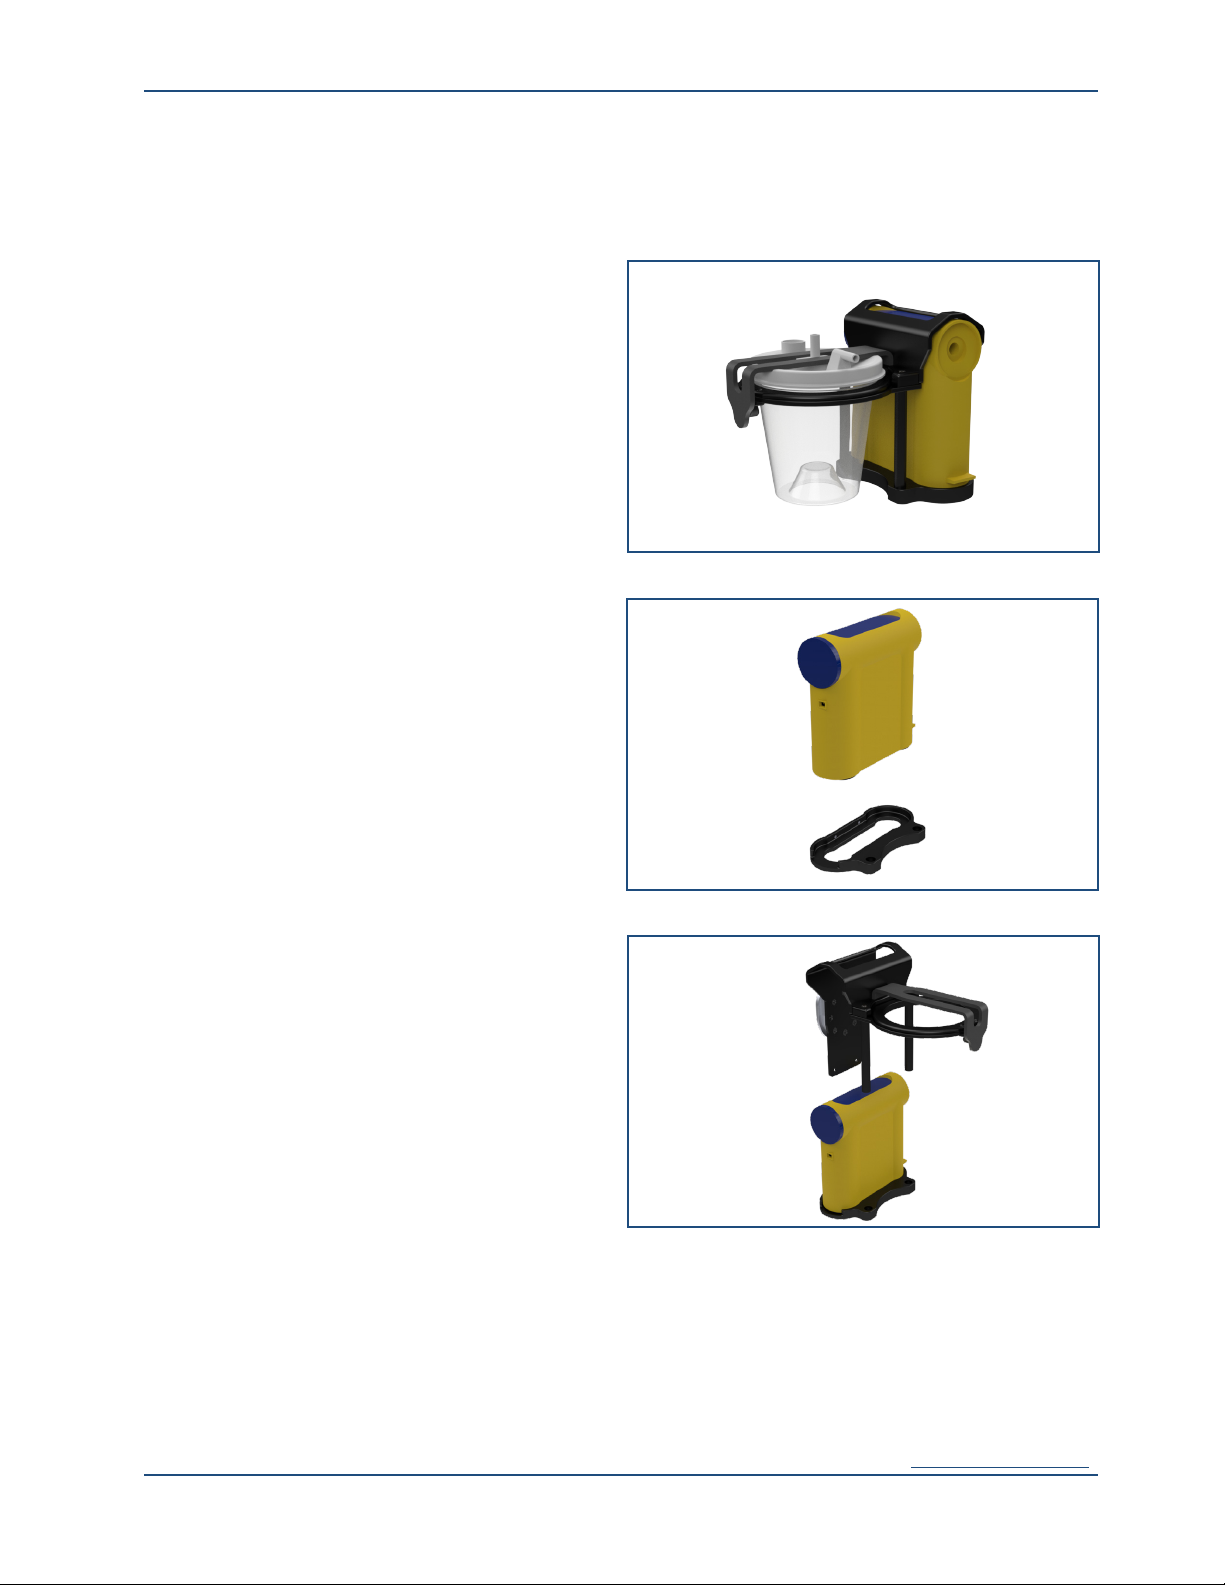
Identification of Components ....................................................................................................................................16
Bottom Support Block .........................................................................................................................................16
Hardware Kit ........................................................................................................................................................16
Installation of the Bracket onto the Laerdal Compact Suction Unit 4 .................................................................17
Installation of the Canister into the Bracket .........................................................................................................19
Removing the Canister from the Bracket .................................................................................................................20
MAINTENANCE GUIDE......................................................................................................................................... 21
Cleaning .......................................................................................................................................................................21
Cleaning Process ..................................................................................................................................................21
Removal of Iodine Compounds ...........................................................................................................................22
Preventive Maintenance .............................................................................................................................................22
Inspection Process and Schedule...............................................................................................................................23
Maintenance Program .........................................................................................................................................23
Inspection and Maintenance Record .........................................................................................................................24
Training Record ...........................................................................................................................................................25
Replacement Parts .......................................................................................................................................................26
WARRANTY .......................................................................................................................................................... 27
Warranty Policy ..........................................................................................................................................................27
Limited Responsibility and Warranty .........................................................................................................................27
International Warranty Clause .................................................................................................................................27

www.technimount.com BP77 UG 202108-01 5
TABLE OF CONTENTS
RETURN POLICY ................................................................................................................................................... 28
Return Policy ...............................................................................................................................................................28
Prior to 30 Days ...................................................................................................................................................28
Prior 45 Days ........................................................................................................................................................28
Prior 60 Days ........................................................................................................................................................28
Return Authorization .................................................................................................................................................28
Damaged Merchandise ................................................................................................................................................29
Claim Process ..............................................................................................................................................................29
Required Information ..........................................................................................................................................29
Findings and Conclusion .....................................................................................................................................29
Questions about our Policy .......................................................................................................................................29

Return to Table of Contents
6 BP77 UG 202108-01 www.technimount.com
INTRODUCTION
SYMBOLS AND DEFINITIONS
SYMBOL DESCRIPTION
Warning and Cauon, special aenon is required. Consult
accompanying documents
Safe working load symbol and Load balance symbol

www.technimount.com BP77 UG 202108-01 7
Return to Table of Contents
WARNING/CAUTION/NOTE
The word warning, cauon, or note carry special meaning and should be carefully reviewed.
SYMBOL DESCRIPTION
Warning
Alerts the reader about a situaon which, if not avoided, could
result in death or serious injury. It may also describe potenal
serious adverse reacons and safety hazards.
Caution
Alerts the reader of a potenally hazardous situaon, which, if
not avoided, may result in minor or moderate injury to the user
or paent or damage to the equipment or other property. This
includes special care necessary for the safe and eecve use of the
device to avoid damage that may occur as a result of use or misuse.
NOTE Provides special informaon about the product.
INTRODUCTION

Return to Table of Contents
8 BP77 UG 202108-01 www.technimount.com
PRODUCT ILLUSTRATION
BRACKET PRO SERIE 77
Front View
INTRODUCTION
Strap to Secure
800ml Canister
Bracket for
800ml Canister
High-Density Aluminum with
Black-Anodized Finish

www.technimount.com BP77 UG 202108-01 9
Return to Table of Contents
PRODUCT ILLUSTRATION (CONTINUED)
BRACKET PRO SERIE 77 (SUITE)
Back View
INTRODUCTION
Boom Support Block to
Secure Medical Device
An-Rotaon Micro Disc for
Installaon on Vercal and
Wall Mounng Systems

Return to Table of Contents
10 BP77 UG 202108-01 www.technimount.com
INTRODUCTION
PURPOSE OF THE DOCUMENT
This user guide is designed to assist you with the installaon, operaon and maintenance of the Technimount Bracket
Pro Serie 77 for the Laerdal Compact Sucon Unit 4 (LCSU 4).
PRODUCT DESCRIPTION
The Bracket Pro Serie 77 is a unique soluon to mount the Laerdal Compact Sucon Unit 4 in dierent applicaons
such as, on surface, a vercal system, stretcher or wall systems. It is designed to securely support and transport the
Laerdal Compact Sucon Unit 4 in pre-hospital and hospital environments. The Bracket Pro Serie 77 provides a higher
exibility for dierent EMS/CCT protocols and applicaons. It is recommended for the safe transport of the Laerdal
Compact Sucon Unit 4 during inter-hospital transfers for neonatal crical care.
INTENDED USE OF THE PRODUCT
The Bracket Pro Serie 77 is a mounng soluon to securely transport the Laerdal Compact Sucon Unit 4 during inter-
hospital transfers. It is designed to be installed on the equipment as described in this user guide. The Bracket Pro Serie
77 is for crew who has received the appropriate training necessary to operate the equipment in the eld according to
its intended use as outlined in this user guide. Please read this user guide thoroughly before using this equipment. To
ensure the safe operaon of this equipment, it is highly recommended to train sta prior to use.
LIMITATION OF LIABILITY
Technimount has designed a system to aach and install medical equipment owned by the customer on an incubator
transport stretcher manufactured by Stryker and involving or not a Dräger or other incubator brand.
The purchase and use of products designed by Technimount are subject to this limitaon of liability clause. It is
important to understand that, as Technimount is not the manufacturer of the Stryker stretcher (or other brand)
nor the manufacturer of the incubators (Dräger or other brand), Technimount cannot guarantee the resistance and
durability of such stretchers and other equipment installed on it.
In addion, the mounng systems are designed by Technimount to install dierent medical equipment. Therefore,
Technimount is not responsible for any damage that may result from the installaon of mulple medical equipment
on the stretcher. For example, risks related, but not limited to, potenal stretcher overloading, pping, interference
between equipment, access restricon or other.
The Neonatal Stretcher System was developed by Technimount to meet an important market need, however, this
transport system involves risks that remain under the sole responsibility of the customer. It is important to instruct
your sta and partners to use Technimount products according to the safest pracces and in accordance with the
user's guide we provide. In addion, follow the safety guidance from the users guides from the manufacturers of
the medical devices, incubators and transport stretcher system. Technimount will not be held responsible for any
misuse of the product. Therefore, by conrming the purchase and accepng delivery of the transport system or any
Technimount product, this constutes conrmaon of consent to this limitaon of liability clause.

www.technimount.com BP77 UG 202108-01 11
Return to Table of Contents
INTRODUCTION
TECHNICAL SPECIFICATIONS
Product Name Bracket Pro Serie® 77
Product Descripon Bracket for Transport of LCSU® 4 on Stretcher during Neonatal Crical Care
Compability of Medical Device* Laerdal Compact Sucon Unit® 4
Environment of Usage EMS/CCT (Ground) - Hospital/Clinic
Product Secon Material • Main Assembly: Aluminum 6061-T6
• An-Rotaon Micro Disc: Aluminum 6061-T6
Product Finish • Main Assembly: Black-Anodized Finish
• An-Rotaon Micro Disc: Silver-Anodized Finish
Environmental Regulaons Complying with RoHS 3
Temperature of Usage - 35° C to 45° C
Cercaon Designed to Comply with:
• SAE J3043 (26 G)
Installaon Device Retained on Main Assembly with Support Blocks
Aachment Opons An-Rotaon Micro Disc
Transportaon Compability System Compable with Technimount's:
• Safety MD-Transporter (vercal)
• Vercal Mounng System
• Micro Base
Features • Access to all Medical Device Monitors, Connectors and Accessories
• Rubber Pads Protecng the Bracket when Placed on a Surface
• Rubber Cushions Inside the Bracket to Protect Medical Device
• An-Rotaon Micro Disc for installaon on Vercal and Wall Mounng
Systems
• Made with High-Density Aluminum
Physical Overall Dimensions Width 7.09 in, Depth 7.62 in, Height 10.14 in
Weight 2.276 lb
Part Number 770-10-LASP - Bracket Pro Serie® 77
Other Models and Conguraon Opons Contact Technimount EMS for more informaon or for other opons at
customer[email protected]
* Product and medical equipment manufacturers names are trademarks™ or registered trademarks® of their respecve holders.
Technimount does not have a commercial relaonship with these medical equipment manufacturers.

Return to Table of Contents
12 BP77 UG 202108-01 www.technimount.com
WARNING/CAUTION/NOTE
Carefully read and strictly follow all Warnings and Cauons listed in this user guide. Servicing and maintenance should
only be done by qualied personnel.
WARNING
9Always hold the bracket with both hands when you manipulate it.
9Operate the bracket only as described in this user guide.
9Do not modify the bracket, or any components of Technimount systems. Modifying the product can cause
unpredictable operaon resulng in injury to the paent or operator.
9It is the responsibility of the operator of the bracket or any of its opons, to ensure equipment being used with the
Technimount products meets the installaon specicaons. Injury may result if non-compable products are used
with Technimount System products.
9Do not aempt to operate, install or remove the equipment while mobile. Ensure that installaon and removal of
equipment is done while vehicle or aircra is immobilized.
9Verify that the bracket is inserted correctly into a mounng system and locked. If equipment is improperly installed
and locked, it can cause the equipment to fall and cause injury to the paent or operator and/or damage to the
medical equipment.
9Never use the bracket if not properly installed and locked on a base, a cot/stretcher, or on a wall mount or oor
mount. If not installed properly, the medical device could fall during transport and may cause injury to the paent
or operator and/or damage to the product.
9Do not allow untrained sta to assist in the operaon of the mounng system. Untrained technicians/sta can
cause injury to the paent or themselves.
9Do not place addional equipment or items onto the bracket or mounts other than approved Technimount or
components, as this could damage the product and may result in injury to the paent or operator.
9Operators must be able to able to safely li the total weight of the bracket system and medical device.
9Do not aach restraints to the bracket frame. It may result in damage to the System and/or result in injury to the
paent or operator.
9Always reposion the equipment with care, avoid any improper pushing or violent manipulaon, as it may result in
unbalanced equipment and may cause injury to the paent or operator and/or damage to the product.
9Improper maintenance can cause injury to paent or operator or damage to the product. Maintain the bracket
and Mounng Systems as described in this user guide. Use only Technimount approved parts and maintenance
procedures. Using unapproved parts and procedures could cause unpredictable operaon and/or injury and will
void the product warranty.
9Failure to properly clean or dispose of corrosive products will increase the risk of premature damage and may
cause injury to the paent or operator.
9Any installaon on a surface, wall or on the structure of the vehicle has to be validated or inspected in order to
ensure it maintains the integrity of the vehicle.
SUMMARY OF SAFETY PRECAUTIONS

www.technimount.com BP77 UG 202108-01 13
Return to Table of Contents
WARNING/CAUTION/NOTE (CONTINUED)
CAUTION
9Only cered technical personnel familiar with the bracket installaon and use should manipulate it. Always refer
to Technimount's user guides for all instrucons for installing and using any Technimount Mounng System.
9Inspect regularly all components on the equipment for any issue and loose screws, bolts and nuts.
9Never install the mount into or on other similar mounng systems or brackets without wrien conrmaon by
Technimount System as these dierent systems may be from other brands or models and may not be compable
with Technimount Systems.
NOTE
9Some cleaning products are corrosive in nature and may cause damage to the product if used improperly. If such
products are used to clean Technimount equipment, the equipment must be rinsed with clean water and thoroughly
dried following the cleaning. Failure to properly rinse and dry the Mounng Systems will leave a corrosive residue
on the surface, possibly causing premature corrosion of crical components.
9When ordering, it is important to idenfy on which mounng system you need to mount the bracket on as there
are dierent systems for dierent applicaons (ground).
9A maintenance program should be established for all Technimount equipment. Prevenve maintenance may need
to be performed more frequently, based on the level of use of the product. Close aenon should be given to
safety features (i.e.: screws, quick release mechanisms, and aachment points).
9Failure to use authorized parts, and lubricants, could cause damage to the equipment and will void the warranty
of the product.
9This user guide should be considered a permanent part of the bracket, and should remain with the product even if
the equipment is subsequently sold.
9Technimount connually seeks advancements in product design and quality. Therefore, while this user guide
contains the most current product informaon available at the me of prinng, there may contain minor dierences
between your mounng system and this user guide.
If you have any quesons, or for more informaon, please contact Technimount Customer Service customerservice@
technimount.com.
SUMMARY OF SAFETY PRECAUTIONS

Return to Table of Contents
14 BP77 UG 202108-01 www.technimount.com
NOTICE/CERTIFICATION
The Bracket Pro Serie® 77 is designed to comply with the essenal requirements and other relevant provisions of
the Direcve 1999/5/EC and SAE J3043. For more informaon, please contact Technimount Customer Service
(customerservice@technimount.com).
Technimount E.M.S. Holding Inc.
C/O: Regulatory Aairs
3770, Jean Marchand Street, Suite 100-C
Quebec (QC) G2C 1Y6
Canada
T + 1 888.639.2758
F + 1 855.339.6351
technimount.com
WARNING
The end user and administrator are responsible to validate regulaons and standards for safety in their region, in
order to comply with applicable safety regulaons. Technimount is not responsible to inform the end user and/or
administrator of applicable legislaon for safety in their area.
LEGAL NOTICE
The purchase and use of products designed by Technimount are subject to this limitaon of liability. It is important to
understand that, as Technimount is not the manufacturer of the Stryker (or other brand) stretcher or the manufacturer
of the medical equipment (Dräger or other brand), Technimount cannot guarantee the resistance and durability of
such stretchers and other equipment installed on it.

www.technimount.com BP77 UG 202108-01 15
Return to Table of Contents
INSTALLATION GUIDE
REMOVING THE PACKAGING FOR INSTALLATION
1. Unpack boxes and check all items are included for installaon.
2. Ensure that all shipping and packaging materials have been properly removed from the product(s) prior to
installaon.
3. Idenfy all of the product components and hardware prior to starng the installaon.
4. The bracket must work properly before it is put into service.
5. Refer to the idencaon of components at the beginning of this user guide if needed.
TOOLS REQUIRED FOR INSTALLATION
Below are the basic tools required for installaon. Other tools may also be required. If you have any quesons regarding
the installaon, or need assistance, please contact our Technical Support team at techsupport@technimount.com
9Phillips Screwdriver
NOTE
9Electrical tools are not recommended, as there is a potenal risk of damage to the threads.
9Technimount provides screws for the installaon of the main assembly.
9During the installaon process, Technimount recommends the use of medium strength thread-locking adhesive
(blue Locte) to prevent the screws from loosening during normal use. Put a few drops of medium strength thread-
locking adhesive (blue Locte) on each screw before installaon.

Return to Table of Contents
16 BP77 UG 202108-01 www.technimount.com
INSTALLATION GUIDE
IDENTIFICATION OF COMPONENTS
BOTTOM SUPPORT BLOCK
The black oxide Stainless Steel boom support block
is designed to hold Laerdal Compact Sucon Unit 4
by securing its base.
HARDWARE KIT
The following hardware is provided for the installaon
of the Bracket Pro Serie 77:
9Two (2) Black Oxide Stainless Steel Flat Head
Phillips Screws 10-32 x 1/2"
9Two (2) Black Oxide Stainless Steel Flat Head
Phillips Screws 10-32 x 3/8"

www.technimount.com BP77 UG 202108-01 17
Return to Table of Contents
1. The Bracket Pro Serie 77 is designed to be
installed on the Laerdal Compact Sucon Unit 4
from Laerdal.
2. Locate the medical device and boom support
block of the main assembly.
3. Align the boom of the medical device with the
boom support block.
4. Install the top part of the bracket above the
medical device, align rear vercal rods with the
mounng holes.
INSTALLATION GUIDE
INSTALLATION OF THE BRACKET ONTO THE LAERDAL COMPACT SUCTION UNIT 4

18 BP77 UG 202108-01 www.technimount.com
INSTALLATION OF THE BRACKET ONTO THE LAERDAL COMPACT SUCTION UNIT 4
(CONTINUED)
5. Align the screws and screws holes of the boom
support block.
6. Install the two (2) Black Oxide Stainless Steel Flat
Head Phillips Screws 10-32 x 1/2" on the boom
support block.
7. Tighten the two (2) screws well.
8. Align the screws and screw holes at the back of
the main assembly.
9. Install the two (2) Black Oxide Stainless Steel Flat
Head Phillips Screws 10-32 x 3/8" on the main
assembly.
NOTE
Put a few drops of medium strength thread-locking
adhesive (blue Locte 242) on each screw before
installaon to prevent the screws from loosening
during normal use.
10. Tighten the two (2) screws well.
CAUTION
9Do not use electrical tools to install the screws.
9Do not overghten the screws.
INSTALLATION GUIDE

www.technimount.com BP77 UG 202108-01 19
Return to Table of Contents
INSTALLATION GUIDE
INSTALLATION OF THE CANISTER INTO THE BRACKET
1. Keep the strap up.
2. Install the 800ml canister into the main assembly.
3. Verify that the 800ml canister is properly installed
in the main assembly.
4. Close the strap on the canister lid and lock it.
5. Laerdal Compact Sucon Unit 4 is ready for
transport once properly inserted into its bracket
and the stretcher mounng system.

Return to Table of Contents
20 BP77 UG 202108-01 www.technimount.com
REMOVING THE CANISTER FROM THE BRACKET
1. To remove the 800ml canister from the bracket,
li the strap on the canister lid.
2. Raise the strap completely.
3. Remove the canister from the bracket by liing it
upwards to release it.
OPERATION GUIDE
Table of contents
Other Technimount System TV Mount manuals

Technimount System
Technimount System BRACKET PRO 151 Series User manual

Technimount System
Technimount System PRO 160 Series User manual

Technimount System
Technimount System BRACKET PRO 75 Series User manual

Technimount System
Technimount System BRACKET PRO 100 Series User manual

Technimount System
Technimount System PRO 85 Series User manual

Technimount System
Technimount System PRO 150 Series User manual

Technimount System
Technimount System PRO 106 Series User manual

Technimount System
Technimount System PRO 60-SD Series User manual

Technimount System
Technimount System PRO 152 Series User manual

Technimount System
Technimount System PRO 71 Series User manual