manuals.online logo
Brands
  1. Home
  2. •
  3. Brands
  4. •
  5. Teleco
  6. •
  7. Lighting Equipment
  8. •
  9. Teleco TVLRGBDU868ST24 User manual

Teleco TVLRGBDU868ST24 User manual

This manual suits for next models

3

Other Teleco Lighting Equipment manuals

Teleco TVRGB00PSI24 User manual

Teleco

Teleco TVRGB00PSI24 User manual

Teleco OMBREON User manual

Teleco

Teleco OMBREON User manual

Popular Lighting Equipment manuals by other brands

Life 39.9F70020C quick start guide

Life

Life 39.9F70020C quick start guide

EuroLite LED ML-20 user manual

EuroLite

EuroLite LED ML-20 user manual

LIGMAN OD-50141 installation manual

LIGMAN

LIGMAN OD-50141 installation manual

Home Accents Holiday 1002461144 instructions

Home Accents Holiday

Home Accents Holiday 1002461144 instructions

Experia IRiS Ripple Light instruction manual

Experia

Experia IRiS Ripple Light instruction manual

Erco Gecko Mounting instructions

Erco

Erco Gecko Mounting instructions

Inter-lux ZTA.100.Surface Installation and maintenance instructions

Inter-lux

Inter-lux ZTA.100.Surface Installation and maintenance instructions

Whelen Engineering Company TN Series installation guide

Whelen Engineering Company

Whelen Engineering Company TN Series installation guide

IKEA BJÖRKSPIREA manual

IKEA

IKEA BJÖRKSPIREA manual

Toolland PM 6640 instruction manual

Toolland

Toolland PM 6640 instruction manual

GTD GTD-LP200 user manual

GTD

GTD GTD-LP200 user manual

LIVARNO home 1105-W-UK manual

LIVARNO home

LIVARNO home 1105-W-UK manual

ProLights EclPar IPMFC user manual

ProLights

ProLights EclPar IPMFC user manual

Velvet EVO Series user manual

Velvet

Velvet EVO Series user manual

IDTOLIGHT GENT installation instructions

IDTOLIGHT

IDTOLIGHT GENT installation instructions

MAYTONI S35 installation manual

MAYTONI

MAYTONI S35 installation manual

MaxLite MLFP14DP4535 user manual

MaxLite

MaxLite MLFP14DP4535 user manual

SLV Elektronik 550621 instruction manual

SLV Elektronik

SLV Elektronik 550621 instruction manual

manuals.online logo
manuals.online logoBrands
  • About & Mission
  • Contact us
  • Privacy Policy
  • Terms and Conditions

Copyright 2025 Manuals.Online. All Rights Reserved.

T1
T2
T3
B-
G-
R-
Led 1
P1
P2
P3 Led 2
Led 3
Led 4
B1
B2
BUS
+COM
1
2
3
4
5
6
7
8
9
10
11
12
13
14
15
16
COM
BUS power supply
24V IN
24V OUT
IT - RICEVITORE RADIO BUS PER IL CONTROLLO DI STRIP LED RGB ANODO COMUNE
EN  BUS RADIO RECEIVER CONTROLLING RGB LED STRIPS COMMON ANODE
FR - RECEPTEUR RADIO BUS POUR LE CONTROLE DES LEDS RGB AVEC ANODE COMMUNE
DE  BUS EMPFÄNGER ZUR ANSTEUERUNG VON RGB LED STRIPES  GEMEINSAME ANODE
IT - Codice prodotto
EN - Product code
FR - Code du produit
DE - Artikelnummer
IT - Attenzione: l’alimentazione fornita al ricevitore deve corrispondere al voltaggio del carico!
EN - Attention: the power supply connected to the receiver must correspond to the voltage of the load!
FR - Attention: l’alimentation fournie au récepteur doit correspondre à la tension de la charge!
DE - Achtung: Die Stromversorgung des Empfängers muss mit der Spannung der Last übereinstimmen!
IT - Ingressi lari
EN - Wired input
FR - Entrées laires
DE - Verdrahtete Eingänge
TVLRGBDU868ST24 Master BUS 3x4A (868.3Mhz)
TVLRGBDU916ST24 Master BUS 3x4A (916Mhz)
TVLRGBDU868BST24 Master BUS 3x4A, Box IP54 (868.3Mhz)
TVLRGBDU916BST24 Master BUS 3x4A, Box IP54 (916Mhz)
TVLRGBD000ST24
Slave 3x4A
165 mm
IT - Foro per il fissaggio con vite (sotto lo sportello)
EN - Hole for fixing with screw (under the cover)
FR - Trou pour fixation avec vis (sous le couvercle)
DE - Loch für die Montage mit Schraube (unter dem Deckel)
IT - Montaggio su superficie piana
EN - Flat surface mounting
FR - Fixation sur surface plate
DE - Montage auf ebene Oberfläche
70 mm
185 mm
IT - Foro per il fissaggio con vite (sotto lo sportello)
EN - Hole for fixing with screw (under the cover)
FR - Trou pour fixation avec vis (sous le couvercle)
DE - Loch für die Montage mit Schraube (unter dem Deckel)
IT - Montaggio su superficie piana
EN - Flat surface mounting
FR - Fixation sur surface plate
DE - Montage auf ebene Oberfläche
74 mm (50 mm)
56 mm
151 mm
47 mm
40 mm
IT - MONTAGGIO EN  MOUNTING FR - FIXATION DE  MONTAGE
TELECO AUTOMATION SRL
Via dell’Artigianato, 16 - 31014 Colle Umberto (TV) ITALY
TELEPHONE: ++39.0438.388511 FAX: ++39.0438.388536 - www.telecoautomation.com
DOC.: T620.03
TVLRGBDUXXXST24 - TVLRGBDUXXXBST24 DATE: 27/08/18
This document is the property of Teleco Automation Srl who reserves all reproduction and copying rights
2
+
-
+
-
+
-
T1
T2
T3
LINE
IN ~
9
10
11
12
13
14
1
2
3
4
5
6
7
8
9
10
11
12
13
14
1
2
3
4
+ COM
- R
- G
- B
+ COM
- R
- G
- B
COM
L
N
...
...
15
16
5
6
7
8
B1 B2
B1
B2
BUS power supply
B2 B1
BUS
BUS in Led 1
Led 2
Led 3
Led 4
24V
24V IN
24V OUT
24V IN
24V OUT
IT - Per vericare il collegamento dei led premere P3 EN - To test the led wiring, press P3
FR - Pour vérier la connexion des LEDs appuyer sur P3 DE - Um den Anschluss der LEDs zu überprüfen drücken Sie P3
IT - COLLEGAMENTI EN  WIRINGS FR - CONNEXIONS DE  ANSCHLÜSSE
IT - Attenzione: non invertire la polarità dei led!
EN - Attention: do not invert the polarity of the led!
FR - Attention: ne pas inverser la polarité des leds!
DE - Achtung: Polung der LEDs nicht invertieren!
IT ----------------------------------------------------
T1 ON (Colore precedente lo spegnimento)
Successivi impulsi = selezione colori in
sequenza.
T2 ON Ciclo automatico colori *
Successivi impulsi = pausa/ripresa ciclo
automatico.
> 2 s = inversione del senso di rotazione.
EN ---------------------------------------------------
T1 ON (Colour ON before last turning off)
Further pulses = colour selection in
sequence.
T2 ON Colour automatic cycle *
Further pulses = pause/play automatic
cycle.
> 2 s. = inversion of cycle direction
FR ---------------------------------------------------
T1 ON (Couleur afchée à l’extinction)
Impulsions suivantes = sélection des
couleurs en séquence
T2 ON Cycle automatique couleurs *
Impulsions suivantes = pause/reprise
cycle automatique
> 2 s. = inversion du sens de rotation
DE ---------------------------------------------------
T1 EIN (Farbe ON bevor letztemAusschalten)
Darauffolgende Impulse = Sequenz-
Farbwahl
T2 EIN Automatische Farbrotation *
Darauffolgende Impulse = Pause/Play
Automatische Farbrotation
> 2 Sek. = Umkehrung der
Rotationsrichtung
T3 OFF (AUS) -----------------------------------
*
4
8
7
6
5
3
2
1
TVLRGBDUxxx(B)ST24
TVLRGBD000(B)ST24
IT - Attenzione: non invertire la polarità del BUS!
EN - Attention: do not invert the polarity of the BUS!
FR - Attention: ne pas inverser la polarité du BUS!
DE - Achtung: Polung des BUS nicht invertieren!
IT - Led2 si accende alla ricezione di comandi dal Master. In caso di errore BUS tutti
i led si accendono ed il buzzer emette un suono per 3s.
EN - Led2 turns on when receiving any commands from Master. In case of BUS error
all the led turn on and the buzzer emits a sound for 3s.
FR - Led2 s’allume à la réception des commandes du Master. En cas d’erreur BUS,
tous les Leds s’allumeront et l’avertisseur sonore émettra un son pendant 3s.
DE - Led2 schaltet bei Erhalt eines Befehls vom Master ein. Im Falle eines BUS
Fehlers schalten alle Leds ein und der Summer gibt einen 3 Sek. langen Ton aus.
3
selezione colori 1 o 2
colors 1 or 2 selection
choix des couleurs 1 ou 2
Wähle Farben 1 oder 2
OFF (AUS)
velocità-speed-vitesse-Geschwindigkeit
colori - colours
couleurs - Farben
1
pausa/play
pause/play
Pause/Start
attiva/inverti ciclo
cycle activation/direction
démarrage/inversion du cycle
Starte Sequenz/Umkehrung
CH1
CH2
CH3
CH4
CH5
CH6
CH7
***
velocità-speed-vitesse-Geschwindigkeit
Ciano - Cyan - Cyan - Hellblau
Giallo - Yellow - Jaune - Gelb
Magenta - Anilinrot
Bianco freddo - Cold white
Blanc froid - Kaltweiß
Rosso - Red - Rouge - Rot
Verde - Green - Vert - Grün
Blu - Blue - Bleu - Blau
Bianco caldo - Warm white
Blanc chaud - Warmweiß
colori - colours
couleurs - Farben
2
IT - TRASMETTITORE 7 CANALI EN  7 CHANNELS TRANSMITTER FR - EMETTEUR À 7 CANAUX DE  7 KANAL SENDER
IT - Premere e tenere premuti i tasti
CH1..4 per regolare l’intensità dei colori
selezionati.
EN - Press and keep pressed the buttons
CH1..4 to dim the light intensity of the
selected colours.
FR - Appuyer sur les boutons CH1..4 et
maintenir appuyé pour régler l’intensité
des couleurs sélectionnées.
DE - CH1..4 drücken und halten Sie
gedrückt um die jeweilige Farbe rauf oder
runter zu dimmen.
**
4
8
7
6
5
3
2
1
colore sso-solid colour
couleur xe-Konstant Farbe
*Velocità ciclo - Cycle speed - Vitesse du cycle - Geschwindigkeit Sequenz
3
variazione-moving
variation-Wechsel
4
8
7
6
5
3
2
1
4
8
7
6
5
3
2
1
21
1 s
4 s
6 s
16 s
10 s
28 s
(default)
colore sso-solid colour
couleur xe-Konstant Farbe
variazione-moving
variation-Wechsel
colore sso-solid colour
couleur xe-Konstant Farbe
variazione-moving
variation-Wechsel
3
2
1
CH6 ► CH1 CH2 CH3
4
tenere premuto
keep it pressed
maintenir appuyé
gedrückt halten
LED ON
P3
IT - Reset colori standard
EN - Preset colours reset
FR - Reset des couleurs standards
DE - Reset voreingestellte Farben
IT - Premere P2 e tenere premuto. Premere un tasto del trasmettitore 7 canali.
EN - Press P2 and keep it pressed. Press any button of the 7 channels transmitter.
FR - Appuyer P2 et le maintenir appuyé. Appuyer sur un bouton de l’émetteur à 7 canaux.
DE - P2 drücken und halten Sie gedrückt. Einen 7-Kanal Sender drücken.
suono continuo
continuous sound
son continu
Dauerton
...
( )
IT - MEMORIZZAZIONE TRASMETTITORE 7 CANALI EN  7 CHANNELS TRANSMITTER MEMORIZATION
FR - MÉMORISATION DE L’EMETTEUR À 7 CANAUX DE  EINLERNUNG 7KANAL SENDER
1.11.1
P2
suono intermittente
intermittent sound
son intermittent
intermittierender Ton
IT - MODIFICARE I COLORI PRESET EN  MODIFYING THE PRESET COLOURS
FR - MODIFIER LES COULEURS PRÉDÉFINIES DE  VOREINGESTELLTER FARBEN ÄNDERN
1.2
* IT - Rotazione automatica dei colori (1 s. sso + 4 s.variazione). Premendo nuovamente il tasto CH6 è possibile cambiare subito il senso di rotazione. EN - Automatic colours rotation (1 s. solid + 4 s.
moving). Pressing again the button CH6 it is possible to change immediately the rotation direction. FR - Variation de couleur automatique (1 s. xe + 4 s. variation). En appuyant de nouveau sur la touche
CH6 on peut changer immédiatement le sens de rotation. DE - Automatischer Farbwechsel (1 Sek. konstant + 4 Sek. Wechsel). Durch Drücken des Tasters CH6 können Sie die Drehrichtung ändern.
*
CH6
4
8
7
6
5
3
2
1
( > 4s)
LED
OFF
LED
ON
LED
ON
CH7
LED
OFF
LED
ON
CH1..4
( 3s)
IT - Uscire con CH7
EN - Exit by CH7
FR - Sortir par CH7
DE - Beenden Sie mit CH7
IT - Memorizzare il colore desiderato tenendo premuto 3 s il
tasto da associare (CH1..4 o CH5 ► CH1..4). EN - Memorize the
desired colour keeping the button to associate (CH1..4 or CH5 ►
CH1..4) pressed 3 s. FR - Mémoriser la couleur choisie en gardant
appuyé pour 3 s le bouton à associer (CH1..4 ou CH5 ► CH1..4).
DE-SpeichernSiediegewünschteFarbeindemSiediezuzuordnende
Taste (CH1…4 oder CH5 ► CH1..4) 3 Sek. lang Drücken.
IT - Tenere premuto CH6 più di 4se rilasciare dopo la
seconda accensione dei LED. EN - Keep CH6 pressed
more than 4sand release after the second turning on
of the LED. FR - Maintenir appuyé CH6 pendant 4sau
min. et relâcher après le clignotement de l’éclairage.
DE - Halten Sie CH6 länger als 4 Sek. gedrückt und
lassen Sie nach dem zweiten Anschalten los.
tenere premuto
keep it pressed
maintenir appuyé
gedrückt halten
( 10 s) LED ON
LED OFF LED OFF
5
IT - MEMORIZZAZIONE CANALE SINGOLO DI COMANDO EN  SINGLE COMMAND CHANNEL MEMORIZATION
FR - MÉMORISATION DE CANAL INDIVIDUEL DE COMMANDE DE  EINLERNUNG EINZEL KANAL FÜR BEFEHLE
1.11.3
IT - 1 tasto SELEZIONE COLORE
EN - 1 button COLOUR SELECTION
FR - 1 bouton SÉLECTION COULEUR
DE - 1 Taste FARBFUNKTION
*
x2
IT - 1 tasto con funzione ON **
EN - 1 button with function ON **
FR - 1 bouton avec fonction ON **
DE - 1 Taste mit Funktion EIN **
*
x3
IT - 1 tasto con funzione OFF
EN - 1 button with function OFF
FR - 1 bouton avec fonction OFF
DE - 1 Taste mit Funktion AUS
*
x4
IT - 1 tasto BIANCO CALDO
EN - 1 button WARM WHITE
FR - 1 bouton BLANC CHAUD
DE - 1 Taste WARMWEISS
*
x5
IT - 1 tasto BIANCO FREDDO
EN - 1 button COLD WHITE
FR - 1 bouton BLANC FROID
DE - 1 Taste KALTWEISS
*
x6
...
tenere premuto
keep it pressed
maintenir appuyé
gedrückt halten
suono continuo
continuous sound
son continu
Dauerton
suono intermittente
intermittent sound
son intermittent
intermittierender Ton
IT - Premere il tasto del
trasmettitore relativo al
codice da memorizzare.
EN - Press the button of
the transmitter relative
to the code to memorize.
FR - Appuyer sur le
bouton de l’émetteur
concernant le code à
mémoriser.
DE - Drücken Sie die
Sendertaste die auf den
zu speichernden Code
bezogen ist.
OFF(AUS)
> 2 s
** IT - Ultimo colore attivo prima dello spegnimento. EN - Last activated colour before turning-off. FR - Dernière couleur activée avant que ça s’éteigne. DE - Letzte aktive Farbe vor dem Ausschalten.
*IT - Il buzzer emette un bip ad ogni pressione. EN - The buzzer will make a beep each press. FR - L’avertisseur sonore émet un bip à chaque appui. DE - Das Gerät quittiert jeden Druck mit einem Ton.
P2
IT - Canale singolo di comando
EN - Single command channel
FR - Canal individuel de commande
DE - Einzel- Kanal für Befehle
. . .
ON/OFF
(EIN/AUS)
< 1 s
DIMMER
ꜛ ꜜ
> 1 s
ON/OFF
(EIN/AUS)
< 1 s
DIMMER
ꜛ ꜜ
> 1 s
6
1.12 IT - CANCELLAZIONE CODICI RADIO EN  RADIO CODES DELETION
FR - SUPPRESSION DES CODES RADIO DE  LÖSCHUNG VON SENDEKANÄLEN
*IT - Il buzzer emette un bip ad ogni pressione. EN - The buzzer will make a beep each press. FR - L’avertisseur sonore émet un bip à chaque appui. DE - Das Gerät quittiert jeden Druck mit einem Ton.
P3
IT - TIPO DI CANCELLAZIONE
EN - TYPE OF DELETION
FR - TYPE DE SUPPRESSION
DE - LÖSCHUNGSART
IT - Cancellazione di un singolo codice radio
EN - Deletion of a single radio code
FR - Suppression d’un seul code radio
DE - Löschung eines einzelnen Sendekanäle
*
x2
IT - Premere il tasto del trasmettitore
relativo al codice da cancellare.
EN - Press the button of the transmitter
relative to the code to delete.
FR - Appuyer sur le bouton de l’émetteur
concernant le code à supprimer.
DE - Drücken Sie die Sendertaste die auf
den zu löschenden Code bezogen ist.
IT - Cancellazione di tutti i codici radio
EN - Deletion of all the radio codes
FR - Suppression de tous les codes radio
DE - Löschung aller Sendekanäle
*
x3
tenere premuto
keep it pressed
maintenir appuyé
gedrückt halten
suono continuo
continuous sound
son continu
Dauerton
...
(10 s) suono intermittente intermittent sound
son intermittent intermittierender Ton
IT - MEMORIA DEL VALORE DI INTENSITÀ LUMINOSA DI CIASCUN COLORE PRESET (VALORE DI FABBRICA = DISATTIVATO)
EN  MEMORY OF THE LIGHT INTENSITY VALUE FOR EACH OF THE PRESET COLOUR DEFAULT VALUE = DEACTIVATED
FR - MÉMOIRE DE LA VALEUR D’INTENSITÉ LUMINEUSE POUR CHAQUE COULEUR PRÉDÉFINIE (VALEUR PRÉDÉFINIE = DÉSACTIVÉ)
DE  SPEICHERUNG WERT DER LICHTINTENSITÄT VON JEDER VOREINGESTELLTER FARBE STANDARDWERT = DEAKTIVIERT
3
Attivazione
Activation
Activation
Aktivierung
Disattivazione
Deactivation
Désactivation
Deaktivierung
LED4 OFF
LED4 ON
P3
LED ON
tenere premuto
keep it pressed
maintenir appuyé
gedrückt halten
( 10 s)
LED OFF
LED
ON
LED
ON
LED
ON
LED
ON
LED
ON
7
IT - Premere il tasto P3 del trasmettitore memorizzato. Premere il tasto relativo ad un codice memorizzato. Premere il tasto relativo
al nuovo codice. EN - Press the button P3 of the memorized transmitter. Press the button relative to a memorized code. Press
the button relative to the new code. FR - Appuyer sur le bouton P3 de l’émetteur mémorisé. Appuyer sur le bouton concernant un
code mémorisé. Appuyer sur le bouton concernant le nouveau code. DE - Drücken Sie die Taste P3 des gespeicherten Senders.
Drücken Sie die auf den gespeicherten Code bezogene Taste. Drücken Sie die auf den neuen Code bezogene Taste.
IT - MEMORIZZAZIONE REMOTA DI ULTERIORI CODICI RADIO EN  REMOTE MEMORIZATION OF FURTHER RADIO CODES
FR - MÉMORISATION À DISTANCE D’AUTRES CODES RADIO DE  FERN SPEICHERUNG VON WEITEREN SENDEKANÄLEN
4.1
1 s< 5 s
suono continuo
continuous sound
son continu
Dauerton
suono intermittente
intermittent sound
son intermittent
intermittierender Ton
...
P3
memorizzato
memorized
mémorisé
gespeichert
memorizzato
memorized
mémorisé
gespeichert
< 5 s
suono continuo
continuous sound
son continu
Dauerton
nuovo
new
nouveau
neu
IT - Il tasto P3 si trova all’interno del trasmettitore.
Il codice radio aggiunto avrà le stesse funzioni del
codice usato per l’inserimento. La procedura è
compatibile con qualsiasi tipo di trasmettitore.
EN - P3 button is located inside the transmitter. The
added radio code will have the same functions of the
code used for the memorization. This procedure is
compatible with any type of transmitter.
FR - Le bouton P3 se trouve à l’intérieur de l’émetteur.
Le code radio ajouté aura les mêmes fonctions que
le code utilisé pour la mémorisation. La procédure
est compatible avec n’importe quel type d’émetteur.
DE - Die Taste P3 bendet sich im Inneren des
Senders. Der hinzugefügte Sendekanal wird
dieselben Funktionen des Codes haben welcher für
die Einlernung verwendet wurde. Die Prozedur kann
mit allen Arten von Sendern durchgeführt werden.
IT - CANCELLAZIONE REMOTA DI UN CODICE RADIO EN  REMOTE DELETION OF A RADIO CODE
FR - SUPPRESSION À DISTANCE D’UN CODE RADIO DE  FERN LÖSCHUNG EINES SENDEKANALS
4.2
IT - Il tasto P3 si trova all’interno del trasmettitore.
EN - P3 button is located inside the transmitter.
FR - Le bouton P3 se trouve à l’intérieur de
l’émetteur. DE - Die Taste P3 bendet sich im
Inneren des Senders.
IT - Premere tre volte il tasto P3 del trasmettitore memorizzato. Premere il tasto relativo al codice da cancellare.
EN - Press three times the button P3 of the memorized transmitter. Press the button relative to the code to delete.
FR - Appuyer trois fois sur le bouton P3 de l’émetteur mémorisé. Appuyer sur le bouton concernant le code à supprimer.
DE - Drücken Sie drei mal die Taste P3 des gespeicherten Senders. Drücken Sie die auf den zu löschenden Code bezogene Taste.
x 3
1 s
suono continuo
continuous sound
son continu
Dauerton
suono intermittente
intermittent sound
son intermittent
intermittierender Ton
...
P3
memorizzato
memorized
mémorisé
gespeichert
< 5 s
suono continuo
continuous sound
son continu
Dauerton
8
IT - Sistema completo per la gestione dell’illuminazione RGB di ambienti. Permette di creare atmosfere con innite possibilità di personalizzazione nella scelta di colori ed effetti in
3 mosse. Il sistema comprende un software PC dedicato alla creazione degli scenari ed un trasmettitore con connessione USB (TVTXQ868U07) per inviare ai ricevitori compatibili
gli scenari con una semplice trasmissione radio. Le operazioni di creazione ed invio degli scenari possono essere effettuate anche in momenti e luoghi diversi.
EN - A complete system for the management of RGB lighting of locations. It allows to create atmospheres with innite possibilities of customizations in colours and effects setting,
all in 3 steps. The system includes a dedicated PC software to create the scenes and a USB transmitter (TVTXQ868U07) to send the scenes to compatible receivers by means of
a simple radio transmission. Scenes creation and sending can be performed even in different time and place.
FR - Système complet pour la gestion des ambiances RGB. En trois étapes, il permet de créer des atmosphères avec possibilités innies de personnalisation dans le choix de
couleurs et effets. Le système comprend un logiciel pour ordinateur dédié à la réalisation des scenarios et un émetteur avec connexion USB (TVTXQ868U07) pour l’envoi via radio
des scenarios aux récepteurs compatibles. Les opérations de création et d’envoi des scenarios pourront être réalisées sans être obligatoirement sur les lieux de l’installation.
DE - Ein komplettes System für die Steuerung von RGB Beleuchtung in Ihrer Umgebung. Sie können damit unterschiedliche Atmosphären kreieren, mit einer endlosen Wahl an Farben
und Effekten in drei einfachen Schritten. Das Kit umfasst einen Sender mit USB-Anschluss (TVTXQ868U07) und eine spezielle PC Software, mit welcher Sie die Szenen einfach über Funk
an die kompatiblen Empfänger übermitteln können. Das Erstellen und Senden der Szenen kann in verschiedenen Momenten und von verschiedenen Stellen aus vorgenommen werden.
21 3
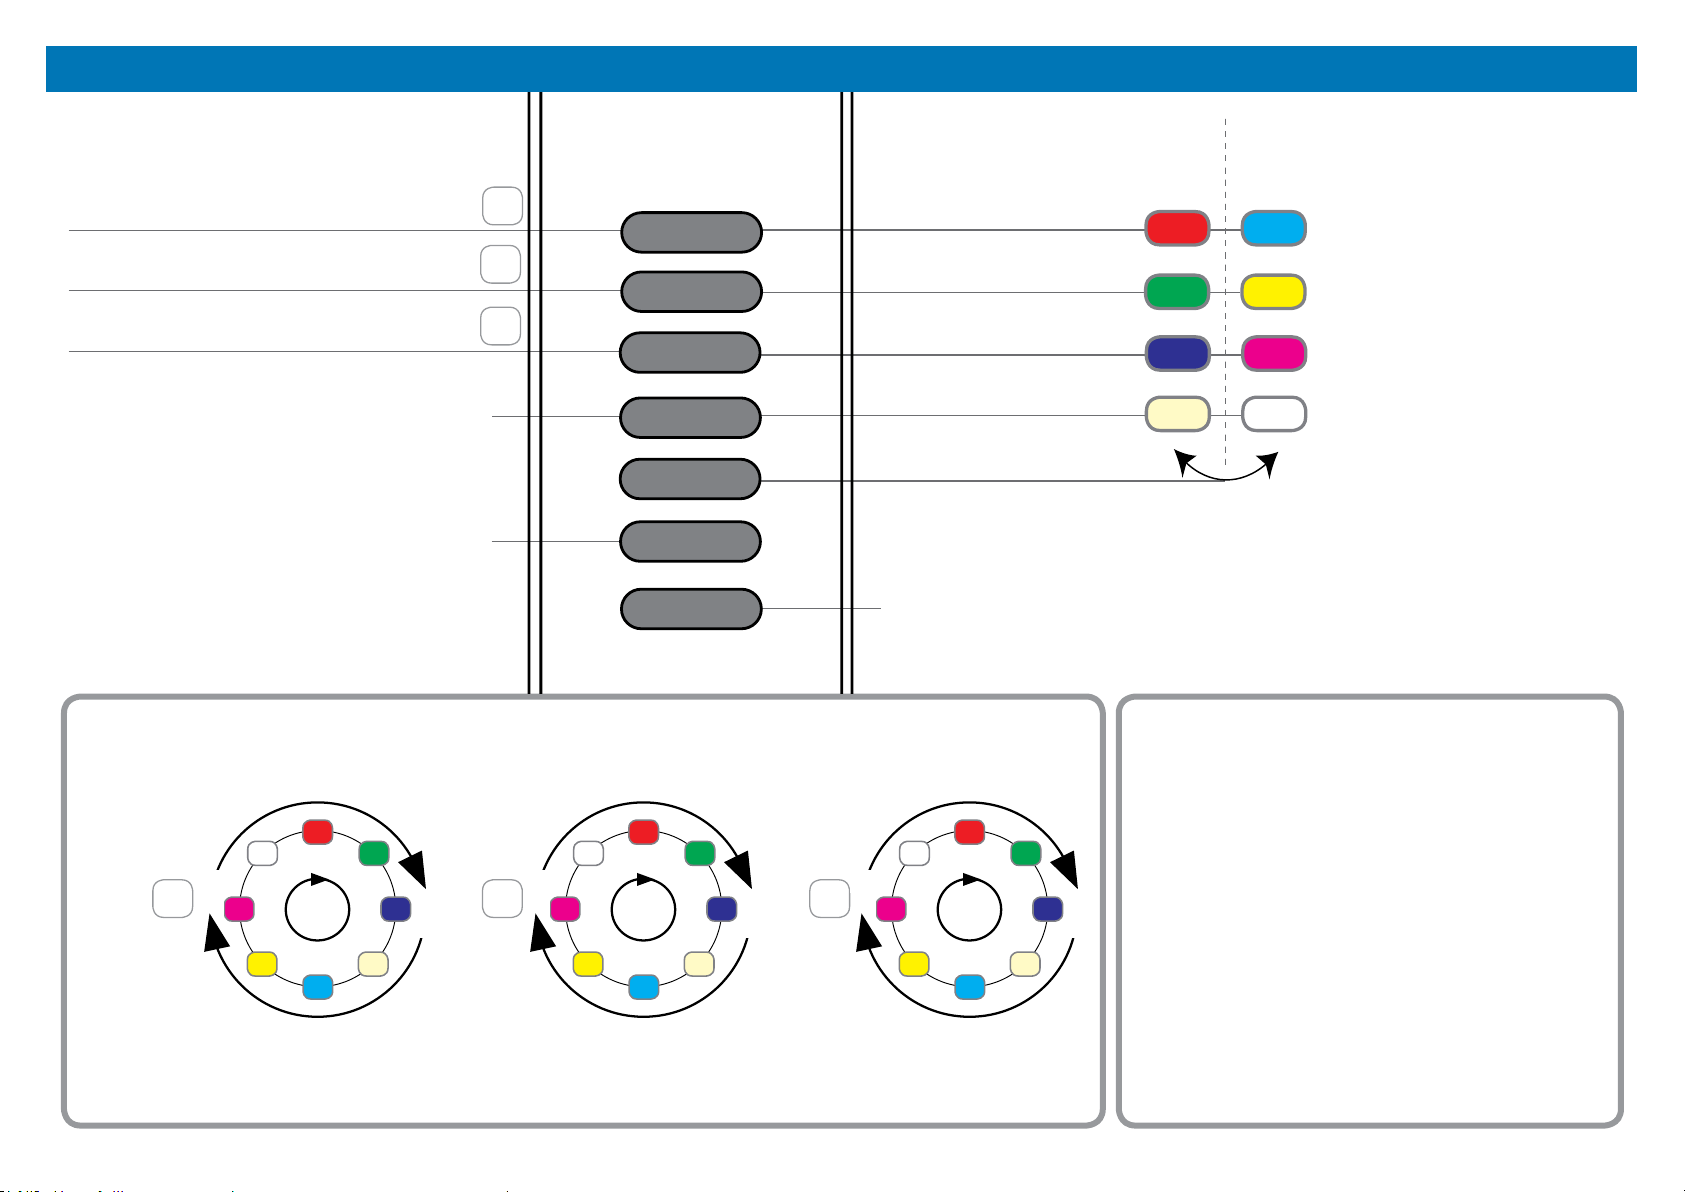
IT - CREAZIONE SCENARI CON IL
SOFTWARE. Collegare il trasmettitore
USB al PC ed utilizzare il software per
creare gli scenari.
EN - SCENES CREATION BY PC
SOFTWARE. Connect the USB transmitter
to PC and use the software to create the
scenes.
FR - CREATION DE SCENARIOS GRACE
AU LOGICIEL. Connecter l’émetteur USB
à l’ordinateur et utiliser le logiciel pour créer
les scenarios.
DE - ERSTELLUNG SZENEN ÜBER PC
SOFTWARE. Schließen Sie den USB
Sender an den PC und erstellen Sie die
Szenen mit der Software.
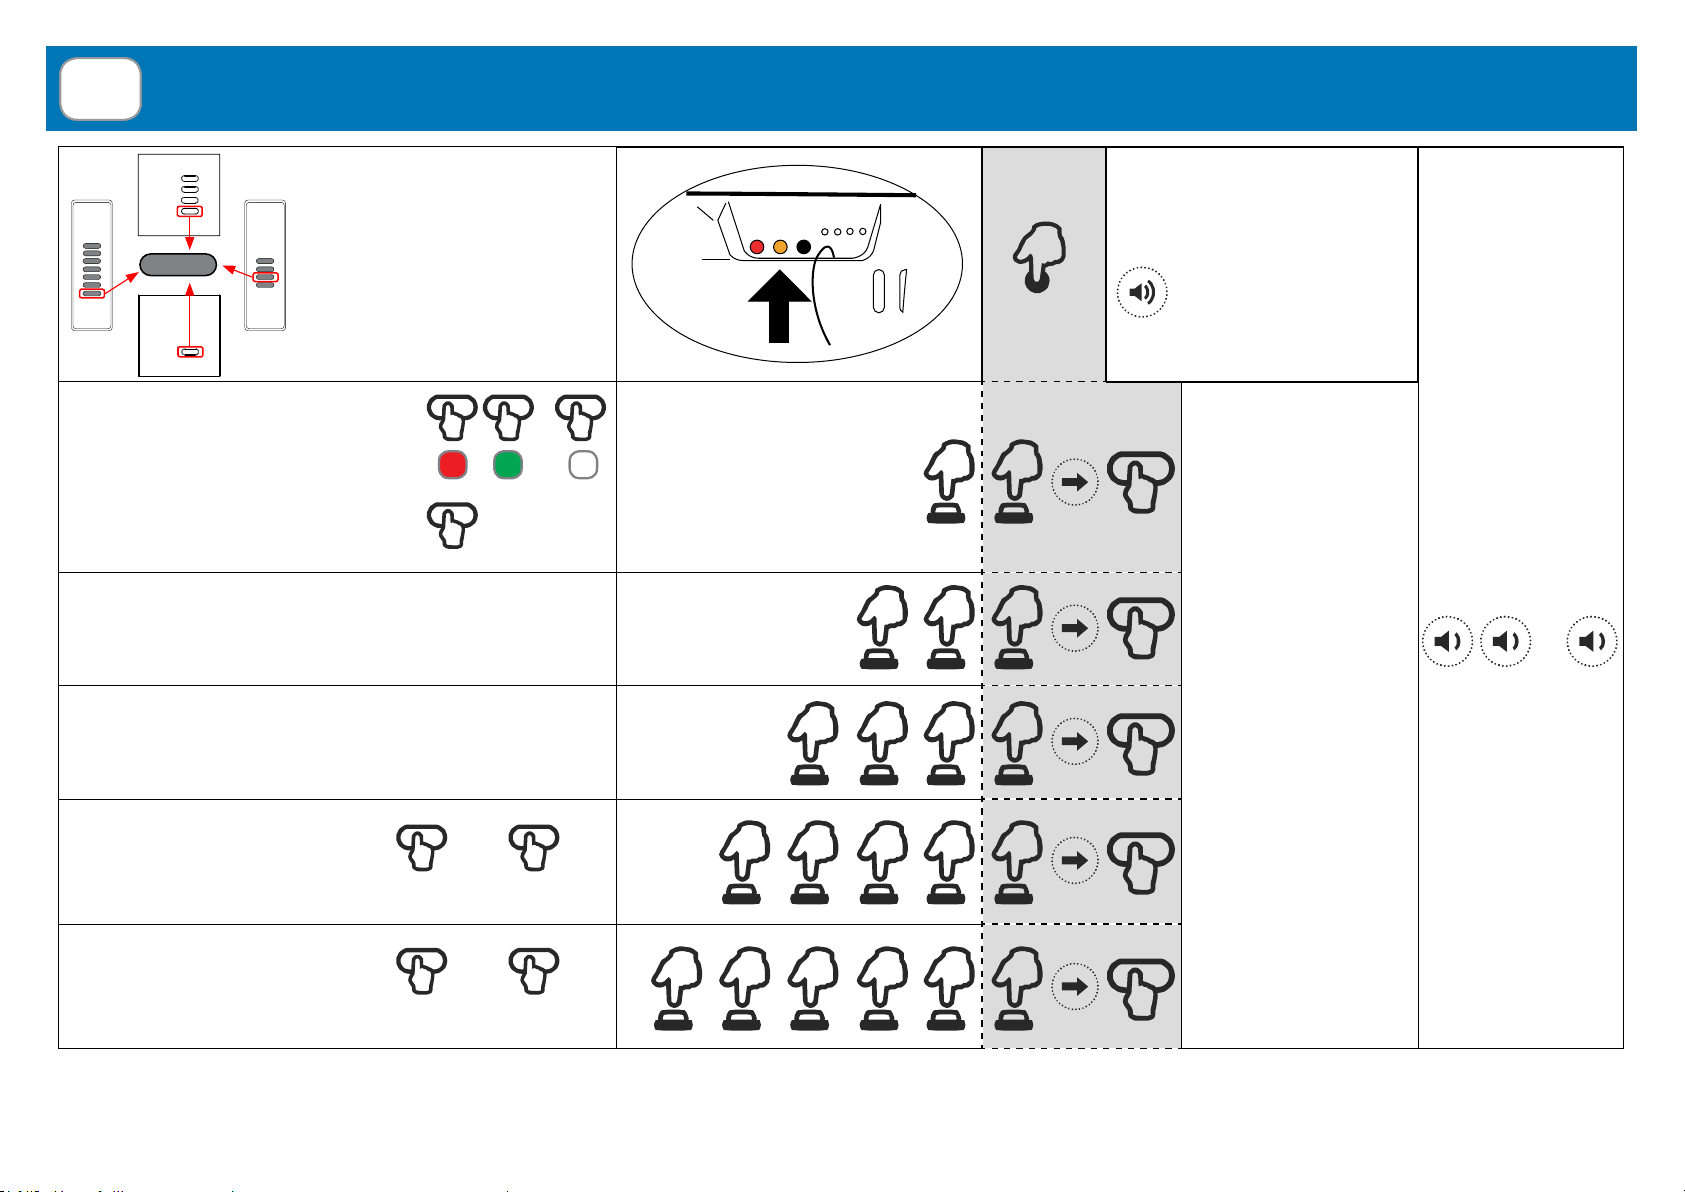
IT - INVIO SCENARI. Se si conosce il codice identicativo del ricevitore, l’invio e
la ricezione degli scenari avvengono automaticamente con un semplice comando,
altrimenti: memorizzare il trasmettitore USB (vedi par. 5.1), accenderlo con il tasto
ON, premere il tasto associato al ricevitore. I LED collegati si accendono prima di
giallo, poi di verde (se OK) o rosso (in caso di errore).
EN - SCENES TRANSMISSION. In case the ID code of the receiver is known,
sending and receiving of the scenes is automatic, by means of a simple command,
otherwise: memorize USB transmitter (see par. 5.1) , uurn it on with the button ON,
press the button associated to the receiver. The connected LED turn on with yellow
colour, then green (if OK) or red (in case of any error).
FR - ENVOI DE SCENARIOS. Si le code d’identication du récepteur est connu, l’envoi et
la réception des scenarios seront faits automatiquement par une simple commande ; en
cas contraire : il faut mémoriser l’émetteur USB (voir § 5.1), allumer l’émetteur en appuyant
sur le bouton ON, appuyer sur le bouton associé au récepteur. Les LED connectées
s’allument d’abord en jaune, ensuite en vert (si OK) ou en rouge (en cas d’erreur).
DE - SENDUNG DER SZENEN. Wenn Sie den ID Code des Empfängers kennen,
werden die Szenen automatische mit einem einfachen Befehl versendet und
empfangen, andernfalls: lernen Sie den USB Sender ein (siehe Abs. 5.1), schalten
Sie den Sender mit der Taste On ein, drücken Sie die dem Empfänger zugeordnete
Taste. Die angeschlossenen LEDs schalten zuerst auf Gelb, dann auf Grün (falls OK)
oder Rot (Fehler).
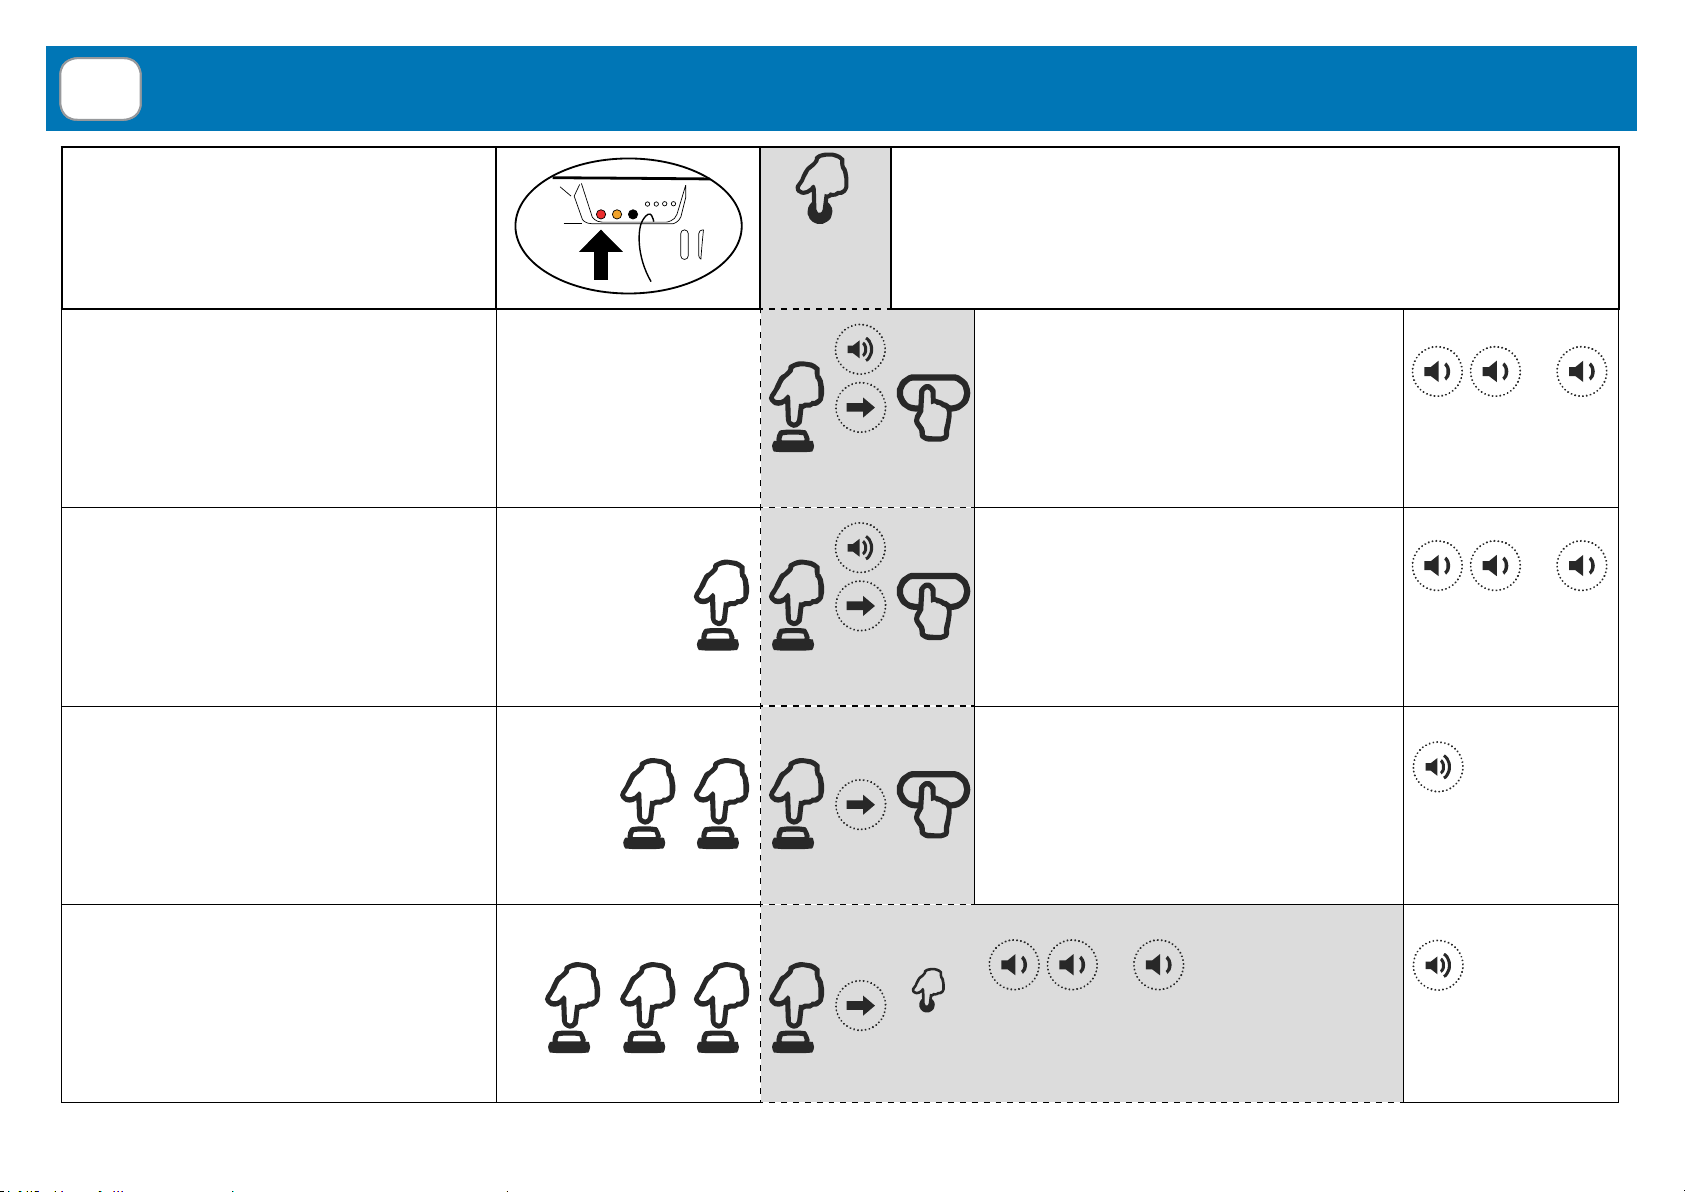
IT - UTILIZZO DEGLI SCENARI. Memorizzare un
nuovo trasmettitore con almeno 4 canali dedicato
al comando dei 4 scenari caricati (CH1..CH4 =
Scenari 1..4, tasto > 2 s = OFF).
EN - USE OF THE SCENES. Memorize a new
transmitter with at least 4 channels, reserved for
the command of the 4 loaded scenes (CH1..CH4 =
Scenes 1..4, button > 2 s = OFF).
FR - UTILISATION DES SCENARIOS. Mémoriser
un nouvel émetteur avec au moins 4 canaux dédiés
au contrôle des 4 scenarios (CH1..CH4 = Scenarios
1..4, bouton > 2 s = OFF).
DE - VERWENDUNG DER SZENEN. Lernen Sie
einen neuen Sender mit mindestens 4 Kanälen
ein für die Steuerung der 4 eingestellten Szenen
(CH1..CH4 = Szenen 1..4, Taste > 2 sek. = OFF).
.
.
.
1
2
3
4
5
6
7
ON
3
21 4
143
2
TVTXQ868U07
TVTXQ868U07
5
9
IT - FUNZIONI CON P1 (FREELED) EN  FUNCTIONS WITH P1 FREELED
FR - FONCTIONS AVEC P1 (FREELED) DE  FUNKTIONEN MIT P1 FREELED
1.15.1
*IT - Il buzzer emette un bip ad ogni pressione. EN - The buzzer will make a beep each press. FR - L’avertisseur sonore émet un bip à chaque appui. DE - Das Gerät quittiert jeden Druck mit einem Ton.
IT - FUNZIONE
EN - FUNCTION
FR - FONCTION
DE - FUNKTION
IT - Memorizzare un trasmettitore per
comandare gli scenari creati con Freeled
EN - Memorizing a transmitter to command the
scenes created by Freeled
FR - Mémoriser un émetteur pour commander
les scenarios créés par le Freeled
DE - Einlernen eines Senders um die mit der
Freeled erstellten Szenen zu steuern
*
x1
IT - Premere un tasto del trasmettitore 4/7/42
canali
EN - Press any button of the 4/7/42 channels
transmitter
FR - Appuyer sur un bouton de l’émetteur à
4/7/42 canaux
DE - Einen 4/7/42-Kanal Sender drücken
IT - Memorizzare un tasto del trasmettitore USB
(se non si opera con codici identicativi)
EN - Memorizing one button of the USB transmitter
(if not working with ID codes)
FR - Mémoriser un bouton de l’émetteur USB
(si non utilisation du code ID)
DE - Einlernen einer Taste des USB Senders
(Für die Verwendung ohne ID Code)
*
x2
IT - Premere il tasto del trasmettitore relativo al
codice da memorizzare.
EN - Press the button of the transmitter relative
to the code to memorize.
FR - Appuyer sur le bouton de l’émetteur
concernant le code à mémoriser.
DE - Drücken Sie die Sendertaste die auf den
zu speichernden Code bezogen ist.
IT - Cancellare un tasto del trasmettitore USB
(se non si opera con codici identicativi)
EN - Deleting one button of the USB transmitter
(if not working with ID codes)
FR - Supprimer un bouton de l’émetteur USB
(si non utilisation du code ID)
DE - Löschen einer Taste des USB Senders
(Für die Verwendung ohne ID Code)
*
x3
IT - Premere il tasto del trasmettitore relativo al
codice da cancellare.
EN - Press the button of the transmitter relative
to the code to delete.
FR - Appuyer sur le bouton de l’émetteur
concernant le code à supprimer.
DE - Drücken Sie die Sendertaste die auf den
zu löschenden Code bezogen ist.
IT - Cancellare tutti i trasmettitori USB
(se non si opera con codici identicativi)
EN - Deleting all the USB transmitters
(if not working with ID codes)
FR - Supprimer tous les émetteurs USB
(si non utilisation du code ID)
DE - Löschen aller USB Sender
(Für die Verwendung ohne ID Code)
*
x4
tenere premuto
keep it pressed
maintenir appuyé
gedrückt halten
suono continuo
continuous sound
son continu
Dauerton
...
(10 s)
suono continuo
continuous sound
son continu
Dauerton
suono intermittente
intermittent sound
son intermittent
intermittierender Ton
...
suono intermittente
intermittent sound
son intermittent
intermittierender Ton
...
suono intermittente
intermittent sound
son intermittent
intermittierender Ton
P1
10
IT - SPECIFICHE TECNICHE EN  TECHNICAL SPECIFICATIONS
FR - SPÉCIFICATIONS TECHNIQUES DE  TECHNISCHE DATEN
IT - Nell’ottica di un continuo sviluppo dei propri prodotti, il produttore si riserva il diritto di apportare modiche a dati tecnici e prestazioni senza preavviso.
EN - In the view of a constant development of their products, the manufacturer reserves the right for changing technical data and features without prior notice.
FR - Dans l’optique d’un développement continu de ses produits, le constructeur se réserve le droit d’apporter sans préavis des modications aux données techniques et aux prestations.
DE - Im Zuge einer kontinuierlichen Weiterentwicklung der Produkte behält sich der Hersteller das Recht vor technische Daten und Funktionen ohne vorherige Ankündigung zu ändern.
Alimentazione - Power supply - Alimentation - Stromversorgung 24V
Uscite - Output - Sorties - Ausgänge 3
Potenza massima per uscita - Max power for each output
Puissance maximale par sortie - Max. Leistung für Ausgänge 4A (100W)
Temperatura di funzionamento - Operating temperature range
Température de fonctionnement - Umgebungstemperatur im Betrieb -20°C / +50°C
Sezione cavi in ingresso (carico massimo) - Section of input cable (maximum load)
Section des câbles pour entrée (charge maximale) - Kabelquerschnitte (Eingang) 2,5 mm2
IT - I cavi di collegamento devono avere una sezione adeguata al carico massimo applicato in uscita, e ai dispositivi supplementari collegati agli ingressi.
EN - The connection cables must have a section suitable to the maximum load applied to the output, and to the additional devices connected to the input.
FR - Les câbles de connexion doivent avoir une section appropriée à la charge maximale appliquée en sortie et aux dispositifs supplémentaires connectés aux entrées.
DE - Die Verbindungskabel müssen einen Durschnitt haben der angemessen ist für die maximale Ausgangslast und für die weiteren Geräte die an den Eingängen angeschlossen sind.
Frequenza ricezione - Reception frequency
Fréquence de réception - Empfangsfrequenz
868.3 MHz (TVLRGBDU868xST24)
916 MHz (TVLRGBDU916xST24)
Capacità memoria radio (trasmettitori) - Radio memory capatibility (transmitters)
Capacité mémoire radio (émetteurs) - Speicherbare Sender 42
Grado di protezione - Protection rating - Degré de protection - Schutzart IP20 / IP54
Numero massimo slave - Max number of slave devices
Nombre maximale d’esclaves - Max. Anzahl Slave-Einheiten 40
Lunghezza totale del BUS - Total length of the BUS
Longueur totale du BUS - BUS Gesamtlänge 200m
Sezione minima del cavo BUS - Minimum section of the BUS cable
Section minimale du câble BUS - Minimal-Durchschnitt des BUS Kabels 2 x 0.5mm
Consumo ingresso BUS slave - Bus input consumption (slave)
Consommation entrée BUS esclave - Verbrauch Eingang BUS Slave 0.15W
Massimo carico sul BUS - Maximum BUS load
Charge maximale sur le BUS - Maximale Last an BUS 6W