Telematrix 3300IP User manual

1
3300IP VOIP Phone
User Manual
TeleMatrix, Inc

2
1 Introduction…………………………………………………………………………5
1.1 Overview of Hardware…………………………………………………………..5
1.2 Overview of Software……………………………………………………………5
2 Keypad of 3300IP…………………………………………………….……………...6
2.1 Function Table of Keyboard
………………………………………………….....6
2.2 Keyboard function and LCD Menu catalog……………………………………..7
3 Program the Phone via a WebBrowser…….……………………………………...10
3.1 Login..…………………………………………………………………………..10
3.2 Current state…………………………………………………………………….10
3.3 Network………………………………………………………………………….11
3.3.1 WAN Config...................................................................................................11
3.3.2 LAN Config………………………………………………………………...13
3.4 VoIP……………………………………………………………………………..13
3.4.1 SIP Config…………………………………………………………………...13
3.4.2 Iax2 Config………………………………………………………………….15
3.5 Advance…………………………………………………………………………16
3.5.1 DHCP Server……………………………………………………………..….16
3.5.2 NAT………………………………………………………………………….17
3.5.3 STUN ………………………………………………………………………..18
3.5.4 Net Service…………………………………………………………………..19
3.5.5 Firewall settings……...………………………………………………………20
3.5.6 QoS settings...………………………………………………………………..21
3.5.7 Digital Map…………………………………………………………………..21
3.5.8 Call Service Settings………….……………………………………………...23
3.5.9 Memory Key ………………………………………………………………...24
3.5.10 MMI Filter………………………………………………………………….24
3.5.11 Audio Settings……………………….……………………………………..25
3.5.12 VPN………………………………………………………………………...25
3.6 Dial-Peer dial rule setting……………………………………………………….26
3.7 Config Manage………………………………………………………………….27
3.8 Update…………………………………………………………………………...28
3.8.1 Update……………………………………………………………………….28
3.8.2 Auto Update…………………………………………………………………29
3.9 System Manage…………………………………………………………………30
3.9.1 Account Manage…………………………………………………………….30
3.9.2 Syslog Config………………………………………………………………..30
3.9.3 Phone Book………………………………………………………………….31
3.9.4 Time Set…………………….……………………………………………….31
3.9.5 MMI SET…………………………………………………………………….32
3.9.6 Logout & Reboot…………………………………………………………….32
4 Operating Method for Dialing…………………………………………………….33
4.1 How to dial IP Phone…………………………………………………………...33
4.2 Set the Phone to Server…………………………………………………….....,33

3
4.2.1 Set WAN Interface…………………………………………………………33
4.2.2 SIP Setting………………………………………………………………….35
4.2.3 IAX Setting………………………………………………………………...36
4.3How to Use Dialing Rules……………………………………………………….36
4.4 Voice mail……………………………………………………………………….38
Reset to Factory Default:
To reset the phone to the factory default settings, press “#” during the startup procedure (At
p
ower up you can see a black progress bar). The phone will enter into “post” mode, then input
“ *#168”. Then you will see “clearing conf” on the screen, next you see “conf reset”. Now
you have reset to the default settings.
Default IP Address = 192.168.10.1
Login = admin
Password = admin
If phone’s default IP address has changed from 192.168.10.1, the current IP address can
be displayed by using the submerged keys below the faceplate. To Enter the Menu, hold
the Left/Store key for 3 seconds and enter default password of 123.
•"STORE" key is "MENU"
•"FLASH" key is "ENTER"
•Scroll using Vol "+" or "-" key.
•Check the IP address via the menu of:
N
ETWORK>WAN >Status

4
Functions
1.
Support two SIP servers working at the same time
2.
Provide a Backup SIP Server
3.
Support NAT (Network Address Translation), Firewall
4.Support DHCP assignment IP addresses, etc automatically
5.Support PPPoE(used while connecting ADSL,cable modem)
6.
Supports program updates through HTTP ,FTP and TFTP
7.Check the dynamic voice; Soften the noise; Buffer technique of voice
8.
Hold Function
9.
Hotline Function (Phone goes off-hook, specified number is dialed)
10.Speed-dial
11.Call-forward, Three-way conference call
12.Caller ID display
13.DND (Do Not Disturb), Black List, Limit List
14.Auto-answer.
15.Set through standard Web Browser
16.Remote Management Function
17.Classification management for common user’s password and superuser’s
password.
Standards and Protocols
IEEE 802.3 /802.3 u 10 Base T / 100Base TX
PPPoE
DHCP Client and Server
Support G.711a/u,G729, G723.1 5.3/6.3 audio Codec
SIP RFC3261, RFC 2543
Support IAX2
TCP/IP: Internet transfer and control protocol
RTP: Real-time Transport Protocol
RTCP: Real-time Control Protocol
VAD/CNG save bandwidth
Telnet: Internet's remote login protocol
DNS: Domain Name Server
TFTP: Trivial File Transfer Protocol

5
1. Introduction
This is the user manual for the 3300IP VoIP Phone. Some configuration and
set-up is required before using the 3300IP. This manual will illustrate how to set
the phone through keyboard and web service.
1.1 Overview of Hardware
1.1.1
The two RJ-45 network interface ports support 10/100M Ethernet. The default
WAN interface is a DHCP Client server. User should connect the WAN interface to
their Internet router ADSL or POE switch, and connect a computer to the LAN
interface (default IP address is 192.168.10.1). You can use the administrator’s
user name “admin” and password“admin”to login and set program changes.
1.1.2
Only the WAN interface supports Power Over Ethernet (802.31f / POE).
1.2 Overview of Software
Network Protocol Tone
Ring Tone
Ring Back Tone
Dial Tone
Busy Tone
Phone Function
SIP v1(RFC2543)
V2(RFC3261)
IP/TCP/UDP/RTP/RTCP
IP/ICMP/ARP/RARP/SNTP
TFTP Client/DHCP Client/PPPOE
Client
Telnet/HTTP Server
DNS Clients
Codec
Volume Adjustment
Speed dial key
Phonebook
IP Assignment
G.711:64K bit/s(PCM)
G.723.1:63k/5.3k bit/s
G.726:16k/24k/32k/40k
bit/s(ADPCM)
G.729A:8k bit/s(CS-ACELP)
G.729B:adds VAD & CNG to
G.729
IP (Static IP)
DHCP
PPPoE
Voice Quality Security
HTTP 1.1 basic/digest
authentication for Web setup
MD5 for SIP authentication
(RFC2069/RFC2617)
QoS
VAD:Voice activity detection
CNG:Comfortable noise
generator
LEC:Line echo canceller
Packet Loss Compensation
Adaptive Jitter Buffer QoS field
Call Function NAT Traversal
STUN Call Hold
Call Waiting Configuration

6
Call Forward
Caller ID
3-way conference
Web Browser
Console/Telnet
Keypad
DTMF Firmware Upgrade
DTMF RELAY
DTMF RFC 2833
DTMF SIP Info
SIP Server
TFTP
HTTP
FTP
Support two SIP server working at
the same time
Provide a Backup SIP Server
2 3300IP phone keyboard
2.1 Keys functions
Keys Mode Function/Display
calling
mode increase the volume
Volume + config
mode choose the page(page up)
calling
mode reduce the volume
Volume - config
mode choose the page(page down)
Enter config
mode confirm/enter into the next menu
hold mode
calling
mode
enter into the speed-dial storage mode and
setting menu after three seconds long pressing.
Menu config
mode back to the last menu
calling
mode redial the last number and make a call
Redial config
mode delete the existing digits
Hold calling
mode call waiting
CONF calling
mode Three way conference
hold mode
M1~M10 dialing
mode 10 speed dial numbers
hold mode
Voicemail Pick up voicemail

7
dialing
mode “1”
1 config
mode “1”, “space”, “@”, “_”, “-”, “/”, “%”
dialing
mode “2”
2 config
mode “2”, “a”, “b”, “c”, “A”, “B”, “C”
dialing
mode “3”
3 config
mode “3”, “d”, “e”, ”f”, “D”, “E”, “F”
dialing
mode “4”
4 config
mode “4”, “g”, “h”, “I”, “G”, “H”, “I”
dialing
mode “5”
5 config
mode “5”, “j”, “k”, “l”, “J”, “K”, “L”
dialing
mode “6”
6 config
mode “6”, “m”, “n”, “o”, “M”, “N”, “O”
dialing
mode “7”
7 config
mode “7”, “p”, “q”, “r”, “s”, “P”, “Q”, “R”, ‘S”
dialing
mode “8”
8 config
mode “8”, “t”, “u”, “v”, “T”, “U”, “V”
dialing
mode “9”
9 config
mode “9”, “w”, “x”, “y”, “z”, “W”, “X”, “Y”, “Z”
dialing
mode “0”
0 config
mode “0”, “*”, “#”, “$”, “&”, “?”, “!”, “<”, “>”
dialing
mode “*”
*
config
mode “*”, “.”

8
calling
mode Realize the 3-way conference call by pressing
# under the Hold mode
# dialing
mode dial as the first number or finish number sign
2.1.1 Voice Control
Press “VOL+”to increase the volume and press “VOL-”to decrease.
2.1.2 Hold Function
When you are in communication on one line and also another line, you can
switch between calls using the “Hold” key.
2.2 Functions and Settings / LCD Menu Catalog
To determine settings as well as modify a subset of the phone’s features,
you must enter the programming mode. This is done by navigating the
submerged keys found underneath the 3300Ips faceplate. The left key is
“Menu” and servers to back out of the menu tree. The right “Enter” key
serves to select and move forward through the menu tree.
1. Press down the left submerged “Menu”key to program a speed dial
button. Input the intended speed dial number. Finally, press the corresponding
speed dial key to save.
2. Enter the programming mode by pressing down the left submerged “Menu”
key for 3 seconds. You will be prompted to “Input Password”… the default
password is 123, then you can press the right submerged “Enter” key to begin
navigating the phone’s programming menus through the LCD.
3. When modifying settings, press “Redial” to enter modification status, and
“0” is to make no choice, “1” is to make choice, “Enter” is to confirm the
modification, “Menu” is to quit the modification. After finishing the modification
setting, we will save it on “Save” menu. After rebooting all the settings will be go
into effect.
4、Menu catalog:
1) Network
2) Call Feature
3) SIP
4) DSP
5) System
6) Other Setting
2.2.1 Network:
2.2.1.1 LAN
1) Bridge Mode
2) IP
3) Netmask
4) DHCP Server
Switch

9
DNS Relay
5) NAT
Switch
FTPalg
PPPTPalg
2.2.1.2 WAN
1) Status
2) Static Net
IP
NetMask
Gateway
DNS
DNS2
3) PPPoE
User name
Password
4) QoS
2.2.2 Call Feature
2.2.2.1 Phone-number
1) Public SIP
2) Private SIP
2.2.2.2 Limit-List
1) Current
2) ADD
3) DEL
2.2.2.3 Black-List
1) Current
2) ADD
3) DEL
2.2.2.4 FastCall
2.2.2.5 Three Talk
2.2.2.6 Call-Transfer
2.2.2.7 Call-Waiting
2.2.2.8 Call-Forward
1) Condition
2) SIP
Transfer Num
Transfer IP
Port
2.2.2.9 Dial-Rule
1) End With #
2) Fixed Length
Switch
Length

10
2.2.3 SIP
2.2.3.1 Reg Status
1) Public Reg
2) Private Reg
2.2.3.2 Reg Switch
1) Public
2) Private
2.2.3.3 Server
1) Public
2) Private
2.2.3.4 Domain
1) Public
2) Private
2.2.3.5 User Agent
1) Public
2) Private
2.2.3.6 Detect-server
2.2.3.7 Dtmf-mode
2.2.3.8 Interval-time
2.2.3.9 Swap-server
2.2.3.10RFC-version
2.2.3.11Signal-Port
2.2.3.12Stun
1) Switch
2) Addr
3) Port
4) Expire Time
2.2.4 DSP
2.2.4.1 Codec
2.2.4.2 Handdown-time
2.2.4.3 Dtfm-Volume
2.2.4.4 Input-Volume
2.2.4.5 Output-Volume
2.2.5 System
2.2.5.1 Save
2.2.5.2 Reboot
2.2.5.3 Set Default
2.2.6 Other Setting
2.2.6.1 Syslog
1) Switch
2) Server-IP
3) Server-Port
11
3 Programming the phone via a web browser
Insert one end of an Ethernet cable into the network interface of your computer, then
insert the other end to the LAN interface of the phone (jack furthest from the handset). The
phones usually come defaulted to have an address of 192.168.10.1. They are also
defaulted to parcel out an IP address to your computer so that your computer will be on
the same network as the phone (such as 192.168.10.2). If this is not the case, you must
manually set the IP address of your computer 192.168.10.xxx. Next open a web browser,
such as Internet Explorer (IE) or Mozilla Firefox and input 192.168.10.1 on the address
field. At this time you will enter the web-enable programming page of the IP phone.
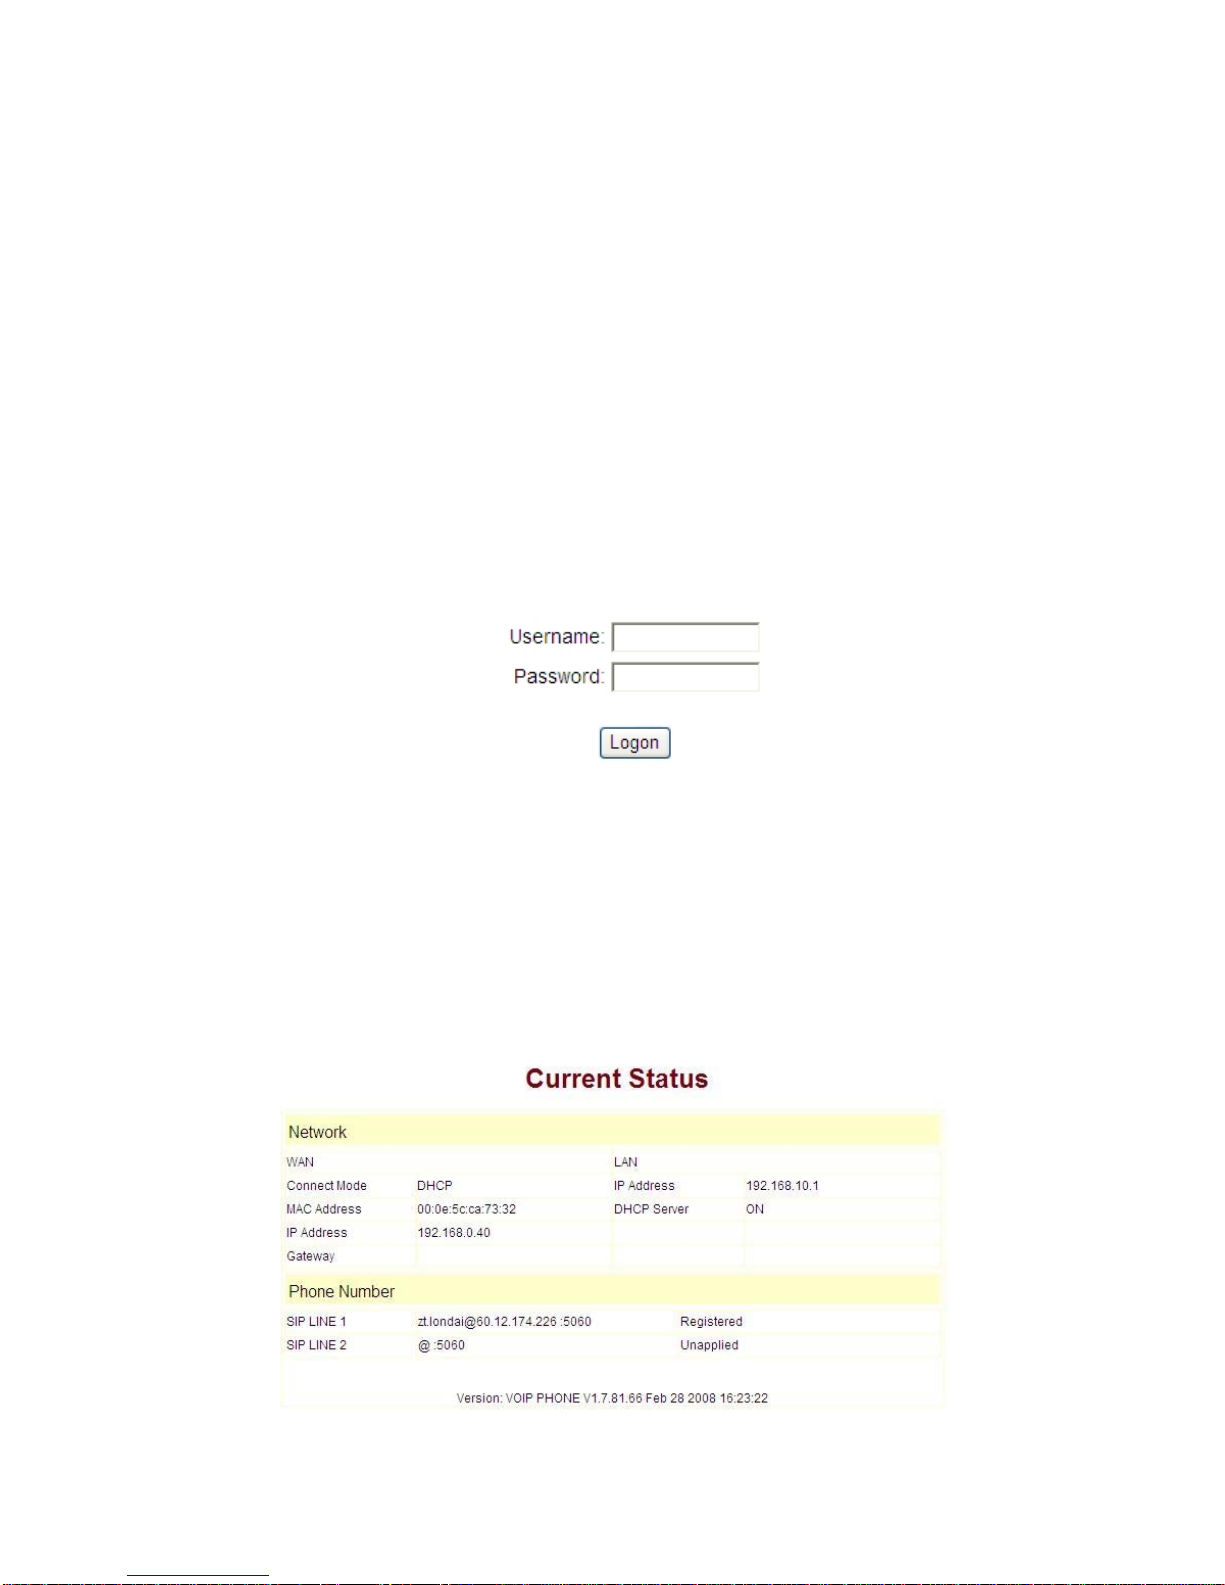
3.1 Login:
The default user name/password are admin/admin or guest/guest.
3.2 Current Status
This page layout shows the operational state of the VoIP phone. The network part
shows the connection state of the WAN interface and the LAN interface as well as the
network setting; the work state of Public SIP service of VoIP part, and here you can see
the registration and whether registered to the server or not. The Phone Number part
shows the telephone numbers in Private SIP server and Public SIP server. The Firmware
version of the phone is shown at the bottom of the page.

12
3.3 Network
3.3.1 Wan Config
WAN port network setting page.
Supports static IP assignment, DHCP (to dynamically obtain an IP address)
and PPPoE.
Configure Static IP:
----Enable Static;
----Set 3300IP’s IP address in the IPAddress;
----Set network mask in the Netmask field;
----Set router IP address in the Gateway;
----DNS Domain:
----Set local DNS server in the Preferred DNS and the Alternate DNS。
Configure to dynamically obtain IP
----Enable DHCP
If there is DHCP server in your local network, the IP phone will automatically obtain
an IP address and WAN port network information from your DHCP server.

13
Configure PPPoE:
----Enable PPPoE
----PPPoE server: Enter “ANY” if none is specified from your ITSP (service provider).
----Enter PPPoE username and pin in the username and password.
The IP Phone will automatically obtain WAN port network information from your ITSP
if PPPoE setting and the setup are correct.
Notice: If user accesses the IP phone through WAN port. He/She should use the new
IP address to access the IP phone when the WAN port address was changed.

14
3.3.2 LAN Config
LAN IP Netmask: Set the IP and Netmask for the LAN
DHCP Server: Enable DHCP service in LAN port; after user changes LAN IP, phone
will automatically modify DHCP Lease Table and save the configuration according to IP
and netmask, DHCP server configuration will not take effect until you reboot the device.
NAT: Enable NAT.
Bridge Mode: Enable this option to switch to bridge mode. IP phone won’t assign IP
addresses for its LAN port in bridge mode and its LAN and WAN port will be in the same
network. (This setting won’t take effect unless you save the config and reboot the device)
3.4 VoIP
3.4.1 SIP Config
Setting page of public SIP server:

15
Register Server Addr: Register address of public SIP server
Register Server Port: Register port of public SIP server,default port is 5060
Register Username: Username of your SIP account (Always the same as the
phone number)
Register Password: Password of your SIP account.
Proxy Server Addr: IP address of proxy SIP server (SIP provider always use
the same IP for register server and proxy server, in this case you don’t need to configure
the proxy server information.)
Proxy Server Port: Signal port of SIP proxy
Proxy Username: proxy server username
Proxy Password: proxy server password
Domain Realm: SIP domain, enter the sip domain if any, otherwise 3300IP
will use the proxy server address as sip domain.
Local SIP port: Local SIP register port, default 5060
Phone Number: Phone number of your SIP account
Enable Register: Enable/Disable SIP register. The IP Phone won’t send
registration information to SIP server if enable register is not selected.
Enable Message Waiting:The configuration allows/forbids Message Waiting.
Advanced SIP Setting
Register Expire Time: register expire time, default is 60 seconds. The IP Phone
will auto configure this expiration time to the server recommended setting if it is different
from the SIP server.
Call Forward: Please refer to Value_add_service for detail.
No answer:If no answer, it will forward to the appointed phone.
Always:The caller always forwards to the appointed phone.
Forward Photo Number:call the forwarded phone number.

16
Detect Interval Time:Co-work with the Auto Detect Server, if Auto Detect Server is
enable, the IP phone will periodically detect if the SIP server is available according this
setting.
User Agent:
Encrypt Key: The particular service system decrypts of the key, matching with the
server Type usage, the key provide by the particular service system supplier, default is
empty
Server Type:The particular service system supplier carries out the sign and
speeches to encrypt, default is common
DTMF Mode: DTMF signal sending mode: support RFC2833, DTMF_RELAY (inband
audio) and SIP info
RFC Protocol Edition: Current 3300IP SIP version. Set to RFC 2543 if the gate
need to communicate to devices (such as CISCO5300) using the SIP 1.0. Default is RFC
3261.
3.4.2 Iax2 Config
Setting page of public IAX server:
IAX Server Addr: Register address of public IAX server
IAX Server Port: Register port of public IAX server,default port is 4569
Account Name: Username of your SIP account (Always the same as the phone
number)
Account Password: Password of your IAX account.
Local port: Signal port of local, default port is 4569
Phone Number: Phone number of your IAX account
Voice mail number: If the IAX support voice mail, but your username of the voice
mail is letters which you can not input with the ATA, then you use the number to stand
for your username
Voice mail text: if IAX support voice mail, config the domain name of your mail box
here.
Echo test number: If the platform supports echo test, and the number is test form,
the config the test number to replace the text format The echo test is to test the ring
status of terminals and platform
Echo test text: echo test number in text format
Refresh time: IAX refresh time
Enable Register: enable or disable register
Enable G.729: Using G.729 speech coding mandatory consultations
IAX2(Default Protocol): Set IAX 2 as the default protocol , if not the system will
choose SIP as default

17
3.5 Advance
3.5.1 DHCP Server
DHCP server manage page.
User may trace and modify DHCP server information in this page.
DHCP Lease Table:display the IP-MAC corresponding table that the server
distributed.
Lease Table Name: Lease table name.
Start IP: Starting IP address of lease table.
End IP: Ending IP address of lease table. Network device connecting to the 3300IP
LAN port can dynamically obtain an IP address in the scope/range between start IP and
end IP.
Lease Time: DHCP server lease time.
Netmask: Netmask of lease table.
Gateway: Default gateway of lease table
DNS: default DNS server of lease table.
DNS Relay: enable DNS relay function.
User may use below setting to add a new lease table.
Notice: This setting won’t take effect unless you save the config and reboot
the device

18
3.5.2 NAT
Advance NAT setting. Maximum 10 items for TCP and UDP port mapping.
DHCP Lease Table:Show IP—MAC corresponding table assigned by DHCP server.
IPSec ALG: Enable/Disable IPSec ALG;
FTP ALG: Enable/Disable FTPALG;
PPTP ALG: Enable/Disable PPTP ALG;
Transfer Type: Transfer type using port mapping.
Inside IP: LAN device IP for port mapping.
Inside Port: LAN device port for port mapping.
Outside Port: WAN port for port mapping.
Click Add to add new port mapping item and Delete to delete current port mapping
item.

19
DMZ Config:
3.5.3 STUN
This page is used to set the private sip server, stun server, and back up sip server
information.
STUN Server setting: SIP STUN is used to realize SIP penetrates through NAT, when
the phone configures IP and port of STUN server (default is 3478) and select Enable SIP
Stun, common SIP server can be used to realize the phone to penetrate through NAT. In
this way, If you have common SIP proxy and STUN server parked public network, it is all
right, but STUN only support three NAT ways: FULL CONE, restricted, port restricted;
STUN Server Addr: configure stun server address;
STUN Server Port: configure stun server port default 3478
STUN Effect Time: stun detect NAT type circle, unit: minute.

20
Local SIP Port:The SIP port of this phone.
Load:Load the choices of SIP line.
Use Stun:Stun. Set the Stun that allows/forbids use user setting.
3.5.4 Net Service
HTTP Port: Configure the HTTP transfer port; default is 80. User may change this
port to enhance system’s security. When this port is changed, please use
http://xxx.xxx.xxx.xxx:xxxx/ to reconnect.
Telnet Port: Configure telnet transfer port, default is 23.
RTP Initial Port: RTP initial port.
RTP Port Quantity: Maximum RTP port quantity, default is 200
Notice: Settings in this page won’t take effect unless you save and reboot
the device.
If you need to change telnet port or HTTP port, please use the port greater
than 1024, because ports under 1024 is system remain ports.
HTTP service if HTTP is set to 0.
Table of contents
Other Telematrix IP Phone manuals

Telematrix
Telematrix NDC2110S User manual

Telematrix
Telematrix 3300IP MWB User manual

Telematrix
Telematrix 9700IP User manual

Telematrix
Telematrix 9602IPMWD User manual

Telematrix
Telematrix SIP Phone Instruction Manual

Telematrix
Telematrix 3300IP-TRM User manual

Telematrix
Telematrix MARQUIS 9600 Series User manual

Telematrix
Telematrix 9600IP User manual

Telematrix
Telematrix IP550 User manual


