Telos VX Prime User manual

Quick Start Guide
1490-00164-002--- QUICK START GUIDE: VX PRIME
ATTENTION!
This quick start guide is intended to aid with basic deployment of your unit.
For detailed product and operational information, as well as current software downloads,
please visit TelosAlliance.com/Telos/VX-Prime
Telos VX Prime
Big Performance for Small Facilities.

We know you’re eager to get your new gear up and running. But first, The Telos Alliance strongly
suggests you use an Uninterruptible Power Supply (UPS), with power line filtering, to prevent damage
in case of electrical storms or power surges. Your Product Warranty (found in the User Manual) does
not cover lightning damage!
Information about lightning protection can be found at:
http://blogs.telosalliance.com/tech/surge-suppression-pointers
Warranty
TelosAlliance.com/Warranty
24/7 Technical Support
+1 (216) 622-0247
Manual and Software Downloads
TelosAlliance.com/Telos/VX-Prime
IMPORTANT SAFETY INFORMATION
ABOUT YOUR NEW PRODUCT

| 1
Thanks for buying a Telos VX Prime, a fully featured VoIP based phone system for Radio and Television studio
use. The VX Prime is the smaller cousin to the VX, found in the best broadcast plants around the world.
The purpose of this document is to get you up and running with your VX Prime system as quickly as
possible. With that said, there is a fair amount of configuration that you’ll be doing. All that configuration
is handled through the VX Prime’s web Graphical User Interface (GUI). So, we’ll get you there as fast as we
can. This document will not go into complete setup of the system—there are quite a few options and we
can’t cover them adequately here. Our goal with this QuickStart Guide is to quickly get you to where the
hardware is “racked up” and is all “talking,” so you can sit down at your desk and comfortably begin the
system setup and testing.
There are two Ethernet jacks on the back panel of your VX Prime, one labeled “LAN/Livewire” and the other
labeled “WAN.” Livewire is our Audio over IP standard that is used for moving caller and host audio and
GPIO in and out of the system. If you’re not familiar with Livewire yet, we’ve found that it’s best to keep it
as “an island.” That is, the only components on a Livewire network would be Livewire components (your
VX Prime, Axia audio consoles, Telos Vset telephones, Telos audio and multipurpose nodes, etc). So the first
thing that we’ll ask you to do, is to enable the WAN Ethernet port, and set the IP addresses for the VX Prime
for both your Livewire and WAN networks. It’s just a few steps:
1. Plan your networks. In 90% of our installations we use both Ethernet interfaces (LAN and WAN).
We think that you’ll nd it simpler to do this, therefore encountering fewer unpleasant surprises and
getting home sooner. If you have a Livewire network already, you’ll just want to come up with an
unused IP address for your VX Prime. Make sure that the netmask matches whatever the rest of your
network is using.
If you’re“starting fresh” you can use the default address for the system (192.168.0.200/255.255.255.0).
The WAN port address will likely be something that needs to t into your oce or SIP PBX
network numbering scheme, or perhaps your provider will tell you what it should be. It does
need to be dierent from the LAN/Livewire port’s address and mask. A common mistake is to use
192.168.0.200/255.255.0.0 and 192.168.2.200/255.255.255.0. The VX Prime will see all of this as one
network because of the subnet, and it’ll be a long, confusing night.
2. Rack up your hardware. The VX prime is a fairly beefy, heavy piece of hardware, that looks a lot like
an audio power amplier. Perhaps you can persuade a colleague to support it in back while you use
the provided rack screws and washer to fasten it in. Be sure to plug in both power supplies or the
unit will report an error condition to the front-panel display and the web GUI. If you have two power
strips in your rack, plug one into a UPS-protected one and the other into a‘direct to utility’ strip. This
will give you the benet of the system staying up in case either the utility power or the UPS fail. The
VX Prime engine is very robust and has great cooling, but try not to jam it into a hot space where it’s
directly above a big, hot power supply.
3. Once plugged in, the display with briey show the Livewire logo as it boots up. The system will then
display a small basic status screen after it has nished booting. Press the navigation knob next to the
OLED display and a menu will come up. Turn the knob to the IP address option and press the knob.
1Quick Start Setup Guide

2| Section 1
4. Enable the WAN port. (It’s o by default.) This will allow you to set an address/Netmask and gateway
for the WAN port. Turn the knob to navigate and press the knob to select the option that you wish to
change or set, then press it again to enter the data. You’ll get the hang of it.
5. Set the IP addresses, netmasks, and the default gateway. When setting the address and netmask,
there is a check mark at the end of the input line. After you set the numbers, move the cursor over
to the right, to the check mark, and press the knob to accept your input. Be sure to set the default
gateway on the WAN port subnet. In other words, if your WAN IP address is 192.168.2.200 and your
LAN/Livewire interface is 192.168.0.200, your default gateway address should be on the same
network as the WAN address, so something like 192.168.2.1 or 192.168.2.254 would be correct
(depending on how your network is set up, including where the router“lives.”) The reason for this is
that normally we don’t route Livewire o its subnet, and if you set the default gateway to 192.168.0.1
(let’s say) then trac that needs to be routed (your phone SIP trac, your web GUI, etc) probably
won’t make it back to you and your Management/Setup computer.
6. Plug the Ethernet cables into both the LAN/Livewire and WAN jacks. The LAN/Livewire connector
should go to your approved and congured Cisco Ethernet switch, or Axia hardware like an X-Switch,
QOR, or Power Station. (See this page if you have a Cisco switch and haven’t used a console cable to
set it up yet: www.telosalliance.com/Axia/What-Ethernet-Switches-has-Axia-Approved.) The WAN
cable can go to any type of switch. Once you do this, within a few seconds, you should see what we
call “The Big OK” on the VX Prime’s OLED status window. If not, don’t panic (yet).
7. Plug a computer into a port on your Livewire Ethernet Switch and congure a static IP address
for your computer on your Livewire network. Make sure that it doesn’t conict with anything else
on the network. If your system uses the default address of 192.168.2.200/255.255.255. then if your
computer was on 192.168.2.11/255.255.255.0 (no gateway or DNS needed), then you should be able
to talk to your VX prime by opening your browser to http://192.168.2.200. The username is “user”and
by default there is an empty password. Since this is a private network, we recommend not setting a
password on the VX Prime, Nodes, or Vset telephones.
8. Once you have done this, the rst thing that you should do is look at the“Main”page. This will show
the network setup. You should enable the services (HTTP, LWCP and SSH) on the WAN port. They
are“Toggles.” If it gives you the option to“enable,”then that means that it’s currently disabled. If
you have a Network Time Protocol server on your networks (either LAN or WAN) then enter that
server’s address in the NTP eld and apply that change. A green check mark will appear if successful.
This is really helpful to make the logs accurate, because the correct time in logs is invaluable for
troubleshooting. A syslog server is very helpful too, and recommended. The full manual describes
conguring your syslog server. Note that“Windows Time” is not the same as NTP or SNTP.
9. From this point the system can be accessed locally from the LAN/Livewire network or the WAN
network. It’s important to note that to access the Web GUI from the WAN port you need to use port
8080 rather than standard port 80. So your URL would be http://192.168.0.200:8080. SSH is a telnet
like command line access that’s very useful for troubleshooting. It is available on port 1022 on the
WAN side instead of the standard port 22 (it’s still port 80 for web/HTTP and 22 for SSH on the LAN/
Livewire network). Windows users can nd a small freeware version of SSH called “putty.exe” available
on the internet. It’s a great tool.
10. This might be a good time to move into your oce or shop. Someplace where you can sit
comfortably, make some notes and maybe enjoy some coee as you start setting the system up in
earnest. It might also be good to temporarily set up a Vset telephone near that location so that you
can see the results of your work and test the system.
QUICK START SETUP GUIDE | 3
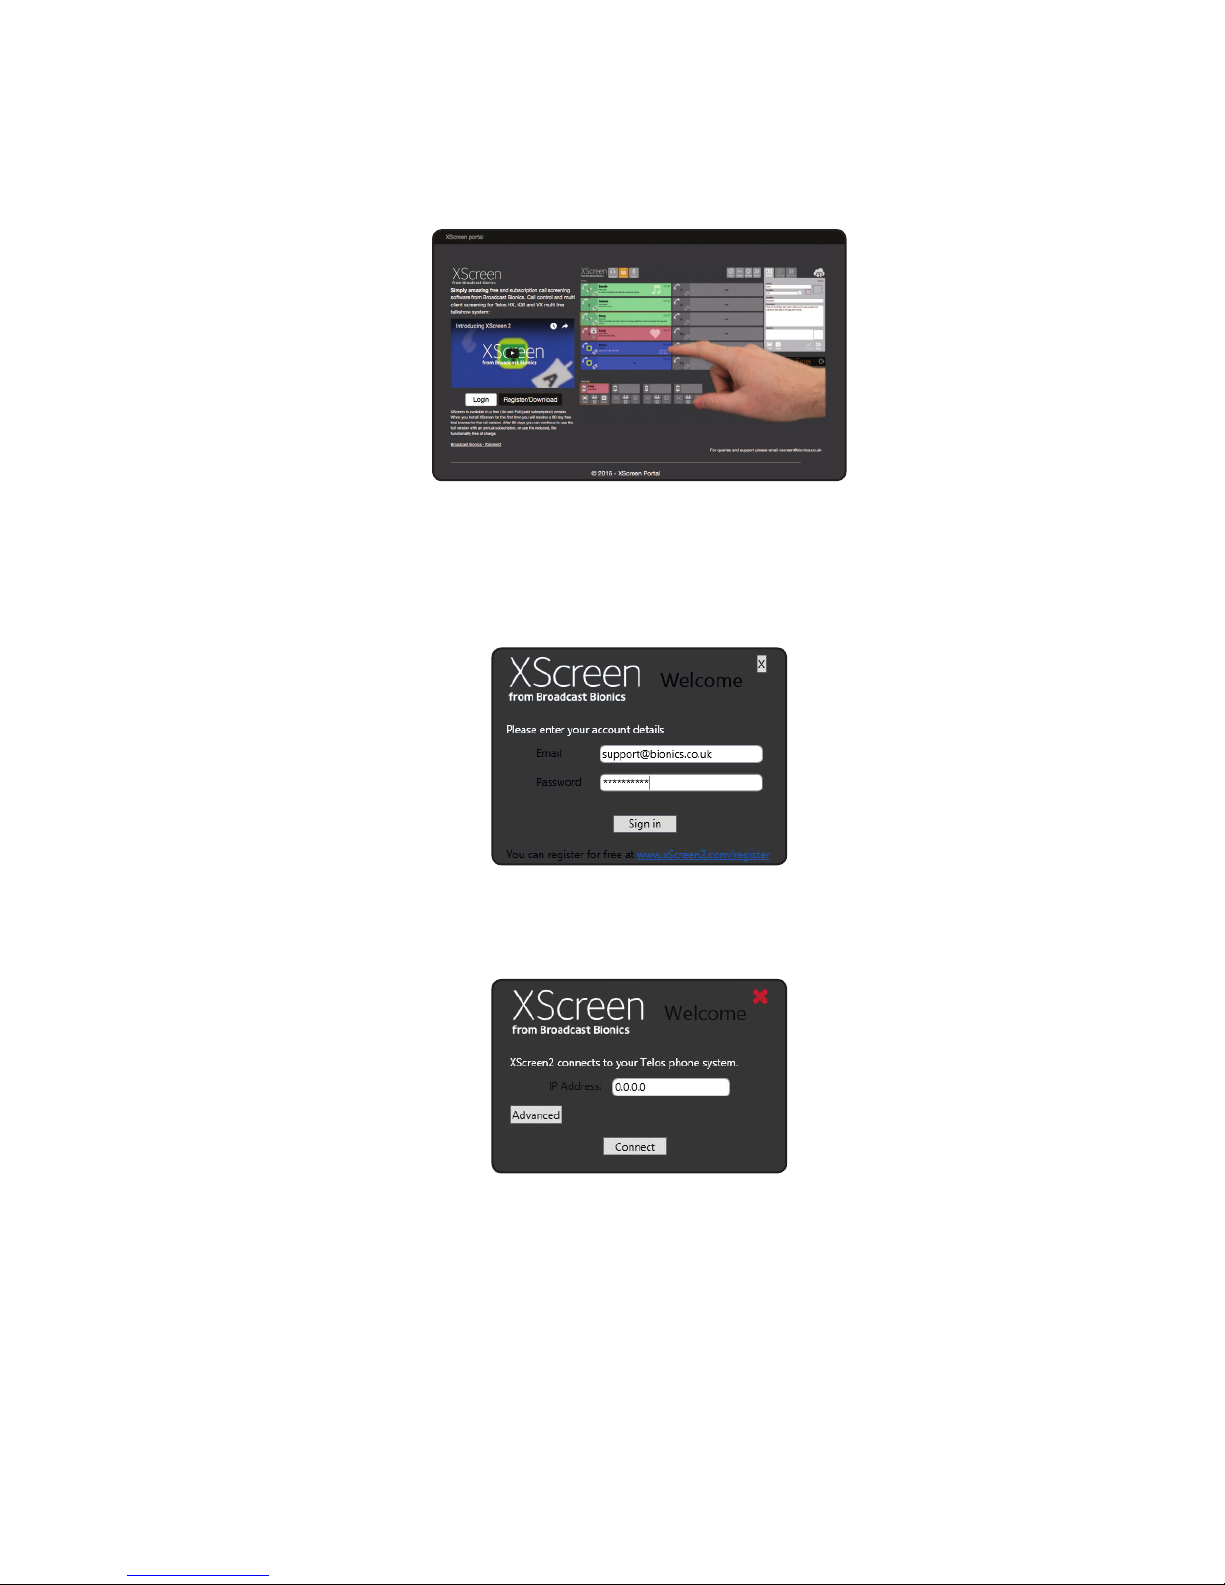
XSreenCall ScreeningSoftwareConfiguration
Visit http://www.xscreen2.com and complete the short cloud registration process. You will create an
XScreen cloud account, enabling you to login to xscreen2.com, download the software and manage your
license. Your cloud account is encrypted and only available to you.
Double-click on the downloaded XScreen installer to install the XScreen software onto your PC.
A screen will prompt you to login to your XScreen cloud account, enter the email address and password of
your newly created XScreen account.
Once logged in, a screen will prompt you for IP address information. Enter the assigned IP address of your VX
Prime in the IP address field.
Once installed, double click the XScreen desktop icon to launch XScreen client.
XSreenCall ScreeningSoftwareConfiguration
Table of contents
Other Telos Telephone manuals


