TENA SmartCare Change Indicator User manual

Version EU :
QUICK GUIDE
TENA SmartCare Change Indicator™
cz
sk
en For family caregivers 02

22enen
The Change Indicator is intended for use
with TENA incontinence products.
Clean the Change Indicator when fully
assembled to prevent water from
entering the device. Do not submerge in
water or clean in a washing machine.
Do not attempt to repair or modify the
Change Indicator or a gateway by
yourself.
Seek immediate medical care if the
battery is swallowed.
Keep the Change Indicator and batteries
away from children and pets.
Important information
A helping hand for you
and your loved one
The Change Indicator is designed to support you by
helping you decide when to change absorbent products
without frequent manual checks. However, it should
never replace your own judgement.

54
enen
What’s in the box
You also need (not included):
TENA
ABSORBENT
PRODUCT
SMARTPHONE
or later
ADHESIVE STRIP
SENSOR STRIP, x 2
BATTERY CR2032, x 2
POWER ADAPTER
MOUNTING BRACKET
LED light
Button
GATEWAY
TRANSMITTER
Buttons
LED light
TENA SMARTCARE
FAMILY CARE APP
Start with the app
1
1.1 DOWNLOAD APP AND REGISTER ACCOUNT
Scanning the relevant QR code will take
you directly to the App Store or Google Play,
where you can download the TENA
SmartCare Family Care app.
1.2 REGISTER YOUR LOVED ONE’S PRODUCT IN THE APP
For the most accurate results, register the absorbent
product your loved one is currently using in the app.
Once you have downloaded the app, start setting
up the Change Indicator using the instruction lms
in the app or this quick guide.
To App Store (iOS) To Google Play (Android)

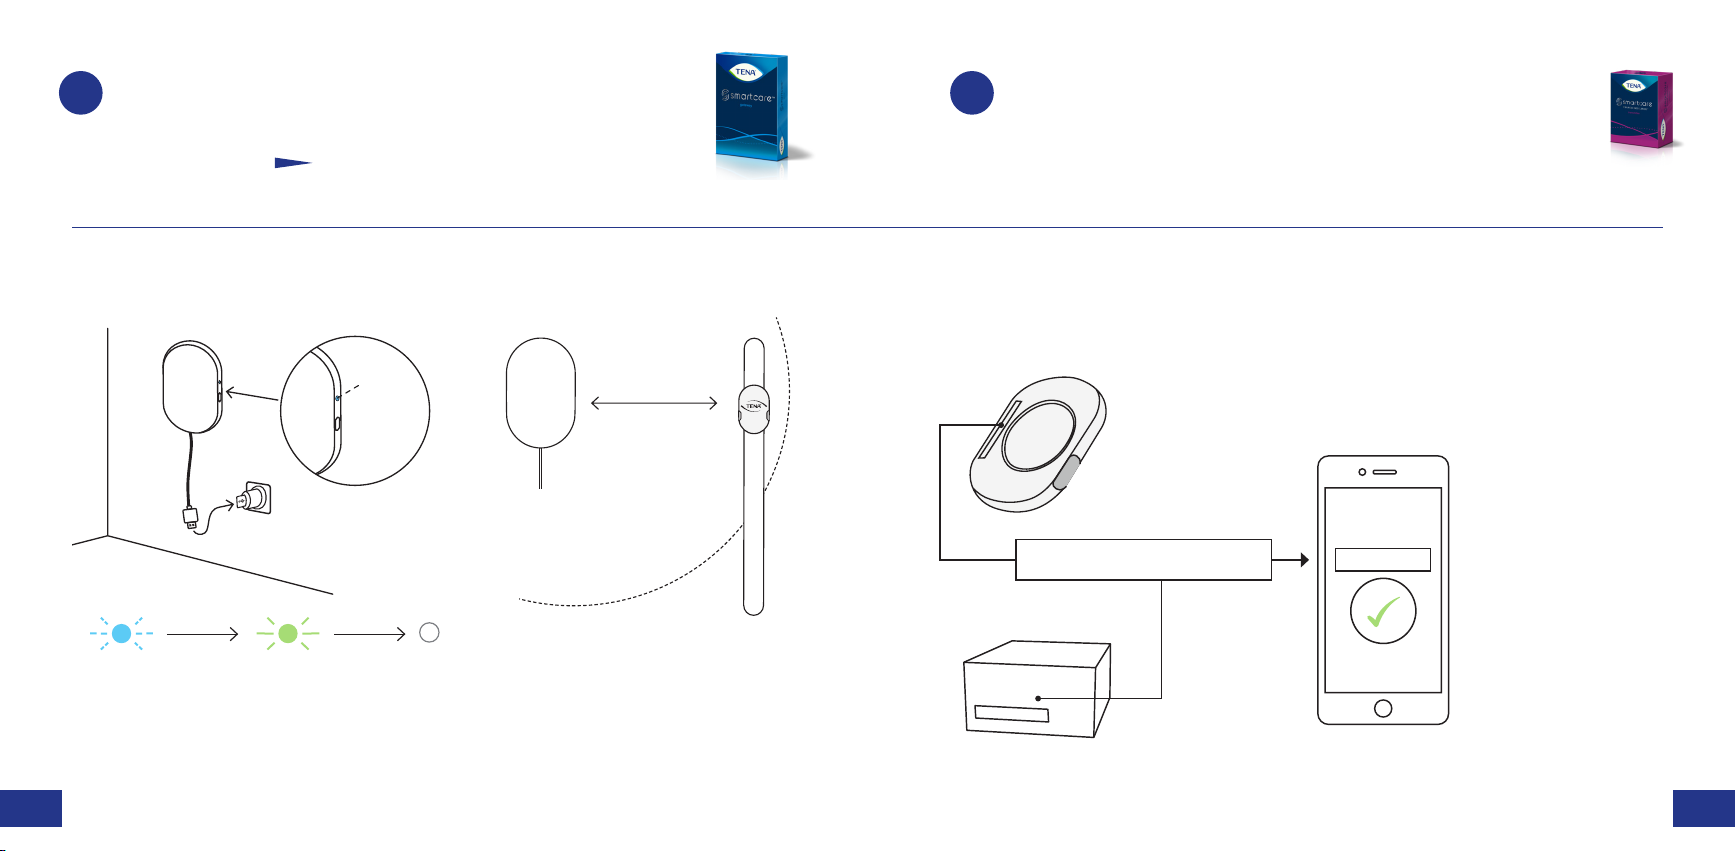
Steady light
= connected
Blinking light
= connecting
No light
= OK
SN (21) 000 000 000 000 000 SN (21) 000 000 000 000 000
en en
Gateway must
be within
Change Indicator
CONNECT
Steady light
= connected
Blinking light
= connecting
No light
= OK
Light
On the back of the transmitter, and on the transmitter packaging, there is a
Register the transmitter
3
2.2 Consider range
Set up the gateway
2

8 9
en en
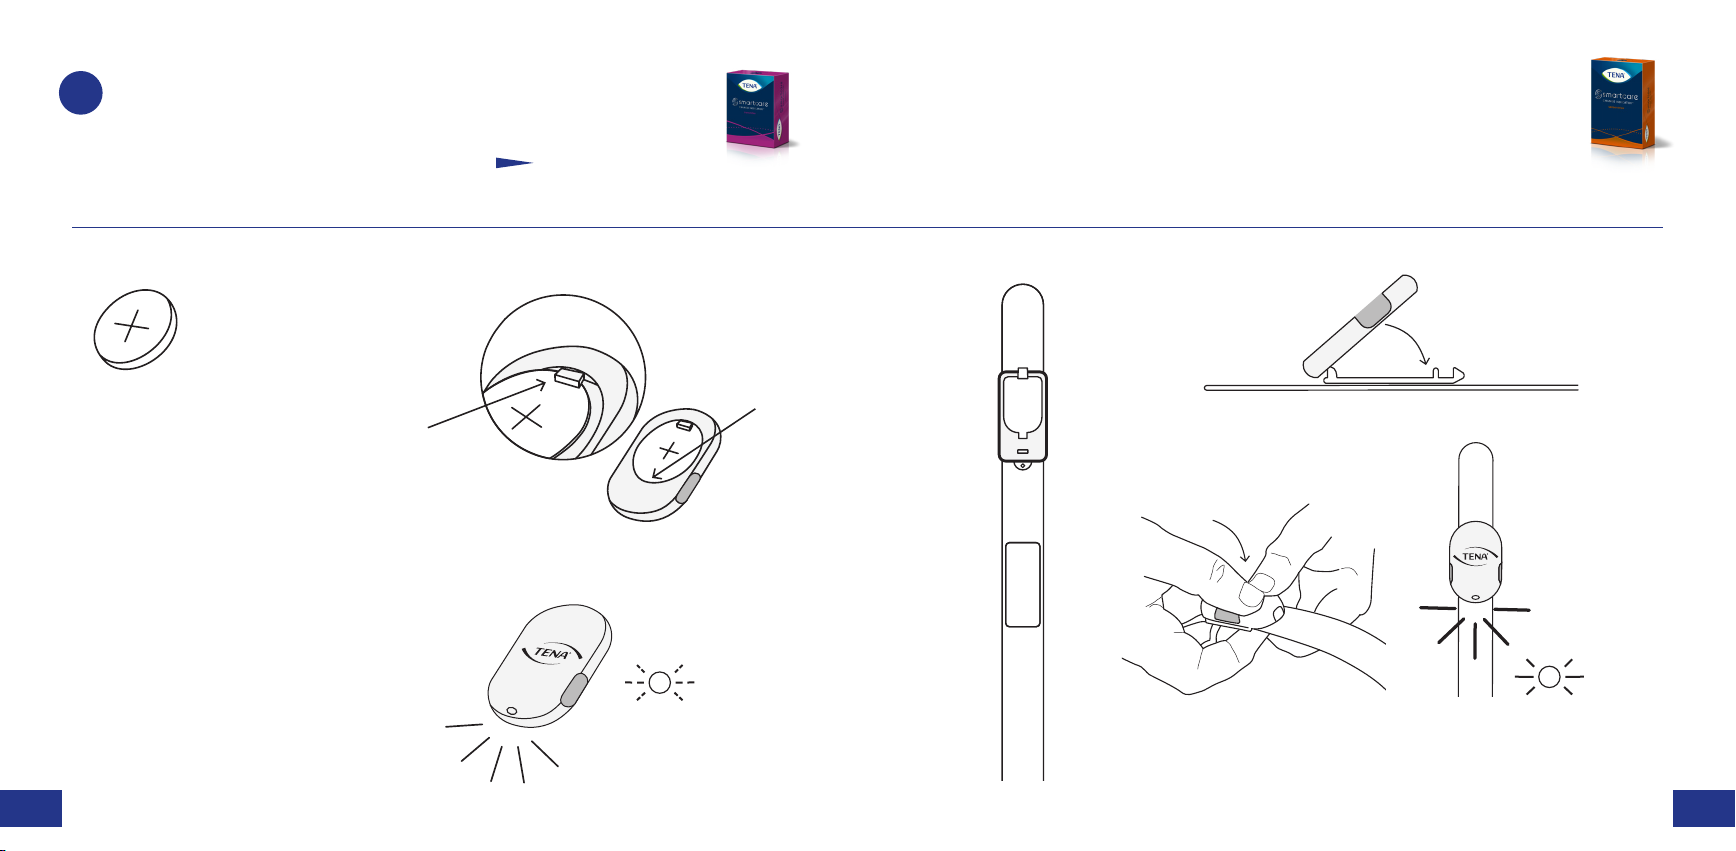
Light blinks
5 times
= OK
Press down till you
hear a click.
TOP OF
SENSOR
STRIP
Click!
Insert battery
under black tab.
Assemble the Change Indicator
4
Click!
Steady light for
a few seconds
= OK
TOP OF
SENSOR
STRIP Start at top, press down to attach
4.2 4.4
4.5

TENA Slip /
TENA Stretch Brief /
TENA Brief
TENA Pants/
TENA Underwear
TENA Slip/
TENA Stretch Brief/
TENA Brief
TENA Pants/
TENA Underwear
TENA Slip/
TENA Stretch Brief/
TENA Brief
TENA Pants/
TENA Underwear
TENA Flex
TENA Slip/
TENA Stretch Brief/
TENA Brief
TENA Pants/
TENA Underwear
TENA Slip/
TENA Stretch Brief/
TENA Brief
TENA Pants/
TENA Underwear
TENA Flex
TENA Slip/
TENA Stretch Brief/
TENA Brief
TENA Pants/
TENA Underwear
en en
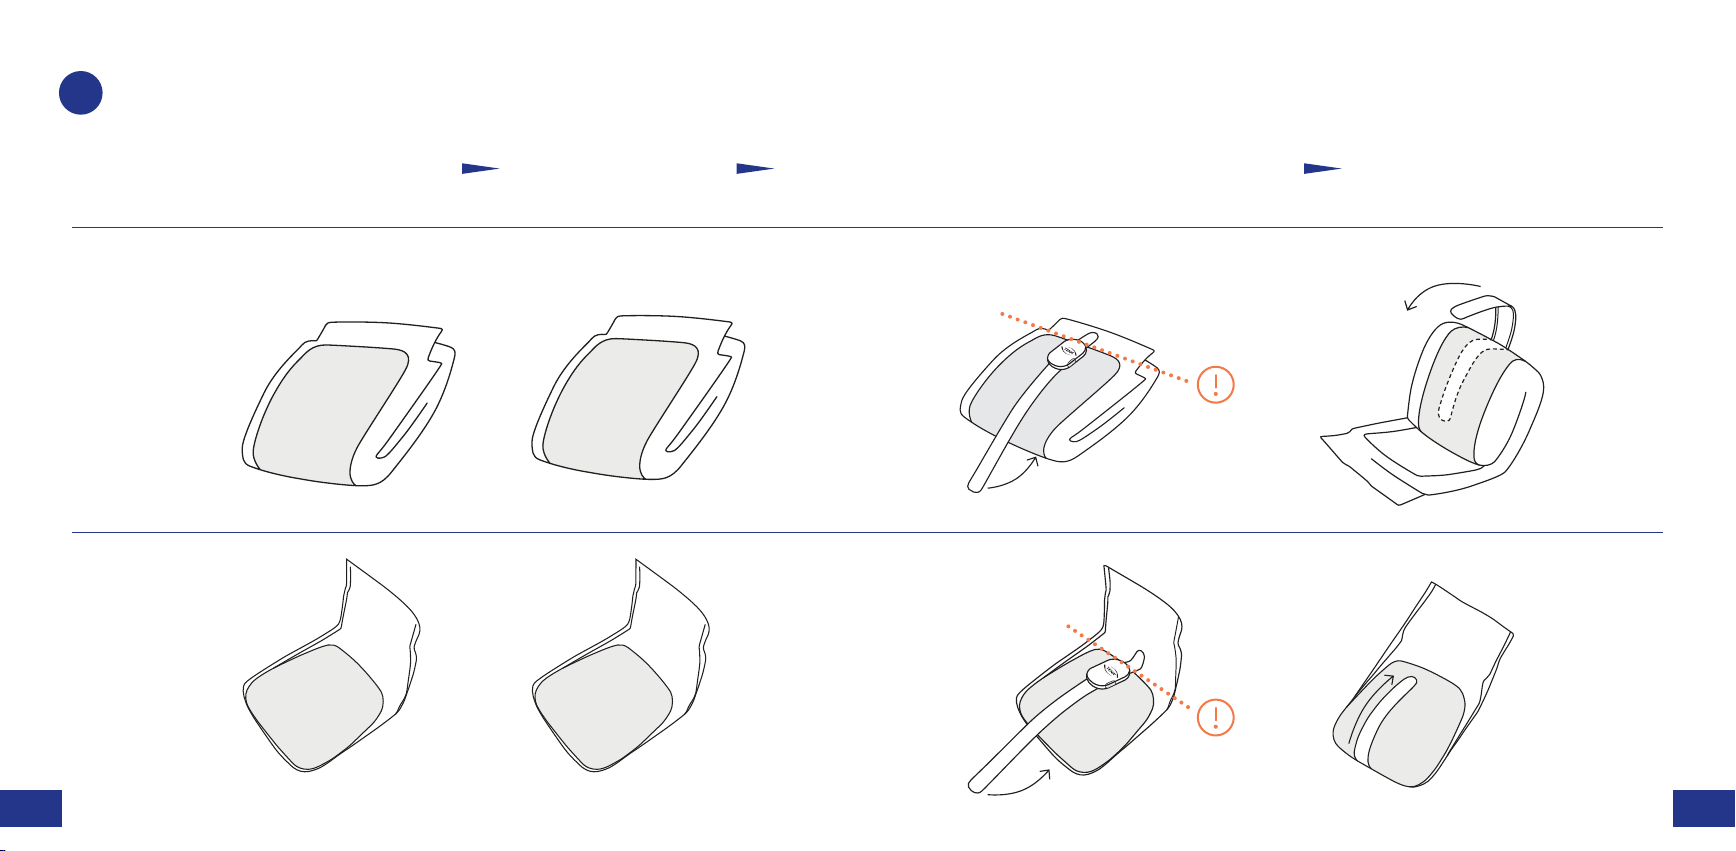
FRONT
KEEP FOLDED PLACE TIGHTLYALIGN WITH THE TOP OF THE
THICKER ABSORBENT AREA
FIND THE FRONT
TENA Pants
Press rmly! Tight t all the way
Press rmly! Tight t all the way
FRONT
FRONT
FRONT
THICKER
ABSORBENT
AREA
THICKER
ABSORBENT
AREA
Attach Change Indicator to product
5
5.2
5.2
5.4
5.4

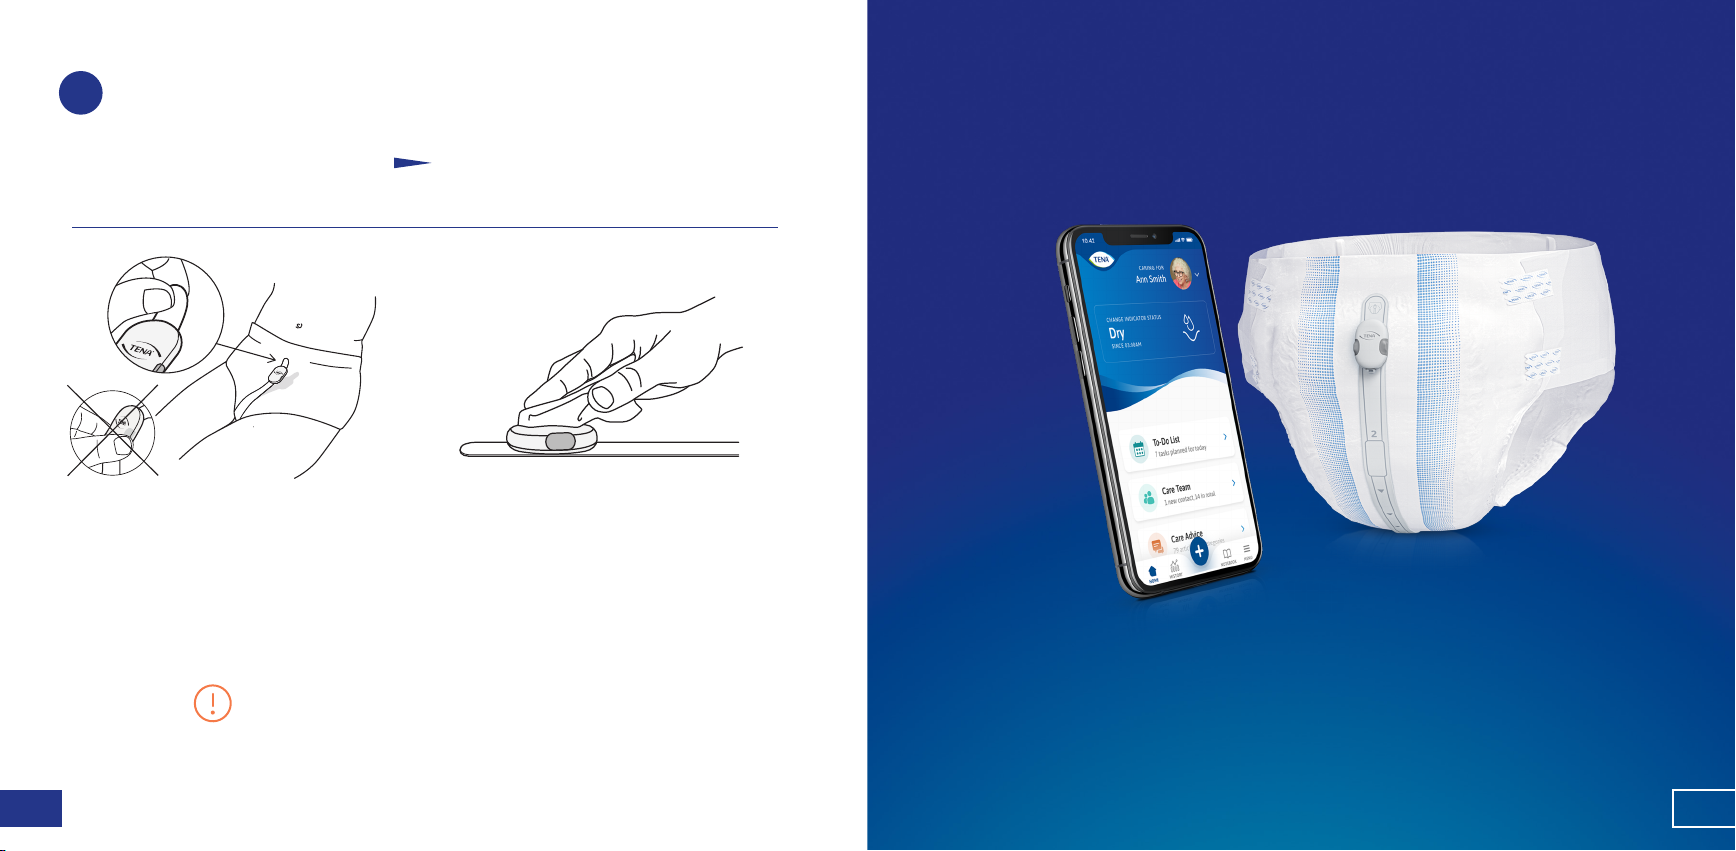
Apply TENA product
on the resident
en en
APPLY THE TENA PRODUCT CONSIDER CHANGEFOLLOW NOTIFICATIONSPRESS BUTTONS
In case of error notications, consult the instructions for use for more information.
Press both buttons
for 2 seconds.
Steady light for a
few seconds = OK
Press both buttons simultaeneously
for two seconds after every change.
This registers the change and
resets the system.
Use the Change Indicator
6
Apply on your loved one.
If the user is very mobile,
or ordinary underwear on top of
the Change Indicator. This will
keep it comfortably in place.
WET
– consider change
absorbent part of the TENA
product. It probably still
feels dry to the skin, but you
should consider change.
SOME URINE
– no action needed
Some urine in the absorbent
part of the TENA product.
The surface still feels dry
to the skin.
DRY
– no action needed
The absorbent part of
the TENA product is dry.

enen
Only clean when assembled.
Clean once a week or as needed.
disinfectant when needed.
Remove Change Indicator before
removing the TENA product.
Start at the top. Grip the tab, then
gently peel straight downwards.
surface when not in use.
Remember to press both buttons
simultaneously for two seconds before
or after every change. This registers the
change and resets the system.
Remove and clean
7

171616 czcz
Důležité informace
Pomocná ruka pro vás
avaše blízké

1918
czcz
ABSORPČNÍ
POMŮCKU
TENA
CHYTRÝ TELEFON
LEPICÍ PÁSEK
PÁSEK SE
SENZOREM, x 2
BATERIE CR2032, x 2
SÍŤOVÝ ADAPTÉR
MONTÁŽNÍ KONZOLA
HLAVNÍ
JEDNOTKA
VYSÍLAČ
APLIKACE TENA
SMARTCARE FAMILY
CARE
Spuštění aplikace
1
1.1 STÁHNĚTE SI APLIKACI AZAREGISTRUJTE
SIÚČET
1.2 ZAREGISTRUJTE VAPLIKACI POMŮCKU, KTEROU
VÁŠ BLÍZKÝ POUŽÍVÁ
Po stažení aplikace začněte snastavením indikátoru
Change Indicator. Můžete ktomu využít instruktážní
lmy vaplikaci nebo tohoto rychlého průvodce.
App Store (iOS) Obchod Play (Android)

20 21
Steady light
= connected
Blinking light
= connecting
No light
= OK
SN (21) 000 000 000 000 000 SN (21) 000 000 000 000 000
cz cz
Indicator
= OK
Kontrolka
Registrace vysílače
3
Nastavení hlavní jednotky
2
22
cz cz
Klik!
Sestavení indikátoru Change Indicator
4
Klik!
= OK
24
TENA Slip /
TENA Stretch Brief /
TENA Brief
TENA Pants/
TENA Underwear
TENA Slip/
TENA Stretch Brief/
TENA Brief
TENA Pants/
TENA Underwear
TENA Slip/
TENA Stretch Brief/
TENA Brief
TENA Pants/
TENA Underwear
TENA Flex
TENA Slip/
TENA Stretch Brief/
TENA Brief
TENA Pants/
TENA Underwear
TENA Slip/
TENA Stretch Brief/
TENA Brief
TENA Pants/
TENA Underwear
TENA Flex
TENA Slip/
TENA Stretch Brief/
TENA Brief
TENA Pants/
TENA Underwear
cz cz
Pevně přitiskněte! Po celé délce musí těsně přiléhat
Pevně přitiskněte! Po celé délce musí těsně přiléhat
Připojení indikátoru Change Indicator
kpomůcce
5

26 27
Apply TENA product
on the resident
cz cz
Vpřípadě chybových zpráv si přečtěte další informace vnávodu kpoužití.
Po každé výměně stiskněte na dvě
sekundy současně obě tlačítka.
Zaregistrujete tak výměnu
aresetujete systém.
Používání indikátoru Change Indicator
6
VLHKÉ
– zvažte VÝMĚNU
PŘÍTOMNOST MOČI
– není třeba žádné opatření
SUCHÉ
– není třeba žádné
opatření
28 29 czcz
Před každou výměnou nebo po každé výměně
nezapomeňte na dvě sekundy stisknout
současně obě tlačítka. Zaregistrujete tak
výměnu a resetujete systém.
Vyjmutí aočištění
7

313030 sksk
TENA.
vody do zariadenia. Neponárajte ho do
Uchovávajte indikátor na výmenu
pomôcky mimo detí a zvierat.
Dôležité informácie
Pomoc pre vás a vašu
blízku osobu
Indikátor na výmenu pomôcky je navrhnutý ako pomôcka pre

3332
sksk
TENA
ABSORPČNÁ
POMÔCKA
SMARTFÓN
iOS 11/Android 7
LEPIACA PÁSKA
PÁSIK SO SENZOROM, 2x
BATÉRIA, CR2032, 2x
SIEŤOVÝ ADAPTÉR
MONTÁŽNA KONZOLA
LED
HLAVNÁ
JEDNOTKA
SENZOR
APLIKÁCIA TENA
SMARTCARE FAMILY
CARE
Začnite saplikáciou
1
1.1 STIAHNUTIE APLIKÁCIE A REGISTRÁCIA
ÚČTU
1.2 ZAREGISTRUJTE POMÔCKU SVOJEJ BLÍZKEJ OSOBY
VAPLIKÁCII.
Po stiahnutí aplikácie si nastavte indikátor na výmenu
pomôcky pomocou inštruktážnych videí v aplikácii
alebo stručnej príručky.
Do App Store (iOS) Do Google Play (Android)
34 35
Steady light
= connected
Blinking light
= connecting
No light
= OK
SN (21) 000 000 000 000 000 SN (21) 000 000 000 000 000
sk sk
od indikátora na
výmenu pomôcky.
Svetlo
Registrácia senzora
3
Nastavenie hlavnej jednotky
2

37
sk sk
Cvak!
Zostavenie indikátora na výmenu
pomôcky.
4
Cvak!
5-krát
4.1 4.2 4.4
4.3
4.5
4.7

38 39
TENA Slip /
TENA Stretch Brief /
TENA Brief
TENA Pants/
TENA Underwear
TENA Slip/
TENA Stretch Brief/
TENA Brief
TENA Pants/
TENA Underwear
TENA Slip/
TENA Stretch Brief/
TENA Brief
TENA Pants/
TENA Underwear
TENA Flex
TENA Slip/
TENA Stretch Brief/
TENA Brief
TENA Pants/
TENA Underwear
TENA Slip/
TENA Stretch Brief/
TENA Brief
TENA Pants/
TENA Underwear
TENA Flex
TENA Slip/
TENA Stretch Brief/
TENA Brief
TENA Pants/
TENA Underwear
sk sk
Nasadenie indikátora na výmenu pomôcky
na pomôcku
5
Pevne zatlačte. Po celej dĺžke musí tesne priliehať.
Pevne zatlačte. Po celej dĺžke musí tesne priliehať.
5.2
5.2
5.3
5.3
5.4
5.4
5.1
5.1
Other manuals for SmartCare Change Indicator
11
Table of contents
Languages:
Other TENA Personal Care Product manuals

TENA
TENA SmartCare Change Indicator User manual

TENA
TENA SmartCare Change Indicator User manual

TENA
TENA SmartCare Change Indicator User manual

TENA
TENA SmartCare Change Indicator User manual

TENA
TENA SmartCare Change Indicator User manual

TENA
TENA SmartCare Change Indicator User manual

TENA
TENA SmartCare Change Indicator User manual

TENA
TENA SmartCare Change Indicator User manual

TENA
TENA SmartCare Change Indicator User manual


