TENA SmartCare Change Indicator User manual

TENA SmartCare
Change IndicatorTM/MC
www.tena.com
www.tena.us
www.tena.ca
Version: NA 2022-10-18
Family caregivers Instructions for use 2–35
en
Familiar cuidador Instrucciones de uso 36–69
es
Instructions d’utilisation pour les aidants familiaux 70–104
fr

TENA SmartCare Change IndicatorTM/MC
2
TENA SmartCare Change IndicatorTM/MC
en
WARNING Care shall be taken to ensure safety and eciency.
Failure to do so could cause damage to equipment or lead to
the receipt of incorrect data.
NOTE Important information or advice/ tips.
CHECK Important information for the system to function.
Symbols used in this guide
This guide is intended for family caregivers using TENA SmartCare Change
IndicatorTM/MC in a home environment.
TENA SmartCare Change Indicator is a digital health technology solution
that helps family caregivers decide when to change absorbent products
without the need for frequent manual checks.
The Change Indicator is attached to the outside of the absorbent
product and tracks the urine saturation levels within. Family caregivers
then receive information about the dierent saturation levels on their
smartphones via the TENA SmartCare Family Care app. This information is
then used to decide whether the absorbent product needs to be changed
or not. The TENA SmartCare Change Indicator system tracks urine
saturation, but does not detect fecal episodes.
TENA SmartCare Change Indicator is a system consisting of:
• An app named TENA SmartCare Family Care that can be installed on one
or more smartphones used in a family.
• A reusable Change Indicator that consists of two parts: a sensor strip and
a transmitter.
• A gateway that relays data from the Change Indicator to a secured server.
In this guide, you will nd instructions for how to use:
The TENA SmartCare Change Indicator system including TENA SmartCare
transmitter, TENA SmartCare gateway, TENA SmartCare sensor strip and
TENA SmartCare Family Care app.
The TENA SmartCare Change Indicator system is designed to be intuitive,
with family caregivers in mind. It does not require special training.
INFORMATION

TENA SmartCare Change IndicatorTM/MC
3
en
Important information 4
Warnings 5
Included in the TENA Smartcare Change IndicatorTM/MC starter kit 7
Download the app and set up the account 8
Explanation of the app during use 9
Set up the gateway 10
Register the transmitter code 11
Install the battery & assemble the Change Indicator 12
Attach the Change Indicator 13
Use the Change Indicator 14
Remove the Change Indicator 15
Intended use 16
List of supported TENA products 17
Attachment instructions for supported TENA products 18
TENA Underwear 18
TENA Briefs 19
TENA Belted briefs 20
Replace the sensor strip & the battery 21
Cleaning 22
Gateway lights & buttons 23
Transmitter lights & buttons 24
Troubleshooting 25–29
Technical descriptions 30
Operating characteristics 30–31
Electromagnetic compability (EMC) 32
Lifetime 32
Disposable parts 33
Labelling symbols 34
Assortment overview 105
CONTENTS

TENA SmartCare Change IndicatorTM/MC
4
TENA SmartCare Change IndicatorTM/MC
en
• Ensure you have read and understood these instructions before
using the product. Save these instructions for future reference.
• If you encounter any problems, equipment failure or if any
other incidents occur, report them to the manufacturer or
TENA SmartCare support.
• The Change Indicator is intended for use with TENA incontinence
products.
• The adhesive strip for attaching the gateway will not adhere well to
dirty, dusty or oily surfaces and may not adhere well to vinyl surfaces.
Do not use tape on wallpaper, bare wood or on porous or
painted surfaces.
• The Change Indicator is not intended to be used in direct contact
with the skin.
• Do not use gateways with unapproved power supplies.
IMPORTANT INFORMATION

TENA SmartCare Change IndicatorTM/MC
5
en
• Keep the Change Indicator and batteries away from children and pets.
• Only a CR2032 battery should be used in the Change Indicator.
Using the wrong type of battery, including rechargeable batteries,
can damage the Change Indicator.
• The Change Indicator should be attached to the outside of the
incontinence product.
• Clean the Change Indicator when fully assembled to prevent water
from entering the device. Do not submerge in water or clean in a
washing machine.
• Do not swing the Change Indicator in the direction of people, pets or
nearby objects. Be aware of the risk of strangulation with the sensor strip.
• Seek immediate medical care if the battery is swallowed.
• Do not attempt to repair or modify the Change Indicator or a gateway
by yourself.
• If any part of the Change Indicator system appears to be damaged or
broken, it should not be used.
• Do not expose the battery to high temperatures, disassemble it,
damage it mechanically or put battery into the re as this can cause
an explosion or a re.
WARNINGS

TENA SmartCare Change IndicatorTM/MC
6
TENA SmartCare Change IndicatorTM/MC
en
This equipment has been tested and found to comply with the limits for
a Class B digital device, pursuant to part 15 of the FCC Rules. These limits
are designed to provide reasonable protection against harmful interference
in a residential installation. This equipment generates, uses, and can radiate
radio frequency energy and, if not installed and used in accordance with
the instructions, may cause harmful interference to radio communications.
However, there is no guarantee that interference will not occur in a
particular installation. If this equipment does cause harmful interference
to radio or television reception, which can be determined by turning the
equipment o and on, the user is encouraged to try to correct the
interference by one or more of the following measures:
• Reorient or relocate the receiving antenna.
• Increase the separation between the equipment and receiver.
• Connect the equipment into an outlet on a circuit dierent from that
to which the receiver is connected.
• Consult the dealer or an experienced radio/TV technician for help.
Changes or modications not expressly approved by the party responsible
for compliance could void the user’s authority to operate this equipment.
This device contains license-exempt transmitter(s)/ receiver(s) that comply
with Innovation, Science and Economic Development Canada’s license-
exempt RSS(s). Operation is subject to the following two conditions:
• This device may not cause interference.
• This device must accept any interference, including interference that may
cause undesired operation of the device.
This equipment complies with the ICES RF radiation exposure limits set forth
for an uncontrolled environment. You also need:
WARNINGS
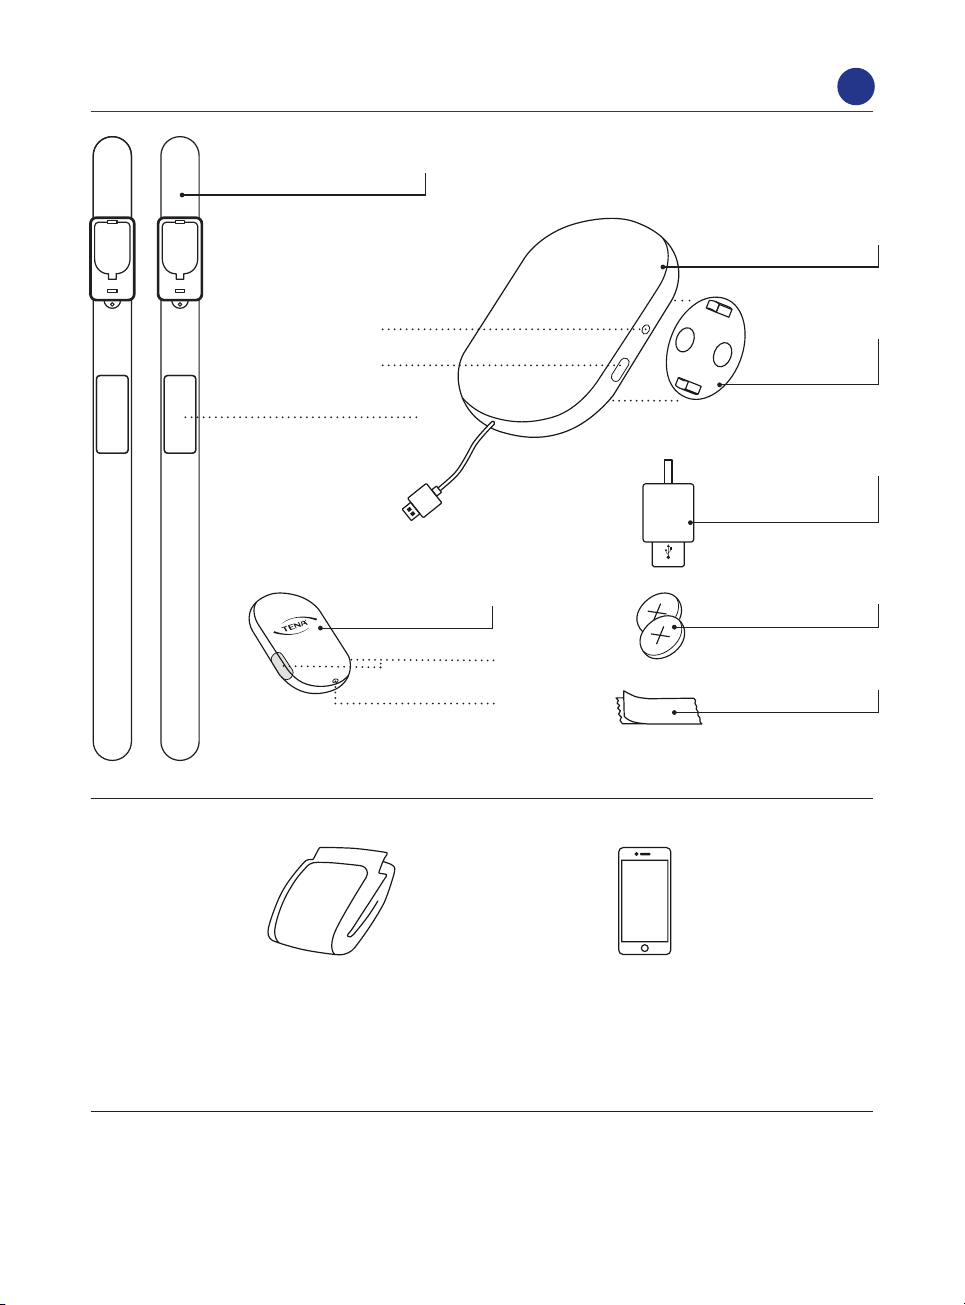
wINCLUDED IN THE TENA SMARTCARE
CHANGE INDICATORTM/MC STARTER KIT
TENA SmartCare Change IndicatorTM/MC
7
TENA SmartCare Change IndicatorTM/MC
en
A SMARTPHONE
with TENA SmartCare Family
Care app, iOS 11/ Android 7
or later.
A SUPPORTED TENA
INCONTINENCE PRODUCT
(see supported TENA products on p. 17
of this guide or in the TENA SmartCare
Family Care app).
CONSUMABLES:
Sensor strip 1 (short), sensor strip 2 (medium), sensor strip 3 (long), battery,
TENA incontinence product.
ADHESIVE STRIP
You also need:
GATEWAY
MOUNTING
BRACKET
POWER
ADAPTER
×
Length: 1, 2 or 3
Place to write
SENSOR STRIP, ×
LED light
Button
Buttons
LED light
TRANSMITTER
wINCLUDED IN THE TENA SMARTCARE
CHANGE INDICATORTM/MC STARTER KIT

TENA SmartCare Change IndicatorTM/MC
8
TENA SmartCare Change IndicatorTM/MC
1
2
3
SN (21) 000 000 000 000 000 SN (21) 000 000 000 000 000
TENA SMARTCARE
FAMILY CARE APP
en
DOWNLOAD THE TENA
SMARTCARE FAMILY CARE APP
Download the TENA SmartCare Family Care app
from the App Store or Google Play and then register
your account.
INVITE OTHER CAREGIVERS
You can create a care team by inviting
others who care for your loved one.
This will give them access to the TENA
SmartCare Family Care app.
Follow the setup instructions in the
TENA SmartCare Family Care app.
The transmitter code is located on
the back of the transmitter and
on the packaging.
REGISTER THE TRANSMITTER
DOWNLOAD THE APP AND SET UP THE ACCOUNT
TENA SmartCare Change IndicatorTM/MC
9
TENA SmartCare Change IndicatorTM/MC
1
2
3
en
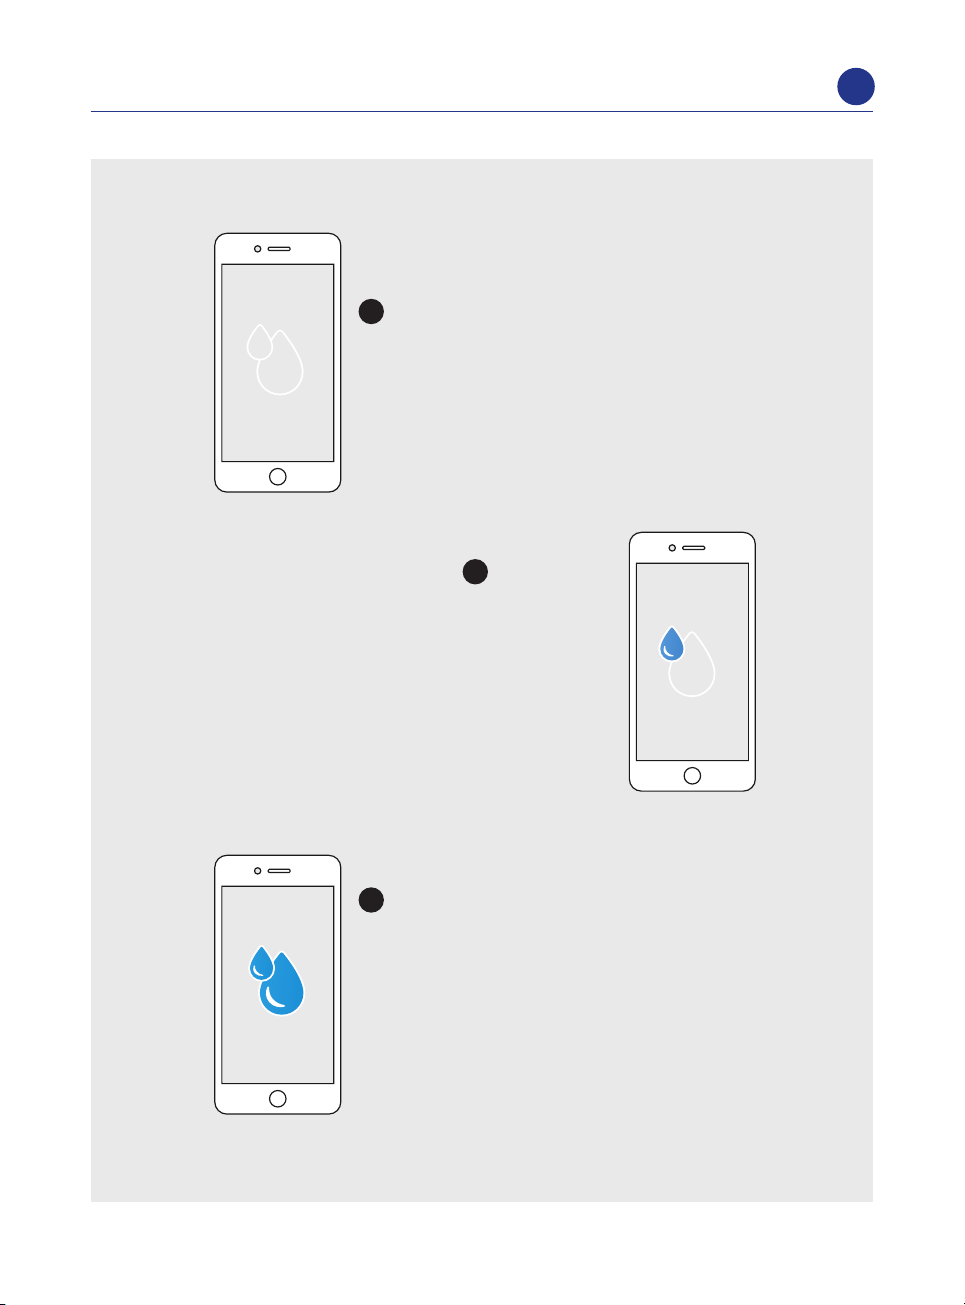
DRY
– no action needed
The absorbent core of the TENA product is dry,
and the surface feels dry to the skin.
SOME URINE
– no action needed
There is some urine in the absorbent core
of the TENA product. However, the surface still
feels dry to the skin. If the absorbent product
has been on for an extended period and the user
has sensitive skin, you may want to consider
changing it.
WET
– consider change
There is a large amount of urine in the absorbent
core of the TENA product. The surface probably
still feels dry to the skin, but you should consider
a change – especially if the absorbent product
has been on for an extended period and/ or the
user has sensitive skin.
EXPLANATION OF THE APP DURING USE
TENA SmartCare Change IndicatorTM/MC
10
TENA SmartCare Change IndicatorTM/MC
Steady light
= connected
Blinking light
= connecting
No light
= OK
1
2
3
5
4
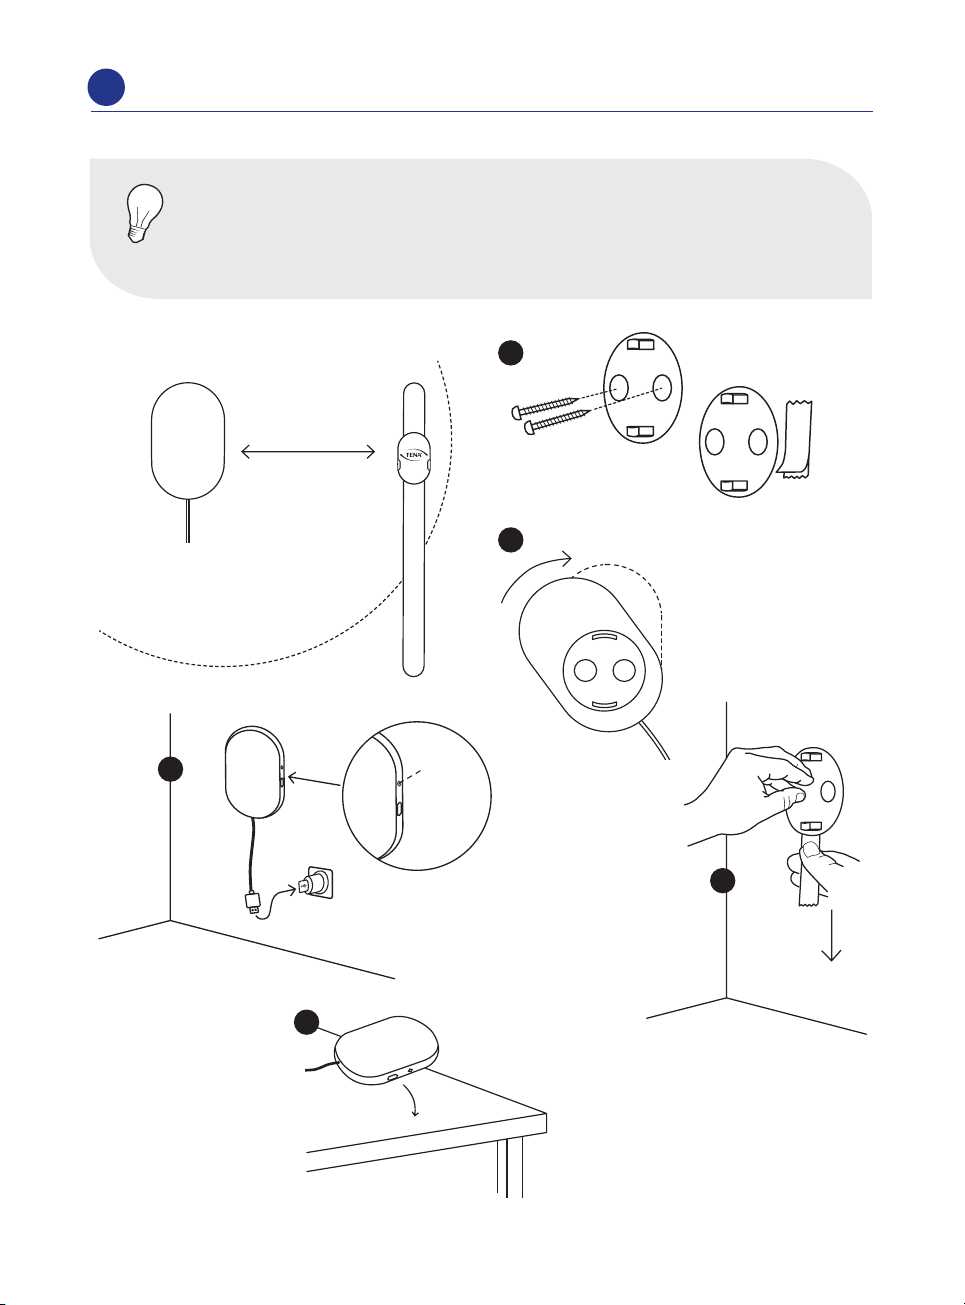
en SET UP THE GATEWAY
NOTE
The gateway should be placed within 33 ft/ 10 m of the Change Indicator
and connected to an electrical power outlet.
Placement
Click!
You can also place the gateway
on a at surface
Screws or
adhesive strip
33 ft/ 10 m
Light
See page 23
Gateway lights
& buttons
Removal of the item: Grab
removal tab and slowly slide
the tab straight down against
the wall stretching the tape
at least 6 inches (15cm) until
item releases from the wall
TENA SmartCare Change IndicatorTM/MC
11
TENA SmartCare Change IndicatorTM/MC
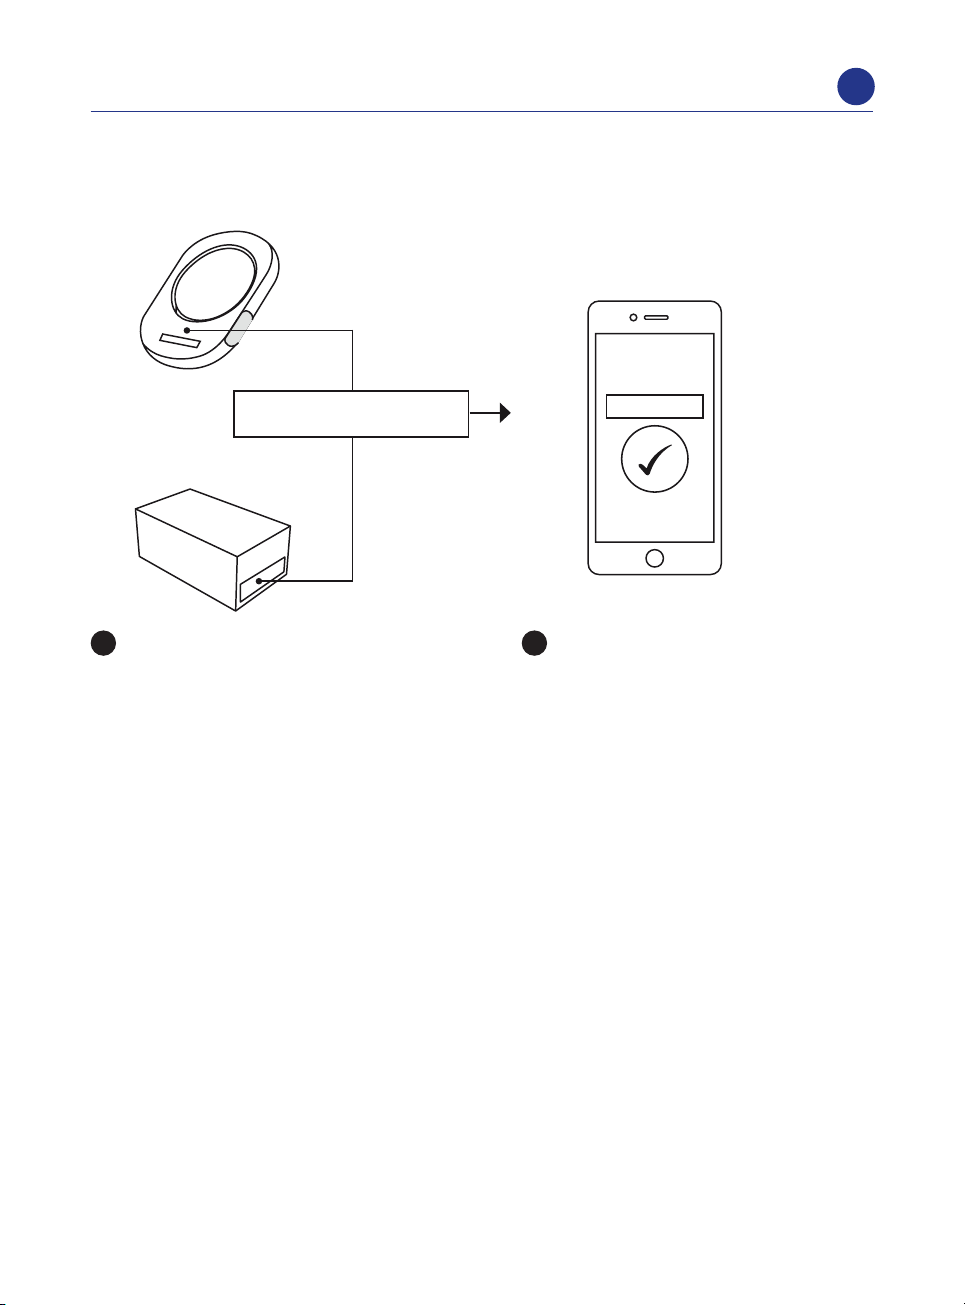
000 000 000 000 000
000 000 000 000 000
000 000 000 000 000
000 000 000 000 000
en
Find the transmitter code, which
is located on the back of the
transmitter and on the packaging.
Enter the transmitter code in the
TENA SmartCare Family Care app
to register.
1 2
REGISTER THE TRANSMITTER CODE
SN (21) 000 000 000 000 000 SN (21) 000 000 000 000 000

TENA SmartCare Change IndicatorTM/MC
12
TENA SmartCare Change IndicatorTM/MC
1 2 3
1 2
3 4
en
Install the battery
WARNING Only CR2032 batteries shall be used
for TENA SmartCare Change Indicator.
CR2032
Light blinks
5 times = OK
See page 24
Transmitter lights
& buttons
Click!
INSTALL THE BATTERY & ASSEMBLE THE CHANGE INDICATOR
Click!
Squeeze rmly together
Assemble the Change Indicator (transmitter + sensor strip)
Steady light for a
few seconds = OK
TOP
TOP
See page 24
Transmitter lights
& buttons
TENA SmartCare Change IndicatorTM/MC
13
TENA SmartCare Change IndicatorTM/MC
12
3 4
TENA Slip/
TENA Stretch Brief/
TENA Brief
TENA Pants/
TENA Underwear
TENA Slip/
TENA Stretch Brief/
TENA Brief
TENA Pants/
TENA Underwear
TENA Flex
TENA Flex
FRONT
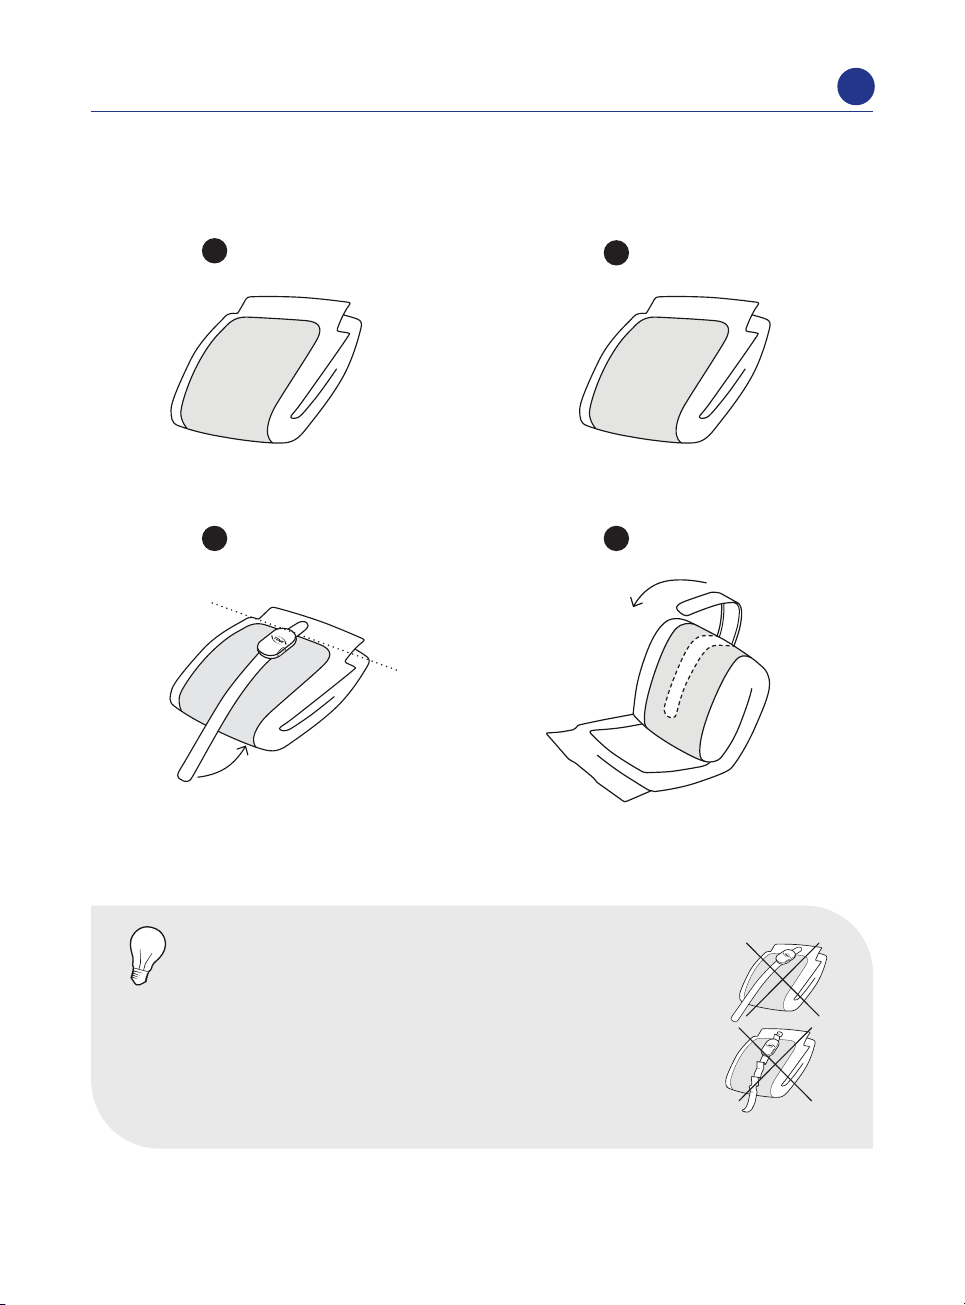
en
See supported TENA absorbent products on
p.
17 of this guide or in the
TENA SmartCare Family Care app.
NOTE
Always attach the Change Indicator before you unfold the incontinence
product. Start by placing the Change Indicator at the front of the inconti-
nence product, on the thicker absorbent area, ensuring it is straight.
Align the transmitter with the top of the thicker absorbent area of the
incontinence product. Press rmly to ensure the Change Indicator has
full contact with the incontinence product. If the user is very mobile,
consider applying a xation pant or ordinary underwear on top of the
Change Indicator. This will keep it comfortably in place.
Keep folded
Place tightly
Align with the top of the
thicker absorbent area
Find the front
FRONT
THICKER
ABSORBENT
AREA
ATTACH THE CHANGE INDICATOR

TENA SmartCare Change IndicatorTM/MC
14
TENA SmartCare Change IndicatorTM/MC
2
1
3
Apply TENA product
on the resident
en
Blinking light:
Change battery, see page 21
For explanations of app notications, see page 9.
Apply the TENA absorbent
product with the Change
Indicator on your loved one.
Steady light for a few seconds:
Continue
Press both buttons simultaneously for two seconds at every
change. This records the change of incontinence product in
the TENA SmartCare Family Care app.
DRY
– no action needed
SOME URINE
– no action needed
WET
– consider change
TENA
SmartCare
Family Care
app
USE THE CHANGE INDICATOR
TENA SmartCare Change IndicatorTM/MC
15
TENA SmartCare Change IndicatorTM/MC
en
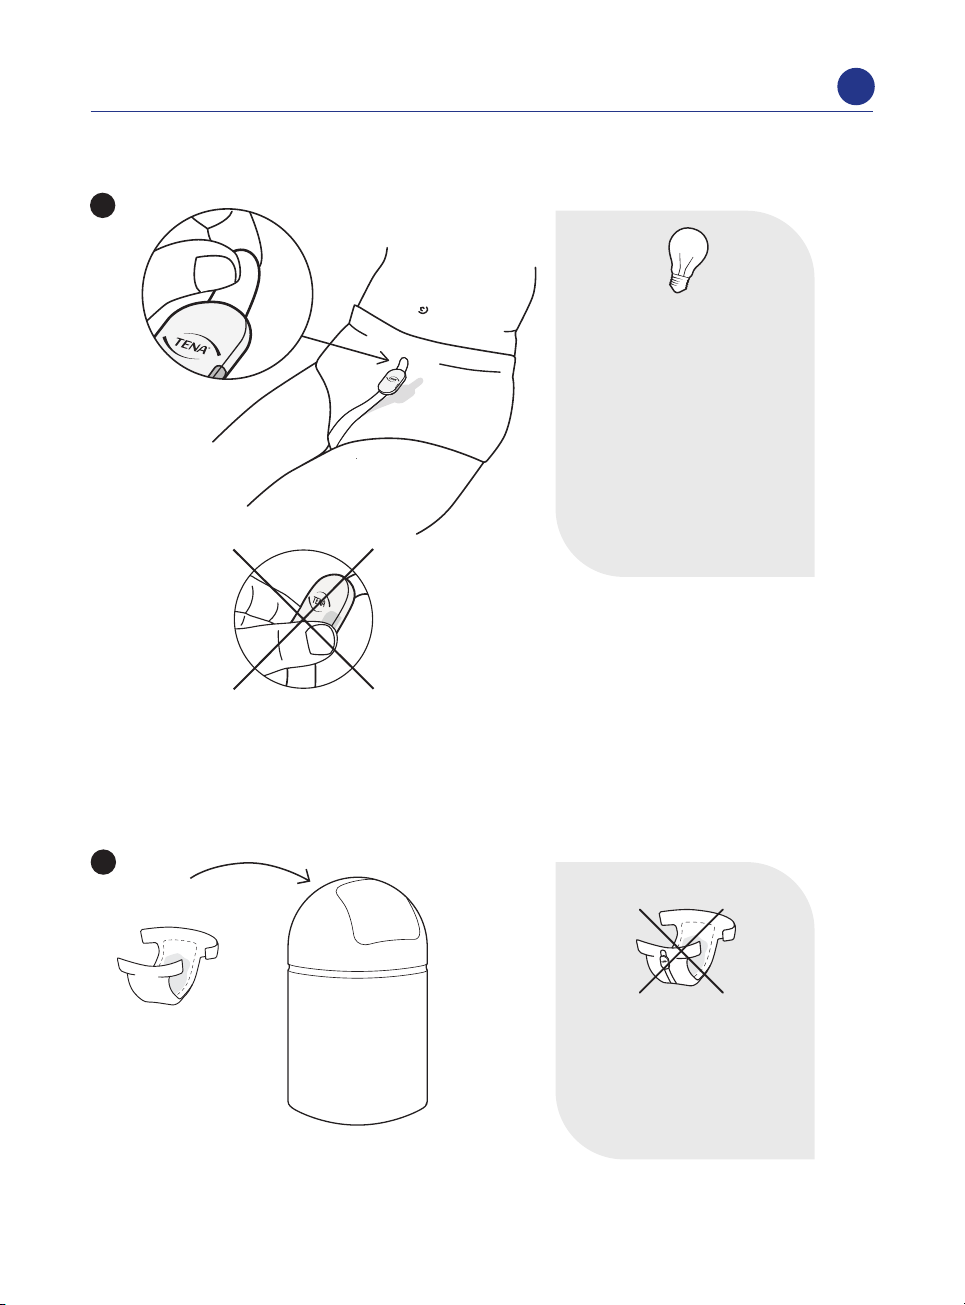
REMOVE THE CHANGE INDICATOR
2
1
Always make sure the
Change Indicator has been
removed before disposing
of the TENA incontinence
product.
NOTE
The Change Indicator
should be removed while
the user is still wearing
the incontinence product.
Gently pull the Change
Indicator down from the
top, then roll the user onto
his/ her side before
completing the removal.
Don’t grab
and pull the
transmitter.
Start at the
top. Grip
the tab, then
gently peel
straight
downwards.

TENA SmartCare Change IndicatorTM/MC
16
TENA SmartCare Change IndicatorTM/MC
en
Intended use:
The TENA SmartCare Change IndicatorTM/MC is an accessory to absorbent incontinence
products, intended for use on individual(s) suering from urinary incontinence in a
home or professional environment who are dependent on one or more caregivers to
change the absorbent incontinence products. The TENA SmartCare Change Indicator
estimates the degree of urine saturation in the absorbent incontinence product and
noties the caregiver(s). This facilitates the caregiver decision regarding when to
change the absorbent incontinence product.
Standard operation:
• If the Change Indicator is broken, it should be replaced, not repaired.
• The Change Indicator should not be in contact with the user’s skin during normal
use. It should always be attached to the outside of the incontinence product.
• The Change Indicator is operated by the caregiver of the incontinent user.
The user wears the Change Indicator in combination with a TENA incontinence
product.
• Attaching the Change Indicator to the incontinence product is considered
a primary operating function.
• Only the caregiver is intended to interact with the Change Indicator.
• To turn the transmitter o, remove the battery.
• The Change Indicator is intended for persons with healthy skin.
Advanced operation:
• Changing the battery and sensor strip are operations that should be carried out
infrequently.
Using the TENA SmartCare Change Indicator according to its intended use does not
add any risk compared to not using it.
The medical device complies with emission and immunity standards and regulations.
It has been tested and fullls requirements for home healthcare environments.
INTENDED USE
TENA SmartCare Change IndicatorTM/MC
17
TENA SmartCare Change IndicatorTM/MC
en
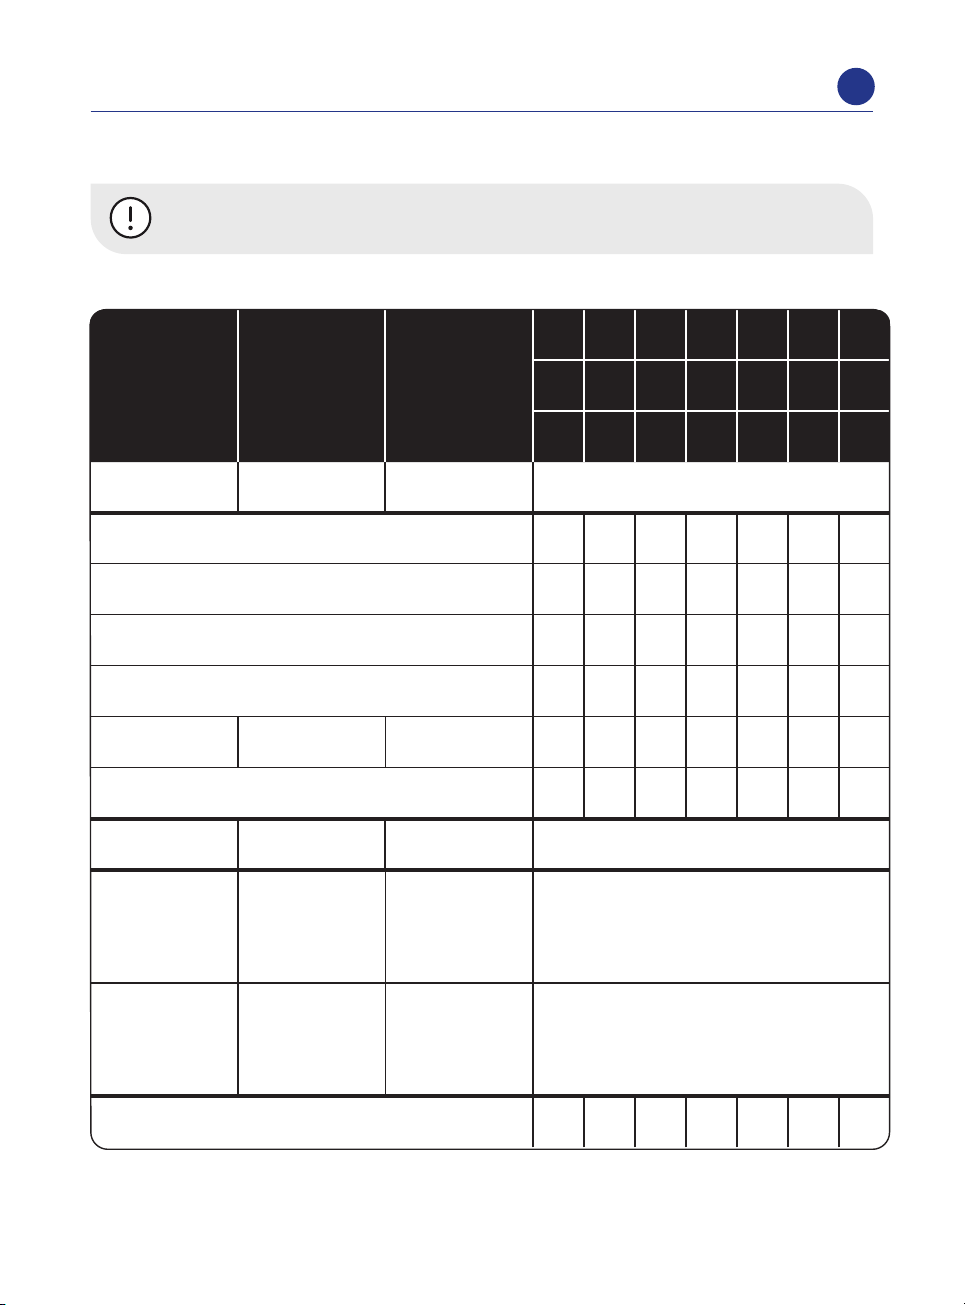
CHECK Ensure you have the correct sensor strip length for your TENA product.
Only products with a textile-like outer lining can be used with the Change Indicator.
LIST OF SUPPORTED TENA PRODUCTS
TENA®
Absorbent
Products
TENA®
Productos
absorbentes
Produits
absorbants
TENA®
S M R L XL 2XL 3XL
S/M M/R L/XL
P M G XG,
TG
2XG,
2TG
Briefs Pañales Culottes
TENA StretchTM/MC: Ultra / Super 2 3 3 3
TENA®: Ultra / Super 2233
TENA CompleteTM/MC /
TENA Complete + CareTM/MC 2 2 2
TENA Complete UltraTM/MC /
TENA Complete + Care UltraTM/MC 2 2 2
TENA®Small
Brief
TENA®Pañal
Pequeño TENA®Culottes
Petites 1
TENA Bariatric UltraTM/MC 3
Underwear Ropa interior Sous-vêtement
TENA®Underwear:
Plus / Extra /
Overnight Super
TENA
®
Ropa
Interior:
Plus / Extra /
Overnight
TM
Super
TENA®
Sous-vêtement
Absorbant:
Plus / Extra /
OvernightMC Super
1
TENA ProSkin
TM/MC
Protective
Underwear for
men / women
TENA ProSkin
TM
Ropa Interior
Protectora para
hombres / mujeres
TENA ProSkinMC
Sous-vêtement
pour hommes /
femmes
1
TENA ProSkinTM/MC Belted brief : Super, Maxi 1 2 3 3

TENA SmartCare Change IndicatorTM/MC
18
TENA SmartCare Change IndicatorTM/MC
TENA Slip /
TENA Stretch Brief /
TENA Brief
TENA Pants/
TENA Underwear
TENA Slip/
TENA Stretch Brief/
TENA Brief
TENA Pants/
TENA Underwear
TENA Slip/
TENA Stretch Brief/
TENA Brief
TENA Pants/
TENA Underwear
TENA Slip/
TENA Stretch Brief/
TENA Brief
TENA Pants/
TENA Underwear
1 2 3
4 5 6
Apply TENA product
on the resident
en
NOTE
Ensure the Change Indicator is straight. Smooth any
sensor strip wrinkles, then press rmly to ensure the
Change Indicator has full contact with the TENA
absorbent product.
TENA Underwear
The TENA SmartCare Change IndicatorTM/MC should always be attached when the
incontinence product is folded and before it has been applied to the user.
Every time you change an
incontinence product, press both
buttons simultaneously for two
seconds to reset the transmitter
and register the change in the app.
Keep folded
Place tightly
Align with the top of the
thicker absorbent area
Find the front
Apply the absorbent product
with the Change Indicator to
your loved one.
FRONT
THICKER
ABSORBENT
AREA
ATTACHMENT INSTRUCTIONS FOR SUPPORTED TENA PRODUCTS

TENA SmartCare Change IndicatorTM/MC
19
TENA SmartCare Change IndicatorTM/MC
TENA Slip/
TENA Stretch Brief/
TENA Brief
TENA Pants/
TENA Underwear
1
TENA Slip/
TENA Stretch Brief/
TENA Brief
TENA Pants/
TENA Underwear
2 3
4 5 6
TENA Slip/
TENA Stretch Brief/
TENA Brief
TENA Pants/
TENA Underwear
Apply TENA product
on the resident
TENA Flex
en
NOTE
Ensure the Change Indicator is straight. Smooth any
sensor strip wrinkles, then press rmly to ensure the
Change Indicator has full contact with the TENA
absorbent product.
TENA Briefs
The TENA SmartCare Change IndicatorTM/MC should always be attached when
the incontinence product is folded and before it has been applied to the user.
Every time you change an
incontinence product, press both
buttons simultaneously for two
seconds to reset the transmitter
and register the change in the app.
Keep folded
Place tightly
Align with the top of the
thicker absorbent area
Find the front
Apply the absorbent product
with the Change Indicator to
your loved one.
THICKER
ABSORBENT
AREA
FRONT

TENA SmartCare Change IndicatorTM/MC
20
TENA SmartCare Change IndicatorTM/MC
TENA Flex
TENA Flex
1 32
TENA Flex
TENA Flex
TENA Flex
TENA Flex
TENA Flex
Apply TENA product
on the resident
4 5 6
Find the front based on the
application of the product.
en
NOTE
Ensure the Change Indicator is straight. Smooth any
sensor strip wrinkles, then press rmly to ensure the
Change Indicator has full contact with the TENA
absorbent product.
TENA Belted Briefs
The TENA SmartCare Change IndicatorTM/MC should always be attached when
the incontinence product is folded and before it has been applied to the user.
Every time you change an
incontinence product, press both
buttons simultaneously for two
seconds to reset the transmitter
and register the change in the app.
Keep folded
Place tightly
Align with the top of the
thicker absorbent area
Find the front
Apply the absorbent product
with the Change Indicator to
your loved one.
BACK
BACK
FRONT
FRONT
BACK
BACK
FRONT
FRONT
THICKER
ABSORBENT
AREA
FRONT
Other manuals for SmartCare Change Indicator
11
Table of contents
Languages:
Other TENA Personal Care Product manuals

TENA
TENA SmartCare Change Indicator User manual

TENA
TENA SmartCare Change Indicator User manual

TENA
TENA SmartCare Change Indicator User manual

TENA
TENA SmartCare Change Indicator User manual

TENA
TENA SmartCare Change Indicator User manual

TENA
TENA SmartCare Change Indicator User manual

TENA
TENA SmartCare Change Indicator User manual

TENA
TENA SmartCare Change Indicator User manual

TENA
TENA SmartCare Change Indicator User manual


