Tenda U6 User manual

300 Mbps High Gain Wireless USB Adapter ·U6

1
2
Copyright Statement
© 2017 Shenzhen Tenda Technology Co., Ltd. All rights reserved.
is a registered trademark legally held by Shenzhen Tenda Technology Co., Ltd.
Other brand and product names mentioned herein are trademarks or registered trademarks of
their respective holders. Copyright of the whole product as integration, including its accessories
and software, belongs to Shenzhen Tenda Technology Co., Ltd. No part of this publication can be
reproduced, transmitted, transcribed, stored in a retrieval system, or translated into any
language in any form or by any means without the prior written permission of Shenzhen Tenda
Technology Co., Ltd.
Disclaimer
Pictures, images and product specifications herein are for references only. To improve internal
design, operational function, and/or reliability, Tenda reserves the right to make changes to the
products without obligation to notify any person or organization of such revisions or changes.
Tenda does not assume any liability that may occur due to the use or application of the product
described herein. Every effort has been made in the preparation of this document to ensure
accuracy of the contents, but all statements, information and recommendations in this
document do not constitute a warranty of any kind, express or implied.
Preface
Thank you for choosing Tenda! Please read this user guide before you start with U6.
Conventions
The typographical elements that may be found in this document are defined as follows.
Item
Presentation
Example
Cascading menus
>
System > Live Users
Parameter and value
Bold
Set User Name to Tom.
Variable
Italic
Format: XX:XX:XX:XX:XX:XX
UI control
Bold
On the Policy page, click the OK button.
Message
“ ”
The “Success” message appears.
The symbols that may be found in this document are defined as follows.
Symbol
Meaning
This format is used to highlight information of importance or special
interest. Ignoring this type of note may result in ineffective
configurations, loss of data or damage to device.
This format is used to highlight a procedure that will save time or
resources.

3
4
Technical Support
If you need more help, contact us by any of the following means. We will be glad to assist you as
soon as possible.
Hotline
Global: (86) 755-27657180
Email
United States: 1-800-570-5892
Canada: 1-888-998-8966
Hong Kong: 00852-81931998
Australia: 1300787922
New Zealand: 800787922
Website
http://www.tendacn.com
Skype
tendasz

5
6
Contents
1Get to Know Your Device ....................................................................4
1.1 Overview............................................................................................................................ 4
1.2 Appearance........................................................................................................................ 4
1.3 Specifications ..................................................................................................................... 4
2Installing the Wireless USB Adpater ...................................................5
2.1 Connecting the Wireless USB Adapter to Your Computer ................................................. 5
2.2 Installing the Tenda Wireless Adapter Program (Example: Windows 7)............................ 5
3Configuring the Wireless USB Adapter...............................................7
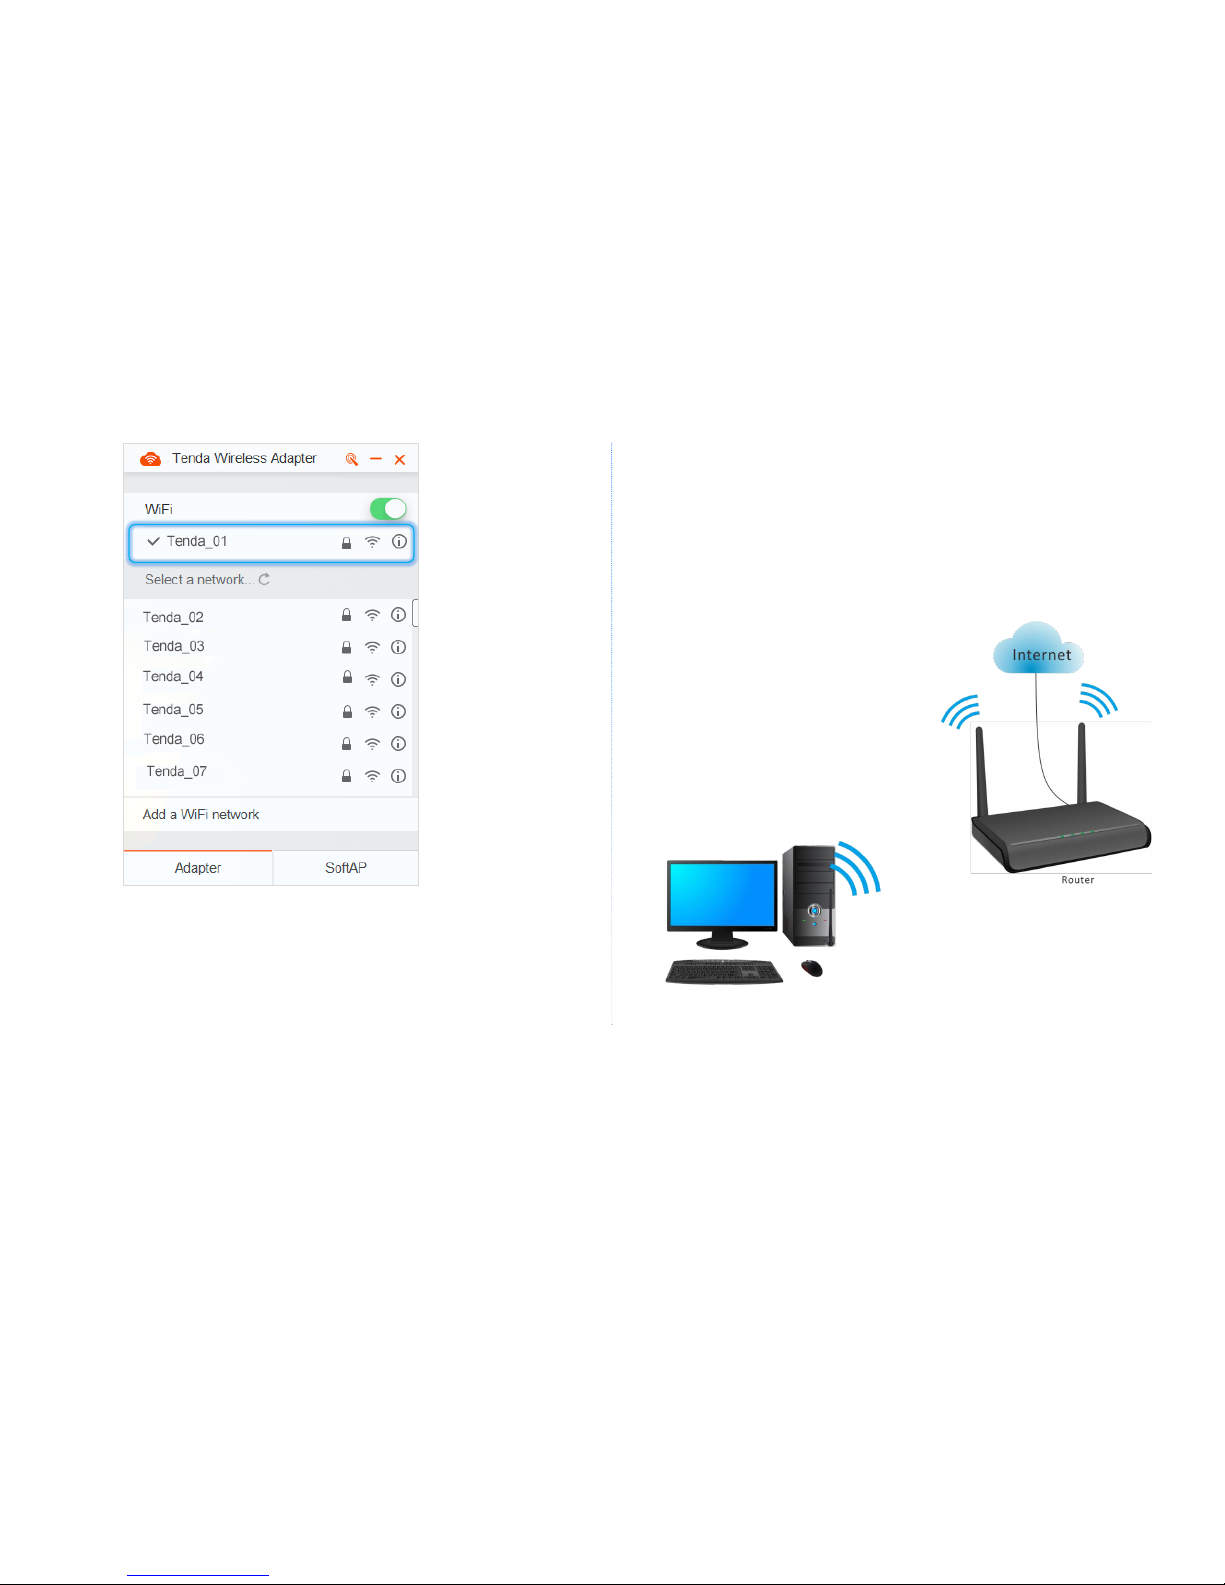
3.1 Adapter Mode.................................................................................................................... 7
3.1.1 Connecting the Wireless USB Adapter to a WiFi Network...................................... 7
3.1.2 WPS Function.......................................................................................................... 9
3.2 SoftAP Mode.................................................................................................................... 13
4Appendixes .......................................................................................16
4.1 Uninstalling the Driver of the Wireless USB Adapter (Example: Windows 7).................. 16
4.2 FAQ................................................................................................................................... 17

7
8
1 Get to Know Your Device
1.1 Overview
Using 11n wireless technology, the wireless USB adapter U6 offers a wireless transmission rate of
as high as 300 Mbps, which can effectively reduce delay, and ensure smooth playback of videos,
online games and videos on demand etc. Through the wireless USB adapter, a computer or
notebook can connect to a wireless network, and wireless devices such as smart phones can
connect to the internet. Quick and easy wireless connection can meet various demands, offering
more flexible connectivity to lives.
1.2 Appearance
1.3 Specifications
USB 2.0 port.
Compliant with IEEE 802.11b, IEEE 802.11g, and IEEE 802.11n standard.
Encrypted using WEP, WPA-PSK and WPA2-PSK.
WPS, SoftAP.
300 Mbps wireless transmission rate.
LED Indicator
Slow blinking.The wireless USB adapter
works properly.
Fast blinking. The wireless USB adapter is
searching, connecting and transmitting.
Off. The wireless USB adapter is faulty.
Ensure the wireless USB adapter is
connected to your computer, the driver is
installed, and the WiFi option on the Web UI
is enabled.

9
10
2 Installing the Wireless USB
Adpater
You can install the wireless USB adapter simply by performing two steps.
2.1 Connecting the Wireless USB Adapter to
Your Computer
Connect the wireless USB adapter to a USB port on your computer.
The wireless USB adapter is compatible with Windows XP/7/8/8.1/10,Linux,and Mac OS.
If you use Windows 10, you do not need to install the wireless USB adapter driver. Connect the
wireless USB adapter to a WiFi network.
2.2 Installing the Tenda Wireless Adapter
Program (Example: Windows 7)
Step 1 Insert the CD into the CD-ROM drive. If your computer has no CD-ROM drive,
download the driver from www.tendacn.com.
CD-ROM drive

11
12
Step 2 Access the CD, double-click Setup.exe, and click .
Step 3 Wait a moment for the installation to complete.
After installation completes, the wireless USB adapter program runs automatically.
Description of Icons and Parameters
on Web UI:
: The wireless USB adapter
is enabled. For normal
connection, do not disable this
button.
: Used to refresh the current
network list.
: This wireless network is
encrypted.
: Used to indicate the
strength of the wireless network.
: Used to view the network
details.
Add a WiFi network: Used to
manually add the information
of the hidden wireless network
to be connected.
Adapter mode: Used to connect
the router, smart phone and
other wireless devices.
SoftAP mode: Used to offer
wireless networks for
connection of smart phones
and other wireless devices.

13
14
3 Configuring the Wireless USB
Adapter
3.1 Adapter Mode
3.1.1 Connecting the Wireless USB Adapter to a WiFi
Network
You can connect to a WiFi network after successful installation of the wireless USB adapter.
Step 1 Select the WiFi network to
be connected, such as
Tenda_01.
Step 2 Enter the password
of the WiFi network,
and click .
Connected.

15
16
If the name of the WiFi network to be connected is hidden, you can perform the following
procedure to connect to the WiFi network:
Step 1 Obtain basic information about the WiFi network. Assume that the following
information is available:
WiFi name:Tenda_01
Security mode: WPA2-PSK
Encryption type: AES
WiFi password: 12345678
Step 2 Set the information manually to connect to the WiFi network.
Step 3 Access the UI of the wireless USB adapter and click Add a WiFi network.
Set WiFi Name to the name of the WiFi network to be connected, which is Tenda_01 in this
example.
Select the security mode of the WiFi network from the Security Mode drop-down list box,
which is WPA2-PSK in this example.
Select the encryption type of the WiFi network from the Encryption Type drop-down list
box, which is AES in this example.
Set WiFi Password to the password of the WiFi network to be connected, which is
12345678 in this example.
Click .
输入 WiFi 信号的基本信息,
点击 。

17
18
3.1.2 WPS Function
The wireless USB adapter supports the WPS function, which enables you to quickly connect the
wireless USB adapter without a password to the encrypted WiFi network of a router that
supports this function.
The wireless USB adapter provides a WPS button as well as a PIN for the WPS function. The
following section describes how to use the function to connect the wireless USB adapter to a
Tenda router. Assume that the WiFi name of the router is Tenda_01.
The following figure shows the application scenario:
Connected.

19
20
Method 1: Using the WPS Button to Connect the Wireless USB
Adapter to the Router
Step 1 Enable the WPS-PBC function of the router. (For details, refer to the user guide for the
router.)
Step 2 Access the UI of the wireless USB adapter.
Step 3 Click in the upper-right corner of the UI.
Step 4 Select WPS Button from the Connection Type drop-down list box and click
.
Step 5 Wait a moment for the connection to complete.

21
22
Step 6 Click OK and you can see that the wireless USB adapter has been connected to the
WiFi network of the router.
Method 2: Using the PIN to Connect the Wireless USB Adapter to
the Router
Step 1 Enable the WPS-PBC function of the router and record the PIN of the router. (For
details, refer to the user guide for the router.)
Step 2 Access the UI of the wireless USB adapter.
Step 3 Click in the upper-right corner of the UI.

23
24
Step 4 Select PIN Code from the Connection Type drop-down list box.
Step 5 Enter the PIN code of the router in the PIN Code text box.
Step 6 Click .
Step 7 Wait a moment for the connection to complete.
If connection succeeds, the message shown in the following figure appears.

25
26
Step 8 Click OK and you can see that the wireless USB adapter has been connected to the
WiFi network of the router.
3.2 SoftAP Mode
When functioning as a soft AP, the wireless USB adapter can convert the wired network signal
into a wireless network signal for nearby wireless devices to connect.For connection of other
wireless devices to the WiFi network released by the wireless USB adapter, make sure that your
computer is connected to the internet.
The following figure shows the application scenario:

27
28
Steps for Switching to SoftAP:
Step 1 Click in the lower-right corner of the screen to access the configuration page
and click .

29
30
Step 2 Wait when the wireless USB adapter is switching to the SoftAP mode.
After the wireless USB adapter is switched to the SoftAP mode, the default soft AP settings
are as follows:
WiFi Name: Tenda_XXXXXX, where XXXXXX represents the last 6 digits of MAC address;
WiFi Password: Random 8-digit number. To view the WiFi password, click .
To change the WiFi name or WiFi password, click , enter the new WiFi name or
password, and click .

31
32
4 Appendixes
4.1 Uninstalling the Driver of the Wireless
USB Adapter (Example: Windows 7)
Step 1 Click and choose Control Panel.
Step 2 Click Uninstall a program.
Step 3 Right-click the driver of the wireless USB adapter and choose Uninstall.
If you want to uninstall only the UI of the wireless USB adapter, deselect Uninstall the
driver.
Step 4 Click Yes.

33
34
Step 5 Wait a moment for the uninstallation to complete.
When uninstallation succeeds, the message shown in the following figure appears.
4.2 FAQ
Q1: Driver installation fails or the driver cannot work properly. What should I do?
A1: ❶If a dialog box appears to require a file when you install the driver on Windows XP, click
OK to continue installing the driver.
❷During installation, if a dialog box appears asking you whether to block the current
installation operation, do not block the operation.
❸If the wireless USB adapter fails to work properly after being installed, try reinstalling
it.
Q2: The wireless USB adapter fails to connect to a WiFi network. What should I do?
A2: ❶Verify that the WiFi password is correct.
❷If you connect the wireless USB adapter to the WiFi network by manually entering WiFi
information, verify that the WiFi name, security mode, encryption type, and WiFi
password are correct.
Q3: WPS negotiation between the wireless USB adapter and a router fails. What should I do?
A3: ❶Reduce as much blockage and interference between the wireless USB adapter and the
router as possible.
❷Verify that the WPS function of the router is enabled. (For details, refer to the user
guide for the router.)
❸Verify that the LED indicator of the wireless USB adapter blinks fast during WPS
negotiation.
For more information, download the latest documents for the wireless USB adapter from Tenda's
official website at http://www.tendacn.com

35
Copyright
© 2017 Shenzhen Tenda Technology Co., Ltd. All rights reserved.
Tenda is a registered trademark legally held by Shenzhen Tenda Technology Co., Ltd. Other brand
and product names mentioned herein are trademarks or registered trademarks of their
respective holders. Specifications are subject to change without notice.
Safety and Emission Statement
CE Mark Warning
This is a Class B product. In a domestic environment, this product may cause radio interference,
in which case the user may be required to take adequate measures.
This equipment should be installed and operated with minimum distance 20cm between the
radiator & your body.
NOTE: (1) The manufacturer is not responsible for any radio or TV interference caused by
unauthorized modifications to this equipment. (2) To avoid unnecessary radiation interference, it
is recommended to use a shielded RJ45 cable.
Declaration of Conformity
Hereby, SHENZHEN TENDA TECHNOLOGY CO., LTD. declares that the radio equipment type U6 is
in compliance with Directive 2014/53/EU.
The full text of the EU declaration of conformity is available at the following internet address:
http://www.tendacn.com/en/service/page/ce.html
Operate Frequency: 2.4G: EU/2400-2483.5MHz (CH1-CH13)
EIRP Power (Max.): 12.9dBm
Software Version: V0.12.2
RECYCLING
This product bears the selective sorting symbol for Waste electrical and electronic equipment
(WEEE). This means that this product must be handled pursuant to European directive
2012/19/EU in order to be recycled or dismantled to minimize its impact on the environment.
User has the choice to give his product to a competent recycling organization or to the retailer
when he buys new electrical or electronic equipment.
FCC Statement
This equipment has been tested and found to comply with the limits for a Class B digital device,
pursuant to Part 15 of the FCC Rules. These limits are designed to provide reasonable protection
against harmful interference in a residential installation. This equipment generates, uses and can
radiate radio frequency energy and, if not installed and used in accordance with the instructions,
may cause harmful interference to radio communications. However, there is no guarantee that
interference will not occur in a particular installation. If this equipment does cause harmful
interference to radio or television reception, which can be determined by turning the equipment
off and on, the user is encouraged to try to correct the interference by one or more of the
following measures:
—Reorient or relocate the receiving antenna.
—Increase the separation between the equipment and receiver.
—Connect the equipment into an outlet on a circuit different from that to which the receiver is
connected.
—Consult the dealer or an experienced radio/TV technician for help.

37
This device complies with Part 15 of the FCC Rules. Operation is subject to the following two
conditions: (1) this device may not cause harmful interference, and (2) this device must accept
any interference received, including interference that may cause undesired operation.
Radiation Exposure Statement
This equipment should be installed and operated with minimum distance 20cm between the
radiator & your body.
Caution:
Any changes or modifications not expressly approved by the party responsible for compliance
could void the user's authority to operate this equipment.
This transmitter must not be co-located or operating in conjunction with any other antenna or
transmitter.
NOTE: (1) The manufacturer is not responsible for any radio or TV interference caused by
unauthorized modifications to this equipment. (2) To avoid unnecessary radiation interference, it
is recommended to use a shielded RJ45 cable.
Table of contents
Other Tenda Adapter manuals
Popular Adapter manuals by other brands

Kewtech
Kewtech Lightmate BC instructions

RKI Instruments
RKI Instruments 30-0954RK-250 Series Operator's manual

NETGEAR
NETGEAR XAV1301v1/XAVB1301v1 Installeringsveiledning

UCONNECT INTERNATIONAL
UCONNECT INTERNATIONAL RS-232 quick start guide

NEC
NEC SB-02AM quick start guide

König Electronic
König Electronic P.SUP.NBC125K1 manual