TERSUS PRECIS-TX204 User manual

User Manual
Version V1.0-20170511
Precis-TX204
GNSS Receiver
©2017 Tersus GNSS Inc.All rights reserved.
Sales & Technical Support:
sales@tersus-gnss.com & support@tersus-gnss.com
More details, please visit www.tersus-gnss.com

1/ 49
Table of Content
1Introduction.................................................................................................................7
1.1 Receiver Features........................................................................................................7
1.2 Typical application of TX204 Receiver......................................................................9
1.2.1 Work as a RTK client..................................................................................................9
1.2.2 Work as a Base............................................................................................................9
1.2.3 Work as a post-process data collector...................................................................... 10
2Precis-TX204 Standard Package.............................................................................. 11
2.1 Precis-TX204 Accessories....................................................................................... 11
2.1.1 Helix Antenna.......................................................................................................... 11
2.1.2 Precis-TX204 Adapter ............................................................................................. 12
2.1.3 Shoulder-strap.......................................................................................................... 12
2.2 Use and Care............................................................................................................ 12
2.3 Keypad and Display................................................................................................. 13
2.4 Rear Connectors....................................................................................................... 14
3Battery and Power.................................................................................................... 16
3.1 External Power......................................................................................................... 16
3.2 Charging the Battery................................................................................................ 16
3.3 Removing the Battery .............................................................................................. 16
4Set up Precis-TX204 GNSS Receiver...................................................................... 17
4.1 Turn on/off the Receiver.......................................................................................... 17
4.2 Guidelines for Setting up the Receiver .................................................................... 17
4.2.1 Environmental Conditions ....................................................................................... 17
4.2.2 Sources of Electrical Interference............................................................................ 17
4.2.3 Lighting and Surge Protection ................................................................................. 18
4.3 Placing the Antenna ................................................................................................. 18
4.3.1 Supported Antenna................................................................................................... 18
4.4 System Installation................................................................................................... 19
4.4.1 System Installation Diagram.................................................................................... 19
5Configure the Receiver ............................................................................................ 20
5.1 Access Precis-TX204 via Wi-Fi............................................................................... 20
5.2 Configuring through a Web Browser....................................................................... 20
5.3 Changing the Setting................................................................................................ 22
5.3.1 Status Menu.............................................................................................................. 22

2/ 49
5.3.1.1 Position..................................................................................................................... 22
5.3.1.2 Activity..................................................................................................................... 23
5.3.1.3 Google Map.............................................................................................................. 24
5.3.2 Satellites Menu......................................................................................................... 24
5.3.2.1 Satellite Tracking Graph.......................................................................................... 24
5.3.2.2 Satellite Tracking Graph.......................................................................................... 25
5.3.2.3 Tracking Skyplot...................................................................................................... 25
5.3.2.4 Satellite Activation................................................................................................... 26
5.3.3 Receiver Configuration Menu.................................................................................. 26
5.3.3.1 Receiver Summary................................................................................................... 27
5.3.3.2 Antenna Configuration............................................................................................. 27
5.3.3.3 Reference Station Settings ....................................................................................... 27
5.3.3.4 Receiver Reset.......................................................................................................... 29
5.3.3.5 Languages ................................................................................................................ 30
5.3.3.6 User Management .................................................................................................... 30
5.3.3.7 HCPPP Settings........................................................................................................ 31
5.3.4 Data Recording Menu.............................................................................................. 31
5.3.4.1 Log Settings ............................................................................................................. 31
5.3.4.2 FTP Push Settings.................................................................................................... 33
5.3.4.3 FTP Push Recording ................................................................................................ 34
5.3.4.4 Data Download ........................................................................................................ 34
5.3.5 I/O Settings Menu.................................................................................................... 35
5.3.5.1 I/O Settings .............................................................................................................. 36
5.3.6 Network Set Menu ................................................................................................... 39
5.3.6.1 Summary.................................................................................................................. 39
5.3.6.2 Wired Network Setting ............................................................................................ 40
5.3.6.3 Mobile Network Setting........................................................................................... 40
5.3.6.4 Other Submenus....................................................................................................... 41
5.3.7 Module Setting Menu............................................................................................... 41
5.3.7.1 Summary.................................................................................................................. 41
5.3.7.2 Wi-Fi Settings.......................................................................................................... 42
5.3.7.3 BlueTooth set........................................................................................................... 42
5.3.8 Firmware Menu........................................................................................................ 43
5.3.8.1 Board Upgrade......................................................................................................... 43

3/ 49
5.3.8.2 Firmware Info .......................................................................................................... 43
5.3.8.3 System Log .............................................................................................................. 44
5.3.8.4 Firmware Update...................................................................................................... 44
5.3.8.5 Config File ............................................................................................................... 44
5.3.8.6 GNSS Registration................................................................................................... 45
5.3.8.7 The Hardware Version............................................................................................. 45
5.3.8.8 Upgrade Online........................................................................................................ 46
5.3.8.9 User log.................................................................................................................... 46
6Appendix.................................................................................................................. 47
6.1 RTK configuration................................................................................................... 47
6.2 Heading configuration.............................................................................................. 47
6.3 Troubleshooting....................................................................................................... 48

4/ 49
List of Figures
Figure 1 Outlook of Precis-TX204 GNSS receiver ..................................................................7
Figure 2 Standard package of Precis-TX204 ..........................................................................11
Figure 3 Outlook of helix antenna ..........................................................................................11
Figure 4 Outlook of adapter....................................................................................................12
Figure 5 Outlook of shoulder-strap.........................................................................................12
Figure 6 Outlook of front panel ..............................................................................................13
Figure 7 Outlook of back panel...............................................................................................14
Figure 8 Outlook of Precis-TX204 adapter.............................................................................14
Figure 9 Outlook of ports on the adaptor................................................................................14
Figure 10 Charging the battery ...............................................................................................16
Figure 11 Outlook of helical GNSS antenna...........................................................................18
Figure 12 System installation diagram....................................................................................19
Figure 13 Illustration of Precis-TX204 Wi-Fi signal..............................................................20
Figure 14 IP address................................................................................................................20
Figure 15 Login to configuration............................................................................................21
Figure 16 Receiver status info.................................................................................................21
Figure 17 Choose language for setting....................................................................................22
Figure 18 Status menu.............................................................................................................22
Figure 19 Position page...........................................................................................................23
Figure 20 Operation page........................................................................................................23
Figure 21 Satellites menu........................................................................................................24
Figure 22 Satellite tracking table ............................................................................................24
Figure 23 Satellite tracking Graph..........................................................................................25
Figure 24 Skyplot....................................................................................................................25
Figure 25 Satellite activity page..............................................................................................26
Figure 26 Receiver settings menu...........................................................................................26
Figure 27 Receiver Summary page.........................................................................................27
Figure 28Antenna parameter settings page ............................................................................27
Figure 29 Station settings page...............................................................................................28
Figure 30 Coordinates input....................................................................................................29
Figure 31 Receiver reset page.................................................................................................30
Figure 32 Language page........................................................................................................30
Figure 33 User management ...................................................................................................30
Figure 34 Data recording page................................................................................................31
Figure 35 Log settings page....................................................................................................32
Figure 36 Recording edit page................................................................................................32
Figure 37 FTP push page ........................................................................................................34
Figure 38 FTP push recording.................................................................................................34
Figure 39 Data download page ...............................................................................................35
Figure 40 FTP directory page..................................................................................................35
Figure 41 FTP directory page..................................................................................................35
Figure 42 I/O settings menu....................................................................................................36
Figure 43 NTRIP client setting page.......................................................................................36

5/ 49
Figure 44APIS_BASE setting page .......................................................................................37
Figure 45 TCP/UPD client setting page..................................................................................37
Figure 46 NTRIP server setting page......................................................................................38
Figure 47 TCP server setting page..........................................................................................38
Figure 48 BlueTooth port setting page....................................................................................39
Figure 49 Network Set menu ..................................................................................................39
Figure 50 Network information ..............................................................................................40
Figure 51 Network setting page..............................................................................................40
Figure 52 Network Set page....................................................................................................41
Figure 53 Module Setting .......................................................................................................41
Figure 54 Summary page........................................................................................................42
Figure 55 Wi-Fi Setting page..................................................................................................42
Figure 56 BlueTooth Set page.................................................................................................42
Figure 57 Submenus in Firmware...........................................................................................43
Figure 58 Board Upgrade page...............................................................................................43
Figure 59 Firmware information.............................................................................................44
Figure 60 System log download page.....................................................................................44
Figure 61 Firmware update page.............................................................................................44
Figure 62 Config file setting page...........................................................................................45
Figure 63 GNSS registration page..........................................................................................45
Figure 64 Hardware Version page...........................................................................................45
Figure 65 Upgrade Online page..............................................................................................46
Figure 66 User log page..........................................................................................................46

6/ 49
List of Tables
Table 1 Features of TX204........................................................................................................7
Table 2 TX204 models..............................................................................................................9
Table 3 Description of power LED and button of front panel.................................................13
Table 4 Description of power LED and button of back panel.................................................14
Table 5 Description of ports on the adaptor............................................................................15
Table 6 Description of receiver issues.....................................................................................48

7/ 49
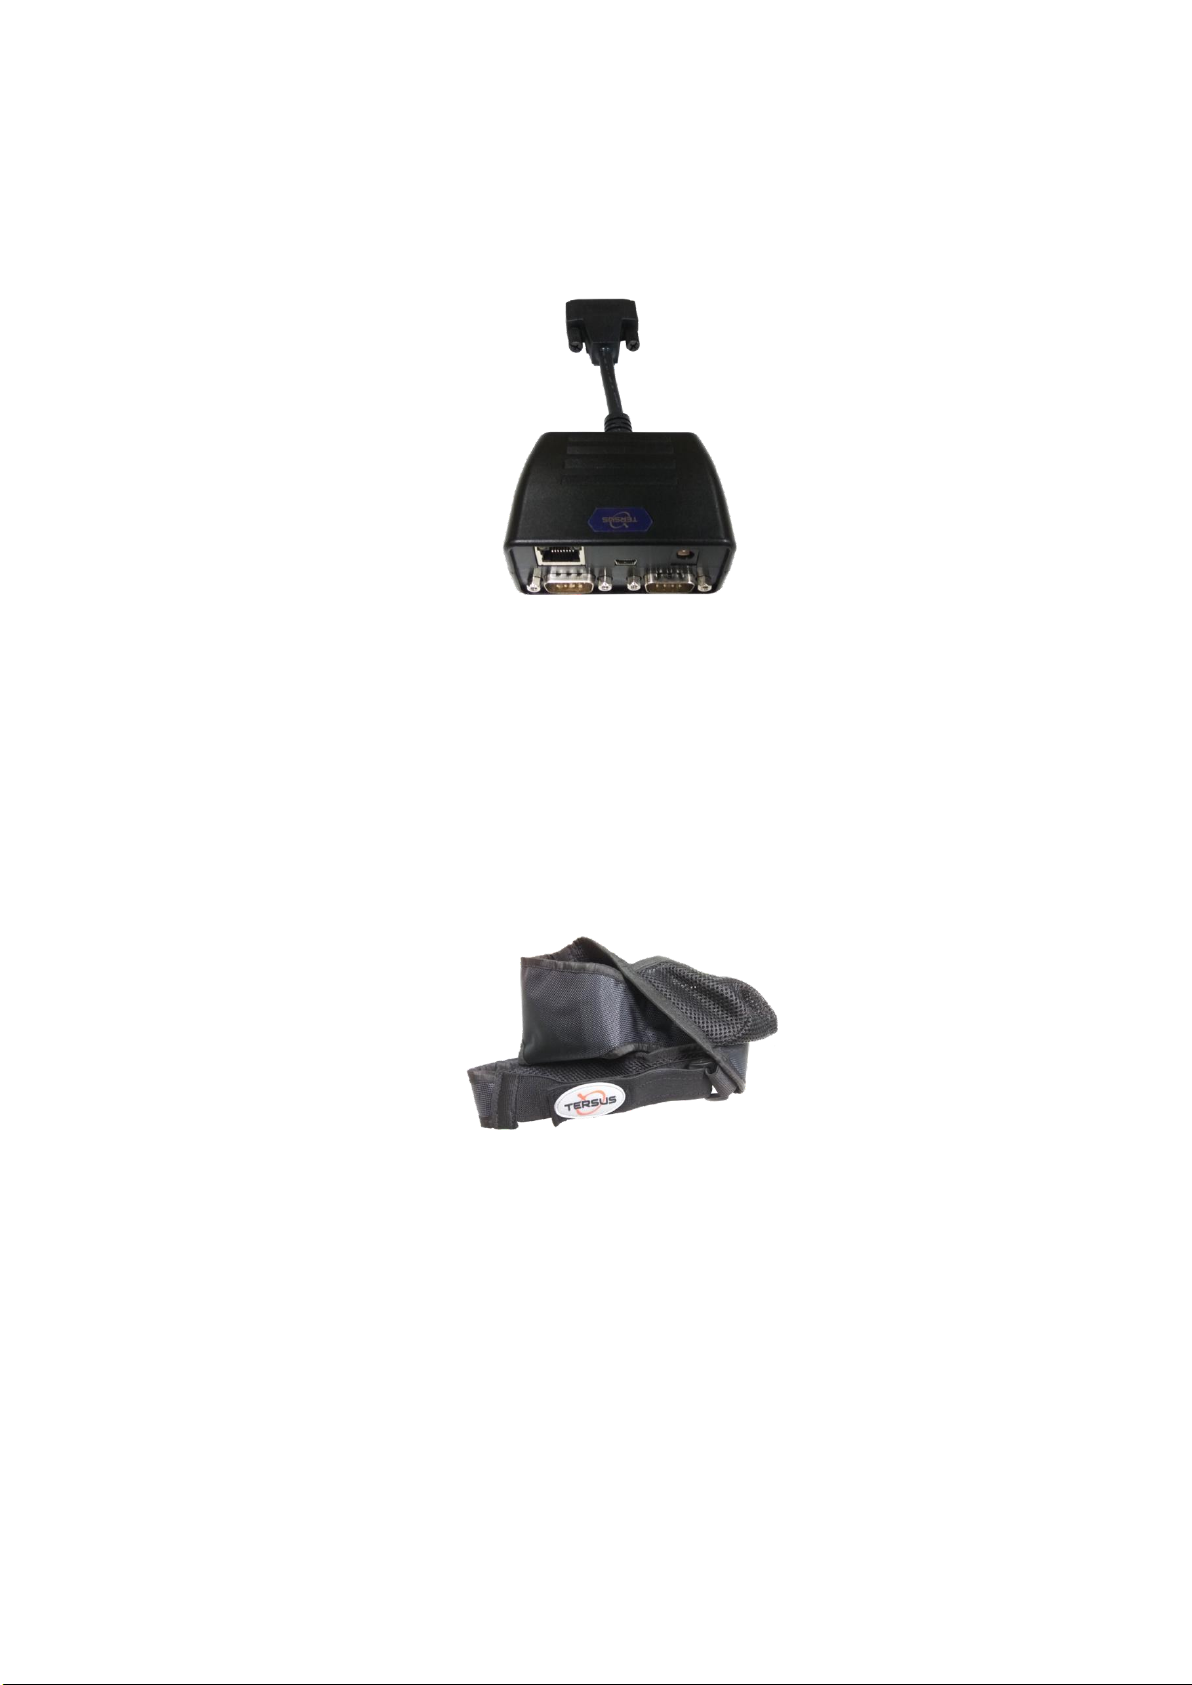
1Introduction
Precis-TX204 is an integrated multi-GNSS receiver, which is light-weight, rugged
with built-in centimeter accurate RTK engine, onboard storage and versatile
connectivity. The TX204 rear panel also features Light Emitting Diodes (LEDs) for
status indication. After powered on, the TX204 begins operating as a fully functional
GNSS system. Figure 1 shows the TX204 without antenna or cables.
Figure 1 Outlook of Precis-TX204 GNSS receiver
1.1 Receiver Features
Table 1 Features of TX204
Performance
Update rate
1Hz (typical) and can up to 20Hz
NMEA-0183
Supported
Correction format
RTCM2.x/3.x, CMR, CMR+
Time to First Fix (TTFF)
< 60s (cold start)
<10s (hot start)
Reacquisition
<1s
Positioning accuracy
2m (single position)
10mm+1PPM (RTK)
Physical Description
CPU
Freescale i.MX28 (454MHz)
RAM
16G

8/ 49
Size L*W*H
110*81*52 (battery included)
Weight
489g (battery included), 250g (battery excluded)
Battery type
Removable lithium battery
Battery capacity
7.4V 4300mAH
Charging time
4hour (typical)
Internal flash size
16GB
Operating time
12 hours (GNSS only)
11hours (GNSSS + BlueTooth)
10 hours (GNSS + Wi-Fi)
8hours (GNSS + cellular module)
Communication &Antenna
Wi-Fi
802.11b/g/n
BlueTooth
2.1 +EDR
Cellular module
3.75G modem
GSM/GPRS/EDGE
Dual band UMTS 900/1800MHz
UMTS/HSPA+
Dual band UMTS 900/2100MHz
Downstream 7.2Mbps, Upstream 5.7Mbps
Ethernet
IEEE 802.3
CAN
ISO/DIS 11898
Interface
Input/output
DB9 serial port
USB-B interface
DC power port
RJ-45 interface
CAN interface
SIM card
Other features
Electronical compass
Supported
Temperature
-20°C to +60°C (operating)
-40°C to +70°C (storage)
Immersion
IP67
Drop test
1.2m fall
The TX204 is available in three different models, which can support different
constellations and signals. TX204 in this manual can be anyone of the three models.
Table 2 gives the details.

9/ 49
Table 2 TX204 models
Model Name
Description
TX204B
Supporting GPS L1/L2, GLONASS G1, Beidou B1/B3
TX204G
Supporting GPS L1/L2, GLONASS G1/G2, Beidou B1
TX306
Supporting GPS L1/L2, GLONASS G1/G2, BeiDou B1,
Galileo E1, SBAS and QZSS
1.2 Typical application of TX204 Receiver
The following sections give three typical applications for TX204, draft config steps
are given, too. The detailed config can be found in the specific sections in chapter 5.
1.2.1 Work as a RTK client
The TX204, configured with a smartphone via the Wi-Fi, can work as a rover. The
steps are given below:
1. Insert the SIM card1, and an antenna is installed.
2. Power on the receiver, go to Network Settings -> Mobile network Settings to
check the network status. Please ensure the GPRS model status is ON, Auto Start
is Yes and Dialing status is OK.
3. Go to I/O Settings -> RTK client to set where the RTK corrections are from.
4. Go to Status-> Position to confirm the position type is fixed.
5. The position info can be output through the Bluetooth or the Ethernet port in the
adapter to transmit the solution to Internet or an App.
1.2.2 Work as a Base
The TX204 can also work as a base, from which RTK corrections can be transmitted
to Internet with an Ethernet port or to a radio. The steps are given below:
1. An antenna is installed.
2. If the RTK corrections are transmitted to a radio, no SIM card1 is needed,
otherwise, insert the SIM card1.
3. Power on the receiver, Go to Receiver Configuration-> Reference Station
Settings, and select Auto Base or Manual Base in the Reference Station Mode
menu.
4. If a SIM card is inserted, go to step 6.

10 / 49
5. Connect an adapter to TX204 and connect the COM1 (under the RJ-45 port) to a
computer, after the RTK corrections configuration is finished, disconnect the
COM1 to the computer and connect a proper radio to it.
6. Go to Network Settings -> Mobile network Settings to check the network status,
ensure the GPRS model status is ON, Auto Start is Yes and Dialing status is OK.
7. Go to I/O Settings -> TCP/UDP_Client1/Ntrip Server, select Connect in the
modify menu and ensure the RTK corrections are transmitted to the server.
1.2.3 Work as a post-process data collector
There is a 16GB flash in the TX204, it can be used as a data collector to save raw
measurements for post-processing. The steps are given below:
8. An antenna is installed.
9. Power on the receiver, go to Data recording -> Log settings, press Modify in the
Setting Parameter, after all the parameter is set, press ON in the Switch.
After all the data is saved, plug the adapter to TX204, and you can connect the USB
port in the adapter to your computer and copy/delete the files in the flash memory.
1
Note 1: The SIM card must support GSM/GPRS/EDGE.

11 / 49
2Precis-TX204 Standard Package
The standard package for Precis-TX204 includes the GNSS receiver x1, power
adapter x1.
Figure 2 Standard package of Precis-TX204
2.1 Precis-TX204 Accessories
Below accessories are optional in addition to the standard package.
2.1.1 Helix Antenna
Figure 3 Outlook of helix antenna
12 / 49
2.1.2 Precis-TX204 Adapter
Figure 4 Outlook of adapter
2.1.3 Shoulder-strap
Figure 5 Outlook of shoulder-strap
2.2 Use and Care
Precis-TX204 is a high-precision electronic instrument and should be treated with
reasonable care. The operating temperature range is -20°C to +60°C. Operating or
storing the receiver outside the specified temperature range can damage it.
13 / 49
High-power signals from a nearby radio or radar transmitter may devastate the
receiver circuits. Avoid locating the receiver or antenna within 400 meters of powerful
radar, transmitters or GNSS antennas.
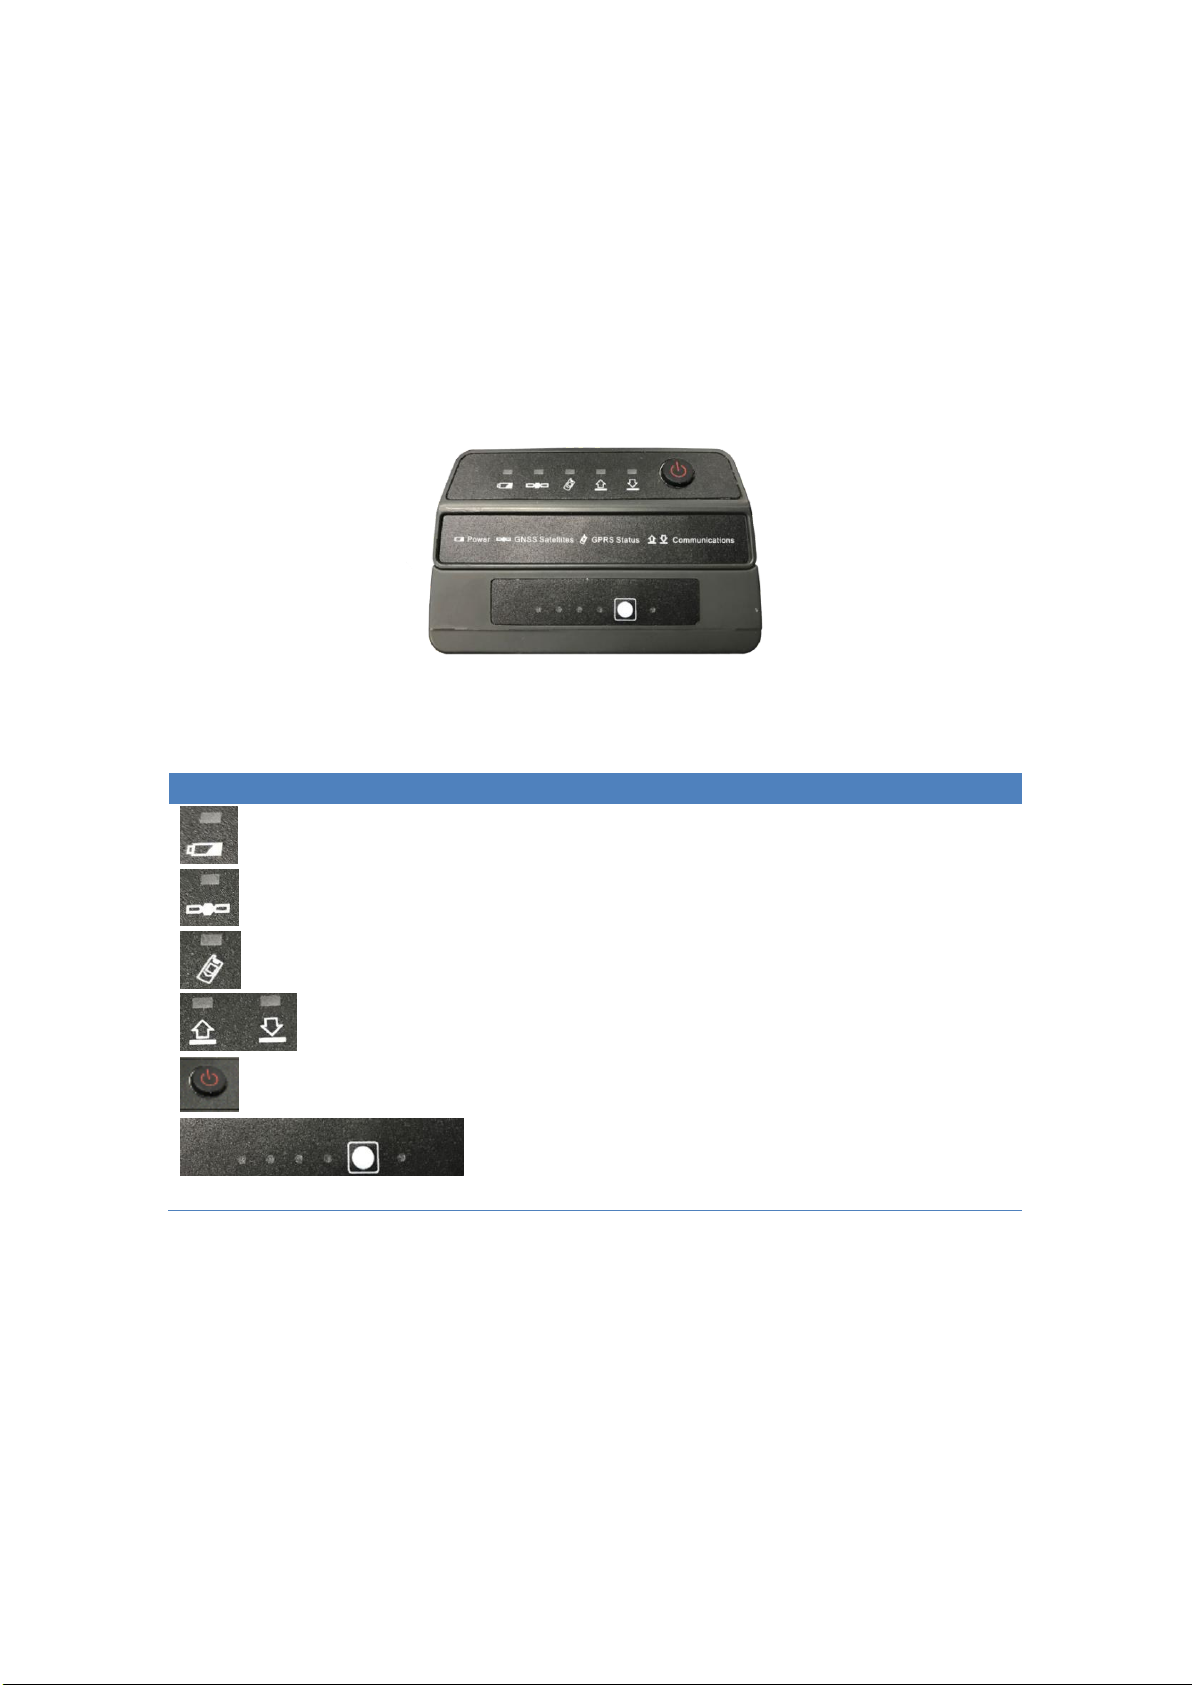
2.3 Keypad and Display
Figure 6 Outlook of front panel
Table 3 Description of power LED and button of front panel
Icon
Name
Description
Power
On when the receiver is power on, and
blinks when battery <20%
GNSS Satellites
Blinks (at 5 seconds interval) show
number of satellites
GPRS Status
On in normal working status, blinks when
malfunction
Communications
Power Switch
Blinks when 3G data is downloading
Blinks when 3G data is uploading
Power on/off
Battery Button
After the button is pressed, five LEDs
(four at left, one at right) will show how
much battery is left.

14 / 49
2.4 Rear Connectors
Figure 7 Outlook of back panel
Table 4 Description of power LED and button of back panel
Icon
Name
Description
ANT
Connect to the GNSS antenna
Common port
DC
To connect the external LAN/DC/USB/COM
port
For the power supply
Figure 8 Outlook of Precis-TX204 adapter
Figure 9 Outlook of ports on the adaptor

15 / 49
Table 5 Description of ports on the adaptor
Icon
Interface
Description
Serial 1/2
RS-232 serial communications using a 9-pin dB9 cable
Pass-through to the mainboard without issuing the pass-through
command via this port
Serial 2/2
RS-232 serial communications using a 9-pin dB9 cable
Ethernet
Data streaming transmission port
Supports link to 10BaseT/100BaseT auto-negotiate networks
HTTP, TCP/IP, UDP, FTP, NTRIP Caster, NTRIP Server,
NTRIP Client
Simultaneously transmits multiple data stream
Mini-USB
DC
Connect to external USB drive for external data logging after
configured through web interface
Upgrade the receiver firmware with the inserted USB driver
containing the related upgrade file after restart the receiver
Connect the receiver to a computer to download files from the
receiver (as external storage equipment) to the computer
Use to charge the battery

16 / 49
3Battery and Power
Precis-TX204 uses a built-in rechargeable battery. The operational time provided by
the internal battery depends on the type of measurement and operating conditions.
Typically, the internal battery provides up to 12 hours operation.
3.1 External Power
Precis-TX204 can use an external power source for power supply.
3.2 Charging the Battery
Charge the battery completely before using it for the first time. To charge the battery,
you should plug the AC adapter in the DC port in the rear panel, and then plug the
other end of the AC adapter to a 220VAC or 110VAC outlet. During charging, one of
the five LEDs besides the battery button will blink to show the processing. All the
LEDs are off after charging is completed, which is about 4 hours.
Figure 10 Charging the battery
3.3 Removing the Battery
The built-in battery may be removed only by Tersus GNSS engineers.

17 / 49
4Set up Precis-TX204 GNSS Receiver
This chapter describes how to set up the Precis-TX204 and gives installation diagram,
including Precis-TX204, GNSS antenna, external power and network cable.
4.1 Turn on/off the Receiver
Pressing the power button more than 5 seconds, the Precis-TX204 will power on, and
the LEDs in the front panel will be on. Pressing the power button more than 5 seconds,
the Precis-TX204 will power off, and the LEDs in the front panel will be off.
4.2 Guidelines for Setting up the Receiver
When you set up the receiver, it is better to follow guidelines mentioned below.
4.2.1 Environmental Conditions
Precis-TX204 has a waterproof house but you must be careful to keep the receiver dry.
To keep the performance and long-term reliability of the receiver, do not expose the
receiver to extreme environmental conditions.
4.2.2 Sources of Electrical Interference
Pay attention to below conditions when using the receiver:
Gasoline engines
Televisions and computer monitors
Alternators and generators
Electric motors
Equipment with DC-to-AC converters
Fluorescent lights
Switching power supplies
Arc welding equipment

18 / 49
4.2.3 Lighting and Surge Protection
Tersus GNSS recommends that you install lightning protection equipment at
permanent sites. All connections to the receiver should have surge protection.
4.3 Placing the Antenna
Pay attention to below conditions when mounting antenna.
Keep the distance from the objects that may cause the multipath effects (such as
buildings, trees, reflective surface) for at least 200 m.
Clear sky above 10 degrees elevation.
Away from electromagnetism interference region at least 200 m.
Mounted 2m over any nearby signal reflectors.
Mount stability that is not influenced by thermal expansion, wind loading, or soil
expansion/contraction.
4.3.1 Supported Antenna
The receiver provides a TNC-type female connector for connecting to an antenna. The
receiver is intended for use with a helical antenna.
Figure 11 Outlook of helical GNSS antenna
Other GNSS antennas which support the following features can be connected to
TX204.
Active antenna, whose input power is 5V and power is <0.5W.

19 / 49
The net gain is 33~40dB.
The interface connector is TNC-type male.
4.4 System Installation
4.4.1 System Installation Diagram
The typical installation diagram of the Precis-TX204 connected with external GNSS
antenna, external power supply and communication cable. Steps are given below:
Figure 12 System installation diagram
Install the GNSS antenna at the appropriate location; connect the antenna to the
TNC plug socket of Precis-TX204 via the GNSS antenna cable.
Plug the female jack connector of adapter into the male connector of
Precis-TX204 data cable.
Connect one end of the RS232-USB adapter to COM1 of Precis-TX204 and the
other end to the computer’s USB port.
Connect the network cable to the RJ45 jack of Precis-TX204 to link it with
network.
Connect the power adapter to TX-204 and the mains supply, respectively.
Table of contents
Other TERSUS Receiver manuals

TERSUS
TERSUS BX316 User manual

TERSUS
TERSUS NeoRTK User manual

TERSUS
TERSUS David User manual

TERSUS
TERSUS GeoBee30 User manual

TERSUS
TERSUS David User manual

TERSUS
TERSUS Oscar GNSS User manual

TERSUS
TERSUS Oscar User manual

TERSUS
TERSUS David30 User manual

TERSUS
TERSUS Oscar User manual

TERSUS
TERSUS David User manual


