Tesco PET 1 User manual

User
Guide
PET 1
Upright Vacuum Cleaner

IMPORTANT SAFETY INFORMATION
To reduce the risk of fire, electrical shock, or injury:
$
$
$
$
$
$
$
$
$
$
$
$
$
$
$
$
Read all the instructions carefully before using your
appliance and keep them for future reference. If you pass
the product on to a third party, include this manual.
Unplug the appliance from the mains supply when not in
use, removing or attaching filters, accessories, the dust cup
and and before cleaning any part of the appliance.
When unplugging, hold the plug top, not the power cord.
Do not immerse the body of the cleaner or the electrical
cord or plug in water or liquids.
Never leave the cleaner unattended when it is connected to
the electricity supply.
Do not use outdoors in damp or wet weather
Do not use your appliance indoors in damp or wet
conditions.
Do not use attachments or accessories not recommended
by the manufacturer.
Close supervision is necessary when an appliance is used
near children. Children should not operate this appliance.
This appliance is for household use. Do not use for any
purpose not expressly specified in this manual.
There are no user serviceable parts in this appliance.
Unauthorised dismantling or servicing will void the warranty.
If the supply cord is damaged, it must be replaced by the
manufacturer or its service agent or a similarly qualified
person in order to avoid a hazard
Refer all servicing which involves the taking or putting on of
parts (other than those specifically referred to in this manual),
to a qualified repair person or approved service centre.
Do not use attachments or accessories which are not
recommended by the manufacturer. They may cause
malfunction or injury.
Do not use harsh abrasives, or caustic cleaners when
cleaning this appliance.
Store the appliance away from direct sunlight, with all
accessories detached and out of the reach of children.
Before using this appliance ensure that the voltage of your
electricity supply is the same as that indicated on the rating
plate of the appliance.
Class II construction double insulated. This product
must not be connected to earth.
This appliance is intended only for household use. It must be
properly installed and operated in accordance with these
instructions. Failure to do this will invalidate the warranty.
Electrical Information
Warranty
SPECIFICATIONS
Model:
Voltage:
Power:
PET 1
220-240 V AC 50Hz
1800W( max.) 1400W (nom.)
Your appliance is covered by a warranty for 12 months from
the date of purchase. If a fault develops during this period,
please return the unit to your nearest Tesco store together with
the original receipt as proof of purchase. This warranty in no
way affects your consumer rights
UK:
ROI:
Waste electrical products should not be disposed of
with household waste.
e for details.
Produced after 13th August 2005. Waste electrical
products should not be disposed of with household waste.
Please recycle where facilities exist. Check with your Local
Authority or retailer for recycling advice.
Separate disposal facilities exist, for
your nearest facilities. See www.recycle-more.co.uk or in-
stor
PET 1 Vacuum Cleaner User Guide
Page 2
When operating your cleaner:
$
$
$
$
$
$
$
$
$
$
$
$
$
$
$
$
$
$
$
$
$
$
$
$
Do NOT
Do NOT
Do NOT
Do NOT
Do NOT
Do NOT
Do NOT
Do NOT
Do NOT
Do NOT
Do NOT
Do NOT
Do NOT
DO NOT
use the vacuum cleaner if it has been dropped,
damaged, left outdoors, or dropped into water.
pull or carry the cleaner by the cord, close a door
on the cord, or pull the cord around sharp edges or
corners.
Use the handle to carry and move the cleaner.
run the appliance over the power cord.
handle the mains plug or cleaner with wet hands.
use the vacuum cleaner to pick up large objects
or objects that are likely to damage the vacuum cleaner.
attempt to vacuum long hair, string, pieces of
cloth, etc. when vacuuming carpets or floors. These will
snag in the brush and may stop it rotating altogether.
Keep hair, loose clothing, jewellery, fingers, feet and all
parts of your body away from openings and moving parts.
operate the cleaner in bare feet or when wearing
open toed footwear.
vacuum hot items; e.g. cigarettes, matches, ashes.
vacuum hard or metal objects, nails pins, etc.
Set the cleaner fully upright and switch it off before plugging
or unplugging the vacuum cleaner into the mains.
Use extra care when vacuuming on stairs
pick up toxic, or flammable materials or use in
the presence of explosive or toxic dust, liquids or vapour.
Use only on dry, indoor surfaces.
put any objects into openings.
use with any opening blocked.
use without all the filters in place.
Keep all vents openings and attachments free of dust, lint,
hair and anything else that may reduce air flow.
Keep the end of the hose and all attachments away from
your face and body.
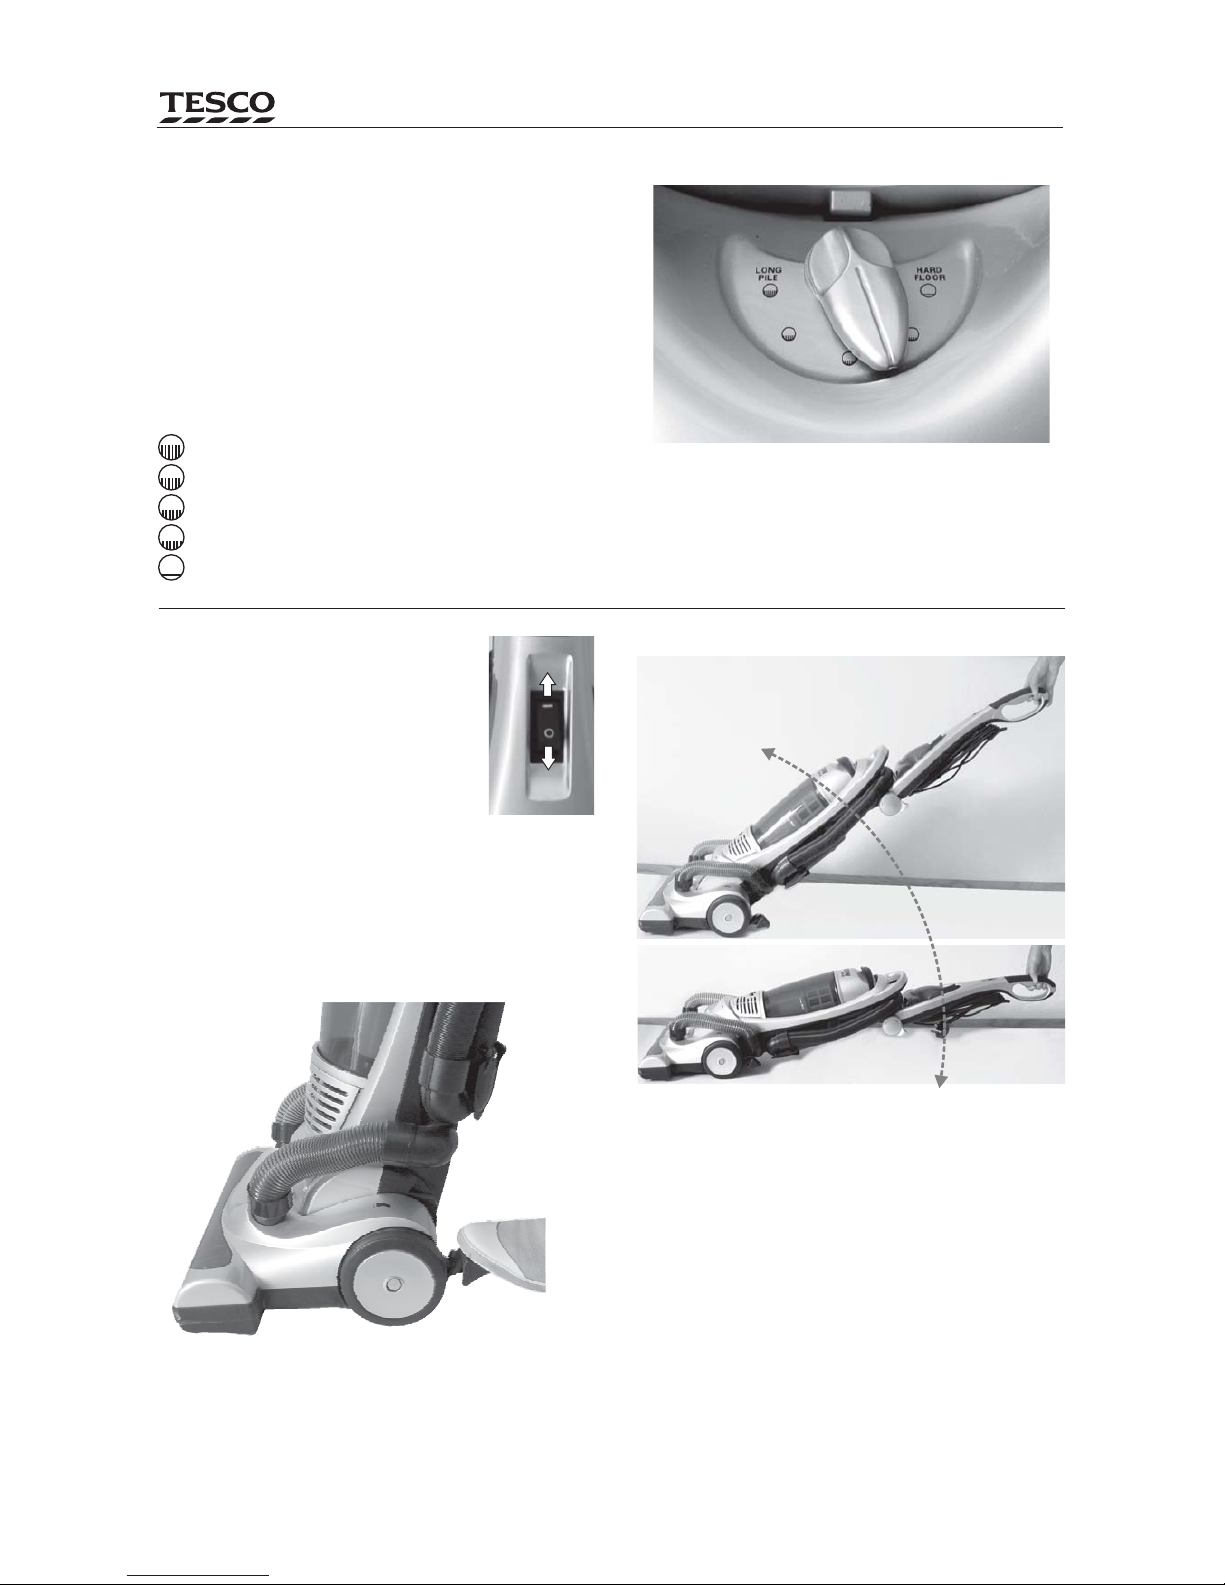
When cleaning carpets, keep the vacuum cleaner head
moving to avoid damaging the carpet.
use the cleaner on hard floors, whether wood,
laminate or plastic, with the brush set up to clean carpets.
This cleaner is exceptionally powerful and the floor could
be scratched or otherwise damaged.
Use the appropriate setting. Cleaning deep pile carpets
with the floor setting could damage the carpet.
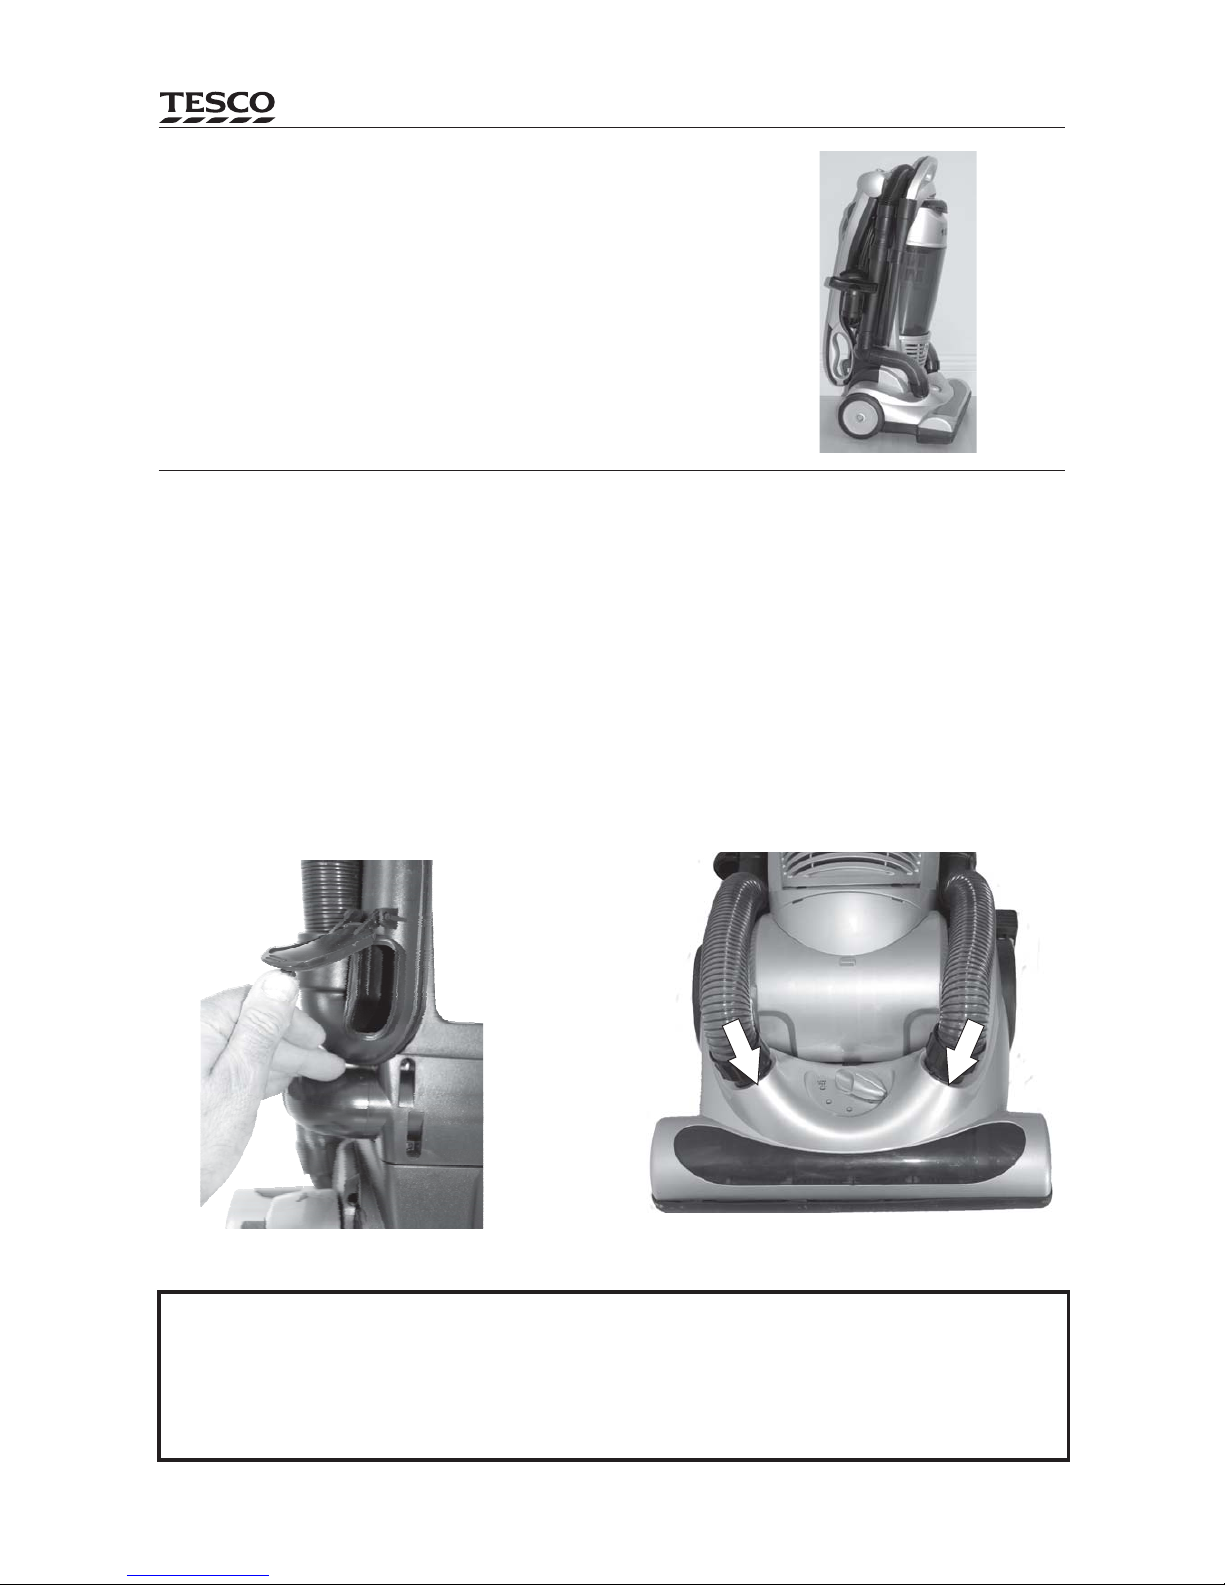
If the appliance becomes clogged, switch off and unplug
the power cord before clearing the obstruction.
!

Assembly
1.
2.
3.
.
5.
Press the upper handle
release down and raise the
handle vertically until it clicks into
place.
2. Push the front
hoses into the
retaining sockets.
there is a guide
on each hose so
you can only
insert it the
correct way.
Coil the hose around the cleaner as shown in the top RH
picture.
Raise the Upper Power Cord
cleat vertical and coil the cable
round the cleats. (The upper cleat
can be rotated to facilitate easy
release of the power cord in use.)
4 Assemble the two piece tube
onto the hose and insert the hose
into the retaining boss.
Assemble the accessories as
shown in the illustrations
Your cleaner is now ready for use.
Your Vacuum Cleaner and its accessories.
PET 1 Vacuum Cleaner User Guide
Page 3
Mains ON/OFF
Switch
Adjustable
Upper Handle
Carrying
Handle
Dust Cup Handle
Dust Cup
Flexible Hose
Carpet Height
Adjustor
Exhaust
Filter Cover
Front Hoses
Upper
Handle Release
Upper Power
Cord Cleat
Crevice Tool
Small
Brush Upholstery
Brush
2 Piece
Extension Tube
Furniture Guard
Power Head
Dust Trap
Cover
Lower Power
Cord Cleat
Power Cord
Top Handle
Front View Rear View
Handle
Release
Turbo Brush
SET
RELEASE

Operating the Cleaner
Before using your cleaner:
Switch on your cleaner:
Set the cleaner height:
NEVER leave the cleaner in a lowered position and
switched on as the brush could scratch the floor surface.
Set the cleaner
fully upright.
Press the Mains ON/OFF switch on the
handle to the “ ” position to switch the
cleaner .
Turn the Upper Power Cord cleat down 180º
and release the power cord.
Uncoil the power cord fully.
Plug the power cord into the electrical outlet.
Switch on at the mains point.
Slide the Mains ON/OFF switch on
the cleaner handle to the “ ” position to switch the cleaner .
With your foot, depress the handle release pedal as shown.
The cleaner can now be angled for normal operation and for
low level cleaning.
To get the cleaner to lie flat, press the release pedal once,
partially lower the handle and then depress the pedal again.
Return the cleaner to the upright position and
ensure it locks in place. This raises the brush clear of the floor.
For convenience, you may reset the upper cleat and then hook
the cable over the cleat. This will help stop the cable snagging.
O
OFF
ION
When you wish to move the cleaner or take a break:
Switch off.
Page 4
Vacuuming Carpets and Hard Floors
Set the vacuuming height before commencing cleaning.
Always check the carpet or floor covering manufacturer's
recommended cleaning instructions before vacuuming.
Suggested Pile Height Settings:
Long pile, deep scatter rugs.
Medium to long pile.
Short to medium pile.
Short pile.
Hard floors.
CAUTION: Setting the vacuuming height should only be
done when the cleaner is switched off at the mains.
Do not attempt to vacuum rubber bands, long
hair, string, pieces of cloth, etc. These will snag in the
bristles and may even stop the brush rotating altogether.
immediately.
Stand the cleaner fully upright.
Turn the carpet height adjustment knob to the desired setting.
You may need to raise the
brush height for easier access to scatter rugs, etc.
If this happens, switch the cleaner off Invert the
cleaner and completely remove all obstructions from the brush
before switching the cleaner on again.
CAUTION.
Using your Vacuum Cleaner
PET 1 Vacuum Cleaner User Guide
ADJUSTING THE CLEANER ANGLE
OFF
ON

Using the accessories
Moving the cleaner
General Do's and Don'ts
Switch the cleaner at the
mains switch on the handle.
Place the cleaner fully in the upright
position.
Set the Brush Control knob to
Lift out the hose and free it from
the retaining clip at the side of the
cleaner.
If you wish to use the extension
tubes and accessories, lift the tube
assembly out and attach it to the
hose.
There are two extension tubes. They fit inside each other and
some pulling force may be necessary to separate them.
The accessories can be used directly on the hose, or with a
short or long tube as you need.
Use the crevice tool for radiators, crevices,
between cushions, joins in stair treads, etc.
Use to clean upholstery, curtains, etc.
Use to clean upholstery, plush toys, etc.
This is a powerful tool. The brush is driven at
high speed by the air being sucked into the cleaner. Use it to
clean small rugs, or areas of bare floor which the normal
vacuum cleaner head cannot reach.
You can use the accessories with the handle extended or folded
down - this position is useful for cleaning stairs, etc.
Always switch the cleaner off before putting on or removing
accessories.
After use always return the accessories to their storage areas in
the cleaner and re-connect the hose to the cleaner.
When moving the cleaner between locations always unplug
the power cord and wind it around the cleats. Accessories
should be safely stowed.
the cleaner must be moved with both hands when it is
extended. Wherever possible we suggest the cleaner is moved
in the folded position.
pull the vacuum cleaner around the room by the hose
as it could tip over and cause damage.
over extend the hose. Trying to reach beyond the
hose length could cause the vacuum to tip over.
Be especially careful on stairs.
pull or carry the cleaner by the cord, close a door on
the cord, or pull the cord around sharp edges or corners.
Use the carry handle when lifting or moving the cleaner
between different locations.
NEVER lift the cleaner with the upper handle only. It could
release and cause injury.
If you are moving the cleaner a long way or up a flight of stairs,
switch off, fold the upper handle down, wind the power cord
and stow the hose and accessories.
OFF
LONG PILE.
Extension tubes
Accessories
Crevice Tool:
Upholstery Brush:
Small Brush:
Turbo Brush:
Never attach or remove accessories when the vacuum
cleaner is switched on.
Do NOT
Do NOT
Do NOT
PET 1 Vacuum Cleaner User Guide
Page 5
Hose Collar
Inner Tube
Outer Tube
Extension Tubes
Crevice Tool
Turbo Brush
Upholstery
Tool
Small
Brush
To Hose Collar
To Accessory Attachment
Extended
Folded

Cleraring the Dust Trap Front Hose Blockage
The dust trap is located at the rear of the cleaner.
Loft the trap up and clear any blockage fully. When you have
finished, close the trap door firmly. If the trap is not firmly
closed, the cleaner will not perform well.
Remove the two hoses at the front of the cleaner and examine
the hoses and the cleaner head. Remove any blockage and
replace the hoses.
If the dust trap is clear and there is still a blockage:
PET 1 Vacuum Cleaner User Guide
When you have finished Vacuuming:
Set the cleaner fully upright.
Switch the cleaner off at the handle.
Unplug from the mains.
Set the upper cleat vertical and wind the cord around the upper
and lower cleats.
Re-assemble the hose and attachments if necessary.
Fold the upper handle down fully.
Empty the dust cup and clean the dust cup filters
Wipe the cleaner body with a damp cloth and dry thoroughly.
Store the cleaner safely out of the reach if children and pets.
(see Pages 7 & 8)
If the cleaner loses suction and the dust in the dust cup is below the mark, this may be due to clogged filters or a blockage.
Set the cleaner upright, switch off and unplug immediately. Empty the dust, check all the filters and clean them.
Check the extension tubes and accessories visually and remove any blockage with a stick or broom handle.
Invert the cleaner, inspect the brush area, and remove any obstruction from the bristles or the brush roller.
MAX
If you suspect a blockage:
If this does not remove the blockage:
DO NOT
operate the cleaner if the suction is impaired.
$
$
$
Clearing a Blockage
Page 6
IMPORTANT-Motor Thermostat
If the vacuum cleaner should overheat, the protective thermostat will automatically turn the unit off.
Switch off and unplug. Check and clear any blockage and clean/replace the filters.
Wait at least 45 minutes before attempting to reuse the cleaner. After the cleaner has cooled down plug in and
switch on. The vacuum should now start.
contact the help line on
If this occurs:
If the vacuum does not start: 0845 456 6767

Emptying the Dust Cup
Check and empty the dust cup
regularly to maintain the efficient
performance of the cleaner.
You empty the Dust Cup
the dirt reaches the MAX
mark.
Set the cleaner upright, switch off
and unplug.
must
before
The maximum dirt level is marked on
the Dust Cup.
Hold the Dust up by
the handle. Lift the
handle up and release
the dust cup from its
cradle. Carefully
remove the dust cup
from the cleaner,
keeping it vertical.
Invert the dust cup over a bin. Press the catch on the lid which
will pop open. Shake and tap the dust cup lightly to remove as
much dust as possible. Close the lid.
If you are still vacuuming, replace the cup.
When you have finished cleaning you must clean the two
filters in the cup after emptying it. This is essential. Refer to
the next page for details.
Cleaning and Replacing the Filters
It is essential to inspect clean the filters regularly. The period between inspections will depend on how often and for how long you
use the cleaner. The motor inlet and exhaust
filters should be checked cleaning sessions.
If the cleaner shows any sign of losing suction, switch off, check and clean the filters and if necessary, clear any blockage.
Before you examine or clean the filters, Set the cleaner fully upright. Switch off and unplug from the mains.
The filter in the dust cup should be cleaned whenever you empty the dust.
after every three
NEVER operate the cleaner with clogged filters, you could damage the cleaner motor.
Filter Locations
Debris Screen
HEPA Filter
(Inside Dust Cup Lid)
The HEPA Filter stops nearly all dust
particles and airborne allergens from
re-entering the air you breathe.
You should also check and clean the
debris screen regularly.
Clean this filter every time you use
the cleaner. Failure to do this will
impair performance and may
damage the cleaner motor.
PET 1 Vacuum Cleaner User Guide
1. Press to Open
2. Tap and shake
to remove dust
Page 7
Pre-Motor Filter
Exhaust Filter
(behind cover)

PET 1 Vacuum Cleaner User Guide
Cleaning the Dust Cup Filters
HEPA Filter
Debris Screen
Remove the cup. Hold the cup as
shown. Rotate the cup lid to the
right to the UNLOCK position and
lift the lid off.
Hold the cup over a bin. In the cup
lid there is a spinner.
Rotate the spinner in both
directions to shake all the dust
off and thoroughly clean the
pleats of the filter.
At least once a month or if you
notice a decrease in suction,
remove and clean the filter.
To remove the filter:
Hold the filter as
shown. Keep the cup
still and rotate the
filter to the left to
loosen it. Now lift it
out.
After removing the
filter, tap the plastic
underside on the
edge of a bin to
remove loose dust.
Now brush the filter
out with a soft brush
and rinse it under the tap. Run the water on the dirty side until it
runs clear. After washing allow the HEPA Filter to fully air dry.
Only when the filter is dry
should you replace it in the Dust Cup.
To replace the filter, ensure
the rubber seal is in place
around the top edge of the
filter cage. Thread the filter
over the arms of the pleat
spinner and. Insert it fully
into the cup lid and twist
clockwise to lock it in place.
The HEPA filter should be replaced at least every six months
to keep your cleaner in peak condition.
Open the dust cup. Hold the dust cup firmly with one hand.
Place your other hand inside the cup and take hold of the
debris screen tube.
Rotate the debris screen firmly to the right to unlock it and then
carefully withdraw the screen from the tube.
Rinse the debris screen under the tap in lukewarm water to
remove any dust. The dust cup and dust cup cover can be
washed in lukewarm water.
After removing the filters he dust cup may now be washed out
in warm water and allowed to dry.
Do not use strong detergents. DO
Thread the screen over the vanes in the black inner tube. Align
the three lugs with the slots in the cup and turn fully
anticlockwise to lock firmly.
Replace the dust cup cover on the dust cup and replace the
assembled dust cup in the vacuum cleaner.
(There may be
some resistance from
the springy arms of
the spinner.)
(This may take up to 24 hours.)
(and ideally three)
NOT place any part in a
dishwasher. Allow all parts to fully dry.
To replace the screen:
Page 8
UNLOCK
LOCK
UNLOCK
LOCK

PET 1 Vacuum Cleaner User Guide
Cleaning Pre-Motor & Exhaust Filters
Check these filters whenever you remove the dust cup for
emptying and clean them when necessary.
B. Exhaust Filter
Place a finger in the hole and press down.The cover
is spring loaded so you will need to press down firmly
and then lift the cover out
Remove the filter holder from the cage and rinse in
lukewarm water. A very soiled filter should be
thoroughly washed with fresh tepid water. with a
drop of mild detergent. Rinse well. Let the filter air dry
for 24 hours.
Now re-install the filter insert in the holder. Replace
the holder in the cleaner.
Finally replace the cover.
A. Pre-Motor Filter
Remove the dust cup. Lift the pre-motor filter insert out. Rinse in
lukewarm water. A very soiled filter should be thoroughly
washed with fresh tepid water. with a drop of mild detergent.
Rinse well. Let the filter air dry for 24 hours before re-installing.
Page 9
IMPORTANT NOTICE
If at any time you notice that the brush speed is slow and/or there is a loss of suction, this may be
caused by the brush getting clogged.
If this happens, switch the cleaner off and unplug it from the mains. Clean the brush area fully and
remove all obstructions before continuing to use the cleaner.
Prompt action will maintain cleaner performance and avoid any potential problems of belt slippage.
Lift out
to clean
A
B
Lift out
to clean
Lift out

PET 1 Vacuum Cleaner User Guide
Page 10
Changing the Brush Roller and Drive Belt
Sluggish speed and loss of suction may be caused by a worn or slack belt. If the cleaner does not pick up on carpets but is OK when
using the attachments this indicates a worn brush roller. These components are user replaceable.
You need a No2 Phillips screwdriver, a 25mm paint brush and a small flat bladed screwdriver to carry out this procedure.
DO NOT replace these components yourself unless you are confident that you can carry out this procedure satisfactorily.
Make sure the cleaner is switched off and unplugged from the mains before you start work. Protect the work surface if
necessary.
2A
2B.
. Release the handle by pressing on the handle release pedal twice and lay it flat on the floor. Turn the cleaner over.
With a Phillips No. 2 screw driver remove the 4 screws on the bottom plate as identified.
Ease the power head cover off . Make sure you do not disturb the handle release pedal.
Lift the belt off the motor spindle
Slide the belt off the motor spindle.
If you are not replacing the belt, clean it carefully with
a dry cloth to remove any residue.
Stage 3. Slide the Belt off the Motor
Stage 2. Remove the Power Head Cover
2A 2B
Stage 1. Detach the accessories and the front tubes

PET 1 Vacuum Cleaner User Guide
Page 11
A
B
Lift the left side of the brush off its mounting. Press the casing out
with a screwdriver and ease the brush up and out of its mounting.
Repeat the procedure for the other side
Now lift the belt off the brush and then remove the brush.
Stage 4. Remove the Brush and Belt
Stage 5. Thread the new
belt over the motor spindle
4A 4B
4A 4B
4A 4B
4A 4B
4A 4B
Stage 7. Align and Secure the Brush
Stage 6. Thread the brush through the belt
56
7A 7B

PET 1 Vacuum Cleaner User Guide
Cleaning and storage
Service and spares
If you have difficulty obtaining replacement spares, filters
0845 456
6767
When you have finished
Vacuuming:
Set the cleaner fully upright.
Switch the cleaner off at the handle.
Unplug from the mains.
Set the cleats vertical and rewind the
cord around the upper and lower
cleats.
Re-assemble the hose and attachments
if necessary.
Fold the upper handle down fully.
Empty the dust cup and clean the dust
cup filters
Wipe the cleaner body with a damp cloth and dry
thoroughly.
The plastic outer body shell and the exterior surfaces of the
attachments may be cleaned with a barely damp cloth and
then dried thoroughly.
Do NOT allow water or liquids to penetrate the vacuum
cleaner. This could be dangerous.
Detach all accessories and store the appliance away from
direct sunlight, and out of the reach of children.
(see Pages 7 & 8)
$
$
, etc.
contact the TESCO electrical help line on
Please have your purchase receipt with you when you
call.
Tesco Stores Ltd, Delamare Road, Cheshunt, Herts, EN8 9SL
Page 12
OPERATING CAUTIONS
$
$
$
NEVER
If an obstruction occurs during cleaning:
If the vacuum cleaner should overheat, the protective thermostat will automatically turn the unit off.
Switch off and unplug. Check and clear any blockage and clean/replace the filters.
Wait at least 45 minutes before attempting to reuse the cleaner. After the cleaner has cooled down plug in and switch
on. The vacuum should now start.
contact the help line on 0845 456 6767
operate the cleaner with damaged filters or with a filter missing
Use approved filters and regularly clean and replace them.
Wind the cord around the cleats after use.
Turn the cleaner OFF and unplug. Check the dust level. Empty the dust cup. Check the
hose and the tubes for blockage and clear these manually following the instructions on Page 6.
If this occurs:
If the vacuum cleaner does not start: .
Stage 8. Rotate the brush by hand
to ensure the assembly moves smoothly
9A.
9B.
9C
9D.
Replace the power head cover.
Press the power head cover down by hand and check that it is
firmly seated all round. Check that the rubber gasket is in place and
not pinched between the cover and the motor housing.
. Fix the cover in place with the four screws.
Re-fit the front hoses
Switch the cleaner on. Check the cleaner operates normally and that
the brush switch operates before re-using the cleaner.
(See Stage 1).
Stage 9. Re-assembly
8
9A&B 9D
Table of contents
Other Tesco Vacuum Cleaner manuals