Tevion HDSTB8800 User manual

INSTRUCTION MANUAL
HIGH DEFINITION
SET TOP BOX
MODEL: HDSTB8800

1.Besuretoread this
Instruction Manual
beforeattempting to
operatethisunit.
2.Neveropen the
cover.It isverydan-
geroustotouchthe
inside ofthe unitdue
tothe possibilityof
electricshock.
3.When thisunitwill
notbe used foran
extended period of
time,removethe
powercordfromthe
outlet. Also,do not
usethisunitifthe
powercordhasbeen
damaged.
4.The apparatus
shall notbe exposed
todripping orsplash-
ing and no objects
filled withliquids,
suchasvases,shall
be placed on the
apparatus.
5.Placethe unitina
well ventilated
environment, and
awayfromheat
sources.
7.Install the unit
horizontally.Unbal-
anced installation may
causethe unitto
malfunction.
6.Donotplaceheavy
objectson the unit.
9.Install the unitina
placewith:
good ventilation
suitabletemperature
no directsunlight
lowhumidity
lowvibration
8.When the unitis
suddenlymoved toa
hotarea fromacold
area,itmaycause
condensation inside
the unit. Inthiscase,
turnoff the power,and
turnon after1-2hours.
IMPORTANTSAFETYINSTRUCTIONS-1

When using anyelectricalapparatusalways observesafetyregulationsand usebasic
safetyprecautionstoreducethe risk offire,electricshock and personalinjury,including
the following.
1.Read,Keep and Followtheseinstructions,heeding all Warnings.
2.Keep outofreachofyoung children.Thisapparatusisnotsuitableforusebyyoung
children orinfirmpersonswithoutsupervision.Young children mustbe supervised to
ensurethattheydo notplaywiththe apparatus.
3.WARNING.Donotinsertanyobjectsintoanyopeningsofan electricalapparatus.
4.WARNING.Donottouchanymoving partsofanyelectricalapparatus.
5.WARNING.Thisequipmentisonlytobe used inmoderateclimateareas.
6.WARNING.Donotusethisapparatusnearwater.Toavoidthe risk offireorelectric
shock,do notexposethisapparatustorainormoisture.The apparatusshall notbe
exposed todripping orsplashes.
7.WARNING.Noobjectsfilled withliquid,suchasvases,shall be placed on anyelectrical
apparatus.
8.Donotimmerseinanyliquidwhilstinuseorincleaning.Clean onlywithadampcloth,
drywithadrytowel.Donotuseharshabrasivesasthesemaydamage plasticparts.
9.DONOTblock anyventilation openings.Keep awayfromcurtains,newspapersand
restricted areas.Install inaccordancewithanyspecificmanufacturer’sinstructions.Always
allowasufficientgap around the apparatustoavoidoverheating.
10.DONOTinstall nearanyheatsourcessuchasradiators,gasheaters,stovesorother
apparatus(including amplifiers)thatproduceheat. Donotleaveindirectsunlight.
IMPORTANTSAFETYINSTRUCTIONS-2

11.WARNING.Donotplaceanynaked flamesource,suchaslighted candleson any
electricalapparatus.
12.WARNING!Connecttoasuitable230-240 ~50 Hzpowersupplyonly.If aclass 1
productitmustbe connected toasuitablyearthed mainssocket.
13.Always unplug fromthe powersourcewhen anyelectricalapparatusisnotinuse.
14.Donotabuseordamage apowercord.If anypowercordisdamaged,itmustbe
replaced bythe manufacturer,itsserviceagentorasimilarlyqualified person inorderto
avoidahazard.Areplaceablecordmustbe replaced withan authorised replacement
froman authorised serviceagentonly.
15.Onlyuseattachments/accessoriesspecified bythe manufacturer.
16.Unplug thisapparatusduring lightening stormsorwhen unused forlong periodsof
time.
17.Attention isdrawntothe environmentalaspectsofdisposing ofanybattery.
18.Referall servicing toqualified personnel.Servicing isrequired when the apparatushas
been damaged inanyway,suchaswhen the powersupplycordorplug isdamaged,
liquidhasbeen spilled orobjectshavefallen intothe apparatus,the apparatushasbeen
exposed torainormoisture,doesnotoperatenormally,orhasbeen dropped.
19.Donotattempttoserviceanydoubleinsulated apparatus.Doubleinsulated apparatus
requiresspecialistservicing and knowledge toretainthe safetyofthe apparatus.
20.WARNING.Donotuseanyelectricalapparatusoutdoors.If anyelectricalapparatusis
tobe used outdoors,useasuitableIsolating transformerorElectricalSafetySwitch
(RCD).
21.Forhouseholduseonly,thisapparatusisnotintended forcommercialuse.
22.If thisapparatusistobe used byathirdparty,pleasesupplytheseinstructionswithit.
23.Noliabilitywill be accepted foranypersonalinjuryordamage caused byfailuretofollow
theseinstructions.

Thelightning flashwitharrowheadsymbol,withinan equilateral
triangle,isintended toalertthe usertothe presenceof
uninsulated“dangerousvoltage”withintheproduct’senclosure
thatmaybeofsufficientmagnitudetoconstitutearisktopersons.
Theexclamationpoint,withinanequilateraltriangle,isintended
toalertthe usertothe presenceofimportantoperating and
maintenance(servicing)instructionsinthe literatureaccompa-
nying the appliance.
Instruction Markings:
Wheresymbolsorcaution labelsareused on thisproductorinthismanual,the follow
ing explanationsaremade.
For any customer query or in the unlikely event of a product failure,
please phone or email the helpline contact details below for assistance.
DO NOT RETURN THE PRODUCT TO THE RETAILER.
Toll Free Help line: 1300 366 144
Email: [email protected]

1
TableofContents
I. GeneralInformation ........................................................................................................ 2
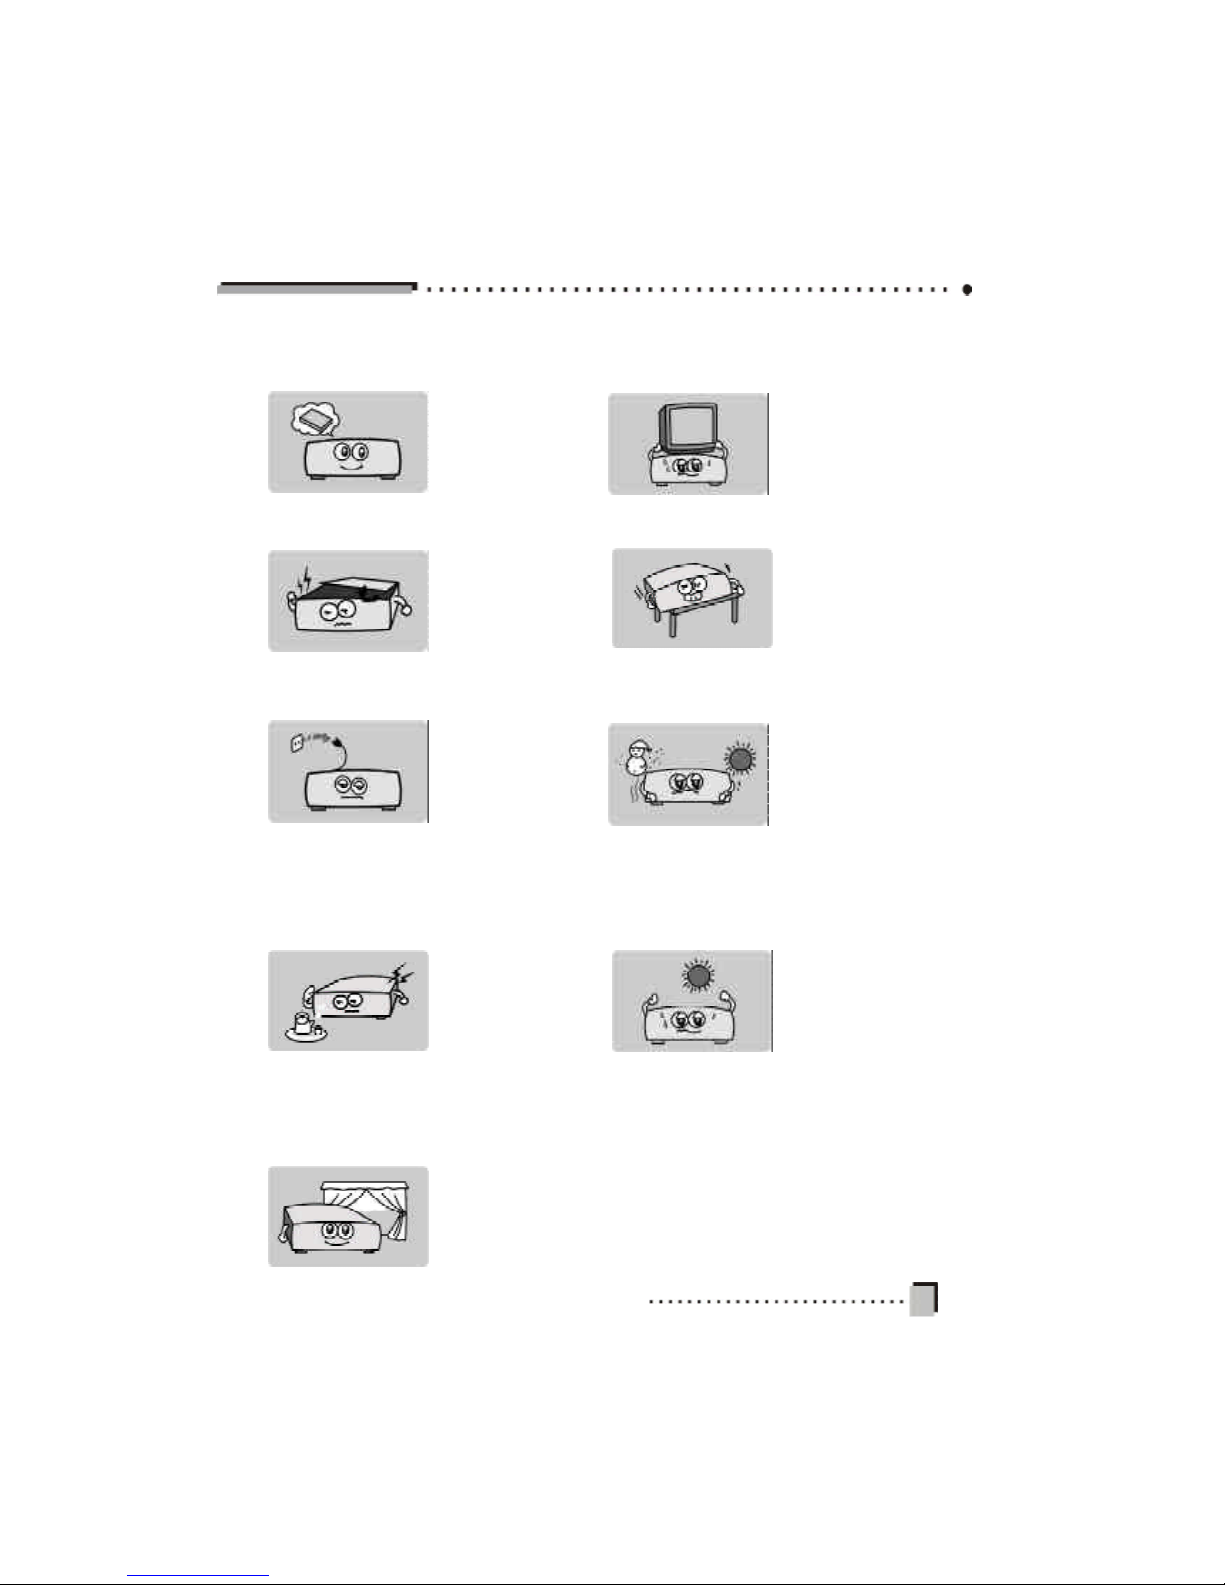
1.Preface........................................................................................................................ 2
2.MainFeatures.............................................................................................................. 2
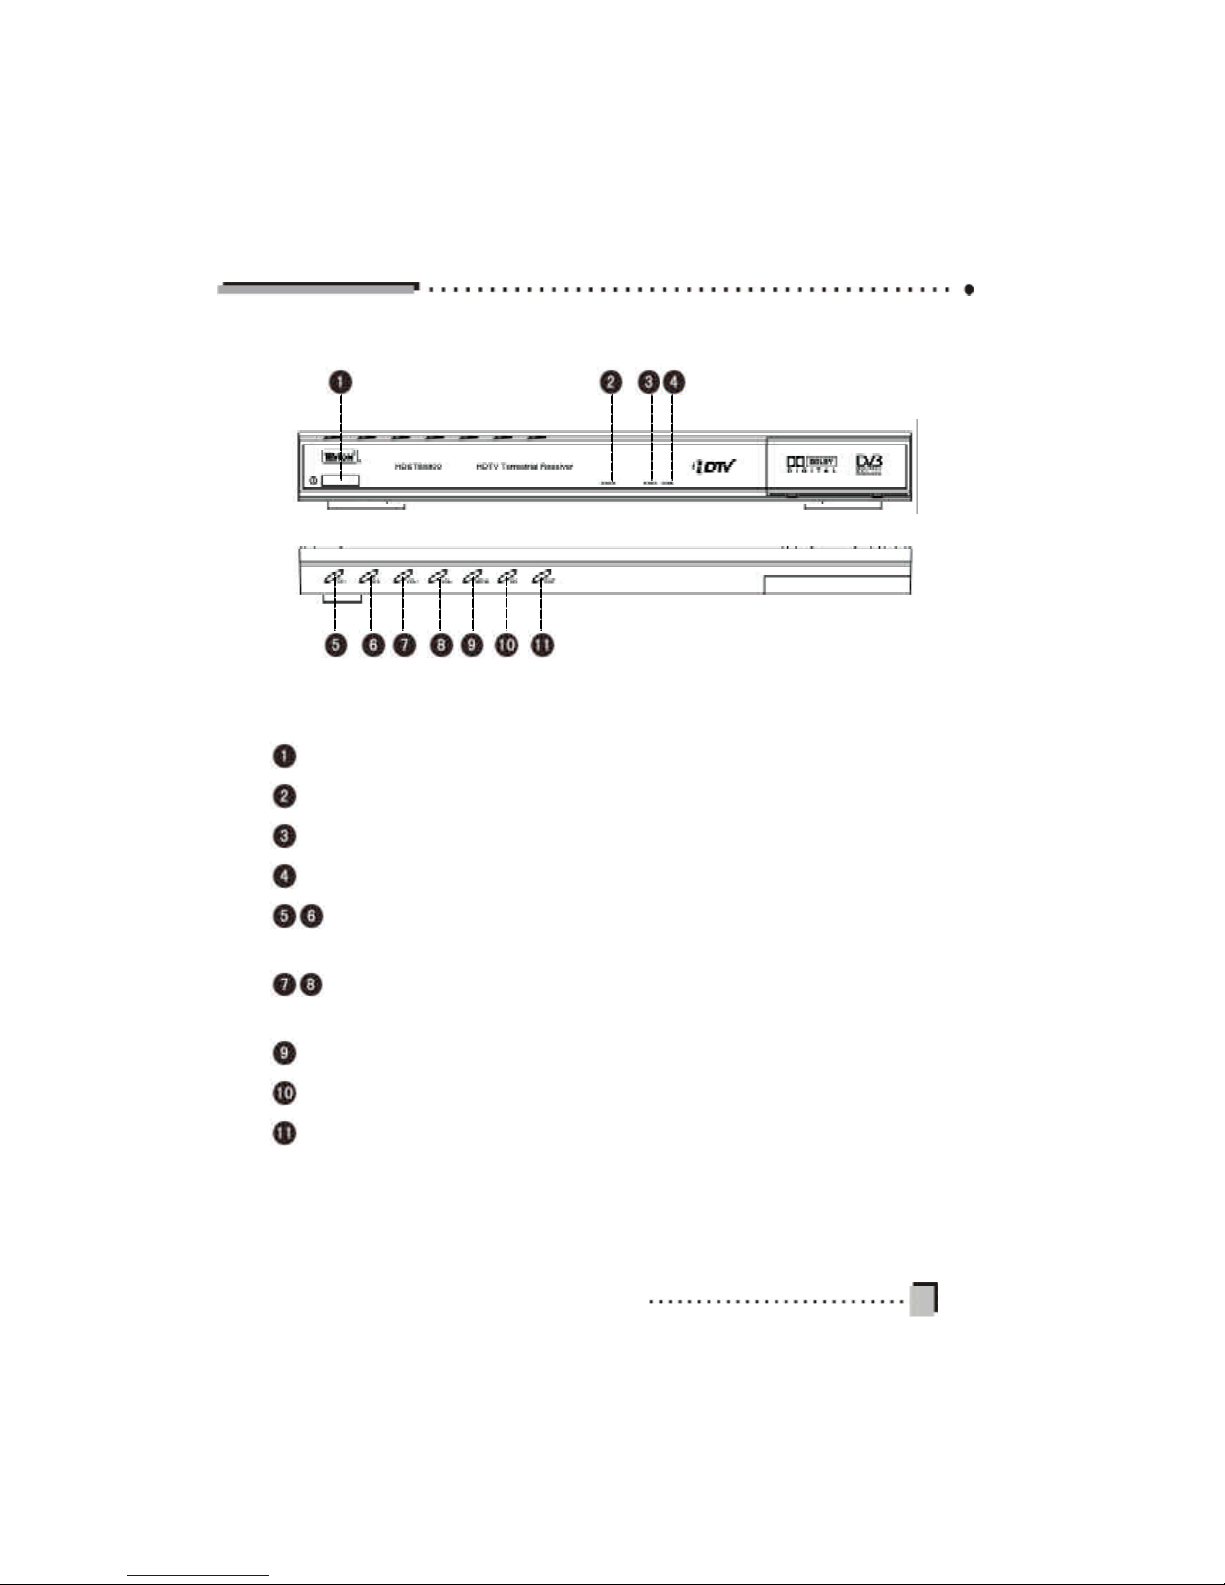
3.FrontPanel.................................................................................................................. 3
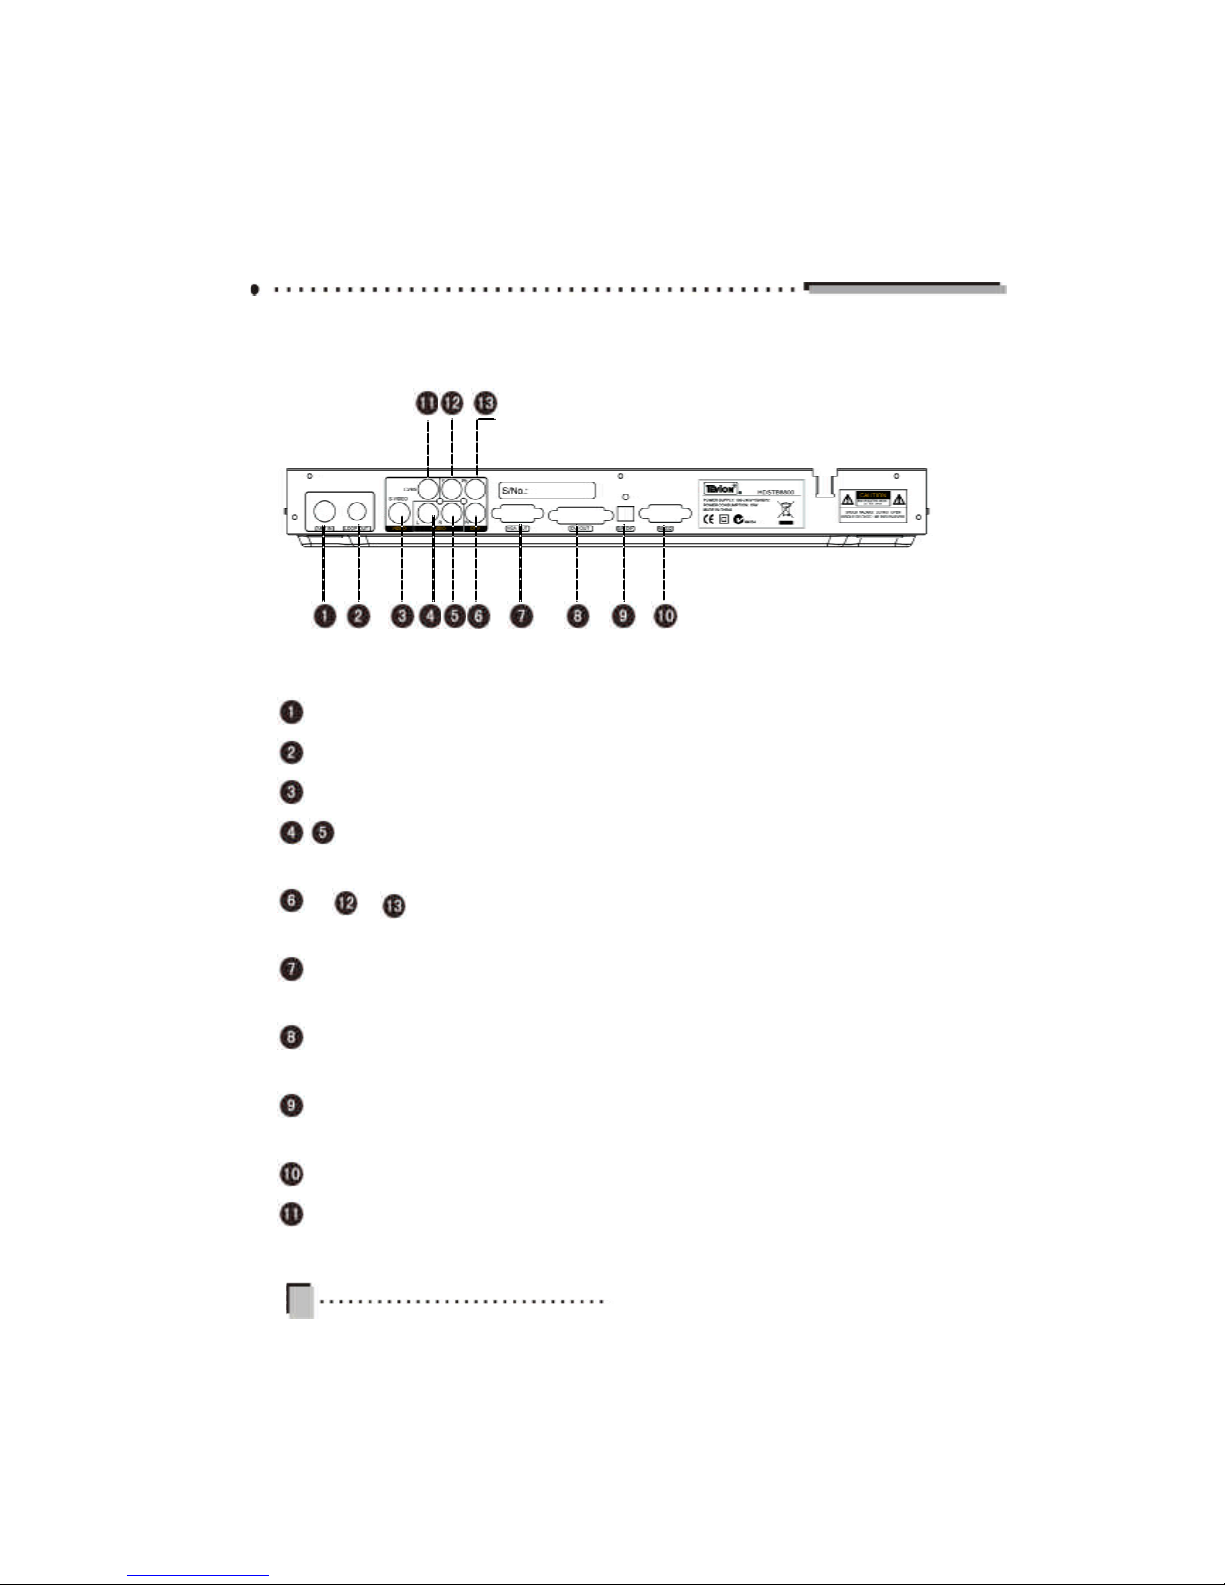
4.RearPanel.................................................................................................................. 4
5.RemoteControlUnit.................................................................................................... 5
6.Keys specification-1.................................................................................................... 6
7.Keys specification-2.................................................................................................... 7
II. Connection and Installation ........................................................................................... 8
1.SystemConnection ..................................................................................................... 8
2.Connections................................................................................................................ 9
3.Quick Installation ....................................................................................................... 10
III. Software...................................................................................................................... 12
1.MainMenu .................................................................................................................. 13
2.Installation ................................................................................................................. 13
2.1AutoSearch.......................................................................................................... 13
2.2ManualSearch..................................................................................................... 14
2.3ChannelEdit ........................................................................................................ 15
2.4FactoryDefault ..................................................................................................... 16
2.5Upgrade ............................................................................................................... 16
3.ProgramGuide .......................................................................................................... 16
4.ProgramManage....................................................................................................... 17
4.1ProgramEdit ........................................................................................................ 17
4.2FavouriteEdit ....................................................................................................... 18
5.ProgramSelect.......................................................................................................... 20
6.SystemSetting .......................................................................................................... 21
6.1Video Setting ........................................................................................................ 21
6.2AudioSetting ........................................................................................................ 21
6.3TimerSetup ......................................................................................................... 21
6.4OnScreen DisplaySetup..................................................................................... 22
6.5ParentalGuide ..................................................................................................... 23
6.6Language Setup .................................................................................................. 24
6.7TimeZone Adjust ................................................................................................. 24
6.8SystemInformation.............................................................................................. 24
7.ShortcutKeyExplanation........................................................................................... 25
IV.TechnicalSpecification .............................................................................................. 27
V.TroubleShooting.......................................................................................................... 29

2
I. GeneralInformation
1.Preface
Thankyou forchoosing topurchaseone ofourTEVIONproducts,weappreciate
yourbusiness and believethatwehaveprovided you withaproductthatisboth
reliableand value formoney.Weencourage you and yourfriendstochoosefrom
ourrange ofTEVIONproductsagaininfuture.
ThisTEVIONHigh Definition SetTop Boxisbuilton apowerfulATIX225 Chip,and
can decode high and standarddefinition digitalTVprograms.
2.MainFeatures
lFullyDVB-T&MPEG-2compliant
lDigitalReception coversVHF&UHFband
lMultiBandwidthselection:7M&8M
lMultidemodulation selection:QPSK,QAM16,QAM64
lMEPG-2HD/SDdecoding (MP@HL/ML)
lDolbyAC-3orMPEG-1audiodecoding
lDown-mixes5.1AC3totwochannelsencoded withDolbyPrologicSurround
lComponent(YPbPr)Output: supports1080i/720p/576p”
lVGAoutput: supports1080i/720p/576p
lDVIoutput: supports1080i/720p/576p
lConversionbetweenSDprogramsandHDprograms
lTeletext(VBI&OSDoutput)
lAspectratio:4:3/16:9
lDolby5.1channelorPCMdigitalaudiooutput
lElectronicprogramguide (EPG)
lParentalguidance
lSoftwareupgradeviaRS232
l32 bitstrue coloron screen display(OSD)
lChanneland Programeditor

3
POWER:Press toturnthe SetTop BoxON/OFF
SENSOR:RemoteControlsensor
POWERINDICATOR:Power-onlamp
SIGNAL:Indicatesthe signalintensity
CH:Press toswitchbetween programswhen watching TV,ormovethe
cursorup ordowninthe menu
VOL:Presstoadjustthevolumewhenwatchingaprogram,ormovethecursor
left orrightinthe menu
MENU:Press todisplaythe MainMenu orexitfromthe displayed menu screen
OK:Press toexecutethe selected itemorconfirmyourselection inthe menu
EXIT:Press toexitfromcurrentmenu
3.FrontPanel

4
ANTIN:Connecttoterrestrialantenna
LOOPOUT:RFoutputtoTVset’santenna input
S-VIDEOOUT:Connecttothe S-VIDEOjack ofthe TVorVCR
L-AUDIO/R-AUDIOOUT:ConnecttoaTVorotheraudiodeviceusing the
RCAcablesprovided
PrYPb(COMPONENT)OUT:ConnecttoaTVorMonitorwithCompo-
nentinput. Compatiblewithhigh definition signal
VGAOUT:ConnecttoamonitorwithVGAinput. Compatiblewithhigh definition
signal
DVIOUT:ConnecttoamonitorwithDVIInput. Compatiblewithhigh definition
signal
OPTICALDIGITALOUT:Connecttoan amplifierorHi-Fisystemwithan optical
digitialinput
RS232:ConnecttoaPCforsoftwareupgrade only
CVBS:Connecttothe video inputofaTVorVCR.Compatiblewithstandard
definition signal.
4.RearPanel

5
5.RemoteControlUnit

6
6.Keys specification-1
:Press toturnthe SetTop Boxon/off.f.
0~9:0~9:Press toselectachannelnumber,ortoenteranumberinan on
screen menu.
:Switchback tothe previouschannel.Inthe EPGmode,movesthe guide
forwardseveraldays
MENU:Displays the mainmenu on yourTVscreen.Closesthe currentmenu
screen and returnstothe normalviewmode
EXIT:Returntothe previousmenu on the menu screen orexitthe MainMenu.
:Movecursorleft/right/up/down.
EPG:Press todisplayProgramGuidescreen.
ASPECT:UsethisHOTKEY toselectyourtelevison screen outputformat.
Continuouslypress thisbutton totogglethrough the differentmodes.
AUDIO:Press todislplaytheAudioLanguage Menu Screen.
Colourkeys:havetheircorresponding functionsinspecified menus.
(refertopage 7)
:Press tomuteorunmute.
INFO:Showsthe information ofthe currentchannelbeing viewed.
:Press toswitchbetween teletextand closed caption.
P+/P-: Press topage up ordown.
OK:Press tosavethe resultsand exitthe currentmenu screen
Bring up the ProgramListwhen notinthe menu mode.
FAV:Displaythe favouritelist.
:Pause/PlayA/V..
:Press toswitchbetween Left, Right, Mixand Stereo Audiomodes.

7
Vision Adjust(RedKey)
When notinthe menu mode,press the Redcolourkey
on the RemoteControltoenterintothe Vision Adjust
menu.Here,adjustthe brightness,contrast, saturation
and sharpness directly.
Postion Adjust(GreenKey)
When notinthe menu mode,bypressing the Green
colourkeyon the RemoteControl,fourbigdirection
arrowswill be displayed inthe middleofthe screen.
Usethe fourdirection arrowkeys on the RemoteCon-
troltoadjustthe position on the screen.
OutputMode(YellowKey)
When notinthe menu mode,usetheYellowcolourkey
toselectthe outputmode between:PAL,VGA,YPbPr
and DVIOutputs.Continuouslypress thisbutton to
togglethrough the differentmodes.Onthe frontpanel,
the firstposition on the LEDdisplaywill showadiffer-
entcharacterforthesefourmodes.Thedisplaywillshow
“P”on PALmode,“V”on VGAmode,“Y”on YPbPr
mode and “D”on DVImode.The PALmodelisused for
the CVBS and S-Video Outputs.
VideoResolution (BlueKey)
When notinthe menu mode,usethe Blue colourkey
toselectthe video resolution among 576P,720Pand
1080I. Continuouslypress thisbutton totogglethrough
the differentresolutions.Onthe frontpanel,the LEDs
will showthe outputmode byyourchoice.The Video
Resolution isnotaccessablewhen inthe PALmode.
7.Keys specification-2

8
II. Connection and Installation
1.SystemConnection
Makesurethe Power,TerrestrialAntenna,TVand otherrelevantequipmentarecon-
nectedaccording tofollowing diagram.If youhaveotherequipmentthatyou wouldlike
toinstall,and areunsureofthe installation process ofthisequipment, consultthe
instruction manualforthe otherequipment,orcontactthe retailerthatthisotherequip-
mentwaspurchased from.Otherwise,pleasecall the toll free numberprovided for
assistance.
1
2
3
45

9
2.Connections
Therearefivemethodsofconnecting thisSetTop BoxtoyourTVorMonitor.
The TV’sorMonitorscan be divided intotwotypes:standarddefinition (SDTV),and
highdefinition(HDTV).
Witheachconnection used,the left and rightaudioconnectionsmustbe connected
aswell.
Note:1,2,3,4,5please refertoconnectionsinthepreviousdiagram.
Don’tconnectyourTVormonitorwithVGAand YPbPratthesametime.
CVBS 1 576IAnalog
S-VIDEO2 576IAnalog
Y,Pb,Pr3 576P,or720P,or1080IYPbPr
VGA4 576P,or720P,or1080IVGA
DVI5 576P,or720P,or1080IDVI
Connect
towhatUsed Connectoron STB
(L-AUDIOand R-Audio)SelectedDefinition VideoOut-
putmode
HDTV
SDTV

10
3.Quick Installation
STEP 1:Check connections
Priortopowering upthe receiver,ensurethatallcabling is
correctlyconnected asexplained insystemconnections.
Ensurethatthe unitisconnected tothe A/Vequipment
and the powersocket.
STEP 2:AdjustTVset
Turnon the television and adjustTV’svideo inputmode
according tothe receiver’svideo ouputmode.
STEP 3:Powerup
Turnon the powerswitchON/OFF on the frontpanelof
yourreceiver.The startup OnScreen Display(OSD)will
be shownon the TVscreen.The startup OSDwill remain
forseveralsecondsand then disappear.If therearepro-
gramsstored inthe SetTop Box,the channelnumberwill
be shownon the LEDdisplay.
STEP 4:Searchprogram
1.If thereareno programsstored inthe receiver,the sys-
temwillguideyoustepbysteptobeginthesearchprocess.
The firstscreen thatwill appearwill be the SystemInfor-
mation screen.Thiswill showthe words“Pleasepress
OKkeytoinitializesystem”.Press the OKkeyto
continue,orpress EXITifyou do notwanttoproceed.If
you selectOK,you will enterthe CountrySelectmenu.
Hereyou selectthe countrythatyou arein(Australia).
Press OKtocontinue.The nextscreen will be the Time
ZoneAdjustmenu.Inthismenu,selectthe correcttime
zone forwhereyou live,and setthe daylightsavingsifitis
applicable.
Press OKtocontinue.Thiswill bring you tothe Parantal
Guidemenu.Hereyou can change the password,and
setparentallocks ifyou desire(see section 5.5forfurther

11
detailson parentallocks).Press OKtocontinue.The next
menuistheAutoSearchmenu.Thesystemwillnowsearch
forprogramsfromallavailablechannels.
When the searchhascompleted,all programsthatwere
found will be added tothe TVprogramlist. The SetTop
Boxwill returntothe normalviewing mode,and will show
the firstchannelthatwasfound.
2.Tosearchforprogramsmanually,followthesesteps:
When notinthe menu mode,press the MENU keyto
displaythe MAINMENU.Usethe keys toselectIn-
stallation and press OK.The systemhasprovided two
ways tosearchprograms:AutoSearchand Manual
Search.
Werecommend thatyou useAutoSearch.Movethe cur-
sortoAutoSearchand press OK.The systemwill search
forprogramsautomatically.Aftersearching,the programs
thatwerefound will be added toTVprogramlist, and the
TVwill returntothe firstprogramthatwasstored.If you
arefamiliarwiththe location ofthe channels,you can use
the ManualSearch.Formoredetails,pleasereferto1.
Installation inSection III.
STEP 5:Viewprogram
Press OKwheninthenormalviewmodeandtheprogram
listwill appear.Usekeys toselectthe desired pro-
gramand press OKtoviewinfull-screen.
Note:All functionscanbeoperatedbyusing the
keys on theRemoteControl, and someofthefunc-
tionscanalsobeoperatedbyusing thekeys on the
frontpaneloftheSetTop Box.

12
III. Software
ProgramManage
ProgramGuide
ProgramEdit
FavoriteEdit
Installation
AutoSearch
ManualSearch
ChannelEdit
FactoryDefault
Upgrade
SystemSetting
AudioSetup
OSDSetup
ParentalGuide
LanguageSetup
TimeZoneAdjust
Video Setup
SystemInformation
ProgramSelect
TimerSetup

13
1.MainMenu
When notinthe menu mode,pressing MENU keywill
displaythe MainMenu.
Thismenu consistsoffivemenu itemsasshownbelow.
vInstallation
vProgramGuide
vProgramManage
vProgramSelect
vSystemSetting
Usethe keys tomoveup ordownfromone itemto
another.The corresponding sub-menu will be displayed
onthescreen whenthe OKkeyispressedontheselected
item.
Toescape the menu systematanytime,press EXITor
MENU on the RemoteControl.
2.Installation
Inthe Installation menu therearetwoways tosearchfor
programs:AutoSearchand ManualSearch.The Channel
Listdetermineswhatchannelswill be searched inthose
twomenus,soitisimportanttoeditthe channelsinthe
ChannelEditmenu.
2.1AutoSearch
Forfirsttimeusers,AutoSearchisthe bestoption.First,
usethe keys toselectAutoSearchinthe Installation
menu.Then press OKtoenterthe AutoSearchmenu.
The systemwill searchforprogramsautomatically.After
searching,the programsthatwerefound will be added to
TVprogramlist, and the TVwill returntothe firstprogram
thatwasfound.

14
Whilesearching,you can press EXITtostop orpress OK
toskip.PressEXITagainorMENUtoexitfromthismenu.
2.2ManualSearch
You can setparametersinthe ManualSearchmenu if
youarefamiliarwiththerelevantparameters.Inthismode,
onlyone channelatatime,whosenecessaryparameters
areentered intothe ManualSearchmenu manually,will
be searched.
ChannelNo.:Press keytoselectthe correctoption.
Frequency:Thevaluevarieswithwhatyouhaveselected
inChannelNo.
Bandwidth:Press keys toswitchbetween 7Mand
8M.
Transmission Mode:You haveachoiceof2K,8Kand
Auto.Press keys toselectappropriatemode.
GuardInterval:Availableoptionsare:1/4,1/8,1/16,1/
32 andAuto.Press keys toselectone ofthese.
NetworkSearch:Press keys toselect“Yes”or“No”.
If you select“Yes”,the receiverwill searchall programs
according tothe channellist. If you select“No”,the re-
ceiverwill onlysearchprogramsfromthe currentchannel
thatyou haveentered above.Atthe bottomofthismenu,
therearetwocolourbarsreflecting the signal’squality
and strength.You can check whetheryou havesetthe
antennacorrectlybythesetwobars.Aftermodifying,press
OKtobeginsearching.Aftersearching,the TVwill return
tothe firstprogramthatwasfound.During the entire
process,you can press EXITorMENU toexit.

15
2.3ChannelEdit
SelectChannelEditinthe Installation menu and press
OK.TheChannelEditmenuwillbedisplayedonthescreen.
Here,anewchannelcan be added and the existing ones
can be edited ordeleted.You can usethe colourkeys on
the RemoteControltoexecutethe corresponding com-
mand toeachcolour.
Add (Redkey)Delete(Greenkey)
Modify(Yellowkey)
vAdd
Afterpressing the Red keyon the RemoteControl,the
Add Channelmenu will be displayed.Hereyou can set
the necessaryparametersofthe newchannel.
ChannelNo:Thisvalue isdetermined bythe receiver
automaticallyand cannotbe modified.
Frequency:You can inputvaluesreferring toabove.
Bandwidth:Press keys toswitchbetween7Mand
8M.
Transmission Mode:You havethe selection of2K,8K
andAuto.Press keys toselectappropriatemode.
GuardInterval:Availableoptionsare:1/4,1/8,1/16,1/
32 andAuto.Press keys toselectone ofthese.
Ensureall ofthe aboveparametersareset, press OKto
confirmand exitfromtheAdd Channelmenu.Inthe
ChannelEditmenu you will see thatthe newchannel
hasbeen added toend ofthe list.
vDelete
Thiscommandallowsyoutodeleteoneormoreunwanted
channels.Firstselectthe channelyou wanttodeleteand
press the Greenkeyon the RemoteControl,and you will
find thisitemwill be marked withthe symbol.You can
Table of contents
Other Tevion Set-top Box manuals