TFA 98.1114.02 User manual

Schutzhülle
Vielen Dank, dass Sie sich für dieses Gerät aus dem Hause TFA entschieden haben.
1. Bevor Sie mit dem Gerät arbeiten
•Lesen Sie sich bitte die Bedienungsanleitung genau durch.
•Durch die Beachtung der Bedienungsanleitung vermeiden Sie auch Beschädigungen
des Geräts und die Gefährdung Ihrer gesetzlichen Mängelrechte durch Fehlgebrauch.
•Für Schäden, die aus Nichtbeachtung dieser Bedienungsanleitung verursacht werden,
übernehmen wir keine Haftung.
•Beachten Sie besonders die Sicherheitshinweise!
•Bewahren Sie diese Anleitung gut auf!
2. Einsatzbereich und alle Vorteile Ihres neuen Produktes auf einen Blick
• Schutzhülle für Thermo- und Thermo/Hygrosender
• Mit Öffnung für Fühlerkabel
• Bietet dem Außensender Schutz vor Niederschlag und direkter Sonneneinstrahlung
• Leicht zu montieren
3. Zu Ihrer Sicherheit
• Das Produkt ist ausschließlich für den oben beschriebenen Einsatzbereich geeignet. Ver-
wenden Sie das Produkt nicht anders, als in dieser Anleitung dargestellt wird.
• Das eigenmächtige Reparieren, Umbauen oder Verändern des Produktes ist nicht gestattet.
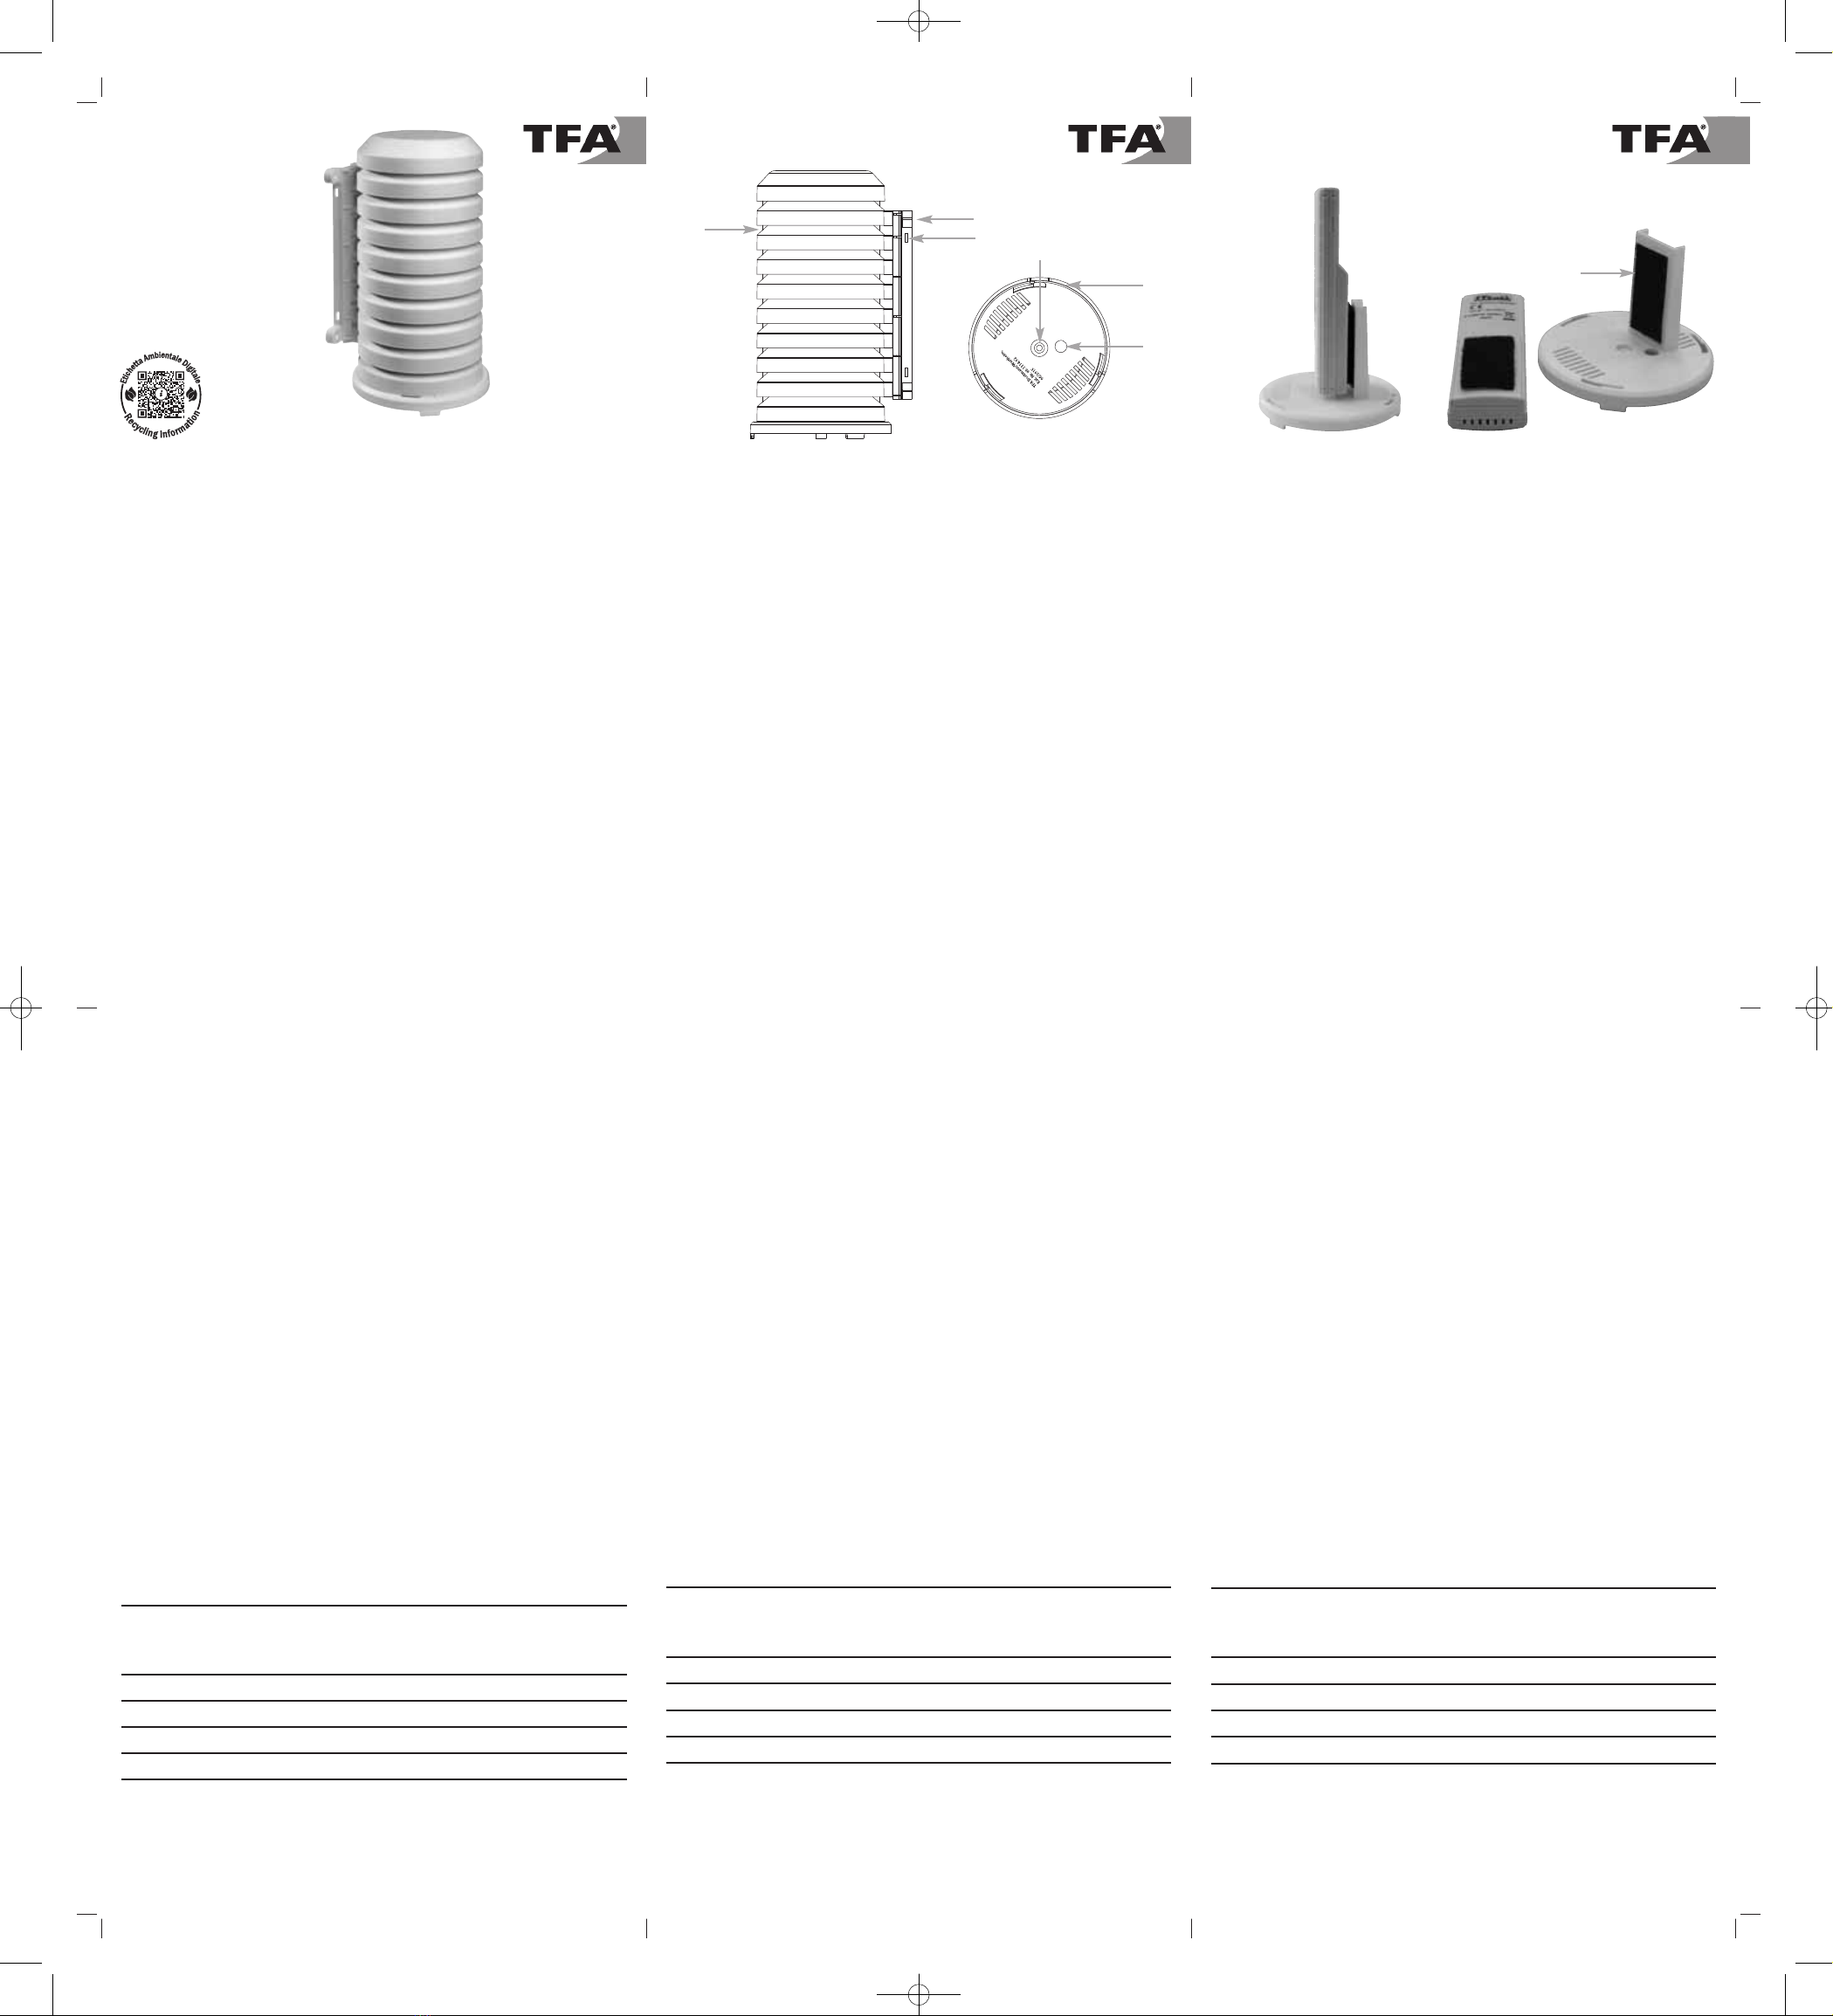
4. Gehäuse
A: Schutzhülle B: Wandhalterung (abnehmbar)
C: Bodenplatte D: Ständer für den Sender
E: Öffnung zur Befestigung F: Öffnung für ein Fühlerkabel
G: Öffnungen für Kabelbinder
5. Hinweise für die Standortwahl des Senders
• Suchen Sie sich im Freien einen schattigen Platz für den Sender aus. (Direkte Sonnen-
einstrahlung verfälscht die Messwerte).
• Prüfen Sie, ob eine Übertragung der Messwerte vom Sender am gewünschten Aufstellort
zur Basisstation stattfindet (bei massiven Wänden, insbesondere mit Metallteilen kann
sich die Sendereichweite erheblich reduzieren).
• Suchen Sie sich gegebenenfalls einen neuen Aufstellort für Sender und/oder Basisstation.
6. Montieren der Schutzhülle
• Drehen Sie die Schutzhülle im Uhrzeigersinn von der Bodenplatte ab.
7. Horizontale Befestigung
• Für einen sicheren Halt kann die Schutzhülle auf einem geeigneten Untergrund festge-
schraubt werden.
• Suchen Sie sich eine glatte, waagrechte Stelle aus.
• Führen Sie eine Schraube durch die Öffnung in der Mitte und schrauben Sie die Boden-
platte fest.
8. Befestigung an der Wand oder an einem Pfosten
• Entfernen Sie die Wandhalterung von der Schutzhülle, in dem Sie sie nach unten schieben.
• Befestigen Sie die Wandhalterung mit den Schrauben und den Dübeln an der Wand. Ach-
ten Sie auf die Markierung „UP” (oben).
• Möchten Sie die Wandhalterung an einem Pfosten anbringen, können Sie auch die
Kabelbinder verwenden.
• Hinweis: Beim Montieren achten Sie bitte darauf, dass die Schutzhülle problemlos in die
Wandhalterung eingesetzt werden kann.
• Setzen Sie die Schutzhülle mit der Bodenplatte und dem befestigten Sender von oben in
die Wandhalterung ein.
9. Befestigung des Senders
• Damit der Sender sicher auf der Bodenplatte steht, befestigen Sie das Klettband mit dem
doppelseitigen Klebeband am Ständer und an der Rückseite des Senders und fixieren Sie
den Sender. Alternativ können Sie auch die Kabelbinder verwenden.
• Sollte der Sender ein Fühlerkabel haben, führen Sie es durch die dafür vorgesehene Öff-
nung in der Bodenplatte.
• Setzen Sie die Schutzhülle auf die Bodenplatte mit dem befestigten Sender und drehen
Sie sie gegen den Uhrzeigersinn fest.
10. Pflege und Wartung
• Reinigen Sie die Schutzhülle mit einem weichen, leicht feuchten Tuch. Keine Scheuer-
oder Lösungsmittel verwenden!
11. Technische Daten
Montagematerial 4 Schrauben
4 Dübel
2 Stück Kabelbinder
Klettband mit doppelseitigem Klebeband
Innenraummaße Höhe 160 mm
Innendurchmesser 60 mm
Gehäusemaße 95 x 102 (108) x 180 mm
Gewicht 163 g
TFA Dostmann GmbH & Co.KG, Zum Ottersberg 12, 97877 Wertheim, Deutschland
Diese Anleitung oder Auszüge daraus dürfen nur mit Zustimmung von TFA Dostmann veröffentlicht wer-
den. Die technischen Daten entsprechen dem Stand bei Drucklegung und können ohne vorherige
Benachrichtigung geändert werden.
Die neuesten technischen Daten und Informationen zu Ihrem Produkt finden Sie auf unserer Homepage
unter Eingabe der Artikel-Nummer in das Suchfeld.
www.tfa-dostmann.de 04/23
Bedienungsanleitung
Kat. Nr. 98.1114.02
Protecting cap
Thank you for choosing this product from TFA.
1. Before you use this product
•Please make sure you read the instruction manual carefully.
•Following and respecting the instructions in your manual will prevent damage to your
instrument and loss of your statutory rights arising from defects due to incorrect use.
•We shall not be liable for any damage occurring as a result of non-following of these
instructions.
•Please pay particular attention to the safety notices!
•Please keep this instruction manual safe for future reference.
2. Field of operation and all the benefits of your new instrument at a glance
• Protecting cap for temperature transmitter and temperature/humidity transmitter
• With hole for the probe wire
• Provides the transmitter protection against precipitation and direct sunlight
• Easy to assemble
3. For your safety
• This product is exclusively intended for the field of application described above. It
should only be used as described within these instructions.
• Unauthorized repairs, modifications or changes to the product are prohibited.
4. Housing
A: Protecting cap B: Mounting bracket (removable)
C: Base D: Stand for the transmitter
E: Hole for the attachment F: Hole for the probe wire
G: Cable tie slots
5. Advice for location of the transmitter
• Placed outside, choose a shady position for the transmitter. (Direct sunshine falsifies the
measurement).
• Check the transmission of the signal from the transmitter to the basic station (within
ferro-concrete rooms, basements, superstructures, the received signal is naturally weak-
ened).
• If necessary choose another position for the transmitter and/or basic station.
6. Assemble of the protecting cap
• Twist the protecting cap clockwise to remove the base.
7. Horizontal mounting
• For a secure hold, the protecting cap can be screwed onto a suitable surface.
• Place the device on a flat and horizontal surface.
• Place a screw through the hole in the center of the base and tighten the base.
8. Mount to a wall or a post
• Remove the mounting bracket from the protecting cap by sliding it downwards
• Attach the mounting bracket with the screws and the dowels on the wall. Pay attention to
the marking “UP”.
• If you want to attach the mounting bracket to a post, you can use the cable ties.
•Note: When attaching, please ensure that the protecting cap can be inserted easily into
the mounting bracket.
• Insert the protecting cap with the base and the fixed transmitter from above into the
mounting bracket.
9. Attachment of the transmitter
• In order to secure the transmitter on the base, attach the Velcro tape with the double-
sided tape on the stand and on the back of the transmitter and fix the transmitter. Alter-
natively, you can also use the cable ties.
• Should the transmitter have a probe wire, lead the probe wire through the opening pro-
vided in the base.
• Place the protecting cap on the base with the fixed transmitter and turn the protecting
cap counter-clockwise.
10. Care and maintenance
• Clean the protecting cap with a soft damp cloth. Do not use solvents or scouring agents.
11. Specifications
Assembly material 4 screws
4 dowels
2 cable ties
Velcro tape with the double-sided tape
Interior dimensions Height 160 mm
Inner diameter 60 mm
Housing dimension 95 x 102 (108) x 180 mm
Weight 163 g
TFA Dostmann GmbH & Co.KG, Zum Ottersberg 12, 97877 Wertheim, Germany
No part of this manual may be reproduced without written consent of TFA Dostmann. The technical data
are correct at the time of going to print and may change without prior notice.
The latest technical data and information about this product can be found in our homepage by simply
entering the product number in the search box.
www.tfa-dostmann.de 04/23
Instruction manual
Cat. No. 98.1114.02
F
C
B
E
G
A
C
Gaine de protection
Nous vous remercions d'avoir choisi l'appareil de la Société TFA.
1. Avant d'utiliser votre appareil
•Veuillez lire attentivement le mode d'emploi.
•En respectant ce mode d'emploi, vous éviterez d'endommager votre appareil et de
perdre vos droits légaux en cas de défaut si celui-ci résulte d’une utilisation non-
conforme.
•Nous n'assumons aucune responsabilité pour des dommages qui auraient été causés
par le non-respect du présent mode d'emploi.
•Suivez bien toutes les consignes de sécurité !
•Conservez soigneusement le mode d'emploi !
2. Aperçu du domaine d'utilisation et de tous les avantages de votre nouvel appareil
• Couvercle de protection pour transmetteur de température et transmetteur de tempéra-
ture et d'humidité
• Avec ouverture pour un câble de sonde
• Offre à l’émetteur extérieur une protection contre les intempéries et le rayonnement
direct du soleil
• Facile à monter
3. Pour votre sécurité
• Le produit est destiné uniquement à l'utilisation décrite ci-dessus. N'utilisez jamais l’ap-
pareil à d'autres fins que celles décrites dans le présent mode d'emploi.
• Vous ne devez en aucun cas réparer, démonter ou modifier le produit par vous-même.
4. Boîtier
A: Gaine de protection B : Fixation murale au mur (amovible)
C: Dalle de base D : Montant pour l’émetteur extérieur
E: Ouverture pour fixation F : Ouverture pour un câble de sonde
G: Ouvertures pour serres-câble
5. Indications pour le choix de l’emplacement de l’émetteur
• Choisissez un emplacement à l'ombre pour votre émetteur. Évitez l'ensoleillement direct,
il fausse la mesure indiquée.
• Vérifiez que les valeurs de mesure entre l'émetteur et la station de base sont bien trans-
mises de l'endroit choisi. En cas de murs massifs, en particulier comportant des parties
métalliques, la portée d'émission peut se trouver réduite considérablement.
•
Si nécessaire cherchez du nouvel emplacement pour l'émetteur et/ou pour la station de base.
6. Montage de la gaine de protection
• Dévissez la gaine de protection de la dalle de base dans le sens des aiguilles d’une montre.
7. Fixation horizontale
• Pour garantir un maintien en sécurité de la gaine de protection, celle-ci peut être vissée
sur un support adapté.
• Cherchez une zone lisse et horizontale.
• Introduisez une vis dans l’ouverture du milieu et vissez la dalle de base fermement.
8. Fixation au mur ou à un poteau
• Retirez la fixation murale de la gaine de protection, en la poussant vers le bas.
• Fixez la fixation murale au mur avec les vis et les chevilles. Orientez selon la marque «UP»
(en-haut).
• Si vous souhaitez placer la fixation murale au mur sur un poteau, vous pouvez aussi utili-
ser les serre-câble.
•Remarque : Lors du montage, veillez à ce que la gaine de protection puisse être insérée
sans problème dans la fixation murale au mur.
• Montez la gaine de protection, avec la dalle de base et l’émetteur fixé, par le haut dans la
fixation murale.
9. Fixation de l’émetteur
• Afin que l’émetteur tienne sur la dalle de base en toute sécurité, fixez la bande velcro
avec le ruban adhésif double face au montant et au dos de l’émetteur, puis fixez l’émet-
teur. Vous pouvez également utiliser les serre-câble.
• Si l’émetteur devait avoir un câble de sonde, passez-le par l’ouverture prévue à cette fin
dans la dalle de base.
• Fichez la gaine de protection dans la dalle de base avec l’émetteur fixé et vissez-la dans
le sens inverse des aiguilles d’une montre.
10. Entretien et maintenance
• Pour le nettoyage de la gaine de protection, utilisez un chiffon doux et humide. N’utilisez
pas de solvants ou d’agents abrasifs !
11. Caractéristiques techniques
Matériel de montage 4 vis
4 chevilles
2 serre-câble
Bande velcro avec ruban adhésif double face
Espace intérieur Altitude 160 mm
Diamètre intérieur 60 mm
Dimensions du boîtier 95 x 102 (108) x 180 mm
Poids 163 g
TFA Dostmann GmbH & Co.KG, Zum Ottersberg 12, 97877 Wertheim, Allemagne
La reproduction, même partielle, du présent mode d'emploi est strictement interdite sans l'accord explicite
de TFA Dostmann. Les caractéristiques techniques de ce produit ont été actualisées au moment de l'im-
pression et peuvent être modifiées sans avis préalable.
Les dernières données techniques et les informations concernant votre produit peuvent être consultées en
entrant le numéro de l'article sur notre site Internet.
www.tfa-dostmann.de 04/23
Mode d'emploi
N° de l'art. 98.1114.02
D
Instruction manuals
www.tfa-dostmann.de/en/service/downloads/instruction-manuals
TFA_No. 98.1114_Anleit_04_23 19.04.2023 11:48 Uhr Seite 1

F
C
B
E
G
A
D
Custodia di protezione
Vi ringraziamo per aver scelto il prodotto della TFA.
1. Prima di utilizzare il prodotto
•Leggete attentamente le istruzioni per l'uso.
•Seguendo le istruzioni per l'uso, eviterete anche di danneggiare il prodotto e di pre-
giudicare, a causa di un utilizzo scorretto, i diritti di consumatore che vi spettano per
legge.
•Decliniamo ogni responsabilità per i danni derivanti dal mancato rispetto delle pre-
senti istruzioni per l'uso.
•Prestate particolare attenzione alle misure di sicurezza!
•Conservate con cura queste istruzioni per l'uso.
2. Utilizzi e vantaggi del vostro nuovo apparecchio
• Custodia di protezione per trasmettitori di temperatura e trasmettitori di temperatura e
trasmettitore
• Con apertura per un cavo sensore
• Protegge il trasmettitore esterno da precipitazioni e dalla luce diretta del sole
• Facile da montare!
3. Per la vostra sicurezza
• Il prodotto è adatto esclusivamente agli utilizzi di cui sopra. Non utilizzate il prodotto in
maniera diversa da quanto descritto in queste istruzioni.
• Non sono consentite riparazioni, alterazioni o modifiche non autorizzate del prodotto.
4. Struttura esterna
A: Custodia di protezione B: Supporto a parete (rimovibile)
C: Piastra di base D: Supporto per il trasmettitore
E: Apertura per il fissaggio F: Apertura per un cavo sensore
G: Aperture per fascette serracavi
5. Consigli per la scelta dell'ubicazione del trasmettitore
• Cercare un luogo ombreggiato per il trasmettitore. La luce solare diretta distorce la
misurazione.
• Verificare se il trasferimento dei valori di misura alla stazione base da parte del trasmet-
titore situato nel luogo cui esso è destinato ha luogo correttamente (in caso di pareti
spesse, in particolare con parti metalliche, il raggio d’azione del trasmettitore potrà
ridursi notevolmente).
• Se necessario, cercate nuove posizioni per il trasmettitore e/o il stazione base.
6. Montaggio della custodia di protezione
• Svitare la custodia di protezione in senso orario dalla piastra di base.
7. Fissagio orizzontale
• Per una tenuta sicura, la custodia di protezione può essere avvitata saldamente su un'ap-
posita superficie.
• Scegliere un punto liscio, in posizione orizzontale.
• Inserire una vite nel foro centrale e avvitare la piastra di base con fermezza.
8. Fissaggio alla parete o a un palo
• Rimuovere il supporto a parete dalla custodia di protezione spingendolo verso il basso.
• Fissare il supporto a parete con le viti e i tasselli alla parete. Prestare attenzione alla marca-
tura “UP” (sopra).
• Se si desidera collegare il supporto a parete a un palo, è possibile utilizzare le fascette ser-
racavi.
•Avviso: durante il montaggio, assicurarsi che la custodia di protezione possa essere inseri-
ta facilmente nel supporto a parete.
• Inserire la custodia di protezione con la piastra di base e il trasmettitore fisso dall'alto nel
supporto a parete.
9. Fissaggio del trasmettitore
• Per alloggiare saldamente il trasmettitore sulla piastra di base, fissare la fascia di velcro
con il nastro biadesivo sul supporto e sul retro del trasmettitore e fissare il trasmettitore.
In alternativa, è possibile utilizzare anche le fascette serracavi.
• Se il trasmettitore è dotato di un cavo sensore, infilarlo nell'apposita apertura della pia-
stra di base.
• Posizionare la custodia di protezione sulla piastra di base con il trasmettitore fissato e
ruotarlo in senso antiorario saldamente.
10. Cura e manutenzione
• Per pulire la custodia di protezione utilizzare solo un panno morbido leggermente inumi-
dito. Non usare solventi o prodotti abrasivi.
11. Dati tecnici
Materiale per il montaggio 4 viti
4 tasselli
2 fascette serracavi
Fascia di velcro con nastro biadesivo
Dimensioni interne dell'ambiente Altitudine 160mm
Diametro interno 60 mm
Dimensioni esterne 95 x 102 (108) x 180 mm
Peso 163 g
TFA Dostmann GmbH & Co.KG, Zum Ottersberg 12, 97877 Wertheim, Germania
È vietata la pubblicazione delle presenti istruzioni o di parti di esse senza una precedente autorizzazione
della TFA Dostmann. I dati tecnici corrispondono allo stato del prodotto al momento della stampa e pos-
sono cambiare senza preavviso.
È possibile trovare dati tecnici e informazioni aggiornate sul prodotto inserendo il numero di articolo sul
nostro sito.
www.tfa-dostmann.de 04/23
Istruzioni per l'uso
No. Cat. 98.1114.02
Beschermkap
Hartelijk dank dat u voor dit apparaat van TFA hebt gekozen.
1. Voordat u met het apparaat gaat werken
•Lees de gebruiksaanwijzing aandachtig door.
•Door rekening te houden met wat er in de handleiding staat, vermijdt u ook beschadi-
gingen van het product en riskeert u niet dat uw wettelijke rechten door verkeerd
gebruik niet meer gelden.
•Voor schade die wordt veroorzaakt doordat u geen rekening houdt met de handleiding
aanvaarden wij geen aansprakelijkheid.
•Volg met name de veiligheidsinstructies op!
•Deze gebruiksaanwijzing goed bewaren a.u.b.!
2. Toepassing en alle voordelen van uw nieuwe apparaat in één oogopslag
• Beschermkap voor temperatuur zender en temperatuur en vochtigheid zender
• Met opening voor een sensorkabel
• Beschermt de buitenzender tegen regen en direct zonlicht
• Gemakkelijk te monteren
3. Voor uw veiligheid
• Het product is uitsluitend geschikt voor de hierboven beschreven doeleinden. Gebruik
het product niet anders dan in deze handleiding is aangegeven.
• Het eigenmachtig repareren, verbouwen of veranderen van het product is niet toege-
staan.
4. Behuizing
A: Beschermkap B: Wandbevestiging (wegneembaar)
C: Bodemplaat D: Houder voor het zender
E: Bevestigingsopening F: Opening voor een sensorkabel
G: Openingen voor kabelbinders
5. Instructies voor de plaatsing van de zender
• Zoek een schaduwrijke plaats uit voor de zender. Directe zonbestraling vervalst de meet-
waarden.
• Controleer of een overdracht van de meetwaarden van de buitenzender op de gewenste
opstellingsplaats naar het basisapparaat plaatsvindt (massieve wanden, in het bijzonder
met metalen delen, kunnen de reikwijdte van de buitenzender aanzienlijk beperken).
• Zoek eventueel een nieuwe plaats voor de buitenzender en/of het basisapparaat.
6. De beschermkap bevestigen
• Draai de beschermkap rechtsom los van de bodemplaat.
7. Horizontale befestiging
• Voor een veilige bevestiging kan de beschermkap op een geschikte ondergrond worden
vastgeschroefd.
• Kies hiervoor een gladde, horizontale plaats.
• Steek een schroef door de opening in het midden en schroef de bodemplaat vast.
8. Bevestigen aan de muur of op een paal
• Schuif de wandbevestiging omlaag en maak deze los van de beschermkap.
• Schroef de wandbevestiging met de schroeven en pluggen vast op de muur. Let op de
markering „UP” (boven).
• U kunt voor het bevestigen van de wandbevestiging op een paal ook de kabelbinders
gebruiken.
•Let op: Controleer bij het monteren van de wandbevestiging of de beschermkap pro-
bleemloos kan worden geplaatst.
• Schuif de beschermkap met de bodemplaat en de bevestigde zender vanaf de bovenkant
in de wandbevestiging.
9. De zender bevestigen
• Om de zender goed vast te zetten op de bodemplaat het klittenband met dubbelzijdig
plakband aanbrengen op de houder en op de achterzijde van de zender en vervolgens de
zender op de houder bevestigen. U kunt hiervoor ook de kabelbinders gebruiken.
• Een eventuele sensorkabel kunt u door de daarvoor bedoelde opening in de bodemplaat
leiden.
•
Plaats de beschermkap op de bodemplaat met daarop de zender en draai deze linksom vast.
10. Schoonmaken en onderhoud
• Maak de beschermkap met een zachte, enigszins vochtige doek schoon. Geen schuur- or
oplosmiddelen gebruiken!
11. Technische gegevens
Bevestigingsmateriaal 4 schroeven
4 pluggen
2 kabelbinders
Klittenband met dubbelzijdig plakband
Afmetingen binnenruimte Hoogte 160 mm
Binnendiameter 60 mm
Afmetingen behuizing: 95 x 102 (108) x 180 mm
Gewicht 163 g
TFA Dostmann GmbH & Co.KG, Zum Ottersberg 12, 97877 Wertheim, Duitsland
Deze gebruiksaanwijzing of gedeelten eruit mogen alleen met toestemming van TFA Dostmann worden
gepubliceerd. De technische gegevens van dit apparaat zijn actueel bij het ter perse gaan en kunnen zon-
der voorafgaande informatie worden gewijzigd.
De nieuwste technische gegevens en informatie over uw product kunt u vinden door het invoeren van
het artikelnummer op onze homepage.
www.tfa-dostmann.de 04/23
Gebruiksaanwijzing
Kat.-Nr. 98.1114.02
Cubierta protectora
Muchas gracias por haber adquirido este producto de TFA.
1. Antes de utilizar el producto
•Lea detenidamente las instrucciones de uso.
•Si sigue las instrucciones de uso, evitará que se produzcan daños en el dispositivo y
no comprometerá a sus derechos por vicios, previstos legalmente debido a un uso
incorrecto.
•No asumimos responsabilidad alguna por los daños originados por el incumplimiento
de estas instrucciones de uso.
•Tenga en cuenta ante todo las advertencias de seguridad.
•Guarde estas instrucciones de uso en un sitio seguro.
2. Ámbito de aplicación y ventajas de su nuevo dispositivo
• Cubierta protectora de transmisor de temperatura y transmisor de temperatura y de
humedad
• Con abertura para un cable sensor
• Ofrece protección al emisor exterior ante precipitaciones y la radiación solar directa
• Fácil de montar
3. Para su seguridad
• El producto solo es adecuado para el ámbito de aplicación descrito anteriormente. No
emplee el dispositivo de modo distinto al especificado en estas instrucciones.
• No está permitido realizar reparaciones, transformaciones o modificaciones por cuenta
propia en el producto.
4. Cuerpo
A: Caperuza de protección B: Soporte de pared (desmontable)
C: Placa base D: Soporte para el emisor exterior
E: Abertura para fijación F: Abertura para un cable sensor
G: Aberturas para sujetacables
5. Indicación parar la selección de la ubicación del emisor
• Busque un lugar sombreado para poner el emisor externo. La irradiación solar directa
falsea los valores medidos.
• Compruebe si se produce la transmisión de los valores medidos del emisor externo en el
lugar de instalación deseado para la estación básica (con paredes macizas, especialmen-
te con piezas metálicas puede reducirse considerablemente el alcance del emisor).
• Busque posiblemente un lugar nuevo para el emisor y / o estación básica.
6. Montar la cubierta protectora
• Gire la cubierta protectora desde la placa base en sentido horario.
7. Fijación horizontale
• Para una parada segura la cubierta protectora se puede atornillar bien en un fundamento
adecuado.
• Busque un lugar horizontal y plano.
• Pase un tornillo por la abertura del centro y atornille y fije la placa base.
8. Fijación en la pared o en un poste
• Retire el soporte de pared de la cubierta protectora empujando hacia abajo.
• Fije el soporte de pared con los tornillos y los tacos a la pared. Fíjese en la marca
“UP”(arriba).
• Si desea poner el soporte de pared en un poste, también puede usar el sujetacables.
•Nota: Al montar, tenga en cuenta que la cubierta protectora se pueda meter sin problemas
en el soporte de pared.
• Coloque la cubierta protectora con la placa base y el emisor fijado desde arriba en el
soporte de pared.
9. Fijación del emisor
• Para que el emisor esté seguro en la placa base, fije el velcro con cinta adhesiva de doble
cara en el soporte y en la parte posterior del emisor y fije el emisor. Alternativamente
también puede utilizar un sujetacables.
•
Si el emisor tuviera un cable sensor, llévelo por la abertura prevista para ello a la placa base.
• Ponga la cubierta protectora en la placa base con el emisor fijado y apriételo girando en
sentido antihorario.
10. Cuidado y mantenimiento
• Limpie la cubierta protectora con un paño suave, ligeramente humedecido. ¡No utilice
productos abrasivos o disolventes!
11. Datos técnicos
Material de montaje 4 tornillos
4 tacos
2 sujetacables
Velcro con cinta adhesiva de doble cara
Medida del espacio interior Altura 160 mm
Diámetro interior 60 mm
Dimensiones de cuerpo 95 x 102 (108) x 180 mm
Peso 163 g
TFA Dostmann GmbH & Co.KG, Zum Ottersberg 12, 97877 Wertheim, Alemania
Estas instrucciones o extractos de las mismas no pueden ser publicados sin la autorización de la TFA
Dostmann. Los datos técnicos de este producto corresponden al estado en el momento de la impresión
y pueden ser modificados sin previo aviso.
Los actuales datos técnicos e informaciones sobre su producto los puede encontrar bajo el número de
artículo en nuestra página web.
www.tfa-dostmann.de 04/23
Instrucciones de uso
Kat.-No. 98.1114.02
TFA_No. 98.1114_Anleit_04_23 19.04.2023 11:48 Uhr Seite 2