TFA 35.1022 User manual

433 MHz Wireless Weather Station Kat.No. 35.1022
Introduction:
Congratulations on purchasing this Weather Station as an example of superior design and
fine craftsmanship. The Weather Station displays the time, indoor and outdoor temperatures
and features the weather forecast. For easy and straightforward use, please read this
operating manual to ensure you receive the optimum benefits of all its features.
Weather Station Temperature Transmitter
FEATURES:
Weather Station
- 24-hour time display
- Precise and accurate LCD clock (hours and minutes display with fIashing seconds dots)
- Indoor temperature display in degrees Celsius (°C)
- Outdoor temperature display in degrees Celsius (°C)
- MIN/MAX outdoor temperature display
- Three weather icons with weather tendency indicator for weather forecasting
- Wall mounting
Temperature transmitter
- Remote transmission of outdoor temperature to the Weather Station by 433 MHz signals
- Wall mounting case
Setting up:

1. Firstly, slide the battery cover open on the Temperature transmitter as indicated above.
2. Checking the correct polarization, insert 2 x AAA, IEC LR3, 15V batteries into the battery
compartment.
3. Replace the cover while ensuring that the batteries do not spring free from the contacts.
4. Now flip open the battery cover at the back of the Weather Station as indicated above.
5. Checking the correct polarization, insert 2 x AAA, IEC LR3, 15V batteries into the battery
compartment.
6. Replace the battery cover.
Note:
Should inserting the batteries into the Weather Station take longer than 3 minutes, reset both
units (see Resetting below) otherwise 433MHz reception problems may occur.
LCD SCREEN
Note:
When setting up, always remember to insert the battery into the transmitter first as it will start
transmitting the outdoor temperature for the Weather Station to receive (always ensure
batteries used are new and of the correct sizes).
The transmitter will automatically start measuring the outdoor temperature once the batteries
are inserted. Should the outdoor temperature not be received within one minute after
inserting the batteries into the Weather Station, then please see "Checking tor 433MHz
reception" below.
Immediately after inserting the batteries in to the Weather Station, all the segments on the
LCD will light up briefly before displaying the time section, indoor and outdoor temperature
readings and sun with two clouds icons. The time displayed will be "0:00" and will require
setting as follows:

TIME SETTING:
1. Press the "SET" key to enter the Time setting mode. The hour's digit will start flashing.
2. Use the "+" key to set the hours (each press will increase the digits by one).
3. Press the "SET" key to move into the minutes setting. The minute's digits start flashing.
4. Use the "+" key again, set the minutes (each press will increase the digits by one).
5. Press again the "SET" key to exit the Time Setting mode and to normal display.
Using the Weather Station:
Once the time is set, it will be kept by an accurate LCD clock in 24-hour time display.
Located between the hours and the minutes is a flashing "." Each flash represents the
passing of one second, but more importantly, it demonstrates that the Weather Station's
entire LCD screen is powered and operating.
Indoor Temperature Reading:
The indoor temperature display is under the time section of the LCD and is automatically
measured once the batteries are inserted.
Weather tendency icons
Underneath the indoor temperature reading is the weather icons for forecasting the weather
over a 6 to 12 hour period. The weather icons can be displayed in the following
combinations:
For every sudden or significant change in the air pressure, the weather icons will update
accordingly to represent the change in weather. If the icons do not change, it simply means
either:
1) the weather has either not changed or
2) the air pressure has not changed or the change has been too slow for the Weather Station
to register.
The icons displayed forecasts the weather in terms of getting better or worse and not
necessarily sunny or rainy as each icon indicates. For example, if the current weather is
cloudy and the rainy icon is displayed, it does not mean that the product is faulty because it
is not raining. It simply means that the air pressure has dropped and the weather is expected
to get worse but not necessarily rainy.
After setting up, readings for weather forecasts should be disregarded for the next 12-24
hours. This will allow sufficient time for the Weather Station to collect air pressure data at a
constant altitude and therefore result in a more accurate forecast.
Common to weather forecasting, absolute accuracy cannot be guaranteed. The weather
forecasting feature is estimated to have an accuracy level of about 75% due to the varying
areas the Weather Station has been designed for use in. In areas that experience sudden
changes in weather (for example from sunny to rain), the Weather Station's will be more
accurate compared to use in areas where the weather is stagnant most of the time (for
example mostly sunny).

The weather tendency indictors
The weather tendency indicators are located above (pointing down) and below (pointing up)
the weather icons and show the expected weather tendency over the next 6 to 12 hours be
measuring.
The weather tendency can be displayed as follows:
Tendency pointing upwards: It means that the air-pressure is increasing and the weather
is expected to improve.
Tendency pointing downwards: It means that the air-pressure is decreasing and the weather
is expected to become worse.
Taking this into account, one can see how the weather has changed and is expected to
change. For example, if the indicator is pointing downwards together with cloud and sun
icons, then the last noticeable change in the weather was when it was sunny (the sun icon
only). Therefore, the next change in the weather will be the cloud with rain icons since the
indicator is pointing downwards.
Note:
Once the weather tendency indicator has registered a change in air pressure, it will remain
permanently visualized on the LCD.
Outdoor Temperature Reading:
The outdoor temperature reading is bottom line ot the LCD under the weather icons. The
Weather Station will automatically start scanning for the outdoor temperature via 433MHz
frequency once the batteries are inserted.
Minimum and maximum outdoor temperature recordings:
Underneath the weather tendency icons are the minimum and maximum outdoor
temperature recordings. When a low or high temperature is reached, it will be automatically
recorded and overwrite the previous records. The minimum and maximum outdoor
temperature can be alternatively displayed by pressing the MIN/MAX key.
Resetting the minimum and maximum outdoor temperature:
The minimum and maximum outdoor temperatures can be reset to current outdoor
temperature by simply pressing and holding the MIN/MAX key tor 3 seconds.
Checking for 433MHz reception:
In normal surroundings (for example away from interfering sources such as TV sets), the
outdoor temperature can usually be received within one minute. If the outdoor temperature is
not displayed on the L CD within this time, then check the following:
1. The distance of the Weather Station or transmitter should be at least 1.5 to 2 meters away
from any interfering sources such as computer monitors or TV sets.
2. Avoid positioning the Weather Station onto or in the immediate proximity of metal window
frames.
3. Using other electrical products such as headphones or speakers operating on the same
signal frequency (433MHz) may prevent correct signal transmission and reception.
4. Neighbours using electrical devices operating on the 433MHz-signal frequency can also
cause interference.
Note:
When the 433MHz signal is received correctly, do not re-open the battery cover of either the
transmitter or Weather Station, as the batteries may spring free from the contacts and force a

false reset. Should this happen accidentally then reset all units (see Resetting below)
otherwise transmission problems may occur.
The transmission range is about 20- 25 m from the transmitter to the Weather Station (in
open space). However, this depends on the surrounding environment and interference
levels. If no reception is possible despite the observation of these factors, all system units
have to be reset (see Resetting below).
Resetting:
1. Remove the batteries from both the Weather Station and the transmitter.
2. Wait at least 30 seconds and repeat the procedures specified in Setting up above.
Note:
Always wait at least 30 seconds before reinserting the batteries, otherwise transmission start
up problems may occur.
Remember when resetting, that both units have to be reset and to always reinsert the battery
into the transmitter first.
WALL MOUNTING- WEATHER STATION:
The Weather Station has been designed to be hanging on a wall. To wall mount, please do
the following:
1. Fix a screw (not supplied) into the desired wall, leaving the head extended out the wall by
about 5 mm as indicated above.
2. Using the Weather Station's hanging hole on the back of the unit, carefully hang it onto the
screw. Always ensure that the product securely locks onto the screw head before releasing.
WALL MOUNTING -TEMPERATURE TRANSMITTER:
The Temperature transmitter is supplied with a holder that may be attached to a wall with the
three screws supplied. To attach 10 the wall, please follow the steps below:

1. Mark the wall using a pen through the holes in the holder 10 obtain the exact drilling
position.
2. Drill holes in the wall at the points marked.
3. Screw holder onto wall.
There is also double sided tape included with the wall mount. This can be used instead of
drilling. Please mount this on a smooth surface instead of a brick one. The surface can,
however, affect the transmission range, for example if the unit is attached to a piece of metal,
it may then either reduce or increase the transmitting range. For this reason, we recommend
not placing the unit on any metal surfaces or in any position where a large metal surface is in
the immediale proximity (garage doors, double glazing etc.). Before securing in place, please
ensure that the Weather Station can receive the signal from the Temperature Transmitter at
the positions that you wish to situate them. The Temperature Transmitter clicks in or out of
the holder easily. When inserting or removing the Temperature Transmitter from the wall
holder please hold both units securely.
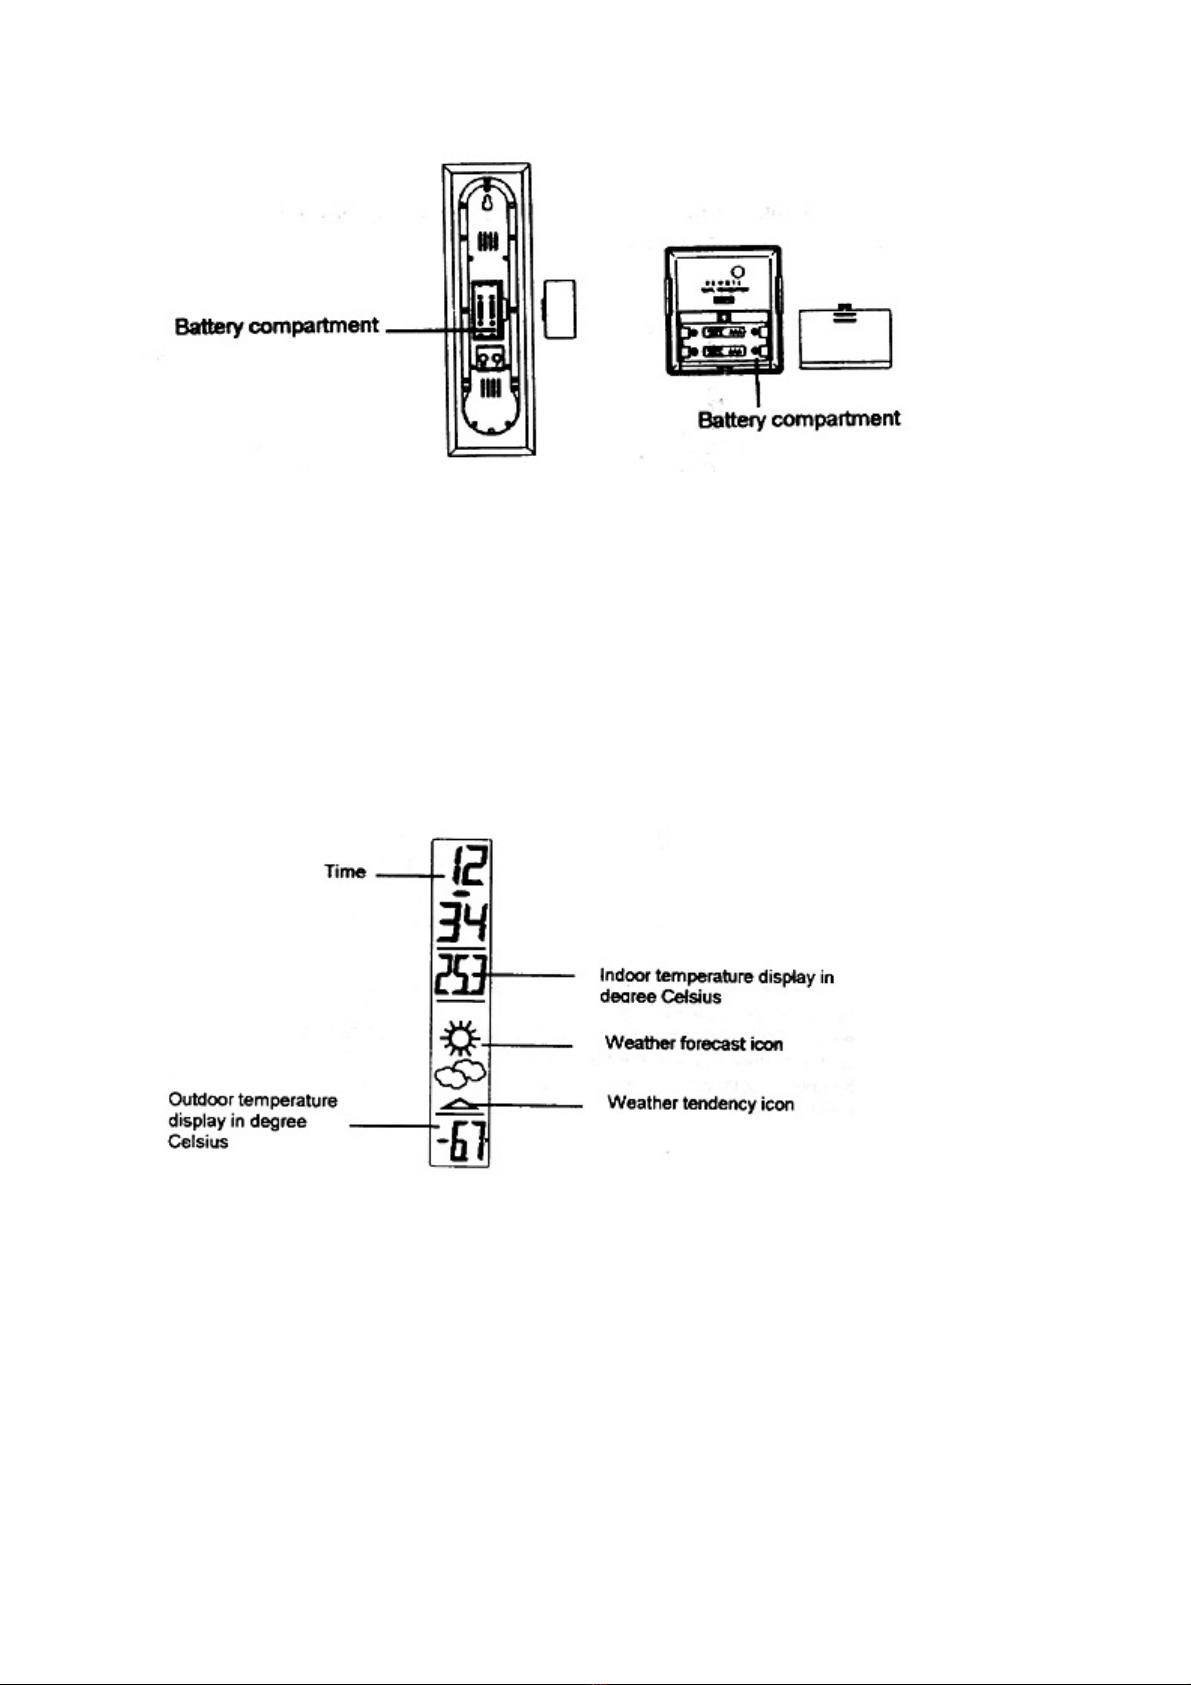
Battery Change:
It is recommended to replace the batteries in all units on an annual basis to ensure optimum
accuracy of these units.
Please participate in the preservation of the environment. Return used batteries to an
authorized depot.
CARE AND MAINTENANCE:
- Extreme temperatures, vibration and shock should be avoided as these may cause damage
to the units and give inaccurate forecasts and readings.
- When cleaning the display and casings, use a soft damp cloth only. Do not use solvents or
scouring agents as they may mark the LCD and casings.
- Do not submerge the units in water.
- Immediately remove allow powered batteries to avoid leakage and damage. Replace only
with new batteries of the recommended type.
- Do make any repair attempts to the units. Return it to its original point of purchase for repair
by a qualified engineer. Opening and tampering with the unit may invalidate its guarantee.
- Do not expose the unit to extreme and sudden temperature changes, this may lead to rapid
changes in forecasts and readings and thereby reduce its accuracy.
SPECIFICATIONS:
Temperature measuring range
- Indoor 0.0 °C to +40.0 °C with 0 1 °C resolution (OFL displayed if outside this range)
- Outdoor -29.9 °C to +69.9 °C with 0.1 °C resolution (OFL displayed if outside this range)
Temperature checking intervals
- Indoor every 10 seconds
- Outdoor 2 times in every 10 minutes
Transmitter temperature update every 60 seconds
Transmitting Frequency 43392 MHz
Temperature transmitting range maximum 25 meters (Open space and free from
interference)
Power source
- Weather Station 2 x AAA, IEC LR3, 15V
- Transmitter 2 x AAA, IEC LR3, 15V
Battery life for both units Approximately 12 months (Alkaline batteries recommended)
Dimensions (L x W x H)

- Weather Station 75 x 21 x 255 mm
- Transmitter 59 x 21 x 65 mm
LIABlLITY DISCLAIMER:
- The manufacturer and supplier cannot accept any responsibility for any incorrect readings
and any consequences that occur should an inaccurate reading take place.
- This product is not to be used for medical purposes or for public information.
- This product is only designed to be used in the home as indication of the future weather
and is not 100% accurate. Weather forecasts given by this product should be taken only as
an indication and not as being totally accurate.
- The specifications of this product may change without prior notice.
- This product is not a toy. Keep out of the reach of children.
- No part of this manual may be reproduced without written consent of the manufacturer.
Table of contents
Other TFA Weather Station manuals
Popular Weather Station manuals by other brands

Auriol
Auriol 283582 Operation and safety notes

La Crosse Technology
La Crosse Technology 308-1425B instruction manual

elv
elv WS 250US Edition operating instructions

Ambient Weather
Ambient Weather WS-1175 user manual

Oregon Scientific
Oregon Scientific BAR686 user manual

Auriol
Auriol Z30398 Operation manual