TFA IQ-WS 35.1040 User manual

25
Hanging hole
Battery
compartment
LCD Display
Function
Keys on both
sides of the
weather station
Foldable
stand
TFAIQ-WS 35.1040
INTELLIGENTWEATHER STATION
Instruction Manual
INTRODUCTION:
Congratulations on purchasing thisstate-of-the-art weather station as an example of excellent
design and innovative measuring technique. Featuring radio controlled time, date,calendar,
weather forecast,moon phase, indoor and outdoor temperature and humidity, air pressure and
various alarm settingsfor different weather conditions,this weather station will never keep you
guessing on currentand future weather conditions. Operation ofthisproduct issimple and
straightforward. Byreading this operating manual, the user will however receive a better
understanding of the Intelligent Weather Station together with the optimum benefit of all its
features.
FEATURES:
The IntelligentWeather Station
•DCF-77 Radio controlled time with manual setting option
•DCF reception ON/OFF (user selectable)
•12/24 hour time display
•Time zone option ±12 hours
•Calendar display(weekday,date, month, year)
•Time alarm settings
•12 Moon phasesdisplaythroughoutthe year
•Weather forecasting with 4weather icons and weather tendencyindicator
•Temperature displayin °C/ºF
•Humiditydisplayas RH%
•Indoor temperature and humiditydisplaywith MIN/MAXand time/date of recording
•Indoor comfort indicator
•Low/High indoor temperature alarm
•Low/High indoor humidityalarm
•Outdoor temperature and humiditydisplaywithMIN/MAXand time/date of recording
•Low/High outdoor temperature alarm
•Low/High outdoor humidityalarm
•Relative air pressure unit inhPa, inHg, or mmHg
•Air pressure tendencyindicator for last 36h (bar graph format)
•Lowpressure alarm
Weather
information text

26
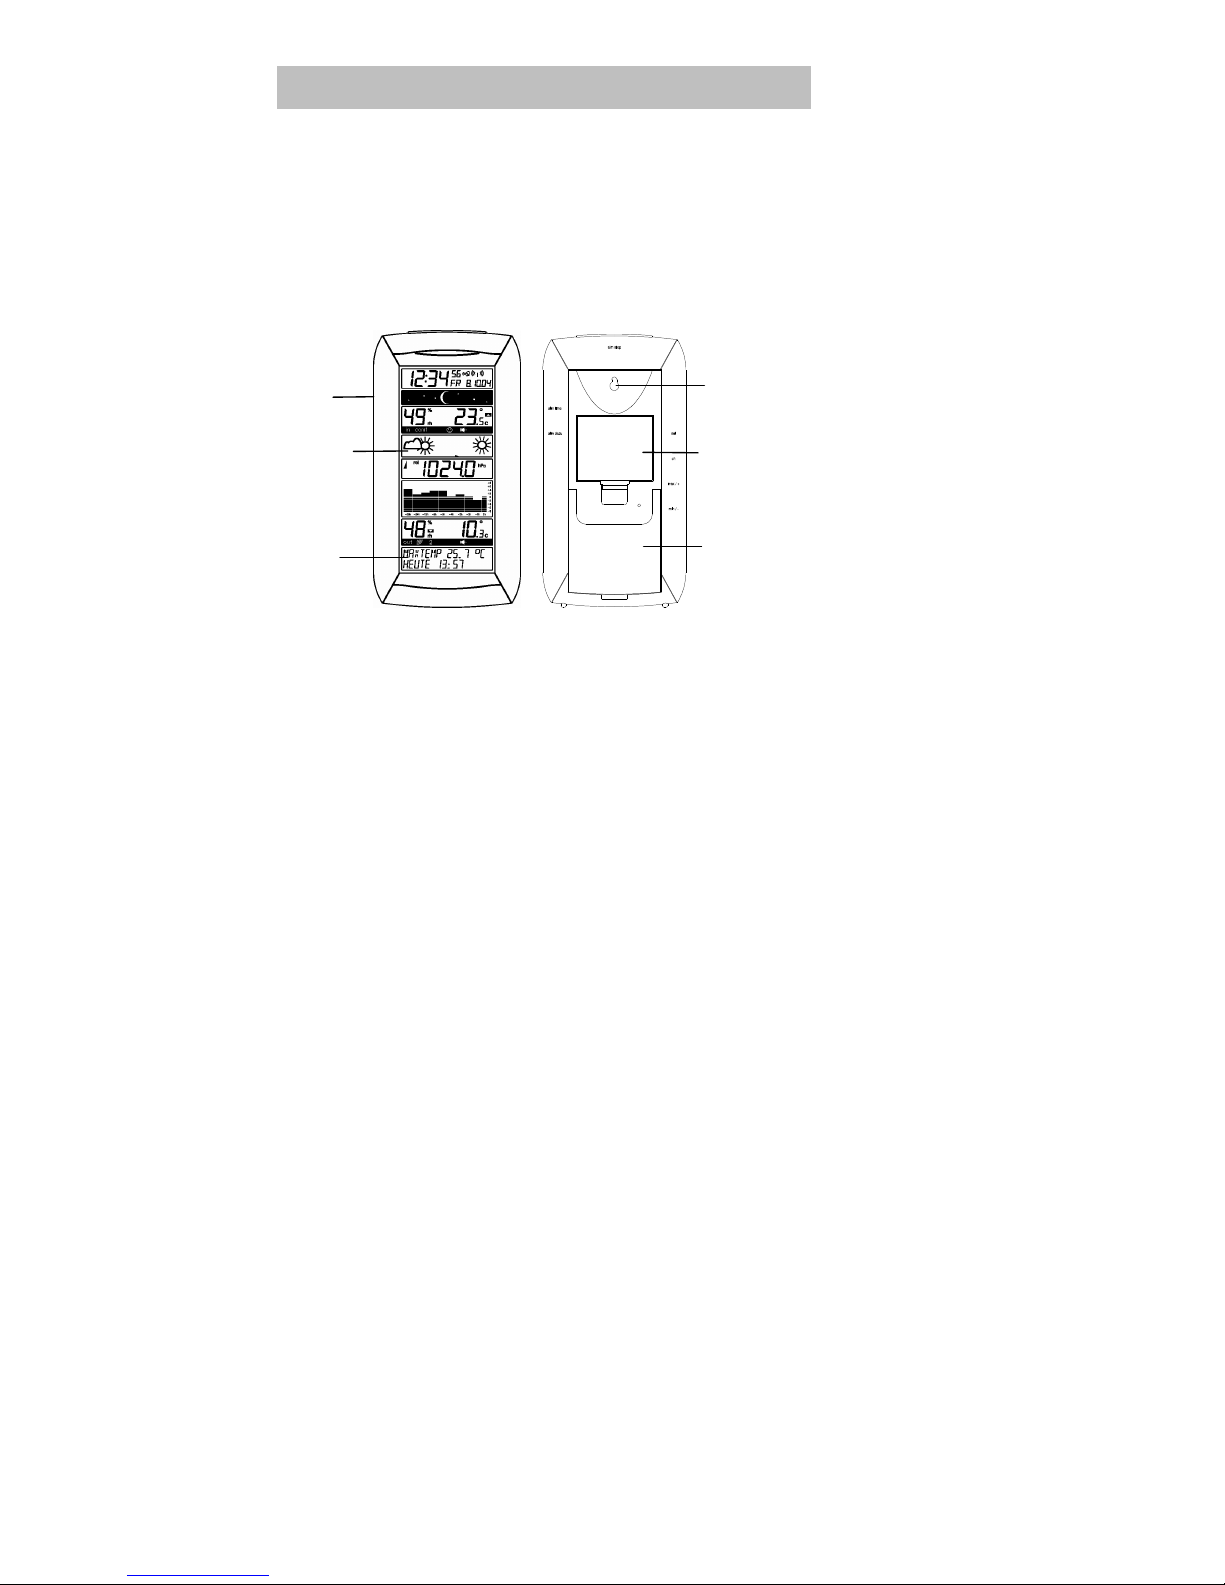
•“Intelligent”weather information display
•Can receive up to 3 transmitters
•LCD contrastselectable
•Lowbatteryindicator
•EL back-light
•Displayin3 languages selectable: German, English and French
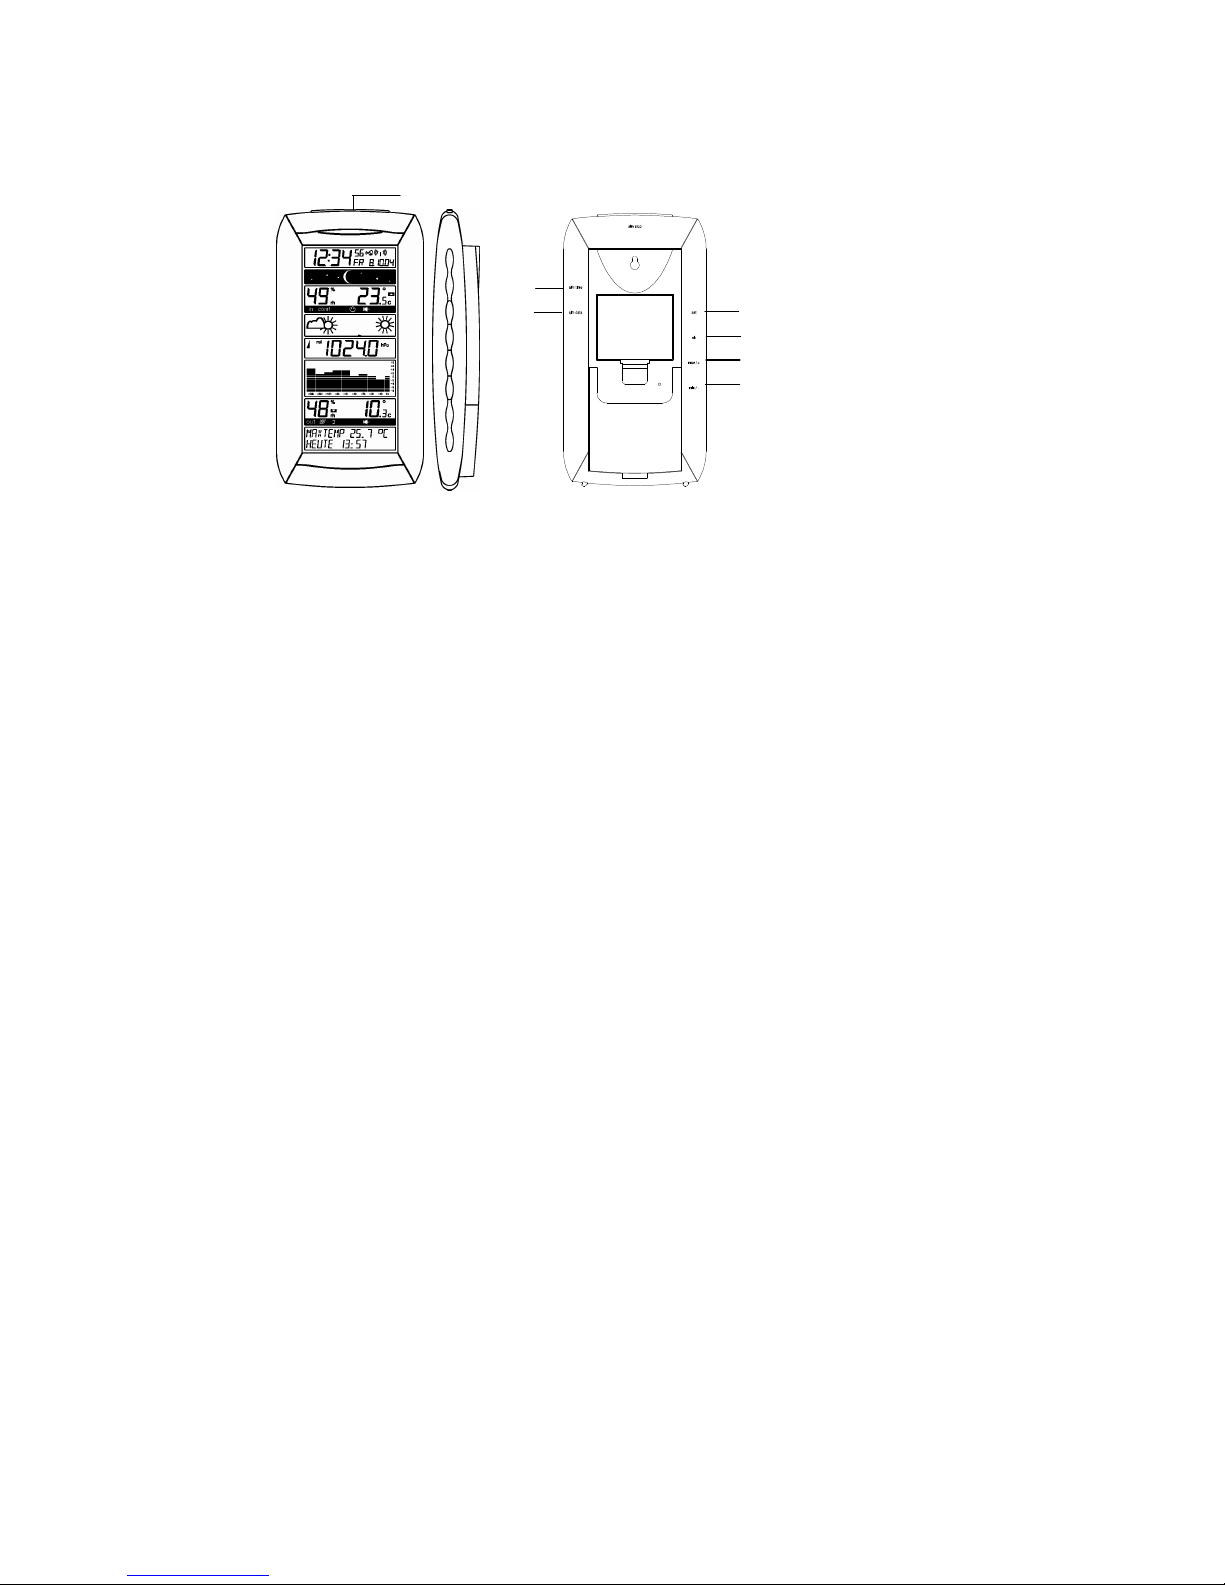
•Wall mounting or table standing
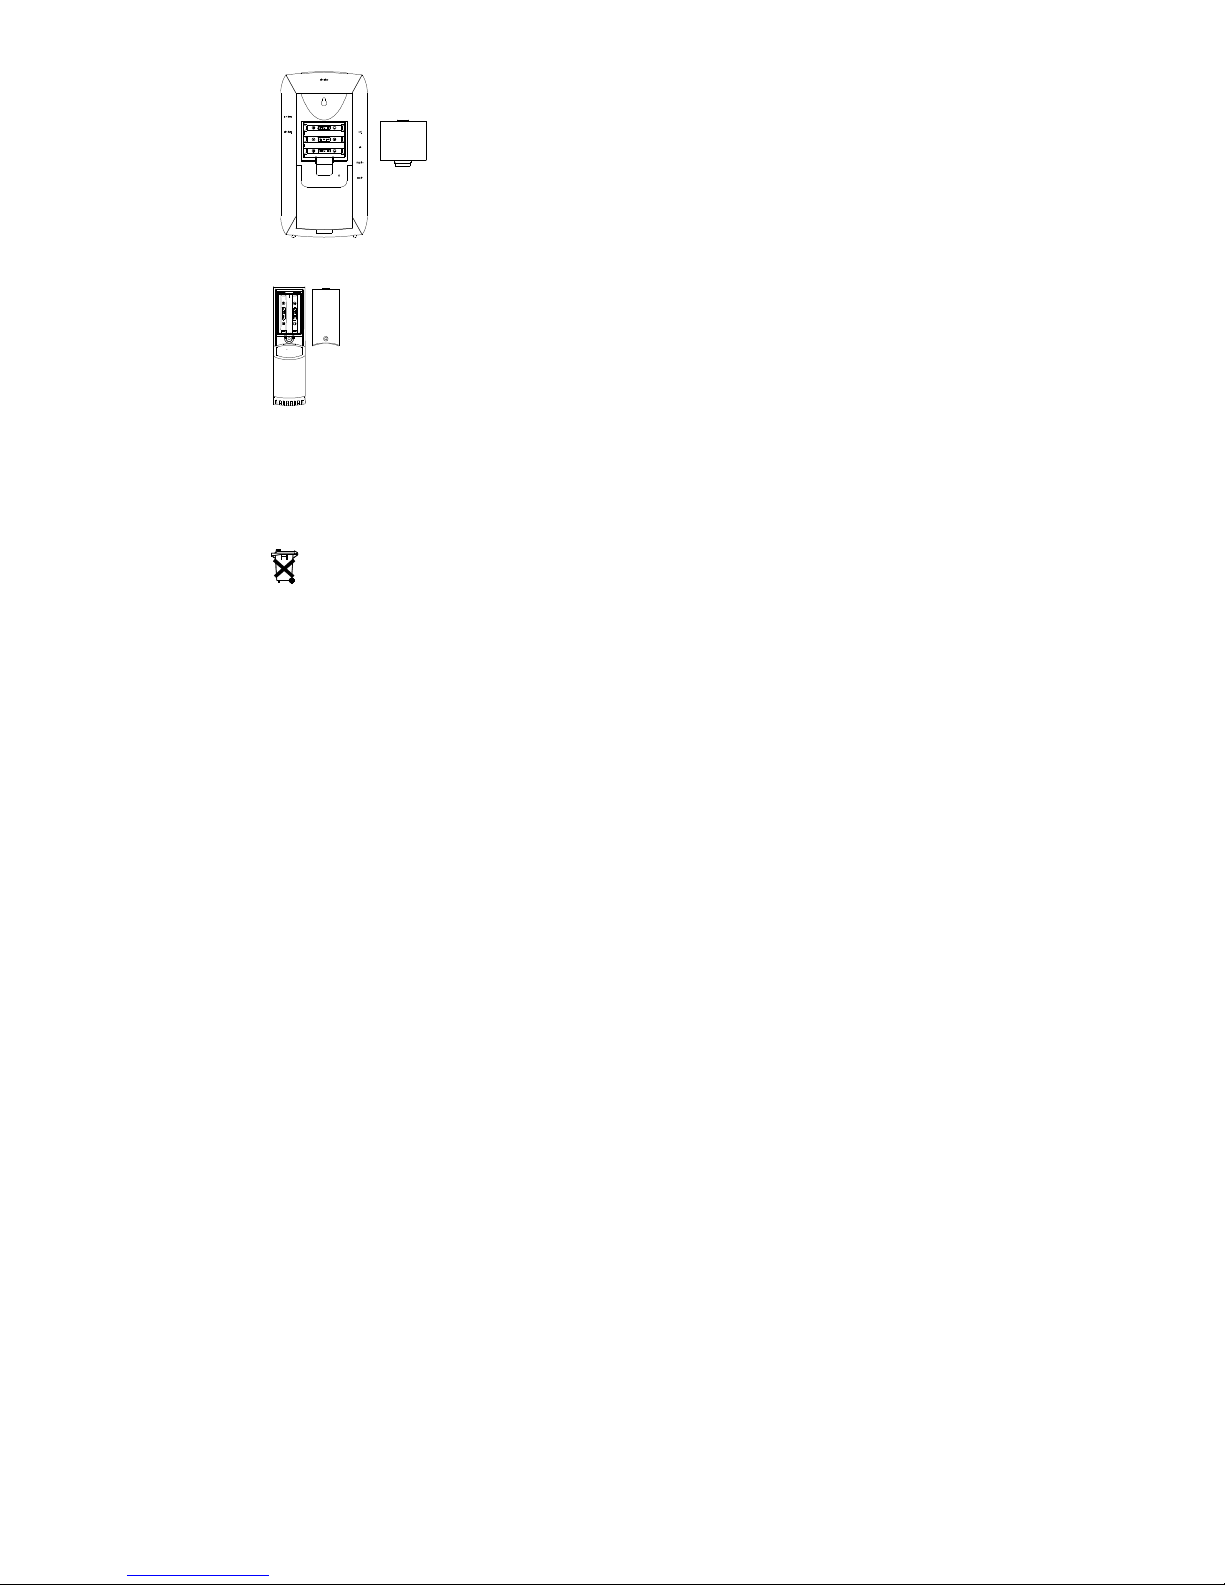
The Thermo-hygroTransmitter
•Remote transmission of outdoor temperature and humidityto Weather
Station by433 MHz
•Shower proof casing
•Wall mounting case
•Mounting at a sheltered place. Avoid direct rain and sunshine
SETTING UP:
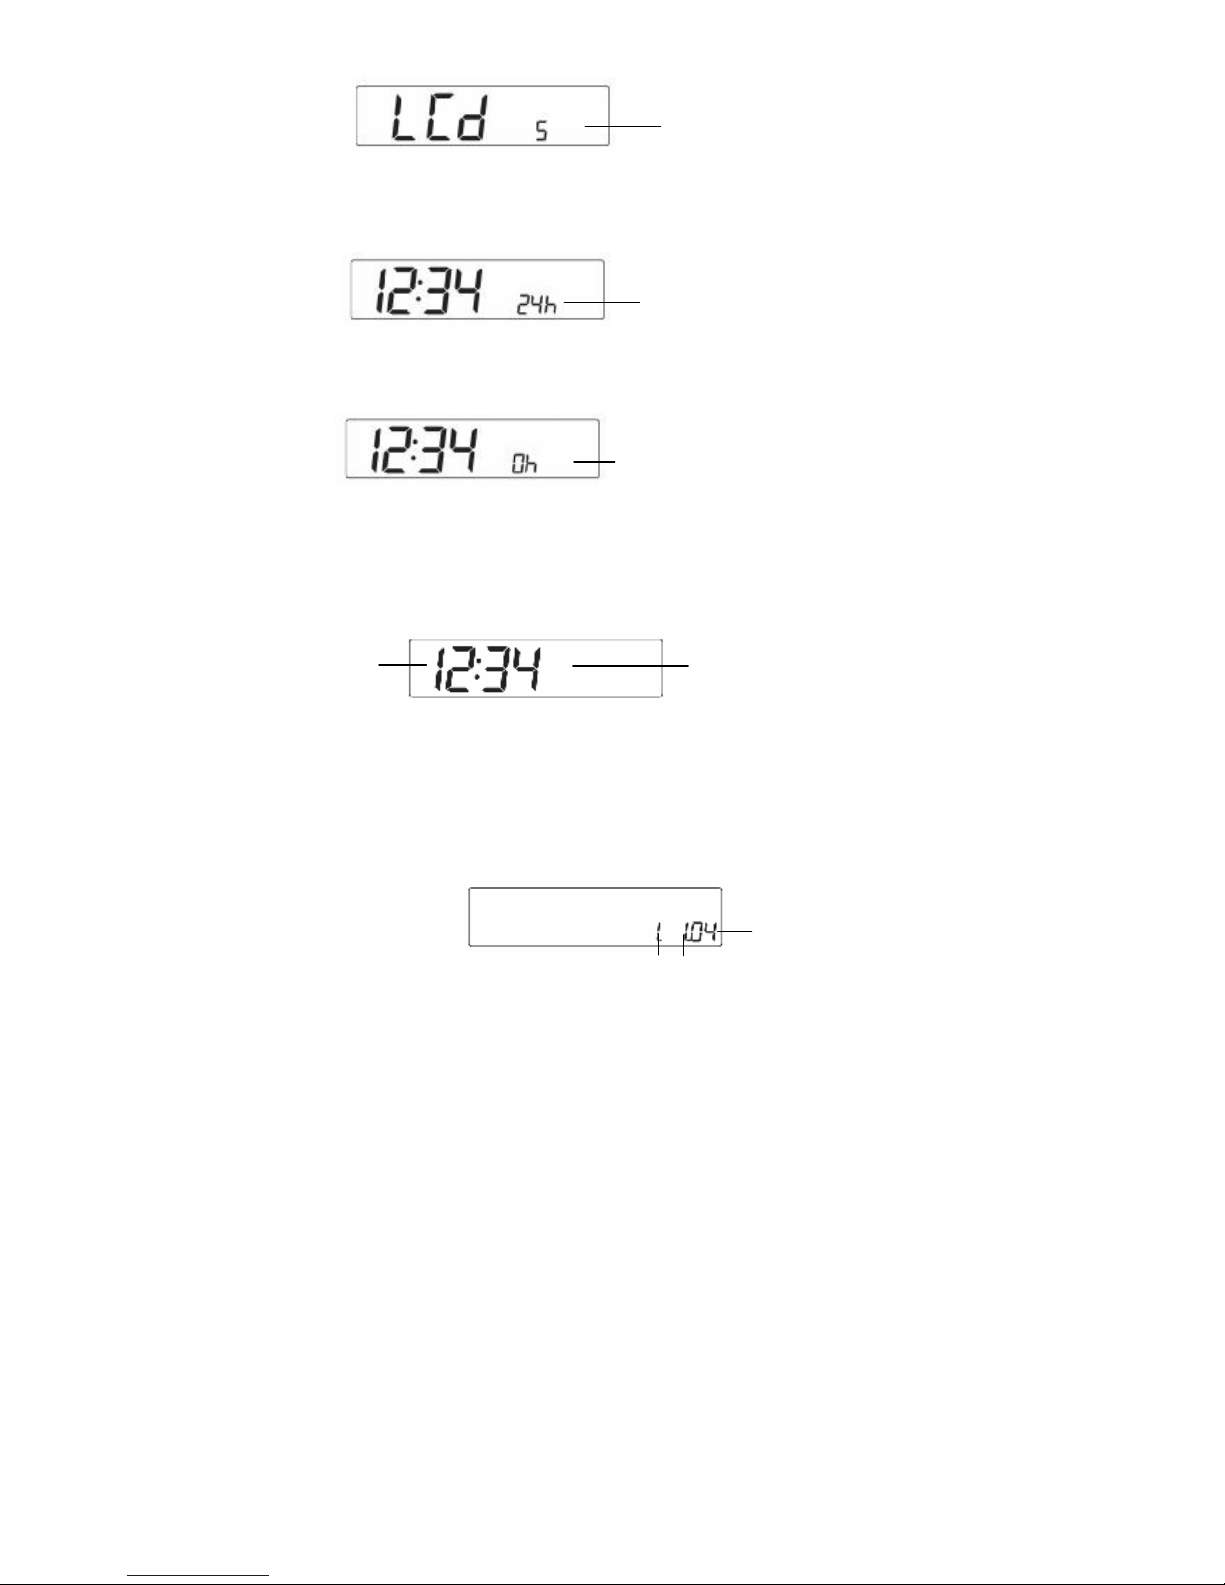
1. First, insertthe batteries into the Weather Station (see “How to install and replace
batteries in the Weather Station”below). Once the batteries are in place, all segments of
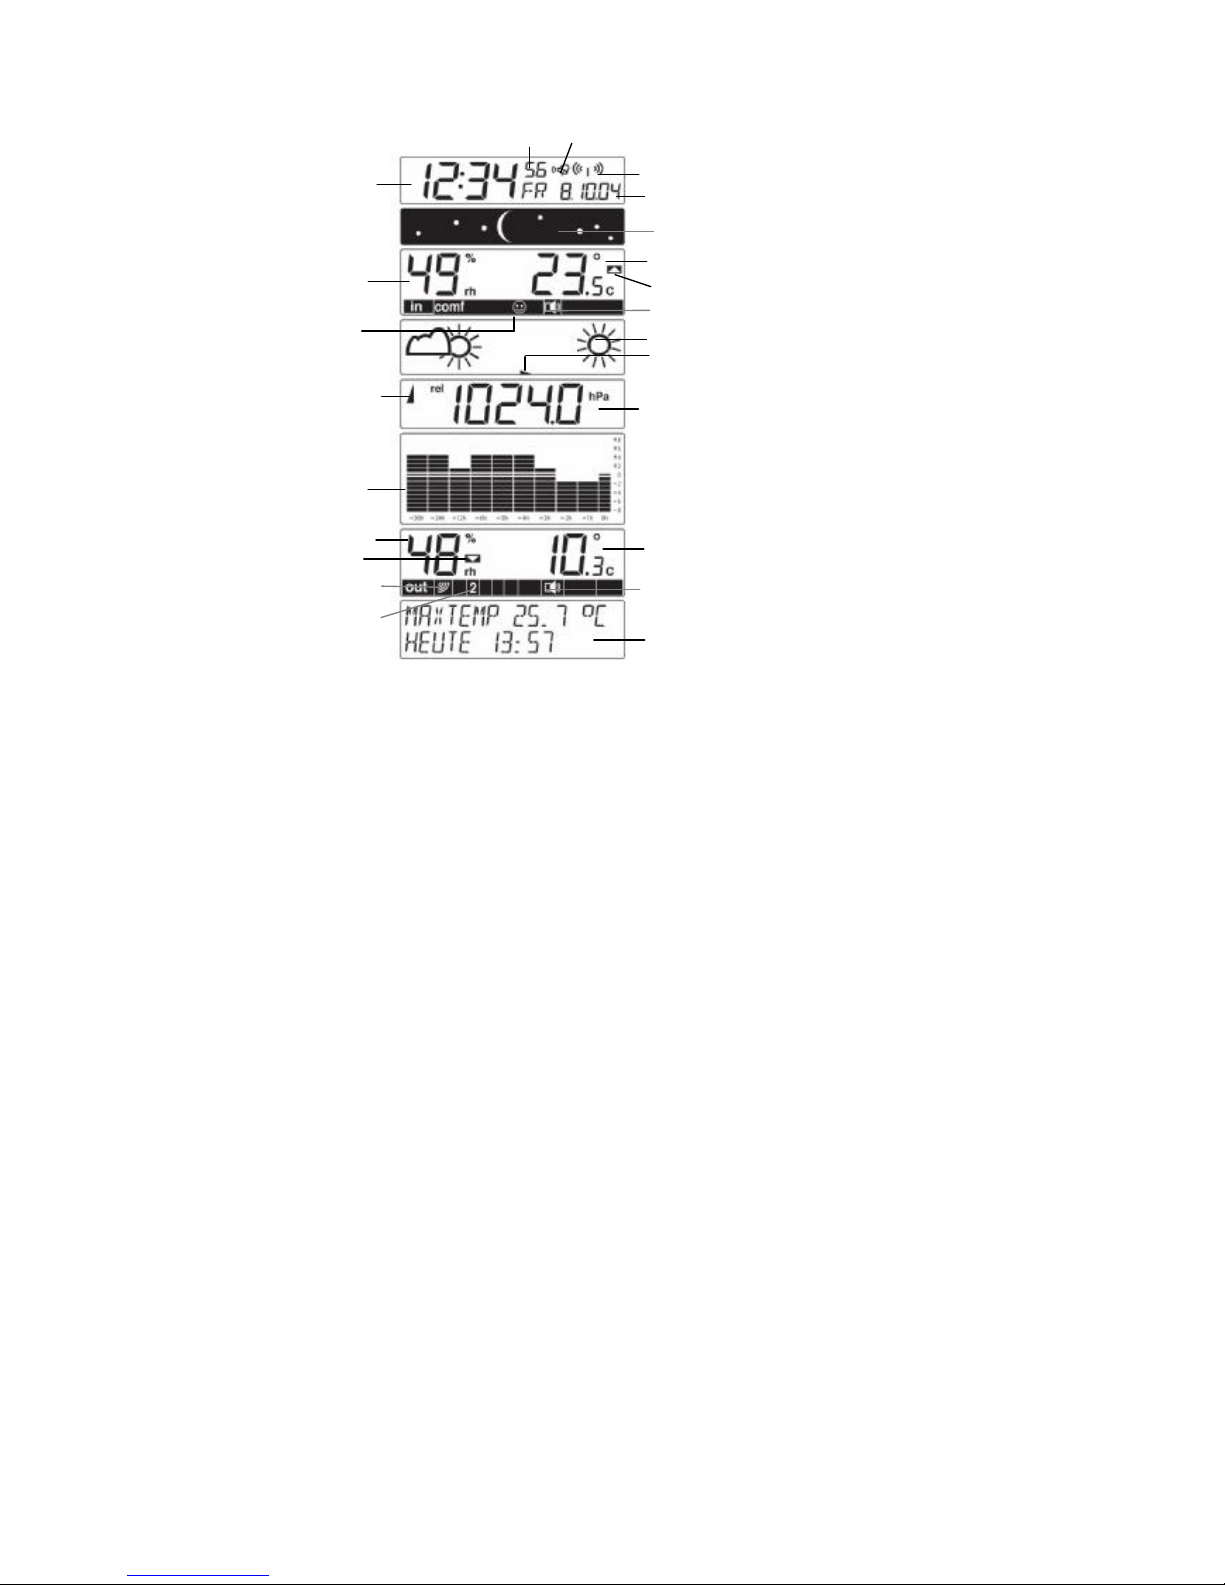
the LCD will lightup brieflyand a short signaltone willsound. Following the displayof the
time as 0:00, the seconds, the date as 1.1.04,the moon and stars icons, the weather icons,
air pressure 1013.0 hPa and some weather information, the indoor temperature and
humiditywill be measured. If the indoor temperature and humidityare not displayed after 30
seconds,remove the batteriesand waitfor at least 15 seconds before reinserting them.
Once the indoor data is displayed proceed to step 2.
2. Within 3 minutes of activating the Weather Station,place the batteriesinto the transmitter
(see “How to installand replace batteries in the Outdoor Thermo-hygrotransmitter“
below).
3. After inserting the batteries into the transmitter, the Weather Station will start receiving data
from the transmitter. The outdoor temperature and humidityshould then be displayed on the
Weather Station. Ifthis does not happen after 3 minutes, the batteries will need to be
removed from both units and resetfrom step 1.
4. The Weather Station can receive up to3 remote Thermo-hygro transmitters. If you have
purchased additionaltransmitters, repeat from step 2 for all extra transmitters.However,
ensure that you leave 10 secondsin between the reception of the lasttransmitter and the
set-up of the following transmitter.The Weather Station will number the transmittersin the
order of set-up, i.e. the first transmitter will have the temperature and humiditydisplayed
with the number 1 against itand so on.
5. With less than 3 transmitters received, the weather station will tryto pickup the remaining
one in approximately3 minutes.If3 transmitters are received, the weather station will stop
further reception.
6. Once the outdoor temperature and humidityreception has been completed and data had
been displayed on the Weather Station,the DCF-77 time code reception isautomatically
started. This takes typicallybetween 3-5 minutes in good conditions.
7. Ifafter 10 minutes, the DCF time has not been received, use the SET keyto manuallyenter
a time initially. The clockwill automaticallyattemptto receive the DCF time from 2:00 to
6:00 am for a successful reception. When DCF signal reception is successful, the received
time will override the manuallysettime.The date is also updated with the received time.
The nextreception attempt will occur on the following day.(Please refer also to noteson
“Radio controlled Time Reception” and “Manual Time Setting”).
HOW TO INSTALL AND REPLACE BATTERIES IN THE WEATHER STATION
The Weather Station uses3 xAA, IEC LR6, 1.5V batteries.When batteries need to be replaced,
the lowbatterysymbol will appear on the LCD.

27
To install and replace the batteries, please follow the steps
below:
1. Insert finger or other solid objectin the space at the
bottom center of the batterycompartment and lift up to
remove the cover.
2. Insert batteries observing the correct polarity(see
batterycompartment marking).
3. Replace batterycover.
HOW TO INSTALL AND REPLACE BATTERIES IN THE OUTDOOR THERMO-
HYGRO TRANSMITTER
The outdoor Thermo-hygro transmitter uses 2xAA IEC LR6, 1.5Vbatteries. To
install and replace the batteries, please follow the stepsbelow:
1. Remove the batterycover at the front side with a small screwdriver.
2. Insert the batteries,observing the correct polarity(see battery
compartmentmarking).
3. Replace the batterycover on the unit.
Note:
In the event of changing batteries in anyof the units, all units need to be reset byfollowing the
setting up procedures. This is becausea random securitycode is assigned bythe transmitter at
start-up and thiscode must be received and stored bythe Weather Station in the first 3 minutes
of power being supplied to it.
BATTERY CHANGE:
Itis recommended to replace the batteries in all units on an annual basis to ensure optimum
accuracyofthese units.
Please participate in the preservation of the environment. Return used batteries
to an authorised depot.
DCF-77 RADIO CONTROLLED TIME RECEPTION:
The time base for the radio controlled time is a Cesium Atomic Clockoperatedbythe
Physikalisch Technische BundesanstaltBraunschweigwhich has a time deviation of less than
one second in one million years.The time is coded and transmitted from Mainflingen near
Frankfurtvia frequencysignal DCF-77 (77.5 kHz) and hasa transmitting range of approximately
1,500 km. Your radio-controlled Weather Station receives this signal and converts it to showthe
precise time in summer or wintertime.
The qualityof the reception depends greatlyon the geographic location. In normal cases, there
should be no reception problems within a 1,500km radius around Frankfurt.
After the temperature and humidityreception is completed in initialsetup, the DCF tower icon in
the clockdisplaywill start flashing in the upper right corner of the firstsection of the LCD. This
indicates that the clockhasdetected the presence of a radio signal and is trying to receive it.
When the time code is received, the DCF tower becomes permanentlylit and the radio-
controlled time will be displayed.
Ifthe tower icon flashes, butdoes notset the time or the DCF tower doesnot appear at all, then
please take note of the following:
•Recommended distance to anyinterfering sourceslike computer monitorsor TV sets isa
minimum of 1.5 - 2 meters.
•Within ferro-concrete rooms (basements, superstructures), the received signal is naturally
weakened. In extreme cases, pleaseplace the unit close toawindow and/or point its front
or backtowards the Frankfurt transmitter.

28
ALM STOP key
•During nighttime, the atmospheric disturbances are usuallyless severe and reception is
possible in most cases. A single dailyreception is adequate to keep the accuracy
deviation below1 second.
FUNCTION KEYS:
Weather Station:
The Weather Station has6 easyto use function keys on the sidesand 1 keyon the top
SET key
•Press and hold the keyto enter manualsetting modes: LCD contrast,12/24 hour time
display, time zone, manual time setting,calendar, DCF ON/OFF, ºC/ºF temperature unit,
pressure unit,relative pressure setting and language display
•Alarm time set inside alarm time setting mode
•Confirm keyinside weather alarm setting mode
•Resetindividual MIN/MAX temperature/humidityrecord
•Combine with the CH keyto re-detecta newtransmitter in displayed channel
•Stop the alarm during the time alarm or weather alarm ringing
•Back-light ON
CH key(Channel key)
•Select channel 1, 2,or 3 (if more than 1 transmitter is used)
•Exit setting mode
•Re-detect newtransmitters signal for all channels
•Combined with the set keyto re-detect a newtransmitter in displayed channel
•Stop the alarm during the time alarm or weather alarm ringing
•Back-light on
MAX/+ key
•DisplayMAX indoor and outdoor temperature and humidityrecords with time ofrecording
•Activate/deactivate the time alarm
•Increase the alarm time (hour and minutes)
•Increase allvalues in manualsetting modes
•Activate/deactivate the weather alarm
•Increase the weather alarm values
•Stop the alarm during the time alarm or weather alarm ringing
•Back-light on
ALM TIME
key
SET key
MAX/+ key
CH key
MIN/- key
ALM
DATA key

29
•Resetall MIN/MAX records
MIN/- key
•DisplayMINindoor and outdoor temperature and humidityrecords with time of recording
•Activate/deactivate the time alarm
•Decrease the alarm time (hour and minutes)
•Decrease all values in manual setting modes
•Activate/deactivate the weather alarm
•Decrease the weather alarm values
•Stop the alarm during the time alarm or weather alarm ringing
•Back-light on
•Resetall MIN/MAX records
ALM TIME key
•Enter the alarm time setting mode
•Stop the alarm during the time alarm or weather alarm ringing
•Back-light on
ALM Data key
•Enter the weather alarm time setting mode
•Stop the alarm during the time alarm or weather alarm ringing
•Set nextweather alarm in weather alarm setting mode
•Back-light on
•Read out alarm data infoon textdisplayafter weather alarm occurred
ALM STOPkey
•Stop the alarm during the time alarm or weather alarm ringing
•Back-light on
•Disable the weather alarm sound

30
Air pressure history
bar graph
LCD SCREEN
The LCDscreen is split into 8 sections displaying the information for time and date, moon
phase, indoor data, weather forecast, air pressure, air pressure history,outdoor data,
“intelligent” weather information display.
MANUAL SETTINGS:
The following manual settings can be changed when pressing and holding the SET keyfor
approximately3 seconds:
•LCD contrastsetting
•12/24 hour time display
•Time zone setting
•Manualtime setting
•Calendar setting
•DCF-77 time reception ON/OFF setting
•°C/°F temperature unit setting
•Air pressure unit setting
•Relative pressure value setting
•Language displaysetting
Outdoor temperature
in °C or ºF
Indoor generalalarmicon
Seconds display
Indoor relative
humidity in RH%
Air pressure
tendency indicator
Indoor Temperature
in °C or ºF
Outdoor transmitter
identification number
Calendar display
DCF reception icon
(for DCF time)
Moon icon/Moon phases
icon/ Star icons
Weather forecast
icon
Weather tendency
indicator
Outdoor signal
reception indicator
Relative air pressure
display in hPa, inHg,
or mmHg
Intelligent weather
display information in
German, English or
French
Indoor comfort
indicator
Outdoor general
alarmicon
Time display
Time alarmicon
High alarmicon
Outdoor relative
humidity in RH%
Lowalarmicon

31
Year
Date Month
LCD CONTRASTSETTING
The LCDcontrast can be set within 8 levels, from LCD 1 to LCD8 (defaultsetting is LCD 5):
1. Press and hold the SET keyfor around 3 seconds until the digit startflashing.
2. Use the MAX/+ or MIN/- keyto view all levels of contrast.
3. Select the desired LCD contrast. Confirm with the SET keyand enter in the 12/24 Time
Displaysetting.
12/24 HOUR TIME DISPLAY SETTING:
The time displaycan be set to viewtime as 12/24 hour format. The default time displaymode is
“24h”.To set to “12h” time display:
1. Use the MAX/+ or MIN/- keyto toggle the value.
2. Confirm with the SET keyand enter the Time Zone setting.
TIME ZONE SETTING
The time zone can be set ±12 hour.The default time zone is setto “ 0h”. To set a differenttime
zone:
1. The currenttime zone value starts flashing.
2. Use the MAX/+ or MIN/- keyto set the time zone. The MAX/+ keyincreasesthe value and
the MIN/- keydecreases the value in consecutive1 hour intervals.
3. Confirm with the SET keyand enter the Manual Time setting.
MANUAL TIME SETTING:
In case the Weather Station cannot detect the DCF-signal (for example due todisturbances,
transmitting distance, etc.), the time can be manuallyset.The clock will then workas a normal
Quartzclock.
1. The hour digit will start flashing.
2. Use the MAX/+ or MIN/- keyto set the hour.
3. Press again the SET keyto switch to the minutes. The minute digits start flashing.
4. Use the MAX/+ or MIN/- keyto set the minutes.
5. Confirm with the SET keyand enter the Calendar setting.
Note:
The unit will still tryto receive the signal between 2:00 and 6:00 am everydaydespite itbeing
manuallyset, if the DCF reception function has been set ON. When it does receive the signal, it
will change the manuallyset time into the received time. During reception attempts the DCF
tower icon will flash. Ifreception has been unsuccessful, then the DCF tower icon will notappear
but reception will still be attempted the following hour.
CALENDAR SETTING:
Last digit flashing
Digit flashing
Minutes
flashing
Hour flashing
Digit flashing
Note:
Date, Month, Year (for 24h display)
Month, Date, Year (for 12h display)

32
The date default of the Weather Station is 1. 1. in the year 2004. Once the radio-controlled time
signals are received, the date isautomaticallyupdated. However, if the signals are not received,
the date can also be setmanually.
1. The year starts flashing.
2. Use the MAX/+ or MIN/- keyto set the year. The range runs from 2004 to 2030.
3. Press the SET keyagain to confirm and to enter the month setting.The month starts
flashing.
4. Use the MAX/+ or MIN/- keyto set the month.
5. Press the SET keyagain to confirm and to enter the date setting mode. The date starts
flashing.
6. Use the MAX/+ or MIN/- keyto set the date.
7. Confirm all calendar settings with the SET keyand enter the DCFTime Reception
ON/OFF setting.
DCF TIME RECEPTION ON/OFF SETTING
In area where reception of the DCF time is not possible, the DCF time reception function can be
turned OFF.The clock will then workas a normalQuartz clock. (Defaultsetting is ON).
1. The digit “ON” will start flashing on the LCD.
2. Use the MAX/+ or MIN/- keyto turn OFF the time reception function.
3. Confirm with the SET keyand enter the ºC/ºF Temperature Unit setting.
Note:
If the DCF time reception function isturned OFF manually,the clock will not perform any
reception of the DCF time as long as the DCF OFF function is activated.
The DCF reception icon will not be displayed on the LCD.
°C/°FTEMPERATURE UNITSETTING
The temperature displaycan be selected to showtemperature data in °Cor °F.(default °C)
1. Use the MAX/+ or MIN/- keyto toggle between “°C” or “°F”.
2. Confirm with the SET keyand enter the Air Pressure Unit setting.
RELATIVE AIR PRESSURE UNITSETTING
The relative air pressure unit can be set in hPa, inHg or mmHg unit. (default unit is in hPa).
1. Use the MAX/+ or MIN/- keyto toggle between “hPa”, “inHg” or “mmHg”
2. Confirm with the SET keyand enter the Relative Pressure Value setting.
Note:
The default reference pressure value ofthe barometer is 1013 hPa. For an exact
measurement it is necessaryto first adjust the barometer to your local relative air
pressure (related to elevation above sea level). Askfor the present atmosphericpressure of
your home area (Local weather service, www,optician, calibrated instruments in public
buildings,airport).
RELATIVE PRESSURE VALUE SETTING
The default relative pressure value is1013 hPa (29.91 inHg). This corresponds to the average
air pressure. Pressure below thisis referred to as low-pressure area (weather to become
Flashing
Flashing
Flashing

33
Time alarmicon
Digit flashing
worse), pressure above ashigh-pressure area (weather to improve). The relative air pressure
can be manuallyset to another value within the range of 960 – 1040 hPa (28.30 – 30.80 inHg or
720 – 781 mmHg) for abetter reference.
1. The currentrelative pressure value will startflashing
2. Use the MAX/+ or MIN/- keyto increase or decrease the value. Keep holding the key
allowsthe value to advance faster.
3. Confirm with the SET keyand enter the Language displaysetting.
Note:
This calibration facilityis useful for those usersliving atvarious elevationsabove sea level, but
wanting their air pressure displaybased on sea level elevation.
LANGUAGE DISPLAY SETTING:
The language for the calendar and “Intelligent” weather information displaycan be set to view in
German (D), English (E) or French (F). Default setting is German.To set another language:
1. Use the MAX/+ or MIN/- keyto set the desire language.
2. Confirm with the SET keyand exit the Manual settings.
TO EXITTHE MANUAL SETTING MODE
To exit the manual setting anytime during the manual setting modes,press the CH keyanytime
or wait for automatic timeout. The mode will return to normal time display.
TIME ALARMSETTING
The alarm time can be set when pressing the ALM TIME key.
1. Press and hold the ALM TIME keyuntilthe “ALARM” digits are shownand flash. Use the
MAX/+ or MIN/- keyto setthe alarm ON/OFF. The time alarm icon “ “ is shown to
indicate that the alarm isON.
2. Press the SET keytoenter the alarm time set mode.The hour digitstart flashing
3. Press the MAX/+or MIN/- keyto set the hour.
4. Press the SET keyto switch to the minutes.The minute digits start flashing.
5. Use the MAX/+ or MIN/- keyto set the alarm minutes.
6. Confirm with the SET keyand exit the Time Alarm setting or wait for automatic timeout.
Note: The maximum alarm ring duration is2 minutes.
To stop the alarm, press anykeyduring alarm ringing.
WEATHER ALARMSETTING
The “Intelligent” Weather Station can be setto alert when a specific weather condition is reach.
The following Weather Alarm settings can be changed when pressing and holding the
ALM DATA keyfor approximately3 seconds:
•LOWindoor temperature alarm
•HIGH indoor temperature alarm
•LOWoutdoor temperature alarm
Alarmtime

34
•HIGH outdoor temperature alarm
•LOWindoor humidityalarm
•HIGH indoor humidityalarm
•LOWoutdoor humidityalarm
•HIGH outdoor humidityalarm
•LOWair pressure alarm
Default alarm values:
Temperature Low 0ºC
High 30ºC
Humidity Low 20%
High 90%
Air pressure Low 1000hPa
LOW INDOORTEMPERATURE ALARMSETTING
Note:
After pressing the ALM DATA keywithin the LOWindoor temperature alarm setting there are the
following individualsub-settings.
To set the LOWindoor temperature alarm (default OFF):
I. Buzzer ON/OFF (alarm sounding):
1. Press the ALM STOP keyto set buzzer ON/OFF. The “ “ icon will appear if the
buzzer alarm is ON.No acousticalarm signal will be heard when the weather alarm
is trigged if buzzer is set OFF.
II. Set the alarm ON/OFF:
1. Press the MAX/+or MIN/- keyto activate the alarm ON/OFF.
III. Set the alarm value (default 0ºC)
1. Press the SET keytoenter the alarm value setting (alarm value flashing)
2. Use the MAX/+ or MIN/- keyto set the alarm value.
3. Press the SET keyto confirm and enter the HIGHindoor temperature alarm
setting.
IV. Ifno LOWindoor temperature setting isneeded, please press the ALM DATA keyto enter
the HIGH indoor temperature alarm setting.
HIGH INDOORTEMPERATURE ALARMSETTING
Note:
Within the HIGHindoor temperature alarm setting there are optional sub-settings which can be
set individually.
To set the HIGHindoor temperature alarm (default OFF):
I. Buzzer ON/OFF (alarm sounding):
1. Press the ALM STOP keyto set buzzer ON/OFF. The “ “ icon will appear if the
buzzer alarm is ON.No acoustic alarm signal will be heard when the weather alarm
is trigged if buzzer is set OFF.
II. Set the alarm ON/OFF:
1. Press the MAX/+or MIN/- keyto activate the alarm ON/OFF.
III. Set the alarm value (default 30ºC)
1. Press the SET keytoenter the alarm value setting (alarm value flashing)
2. Use the MAX/+ or MIN/- keyto set the alarm value.
3. Press the SET keyto confirm and enter the LOW outdoor temperature alarm
setting.
IV. Ifno HIGH indoor temperature setting is needed, please press the ALM DATA keytoenter
the LOWoutdoor temperature alarm setting.

35
LOW OUTDOOR TEMPERATURE ALARMSETTING
Note:
Within the LOWoutdoor temperature alarm setting there are optional sub-settings which can be
set individually.Note: The outdoor temperature alarm can onlybe set for channel1
transmitter.
To set the LOWoutdoor temperature alarm (default OFF):
I. Buzzer ON/OFF (alarm sounding):
1. Press the ALM STOP keyto set buzzer ON/OFF. The “ “ icon will appear if the
buzzer alarm is ON.No acousticalarm signal will be heard when the weather alarm
is trigged if buzzer is set OFF.
II. Set the alarm ON/OFF:
1. Press the MAX/+or MIN/- keyto activate the alarm ON/OFF.
III. Set the alarm value (default 0ºC)
1. Press the SET keytoenter the alarm value setting (alarm value flashing)
2. Use the MAX/+ or MIN/- keyto set the alarm value.
3. Press the SET keyto confirm and enter the HIGHindoor temperature alarm
setting.
IV. Ifno LOWoutdoor temperature setting is needed, please press the ALM DATA keyto
enter the HIGHoutdoor temperature alarm setting.
HIGH OUTDOOR TEMPERATURE ALARMSETTING
Note:
Within the HIGHoutdoor temperature alarm setting there are optional sub-settings. Note: The
outdoor temperature alarm can onlybe set for channel 1transmitter.
To set the HIGHoutdoor temperature alarm (default OFF):
I. Buzzer ON/OFF (alarm sounding):
1. Press the ALM STOP keyto set buzzer ON/OFF. The “ “ icon will appear if the
buzzer alarm is ON.No acousticalarm signal will be heard when the weather alarm
is trigged if buzzer is set OFF.
II. Set the alarm ON/OFF:
1. Press the MAX/+or MIN/- keyto activate the alarm ON/OFF.
III. Set the alarm value (default 30ºC)
1. Press the SET keytoenter the alarm value setting (alarm value flashing)
2. Use the MAX/+ or MIN/- keyto set the alarm value.
3. Press the SET keyto confirm and enter the LOW indoor humidityalarm setting.
IV. Ifno HIGH outdoor temperature setting is needed,please pressthe ALM DATA keyto
enter the LOW indoor humidityalarm setting.
LOW INDOORHUMIDITYALARM SETTING
Note:
Within the LOWindoor humidityalarm setting there are optional sub-settings.
To set the LOWindoor humidityalarm (default OFF):
I. Buzzer ON/OFF (alarm sounding):
1. Press the ALM STOP keyto set buzzer ON/OFF. The “ “ icon will appear if the
buzzer alarm is ON.No acousticalarm signal will be heard when the weather alarm
is trigged if buzzer is set OFF.
II. Set the alarm ON/OFF:
1. Press the MAX/+or MIN/- keyto activate the alarm ON/OFF.
III. Set the alarm value (default 20%)
1. Press the SET keyto enter the alarm value setting (alarm value flashing)

36
2. Use the MAX/+ or MIN/- keyto set the alarm value.
3. Press the SET keyto confirm and enter the HIGHindoor humidityalarm setting.
IV. Ifno LOWindoor humiditysetting is needed, please press the ALM DATA keyto enter the
HIGH indoor humidityalarm setting.
HIGH INDOORHUMIDITYALARM
Note:
Within the HIGHindoor humidityalarm setting there are optional sub-settings.
To set the HIGHindoor humidityalarm (default OFF):
I. Buzzer ON/OFF (alarm sounding):
1. Press the ALM STOP keyto set buzzer ON/OFF. The “ “ icon will appear if the
buzzer alarm is ON.No acousticalarm signal will be heard when the weather alarm
is trigged if buzzer is set OFF.
II. Set the alarm ON/OFF:
1. Press the MAX/+or MIN/- keyto activate the alarm ON/OFF.
III. Set the alarm value (default 90%)
1. Press the SET keytoenter the alarm value setting (alarm value flashing)
2. Use the MAX/+ or MIN/- keyto set the alarm value.
3. Press the SET keyto confirm and enter the LOW outdoor humidityalarm setting.
IV. Ifno HIGH indoor humiditysetting is needed, please press the ALM DATA keyto enter the
LOW outdoor humidityalarm setting.
LOW OUTDOOR HUMIDITYALARM
Note:
Within the LOWoutdoor humidityalarmsetting there are optional sub-settings. Note: The
outdoor humidityalarm can onlybe set for channel 1 transmitter.
To set the LOWoutdoor humidityalarm(default OFF):
I. Buzzer ON/OFF (alarm sounding):
1. Press the ALM STOP keyto set buzzer ON/OFF. The “ “ icon will appear if the
buzzer alarm is ON.No acousticalarm signal will be heard when the weather alarm
is trigged if buzzer is set OFF.
II. Set the alarm ON/OFF:
1. Press the MAX/+or MIN/- keyto activate the alarm ON/OFF.
III. Set the alarm value (default 20%)
1. Press the SET keytoenter the alarm value setting (alarm value flashing)
2. Use the MAX/+ or MIN/- keyto set the alarm value.
3. Press the SET keyto confirm and enter the HIGHoutdoor humidityalarm setting.
IV. Ifno LOWoutdoor humiditysetting is needed,please pressthe ALM DATA keyto enter
the HIGH outdoor humidityalarm setting.
HIGH OUTDOOR HUMIDITYALARM
Note:
Within the HIGHoutdoor humidityalarm setting there are optional sub-settings. Note: The
outdoor humidityalarm can onlybe set for channel 1 transmitter.
To set the HIGHoutdoor humidityalarm (defaultOFF):
I. Buzzer ON/OFF (alarm sounding):
1. Press the ALM STOP keyto set buzzer ON/OFF. The “ “ icon will appear if the
buzzer alarm is ON.No acousticalarm signal will be heard when the weather alarm
is trigged if buzzer is set OFF.

37
II. Set the alarm ON/OFF:
1. Press the MAX/+or MIN/- keyto activate the alarm ON/OFF.
III. Set the alarm value (default 90%)
1. Press the SET keytoenter the alarm value setting (alarm value flashing)
2. Use theMAX/+ or MIN/- keyto set the alarm value.
3. Press the SET keyto confirm and enter the LOW air pressure alarm setting.
IV. Ifno HIGH outdoor humiditysetting isneeded,please pressthe ALM DATA keyto enter
the LOW Air Pressure alarm setting.
LOWAIR PRESSURE ALARMSETTING
Note:
Within the LOWair pressure alarm setting there are optional sub-settings.
To set the LOWair pressure alarm (default OFF):
I. Buzzer ON/OFF (alarm sounding):
1. Press the ALM STOP keyto set buzzer ON/OFF. The “ “ icon will appear if the
buzzer alarm is ON.No acousticalarm signal will be heard when the weather alarm
is trigged if buzzer is set OFF.
II. Set the alarm ON/OFF:
1. Press the MAX/+or MIN/- keyto activate the alarm ON/OFF.
III. Set the alarm value (default 1000hPa)
1. Press the SET keytoenter the alarm value setting (alarm value flashing)
2. Use the MAX/+ or MIN/- keyto set the alarm value.
3. Press the SET keyto confirm and exit the Weather Alarm settings.
IV. Ifno LOWair pressure alarm setting is needed, please press the ALM DATA keyto exit
the Weather Alarm setting.
Note:
The alarm icon “ “ or “ “will be shown innormaldisplaywhen the weather alarm isset
ON. To exit the weather alarm setting mode anytime, pressthe CH keyor wait for automatic
timeout. The mode will return to normaltime display.
WEATHER ALARMOPERATIONS
WEATHER ALARMS
The Weather alarms are settable for when certainweather conditionsare met according to the
users requirements. For example, the user can setthe thresholds for the outdoor temperature to
+40°C(high) and -10°C(low), whilst onlyenabling the high alarm and disabling the low alarm
(i.e. temperatures <-10°C won’t trigger alarm, buttemperatures>+40°C will).
Alarm setting Minimum Maximum
Air Pressure 920.0 hPa 1080.0 hPa
Outdoor Temperature -30.0°C +69.9°C
Indoor Temperature -10.0°C. +59.9°C
Humidity(all) 1% RH 99% RH
HYSTERESIS
To compensate for fluctuation ofthe measured data, which maycause the weather alarm to
sound constantlyif the measured reading is close to user set level, a hysteresis function has
been implemented for each weather alarm. For example,if the high temperature alarm is setto
+25°Cand the current value moves to+25°C, the alarm will be activated (if it has been
enabled). Nowwhen the temperature dropsto +24.9°C or below and thereafter again increases
to beyond +25°C, the data willbe blinking, butno alarm will be activated. Ithas to drop tobelow
+24°C(with a pre-set hysteresis of 1°C) so that the alarm can be produced again. Hysteresis
values for the various weather data types are given in the following table:

38
Weather data Hysteresis
Temperature 1°C
Humidity 3% RH
Air pressure 1 hPa
GENERALALARM
The generalalarm indicator (red LED) and the generalalarm icon will flash when any Weather
Alarm occurs.
General Alarm Indicator
The generalalarm indicator islocated at the top of the weather station. It will flash when any
weather alarm occurs to indicate thata set weather condition has been reached.
To stop the general alarm indicator from flashing press the ALMSTOP (or anyother keys) to
switch off the indicator.
General Alarm Icon
The generalindoor alarm icon will flash when indoor temperature alarm, indoor humidityalarm
or air pressure alarm occur. The general outdoor alarm icon will flash when the outdoor
temperature and humidityalarm occurs.
To switch offthe general alarm icon, press the ALMDATA key.
Additionally,the trigged alarm value and time will then be displayed brieflyfor 2 seconds
on the bottom part of the weather station LCD.
If more than one Weather Alarm occurred,each trigged alarm value and time can be
viewed bypressing the ALM DATAkey. Each Weather Alarm will be displayed for 2
seconds.
The general indoor (or outdoor) alarm icon will be switch off when all indoor (or outdoor) trigged
alarms information are displayed.
MOON PHASE
The Moon icon of the weather station will also display12 different Moon phases according to the
set calendar.
Note: In the southern hemisphere, the phases of the moon are same but the shape of the moon
is mirror inverted.
Generalalarmindicator
Generalindoor
alarmicon
Generaloutdoor
alarmicon

39
Full Moon
Large Waning Gibbous
Small Waning Gibbous
Last Quarter
Large Waning Crescent
Small Waning Crescent
NewMoon
Small Waxing Crescent
Large Waxing Crescent
First Quarter
Small Waxing Gibbous
Large Waxing Gibbous
WEATHER FORECASTAND WEATHER TENDENCY:
WEATHER FORECASTING ICONS:
There are 4weather icons in the fourth section of LCDwhich can be displayed in anyof the
following combinations:
SunnyCloudywith sunny intervals CloudyRainy
For everysudden or significant change in the air pressure, the weather icons will update
accordinglytorepresent the change in weather. Ifthe icons do notchange, then it means either
the air pressure has not changed or the change has been too slowfor the Weather station to
register. However,if the icon displayed is a sun orrainy, there willbe no change oficon if the
weather gets anybetter (with sunnyicon) or worse (with rainyicon) since the icons are already
at their extremes.
The icons displayed forecasts the weather in terms of getting better or worse and not
necessarilysunnyor rainyas each icon indicates.For example,if the current weather is cloudy
and the rainyicon is displayed, it does not mean that the product is faultybecause itis not
raining. It simplymeans that the air pressure has dropped and the weather is expected to get
worse but not necessarilyrainy.
The change of weather forecasticon is in accord to the relationship between currentrelative
pressure and the pressure change since lastthree hours.
Ifthe weather is changing, both oldweather icon and newweather icon will be shown with
weather tendencyindicator (animated arrows). If the weather has notchanged within 6 hours,
onlythe new weather icon in the middle displaywill be shown.
Examples of changing weather icons:
Note:
After initialsetup ofthe Intelligent Weather Station with the setting of the relative value,
readings for weather forecasts should be disregarded for the next 12-24 hours. This will allow

40
sufficient time for the Weather Station to collect air pressure data at a constantaltitude and
therefore resultin a more accurate forecast.
Ifthe Intelligent Weather Station is moved to another location significantlyhigher or lower than
its initial standing point (for example from the ground floor to the upper floors of a house), set
again the relative air pressure value,and discard the weather forecastfor the next 12-24 hours.
Bydoing this, the Weather Station will not mistake the newlocation as being a possible change
in air-pressure when reallyit is due to the slight change of altitude.
AIR PRESSURE TENDENCY INDICATOR
The air pressure tendencyindicators are located on the left side of the air pressure display,
below the Weather icons, and theyworkindependentlyfrom the Weather forecast icons.The air
pressure tendencyindicator pointing upward or downward directions is displayed based on
comparing the difference of the air pressure recorded during a full hour time frame.
Note:
•A single air pressure tendencyindicator will point upward or downward when the
difference in airpressure registered is between 1 and 3hPa within 4 hours.
•Twoair pressure tendencyindicators pointing upward or downward will be displayed when
the air pressure difference has increased or decreased by3hPa or more within 4 hours.
AIR PRESSURE
The 5th and 6th sections of the sections of the LCD showthe relative airpressure and the air
pressure history.
The reference relative air pressure (hPa) can be set between 960 to 1040hPa.See “Relative
pressure value setting” in manual setting.
BAR GRAPH DISPLAY
Depending on programming conditions,displayof the historyof airpressure inform ofagraph
consisting of vertical bars.
AIR PRESSURE HISTORY
The bar graph ofthe electronic barometer shows the air pressure history of the past36 hours in
17 steps.
The horizontal axis representsthe last 36 hours air pressure recording (-36, -24, -12, -6, -5, -4, -
3, -2, -1, and 0 hour). The barsare plotted at each ofthe 17 stepsand give the trend over the
recorded period. The scale on the right compares the result. The ″0″in the middle of this scale
determines the current air pressure.
The vertical axisrepresentsthe air pressure changes inhPa (+8, +6, +4, +2, 0, -2, -4, -8. “0”
represents the current air pressure). Each change (±1, ±2, ±3, ±4, ±5, ±6, ±7, ±8; the odd values
are not shown on the vertical axis but can be determined) shows in Hekto-Pascal (hPa), how
high or lowthe past air pressure was as compared to the current one. Ifthe bars are rising it
indicates that the weather is getting better due to an increase in air pressure. Ifthe bars go down
it indicates a drop of the air pressure and the weather is expected to get worse from the present
time ″0″.
At everyfull hour the current airpressure is used as a basis for the displayof a newgraph bar.
The existing graph is then moved one bar to the left.
Air pressure over the last 12 hours
Air pressure changes
in hPa

41
Note:
For accurate barometric pressure trend, the IntelligentWeather Station should operateat the
same altitude. For example, it should not be move from the ground to the second floor ofthe
house. Should the unit be moved toa newlocation, discard readingsfor the next12 – 36 hours.
INDOOR RELATIVE HUMIDITYAND INDOOR TEMPERATURE:
The indoor temperature and humiditydata are automaticallyupdated and displayed on the third
of the LCD.
COMFORTLEVEL INDICATOR:
Dry :the “Dry” indicator will appear when the relative humidityrange is lower than 45%.
Comfort : the “Comfort” indicator will appear when the relative humidityrange is between
45% and 65% and the temperature range is between 20.0ºCand 25.9ºC.
Wet : the “Wet” indicator will appear when the relative humidityrange is higher than
65%.
HAPY/SAD FACE COMFORTLEVELINDICATOR:
J(happyface) : A happyface icon “J” indicating a temperature level between 20°C and
25.9°C and relative humidityreading between 45% and 65%.
L(sad face) : A sad face icon “L” indicating anyvalue outside the comfortable range.
OUTDOOR TEMPERATURE AND HUMIDITY:
The seventh LCD section can showthe outdoor temperature, the reception indicator, the
minimum or maximum reading. A number in the bottom part willalso be shown if more than one
transmitter has been used.
TOGGLING BETWEEN MIN/MAXINDOOR AND OUTDOOR RECORDINGS:
To toggle between the current,minimum and maximum dataand the timestheywere recorded,
press the MIN/- keyfor viewing the minimum values, and press the MAX/+keyfor viewing the
maximum values (shown inMIN or Max displays).
When pressing the MIN/- or the MAX/+ key, the MINand the MAXdatawill be displayed as
following sequences:
1. MAX or MIN outdoor temperature data with time and date ofrecordings. Datawill flash
2. MAX or MIN outdoor humiditydatawith time and date of recordings.Datawill flash
3. MAX or MIN indoor temperature datawith time and date of recordings. Data will flash
4. MAX or MIN indoor humiditydata with time and date of recordings. Data will flash
5. Return to current indoor and outdoor data.
TO VIEW THE MIN/MAX DATAFROM DIFFERENTTRANSMITTERS
MIN/MAXdata from other transmitters can onlybe displayed if there is more than 1
transmitter used.
Indoor relative
humidity in % Indoor temperature
in °C or ºF
Indoor comfort indicator
Outdoor
temperature
in °C or °F
Transmitter identification number (onlyif there are more than one transmitter)
Outdoor
reception signal
Outdoor humidity
display in RH%

42
1. To toggle between transmitters, press the CHkey:
Once to showtransmitter 2
Twice to show transmitter 3
Three times to return to transmitter 1
2. While the outdoor MIN/MAXhumidityand temperature date is being displayed,press the
CH key.The displaywill toggle between the different channels MIN/MAXdata.
Note:
For example, when the MIN outdoor temperature data is displayed and the MAX/+ keyis
pressed, MAX data outdoor temperature will be displayed. Ifthe MAXoutdoor temperature data
is displayed and the MIN/- keyis pressed, MIN outdoor data will be displayed.
While MIN/MAX data is displayed, the channel can be changed bypressing the CH key.
TO RESET THE MIN/MAX VALUES TO CURRENTVALUES:
To reset individualindoor and outdoor MIN/MAX valuesto current values:
1. Press the MAX/+,MIN/- and CHkeyto selectthe desired MIN/MAX value.
2. Press the SET keytoreset the selected value to current value
Note:
To reset all indoor and outdoor MIN/MAX values to currentvalues,pressand hold the MAX/+ or
MIN/- keyfor 3 seconds.
OUTDOOR CHANNEL RE-LEARN MODE
In case the temperature data in a particular outdoor channel often shows“--.-“ due to lowbattery
level or false resetof a transmitter, thattransmitter can be set up again individuallyor all (ifmore
than 1 transmitter and the “lost” channel can be re-learned again byentering the channel re-
learn mode.
To re-learn ALL channels:
1. Press and hold the CH keyfor 3 seconds (outdoor reception signal will show next to
channeldisplay).
To re-learn the CURRENT selected channel:
1. Press and hold the SET keywhile pressing the CH key(outdoor reception signal will
shownext to channel display).
Note: If the SET keyis pressed too long, the Intelligent Weather Station will enter the Manual
Setting modes instead.
EL BACK-LIGHT
The EL back-light isautomaticallyswitched ON when anykeysare pressed. The EL back-light
will be switched on for approximately15 seconds before automaticallyswitching OFF.
LOW BATTERY INDICATOR
The lowbatteryindicator will be displayed in the LCD when the batterypower of the Intelligent
Weather Station is low. It is recommended to replace the batteries in all unitson an annualbasis
to ensure optimum accuracyof the IntelligentWeather Station.
Note: After batterychange, both the Intelligent Weather Station and the transmitter(s)need to
be reset (see note ”Setting up”)
“INTELLIGENT” WEATHER DISPLAY
The “Intelligent” Weather textdisplaylocated at the last section of the LCD will displaythe
weather forecast based on data received from channel 1 and the air pressure.
The weather station will automaticallydisplaythe following information:
•Minimum temperature of the day
•Maximum temperature ofthe day
•Time frame for the weather forecast
•Probabilityof the weather forecast
•Probabilityof snowfall
•Probabilityof fog

43
•Probabilityof glazed frost
•Probabilityof tempest
•Probabilityof strong wind
•Probabilityof storm
DETAILED INFORMATIONSHOWN IN THE WEATHER DISPLAY:
Language selected
English German French
Forecast period 6
hours Vorhersagedauer 6
Stunden Period prevision6
heures
Timeframe for weather
forecast 12 hours 12 Stunden
24 Stunden
36 Stunden
48 Stunden
12 heures
24 heures
36 heures
48 heures
Forecast
Index 65% Prognose
Index 65% Prévision
Index 65%
Probability of weather
forecast Index 70%
Index 75%
Index 80%
Index 85%
Index 70%
Index 75%
Index 80%
Index 85%
Index 70%
Index 75%
Index 80%
Index 85%
Maximum temperature
of the day MaxTemp xx.xC
Today xx :xx MaxTemp xx.xC
Heutexx :xx MaxTemp xx.xC
Aujourdhuixx :xx
Minimum temperature
of the day MinTemp xx.xºC
Today xx :xx MinTemp xx.xºC
Heutexx :xx MinTemp xx.xºC
Aujourdhuixx :xx
Snowfall
Index 65% Schnee
Index 65% Neige
Index 65%
Probability of snowfall
Index 75% Index 75% Index 75%
Fog
Index 80% Nebel
Index 80% Brouillard
Index 80%
Probability of fog
Index 85% Index 85% Index 85%
Probability of glazed
frost Glazed frost
Index 75% Raureif
Index 75% Givre
Index 75%
Probability of tempest Tempest
Index 80% Gewitter
Index 80% Orage
Index 80%
Probability of strong
winds Strong wind
Index 80% Starkwind
Index 80% VentFort
Index 80%
Probability of storm Storm
Index 75% Sturm
Index 75% Tempête
Index 75%
The forecast period, forecast indexand todaymaximum/minimum temperature will always be
show.
Other information will be show when aspecificweather event happened thathas been
calculated bythe unique algorithm of the IntelligentWeather station.
OUTDOOR THERMO-HYGROTRANSMITTER/433MHZ RECEPTION CHECK
The outdoor temperature and humidityis measured and transmitted every60 seconds.

44
The transmission range ofthe Outdoor Thermo-hygro transmitter maybe affected bythe
ambient temperature.At cold temperaturesthe transmitting distance maybe decreased. Please
bear this in mind when placing the transmitter.
To install the Thermo-hygro transmitter outside,choose a shadyand dryplace.Before
fixing the Thermo-hygrotransmitter with the enclosed screws, wait for 30 minutes to see
if the receiver is able to scan the signal from this location. Obstacles (walls, windows,
trees) and interfering radio waves (PC, mobile phone, TV) can impede the reception or
limit the range (about 100 meters in open space) considerably.Should interference
occurred, choose another location for the Thermo-hygroTransmitter and/or the Weather
Station.
Ifthe outdoor temperature and humidity data are not being received within 1 minute after setting
up (or the outdoor displayshow“--.-“ in the outdoor section of the IntelligentWeather Station
after 3 failed attempts during normal operation). Please checkthe following points:
1. The distance of the Weather Station or transmitter should be at least 1.5 to 2 meters away
from anyinterfering sources such ascomputer monitorsor TV sets.
2. Avoid positioning the Weather Station onto or in the immediate proximityof metal doors or
window frames.
3. Using other electrical products such as headphones or speakers operating on the same
signalfrequency(433MHz) mayprevent correct signaltransmission and reception.
3. Neighboursusing electricaldevicesoperating on the 433MHzsignal frequencycan also
cause interference.
4. “Visibility” of weather station and transmitter (e.g. through awindow) increases the range.
Note:
When the 433MHzsignal is received, do not re-open the batterycover of either the transmitter
or Weather Station, asthe batteries mayspring free from the contacts and force a false reset.
Should this happen accidentallythen reset allunits (see Setting up above) otherwise
transmission problems mayoccur.
Ifno reception is possible despite the observation of these factors,all system units have to be
reset (see Setting up).
POSITIONING THE WEATHER STATION:
The Weather Station hasbeen designed to be hung on a wall or free standing.
For Freestanding:
Pull out the easel on the backof the unit and place onto a flat surface.
To wall mount
Choose a sheltered place. Avoid direct rain and sunshine.
Before wall mounting, please checkthat the outdoor temperature and
humidityvalues can be received from the desired locations. To wall
mount:
1. Fixa screw(not supplied) into the desired wall, leaving the head
extended outthe byabout 5mm.
2. Fold the stand of the Weather Station bypushing inward and hang
it onto the screw. Remember to ensure thatit locks into place
before releasing.
Table of contents
Other TFA Weather Station manuals