THERMA Big Dipper 51000 Series User manual

51000 Series
1. Scan this QR code to watch a video tutorial.
2. You will need a Phillips head screwdriver
driver and a replacement EEC (Electrical
Enclosure Cover).
4. There will be (4) bolts on the front and (1)
in the rear.
3. Unplug the center module and remove
from Big Dipper tank.
6. Lift the skimming wheel cover and start
prying open the EEC cover. Pull upwards
until EEC is completely removed from
center module.
5. Use a Phillips head screwdriver and turn
counterclockwise to remove (5) bolts. Set
bolts aside.
Thermaco, Inc. • 646 Greensboro St. • Asheboro, N. C. 27204-2548 • Phone (336) 629-4651
51000 Series
1. Scan this QR code to watch a video tutorial.
2. You will need a Phillips head screwdriver
driver and a replacement EEC (Electrical
Enclosure Cover).
4. There will be (4) bolts on the front and (1)
in the rear.
3. Unplug the center module and remove
from Big Dipper tank.
6. Lift the skimming wheel cover and start
prying open the EEC cover. Pull upwards
until EEC is completely removed from
center module.
5. Use a Phillips head screwdriver and turn
counterclockwise to remove (5) bolts. Set
bolts aside.
Thermaco, Inc. • 646 Greensboro St. • Asheboro, N. C. 27204-2548 • Phone (336) 629-4651 1
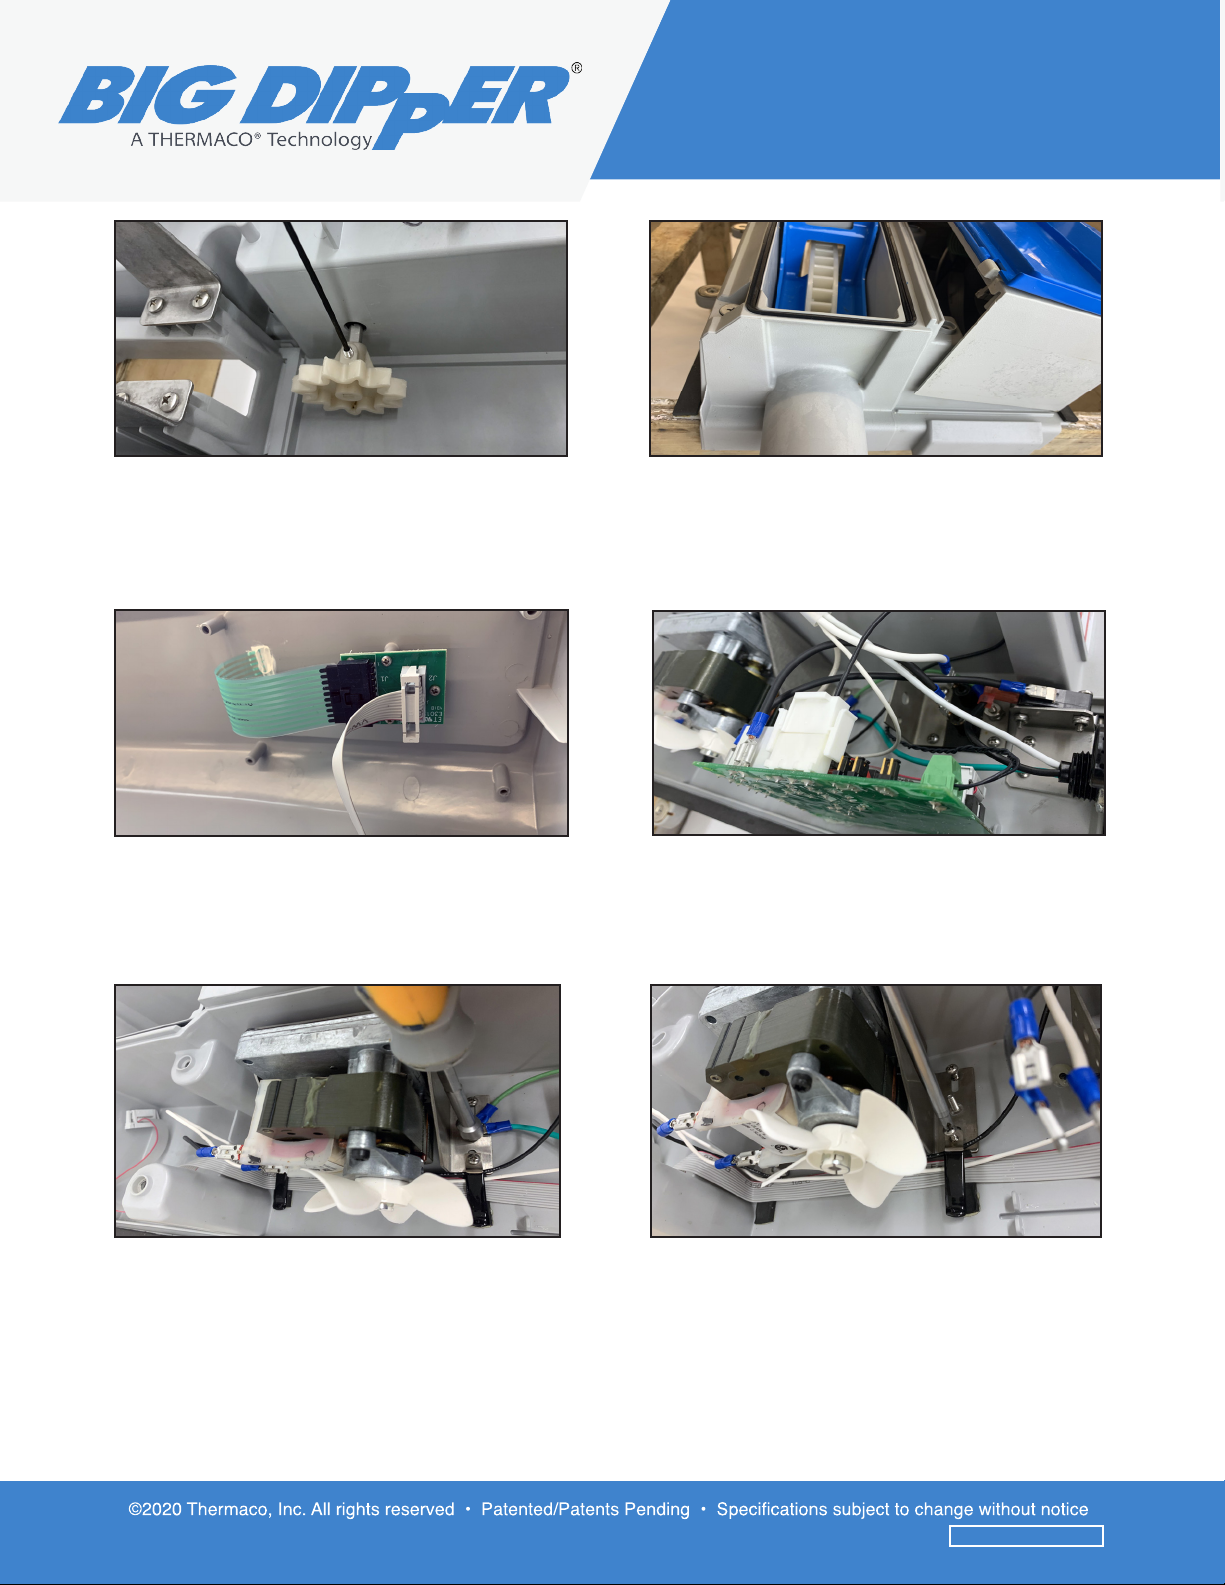
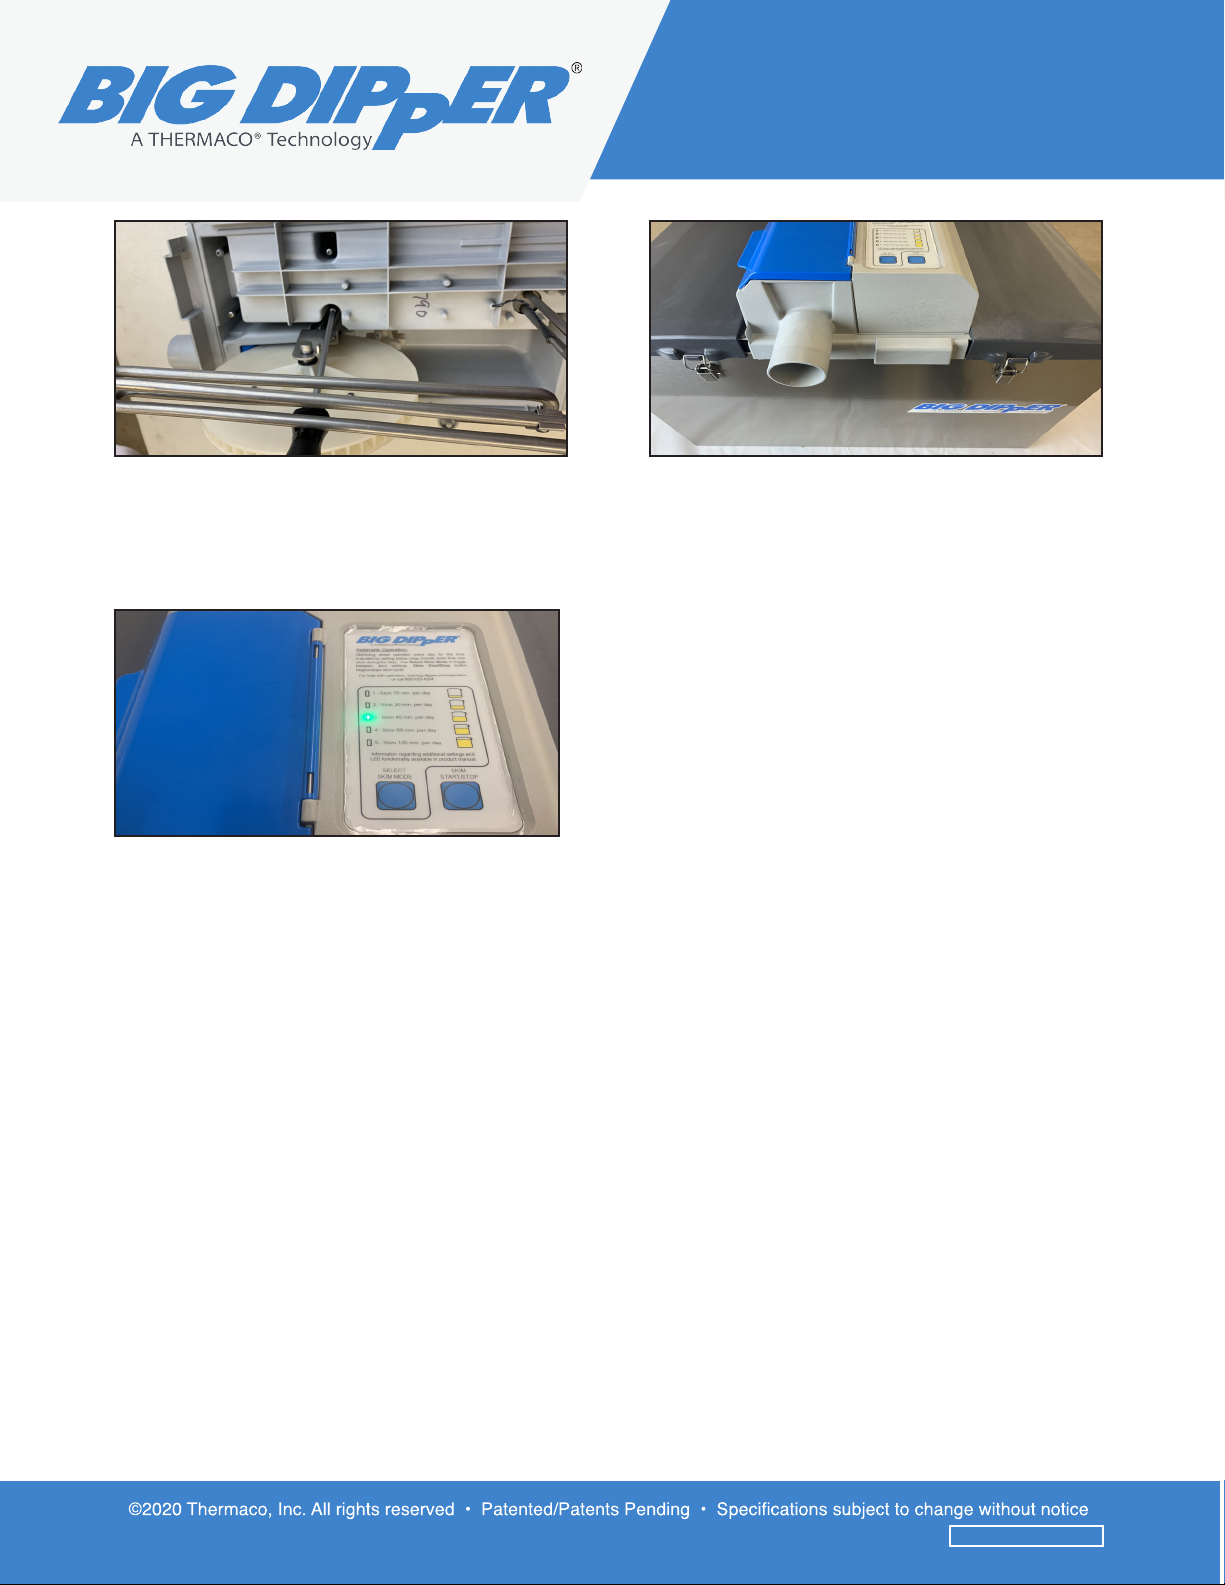
Replacing M-58 Motor
Please scan QR code to review a video
tutorial.
2. ere will be (4) bolts on the front and (1) in
the rear. Use a Phillips head screwdriver and
turn counter-clockwise to remove (5) bolts. Set
bolts aside.
1. Unplug the center module and remove from
Big Dipper tank.
3. Use the needle nose pliers to straighten out
the legs of the cotter pin and push the pin
through the sha.
4. Remove the Skimming Wheel Assembly
and sha then set to the side.
Tools required to Replace a M-58 Motor:
Phillips head screwdriver, needle nose pliers,
5/16 nut driver, and 3/32 Allen wrench.
51000 Series
1. Scan this QR code to watch a video tutorial.
2. You will need a Phillips head screwdriver
driver and a replacement EEC (Electrical
Enclosure Cover).
4. There will be (4) bolts on the front and (1)
in the rear.
3. Unplug the center module and remove
from Big Dipper tank.
6. Lift the skimming wheel cover and start
prying open the EEC cover. Pull upwards
until EEC is completely removed from
center module.
5. Use a Phillips head screwdriver and turn
counterclockwise to remove (5) bolts. Set
bolts aside.
Thermaco, Inc. • 646 Greensboro St. • Asheboro, N. C. 27204-2548 • Phone (336) 629-4651
51000 Series
1. Scan this QR code to watch a video tutorial.
2. You will need a Phillips head screwdriver
driver and a replacement EEC (Electrical
Enclosure Cover).
4. There will be (4) bolts on the front and (1)
in the rear.
3. Unplug the center module and remove
from Big Dipper tank.
6. Lift the skimming wheel cover and start
prying open the EEC cover. Pull upwards
until EEC is completely removed from
center module.
5. Use a Phillips head screwdriver and turn
counterclockwise to remove (5) bolts. Set
bolts aside.
Thermaco, Inc. • 646 Greensboro St. • Asheboro, N. C. 27204-2548 • Phone (336) 629-4651
2
Replacing M-58 Motor
5. Use the 3/32 Allen wrench and turn counter
clockwise to loosen the bolt to remove the
sprocket from the motor sha.
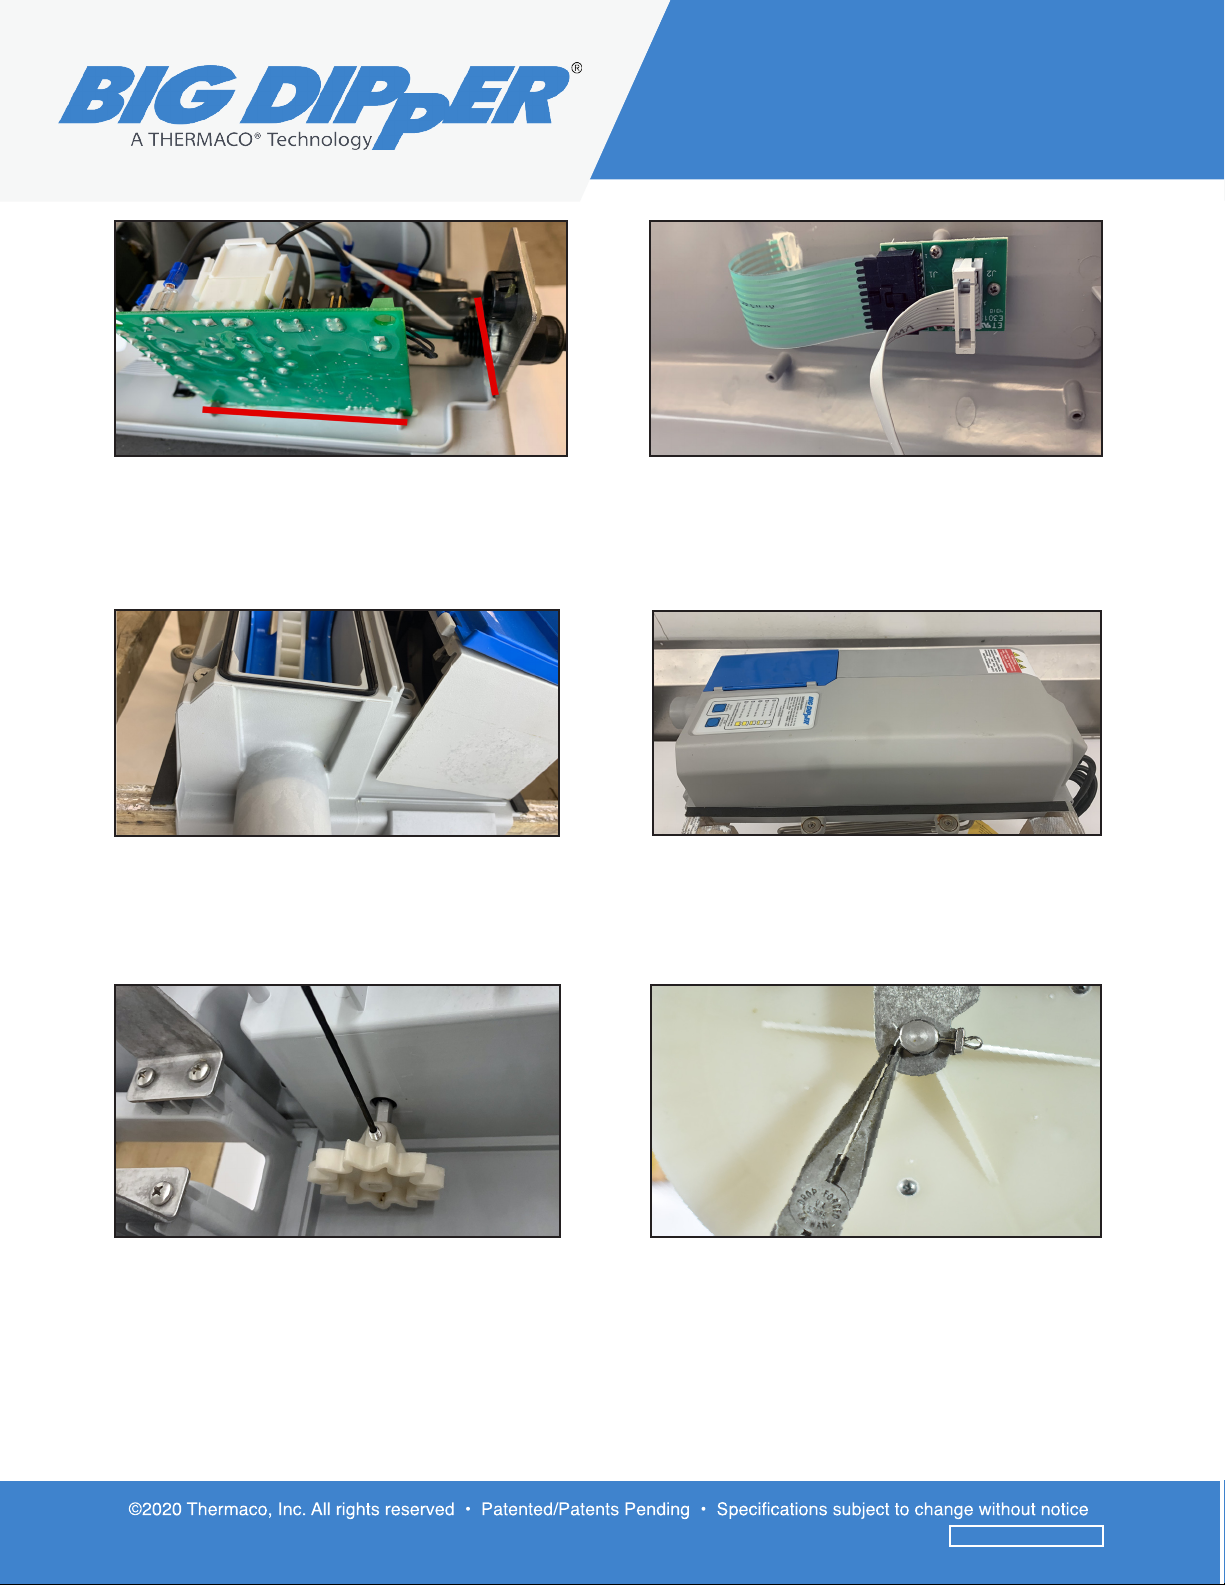
6. Li the cover over the skimming wheel to
pry open the EECA-1 (Electrical Enclosure
Cover Assembly). Pull upwards until EECA is
removed from the center module.
7. Disconnect the push button ribbon from the
push button adapter.
8. It is recommended to remove the board for
easier access to the motor. Before unplugging
any wires, take a picture of the wiring for
reference.
9.Use a 5/16 nut driver and turn counter-
clockwise to remove the nut and washer.
10. Remove the (2) front bolts from the motor
assembly and loosen the (2) bolts on the rear.
Note, the rear bolts do not have to be removed
completely.
51000 Series
1. Scan this QR code to watch a video tutorial.
2. You will need a Phillips head screwdriver
driver and a replacement EEC (Electrical
Enclosure Cover).
4. There will be (4) bolts on the front and (1)
in the rear.
3. Unplug the center module and remove
from Big Dipper tank.
6. Lift the skimming wheel cover and start
prying open the EEC cover. Pull upwards
until EEC is completely removed from
center module.
5. Use a Phillips head screwdriver and turn
counterclockwise to remove (5) bolts. Set
bolts aside.
Thermaco, Inc. • 646 Greensboro St. • Asheboro, N. C. 27204-2548 • Phone (336) 629-4651
51000 Series
1. Scan this QR code to watch a video tutorial.
2. You will need a Phillips head screwdriver
driver and a replacement EEC (Electrical
Enclosure Cover).
4. There will be (4) bolts on the front and (1)
in the rear.
3. Unplug the center module and remove
from Big Dipper tank.
6. Lift the skimming wheel cover and start
prying open the EEC cover. Pull upwards
until EEC is completely removed from
center module.
5. Use a Phillips head screwdriver and turn
counterclockwise to remove (5) bolts. Set
bolts aside.
Thermaco, Inc. • 646 Greensboro St. • Asheboro, N. C. 27204-2548 • Phone (336) 629-4651 3
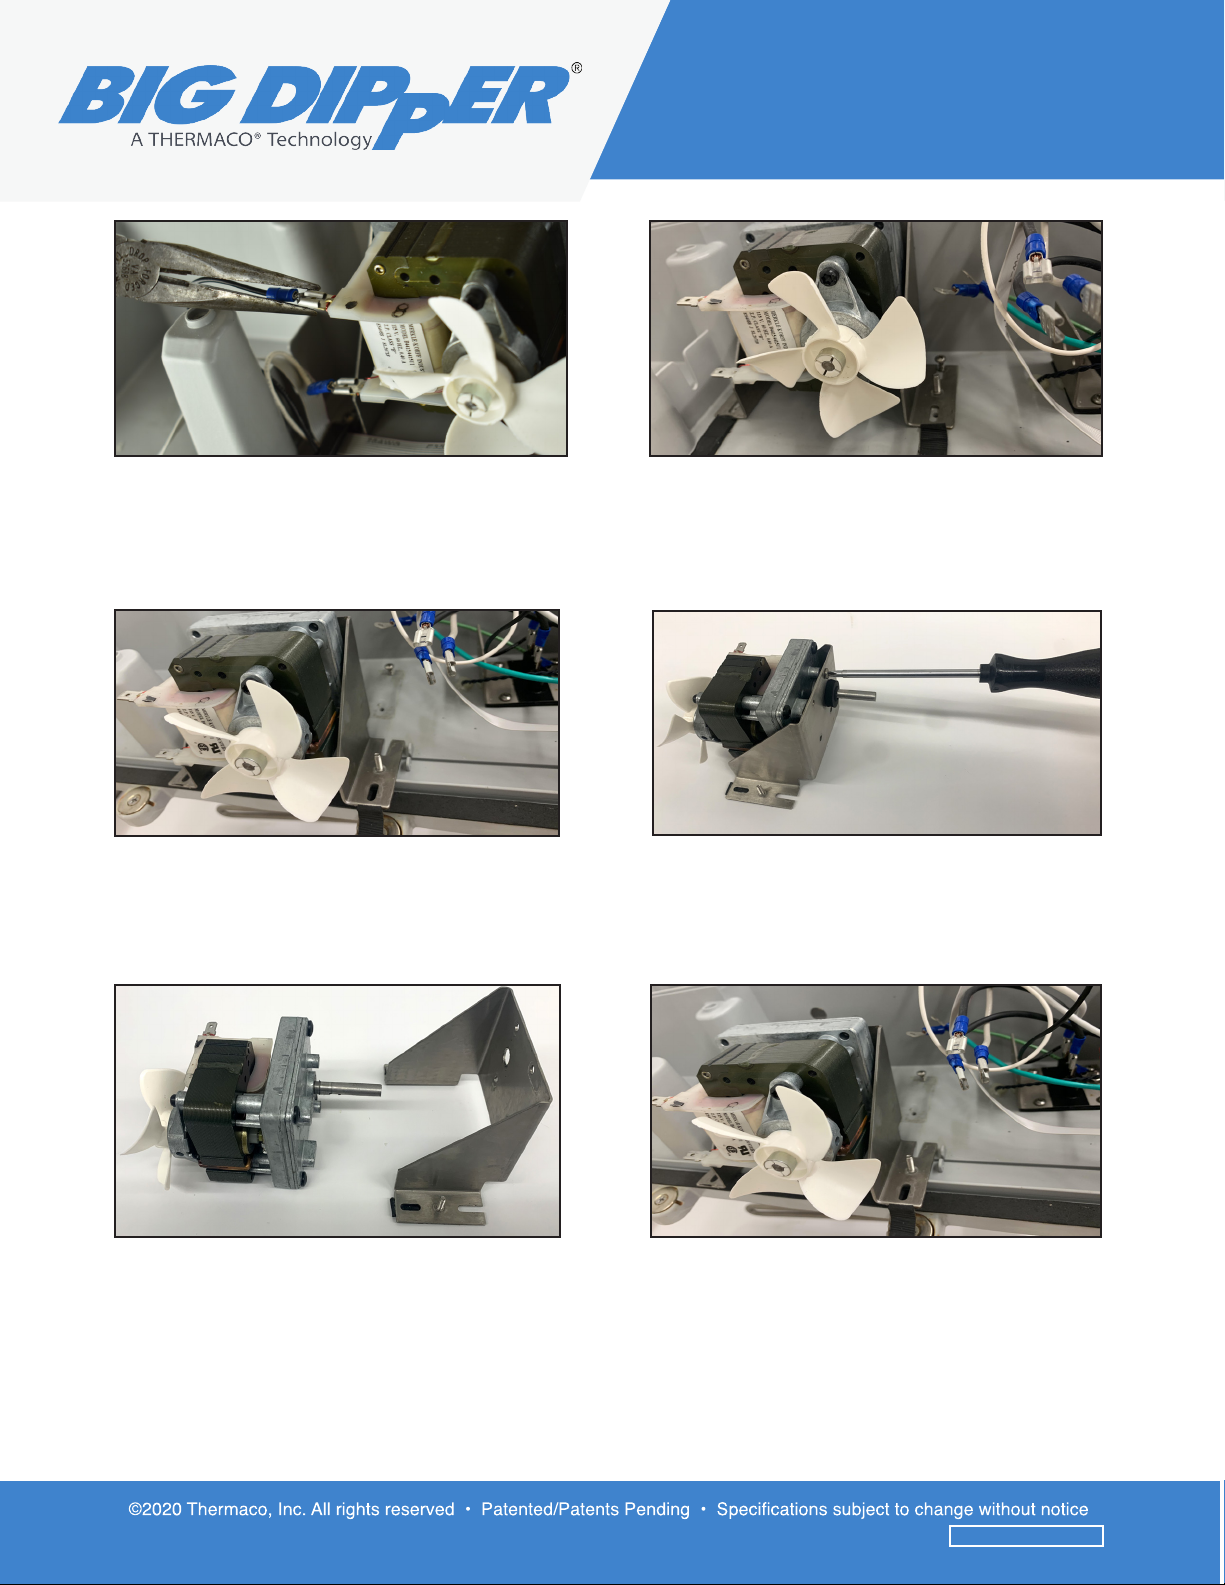
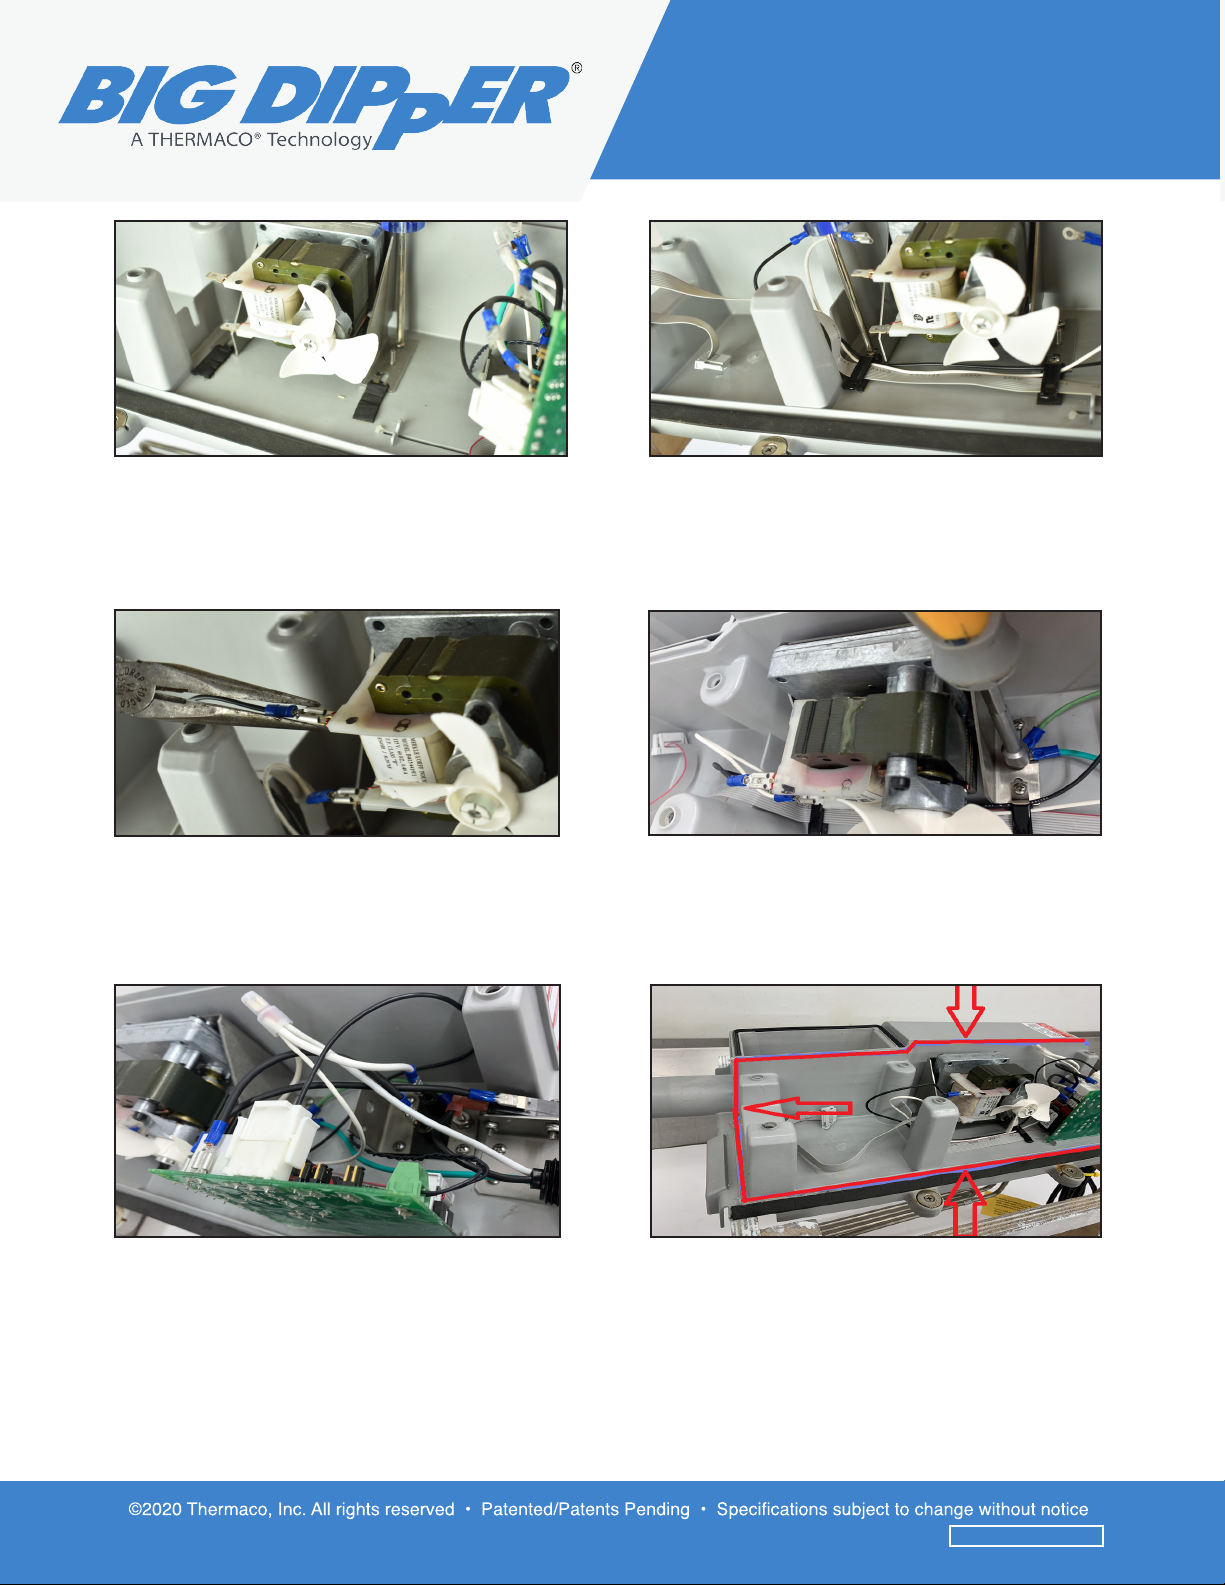
Replacing M-58 Motor
11. Use needle-nose pliers to remove the motor
wire connectors.
12. Pull the motor wires and push button
ribbon to the rear side of the center module for
easier access to remove the motor.
13. Pull away the motor assembly from the
center module.
14. Remove the washer from the motor sha
and use a Phillips head screwdriver to remove
the (4) bolts securing the existing motor to the
motor assembly.
15. Secure the new motor to the assembly
using the (4) existing bolts and place the
washer on the motor sha.
16. Slide the motor assembly into the center
module motor position.
51000 Series
1. Scan this QR code to watch a video tutorial.
2. You will need a Phillips head screwdriver
driver and a replacement EEC (Electrical
Enclosure Cover).
4. There will be (4) bolts on the front and (1)
in the rear.
3. Unplug the center module and remove
from Big Dipper tank.
6. Lift the skimming wheel cover and start
prying open the EEC cover. Pull upwards
until EEC is completely removed from
center module.
5. Use a Phillips head screwdriver and turn
counterclockwise to remove (5) bolts. Set
bolts aside.
Thermaco, Inc. • 646 Greensboro St. • Asheboro, N. C. 27204-2548 • Phone (336) 629-4651
51000 Series
1. Scan this QR code to watch a video tutorial.
2. You will need a Phillips head screwdriver
driver and a replacement EEC (Electrical
Enclosure Cover).
4. There will be (4) bolts on the front and (1)
in the rear.
3. Unplug the center module and remove
from Big Dipper tank.
6. Lift the skimming wheel cover and start
prying open the EEC cover. Pull upwards
until EEC is completely removed from
center module.
5. Use a Phillips head screwdriver and turn
counterclockwise to remove (5) bolts. Set
bolts aside.
Thermaco, Inc. • 646 Greensboro St. • Asheboro, N. C. 27204-2548 • Phone (336) 629-4651
4
Replacing M-58 Motor
21. Use the pictures taken earlier to reconnect
all wires correctly. ere is a wire diagram
beneath the EECA cover for reference if
needed.
22. Using the sealant provided, apply sealant
along the groove of the EECA cover and center
module as illustrated above.
17. Secure the rear bolts on the motor
assembly.
18. Set the push button ribbon and motor wires
underneath the (2) bolt clips and secure the (2)
front bolts.
19. Connect the motor wires to the motor.
Black wire on top and white wire on bottom.
20. Place the (2) ground wires in position and
install the washer. Use the 5/16 nut driver to
secure the nut.
51000 Series
1. Scan this QR code to watch a video tutorial.
2. You will need a Phillips head screwdriver
driver and a replacement EEC (Electrical
Enclosure Cover).
4. There will be (4) bolts on the front and (1)
in the rear.
3. Unplug the center module and remove
from Big Dipper tank.
6. Lift the skimming wheel cover and start
prying open the EEC cover. Pull upwards
until EEC is completely removed from
center module.
5. Use a Phillips head screwdriver and turn
counterclockwise to remove (5) bolts. Set
bolts aside.
Thermaco, Inc. • 646 Greensboro St. • Asheboro, N. C. 27204-2548 • Phone (336) 629-4651
51000 Series
1. Scan this QR code to watch a video tutorial.
2. You will need a Phillips head screwdriver
driver and a replacement EEC (Electrical
Enclosure Cover).
4. There will be (4) bolts on the front and (1)
in the rear.
3. Unplug the center module and remove
from Big Dipper tank.
6. Lift the skimming wheel cover and start
prying open the EEC cover. Pull upwards
until EEC is completely removed from
center module.
5. Use a Phillips head screwdriver and turn
counterclockwise to remove (5) bolts. Set
bolts aside.
Thermaco, Inc. • 646 Greensboro St. • Asheboro, N. C. 27204-2548 • Phone (336) 629-4651 5
Replacing M-58 Motor
23. Before installing the replacement EECA.
Be sure the main board and electrical plate are
aligned to their holding groove.
24. Connect the push button ribbon.
25. With the skimming wheel cover open.
Place the replacement EECA on the center
module.
27. Flip the center module and place the
sprocket in the motor sha and align to the
middle of the skimming wheel placement.
26. EECA cover should be ush with the center
module.
28. Place the skimming wheel in position.
Slide the sha thru the wheel and sha
assembly. Insert the cotter pin thru the sha
and open the legs of the cotter pin.
51000 Series
1. Scan this QR code to watch a video tutorial.
2. You will need a Phillips head screwdriver
driver and a replacement EEC (Electrical
Enclosure Cover).
4. There will be (4) bolts on the front and (1)
in the rear.
3. Unplug the center module and remove
from Big Dipper tank.
6. Lift the skimming wheel cover and start
prying open the EEC cover. Pull upwards
until EEC is completely removed from
center module.
5. Use a Phillips head screwdriver and turn
counterclockwise to remove (5) bolts. Set
bolts aside.
Thermaco, Inc. • 646 Greensboro St. • Asheboro, N. C. 27204-2548 • Phone (336) 629-4651
51000 Series
1. Scan this QR code to watch a video tutorial.
2. You will need a Phillips head screwdriver
driver and a replacement EEC (Electrical
Enclosure Cover).
4. There will be (4) bolts on the front and (1)
in the rear.
3. Unplug the center module and remove
from Big Dipper tank.
6. Lift the skimming wheel cover and start
prying open the EEC cover. Pull upwards
until EEC is completely removed from
center module.
5. Use a Phillips head screwdriver and turn
counterclockwise to remove (5) bolts. Set
bolts aside.
Thermaco, Inc. • 646 Greensboro St. • Asheboro, N. C. 27204-2548 • Phone (336) 629-4651 6
Replacing M-58 Motor
30. Set the center module on the Big Dipper
tank and latch the lids on each end. Place the
grease collector on the front end.
31. Plug the unit to a power source. Select the
appropriate skimming cycle for your business.
If you continue to expereince issues please contact ermaco Technical Support Team at support@thermaco.
com or 800-633-4204.
For additional troubleshooting guides go to www.dipperhelp.com
29. Secure using the (5) bolts that were
removed from the cover. (4) in the front and
(1) on the rear.
Other THERMA Industrial Equipment manuals

THERMA
THERMA Big Dipper 51000 Series User manual

THERMA
THERMA Trapzilla TZ-1826 Installation and operating instructions

THERMA
THERMA Big Dipper 40000 Series User manual

THERMA
THERMA Big Dipper 51000 Series User manual

THERMA
THERMA Big Dipper IS Series Installation instructions

THERMA
THERMA Internal Strainer Series Installation instructions


