Thermopatch HS-21-SQR Penguin User manual

Y600 Thermo-Seal-Jet
thermopatch.com
HS-21-SQR Penguin
Manual
September 2020 ENG

thermopatch.com
2
Copyrights
© 2020, Thermopatch bv, Almere, the Netherlands.
No part of this publication may be reproduced by any means without the prior written
permission of Thermopatch bv, the Netherlands.
Thermopatch and the Thermopatch logo, Thermoseal and Thermocrest are registered
trademarks of Thermopatch.
Introduction
Dear user,
Congratulations and welcome to the ever growing number of Thermopatch users.
You have acquired a machine which has been manufactured by Thermopatch with the
greatest possible care. We are condent that you will be enjoying the use of this machine
for a long time.
Please take note of the contents of this manual to familiarize yourself with the workings and
safety aspects of the machine. This manual was written for the benet of all users and
technicians who install and maintain the machine. You will nd information on operating,
safety and maintenance as well as spare parts and supplies.

thermopatch.com
3
Content Copyrights 2
Introduction 2
Content 3
1. General description 4
1.1 What did you receive ? 4
1.2 Warranty 4
3. Assembly and installation 5
3.1 Installing the HS-21-SQR 5
3.2 Electrical Requirements 5
4. Operating manual 6
4.1 How to operate the HS-21-SQR HS-21-SQR 6
4.2 The HS-21-SQR display 6
4.3 How to operate the display 6
5. Overview of safety measures and warnings 9
5.1 Safety 9
6. Technical specications 10
6.1 Specifications of the HS-21-SQR 10
7. Transport and storage 11
7.1 Transport 11
7.2 Storage 11
8. Maintenance 11
8.1 Daily maintenance 11
8.2 Periodical maintenance 11
9. Technical annexes 12
9.1 Faults: 12
9.2 Replacement parts 12
9.3 Exploded views and parts 13
9.3A Heating plate enhancement June 2018 25
9.4 Wiring diagram 26
10. End of life 27
11. Declaration of conformity 28
12. Disclaimer 29

thermopatch.com
4
1. General description
Labels, patches, transfers and emblems can be applied quickly thanks to the two press
plates. With a warm-up time of less than a minute, ecient work is guaranteed. The HS-21-
SQR provides full digital control; the graphic display clearly shows the current status of the
press, including temperature and heat seal time.
1.1 What did you receive ?
The HS-21-SQR has been packed in a cardboard box. The following articles should have
been delivered:
• HS-21-SQR heat seal machine
• Electrical power cable
• User’s Guide on USB
If one of these articles is missing, please contact our customer service or your Thermopatch
supplier.
1.2 Warranty
Thermopatch refers to its warranty and product liability conditions as laid down in our
general conditions. These can be obtained at your Thermopatch supplier.

thermopatch.com
5
ABC
2. Intended use
The HS-21-SQR has been developed to heat seal labels, patches, transfers and emblems
quickly thanks to the two press plates. The machines warms up to the required temperature
within a minute which ensures ecient working.
3. Assembly and installation
3.1 Installing the HS-21-SQR
Take the machine out of the box and put it on a worktable near an earthed wall socket.
Ensure that there is sucient free space around the HS-21-SQR. Also ensure that there are
no items near the HS-21-SQR, which are sensitive to heat radiation.
3.2 Electrical Requirements
The HS-21-SQR should be connected to the electricity grid (230V) with the supplied
electrical cable (A).
The HS-21-SQR is earthed and has been provided with two fuses of 3 Amps (B).

thermopatch.com
6
31
4
2
4. Operating manual
4.1 How to operate the HS-21-SQR
• Starting up:
1. Switch on the machine: pushing the on-o switch at the back to “on” (C, see page 5).
2. Wait until the standard set temperature has been reached.
The standard sealing temperature is set on 204 °C. During warming up, which will take a
few minutes and the actual temperature is displayed. When the HS-21-SQR has reached
the desired temperature we advise to close it for several moments to heat up the silicone
rubber sealing pad.
4.2 The HS-21-SQR display
4.3 How to operate the display
The display has one set of buttons on the left (1+2) - and one set on the right side (3+4),
with a digital LED screen in the middle.
To adjust the heat seal temperature:
Press the upper left button (1) and increase (3) or decrease (4) the temperature per degree
with the buttons on the right side.
Default set heat seal temperature: 204 °C
The set temperature can be checked and conrmed with Thermopatch temperature
measuring strips.
If the temperature on the screen should not equal the set temperature, adjust it as follows:
Push the upper (1) and lower (2) left buttons at the same time for 3 seconds and adjust
temperature with the buttons 3 and 4.
The new setting will be stored if the buttons are not touched for 3 seconds.
• Should you want to seal a garment with a much lower temperature other than the
standard seal temperature, you should set the HS-21-SQR to the desired values.

thermopatch.com
7
To change from Celsius to Fahrenheit and vice versa
Press the 3 and 4 buttons and hold for more than 3 seconds and the changed setting will be
shown on the LED screen.
To adjust the heat sealing time:
Press the lower left button (2) once and change the seal time in seconds (3) or (4).
Default set heat sealing time: 12 seconds.
• The seal time ranges from 0-60 seconds.
To adjust the energy saver setting:
Press the lower left button (3) twice to set the energy saver in
minutes (3) or (4).
The energy saver will start after the set time in minutes.
Default start energy saver: 20 minutes
The new setting will be stored if the buttons are not touched for 3 seconds.
Energy saving is active when the sleeping penguin is shown on the LED display:
To adjust the day total counter:
Press the upper right button (3) once to see the day count during 5 seconds. When pushed
3 seconds, the day count will become 0.
To see the grand total counter:
Press the lower right button (4) once to see the grand total during 5 seconds.
The grand total is shown with this symbol:
To adjust the heat sealing pressure:
The pressure on the HS-21-SQR is not adjustable. Due to its unique construction, a
constant pressure is maintained while heat sealing.
Working with Thermopatch heat seal products:
With the HS-21-SQR it is very easy to apply heat seal products such as HiQ-labels, Digiline-
emblems and Thermopatch repair patches to textiles.
Follow the procedure listed below:
• Set the time.
Almost all Thermopatch heat seal products need 12 - 15 seconds for correct adhesion.
• Pull the fabric tightly over the silicone rubber sealing pad.
Make sure that the fabric is pulled tight and no seams, buttons, zippers or other thick parts
are under the machine.
These will take away pressure from the heat seal product and can cause problems with the
adhesion.
• Place the label (or any other heat seal product).
Note: Thermopatch materials cannot be removed easily. The material is meant for
permanent adhesion.
Therefore, make sure that the position is correct.
• Close the machine by pressing the press arm down until it locks.
This will start the heat sealing cycle.
At the end of the set heat sealing time, the buzzer will be activated, indicating that the heat
sealing cycle is completed and the garment needs to be removed.
• Open the press.
Open the press by moving the arm upward and remove the fabric and check the result.
Once cooled o, the heat seal product is permanently attached.
• Repairs
Preferably repair damages without the loss of bres, such as right-angled tears, from the
inside of the fabric.
In almost all cases it is sucient to use a press time of 12 - 15 seconds.
Exceptions are thick fabrics like materials for gauntlets and patches for protective clothing,
which can require up to 20 seconds.

thermopatch.com
8
• Labels and emblems
Shrinkage, nishes and coatings on the textile can inuence the heat sealing result in a
negative way.
Pre-heating can oer a solution in some cases.
If it appears that there is not a complete adhesion, it is recommended to re-seal another 10
seconds.
Remark:
Some modern fabrics cannot withstand the heat sealing temperature of 204 °C. If you
cannot be sure of the result, use a sample of the same fabric, if possible, to establish
its heat resistance. Also care labels in garments can inform you of their heat resistant
properties (iron ability). When it is necessary to lower the temperature, it is necessary to
press for a longer time.
How to remove heat sealed Thermopatch labels:
Because Thermopatch labels must be wash resistant to all industrial washing processes, it
is not easy to remove heat seal products.
When necessary you can try following procedure:
• Put the garments with the label to be removed under the press for about 7 seconds. The
glue layer will melt again.
• Leave the garment on the plate and remove the label, if necessary by means of a blunt
scraper or tweezers.
• Please note: Heating plate and labels are hot!!
• Repeat this procedure if you are not successful the rst time trying.
Interrupting the heat sealing cycle:
You can interrupt the operation at any moment by unlocking the arm of the closed heat seal
machine during the press cycle.
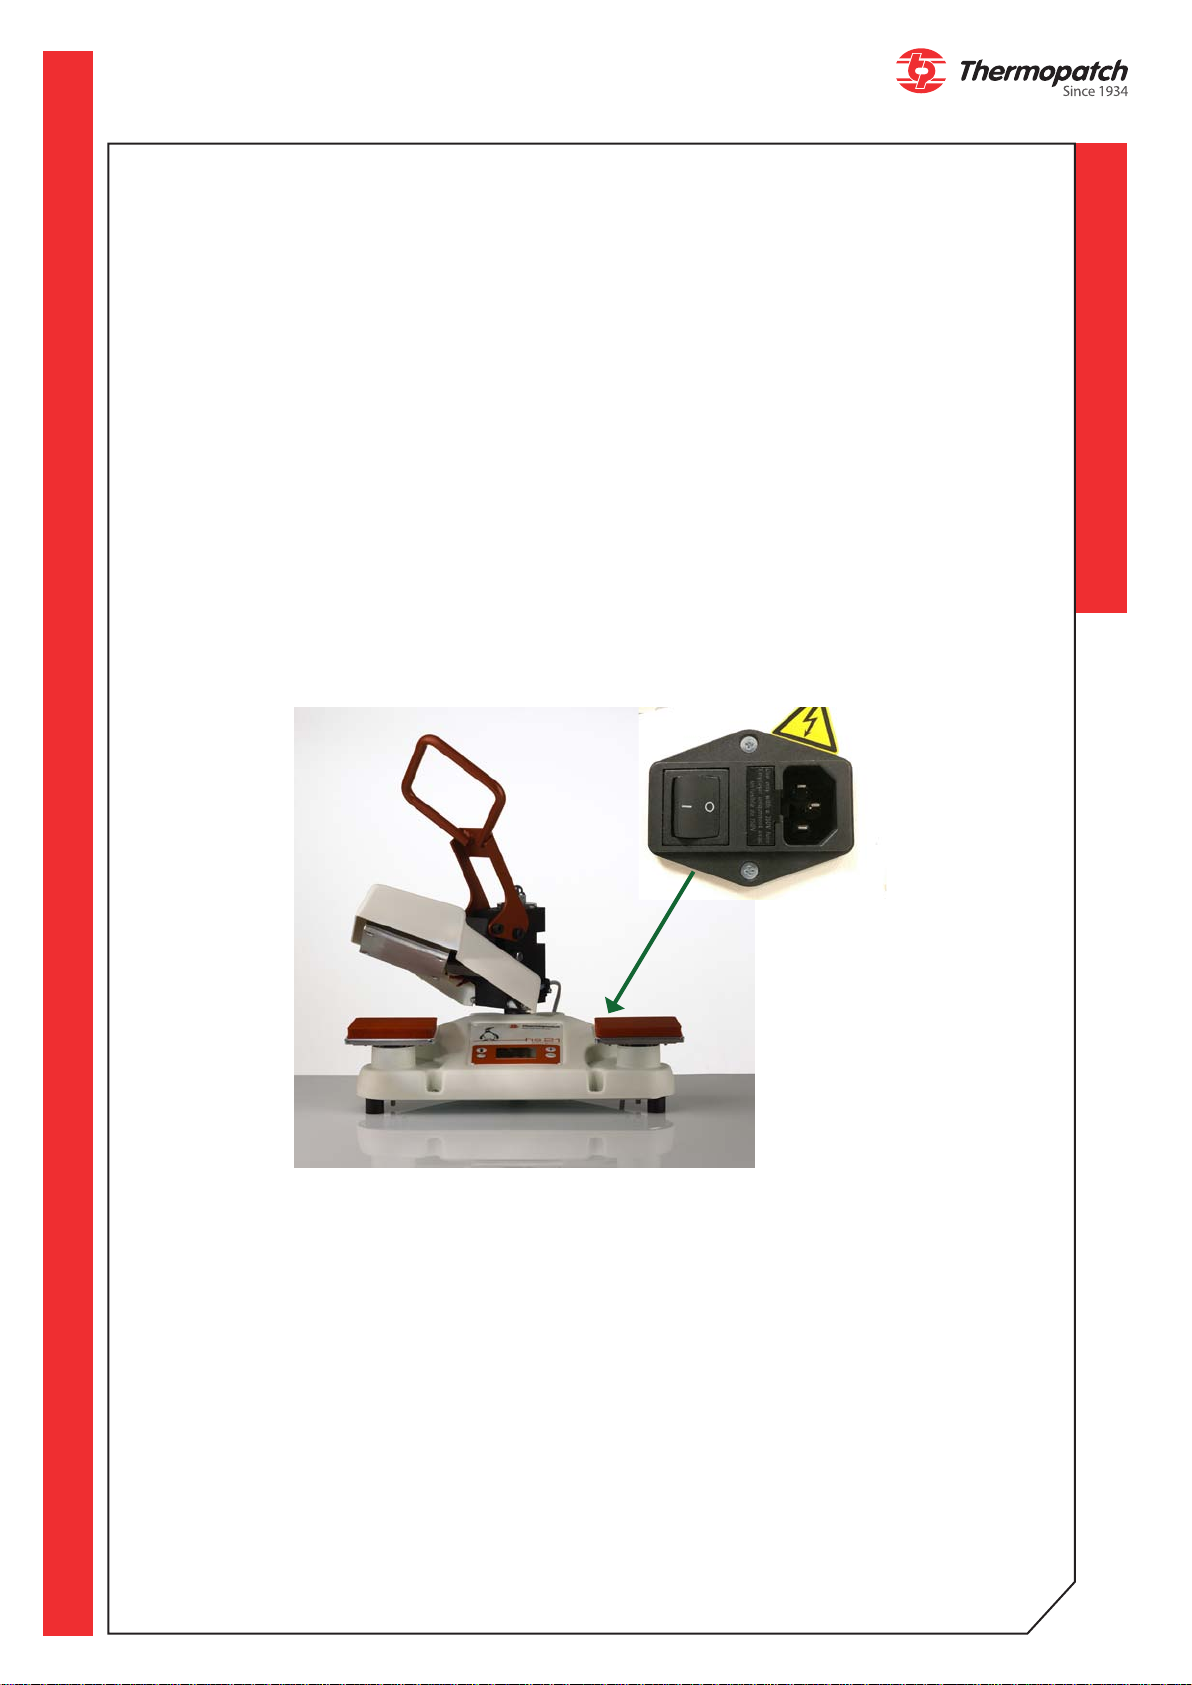
When you wish to shut down the machine, switch the main switch to o. It is located on the
right side of the machine.
The indicators on the control panel are then turned o.
Trouble shooting:
Some problems and failures that can occur, are listed below.
After describing each problem, the possible cause (sometimes more than one) is given, as
well as a possible solution.
If the described solution cannot solve the problem, please contact the service department
of your distributor.
Heat sealing problems:
Insucient adhesion of the glue layer
• Press time too short.
• Increase the time in steps of 2 seconds and try again.
• Temperature too low.
• Check with Thermolabels and increase the temperature, if necessary.
The pressure is not sucient.
• The silicone rubber sealing pads are worn out: replace when worn.
• The sealing pressure is set in the factory and cannot be adjusted.
• The teon self-adhesive coating of the press element is dirty or worn-out.
• Clean with a damp cloth and replace it, if necessary. When replacing the old teon, it is
very important that adhesive residue is removed from the heating element. To do this it
is necessary to heat up the machine, scrape o the glue remains by using a blunt edged
scraper. It is important to avoid scratching the metal of the heating plate.
• After this is done, degrease the heating element and apply the self-adhesive teon
cover.
Glue layer becomes too thin, causing adhesion problems
• Sealing time too long.
• Lower the time in steps of 2 seconds and try again.
• Temperature too high.
Check with Thermolabels and lower the temperature, if required.

thermopatch.com
9
5. Overview of safety measures and warnings
5.1 Safety
The HS-21-SQR has been equipped with various safety features to ensure safe operation.
1. Safety thermostat
The safety thermostat is installed to prevent overheating when the controller should fail. It
switches o the power to the heating element when the temperature exceeds 260°C.
If this happens, the machine has to be checked by a qualied technician.
2. Acoustic signal
Once the press cycle is complete an acoustic signal will be sound after which the press must
be opened.
3. Automatic Switch-O
When the HS-21-SQR is not opened after 10 seconds it will automatically switch o to
prevent damaging it.
4. Warning symbols
The HS-21-SQR is marked with appropriate heat radiation safety symbols on either side of
the press head and the hazardous voltage symbol next to the power inlet on the back.
WARNING!
Hot surface
WARNING!
Electric tension
Safety tips
The customer service of your distributor has its own service engineers, and if required,
maintenance is available. A maintenance contract ensures prompt service in the
event of appliance failure together with additional periodic inspections.
Under normal conditions accidents are rare; however, listed below are some practical points
to ensure your safety:
• Pull out the electrical plug from the wall socket when doing maintenance or cleaning work
on the appliance.
• Ensure that there is sucient space around the appliance. Cables and connections must
not get jammed. Although the heat radiation of the press is low, there should be enough
space for cooling down.
• Avoid contact with the heating element.

thermopatch.com
10
6. Technical specications
6.1 Specifications of the HS-21-SQR
Power consumption 650 W
Power supply 230 V
Temperature 50-225 °C
Machine height (open) 525 mm
Machine height (closed) 315 mm
Machine width 465 mm
Machine depth (connections included) 420 mm
Net weight 15 kg
Press pad dimensions Square 120 x 120 mm
Fuses 3 amps

thermopatch.com
11
A-weighed noise level < 70 dB (A)
7. Transport and storage
7.1 Transport
When the machine needs to be moved, Thermopatch recommends to use the original
packaging.
7.2 Storage
When the machine needs to be stored, Thermopatch recommends to use the original
packaging. The machine should preferably be stored on a pallet, o the oor, in dry
conditions.
8. Maintenance
8.1 Daily maintenance
For good heat sealing results it is important to keep the press surfaces clean. Therefore,
clean the teon coating of the upper plate with a clean, dry cloth.
Also clean the rubber pads daily with a dry cloth. Do not use solvents or other chemical
substances to remove impurities.
Do not let buttons, zippers, etc. come between the plates. It will keep the silicone rubber
undamaged for a long time.
8.2 Periodical maintenance
The mechanism needs no maintenance.
First switch o the machine, let it cool down and pull the plug out of the socket.
Replace the rubber pads and the teon regularly.
Clean the outside of the machine regularly with a clean, moist cloth.
In order to replace the teon, the press machine must be warm (± 80°C). Remove the
teon and carefully remove all glue residues from the metal surface with a putty knife.
Then use a copper brush to clean the surface.
Finally, use a dry cloth to clean the element. The surface must be absolutely clean and
smooth, so that the new teon sticks well, without air bubbles.

thermopatch.com
12
• Turn the excenter screw from left to right for
a lighter setting.
• Turn the excenter screw from right to left for
a heavier setting.
9. Technical annexes
9.1 Faults:
1. Press does not warm up, the time does not count down or the temperature does not rise
on the display:
• The machine is not connected to the electricity grid. Put the plug of the power cable in
an earthed socket and switch the machine on.
• The machine is not connected. Set the switch at the back of the machine to the ON
position.
• A switch has broken or a connector has come loose. Please contact the service
department.
2. Press does not warm up:
• The sensor is defective. Please contact the service department.
• The safety thermostat has been activated. Please contact the service department.
• The heating element is defective. Please contact the service department.
3. The press time cannot be set correctly:
• The electronics are defective. Please contact the service department.
• There is no signal at the end of the press time.
• The timer or the beeper is defective. Please contact the service department .
• The electronics are defective. Please contact the service department.
4. Press does not close or is dicult to open:
• Adjust the excenter screw (A) and close the machine. By turning the eccentric, the
momentum for opening can be easily adjusted. Turn clockwise for a lighter setting and
counter clockwise for a heavier setting.
AA
Error codes:
Below you will nd an overview of the error codes which appear on the display. If these
error codes occur, please contact your Thermopatch supplier.
• Error code 1: Breakage of wire in PT1600 (resistance high)
• Error code 2: PT1600 short circuit (resistance low or 0)
• Error code 3: Heating element is broken down.
• Error code 4: Electronics are broken down.
9.2 Replacement parts
The following parts should be replaced regularly:
Silicone rubber sealing pad 120 x 120 mm square SPAPEN-21026
Self-adhesive teon cover 120 x 120 mm square SPAPEN-21316

thermopatch.com
13
9.3 Exploded views and parts
Please visit our website for more information: www.thermopatch.com, Equipment and parts

thermopatch.com
14
1.1 Sealing plate 120 x 120 2SPAPEN-21026
1.1 Sealing plate 60 x 20 2 SPAPEN-21026A
1.1 Sealing plate 70 x 30 2 SPAPEN-21026B
1.1 Sealing plate 100 x 120 2 SPAPEN-21026C
1.2 Sealing plate
support 2SPAPEN-21025
1.3 Spring support 2SPAPEN-21006
1.4 Allen screw M8 X 65 2 DIN 912
1.5 Nut M5 M5 2DIN 934
1.6 Press spring 2 SPAPEN-21033
1.7 Spring retainer 2SPAPEN-21004
1.8 Nut M6 3DIN 934
1.9 Rubber foot D25 h 20 3 SPAPEN-01-03
1.10 Nut + spring
washer M8 2DIN 934
1.11 Allen screw +
spring washer M5 X 20 2 DIN 912
1.12 Countersunk
screw M5 X 16 4 DIN 7991
1.13 Cap nut + spring
washer M16 1DIN 1587
1.14 Locking disc 2SPAPEN-21013
1.15 Main column 1SPAPEN -21010
1.16 Filling washer XSPAPEN-01-01
1.17 Circlip Ø40 1SPAPEN-01-12
1.18 Mounting plate 1SPAPEN-21023
1.19 Set screw M16 x 40 1 DIN913
1.20 Bolt M16 x 40 1 DIN931

thermopatch.com
15

thermopatch.com
16
2.1 Tapping screw 3 x 25 2 DIN 965
2.2 Nylock nut M8 1DIN 7971
2.3 Collar bearing 10170-P14
10-12-10 4 SPAPEN-21012
2.4 Spring dowel Ø 6 x 40 1 DIN 7344
2.5 Bearing 4030-P10 2 SPAPEN-21203
2.6 Hinge block 1 SPAPEN-21017
2.7 Pull relief 2SPAPEN 02-02
2.8 Ring M8 1DIN 9021
2.9 Spring dowel Ø 10 x 8.5 x 60 1 DIN 7346
2.10 Bolt M8 x 80 1 DIN 933
2.11 Eccentric disc SPAPEN-21005

thermopatch.com
17

thermopatch.com
18
3.1 Handle 1 SPAPEN-21015
3.2 Nylock nut M8 2DIN 985
3.3 Nylon press link 1 SPAPEN-21001
3.4 Collar bearing 10170-P14 4SPAPEN-21012
3.5 Shoulder bolt C7111.080.070 2 ISO 7393
3.6 Screw 3 x 10mm 2 DIN 7971
3.7 Cover plate (black) 1 SPAPEN 009

thermopatch.com
19

thermopatch.com
20
4.1 Nylock nut M5 6DIN 985
4.2 Spring D-180S D-180S 2SPAPEN-21032
4.3 Connector Porcelain Porcelein 1SPAPEN-03-04
4.4 Allen screw M3 x 20 1 DIN 912
4.5 Press arm 1 SPAPEN-21011
4.6 Nut M5 2DIN 934
4.7 Isolating plate 1SPAPEN-21027
4.8 Rubber 1SPAMA-01-01-A
4.9 Heat sensor PT 1600 1SPAPEN-03-11
4.10 Sensor plate 1SPAPEN-21023
4.11 Heating element 1SPAPEN-21031
4.12 Heat shield 1 SPAPEN-21021
4.13 Micro switch SPAPEN 03-09
4.14 Allen screw + nut M3 x 16 2 DIN 912
4.15 Cable clamp 1SPAPEN-21033
4.16 Allen screw M3 x 5 1 DIN 912
4.17 Countersunk screw M5 X 35 2 DIN 7991
4.18 Thermostat 1SPAPEN 03-02
4.19 Countersunk screw M5 X 30 4 DIN 7991
Table of contents
Other Thermopatch Food Saver manuals

Thermopatch
Thermopatch NL-30 User manual

Thermopatch
Thermopatch NL-35 User manual

Thermopatch
Thermopatch HS-4-C User manual

Thermopatch
Thermopatch Auto Maxi NL-33 User manual

Thermopatch
Thermopatch Auto Maxi NL-33 User manual

Thermopatch
Thermopatch Almere NL-22 User manual

Thermopatch
Thermopatch Auto Maxi NL-33 User manual
Popular Food Saver manuals by other brands

OLITREM
OLITREM AP 600 Operating and maintenance instructions

FISCHBEIN
FISCHBEIN Saxon SH 2000 Instruction and maintenance manual

CARTER-HOFFMANN
CARTER-HOFFMANN VCNH2W3S owner's manual

Catler
Catler VS 8011 user manual

Omcan
Omcan SE-CN-0095 instruction manual

Interpack
Interpack IPG USA 20-B Operations manual & parts list