ThyssenKrupp Flow2 User manual

Flow2 stairlift
Tab 04: Install, adjust and release

Flow2 stairlift
Tab 04: Install, adjust and release
© 2006 ThyssenKrupp Accessibility B.V.
All rights reserved
The information in this manual may not under any circumstances be given to someone else, reproduced or published
by any means without the prior written permission of Product Management.

2007.03.07Flow2 stairliftTab 04: Install, adjust and release
www.ThyssenKruppAccessibility.nl1
Table of Contents
1 Preparations . . . . . . . . . . . . . . . . . . . . . . . . . . . . . . . . . . . . . . . . . . . . . . . . . . . . 3
1.1 At the branch . . . . . . . . . . . . . . . . . . . . . . . . . . . . . . . . . . . . . . . . . . . . . . . . . . . . . . . 3
1.2 At the customer’s home . . . . . . . . . . . . . . . . . . . . . . . . . . . . . . . . . . . . . . . . . . . . . . . 3
2 Preassembly . . . . . . . . . . . . . . . . . . . . . . . . . . . . . . . . . . . . . . . . . . . . . . . . . . . . 5
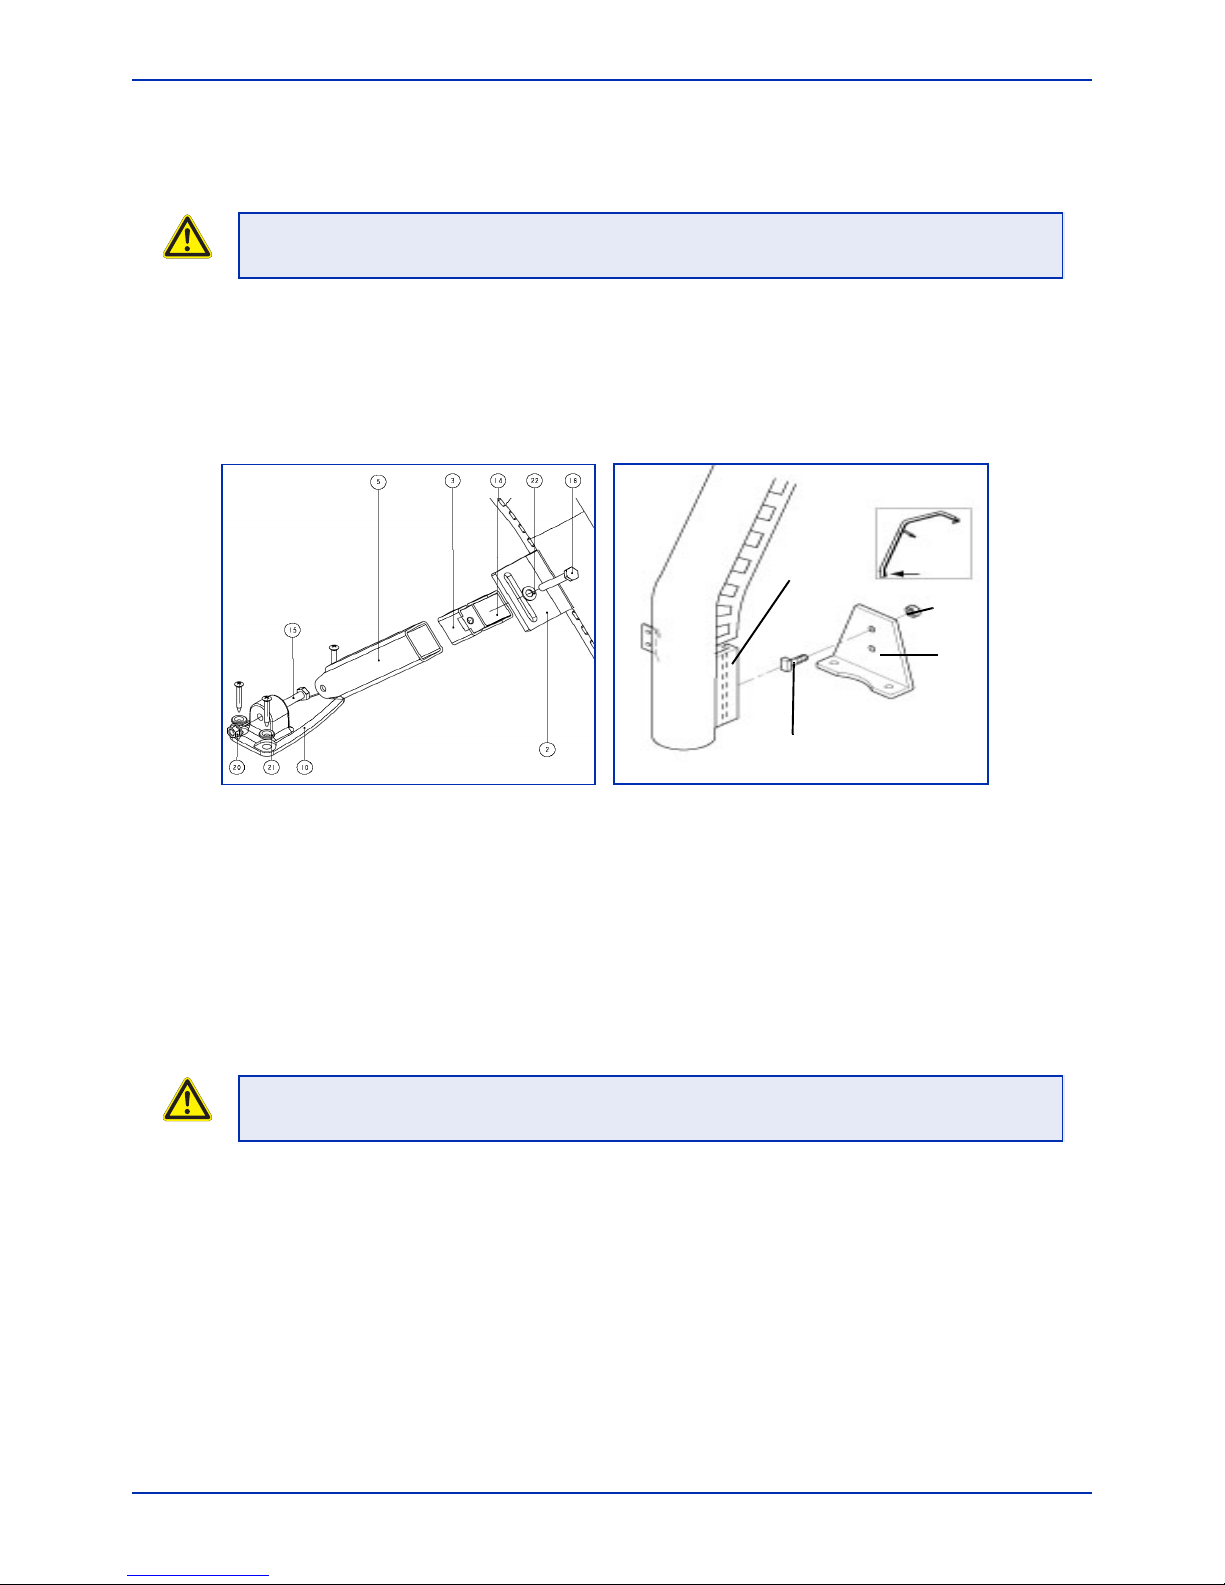
2.1 Fitting the legs and brackets . . . . . . . . . . . . . . . . . . . . . . . . . . . . . . . . . . . . . . . . . . . . 5
2.2 Connecting the rail sections with a section bush . . . . . . . . . . . . . . . . . . . . . . . . . . . . . 7
2.3 Installing the feeder cable . . . . . . . . . . . . . . . . . . . . . . . . . . . . . . . . . . . . . . . . . . . . . . 7
2.4 Fitting and installing the charging contacts . . . . . . . . . . . . . . . . . . . . . . . . . . . . . . . . .8
2.5 Connecting and mounting the transformer . . . . . . . . . . . . . . . . . . . . . . . . . . . . . . . . . 9
2.6 Positioning the rail . . . . . . . . . . . . . . . . . . . . . . . . . . . . . . . . . . . . . . . . . . . . . . . . . . 10
2.7 Greasing the rail . . . . . . . . . . . . . . . . . . . . . . . . . . . . . . . . . . . . . . . . . . . . . . . . . . . . 10
3 Assembly . . . . . . . . . . . . . . . . . . . . . . . . . . . . . . . . . . . . . . . . . . . . . . . . . . . . . . 11
3.1 Prepare the drive unit . . . . . . . . . . . . . . . . . . . . . . . . . . . . . . . . . . . . . . . . . . . . . . . . 11
3.2 Preparing to drive onto the rail . . . . . . . . . . . . . . . . . . . . . . . . . . . . . . . . . . . . . . . . . 12
3.3 Driving onto the rail . . . . . . . . . . . . . . . . . . . . . . . . . . . . . . . . . . . . . . . . . . . . . . . . . 13
3.4 Registering the radio frequency equipment . . . . . . . . . . . . . . . . . . . . . . . . . . . . . . . . 15
3.4.1 Registering control boxes . . . . . . . . . . . . . . . . . . . . . . . . . . . . . . . . . . . . . . . 16
3.4.2 Re-registering a control unit . . . . . . . . . . . . . . . . . . . . . . . . . . . . . . . . . . . . . 17
3.4.3 Registering a repeater . . . . . . . . . . . . . . . . . . . . . . . . . . . . . . . . . . . . . . . . . . 18
3.4.4 Setting the call and park positions . . . . . . . . . . . . . . . . . . . . . . . . . . . . . . . . . 18
3.5 Preparing the drive unit for use . . . . . . . . . . . . . . . . . . . . . . . . . . . . . . . . . . . . . . . . . 19
3.6 Fit the chair base . . . . . . . . . . . . . . . . . . . . . . . . . . . . . . . . . . . . . . . . . . . . . . . . . . . 20
3.6.1 Installing the fixed seat and manual swivel seat . . . . . . . . . . . . . . . . . . . . . . . 20
3.6.2 Chair base height adjustment . . . . . . . . . . . . . . . . . . . . . . . . . . . . . . . . . . . . 22
3.6.3 Adjusting the length of the safety belt . . . . . . . . . . . . . . . . . . . . . . . . . . . . . . 24
3.7 Fixing the rail to the stairs . . . . . . . . . . . . . . . . . . . . . . . . . . . . . . . . . . . . . . . . . . . . . 24
4 Making a test run . . . . . . . . . . . . . . . . . . . . . . . . . . . . . . . . . . . . . . . . . . . . . . . 27
5 Fitting the RF equipment . . . . . . . . . . . . . . . . . . . . . . . . . . . . . . . . . . . . . . . . . 29
5.1 Call and park unit . . . . . . . . . . . . . . . . . . . . . . . . . . . . . . . . . . . . . . . . . . . . . . . . . . . 29
5.2 Repeater . . . . . . . . . . . . . . . . . . . . . . . . . . . . . . . . . . . . . . . . . . . . . . . . . . . . . . . . . 29
6 Releasing the product . . . . . . . . . . . . . . . . . . . . . . . . . . . . . . . . . . . . . . . . . . . 31
6.1 Completing the CE inspection form . . . . . . . . . . . . . . . . . . . . . . . . . . . . . . . . . . . . . . 31
6.2 Clearing up the workplace . . . . . . . . . . . . . . . . . . . . . . . . . . . . . . . . . . . . . . . . . . . . 31
6.3 Instructing the user . . . . . . . . . . . . . . . . . . . . . . . . . . . . . . . . . . . . . . . . . . . . . . . . . 31
6.4 Inspecting the installation and the safety measures (checklist) . . . . . . . . . . . . . . . . . . 31
7 Installation without Flash card data . . . . . . . . . . . . . . . . . . . . . . . . . . . . . . . . 35
7.1 Rail sections . . . . . . . . . . . . . . . . . . . . . . . . . . . . . . . . . . . . . . . . . . . . . . . . . . . . . . 35
7.2 Determining the speed profile . . . . . . . . . . . . . . . . . . . . . . . . . . . . . . . . . . . . . . . . . . 36
7.3 Determining the seat rotation profile . . . . . . . . . . . . . . . . . . . . . . . . . . . . . . . . . . . . . 37

2007.03.07Flow2 stairliftTab 04: Install, adjust and release
www.ThyssenKruppAccessibility.nl2
Table of Contents
7.4 Park and halt locations . . . . . . . . . . . . . . . . . . . . . . . . . . . . . . . . . . . . . . . . . . . . . . . 38

2007.03.07Flow2 stairliftTab 04: Install, adjust and release
www.ThyssenKruppAccessibility.nl3
1 Preparations
1.1 At the branch
Check using the installation drawings and the shipping receipt whether all the required parts of the
drive unit are present and undamaged, especially:
- The rail sections and the section bushes.
- The drive unit.
- The chair base with armrest control.
- Various loose components, such as: Call and park units with joysticks, transformer flash card,
two-core power cable, charging contacts, rail brackets with fixing materials and an installation
drawing.
Consult the installation drawing and the bill of materials to check:
- The colour of the rail.
- The type and colour of the upholstery.
1.2 At the customer’s home
- Inspect the area in which you plan to install the stairlift to verify that all the necessary and
agreed structural alterations have been carried out. If these alterations have not been carried
out then you should consult the Chief Engineer or the Service Manager.
- Inspect the area where you plan to install the drive unit for damage. Inform the customer of
any damage you find, and make a note on the requisite form. Have the customer sign the
form.
Fig. 1-1 Rail sections Fig. 1-2 Drive unit Fig. 1-3 Chair base Fig. 1-4 Various

2007.03.07Flow2 stairliftTab 04: Install, adjust and release
www.ThyssenKruppAccessibility.nl4
Preparation
- To ensure that you will be able to work without having to wait you will need to go through all the
points for which you need information from the customer, i.e.:
- What is the best position for the transformer?
- What is the best place for the call and park units?
- Is there anything that you will need to remove or relocate (such as a painting, or a hat
rack)?
- Are there any structural points you will need to take into account?
TIP
Now give the customer the user manual so that he/she can read it already.

2007.03.07Flow2 stairliftTab 04: Install, adjust and release
www.ThyssenKruppAccessibility.nl5
2Preassembly
During the preassembly you fit the entire rail together without fixing it to the stairs.
1. Sort the rail sections, brackets and legs by number (refer to the installation drawing).
2. Assemble the rail section for section from the bottom of the stairs to the top:
a. Fit the relevant legs and brackets to the rail section.
b. Insert a section bush into the upper end of the rail section.
c. Lay the rail section in position and draw the feeder cable for the charging contacts through
the rail section. When charging contacts are to be fitted to the relevant rail section, make
sure that the feeder cable projects from the position of the charging contacts, and then
draw the remainder through the rail section.
d. Slide the rail section over the section bush of the previous rail section and clamp the
section bush.
e. Drive a locking pin into the rack coupling.
f. Repeat steps a to e inclusive for the next rail section.
g. Fit a cap to the top and bottom ends of the rail.
h:. Assemble and install the charging contacts.
i. Connect the transformer.
j. Position the rail.
2.1 Fitting the legs and brackets
Three types of brackets are used:
- Floor brackets (for a vertical stop at the bottom of the stairs).
- Tread brackets (on the stairs).
- Landing brackets (for landings and horizontal sections).
TIP
The above is a recommended sequence. Usually, assembly from the bottom to the top
will be preferable; however, this is not always the case. Decide for yourself which one you
find is the simplest.
CAUTION
Ensure that the locking pin is securely seated in the rack coupling, it must not protrude
underneath the rail.

2007.03.07Flow2 stairliftTab 04: Install, adjust and release
www.ThyssenKruppAccessibility.nl6
Preassembly
The floor bracket:
1. Insert two hammer-head bolts (1) in the openings in the rail flange (2).
2. Fix the floor bracket (4) to the rail flange with the two hammer-head bolts and two Tensilock
nuts (3).
The tread brackets:
Possibly prepare the support.
1. Fit the leg (5) to the foot (10). Do this by assembling it with the M10 bolt (15) and locknut (20).
2. Screw the bolt (6) and washer (22) into the wedge (3) in the sleeve (5) with the rail bracket (2)
between at the right height.
CAUTION
Fit the legs and brackets solely to the rail sections. Do not fix them to the stairs yet.
Fig. 2-1 Fitting the tread support on the rail
bracket
1
Fig. 2-2 Fitting the floor support on the rail
bracket
13
4
1
2
CAUTION
Always fit the nut out of sight on the side facing the wall. Fit the bolt on the side facing the

2007.03.07 Flow2 stairlift Tab 04: Install, adjust and release
www.ThyssenKruppAccessibility.nl 7
Preassembly
The landing brackets:
1. Fix the landing bracket (8) to the rail flange (10)
with two Tensilock bolts (9).
2.2 Connecting the rail sections with a section bush
1. Tighten (loosely) the four socket-head screws in the section
bush so that the four nuts are trapped in the slot on the inner
surface.
2. Fit the section bush in the end of a rail section and adjust it to
the correct position.
3. Lock the section bush by tightening the first socket-head bolt
(do not over-tighten).
4. Slide the other rail section over the section bush and make
sure that the two sections mate properly.
5. Position a locking pin in the uppermost hole in the rail section
6. Push the locking pin using a welding clamp or adjustable wrench into the rack
2.3 Installing the feeder cable
1. Pull the two-core supply cable with a cable puller (2) through
the rail section tube.
2. Pull the supply through the opening (1) in the flange for the
charging contacts. Ensure that the length through the rail hole
L is approximately 20 cm.
Fig. 2-3 Fit the landing bracket to the rail
bracket
1
10
8
9
Fig. 2-4 Connect the rail sections
1
Fig. 2-5 Protruding length
of supply cable
L
1
L

2007.03.07Flow2 stairliftTab 04: Install, adjust and release
www.ThyssenKruppAccessibility.nl8
Preassembly
2.4 Fitting and installing the charging contacts
The charging contact is installed as follows:
1. Strip approximately 9 cm of the supply cable.
2. Attach a faston connector to the cable ends.
3. Feed the cables through the charging contact.
4. Secure the Faston connector on the lips in the charging contact.
5. Fit the charging contact to the rail with (2x) M6x16.
6. Adjust the position of the charging contact so that it is in line with the drive unit spring contact.
Adjustment is always necessary for a vertical start.
TIP
A rail section with a parking point will be fitted with an extra bracket with a feed-through
opening. The two-core supply cable must also be fed to this.
Fig. 2-6 Cable feed in charging contact
1
Fig. 2-7 Secure the cables
1
Fig. 2-8 Mount the charging contact on the rail
1
Fig. 2-9 Adjust the charging contact
1

2007.03.07 Flow2 stairlift Tab 04: Install, adjust and release
www.ThyssenKruppAccessibility.nl 9
Preassembly
2.5 Connecting and mounting the transformer
1. Connect the transformer to the charging contacts closest to a 220V wall socket. Use an
extension lead if necessary.
2. Put the transformer plug in the wall socket.
TIP
For the parallel connection of multiple charging contacts, the cables can be connected
with solder cap. When there are several floors, the join can best be made at the junction
(see Fig. 2-11).
CAUTION
The connections to the + and - terminals of the bottom charging contacts must be
reversed as compared to those of the other charging contacts. This is necessary to
enable the drive unit to detect that it has reached the bottom of the stairs and must stop.
This is the so-called reset point (see Fig. 2-10).
Fig. 2-10 Charging contact polarity
1
Fig. 2-11 Welding tube
1
Fig. 2-12 Schematic diagram of charging contact connections
Trans-
former
Charging con- Charging con- Charging con- Charging con-

2007.03.07Flow2 stairliftTab 04: Install, adjust and release
www.ThyssenKruppAccessibility.nl10
Preassembly
3. Check that the voltage is approximately 33 V and the connection is as indicated in the upper
parts of the figures.
4. Connect the building wires from the charging contacts to the transformer.
5. Choose a suitable position for the transformer and secure it with four screws and washers.
2.6 Positioning the rail
1. Check the adjustment positions 'X', 'Y' and 'Z' using the
installation drawing. The adjustment dimensions are
measured from the wall or a tread to the centre of the rail’s
pipe.
2. Check the gradient of the rail against the gradients shown on
the installation drawing.
3. Locate the rail in the optimum position.
4. Adjust the legs and brackets such that the rail is stable on the stairs. Insert one or more
spacers between the legs and the rail if so required.
2.7 Greasing the rail
1. Degrease the rail with degreaser if it is greasy.
2. For greasing, use 'Super Lube' grease and spread it on the
rail with a brush.
- Grease the bearing surfaces in the holes.
- Grease the support wheel running surface.
TIP
Instead of extending the mains cable you can also extend the building wire and then fix it
out of sight.
TIP
Remove the plug from the wall socket.
Fig. 2-13 Rail position
1
Z
Y
Fig. 2-14 Rack greasing points for
attention
1

2007.03.07Flow2 stairliftTab 04: Install, adjust and release
www.ThyssenKruppAccessibility.nl11
3Assembly
Fully assemble the lift. Do not yet secure the rail to the stairs.
For the 'commissioning' of the Flow2, the following procedure has been defined. It is extremely
important to actually perform all the steps in sequence.
Procedure:
1. Prepare the drive unit.
2. Preparing to drive onto the rail.
3. Driving onto the rail.
4. Registering the radio frequency equipment.
5. Preparing the drive unit for use.
6. Fitting the chair base on the drive unit.
7. Installing the rail.
3.1 Prepare the drive unit
Place the drive unit, in its packaging, at the location where it will be driven onto the rail.
This is done as follows:
1. Open the packaging.
2. Remove the top frame from the box and place it next to the driving-on point on the rail.
3. Lift the drive unit out of the box and place it on the top frame so that the drive unit is in the right
position to drive onto the rail.
CAUTION
It is possible that the entire unit becomes somewhat unstable. In that case secure the rail
temporarily (for example with glue clamps).
TIP
When the driving-on point is at the top of the stairs, the drive unit will have to be carried
to the top in its box. The other boxes can be unpacked downstairs. Bring the empty
packaging material back downstairs again. You will then be certain that you do not forget
anything or accidentally throw something away with the packaging.

2007.03.07Flow2 stairliftTab 04: Install, adjust and release
www.ThyssenKruppAccessibility.nl12
Assembly
3.2 Preparing to drive onto the rail
1. Remove the service cover.
2. Fit the fuse (40 A) in the drive unit, the fuse is located in the handle.
3. Turn on the drive unit by pulling the red main switch, on the rear of the drive unit, up a few
millimeters.
4. Check that the mode knob on the service board is set to mode 3.
Fig. 3-1 Prepare the drive unit
11 1
Fig. 3-2 Remove the service
cover
1
Fig. 3-3 Fuse in drive unit
1
Fig. 3-4 Switch on drive unit
1
TIP
When switching on the lift an audio signal will be heard. The three-digit release number
will also be shown in the service unit display.

2007.03.07 Flow2 stairlift Tab 04: Install, adjust and release
www.ThyssenKruppAccessibility.nl 13
Assembly
5. If there is no end cap, fit an end cap on the end of the rail.
6. Turn the handle on the support bracket, shown in the
figure, two ways to check whether the motor runs. You use
this handle for driving on the drive unit
3.3 Driving onto the rail
The drive unit is positioned on the top frame at the driving-on point, it can now be easily driven onto
the rail. Ensure that you are standing in front of the drive unit as shown in Fig. 3-9.
1. Ensure that the transformer plug is not plugged into the wall socket.
2. Position the forks of the loading assembly straight under the drive unit so that they are in line
with the rack while driving onto the rail.
3. Grasp the drive unit by the support bracket and the undercarriage.
Display
Pushbuttons [D] [E] [I]
Mode switch
Laptop connection
Armrest control connection
Support bracket connection
Fig. 3-5 Service board Fig. 3-6 ESD precautions
1
Fig. 3-7 Operating handle
1
CAUTION
Take ESD precautions, such as a mat, strap and shoes. Never touch a circuit board
without taking these precautions.
CAUTION
Check the wiring if the motor does not run.

2007.03.07Flow2 stairliftTab 04: Install, adjust and release
www.ThyssenKruppAccessibility.nl14
Assembly
4. Push the first undercarriage onto the rail.
5. Keep the drive unit horizontal and push it onto the rail until the drive pinion touches the rack.
6. Carefully drive the drive unit onto the rail using the handle on the support bracket. During this,
check the position of the forks; they should be on either side of the pinion. Correct the position
if necessary.
7. Keep the drive unit horizontal so that the rear undercarriage can drive onto the rail properly.
Fig. 3-8 Position the forks
correctly
1
Fig. 3-9 Grasp the drive unit
1
Fig. 3-10 Push the first
undercarriage onto the
rail
1
Fig. 3-11 Keep the drive unit
horizontal
1
CAUTION
Ensure that the drive unit is kept horizontal while driving it onto the rail to prevent the
drive unit becoming stuck on the rail.

2007.03.07 Flow2 stairlift Tab 04: Install, adjust and release
www.ThyssenKruppAccessibility.nl 15
Assembly
8. Put the transformer plug in the wall socket.
9. Drive the drive unit from the top to the bottom to the reset point (lowermost charging contact)
and stop a few millimeters above the centre of this charging contact. At the moment that the
charging blades come into contact with the reset point the message 'rSt' must appear briefly in
the display. If this does not occur, check whether the reset point has been correctly connected
and that there is a voltage at the contact.
3.4 Registering the radio frequency equipment
Now the radio frequency (RF) equipment can be registered. The Flow2 has a number of standard and
a number of optional RF equipments.
Standard:
- armrest control
- call and park units
Optional:
- attendant control unit
- repeater.
Fig. 3-12 Check the position of
the forks
1
Fig. 3-13 Driving onto the rail
1
WARNING
A reset must be done in the downwards direction. For driving onto the rail downwards
this means: first drive past the reset point and then drive back again. The ‘rSt’ message
only appears when the drive module is moving.
WARNING
Driving on mode (-3-) and programming mode (-6-) take no account of the position on
the rail. Ensure that the lift does not drive into the ground or off the rail.

2007.03.07Flow2 stairliftTab 04: Install, adjust and release
www.ThyssenKruppAccessibility.nl16
Assembly
When an RF equipment is registered, it receives a specific code. The code ensures that a specific
equipment can only operate the associated drive unit and not that of a neighbour.
If there is another Flow2 in the vicinity or another RF equipment, it is possible for this to be on the
same channel and interfere with one another with the result that the lift stops or will not move. In this
case you must change the channel.
To choose a different channel, carry out the following actions:
- go to menu -9-
- for CH1, now choose CH 2 or CH3
- register all RF boxes again as described below.
3.4.1 Registering control boxes
1. Make it possible for you to identify the boxes by coding them:
- '0' for the call and park unit at the bottom.
- '1' for the unit fitted a bit higher.
- '2' for the next higher unit, and so on.
- 'Att' for the attendant control unit.
2. Place the batteries in the battery holder.
3. The RF equipment is in register mode as standard. Select mode 7 and press the [E] button on
the service board. A question mark appears on the service board display ( ). This
indicates that the drive unit is waiting for a signal from the RF equipment to be registered. If
this does not happen, go to the next section.
TIP
When you operate the park button on the call and park unit, the stairlift will not go further
than the programmed parking contact. If the stairlift should be ridden further, an
attendant control unit must be used.
CAUTION
For registration, both the drive unit and the RF equipment must be switched to
registration mode, see Section 3.4.1.
TIP
A maximum of nine call and park units can be registered (codes ‘0’ to ‘8’).

2007.03.07 Flow2 stairlift Tab 04: Install, adjust and release
www.ThyssenKruppAccessibility.nl 17
Assembly
4. Move the joystick in the control unit, the red LED flashes. Depending on the type of RF
equipment, the following message appears in the display:
Armrest control (ui).
Call and park (CP0).
Repeater (rEP).
Go to Section 3.4.2 if the red LED does not flash.
5. When registering a call and park unit, for example, at step 4 'CP0' in the display indicates that
the drive unit gives the RF equipment code '0' for further programming. If this does not match
the code you set yourself, go to step 7.
6. If the code does not match, the last digit in the display must be set so that it does match with
the [I] and [D] buttons. The [I] button increases the digit, going from '0' to '8' and then 'Att' for
the attendant control unit. The number is decreased with the [D] button.
7. Press the [E] button for 2 seconds. Registration is now carried out. The display now shows '7'
and the flashing red LED on the control unit goes out.
8. Check that the green LED lights when the control is operated on the control unit. This indicates
that the RF equipment has been programmed.
9. Carry out steps 2 to 9 for each control unit.
3.4.2 Re-registering a control unit
This section can be skipped when the control units have been registered without any problems.
If the red LED does not flash during registration when the joystick on the control unit is moved, there
is a good chance that it has already been registered. This can be undone by carrying out the
following actions.
1. Push the joystick on the control unit in a little
2. Move the joystick to the left until the LED lights green for a few
seconds and then release it.
3. After a few seconds the LED goes out: then move the joystick
to the right until the LED flashes red.
4. Go back to the previous section and continue with step 5.
Fig. 3-14 Re-registering a control
unit
1

2007.03.07Flow2 stairliftTab 04: Install, adjust and release
www.ThyssenKruppAccessibility.nl18
Assembly
3.4.3 Registering a repeater
A repeater acts as a sort of radio signal amplifier so that the RF equipment can communicate over
greater distances with the stairlift. A repeater is only necessary when the distance between the call
and park units and the stairlift becomes so great that the stairlift will move jerkily.
The installation of a repeater consists of the following steps:
1. Go to mode 9 and choose option 'rPt'.
2. With the [I] or [D] button you can now choose from:
- 'rP0': control does not account for a repeater.
- 'rP1': control expects a repeater in the system.
3. Press the [E] button for a few seconds to save the setting.
4. Go to mode 7 to register the repeater. The procedure is the same as for the armrest control,
only 'rPt' appears in the display. A flashing 'rPt' means that the control does not yet make
account for a repeater. Steps 1-2-3 have therefore not yet been carried out.
5. Finally, all other RF equipment must be registered again, including the attendant control unit. If
you forget this, the result with be jerky operation and incorrect LED indication of the
equipment.
3.4.4 Setting the call and park positions
The call and park positions (or charging positions, see Section 3.4.1) of the call and park units just
registered must now be entered.
1. Choose mode 8 and press the [E] button. The numbers in
the display have the following meaning:
2. The number can be increased by pressing the button
indicated. It is not possible to decrease the number here.
In this case you must keep the button pressed until the
numbering starts at '0' again.
3. Check whether the call and park positions are correct for
the call and park units just registered. If not, the positions
can be changed with the [D], [E] and [I] buttons. Press the
[E] button for 2 seconds to save all the positions that have
been entered.
The RF equipment is now registered and assigned.
Fig. 3-15 Display service
module
Call position
[D] button
Call en Park unit [E]
button
Park position
[I] button
Other manuals for Flow2
3
Table of contents
Other ThyssenKrupp Stairlift manuals